
HRIS – Human Resources Information Solution
RESOURCE GUIDE:
DIRECT DEPOSIT
HRIS Resource Guide
- Internal Use Only April 1, 2020 Direct Deposit 2
DIRECT DEPOSIT
Table of Contents
SOA DIRECT DEPOSIT DISTRIBUTION XR12.1 .......................................................................................................... 3
INTRODUCTION ...................................................................................................................................................... 3
PRE-NOTIFICATION PROCESS ..................................................................................................................................... 3
ADD A NEW DIRECT DEPOSIT ACCOUNT ................................................................................................................ 4
REVIEW EXISTING DIRECT DEPOSITS ............................................................................................................................ 4
ADD DEFAULT ACCOUNT .......................................................................................................................................... 5
ADD ADDITIONAL (NON-DEFAULT) ACCOUNTS .............................................................................................................. 7
CHANGE AN EXISTING ACCOUNT ........................................................................................................................... 9
CHANGE THE CYCLES OR AMOUNT OF NON-DEFAULT ACCOUNT .......................................................................................... 9
STOP EXISTING ACCOUNT ....................................................................................................................................... 11
AUTOMATIC DEPOSIT MAINTENANCE (XR12.3) ................................................................................................... 13
DIRECT DEPOSIT ACCOUNT LISTING PR212 .......................................................................................................... 14
CREATE REPORT PARAMETERS ................................................................................................................................. 14
SUBMIT REPORT ................................................................................................................................................... 16
EXAMPLE OF REPORT RESULTS ................................................................................................................................. 16

HRIS Resource Guide
- Internal Use Only April 1, 2020 Direct Deposit 3
SOA Direct Deposit Distribution XR12.1
Introduction
Employees are required to have their wages directly deposited into a selected bank account. Direct
Deposit is the process that establishes and automatically deposits the employee's wages into their
bank account. Employees can establish their Direct Deposit accounts in Y.E.S.
If the employee does not use Y.E.S. the Agency Payroll Specialists can set up Direct Deposit using the
SOA Direct Deposit Distribution form (XR12.1). Before Direct Deposit is established, the employee must
complete all applicable fields on the GAO-65 (Authorization for a Direct Deposit or Payroll Deduction)
Form. All newly established Direct Deposit accounts must go through the pre-notification process.
For rehired employees the Agency Payroll Specialist must review and stop any existing Direct Deposits
before the employee’s first paycheck and the employee must fill out a new GAO-65 (Authorization for a
Direct Deposit or Payroll Deduction) Form. This is not applicable to interagency transfers.
All actions processed in HRIS and Y.E.S. Direct Deposit will trigger email notifications to the Agency
Payroll Office, employee’s Work Email and employee’s Personal Email.
Pre-Notification Process
All new Direct Deposit accounts must go through the pre-notification process before a deposit can
occur. The Prenotify Status field must be set to the default of N. The user must never change this. Pre-
notification files are sent to the bank weekly for verification. The file verifies that the routing number
and account number are valid, it does not verify account holder names. HRIS will update the Prenotify
Status at each step in the Pre-Notification process:
N - Not Prenotified: Account has not been verified by the bank. Monies will not deposit
P - PreNotified: Account has been verified by the bank. Monies will deposit on the next paycheck
A - Accepted: Account has been verified by the bank. Monies successfully deposited

HRIS Resource Guide
- Internal Use Only April 1, 2020 Direct Deposit 4
Add a New Direct Deposit Account
Review Existing Direct Deposits
Employees may have one Direct Deposit per account number - up to a maximum of five different
account numbers. While an employee’s net pay may be directly deposited into more than one
account, one hundred percent (100%) of the net pay must be directly deposited. For example:
One net pay Direct Deposit (checking or savings), or
One net pay Direct Deposit plus up to four additional accounts fixed amount or percent amount
Prior to adding a new account, review the employee’s setup for prior distributions
1. Type XR12.1 in search field, click Go
2. Company: Type or select 1
3. Employee: Type or select the Employee Identification Number
4. Click View All: To view prior distributions established on XR12.3 SOA Automatic Deposit
Maintenance
If this is the employee’s first distribution, the list will be blank, new account will be
assigned Distribution Order 1 – follow training- Add Default Account
If distributions appear, then employee has prior distributions
o Review current distributions and verify if this distribution is a new account (add)
or an old account (change). If the account number or Receiving DFI changes in any
way, add a new distribution order using the next number in sequence– follow
training – Add Additional Accounts
o If adding a new default account, verify the employee's old default account has
been stopped and the default flag has been set to 'N' or this new distribution
cannot be setup. See the steps for Stop Existing Account first to update the old
distribution or a new net pay distribution will not be able to be established

HRIS Resource Guide
- Internal Use Only April 1, 2020 Direct Deposit 5
Add Default Account
The default account is like a safety net and it ensures that all pay is designated to a bank account. The
default account is designated at 100%. That is, 100% of anything left over after all other distributions are
made will deposit to this account. The default account displays Y Yes in the Default field
All employees are required to have one active default account.
1. Distribution Order: Type 1 for the default account
2. Receiving DFI: Type or select Bank Routing Number. The bank name will populate:
The Bank Routing number will appear on
the GAO-65 form and must be verified
against the 8 or 9-digit number on the
bottom left corner of the cancelled check.
If the Bank Routing Number cannot be located
in the drop down menu, contact GAO Central
Payroll to have the bank added to HRIS prior to
continuing with this distribution setup.
3. Account: Type the Employee’s bank account number
4. Account Type: Select C Checking or S Savings
5. Payment Description: Type DEFAULT

HRIS Resource Guide
- Internal Use Only April 1, 2020 Direct Deposit 6
6. Percent of Net: Type 100.00
7. Default: Select Y Yes
8. Effective Date: Select today’s date in the first box. Leave the second box blank
9. Cycles: Select X in the first three boxes
10. Click Add. Status bar displays the message Add Complete – Continue
All new Direct Deposit accounts must go through the pre-notification process first. The Prenotify Status
field must be set to the default of N. This must never be changed. The status will change to P after it has
been verified with the bank. The status will change to A after monies have been sent.

HRIS Resource Guide
- Internal Use Only April 1, 2020 Direct Deposit 7
Add Additional (Non-Default) Accounts
Employee can have a maximum of five active accounts. Four of the accounts can be setup as Flat
Amounts or various percentages.
1. Distribution Order: Type the next sequence number (Click View All to view sequence numbers)
2. Receiving DFI: Type or select Bank Routing Number. The bank name will populate:
The Bank Routing number will appear on
the GAO-65 form and must be verified
against the 8 or 9-digit number on the
bottom left corner of the cancelled check
If the Bank Routing Number cannot be
located in the drop down menu, contact GAO
Central Payroll to have the bank added to
HRIS prior to continuing with this distribution
setup
3. Account: Type the Employee’s bank account number
4. Account Type: Select C Checking or S Savings
5. Payment Description: Type FLAT for fixed amount or PERCENT if a percent is elected

HRIS Resource Guide
- Internal Use Only April 1, 2020 Direct Deposit 8
6. Flat Amount or Percent of Net: Type one value:
Type Flat Amount to two decimals, or
Type Percentage elected in whole numbers, i.e. 10 for 10%
7. Default: Select N No
8. Effective Date: Select today’s date in the first box. Leave the second box blank
9. Cycles: Type X in the cycles selected
Select cycles 1 and 2 to setup for 24 deposits
Select cycles 1, 2 and 3 to setup for 26 deposits
10. Click Add. Status bar displays the message Add Complete – Continue
All new Direct Deposit accounts must go through the pre-notification process first. The Prenotify Status
field must be set to the default of N. This must never be changed. The status will change to P after it has
been verified with the bank. The status will change to A after monies have been sent

HRIS Resource Guide
- Internal Use Only April 1, 2020 Direct Deposit 9
Change an Existing Account
Change the Cycles or Amount of non-default Account
Process to change the amount of an existing direct deposit.
If the Employee requests a change to any of the following fields then the existing Direct Deposit
must be stopped and a NEW Direct Deposit must be established. Follow training to Add
Additional Accounts
Receiving DFI Field = Bank Routing Number
Account Number Field
Account Type
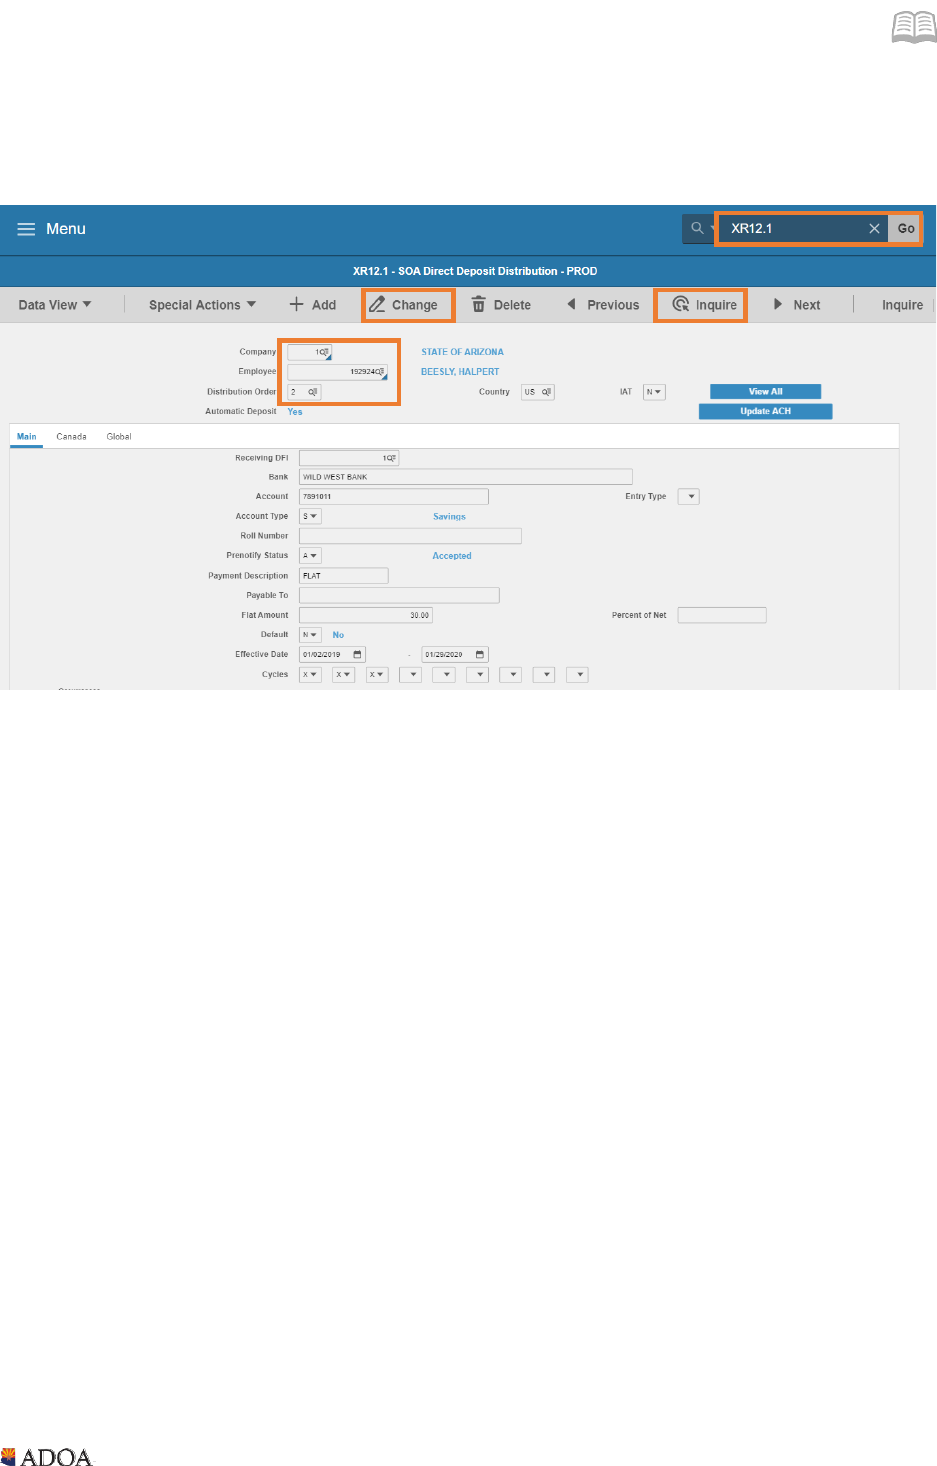
1. Type XR12.1 in search field, click Go
2. Company: Type or select 1
3. Employee: Type or select the Employee Identification Number
4. Distribution Order: Type or select the distribution order to be changed
5. Click Inquire

HRIS Resource Guide
- Internal Use Only April 1, 2020 Direct Deposit 10
6. Flat Amount: Type the new amount of the flat (fixed) amount distribution using two decimals.
Skip if flat amount is not changing
7. Percent of Net: Type the new Percentage elected in whole numbers, i.e. 10 for 10%
Skip if the percent is not changing
8. Cycles: Type X in the new cycles selected. Skip if Cycles are not changing
Select cycles 1 and 2 to setup for 24 deposits
Select cycles 1, 2 and 3 to setup for 26 deposits
9. Click Change. Status bar displays message Add/Change Complete – Continue
If the Status bar displays message Must have a 100% net account; Change to continue,
click Change again
If the Status bar displays message Warning, multiple distributions at 100 percent it
means that there are multiple distributions set with percent of net = 100. Click Change
again. Then, review and correct the employee’s record to ensure only one distribution is
active (no end date) with a percent of net = 100.
HRIS Resource Guide
- Internal Use Only April 1, 2020 Direct Deposit 11
Stop Existing Account
To prevent the paycheck from depositing to the account, stop accounts before Tuesday at 2:00 pm of
payday week.
1. Type XR12.1 in search field, click Go
2. Company: Type or select 1
3. Employee: Type or select the Employee Identification Number
4. Distribution Order: Type or select the Distribution Order to be stopped
5. Click Inquire

HRIS Resource Guide
- Internal Use Only April 1, 2020 Direct Deposit 12
6. Default: Select N
7. Effective Date: Select the stop date in the second box. Stop date is the date of entry into HRIS
unless specifically noted as a future stop date.
8. Click Change. Status bar displays message Add/Change Complete – Continue
If the Status bar displays message Must have a 100% net account; Change to continue,
click Change again.
If the Status bar displays message Warning, multiple distributions at 100 percent it
means that there are multiple distributions set with percent of net = 100. Click Change
again. Then, review and correct the employee’s record to ensure only one distribution is
active (no end date) with a percent of net = 100.
If an employee chooses to restart the Direct Deposit this is considered a new request. The Direct Deposit
will need to be added as a new distribution order and must go through the pre-notification process.

HRIS Resource Guide
- Internal Use Only April 1, 2020 Direct Deposit 13
Automatic Deposit Maintenance (XR12.3)
Use form to view and/or change the order that the payroll system takes Direct Deposit
distributions. The screen can also be used to reassign the Default account.
1. Type XR12.1 in search field, click Go
2. Company: Type or select 1
3. Employee: Type or select the Employee Identification Number
4. Click View All. Sub-form Automatic Deposit Maintenance XR12.3 displays
5. FC: Type or select C
6. Deposit Order: Type the sequence number the employee wishes to have the distribution taken.
For example, if they have two accounts, a checking and a savings account and they want $50.00
to go into the savings account and the net to go to the checking:
Type 1 into the Deposit Order field for the savings account and
Type 2 in the Deposit Order for the checking account
This will tell the system to first put $50.00 into savings and put the rest into checking.
7. Default: The Default field is N for all accounts except the most current 100% Net Percent
(default) account. The most current default percent account must have a Y in the default field.
8. Click Change
9. Click Back to return to XR12.1

HRIS Resource Guide
- Internal Use Only April 1, 2020 Direct Deposit 14
Direct Deposit Account Listing PR212
Create Report Parameters
The Direct Deposit Account Listing PR212 report shows the date direct deposit accounts were created
and the date of the last change. The report contains the user ID of the individual that made the changes.
Changes made in Y.E.S. will display as W followed by the EIN i.e. W123456. Report does not display the
details of the change.
1. Type PR212 in search field, click Go
2. Job Name: Type a unique name for the report
3. Job Description: Type a detailed description of the report

HRIS Resource Guide
- Internal Use Only April 1, 2020 Direct Deposit 15
4. Company: Type or select 1
5. Employee: Type or select the Employee Identification Number in both boxes
6. Print Option: Type or select R ACH Report
7. Click Add to save report parameters. Status bar displays message Job Added

HRIS Resource Guide
- Internal Use Only April 1, 2020 Direct Deposit 16
Submit Report
1. Click Quick Submit, status bar displays message Job has been submitted
2. Click Print Mgr to view the report results in your Print Manager
For additional instructions on how to view reports, see the Agency HRIS Intro Training for On Demand
Reports.
Example of Report Results
Report results in pdf format
