
Installation
24.1
June 13, 2024

ii LSCentral 24.1 Installation Guide
© 2024 LS Retail ehf. All rights reserved.
All trademarks belong to their respective holders.

Contents
LSCentral 24.1 Installation Guide iii
Contents
Installation of LSCentral 1
System Requirements 1
Data Director System Requirements 1
Hardware 1
Software 2
Operating systems 2
Database servers 2
Kitchen Display System Requirements 3
LSCentral Installation 5
Prerequisites 5
Adding the LSCentral Extensions to an Existing Database 5
Restoring the LSCentral Demo Database Backup 6
Uninstalling the LSCentral Extension 7
LSCentral Help Installation 7
Remote setup 7
Local setup 7
Data Director Installation 8
Prerequisites 8
Security considerations 8
To install the Data Director 9
Install and Configure IIS 11
On Windows 10 11
See also 14
Install Options 14
Commerce Installation 16
See also 16
Before Installation 16
See also 17
Install and Configure IIS 17

Contents
On Windows 10 17
See also 20
Install Commerce Service 20
After Installation 25
Single-tenant 25
Multi-tenant 26
LSCentral in SaaS 26
See also 26
SQL Server Database 26
For Commerce Service setup with LSCentral SQL access 27
Setup Command Lines 28
Samples: 28
Hardware Station Installation 28
Kitchen Display System Installation 29
System requirements 29
Kitchen service machine 29
Display station machines 29
LSCentral KDS Web Service 29
KDS licenses 29
System setup 29
Install the Kitchen Service application 30
Install the Display Station application 30
Set the Kitchen Service Configuration 30
Configure the layout of the KDS 31
Data structures 31
LSCentralKDS Web Service setup 31
Troubleshooting 32
KDS Utility 32
See also 33
KDSS2SOAuth in SaaS 33
KDSS2SODataV4 On-premises 35
Display Station Utility 38
Pharmacies Installation 41
LSCentral 41
iv LSCentral 24.1 Installation Guide

Contents
LSCentral 24.1 Installation Guide v
Pharmacies administration tasks 41
Pharmacies configuration packages 42
Role center 42
User setup 42
POS button 42
Setting Up a Demo Prescription 43
To process a prescription for demo or testing 43
To create a paper prescription 43
Prescription details 44
Final Control 44
Posting 45

vi LSCentral 24.1 Installation Guide
Contents
This page is intentionally left blank to ensure new chapters start
on right (odd number) pages.

System Requirements
Installation of LSCentral
This release can be used for localizations and demonstrations.
The following products are available from the LS Retail Portal for down-
load (login required):
l
DD Web Monitor
l
Commerce
l
Kitchen Display System
l
Data Director
Note: In these instructions references to software versions are in gen-
eric form and always refer to the latest version.
Example: In April 2024
LSCentral xx.xx
stands for
LSCentral 24.0
.
System Requirements
LSCentral has the same system requirements as standard Business
Central:
https://learn.microsoft.com/en-us/dynamics365/business-central/dev-
itpro/deployment/system-requirements-business-central-v24
Data Director System Requirements
The Data Director requires the following hardware and software
resources in order to run properly:
Hardware
l
At least 1 GB of available RAM. The base processes use around
100-200 MB of RAM for normal operation. The amount of RAM
required depends on the size of database queries that DD needs
to perform.
l
100 MB disk space for the base application. This is the absolute
minimum space required. The additional disk space required when
moving data depends on the amount of data and how frequently it
is moved. You should have at least 10 GB free on your hard drive
for the temporary data generated by the DD.
l
A Dual Core processor or better. The DD is a CPU intensive applic-
ation, especially when processing data, so a faster processor usu-
ally means improved performance.
LSCentral 24.1 Installation Guide 1

Software
l
Refer to DDrelease notes for details on supported operating sys-
tems and databases.
l
The DD needs 2-3 user sessions in the database it is processing
data to and from. The number of user sessions depends on the
functionality used and Data Thread setting in the DD Con-
figuration tool. For normal operation DD uses one session for
query data, one session for insert/update and then one or more
sessions for incoming TS requests.
l
The databases which the DD needs to connect to should have
TCP/IP protocol active and port open in Firewall.
l
IIS is needed for DD Web Service when running Scheduler Jobs
from LSCentral 16 or later.
Operating systems
The following operating systems are supported:
l
MS Windows Server 2018 and later
l
MS Windows 10 and later.
IPv4 and IPv6 are supported for all operating systems.
Database servers
The following databases are fully supported:
l
MS Dynamics NAV (LSNav)
l
MS Business Central (LSCentral)
l
MS Dynamics AX 2012, 2012 R2
l
MS SQL Server / Express
l
Any database that supports either ODBC or OleDB connection
l
XML and text files.
2 LSCentral 24.1 Installation Guide
Data Director System Requirements

Kitchen Display System Requirements
Kitchen Display System Requirements
The KDS system has the following components:
Component Description Requirements
Kitchen Man-
ager
Windows Service Windows 10
2 GB memory (4
GB preferred)
KDS DB Kitchen database for
l
KDS configuration – loaded
on startup
l
KDS logs
We recommend having the KDS
DB (on SQL Express) on the
same computer that runs the
KDS server.
MS SQL Express
2014 or higher
Kitchen Display
Station
Windows executable (can run on
same machine as Kitchen Man-
ager service).
It is possible to run multiple
instances on same machine
and/or on multiple machines with
display stations that connect to
the same service.
The screen can be connected to
a computer with a VGA display
port or an HDMI port to the com-
puter running the Kitchen Dis-
Windows 10
2 GB memory (4
GB preferred)
LSCentral 24.1 Installation Guide 3

play Station program. The com-
puter running this program must
be on the same network as the
KDS server (can be a domain or
a work group), so it can com-
municate with the Kitchen Ser-
vice on the KDS server
(Windows Service).
Bump bars Connects to a KDS computer to
control a display station. Must
return an alpha key or numeric
keys.
USB interface
4 LSCentral 24.1 Installation Guide
Kitchen Display System Requirements

LSCentral Installation
LSCentral Installation
LSCentral is distributed in a single executable file,
W1_LS_Central_
xx.x1.exe.
Before you start the actual installation, you should run this application.
This will uncompress the installation files and store them in an install-
ation directory on your hard drive.
The default path for these files is
C:\LS Retail\LSxx.x
.
Prerequisites
Before installing the LSCentral extension make sure:
l
You have administrator privileges and necessary permissions and
licenses to install Business Central, to add the LSCentral exten-
sion, and to create users.
l
Microsoft Dynamics 365 Business Central is installed.
l
Microsoft PowerShell is installed.
l
The
Microsoft.Dynamics.Nav.Apps.Management
module has been
imported to the PowerShell session.
Additionally, if you are restoring the demo data backup make sure:
l
You have a working knowledge of Business Central and Microsoft
SQL Server, including how to restore a SQL database backup.
Adding the LSCentral Extensions to an Existing Database
Follow these steps to add the LSCentral System App and LSCentral
extensions to Business Central:
l
Install the Data Director
To publish the extensions to the database, run this in PowerShell:
Publish-NAVApp -ServerInstance "BC" -Path 'C:\LS
Retail\LS22.0\Application\LS Central\LS Central_Sys-
tem_App_X.app'
Sync-NAVApp -ServerInstance "BC" -Name "LS Central
System App"
Publish-NAVApp -ServerInstance "BC" -Path 'C:\LS
Retail\LS22.0\Application\LS Central\LS Retail_LS Cen-
tral_X.app'
Sync-NAVApp -ServerInstance "BC" -Name "LS Central"
To install the extension:
1. Open the Setup & Extensions page.
2. Select Install for the LSCentral extension.
LSCentral 24.1 Installation Guide 5

You can also run the publish and install steps in PowerShell by running
this script:
Publish-NAVApp -ServerInstance "BC" -Path 'C:\LS
Retail\LS22.0\Application\LS Central\LS Cen_tral_Sys-
tem_App_X.app'
Sync-NAVApp -ServerInstance "BC" -Name "LS Central
System App"
Install-NAVApp -ServerInstance "BC" -Name "LS Central
System App"
Publish-NAVApp -ServerInstance "BC" -Path 'C:\LS
Retail\LS22.0\Application\LS Central\LS Retail_LS Cen-
tral_X.app'
Sync-NAVApp -ServerInstance "BC" -Name "LS Central"
Install-NAVApp -ServerInstance "BC" -Name "LS Cen-
tral"
Restoring the LSCentral Demo Database Backup
1. Start the Microsoft SQL Server Management Studio, and connect
to the database server.
2. Restore the
ls-central-release.bak
backup file, found in the Applic-
ation folder in the installation directory.
3. Install the toolbox by running the
LSCentral Service Com-
ponents.exe
, found in the Setup folder in the installation directory.
4. Install the Data Director.
5. Open the Business Central Administration client, and define a ser-
vice which connects to the database created.
6. Open the Business Central web client, and add the current user,
followed by any additional users.
7. Restart the service.
The installation is done. You can now start to use LSCentral.
6 LSCentral 24.1 Installation Guide
LSCentral Installation

LSCentral Help Installation
Uninstalling the LSCentral Extension
Follow these steps to uninstall the LSCentral and LSCentral System
extensions from Business Central:
1. Open the Setup & Extensions page.
2. Select Uninstall for the LSCentral extension.
3. Select Uninstall for the LSCentral System App extension.
To unpublish the extension from the database, run this script in Power-
Shell:
Unpublish-NAVApp -ServerInstance "BC" -Name "LS Cen-
tral"
Unpublish-NAVApp -ServerInstance "BC" -Name "LS Cen-
tral System App"
You can also uninstall (steps 1 to 3)through PowerShell by running this
script:
Uninstall-NAVApp -ServerInstance "BC" -Name "LS Cen-
tral"
Uninstall-NAVApp -ServerInstance "BC" -Name "LS Cen-
tral System App"
Unpublish-NAVApp -ServerInstance "BC" -Name "LS Cen-
tral"
Unpublish-NAVApp -ServerInstance "BC" -Name "LS Cen-
tral System App"
LSCentral Help Installation
Remote setup
LS Retail hosts the online help on a public server at https://help.ls-
central.lsretail.com.
To add the LSCentral help website to the Help & Support page in Busi-
ness Central, set the BaseHelpUrl in navsettings.json to
https://help.lscentral.lsretail.com as described in https://-
docs.microsoft.com/en-us/dynamics365/business-central/dev-itpro/de-
ployment/configure-help#online-library
Local setup
Note:As of version 18.0, the Microsoft Dynamics 365 Business Central
Help Server has been discontinued. The Business Central online help is
available via links on the LSCentral Home page and side navigation
menu, and directly via this link.
LSCentral 24.1 Installation Guide 7

Data Director Installation
Prerequisites
There are a few things, as listed below, that you need to keep in mind
before setting up the Data Director.
l
You should have a solid understanding of the TCP/IP networking
protocol. You should know how IP addresses can be assigned and
be able to use tools such as ping and tracert. You must be able to
assign names to an IP number, preferably using a DNS server or
the local hosts file.
l
You should know how to work with Microsoft Windows Services
and view events from the Event Log.
l
Make sure that you have the necessary permissions to install pro-
grams and be able to start and stop services on the computer run-
ning the DD service.
l
You should have a working knowledge of Microsoft Business Cen-
tral.
l
The DD Web Service is a Windows Communication Foundation
(WCF) service that is hosted in IIS and requires IIS version 7 and
above. Those who want to install DD Web Service must therefore
be familiar with IIS.
Note: DD version 3.2.128 does not support CFront data access. If NAV
Database is native, an older version of DD needs to be installed to
access that database. If the Database is SQL, use SQL connection
string to access the data.
Security considerations
Most data communication tools like the DD will need access to your
organization’s databases in order to move data between them. For
security purposes, you should restrict the DD’s access to the database
tables that it needs to read or write into. This is important because,
unlike regular database users, the DD can effectively access any table
in your database, as it is not restricted to viewing data via a graphical
user interface. By choosing not to restrict the DD’s access to your data-
base, you risk giving users access to data that they should not have
access to.
Most database systems allow database administrators to set user
access permissions relatively easily. It is strongly recommended that
you spend some time specifying access permissions for the user
account that the DD will use to access your database. For example, the
Business Central security system provides a powerful feature that limits
a user’s access to database tables only, making the user account use-
less to regular users since they do not have access to the database’s
graphic user interface. Similar features can be found in most other data-
8 LSCentral 24.1 Installation Guide
Data Director Installation

Data Director Installation
base systems. If this feature is available, it should preferably be used
for all user accounts that the DD uses.
To install the Data Director
DD3 Runs on Framework 4.7 so you need to install it before you install
DD3.
1. Install DD3 by running
LS.DataDirector.3.02.xx.Setup.exe
.
2. If you clear all check boxes, only DD Client files are installed
without the Client Tools. These are the files needed for LS Nav,
LSCentral, or LS One to communicate with the Data Director:
Task Description
DD Service: DD Service that handles all the data
transfer. If you are installing only client
controls for LS Retail products such s
LSCentral or LS One, to be able to con-
nect to DD Service on another host,
then clear this check box and only the
Client files will be installed.
Client Tools: Configuration Tool and Monitoring Tools
for Data Director. If you do not want the
tools to be available on this host, then
clear this check box. DD can be con-
figured and monitored remotely.
DD Add-ins files fo r
NAV/BC RTC:
Add DD Client files to the Add-ins folder
for NAV/BC RTC Client. This is only
needed for LSCentral version 15 or
older. If there are more than one version
of NAV/BC installed, only the newest
version will get the files. You must copy
the files manually to the Add-ins folder
for other versions.
LSCentral 24.1 Installation Guide 9

DD Add-ins files fo r
NAV/BC SRV:
Add DD Client files to the Add-ins folder
for NAV/BC Middle Tier Service. This is
only needed for LSCentral version 15
or older.
Install Incoming DD
Web Service:
Installs Web Service support to IIS to
accept Job Requests via Web Services.
(See Install and Configure IIS in the
LSCentral Help on how to prepare IIS
before install). This is required for
LSCentral version 20 or later.
If the install cannot find the default install path for NAV/BC, it will bring
up selection windows with the install path where NAV/BC is located,
both for RTC and Service.
l
To install DD with NAV 2009 or older:
Select DD Service, Client Tools.
l
To install DD with NAV 2013 or newer (and not support for older
NAV):
Select DD Service, Client Tools and DD Add-ins files for NAV/BC,
both for RTC and SRV.
l
To install DD with LSCentral 16.x or newer:
Select DD Service, Client Tools and DD Add-ins files for NAV/BC
SRV.
l
To install DD with LSCentral 20.x or newer:
Select DD Service, Client Tools and Incoming DD Web Service.
l
To install DD with LS One Site Manager:
Select DD Service and Client Tools.
l
To install DD Client files for POS that will not include DD Ser-
vice:
Clear all check boxes and only the client files will be installed.
Depending on what options you select, changes to DD Configuration
will be made to match the selection if this is a new installation.
No configuration is needed to start up DD3 with default settings. After
install, the DD will start up with a default configuration. If DD should
connect to database with a trusted connection, you need to add Login
to the DD Service to log on as a user that has access to read and write
the data onto the database.
Open the Configuration Tool and upload the DD license, a demo DD
license is installed when the DD is installed.
Note: At least one Incoming DD Web Service needs to be installed in a
network where jobs are going to be distributed. LSCentral that runs the
Scheduler job has to have access to the IIS Service where DD Web Ser-
vice runs. DD Web Service then has to have access to any Source DD
10 LSCentral 24.1 Installation Guide
Data Director Installation

Data Director Installation
host that jobs will be sent to. No Web Service is required on Destination
hosts.
For install options via command line see "Install Options" on page 14.
To test if DD Web Service is running without an error, type in a browser:
http://localhost/DDWebService/ddjson.svc/ping
If everything is working correctly, you get an OK as reply.
Install and Configure IIS
Follow these steps to turn on IIS (Internet Information Service or Web
Service) on Windows 10. The procedure is similar on other versions of
Windows.
Tip: A quick Google search gives you multiple results on how to install
IIS on your machine,
https://www.rootusers.com/how-to-install-iis-in-windows-server-2019/
On Windows 10
1. Open the Windows Control Panel (right-click the Start button in
the bottom-left corner and select Control Panel).
2. Select Programs and Features:
LSCentral 24.1 Installation Guide 11

3. Click Turn Windows features on or off:
4. In the Windows Features, select the check boxes shown in the
below image:
l
NET framework 3.5 (includes .NET 2.0 and 3.0)
o
Windows Communication Foundation HTTP Activ-
ation
l
Internet Information Services
o
Web Management Tools
o
IIS Management Console
o
World Wide Web Services
o
Dynamic Content Compression
o
Basic Authentication
12 LSCentral 24.1 Installation Guide
Data Director Installation

Data Director Installation
5. Click OK.
If you completed step 4 successfully, you should be ready to run the
CommerceServiceForLSCentral.Setup.202x.x.exe
setup to create the
WCF web service.
If .NET Framework 4.7 Advanced Services is not an available feature
to you, you have to set up .NET Framework 4.7 (https://-
dotnet.microsoft.com/download/dotnet-framework/net47).
After installing the .NET framework, make sure that
Internet Information Services
l
World Wide Web Services
l
Application Development Features
l
ASP.NET
is selected (inside Windows Features).
LSCentral 24.1 Installation Guide 13

The final step is to activate and allow the newly installed .NET 4.7
framework inside IIS:
1. Start by looking for and opening Internet Information Services:
2. In IIS, select ISAPI and CGI Restrictions:
3. Right-click ASP.NET v4, and click Allow:
See also
Enable Basic Authentication (LSCentral Help)
Install Options
Data Director Install can be executed with parameters to make use of a
scripted installation. You can find details of what options are available
here:
http://unattended.sourceforge.net/InnoSetup_Switches_ExitCodes.html
14 LSCentral 24.1 Installation Guide
Data Director Installation

Data Director Installation
The available tasks are:
l
srvfiles: DD Service [Default]
l
clitools: Client tools (Config & Job Monitor) [Default]
l
navcli: Add-ins files for NAV/BC RTC
l
navsrv: Add-ins files for NAV/BC SRV
l
web: Install Incoming DD Web Service to IIS
l
Install DD in silent mode with Service and Client Tools:
/VERYSILENT /SUPPRESSMSGBOXES
l
Install Service and Client Files only:
/VERYSILENT /SUPPRESSMSGBOXES /TASKS-
S=”srvfiles,!clitools”
l
Install only Client Files, without Service and Client Tools:
/VERYSILENT /SUPPRESSMSGBOXES /TASKS-
S=”!srvfiles,!clitools”
l
Install Service, Client Files & Tools and add BC Addins:
/VERYSILENT /SUPPRESSMSGBOXES /MERGETASKS-
S="navcli,navsrv"
To add path for NAV/BC installation folders, for example if Nav/BC is
installed on Docker, and path cannot be found in the Registry, add -
NAVSRV “<path>” -NAVCLI “<path>”
It is possible to change default DD Configuration values during install-
ation:
l
Create
ddconfig.xml
file with the modified values, put the file into
the bin folder where DD will be installed, and after installation is
done, DD will check for this file before creating the default con-
figuration file, and modify those values from the xml file.
Note: This file must be in place before the first start of DD, as DD will
only look for this file if default configuration values have not yet been
created.
Sample of
ddconfig.xml
file that will set the Alias value and change
Decimal fix for Database process to BIG and activate debug:
LSCentral 24.1 Installation Guide 15

Commerce Installation
The articles in this section provide full instructions on how to install a
local instance of the Commerce Service and how to connect the Mobile
Apps to the service, if apps will be used.
Note: The instructions assume that LSCentral has been installed with
LSCentral Web Services up and running. See "Before Installation" on
page 16 for information on how to prepare LSCentral for Commerce.
You can download the Commerce installation file
Com-
merceServiceForLSCentral.Setup.202x.x.exe
from the LS Portal (login
required).
The Service setup creates a new Commerce Database on SQL Server
(default name
Commerce
) and adds CommerceService to IIS (default
name
CommerceService
). These default names are used throughout
these installation instructions.
See also
"Before Installation" on page 16
"Install and Configure IIS" on page 17
"Install Commerce Service" on page 20
"After Installation" on page 25
"Setup Command Lines" on page 28
Before Installation
Before installing the Commerce Service make sure you have the fol-
lowing:
1. LSCentral has been set up and is running. The Commerce Ser-
vice setup needs access to LSCentral head office data that can
either be running in a SaaS or On-Premises.
2. Windows user name and password used for the Windows
Authentication or S2S Client Token and Key to access LSCentral
Web Service.
3. Set up Web Service in LSCentral under Web Service Setup.
l
Add all values needed to generate Web Service URI that can
be used for Commerce setup.
l
Publish, Publish Commerce Web Service and Subscribe
under Web Request 2.
l
Get RetailWebServices URI from the Web Service URI field.
An example of a RetailWebServices URL:
http://-
mycentralserver:9047/BC210/WS/CRONUS - LS Cen-
tral/Codeunit/RetailWebServices
16 LSCentral 24.1 Installation Guide
Commerce Installation

Commerce Installation
l
Get ODataV4 URI, by going to Actions - Functions - Show
OData V4 Uri, copy the URI part up to /%1_%2.
An example of ODataV4 URL:
http://-
mycentralserver:9048/BC210/ODataV4
l
Tenant ID for SaaS.
4. Running IIS Server on the machine that the Commerce Service
will be installed on. Commerce Service is a WCF application and
the
.svc
must be mapped in IIS (in Handler Mappings).
See also
Configuring Web Services for LSCentral on-premises (LSCentral Help)
Configuring Web Services for LSCentral in SaaS (LSCentral Help)
Install and Configure IIS
Follow these steps to turn on IIS (Internet Information Service or Web
Service) on Windows 10. The procedure is similar on other versions of
Windows.
Tip: A quick Google search gives you multiple results on how to install
IIS on your machine,
https://www.rootusers.com/how-to-install-iis-in-windows-server-2019/
On Windows 10
1. Open the Windows Control Panel (right-click the Start button in
the bottom-left corner and select Control Panel).
2. Select Programs and Features:
LSCentral 24.1 Installation Guide 17

3. Click Turn Windows features on or off:
4. In the Windows Features, select the check boxes shown in the
below image:
l
NET framework 3.5 (includes .NET 2.0 and 3.0)
o
Windows Communication Foundation HTTP Activ-
ation
l
Internet Information Services
o
Web Management Tools
o
IIS Management Console
o
World Wide Web Services
o
Dynamic Content Compression
o
Basic Authentication
18 LSCentral 24.1 Installation Guide
Commerce Installation

Commerce Installation
5. Click OK.
If you completed step 4 successfully, you should be ready to run the
CommerceServiceForLSCentral.Setup.202x.x.exe
setup to create the
WCF web service.
If .NET Framework 4.7 Advanced Services is not an available feature
to you, you have to set up .NET Framework 4.7 (https://-
dotnet.microsoft.com/download/dotnet-framework/net47).
After installing the .NET framework, make sure that
Internet Information Services
l
World Wide Web Services
l
Application Development Features
l
ASP.NET
is selected (inside Windows Features).
LSCentral 24.1 Installation Guide 19

The final step is to activate and allow the newly installed .NET 4.7
framework inside IIS:
1. Start by looking for and opening Internet Information Services:
2. In IIS, select ISAPI and CGI Restrictions:
3. Right-click ASP.NET v4, and click Allow:
See also
Enable Basic Authentication (LSCentral Help)
Install Commerce Service
The installation process requires the following information:
l
SQL Server instance (for example,
mySqlServer
or
mySqlServer-
\MSSQLSERVER
) used to create the Commerce database.
20 LSCentral 24.1 Installation Guide
Commerce Installation

Commerce Installation
o
Default collation used is:
COLLATE Latin1_General_CI_AS
.
If another collation is to be used, create a new Commerce
Service database with the required collation in SQL Man-
agement Studio. The setup uses the existing database.
l
LS Nav/Central SQL Server instance (for example,
MySQLServer
)
l
LS Nav/Central SQL database name (for example,
LSCentral
)
l
LS Nav/Central company name (for example,
Cronus - LS Central
)
l
URL to LS Nav/Central web service (
http://-
localhost:7047/BCxxx/WS/CRONUS - LS Cen-
tral/Codeunit/RetailWebServices
)
l
Windows user name and password used for the Windows
Authentication against the LS Nav/Central web service.
Run the setup program
Com-
merceServiceForLSCentral.Setup.202x.x.exe
.
The setup creates the CommerceService service in IIS and the Com-
merce database. You can run the setup multiple times to update and to
recreate and override objects in the existing Commerce database.
Installation options
Select check boxes depending on the type of installation.
Note: For updating an existing installation only, clear all check boxes,
and only the files will be updated but the configuration and database
will stay the same.
Note: When you are switching Commerce Service modes (for example
single-tenant to multi-tenant), uninstall Commerce Service and install
again with the new settings.
Installation options:
LSCentral 24.1 Installation Guide 21

Create Commerce Service for LSCentral Database
l
Create Commerce Database. Select this check box to update the
database. (Note: when updating, all existing data will be deleted.)
o
Use Multi-Tenant Mode enables multi-tenancy to use one
Commerce Service to communicate with multiple LSCentral
instances. Configurations for LSCentral tenants are con-
figured in the Commerce Admin Portal instead of the usual
AppSettings.config
file. See "Commerce Admin Portal" in the
LS Central Help for more information.
o
Use WS Mode for LSCentral in SaaS is used when
LSCentral is in SaaS and it only uses LSCentral Web Ser-
vices to retrieve data. No Direct access to LSCentral data-
base.
Configure LSCentral SQL parameters
l
Configuration needed to connect to LSCentral SQL Database. Not
used in SaaS or Multi-Tenant mode.
Create CommerceService under IIS
l
Must run locally on the IIS machine.
l
Creates a new Web Application called CommerceService.
l
Creates a new application pool called CommerceServicePool. The
CommerceService worker process runs under the identity set in
this application pool.
SQL Server database for Commerce Service for LSCentral
This will create an Commerce Database.
l
Type in an SQL Server name where the database will be located,
and either use the default database name or change it.
l
Select the Create and use CommerceUser to connect to Com-
merce Database check box to let setup create CommerceUser
with default password CommerceUser and use that user as login
22 LSCentral 24.1 Installation Guide
Commerce Installation

Commerce Installation
for the Commerce database. If this check box is not selected, the
SQL credentials will be used to connect to Commerce database.
l
SQL credentials are used to create the database and run other
scripts during the setup process. This must be sysadmin on the
SQL Server to be able to create the database. If Windows
Authentication is used, the user logged in to the host and running
the setup needs to be
sysadmin
on the SQL Server. If default Com-
merceUser does not already exist, you need to pick one that does
exist already in the SQL Server.
The Test SQL Connection button tests the SQL credentials provided
for the SQL Connection.
LSCentral SQL Server Database
SQL Server connection setting used to connect directly to on-premises
LSCentral Database.
l
SQL Server instance
l
SQL Database name
l
Company name
l
Select the appropriate LSCentral Version range depending on
which version you are connecting to.
l
Choose the Log on credentials to use to access the LSCentral
Database. The user has to have read access to all the tables
needed to get data from.
The Test SQL Connection button tests the SQL credentials provided
for the SQL Connection.
Note: If using CommerceUser when installing for the first time, the user
does not exist on the SQL Database and Test Connection will not work.
Skip the test and continue the installation as the user will be created
during install.
LSCentral 24.1 Installation Guide 23

IIS Web Application setup
IIS Web Application Service settings for where Commerce Service will
installed.
l
Web Site name: The IIS Web Site to which Commerce Service will
be added.
l
Web Service name: Name for Commerce Web Service. If you are
installing more than one instance of Commerce Service, choose a
different name for each instance.
l
Ecom webhook URL: URL to Magento webhook to receive order
status messages and payment updates from LSCentral.
l
LS Central WS URL: Web Service URL for RetailWebServices.
See "Before Installation" on page 16.
l
LS Central OData URL: Web Service URL for ODataV4. See
"Before Installation" on page 16.
l
User name: For on-premises, enter a valid LSCentral user with
access to use the Web Service. For SaaS setup, enter the user
name used when creating the Web Service URI
l
Password/WebKey: For on-premises, enter the password or
WebKey for the LSCentral user. For SaaS setup, use oAuth.
For oAuth (S2S) connection to LSCentral in SaaS, select the Use S2S
oAuth check box, and add authentication information to the relevant
fields.
24 LSCentral 24.1 Installation Guide
Commerce Installation

Commerce Installation
After Installation
You can "ping" the Commerce Web Service to see if the WCF web ser-
vice is working properly. First, ping them from a browser on a laptop
(Chrome/Edge or Firefox recommended), and later from a browser on
your mobile phone.
The ping checks the connection to Commerce Service and LSCentral
SQL Server Databases and LSCentral Web Service.
l
http://localhost/CommerceService/appjson.svc/ping
If the ping is successful, a “pong” reply is returned. After a successful
ping, a Mobile App should be able to connect with the web service. If
the ping returns an error, see "Troubleshooting Communication
Between LS Nav/Central and Commerce" in the LSCentral Help.
In Windows Explorer, open
C:\LS Retail\Commerce\CommerceService\
.
The
\Sql
folder has all the sql scripts used and the
\logs
folder has the
logfile.txt
which is extremely useful.
You can change the values you entered during the setup in the
AppSet-
tings.config
file or in the Commerce admin portal, depending on the
setup.
The connection strings to Commerce and LSCentral SQL databases
are stored in the
AppSettings.config
file (see "Appsetting Con-
figuration" in the LSCentral Help). You can control the error logging
with the
NLog.config
file, (see "Logging Configuration").
Note: If you change these configuration files, you must restart the Com-
merce Service web service. To restart go to IIS Manager and restart
Web Service where Commerce Service is located. You should not
change the
web.config
, unless you setting up SSL.
Single-tenant
After a successful installation, the next step is to validate the data
entered during the installation. Configuration for Single-tenant is stored
in the
Appsettings.config
file, located where Commerce Service is
installed.
LSCentral 24.1 Installation Guide 25

Multi-tenant
After a successful installation, the next step is to create the first tenant,
see "Commerce Admin Portal" in the LSCentral Help. When you have
set up the first tenant, your next step is to validate the tenant con-
figuration.
Note: Commerce Admin Portal is only used for Multi-tenant con-
figurations; it is not needed in a Single-tenant setup.
LSCentral in SaaS
1. Set correct Protocol for Commerce to communicate with
LSCentral in SaaS.
2. Open the
Appsetting.config
file.
3. Find the following line in this file:
<add key="BOConnection.Nav.Protocol" value=""/>
The default value is Ss13 but you have to know which value to fill in
here for your cloud instance.
Tip: If you are not sure, try one of the valid options Ssl3 - Tls - Tls11 -
Tls12 - Tls13 - S2S and see which one works. The most common option
for SaaS is S2S.
See also
LSCentral Configuration (LSCentral Help)
SQL Server Database (LSCentral Help)
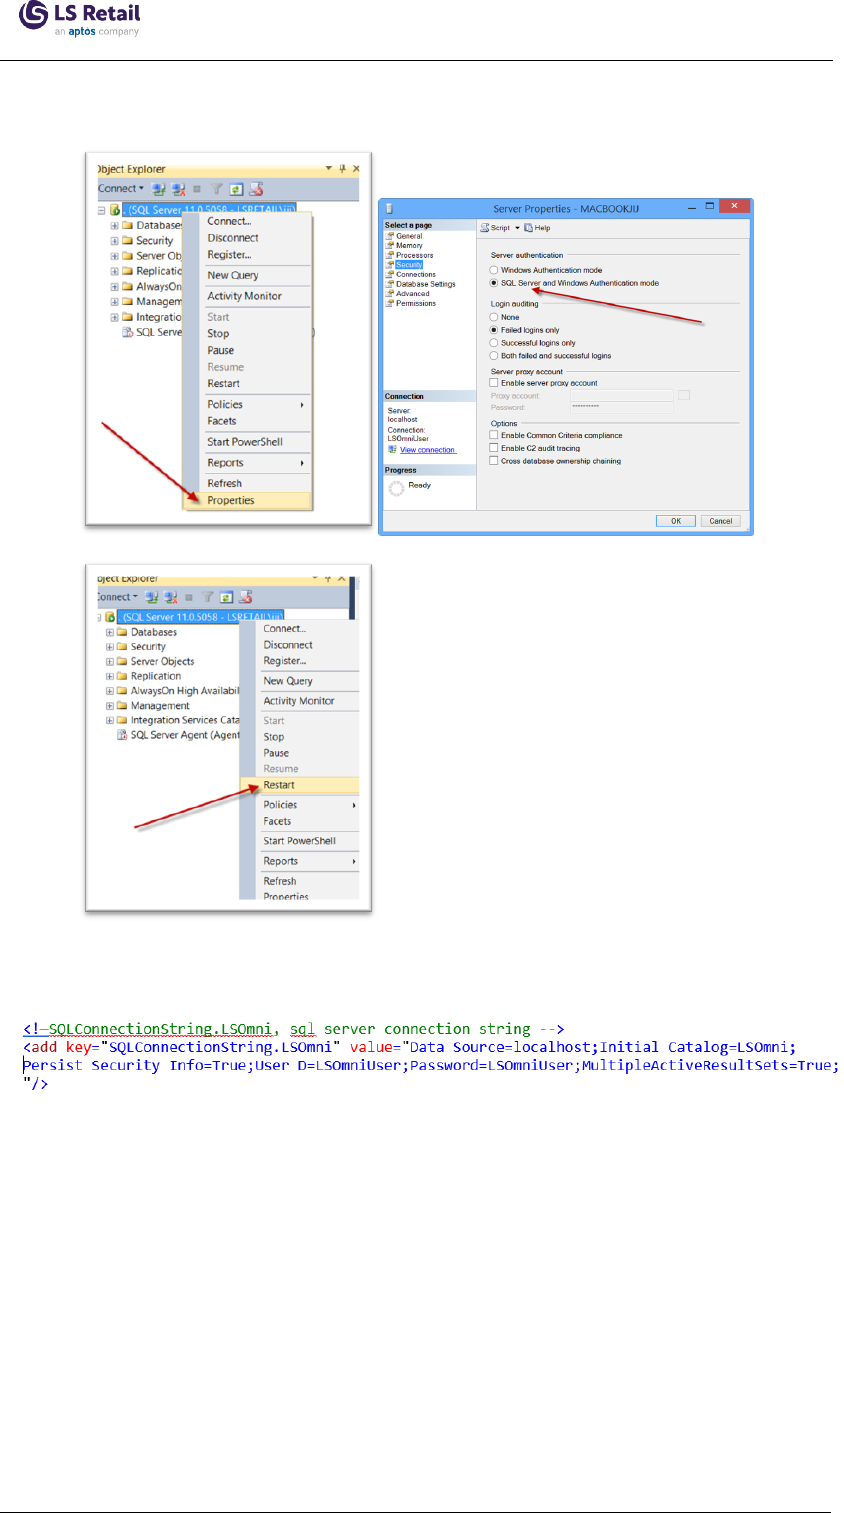
SQL Server Database
A new Commerce SQL Database is created during the Commerce Ser-
vice Setup.
The setup creates the SQL Server login CommerceUser with password
CommerceUser, and grants this user data reader and data writer priv-
ileges in the Commerce database.
If you have a problem logging in with this CommerceUser, you can con-
figure the SQL Server with SQL Server Authentication disabled. The
setup will display a warning, but allow the setup to continue. If the SQL
Server and Windows Authentication mode option is not enabled, you
cannot use the CommerceUser.
To enable this option:
1. Open the SQL Management Studio.
2. Open the Server Properties.
26 LSCentral 24.1 Installation Guide
Commerce Installation
Commerce Installation
3. Restart, see images below:
The SQL Server connection string is stored in:
C:\LS Retail\Com-
merce\CommerceService\AppSettings.config
Note: In production, you can change this connection string to use Win-
dows Authentication or any other SQL Server login/password.
For Commerce Service setup with LSCentral SQL access
CommerceUser must also have read access to LSCentral Database as
Commerce will access LSCentral database to pull some data from it.
Note: In a testing and demo environment, you can give the Com-
merceUser sysadmin access to bypass all restrictions. Do not do this in
a production environment.
LSCentral 24.1 Installation Guide 27

Setup Command Lines
These command line parameters can be used with the setup to run it in
Silent mode.
Samples:
CommerceServiceForLSCentral.Setup.2023.1.exe
/VERYSILENT /SUPPRESSMSGBOXES -Cmd true -SqlSrv loc-
alhost -SqlUsr CommerceUser -SqlPwd CommerceUser -
NavSrv localhost -NavDb BC170 -NavComp "CRONUS - LS
Central" -NavUsr CommerceUser -NavPwd CommerceUser -
IisUsr super -IisPwd xxx
CommerceServiceForLSCentral.Setup.2023.1.exe
/VERYSILENT /SUPPRESSMSGBOXES -Cmd true -NavX false -
SqlX false -IisUsr dd -IisPwd dd.12345
CommerceServiceForLSCentral.Setup.2023.1.exe
/VERYSILENT /SUPPRESSMSGBOXES -Cmd true -NavX false -
SqlX false -IisX false
Hardware Station Installation
l
Run the
LS Hardware Station.exe
, found in the Setup folder in the
installation directory.
See "How to:Set Up Hardware Station" and "Video Tutorial:Setup" in
the LSCentral Help for more information.
28 LSCentral 24.1 Installation Guide
Hardware Station Installation

Kitchen Display System Installation
Kitchen Display System Installation
The Kitchen Display System (KDS)works with LSCentral for res-
taurants and hotels.
Note: The KDS does not work with the Offline Call Center.
System requirements
Kitchen service machine
l
Software
o
Operating system: Windows 7.1 or newer
o
Software: .NET Framework 4.5 or newer
l
Hardware: Minimum requirements
o
Processor: 2 GHz or faster
o
2 GB RAM
o
Hard disk: 5 GB free space
Display station machines
l
Software
o
Operating system: Windows 7.1 or newer
o
Software: .NET Framework 4.5 or newer
l
Hardware: Minimum requirements
o
Processor: 1 GHz or faster
o
500 MB RAM
o
Hard disk: 2 GB free space
LSCentral KDS Web Service
l
The KDSconfiguration is stored in the Dynamics Business Central
database. The Kitchen Service calls the LS Central KDSWeb Ser-
vice to fetch the configuration. No database connection is needed.
KDS licenses
No license is needed for the KDS, it is included in the
LSCentrallicense.
System setup
Every KDS setup needs to go through the same basic steps. Get the
latest version of the KDS setup files from the LSRetail Portal (login
required), go to the LSCentral Downloads page (select the appropriate
release folder, and there open the Setup xx.0 folder where the
KDSsetup files are located).
1. Install the Kitchen Service application.
2. Install Display Station application on all Display Station machines.
LSCentral 24.1 Installation Guide 29

3. Be sure to insert the appropriate default data before starting to
configure the layout. See "Insert default data"in the LSCentral
Help.
4. Configure the following layout in the LSCentral to get a func-
tioning KDS:
o
Display profile
o
Functional profile
o
Button profile
o
Visual profile
o
Style profile
5. Configure the Kitchen Service settings in LSCentral.
Note:First time use in LSCentral requires initialization of the
SOAPURLin the Kitchen Service Configuration.
6. Configure the KitchenService settings to communicate with
LSCentral with the KDS Utility and restart the Kitchen Service.
7. Configure the Display Stations startup on each computer where
they should run using the "Display Station Utility" on page 38.
See samples for suggested KDSsetup for single or multiple servers.
Install the Kitchen Service application
Complete the setup from the setup file LS.KitchenService.Setup.exe.
This will install the Kitchen Service and start it.
To create a shortcut to the KDS Utility, select the check box Create a
desktop icon for the KDS Utility, if it is not already selected. The
KDSUtility is needed to configure the Kitchen Service with the URLto
the Dynamics Business CentralKDSWebServvice and credentials, if
necessary.
By default the service starts listening on TCP/IP port 17750 and waits
for the correct configuration from the Hospitality system. If you are
upgrading from a previous KDS version, the new version will use the
same configuration file as the previous version. If the previous version
was using the NAS it must be overwritten with the KDSUtility.
Install the Display Station application
Complete the setup from the setup file LS.DisplayStation.Setup.exe.
This will install the Display Station. See "How to: Set up a Display Sta-
tion" in the LSCentral Help for more information.
Set the Kitchen Service Configuration
This configures the connection information for the Kitchen Service, so it
can connect to the correct Business Central WebService. And other set-
tings for the KDS to run optimally.
See "Kitchen Service Configuration" in the LSCentral Help for details
on how to configure.
30 LSCentral 24.1 Installation Guide
Kitchen Display System Installation

Kitchen Display System Installation
Configure the layout of the KDS
All data setup for the KDS system is done in the Hospitality system. All
Display Station configurations are set there, as well as the Kitchen Ser-
vice connection properties. See "KDS profiles" for a good starting point.
Data structures
Below you can see the data structures of the Kitchen Display System
and their relations.
Initially, the KDS configuration in LSCentralis empty. It can be pop-
ulated with predefined demo data in an xml file,
KDS.xml
,which is
included in the KDSinstallation package.
See "Import demo data" in the LSCentral Help for details on how to
import the demo data and insert the default lookup values for the style
types and header/footer column types.
The demo data should help you understand the structure of the setup
and be a good starting point for the real setup.
LSCentralKDS Web Service setup
In order for the Kitchen Service to be able to communicate with the Hos-
pitality system, it must know the URLof the Web Service it should con-
nect to. The Web Services are run in the Dynamics Business Central
service tier. See "Kitchen Service Configuration" in the LSCentral Help
for more information.
See "KDS Utility" on page 32 for information on how to set the Kitchen
Service settings.
LSCentral 24.1 Installation Guide 31

Troubleshooting
See "KDS Troubleshooting" if you are having problems getting the KDS
to run properly.
KDS Utility
The KDS Utility is a stand-alone program to manage the configuration
of the Kitchen Service connection to the LSCentral KDSWebService
API. It is installed when the Kitchen Service is installed.
Some of the configuration information can be changed in the Kitchen
Service Configuration page in LSCentral. When the Kitchen Service
starts, it updates the information in the KDSConfiguration with it.
In LSCentral SaaS version 21.0 and onwards, the OAuth authentication
is the only way for the KDS to access the OData KDSWebService. See
S2S Authentication for more information on OAuth setup.
The On-premises versions can still use the SOAPWebService, but it is
recommended to use the OData, since SOAPis being deprecated.
Start the KDSUtility by double-clicking the desktop shortcut, or locate
it in the Start Menu, or, as a third option, locate the application file
C:\Program Files\LS Retail\Kitchen Service\LS KDS Utility.exe
and
double-click it.
If you are configuring for the first time, the window will look like this
(select the appropriate choice from the DataProvider dropdown list):
32 LSCentral 24.1 Installation Guide
Kitchen Display System Installation

Kitchen Display System Installation
See also
KDSS2SOAuth in SaaS (LSCentral Help) on how to configure the
access to OAuth authentication in LSCentral SaaS.
KDSS2SODataV4 On-premises (LSCentral Help) on how to configure
the KDS to use OData in LSCentral on-premises.
KDSUses SOAPService On-premises (LSCentral Help) on how to con-
figure the SOAP access for older versions of LSCentral.
KDSS2SOAuth in SaaS
The KDS uses the ODataV4 protocol to connect to the SaaS LSCentral
KDSWeb Service. See S2S Authentication for more information on
OAuth setup.
Use the KDSUtility to set the configuration:
1. Start the KDSUtility by double-clicking the desktop shortcut, or
locate it in the Start Menu, or, as a third option, locate the applic-
ation file
C:\Program Files\LS Retail\Kitchen Service\LS KDS Util-
ity.exe
and double-click it.
2. Start by setting the KDSData Provider field to
S2SOAuth SaaS
.
Only the necessary fields for connecting to the Web Service are
then shown.
If you are configuring for the first time, the window will look like
this:
LSCentral 24.1 Installation Guide 33

If not, the fields are populated with the data from the Kitchen Ser-
vice configuration file.
There are two ways to populate the fields:
l
Fill in the fields with the correct data from the information in
the Web Service Setup page. See How to:Set Up
LSCentral to Use OAuth.
l
Copy the information from the JSONfor KDSUtility field in
the page in LSCentral.
Fields to be set are:
Server computer name This is the name of the SaaS server
where the LSCentral KDSWeb Service
runs. Example:
api.busi-
nesscentral.dynamics.com
Version WS Version
Protocol/Client Type The method to access the KDSWeb
Service. ODataV4 (REST)is default.
Company Name The name of the Company in
LSCentral.
TenantID Tenant ID in SaaS.
Environment Environment name instance.
Client ID Client ID in SaaS.
Client Password/Secret Client Secret.
Web Service Name The name of the KDSWeb Service in
the Web Services list. The default
value is KDSodataAPI.
Restaurants filter Use this to specify from which Res-
taurant the Kitchen Service should
fetch KOTs (orders). If nothing is spe-
cified, the KOTsfrom all KDS-enabled
restaurants are retrieved when they are
created. If only one restaurant is in
use, you can leave the field empty.
This setting is useful in the Cloud/SaaS
environment. If there are more than
one restaurant in use per company and
they are in different locations, the
34 LSCentral 24.1 Installation Guide
Kitchen Display System Installation

Kitchen Display System Installation
Kitchen Service, in each location, can
filter on the corresponding restaurant.
This is also applicable if LSCentral is
on one central server and more than
one restaurant are connecting to it.
Note: This setting is stored locally per
Kitchen Service and not in the Kitchen
Service Configuration page in the Busi-
ness Central.
WSInfo The information from the JSON field in
the page in the Hospitality system.
Copy the string from Business Central,
paste it into this field, and the rest of
the fields will be populated. Except for
the Client Secret field, which you must
set manually.
3. If changes have been made, click GetConfig in the top menu to
save the Kitchen Service configuration.
The configuration will be saved in the file
C:\ProgramData\LS
Retail\Kitchen\KitchenServiceConfig.config
.
The utility then tries to connect to the KDSWeb Service, and if it
is successful, it will show a dialog window with some of the inform-
ation from the web service.
4. Restart the Kitchen Service, either by selecting Restart Service
from the Manage Service menu item, or by starting Windows Ser-
vices (Services.msc) and restarting it there.
5. There are two other options in the Manage Service menu item:
l
Refresh Service tells the Kitchen Service to fetch the con-
figuration from the web service without restarting the Kitchen
Service. This is useful when the configuration of the KDS is
changed in the back office.
l
Restart all Displays tells the Kitchen Service to turn off all
connected Display Stations and restart them.
Note:If there are errors, you can examine the KDSUtility Log by click-
ing Logs in the top menu and then Show Utility Log. The log file opens
in Notepad.
Tip:You can also open the last Kitchen Service log file by clicking Logs
in the top menu and then Show KS Log. This will open the log file in
Notepad.
KDSS2SODataV4 On-premises
The KDS uses ODataV4 to connect to the KDSWeb Service in
LSCentral when it is not running as SaaS (on-premises).
Use the KDSUtility to configure the connection:
LSCentral 24.1 Installation Guide 35

1. Start the KDSUtility by double-clicking the desktop shortcut, or
locate it in the Start Menu, or, as a third option, locate the applic-
ation file
C:\Program Files\LS Retail\Kitchen Service\LS KDS Util-
ity.exe
and double-click it.
2. Start by setting the KDSData Provider field to
S2SOData
OnPrem
. Only the necessary fields for connecting to the Web Ser-
vice are then shown.
If you are configuring for the first time, the window will look like
this:
If not, the fields are populated with the data from the Kitchen Ser-
vice configuration file.
There are two ways to populate the fields:
l
Fill in the fields with the correct data and the URL will be
built up from that information.
l
Copy the JSONstringfrom LSCentral, and paste it into the
WSInfofield. The other fields will be filled with the inform-
ation from the URL string.
The correct URL can be located in the in LSCentral.
Fields to be set are:
Server Computer name This is the host name of the server
where the LSCentral service tier runs.
36 LSCentral 24.1 Installation Guide
Kitchen Display System Installation

Kitchen Display System Installation
Company Name The name of the Company in
LSCentral.
Service Tier The name of the BC service tier. Usu-
ally the value is
BC
.
WebService Name The name of the KDSWeb Service in
the Web Services list. The default
value is KDSodataAPI.
Port No This is the port number which the Web
Service listens on. This is usually
7048
for OData, but can be different depend-
ing on how the BCservice tier is con-
figured.
Client/Protocol Type The method to access the
KDSWebService. ODataV4 (REST)is
default.
Domain name If applicable, set the user's domain
name here.
Username User which logs on to the Web Service
Password Password for the Web Service user if a
user name is set.
Restaurants filter Use this to specify from which res-
taurant the Kitchen Service should
fetch KOTs (orders). If nothing is spe-
cified, the KOTsfrom all KDS-enabled
restaurants are retrieved when they are
created. If only one restaurant is in
use, you can leave the field empty.
This setting is useful in the Cloud/SaaS
environment. If there are more than
one restaurant in use per company and
they are in different locations, the
Kitchen Service, in each location, can
filter on the corresponding restaurant.
This is also applicable if LSCentral is
on one central server and more than
one restaurant are connecting to it.
Note: This setting is stored locally per
Kitchen Service and not in the Kitchen
Service Configuration page in the Busi-
ness Central.
LSCentral 24.1 Installation Guide 37

WSinfo The information from the JSON field in
the page in the Hospitality system.
Copy the string from BC and paste it
into this field and the rest of the fields
will be populated. Except for the pass-
word field and the port number, which
you will have to set manually.
3. If changes have been made, click GetConfig in the top menu to
save the Kitchen Service configuration.
The configuration will be saved in the file
C:\ProgramData\LS
Retail\Kitchen\KitchenServiceConfig.config
.
The utility then tries to connect to the KDSWeb Service, and if it
is successful, it will show a dialog window with some of the inform-
ation from the web service.
4. Restart the Kitchen Service, either by selecting Restart Service
from the Manage Service menu item, or by starting Windows Ser-
vices (Services.msc) and restarting it there.
5. There are two other options in the Manage Service menu item:
l
Refresh Service tells the Kitchen Service to fetch the con-
figuration from the web service without restarting the Kitchen
Service. This is useful when the configuration of the KDS is
changed in the back office.
l
Restart all Displays tells the Kitchen Service to turn off all
connected Display Stations and restart them.
Note:If there are errors, you can examine the KDSUtility Log by click-
ing Logs in the top menu and then Show Utility Log. The log file opens
in Notepad.
Tip:You can also open the last Kitchen Service log file by clicking Logs
in the top menu and then Show KS Log. This will open the log file in
Notepad.
Display Station Utility
The Display Station Utility is a stand-alone utility program to manage
the configuration of the Kitchen Display Stations. It makes it simple to
add or remove Display Stations and it creates a shortcut to start up all
the defined Display Stations on the computer.
Note: The utility only manages the Display Station on the computer it is
running on. The utility is installed as part of the Display Station setup. A
shortcut is placed on the desktop to start it up.
1. Start the DisplayStation Utility by double-clicking the desktop
shortcut. Or locate the utility in the Start Menu in the LSRetail
folder. The third option is to locate the application file
C:\Program
Files\LS Retail\Display Station\LS DisplayStation Utility.exe
and
double-click it or create a shortcut to it.
38 LSCentral 24.1 Installation Guide
Kitchen Display System Installation

Kitchen Display System Installation
A window like this one opens:
When the utility starts, it reads the Display Station configuration
file and uses the information in it to connect to the Kitchen Service
and get the Display Station information from it. If there is no con-
nection, the basic information from the configuration file is shown.
If there is no configuration file, for example just after a new install-
ation, the default values for the service are only shown and must
be set before continuing.
The Top menu commands:
Com-
mand
Description
Test Con-
nection
This command starts by pinging the server specified
in the S erver Name field. If successful, the command
tries to connect to the Kitchen Service.
If unsuccessful, the command will only show the
information from the Display Station configuration file
in the Display Stations box.
Identify
Screens
If there are more than one monitors connected to the
computer, this command will show the screen number
on each screen.
Save Saves the new/updated configuration in the Display
Station configuration file (
C:\ProgramData\LSRetail\KitchenDisplayStation\Con-
figurations.xml
).
A shortcut, to start the Display Stations, will also be
created/updated on the desktop.
LSCentral 24.1 Installation Guide 39

The Kitchen Service box:
IP Address This is for information only. Shows the
IPaddress of the computer running the util-
ity.
Server Name This is the host name of the server where
the Kitchen Service runs. The name in this
field is used when the utility connects to
the Kitchen Service.
Note: This must be a host name and not an
IP address.
The Kitchen Service insists on using host
names to establish a proper connection
between endpoints, that is between the Dis-
play Station and itself.
Port This is the TCP port which the Kitchen Ser-
vice is listening on for incoming requests.
The default port number is
17750
.
Utility Log link If you click this link, the utility log file
opens in Notepad. It shows all the activity
of the running session. The results of
everything done is stored there.
The Display Stations box:
New button Click this button to create a new Display
Station line in the box below.
Display Station
column
Select the Display Station here. If there is a
connection to the Kitchen Service, the drop-
down list will show the available stations.
Screen column If there are more than one screen/monitor
connected to the computer, choose the
screen number here. If you leave these
fields blank, the Display Station will use the
screen number value from the Display Sta-
tion configuration in the LSCentral setup. If
you enter a value in these fields, it will over-
ride the value in the LSCentral setup.
Log link Click to open the log file for the Display Sta-
tion in this line. This comes in handy if you
need to examine the Display Station log file.
Delete link Click to delete the Display Station from the
40 LSCentral 24.1 Installation Guide
Kitchen Display System Installation

Pharmacies Installation
configuration.
2. When the configuration is done, click Save in the top menu to
save the configuration and create or update the desktop shortcut
for starting the Display Stations.
3. Double-click the Start Display Stations shortcut to start up all the
stations in the configuration file.
Tip:If something goes wrong, start the Display Station Utility and
examine the Utility log and the logs for the Display Stations.
Pharmacies Installation
The Pharmacies module comes with demo data that can be
imported.The demo data is in configuration packages that you must
import and apply.
Before importing the configuration packages, you must run the fol-
lowing administration tasks (setup tasks).
LSCentral
l
Start by setting up LSCentral, for example by importing the con-
figuration packages.
Pharmacies administration tasks
1. Save the Pharmacies Web Templates to your local drive.
2.
Click the icon, enter Pharmacy Administration Tasks, and
select the relevant link.
3. Run the following tasks to register the Pharmacies module, includ-
LSCentral 24.1 Installation Guide 41

ing importing the web templates:
Note:The (Dose) Dispense Module is optional.
Pharmacies configuration packages
Import and apply the pharmacy configuration packages provided in the
release. The packages must be imported and applied in this order:
1. Package LSPH_0
2. Package LSPH_BASE
3. Package LSPH_DISPENSE (optional).
Role center
l
Create and open a role center for Pharmacies (Page = 10015410).
l
Optionally, create a role center for Dispense (Page = 10015650).
User setup
1. From the Pharmacies role center, open Pharmacy Users (Setup -
Other Setup - Users).
2. Change User
121
to your Windows User.
3. Link the user to Store
S0015
and POS
P0073
.
4. Make sure your Retail User is linked to the same store and POS
and is a POS Super User.
POS button
To be able to use the Pharmacies module in the LSCentral POS, create
a new button or change an existing one as shown below:
42 LSCentral 24.1 Installation Guide
Pharmacies Installation

Pharmacies Installation
Setting Up a Demo Prescription
The Pharmacies system can be set up using configuration packages
and administration tasks.
To process a prescription for demo or testing
1. Set up the system using configuration packages and admin-
istration tasks.
2. Create a paper prescription.
Optional: Convert the paper prescription to e-prescription using
the Upload action in the Prescription Order page.
3. Confirm and pick the prescription.
4. Open Final Control, approve the prescription, and take to POS for
payment.
5. Pay on the POS.
6. Post from the Role Center.
To create a paper prescription
1. Open the POS, and login as user
1501
.
2. Start the prescription process from the POS, and find customer
1000
. Select
Know customer option
as identification.
LSCentral 24.1 Installation Guide 43

3. Press Add manual prescription – Paper.
4. Register the following information on the prescription:
l
Issuer 1010
l
Issued Pharmacy Item no. 706300
l
Dose Text 1x1 (shortcut for 1 tablet daily).
5. Close the prescription page and the order overview page that fol-
lows.
Prescription details
Here the pharmacist or employee reviews that everything is in order,
confirms the prescription and picks the items (usually by scanning the
packs). Optionally, the pharmacist can do a substitution.
1. Confirm the prescription. This reserves inventory and locks the
line.
2. Pick the line by pressing the Barcode control button, and type in
the item number (706300).
3. Press Final Control.
Final Control
Here a pharmacist needs to approve what is being handed out to the
customer. This is usually done by approving the prescription and the
44 LSCentral 24.1 Installation Guide
Pharmacies Installation

Pharmacies Installation
order.
1. Press Approve. This approves the line.
2. Press To POS to pay for the prescription order. This approves the
whole order and sends to the POS.
3. In the POS, take a payment like normally.
Posting
The prescription is usually posted from a scheduler job when it has
been paid. Manual posting can be done from the pharmacy role center.
LSCentral 24.1 Installation Guide 45

46 LSCentral 24.1 Installation Guide
Pharmacies Installation
This page is intentionally left blank to ensure new chapters start
on right (odd number) pages.
