
Operation Manual
© 2020 ZOOM CORPORATION
Copying or reproduction of this document in whole or in part without permission is prohibited.
Proper display is not possible on grayscale devices.
Version 3.0
for Android™

2
Contents
Introduction ······································································································································ 3
Copyrights ········································································································································ 3
Main Screen ····································································································································· 4
Landscape mode ····················································································································· 5
Recording ········································································································································· 6
Pausing recording ···················································································································· 6
Adjusting the recording level ··································································································· 7
Setting the recording format ··································································································· 7
Muting the input ······················································································································ 8
Adding recordings (landscape mode only) ··············································································· 9
Using mid-side recording (Am7 only feature) ·········································································11
Setting mid-side monitoring ···································································································11
Playback ·········································································································································· 12
Selecting and playing les ····································································································· 12
Pausing playback ··················································································································· 13
Playing les from the FILE screen ························································································· 13
Adjusting the playback level ·································································································· 14
Repeating playback of an interval ·························································································· 14
Editing and deleting les ················································································································ 15
Dividing les (landscape mode only) ····················································································· 15
Deleting le beginnings/ends (landscape mode only) ··························································· 16
Deleting les ························································································································· 18
Deleting all les ····················································································································· 19
Using effects ·································································································································· 20
Effect settings ······················································································································· 22
Enabling direct monitoring (Am7 only feature) ··············································································· 23
Using AUTO REC ···························································································································· 24
Turning the AUTO REC function ON/OFF ·············································································· 25
Setting the START LEVEL ······································································································ 25
Turning the AUTO STOP function ON/OFF ············································································ 26
Setting the STOP LEVEL ······································································································· 27
Sharing recorded les ····················································································································· 28
Sharing les from the FILE screen ························································································ 29
Changing the name of a shared le ······················································································ 29
Changing sharing settings ····································································································· 30
Updating Am7 rmware ················································································································· 31
Locking the controls ······················································································································· 32
Other options ·································································································································· 33
Swapping left and right input channels ·················································································· 33
Restoring default settings ····································································································· 33

3
Introduction
Handy Recorder is a high-performance PCM/AAC recording application that runs on
Android. Use it together with ZOOM Am7 stereo mic for Android devices (hereaf-
ter, Am7) for high-quality stereo recording. In addition, you can use this app to play
back and edit recorded les, to apply reverb and other effects to them and to share
them. This app can also start and stop recording automatically in response to the
input audio level.
Copyrights
Android is a trademark of Google LLC.
Note: Other product names, registered trademarks and company names in this
document are the property of their respective companies.
All trademarks and registered trademarks in this document are for identication
purposes only and are not intended to infringe on the copyrights of their respective
owners.
Recording from copyrighted sources, including CDs, records, tapes, live perfor-
mances, video works and broadcasts, without permission of the copyright holder
for any purpose other than personal use is prohibited by law. Zoom Corporation will
not assume any responsibility related to infringements of copyrights.

4
Main Screen
When you start Handy Recorder, the Main Screen appears.
Stereo width adjuster
This adjusts the stereo
width of mid-side record-
ing les during playback.
(
P11)
Mid-side file playback
Information display
This shows whether the app is recording, playing back,
stopped or paused.
This shows the current playback/recording time.
This shows the input status. ( P8)
This shows the width setting. If Am7 is connected, 90º,
120º or M-S will appear.
This shows the current recording format. ( P7)
This shows the remaining possible recording time on
the Android device using the current format.
This shows the name of the le that is being recorded
or played back.
This shows the playback levels when a le is playing
back. Otherwise, it shows the current input levels.
This shows the waveform of the current le. It will be
blank if there is no recorded le.
Controls
Rotate button
Touch to switch to landscape mode.
Stop button
Touch when playing back or recording to stop.
Touch when stopped to move the playback position to
the beginning of the le.
Play button
Touch to start playing a recorded le. ( P12)
Record button
Touch to start recording. ( P6)
FF/REW buttons
Touch to change the current le. Hold during playback to
search backward/forward. These do not function when
recording or when there is no playback le.
Lock slider
Lock to disable the Handy Recorder buttons.
Unlock to enable use of the buttons. (
P32)
Volume adjustment bar
Use to adjust the output volume. (This only appears
when Am7 is connected.) When it appears, the Android
device volume buttons are disabled.
Menu buttons
EFFECT
Use effects on recorded les. ( P20)
SHARE
Share recorded les. ( P28)
FILE
Manage and edit recorded les.
MENU
Access automatic recording and other settings.
(
P23–27)

5
This shows the waveform of the se-
lected le. If the le was recorded with
left and right channels, the average value
of the two channels will be shown. If
the le was recorded in MS-RAW mode,
only the mid (M) waveform will be
shown. This area will be blank if there is
no recorded le.
Selected interval
ending point
Selected interval
starting point
This shows the current playback position of the le playing.
Slide it to a point to play back from there.
Waveform display
Landscape mode
Press the rotate button to change to landscape mode.
Indicators
This shows whether the app is recording, playing back,
stopped or paused.
This shows the current playback/recording time.
This shows the playback levels when a le is playing
back. Otherwise, it shows the current input levels.
This shows the waveform of the current le. If the le
was recorded in stereo, two waveforms will be shown.
The waveforms for les recorded with left and right
channels will be shown with the left channel above
and the right channel below. The waveforms for les
recorded in MS-RAW mode will be shown with the
mid (M) channel above and the side (S) channel below.
Pinch out/in along the time axis to zoom in/out on the
waveform.
This shows the current playback position of the le.
Drag this start locator to set the interval starting point.
Drag this end locator to set the interval ending point.
This shows how much of the entire le is being shown
in the waveform display area above. Pinch out/in along
the waveform time axis to zoom in/out on the le. The
light blue interval is being shown above, while the dark
blue parts are not being shown. The red line shows the
current playback position, and the yellow lines show the
starting and ending points of the selected interval.
Buttons
Stop
Touch when playing back or recording to stop.
Touch when stopped to move the playback position to
the beginning of the le.
Play
Touch to start playing a recorded le. ( P12)
FF/REW
Move the playback position forward or backward one
second. Hold during playback to search backward/for-
ward. These do not function when recording or when
there is no playback le.
Record
Touch to start recording. ( P6)
Recording mode
Touch to change the recording mode. ( P9)
UNDO
Use to undo an additional recording. After a recording is
added, it will appear lit. If used to undo, it will become
unlit again. (
P9)
Edit
Divide at the selected position or erase the selected
interval. (
P15)
Rotate button
Touch to switch to portrait mode.

6
Recording
Follow these steps to use the recording functions of the app.
Recording
2
1
1.
Touch
During recording, becomes red.
2.
Touch
Recording stops.
Pausing recording
NOTE
•ByconnectingheadphonestoAm7,youcan
listen to audio while it is recorded.
•Turndirectmonitoringontolistentoaudioasit
is recorded without any time lag. (
P23)
•Whenusinglandscapemode,conrmthatthe
recording mode is “New Rec” before starting a
new recording.
1, 2
Paused
1.
Touch during recording
When paused, blinks red.
2.
Touch again
Recording starts again.

7
Adjusting the recording level
Use the MIC GAIN control on Am7 to adjust the recording level.
Setting the recording format
1
3
2
1.
Touch
2.
Touch REC FORMAT
3.
Select the recording format
The default setting is WAV.
The options are WAV, AAC64kbps, AAC128kbps and AAC160kbps.
WAV format Use to record with better audio quality.
AAC format This lowers audio quality but also reduces le sizes, conserving
storage space on the Android device.
NOTE
•WhenusingtheWAVformat,iftherecordinglesizeexceeds2GB,anewrecordingwill
be created automatically. When the new le is created, recording will continue without
anygap.WhenusingtheAACformat,iftherecordinglesizeexceeds400MB,anewle
will be created in the same manner.
•Audiosamplingfreqency=48kHz
8
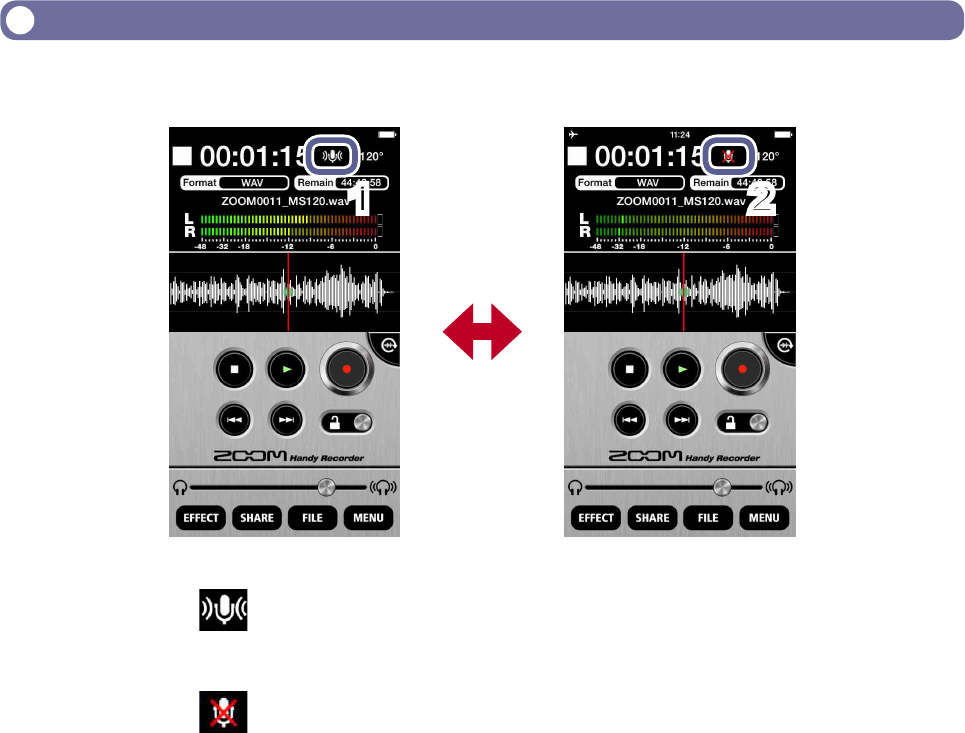
Muting the input
Follow these procedures to mute the input.
21
1.
Touch
This mutes the input.
2.
Touch
This unmutes the input.

9
Adding recordings (landscape mode only)
Landscape mode only
You can start recording to an already recorded le from any point you like. Additional
recordings can overwrite, overdub or be inserted into already recorded les.
3
4
567
1.
Select a file on the Main Screen or the FILE screen ( P12)
2.
Touch
The screen switches to landscape mode.
3.
Check the recording format
If you want to record in standard stereo, conrm that the LR indicator appears between the
time and the level meters.
If you want to record in mid-side mode, conrm that the MS indicator appears between the
time and the level meters. ( P11)
NOTE
•DonotaddMSrecordingstoalreadyrecordedstereolesorstereorecordingstoalready
recorded MS les.
•DonotaddstereoLRorMSrecordingstoalreadyrecordedmonolesormonorecord-
ings to already recorded stereo LR or MS les.
4.
Slide to the point where you want to start additional recording
5.
Touch New Rec and set the recording mode to Overdub,
Overwrite or Insert
Overdub This replaces the original recording with the new recording.
Overwrite This combines the original recording with the new recording.
Insert This inserts the new recording into the original recording.
NOTE
•IftherecordingmodeissettoNew Rec, a new le will be recorded.

10
6.
Touch
Additional recording starts.
7.
Touch
Additional recording stops. The waveform of this additional recording is shown in red.
8.
Touch to undo this additional recording
This reverts the recording to the state before this additional recording was made.
NOTE
•Ifmultipleadditionalrecordingshavebeenmade,onlythemostrecentadditional
recording can be undone.
•Additionalrecordingscannotbeundoneaftertheyhavebeensaved.Additionalrecord-
ings are saved whenever a le is divided, trimmed or shared, a le with an effect applied
is saved, a new recording le is created, a different le is selected or Handy Recorder is
closed.
•WhenusingtheOverwrite and Overdub functions, you can set the interval of the addi-
tional recording. To set this interval, slide the start locator to the starting point and the end
locator to the ending point.
When using Overwrite, the le will be overwritten until the ending point of the selected
interval where additional recording will stop automatically.
When using Overdub, the le will be overwritten until the ending point of the selected
interval, and then recording will automatically continue from the starting point, allowing
repeated overdubbing.
•Therecordingformatusedtosaveanadditionalrecordingisthesameasthatofthe
originally recorded le.

11
Using mid-side recording (Am7 only feature)
Am7 only feature
This app can be used for mid-side recording. To use this function, connect Am7 and
set its stereo width switch to M-S.
1.
Touch
2.
Touch
Recording starts.
NOTE
•Whenyouplayalethatwasrecordedinmid-side
mode, a stereo width adjustment control appears.
Slide this to set the stereo width of the audio during
playback.
Input level meters change
from L/R to M/S
1
2
M-S appears
Setting mid-side monitoring
Set the type of monitoring to use when mid-side recording.
1.
Touch
2.
Touch M-S MONITOR
3.
Touch STEREO or M-S
When set to M-S, the mid mic can be monitored through the
left channel and the side mic through the right channel.
4.
Touch
The Main Screen reopens.
NOTE
•Whendirectmonitoringison,theM-SMONITOR
setting has no effect on the audio heard through Am7.
The output will be as though set to M-S.
3
1, 4
2

12
Playback
Follow these steps to play back recorded les.
Selecting and playing files
3
1
2
Slide to adjust the output volume
•Lefttolower
•Righttoraise
(Only appears when Am7 is con-
nected)
Playing
NOTE
•Thevolumesetwiththe
volume control bar is stored
in Am7 itself and will be
applied when Am7 is used
with other applications.
1.
On the Main Screen, use / to show the file you want to play
2.
Touch
Playback starts. During playback, lights green.
Current le playback time
Current le playback position
Place this at a point to play back
from there.
Name of le playing
3.
Touch
Playback stops.
NOTE
•Youcanchangethescreentolandscapemodeduringleplayback.
•Inlandscapemode,youcanselecttheplaybackinterval.
•Inlandscapemode,youcannotselectles.

13
Pausing playback
1.
During playback, touch
When paused, blinks green.
2.
Touch again
Playback starts again.
NOTE
•Pausingworksthesamewayinlandscapemode.
Touch
.
Playing files from the FILE screen
3
1
Scrolling up and
down is possible.
The les appear in
order of age, with the
oldest le at the top of
the list.
2
1.
Touch
2.
Touch the file name on the FILE screen
The selected le is highlighted blue.
3.
Touch
During playback, appears green.
1, 2
Paused

14
Adjusting the playback level
When using Am7, slide the volume control.
When not using Am7, use the Android device volume buttons.
Repeating playback of an interval
You can repeat playback between two set points. These points can only be set when
in landscape mode.
3 4
56
1.
Select a file from the Main Screen or the FILE screen ( P12)
2.
Touch
The screen switches to landscape mode.
3.
Slide the start locator to the starting point
This sets the starting point of the interval that will be played back repeatedly.
4.
Slide the end locator to the ending point
This sets the ending point of the interval that will be played back repeatedly.
5.
Touch
Repeat playback of the set interval starts.
6.
Touch
Repeat playback stops.
NOTE
•Youcanevensetthetwopointswhiletheleisplaying.

15
Editing and deleting files
The app can be used to divide and delete recorded les, as well as to trim (delete)
their beginnings and ends.
Dividing files (landscape mode only)
Landscape mode only
You can divide a recorded le into two parts. This function can only be used in land-
scape mode.
3 3
5
4
6
7
1.
Select a file from the Main Screen or the FILE screen ( P12)
2.
Touch
The screen switches to landscape mode.
3.
Slide the start or end locator to where you want to divide the file
NOTE
•Youcanalsoplayaletoconrmthedivisionpoint.
4.
Touch
A ”Choose edit.” message appears.
5.
Touch “Divide at START” or “Divide at END”
A ”Save as new le?” message appears.

16
6.
Touch New, Overwrite or Cancel
A “Now Processing” message appears.
When le division completes, “Complete!” appears.
New Create divided les and also save the original le.
Overwrite Create divided les and delete the original le.
Cancel Cancel division.
7.
Touch OK
NOTE
•Duringdivision,donotturnofftheAndroiddeviceorquitHandyRecorder.Doingsocould
cause loss of data.
•Therstpartofthedividedleissavedwith“A”addedtotheendoftheoriginalle
name,andthesecondpartissavedwith“B”addedtotheendoftheoriginalname.
Deleting file beginnings/ends (landscape mode only)
Landscape mode only
You can delete (trim) unwanted beginnings and endings of les. This function can
only be used in landscape mode.
3 4
6
5
7
8
1.
Select a file from the Main Screen or the FILE screen ( P12)
2.
Touch
The screen switches to landscape mode.
3.
Slide the start locator to the interval starting point

17
4.
Slide the start locator to the interval ending point
5.
Touch to trim the file to the selected interval
A “Choose edit.” message appears:
6.
Touch “Trim between START and END”
A “Save as new le?” message appears.
When trimming completes, “Complete!” appears.
7.
Touch New, Overwrite or Cancel
A “Now Processing” message appears.
When trimming completes, “Complete!” appears.
New Create trimmed le and also save the original le.
Overwrite Create trimmed le and delete the original le.
Cancel Cancel trimming.
8.
Touch OK

18
Deleting files
The app can be used to delete recorded les.
1
6
5
2
3
4
1.
Touch
2.
Touch
A screen opens where you can select les to delete.
3.
Touch the names of files that you want to delete
marks appear next to the names of selected les. You can select multiple les.

19
4.
Touch
A conrmation message appears:
“Delete File? This will delete the selected le(s). It cannot be undone!”
5.
Touch “Delete”
The FILE Screen reappears after deletion completes.
6.
Touch
The Main Screen reopens.
Deleting all files
You can delete all the les in the app at the same time.
21
1.
Touch on the file deletion selection screen
This selects all the les.
2.
Touch
A conrmation message appears:
“Delete les? This will delete the selected les. It cannot be undone!”
3.
Touch “Delete”
All the les are deleted.


21
5.
Touch on the effect setting screen
6.
Touch “Save with EFFECT/NORMALIZE”
7.
On the “Save as new file?” message, touch New, Overwrite or
Cancel to select how the file is saved
New The original le is not changed. A new le is created with the effect applied.
The new le is saved and named with the newest number.
Overwrite The original le is overwritten with the effect applied.
Cancel No le is created with the effect applied.
8.
To optimize the file volume, touch YES on the “Normalize file?”
message
When normalization completes, “Complete!” appears.
Touch CANCEL to save the le without optimizing the volume.
NOTE
•Whilesavingale,donotturnofftheAndroiddeviceorquitHandyRecorder.Doingso
could cause loss of data.
9.
Touch
The Main Screen reopens.
NOTE
•Aftermakingeffectsettings,youcanplaybacktheletoheartheaffectedaudio.
•Effectsettingsareappliedtoaudioplayback.Theyarenotappliedtoinputaudio.
22
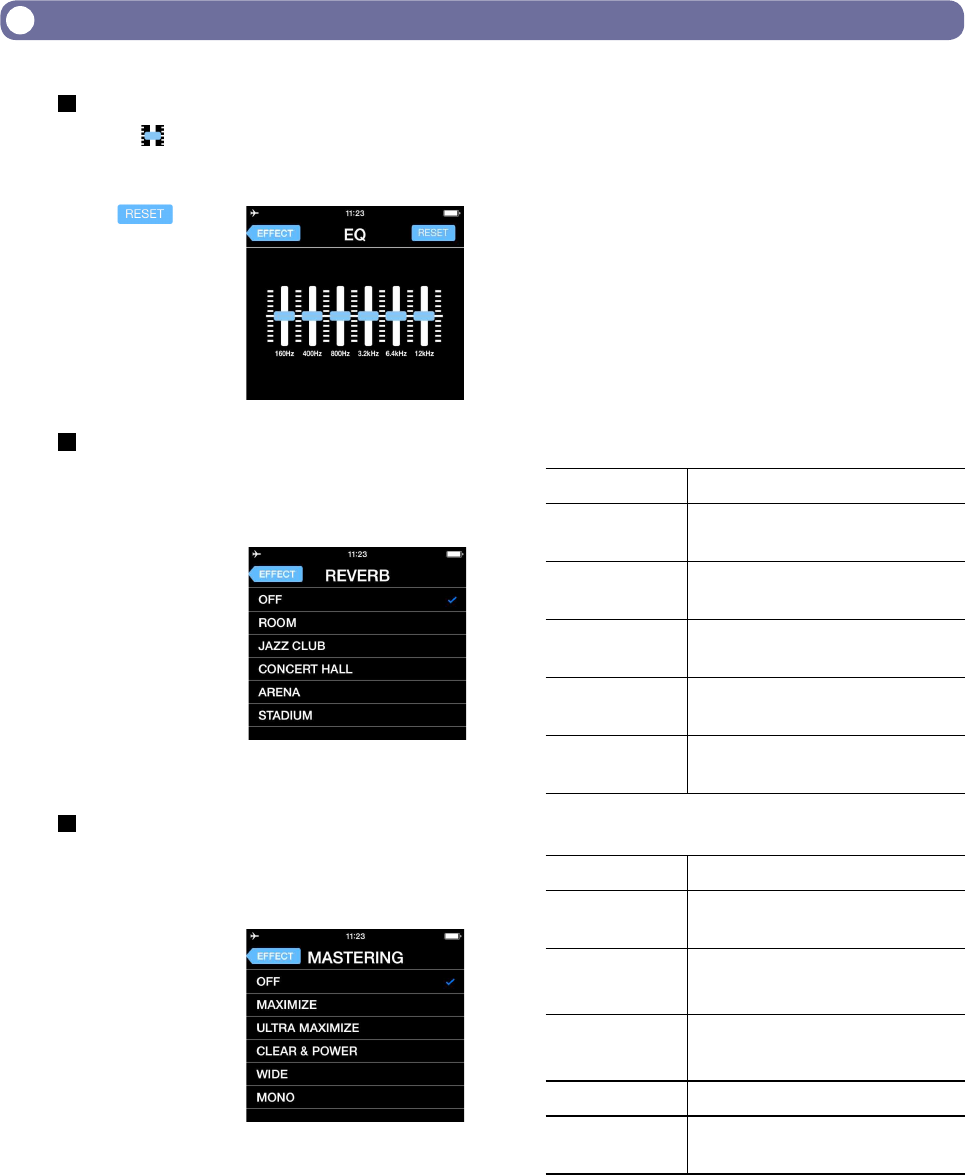
Effect settings
EQ (adjust/correct sound quality)
Slide the faders on the frequency bands
(160Hz/400Hz/800Hz/3.2kHz/6.4kHz/12kHz) to
adjust the sound quality.
Touch
to
restore sound to its
at state (no EQ).
REVERB
OFF Off
ROOM Simulates the reverberations of a
room
JAZZ CLUB
Simulates the reverberations of a
jazz club
CONCERT
HALL
Simulates the reverberations of a
concert hall
ARENA
Simulates the reverberations of an
arena
STADIUM
Simulates the reverberations of a
domed stadium
MASTERING
OFF Off
MAXIMIZE Evens the volume level with soft
compression
ULTRA
MAXIMIZE
Evens the volume level with
strong compression
CLEAR &
POWER
Emphasizes mid frequencies
with compression
WIDE Emphasizes stereo elements
MONO Centers all sound dispersed to
the left or right
REVERB (add sound reverberations)
This is OFF by default.
Touch ROOM, JAZZ CLUB, CONCERT HALL,
ARENA or STADIUM.
MASTERING (increase impact)
This is OFF by default.
Touch MAXIMIZE, ULTRA MAXIMIZE,
CLEAR & POWER, WIDE or MONO.

23
Enabling direct monitoring
(Am7 only feature)
Am7 only feature
Sound can be output directly from the mic for monitoring without any time lag.
1 4
3
2
1.
Touch
2.
Touch DIRECT MONITOR
3.
Touch ON or OFF
4.
Touch
The Main Screen reopens.
NOTE
•ThedirectmonitoringsettinghasnoeffectwhenusingAm7withanyappotherthan
Handy Recorder.
•Whendirectmonitoringison,youwillabletomonitorsoundsinputthroughthemiceven
when a le is playing back.
•Whendirectmonitoringison,theM-SMONITORsettinghasnoeffectontheaudioheard
through Am7. The output will be as though set to M-S.

24
Using AUTO REC
The AUTO REC function can be set to start and stop recording automatically.
1
4
3
2
5
1.
Touch
2.
Touch AUTO REC
You can turn automatic recording ON/OFF and set its start level and stop conditions.
3.
Touch ON/OFF, START LEVEL or AUTO STOP
See P25–27 for how to make each setting.
4.
Touch
The Main Screen reopens.
5.
Touch
Recording will start automatically when the input level exceeds the START LEVEL.

25
Turning the AUTO REC function ON/OFF
1
2
1.
Touch ON/OFF on the AUTO REC screen
2.
Touch ON or OFF
When set to ON, “AUTO” will appear on the Record button.
Setting the START LEVEL
Set the level that causes automatic recording to start.
1
This shows the adjusted
level value
2
Slide to adjust the level
•Lefttolower
•Righttoraise
1.
Touch START LEVEL on the AUTO REC screen
2.
Slide to adjust the automatic recording start level
Youcansetthislevelbetween–48dBand0dB.Thedefaultsettingis–24dB.

26
Turning the AUTO STOP function ON/OFF
Set the number of seconds until automatic recording stops after the level goes below
the set STOP LEVEL.
1
2
3
4
1.
Touch AUTO STOP on the AUTO REC screen
2.
Touch ON/OFF
3.
Touch the number of seconds until automatic recording stops
4.
Touch
The AUTO STOP screen reopens.

27
Setting the STOP LEVEL
Set the level at which automatic recording stops.
1
2
3
4
1.
Touch AUTO STOP on the AUTO REC screen
2.
Touch STOP LEVEL
3.
Slide to adjust the automatic recording stop level
Youcansetthislevelbetween–48dBand0dB.Thedefaultsettingis–24dB.
4.
Touch
The AUTO STOP screen reopens.

28
Sharing recorded files
You can share the recorded le using the Android device’s le sharing function.
1
4
3
2
1.
Load the file on the Main Screen ( P12)
NOTE
•Ifanintervalisselected,thelewillbetrimmedtothatintervalbeforebeinguploaded.
2.
Touch
3.
Touch
4.
Operate the Android device’s file sharing function to share the
file.

29
Sharing files from the FILE screen
1.
Select the file you want to upload on the
FILE screen (
P13)
2.
Touch
The SHARE screen opens. See P28 for additional steps.
1
2
Changing the name of a shared file
1.
Touch on the
SHARE screen
“Enter New File name”
appears.
2.
Input the file name
3.
Touch RENAME
The le name is changed.
2
3
1

30
Changing sharing settings
1.
Touch on the
SHARE screen
The SETTING screen
appears.
2.
Touch M-S >>
STEREO ENCODE,
WAV >> AAC
ENCODE or EMAIL
LIMIT
3.
Change the setting
1
2,3
M-S >>
STEREO ENCODE
Set whether mid-side recording les are converted to stereo before uploading
(ON/OFF).
During conversion, the stereo width adjustment setting is used. (
P11)
WAV >>
AAC ENCODE
Set whether WAV format les are converted to AAC format before uploading
(OFF/64kbps/128kbps/160kbps).
EMAIL LIMIT
Set the maximum size of les attached to email (1–25MB).
NOTE
•TheEMAIL LIMIT setting is only for email.

31
Updating Am7 firmware
Connect Am7 to update its rmware to the latest versions.
2
1
3
Currentversion=>
Version after update
4
1.
Touch
2.
Scroll down the MENU, and touch FIRMWARE UPDATE
If Am7 is connected properly, the current version and the latest version will be shown.
NOTE
•If“Unsupportedfunction.”appears,Am7isnotconnectedproperly.

32
3.
Touch
4.
When “Version Update?” appears, touch Continue
Touch Cancel to stop the update.
NOTE
•Duringarmwareupdate,donotdisconnectAm7fromtheAndroiddeviceorquitHandy
Recorder.
•Whenupdatingthermware,useoftheAndroiddevice’sphoneoralarmfunctionscould
cause the update to fail and the Android to become unstartable. When updating, always
put the Android device into Airplane Mode and turn off any alarms.
•Beforestartingarmwareupdate,conrmthattheAndroiddevicehasenoughremaining
battery power.
Locking the controls
You can disable the Handy Recorder controls by activating the lock.
1.
Slide left
This locks the controls.
2.
Slide right
This unlocks the controls.
NOTE
•Landscapemodecannotbe
used when locked.
1 2

ZOOM CORPORATION
4-4-3 Kanda-surugadai, Chiyoda-ku, Tokyo 101-0062 Japan
zoomcorp.com
Z2I-4182-01
Other options
Swapping left and right input channels
Am7 only feature
The left and right channels can be swapped when using Am7. Use this function when
the left and right channels of Am7 are actually reversed, such as when using the built-
in camera of the Android device to record video.
1.
Touch
The MENU screen opens.
2.
Touch L/R SWAP
The L/R SWAP screen opens.
3.
Touch ON or OFF
Turn ON to swap the left and right channels of Am7. The default value is OFF.
The L/R SWAP setting made with Handy Recorder is stored in Am7, so the setting will also be
applied when using Am7 with other apps.
Restoring default settings
You can restore Handy Recorder to its default settings.
1.
Touch
The MENU screen opens.
2.
Touch RESET
A “Reset all Handy Recorder settings? It cannot be undone!” message appears.
Touch Reset to restore the default settings, or touch Cancel to keep the current settings.
When resetting nishes, “Complete!” appears.
System requirements: Android 9.0 or later
