
Installation Guide | PUBLIC
Document Version: 1.0 – 2020-12-04
Common Installation Guide for SAP Customer
Activity Repository applications bundle 5.0
© 2020 SAP SE or an SAP aliate company. All rights reserved.
THE BEST RUN
Content
1 How to Use this Common Installation Guide........................................5
1.1 Naming Conventions...........................................................7
1.2 Information Available on SAP Help Portal............................................10
2 Plan your System........................................................... 13
2.1 System Landscape...........................................................14
2.2 Deployment Options..........................................................16
2.3 Integration with Source Master Data Systems........................................17
3 Install the Prerequisites......................................................19
4 Prepare the Installation......................................................30
4.1 Implement SAP Notes for the Installation...........................................30
4.2 Verify SAP HANA Users and Privileges............................................. 49
4.3 Verify Correct Schema Mapping..................................................54
4.4 Generate Time Data for Gregorian Calendar......................................... 58
4.5 Congure AFL Usage..........................................................59
Enable Usage of PAL Functions (SAP Assortment Planning)............................60
Check the OFL Installation................................................... 61
4.6 Migrate to New Default Table for Sales Pricing Data (/DMF/PRC).......................... 62
5 Install the Software.........................................................63
5.1 Verify Prerequisites and SAP Notes (Pre-Installation)...................................63
5.2 Install ABAP Back-End Server...................................................64
Download and Install SAP RTL AFL FOR SAP HANA (Mandatory)...................... 65
Download and Install SAP XRP AFL (Only for SAP Replenishment Planning)................68
Install SAP CARAB Back-End Product Version......................................71
Set Up SAP Client......................................................... 73
5.3 Install ABAP Front-End Server...................................................76
Verify Installation of SAP Gateway Foundation..................................... 77
Verify Installation of Central SAP Fiori UI Component................................ 78
Install SAP FIORI FOR SAP CARAB Front-End Product Version........................79
5.4 Verify SAP Notes and RINs (Post-Installation)........................................ 81
6 Set Up the Applications......................................................83
6.1 SAP Customer Activity Repository................................................83
Core (Mandatory for All Applications)...........................................83
Advanced (Optional).......................................................119
2
PUBLIC
Common Installation Guide for SAP Customer Activity Repository applications bundle 5.0
Content
Troubleshooting..........................................................207
6.2 SAP Merchandise Planning ....................................................226
Perform Core Steps for SAP Customer Activity Repository............................226
Congure SAP Merchandise Planning..........................................226
Verify the Connection Between the SAP Merchandise Planning System and SAP Analysis for
Microsoft Oce..........................................................231
Activate SAP Merchandise Planning Omnichannel BI Planning Framework Content.......... 231
Congure Data Replication Steps............................................. 268
Create Market Hierarchy....................................................275
Specify Analysis Workbook Settings........................................... 275
6.3 SAP Assortment Planning.....................................................277
Perform Core Steps for SAP Customer Activity Repository............................278
Congure Assortment Planning...............................................278
Maintain Fiscal Year Variant for Retail Week...................................... 279
Maintain Fiscal Year Variant for Month..........................................281
Generate Time Data - Fiscal Calendar.......................................... 283
Activate Planning Framework Content (SAP Assortment Planning)......................284
Congure Data Replication..................................................293
Run the Validation Report...................................................293
Congure Front-End.......................................................294
Additional Information for Retail SAP BW Structure................................ 299
6.4 SAP Promotion Management...................................................303
Perform Core Steps for SAP Customer Activity Repository........................... 304
Activate Internet Communication Framework (ICF) Services..........................304
6.5 SAP Allocation Management...................................................304
Perform Core Steps for SAP Customer Activity Repository........................... 305
Activate SAP HANA Content for SAP Allocation Management .........................305
Check Procedure Associated with Function GENIOS_SOLVE Is Active....................309
Congure SAP Allocation Management......................................... 310
Congure Data Replication.................................................. 311
Congure Front End.......................................................315
Implement BAdI for Real-Time Inventory.........................................317
6.6 SAP Replenishment Planning...................................................317
Perform Core Steps for SAP Customer Activity Repository............................318
Implement SAP Notes for the Integration of SAP Replenishment Planning with SAP ERP or
SAP S/4HANA...........................................................318
Specify RFC Destinations for Source Master Data Systems........................... 319
Enable the Use of Scheduling Groups...........................................319
Set Up SAP Fiori Apps for SAP Replenishment Planning............................. 320
Set Up Database Roles and Authorizations.......................................343
Set Up Back-End Roles and Authorizations.......................................344
Common Installation Guide for SAP Customer Activity Repository applications bundle 5.0
Content
PUBLIC 3
Set Up Authorizations for Transfer of Order Plan Items to Source Master Data System........349
Perform Conguration Steps in SAP Customer Activity Repository......................350
Congure SAP Replenishment Planning.........................................351
Dene the Parameterization Proles and the Assignment............................ 353
Congure Exception Management.............................................354
Set Up Real-Time Inventory Integration.........................................356
6.7 Congure Access to Documentation Provided on SAP Help Portal (Optional for All Applications)
........................................................................357
6.8 Enable In-App Help (Web Assistant)..............................................359
Install and Congure SAP Web Dispatcher.......................................360
Set Up the In-App Help (Web Assistant) Plugin....................................362
4 PUBLIC
Common Installation Guide for SAP Customer Activity Repository applications bundle 5.0
Content

1 How to Use this Common Installation
Guide
This guide describes how to install and set up the applications included in SAP Customer Activity Repository
applications bundle 5.0. Learn what applications are included in this release, and get an overview of the main
installation steps.
Applications in this Release (Functional View)
Caution
If you already have an existing installation of any of these applications, you must perform a software
upgrade rather than a new installation. In this case, see the Common Upgrade Guide for this release at
https://help.sap.com/viewer/p/CARAB.
Functionally, SAP Customer Activity Repository applications bundle 5.0 includes the following applications:
● SAP Customer Activity Repository 5.0
● SAP Merchandise Planning 5.0
● SAP Assortment Planning 5.0
● SAP Promotion Management 5.0
● SAP Allocation Management 5.0
● SAP Replenishment Planning 5.0
Product Documentation
You can nd this guide and all product documentation for these applications on SAP Help Portal for SAP
Customer Activity Repository applications bundle at https://help.sap.com/viewer/p/CARAB.
Note
You can set up your back-end system to consume documentation directly from SAP Help Portal. For more
information, see Congure Access to Documentation Provided on SAP Help Portal (Optional for All
Applications) [page 357].
What to Install (Technical View)
Technically, SAP Customer Activity Repository applications bundle 5.0 is delivered in the form of two installable
product versions, one for the back-end and one for the front-end.
Common Installation Guide for SAP Customer Activity Repository applications bundle 5.0
How to Use this Common Installation Guide
PUBLIC 5

Product Versions for this Release Purpose
SAP CARAB 5.0 Back-end product version
Contains several software components that provide the ABAP
back-end functionality and the business content for all the appli
cations in SAP Customer Activity Repository applications bundle
5.0. For example, this includes SAP HANA views and SQLScript
procedures, local BI Content, application function libraries, and
workbooks, where applicable.
SAP FIORI FOR SAP CARAB 5.0 Front-end product version
Contains one software component that includes the SAP Fiori
apps for the applications in SAP Customer Activity Repository
applications bundle 5.0. This product version is also referred to as
the product-specic SAP Fiori UI component.
Installation at a Glance
This guide leads you through the following main activities:
1. First you prepare the installation. Here you ensure that the technical prerequisites are installed. You also
implement mandatory corrections, verify authorizations, and do other preparatory tasks. These steps are
described in section Install the Prerequisites [page 19] and section Prepare the Installation [page 30].
2. Then you install the back-end product version and the front-end product version. These steps are
described in section Install the Software [page 63]. You must do these steps regardless of the application
that you want to set up later on.
3. Now you can set up the desired applications. These steps are described in section Set Up the Applications
[page 83]. First you must do the general setup steps in section Core (Mandatory for All Applications)
[page 83]. You must do these core steps regardless of the application that you want to set up. After the
core steps, you only need to do the steps that are required for your application. You do not need to read
sections that do not apply to your application.
Tip
Get Notied of SAP Note Updates
This guide references several SAP Notes that are regularly updated with new information. If a note is
particularly relevant for your scenario and you want to be informed of updates, you can easily set up email
notications. See SAP Note 2478289 (How to get notications for SAP Notes or KBAs).
Tip
Get SAP Universal ID for Easy Login
With an SAP Universal ID, you get a single user login and prole. You are able to log in once to gain access to
all of your authorized SAP platforms and applications.
SAP Universal ID is a free service oered by SAP which requires no software installation. For more
information, see https://discover.sap.com/universalid/en-us/about.html .
6
PUBLIC
Common Installation Guide for SAP Customer Activity Repository applications bundle 5.0
How to Use this Common Installation Guide

1.1 Naming Conventions
This section explains important terms used in this guide. It also explains the meaning of important variables
(for example, SAPHANADB). Additionally, you get an overview of naming dierences that exist between the
consuming applications.
Important Terms
Term Denition
Common Installation Guide
Common Upgrade Guide
These two common guides are your entry points for all the applications and scenarios in
cluded in SAP Customer Activity Repository applications bundle. Use the Common Installa
tion Guide if you wish to do a completely new installation. Use the Common Upgrade Guide
if you wish to upgrade from a lower release.
You can nd both guides on SAP Help Portal at https://help.sap.com/viewer/p/CARAB un
der Implement.
consuming application An application consuming data from SAP Customer Activity Repository.
Examples:
● SAP Allocation Management
● SAP Assortment Planning
● SAP Merchandise Planning
● SAP Promotion Management
● SAP Replenishment Planning
back-end server / back-end
system
The SAP NetWeaver-based ABAP back-end server
Depending on your deployment scenario, this is where you might install the SAP CARAB
back-end product version of SAP Customer Activity Repository applications bundle..
front-end server / front-end
system
The SAP NetWeaver-based ABAP front-end server
Depending on your deployment scenario, this is where you might install SAP Gateway, the
central SAP Fiori UI component (including SAP Fiori launchpad), and the SAP FIORI FOR
SAP CARAB
front-end product version of SAP Customer Activity Repository applications
bundle.
logical schema A term used in the Display Mappings of Database Schemas transaction in SAP Customer
Activity Repository.
The term is synonymous with the authoring schema concept in SAP HANA studio.
Common Installation Guide for SAP Customer Activity Repository applications bundle 5.0
How to Use this Common Installation Guide
PUBLIC 7

Term Denition
source master data system SAP Customer Activity Repository applications bundle must be deployed alongside an SAP
ERP (SAP Retail, SAP Fashion Management) or SAP S/4HANA (SAP S/4HANA Retail) cen
tral component as the single source of truth for all master data.
Whenever this guide refers to a source master data system, it refers to the SAP ERP or SAP
S/4HANA central component that you choose for your implementation.
For more information, see Integration with Source Master Data Systems [page 17].
SAP ERP Unless otherwise specied, references in this guide to SAP ERP are comprehensive. That is,
they apply to SAP Retail and SAP Fashion Management.
SAP S/4HANA Unless otherwise specied, references in this guide to SAP S/4HANA are comprehensive.
That is, they apply to SAP S/4HANA Retail for merchandise management and to SAP S/
4HANA for fashion and vertical business.
Important Variables
Note
Variables are placeholders for objects that have dierent names in your customer system landscape or are
user-dened.
When you come across a variable in this guide, replace it with your customer-specic name of the
respective object.
Example
An instruction states to map the authoring schema to the SAPHANADB physical schema in your ABAP back-
end system.
● In your customer system landscape, this physical schema is called ABC01.
● You therefore replace the SAPHANADB variable with ABC01. That is, you map the authoring schema to
the ABC01 physical schema.
8
PUBLIC
Common Installation Guide for SAP Customer Activity Repository applications bundle 5.0
How to Use this Common Installation Guide

Variable Description
Depending on the documentation and user
interface, you might come across any of the
following variables. They all mean the
same:
● SAPHANADB
● SAPABAP<num>
● SAP<id>
Stands for the name of the ABAP back-end system, database schema, or da
tabase user in your customer system landscape.
Tip
If you don't know what the name is in your customer system landscape,
there are two easy ways to nd it:
● Log on to your ABAP back-end system using SAP Logon. Choose
System Status . In the section titled Database data, see the
name for Schema.
● In SAP HANA studio, the schema name is listed under Catalog.
For more information, see SAP Note 2535951 (FAQ: SAP HANA Users and
Schemas).
<DBSID>
Database ID in uppercase letters
<dbsid>
Database ID in lowercase letters
<INSTDIR>
Installation directory for the SAP system
<DVD_DIR>
Directory on which a DVD is mounted
<OS>
Operating system name within a path
Naming Dierences
Due to naming dierences between the underlying technical objects, the following terms are used
interchangeably in this guide:
SAP Customer Activity
Repository (all modules ex
cept for UDF and DDF)
Unied Demand Forecast
(UDF) and Demand Data
Foundation (DDF)
SAP Merchandise Planning
SAP Assortment Planning
SAP Promotion
Management
SAP Replenishment
Planning
SAP Allocation
Management
SAP Retail and SAP S/
4HANA
article product product article
material
Common Installation Guide for SAP Customer Activity Repository applications bundle 5.0
How to Use this Common Installation Guide
PUBLIC 9

SAP Customer Activity
Repository (all modules ex
cept for UDF and DDF)
Unied Demand Forecast
(UDF) and Demand Data
Foundation (DDF)
SAP Merchandise Planning
SAP Assortment Planning
SAP Promotion
Management
SAP Replenishment
Planning
SAP Allocation
Management
SAP Retail and SAP S/
4HANA
article variant product variant product variant or product/
color/size
article variant
store location (used as an umbrella
term for stores, distribution
centers, etc.)
store store
site
1.2 Information Available on SAP Help Portal
Information on prerequisite platforms, applications, and other components as well as quick links to SAP sites
Information on Prerequisite Platforms, Applications, Other Components
Information On Path Title
Installing SAP HANA http://help.sap.com/viewer/p/
SAP_HANA_PLATFORM
<Version> Installation and
Upgrade
SAP HANA Server
Installation and Update Guide
SAP HANA Server Installation and Up
date Guide
Installing SAP HANA database clients http://help.sap.com/viewer/p/
SAP_HANA_PLATFORM
<Version> Installation and
Upgrade
SAP HANA Client
Installation and Update Guide
SAP HANA Client Installation and Up
date Guide
Installing SAP HANA studio http://help.sap.com/viewer/p/
SAP_HANA_PLATFORM
<Version> Installation and
Upgrade
SAP HANA Studio
Installation and Update Guide
SAP HANA Studio Installation and Up
date Guide
10 PUBLIC
Common Installation Guide for SAP Customer Activity Repository applications bundle 5.0
How to Use this Common Installation Guide

Information On Path Title
Installing SAP LT (Landscape Transfor
mation) Replication Server for SAP
HANA
http://help.sap.com/viewer/p/
SAP_HANA_REAL_TIME_REPLICATION
<Version> Installation and
Upgrade
Installation Guide
Managing major operational aspects of
the SAP LT (Landscape Transforma
tion) Replication Server for SAP HANA
http://help.sap.com/viewer/p/
SAP_HANA_REAL_TIME_REPLICATION
<Version>
Versions up to 3.0 SP04: Application
Operations Guide
Versions 3.0 SP04 and higher: Applica
tion Help
Using SAP HANA http://help.sap.com/viewer/p/
SAP_HANA_PLATFORM
<Version> Administration SAP
HANA Administration Guide
SAP HANA Administration Guide for
SAP HANA Platform
Using the SAP HANA development
tools to create comprehensive analyti
cal models and to build applications
with SAP HANA interfaces and inte
grated development
(for developers)
http://help.sap.com/viewer/p/
SAP_HANA_PLATFORM
<Version> Development SAP
HANA Developer Guide (For SAP HANA
Studio)
SAP HANA Developer Guide
Dening data models for use in SAP
HANA
(for modelers, business analysts)
http://help.sap.com/viewer/p/
SAP_HANA_PLATFORM
<Version> Development SAP
HANA Modeling Guide (For SAP HANA
Studio)
SAP HANA Modeling Guide for HANA
Studio
Installing Foundation on SAP NetWea
ver AS for ABAP 7.52, version for SAP
HANA
https://help.sap.com/viewer/p/
SAP_NETWEAVER_AS_ABAP_752
<Version> Installation and
Upgrade Master Guide
Master Guide
Installing SAP ERP 6.0 http://help.sap.com/viewer/p/
SAP_ERP
<Version> Installation
and Upgrade Installation Guide
Installation Guide
Installing SAP S/4HANA http://help.sap.com/viewer/p/
SAP_S4HANA_ON-PREMISE
<Version> Implement
Installation Guide
Installation Guide
Common Installation Guide for SAP Customer Activity Repository applications bundle 5.0
How to Use this Common Installation Guide
PUBLIC 11

General Quick Links
SAP Site Path
SAP Help Portal
http://help.sap.com
Knowledge Base Articles and SAP Notes
https://support.sap.com/en/index.html
Product Availability Matrix (PAM)
http://support.sap.com/pam
Maintenance and release strategy
https://support.sap.com/en/release-upgrade-maintenance.html
SAP Software Download Center
http://support.sap.com/swdc
SAP Solution Manager
http://support.sap.com/solutionmanager
SAP Security Optimization Services Portfolio https://support.sap.com/en/oerings-programs/support-services/
security-optimization-services-portfolio.html
Data Protection and Privacy
2590321 Upgrade recommendations to support GDPR compliance
Support information (quick access via SAP ONE
Support Launchpad; requires login)
https://launchpad.support.sap.com/#/productsearch
Support package stacks, latest versions, patch
level requirements
http://support.sap.com/patches
System sizing
http://www.sap.com/sizing
12 PUBLIC
Common Installation Guide for SAP Customer Activity Repository applications bundle 5.0
How to Use this Common Installation Guide
2 Plan your System
Plan your customer landscape so that it best serves your business scenario. Choose the best deployment
option, and see from which source master data systems you can replicate data to your SAP Customer Activity
Repository applications bundle system.
System Landscape [page 14]
Find out what a typical system landscape for SAP Customer Activity Repository applications bundle
looks like. You can see the main layers in the diagram (database, back-end, front-end).
Deployment Options [page 16]
Learn about the two deployment options for your SAP Customer Activity Repository applications
bundle solution.
Integration with Source Master Data Systems [page 17]
Get an overview of the source master data systems from which you can replicate master data and
transactional data to SAP Customer Activity Repository applications bundle.
Common Installation Guide for SAP Customer Activity Repository applications bundle 5.0
Plan your System
PUBLIC 13
2.1 System Landscape
Find out what a typical system landscape for SAP Customer Activity Repository applications bundle looks like.
You can see the main layers in the diagram (database, back-end, front-end).
14 PUBLIC
Common Installation Guide for SAP Customer Activity Repository applications bundle 5.0
Plan your System

System Landscape Example
The applications included in SAP Customer Activity Repository applications bundle require a layered system
landscape, as shown in the following example:
System Landscape Example
Tip
Planning Help
● For more information on possible deployment scenarios, see Deployment Options [page 16].
● For the minimum versions required for this release, see Install the Prerequisites [page 19].
Common Installation Guide for SAP Customer Activity Repository applications bundle 5.0
Plan your System
PUBLIC 15

2.2 Deployment Options
Learn about the two deployment options for your SAP Customer Activity Repository applications bundle
solution.
To help you decide on the best deployment option for your scenario, please see SAP Note 2997851 (SAP
Customer Activity Repository applications bundle 5.0: Front-end deployment options).
What is Central Hub Deployment?
With central hub deployment, you install the back-end product version (SAP CARAB) in your ABAP back-end
system, while you install the front-end product version (SAP FIORI FOR SAP CARAB) and the SAP Fiori front-
end server in a separate front-end system.
As a result, the SAP Fiori apps are deployed in separate systems (UIs in the front-end system, related OData
services in the back-end system).
What is Embedded Deployment?
With the embedded deployment option, you install the SAP Fiori front-end server in the same system as your
ABAP back-end server. For your SAP Customer Activity Repository applications bundle solution, this means
that you install the back-end product version (SAP CARAB) and the front-end product version (SAP FIORI
FOR SAP CARAB) in the same system (that is, your SAP S/4HANA FOUNDATION back-end system).
Caution
If you wish to use or are already using an embedded deployment scenario for SAP Customer Activity
Repository applications bundle in the same system as the SAPS/4HANA source master data system,
carefully read SAP Note 2948396 (Deployment options for SAP Customer Activity Repository
applications bundle and SAP S/4HANA source master data system).
The note contains important deployment information for the following scenario:
● Your current source master data system is SAP S/4HANA 1709 or 1809.
● You want to install or upgrade to SAP S/4HANA 1909 or higher.
● You are using your source master data system in an embedded deployment scenario. That is, you are
also using it as your front-end system for SAP Customer Activity Repository applications bundle. In
other words, you have installed the front-end product version SAP FIORI FOR SAP CARAB
(containing the software component UICAR001 with the SAP Fiori apps) on your SAP S/4HANA
system.
The advantage of this option is that you do not require a separate front-end system.
● Be aware that such an embedded scenario is no longer possible as of SAP S/4HANA 1909. For more
information and for supported deployment alternatives, please see SAP Note 2948396 .
16
PUBLIC
Common Installation Guide for SAP Customer Activity Repository applications bundle 5.0
Plan your System

More Information
Tip
To help you decide on the best deployment option for your scenario, see SAP Note 2997851 (SAP
Customer Activity Repository applications bundle 5.0: Front-end deployment options).
For more information on deployment options for SAP Fiori, see the following:
● For a system landscape overview showing the ABAP back-end server and the ABAP front-end server, see
https://help.sap.com/viewer/p/FIORI_IMPLEMENTATION and choose Implement Installation and
Upgrade
SAP Fiori: Setup and Conguration Setup of SAP Fiori System Landscape .
2.3 Integration with Source Master Data Systems
Get an overview of the source master data systems from which you can replicate master data and transactional
data to SAP Customer Activity Repository applications bundle.
Overview
You can deploy your scenario of SAP Customer Activity Repository applications bundle in parallel with one of
the following source master data systems:
Source Master Data System Flavor
SAP ERP SAP Retail (add-on to SAP ERP)
SAP Fashion Management (add-on to SAP Retail)
SAP S/4HANA SAP S/4HANA Retail for merchandise management
SAP S/4HANA for fashion and vertical business
Note
Unless otherwise specied, references in this guide to SAP ERP are comprehensive. That is, they apply to
SAP Retail and SAP Fashion Management.
The same is true for references to SAP S/4HANA. That is, they apply to SAP S/4HANA Retail for
merchandise management and to SAP S/4HANA for fashion and vertical business.
For more information on these and other important terms used in this guide, see Naming Conventions
[page 7].
Common Installation Guide for SAP Customer Activity Repository applications bundle 5.0
Plan your System
PUBLIC 17

3 Install the Prerequisites
This section lists all the prerequisite platforms, applications, and components that must be installed and
congured to prepare the system landscape for a new installation of this release.
Note
If you are upgrading from a previous release, the information in this Common Installation Guide is not
relevant for you. Instead, proceed with the Common Upgrade Guide available at https://help.sap.com/
viewer/p/CARAB on the Implement tab.
The prerequisites are grouped in two categories:
● Common Prerequisites, which must be installed regardless of the business scenario you are planning to
implement
● Application-Specic Prerequisites, which are only relevant for specic applications under specic
conditions
Caution
The prerequisites should be installed and congured by an experienced SAP Basis administrator.
Tip
This guide references several SAP Notes that are updated regularly. If you want to be informed of such
updates because a note is particularly relevant for your scenario, you can easily set up email notications
for it. For instructions, see SAP Note 2478289 (How to get notications for SAP Notes or KBAs).
Common Prerequisites
Tip
For the latest support information and technology updates, always see SAP Note 2957259 (Latest news
on SAP Customer Activity Repository applications bundle 5.0). If there are updates concerning the
prerequisites described in this guide, you can nd this information in the note.
You can also nd the note on SAP Help Portal at https://help.sap.com/viewer/p/CARAB under
Implement Important SAP Notes .
Common Installation Guide for SAP Customer Activity Repository applications bundle 5.0
Install the Prerequisites
PUBLIC 19

SAP S/4HANA FOUNDATION
The minimum requirement for this release is as follows, regardless of the business scenario you are planning to
implement:
Foundation Com
ponent Minimum Requirement Installation Information
SAP S/4HANA
FOUNDATION
● SAP S/4HANA FOUNDATION
1909 — FPS02 (05/2020)
(SAP S/4HANA Foundation)
● SAP Note 2750164 (SAP S/4HANA FOUNDATION 1909:
Release Information Note)
● Guide Finder (list of guides with installation and migration
information on SAP S/4HANA FOUNDATION)
Caution
Before installing or upgrading the foundation component in your system landscape, check for the latest
support information. See SAP Note
2957259 (Latest news on SAP Customer Activity Repository
applications bundle 5.0).
SAP HANA Platform 2.0
● SAP HANA database component:
The minimum requirement for this release is as follows, regardless of the business scenario you are
planning to implement:
○ SAP HANA database 2.0 SPS05 revision 50.00
○ Before installing a revision, check for the latest support information. See SAP Note 2818378 (Which
releases of SAP HANA Platform are supported for which releases of SAP Customer Activity Repository
applications bundle (SAP CARAB)?).
Caution
Guidance for Selecting a Higher Revision than the Minimum Revision
If you wish to use a higher revision, we recommend that you select one of the “maintenance revisions”.
See SAP Note 2378962 (SAP HANA 2.0 Revision and Maintenance Strategy) and consult the
information under Last Released Revision or Maintenance Revision.
Also use this same strategy if the minimum revision is no longer available for download from the
Software Download Center. This situation might occur depending on when you perform the actual
installation and how long ago the revision was released.
If you wish to use the latest SAP HANA support package stack, be aware that there are no
maintenance revisions for it. In this case, we recommend the following:
1. To avoid incompatibilities, rst consult SAP Note 2818378 (Which releases of SAP HANA
Platform are supported for which releases of SAP Customer Activity Repository applications bundle
(SAP CARAB)?).
Select a supported combination of releases. This applies not only during a new installation or an
upgrade, but is equally relevant if you decide to upgrade your SAP HANA Platform to a higher
revision or even support package stack later on.
2. Install the latest SAP HANA support package stack in your test system. Test it carefully to evaluate
its impact on your customer system landscape. Only roll it out to your production system when you
are sure that it integrates well with your day-to-day business processes.
20
PUBLIC
Common Installation Guide for SAP Customer Activity Repository applications bundle 5.0
Install the Prerequisites

● SAP HANA AFL component:
The minimum requirement for this release is the SAP HANA AFL revision that is compatible with the
selected SAP HANA database revision.
For installation information, see the following:
● SAP Note 2818378 (Which releases of SAP HANA Platform are supported for which releases of SAP
Customer Activity Repository applications bundle (SAP CARAB)?)
● SAP Note 2378962 (SAP HANA 2.0 Revision and Maintenance Strategy, lists the available maintenance
revisions)
● SAP Note 2115815 (FAQ: SAP HANA Database Patches and Upgrades, helpful information on database
upgrades, downgrades, downtimes, patch levels, and more)
● SAP HANA 2.0 Revision Strategy (what are revisions, what are support package stacks, what is the SAP
HANA product availability and maintenance strategy)
● SAP Note 2844322 (SAP HANA Platform 2.0 SPS 05 Release Note)
● SAP HANA Server Installation and Update Guide for your SAP HANA Platform version at https://
help.sap.com/viewer/p/SAP_HANA_PLATFORM
● Overview and download of SAP HANA Platform 2.0: http://support.sap.com Software Downloads
By Alphabetical Index (A-Z) H SAP HANA PLATFORM EDITION SAP HANA PLATFORM EDITION 2.0
INFO
● SAP Note 2339267 (HANA Client version and installation manifest le doesn't match currently available
HANA server version information)
If you are planning to upgrade from SAP HANA Platform 1.0 to SAP HANA Platform 2.0, also see the following:
● SAP Note 1948334 (SAP HANA Database Update Paths for SAP HANA Maintenance Revisions)
● SAP Note 2372809 (Mandatory Preparation Steps for Upgrading a SAP HANA 1 System to SAP HANA 2)
● SAP Note 2422421 (Guideline for upgrading a SAP HANA system with extended application services,
advanced model)
SAP RTL AFL FOR SAP HANA
Note
SAP RTL AFL FOR SAP HANA is a back-end software component of SAP Customer Activity Repository
applications bundle. However, you must always install this component together with the SAP HANA
Platform. You must do this before installing the SAP CARAB back-end product version. This guide leads you
through the correct steps.
The minimum revision for SAP RTL AFL FOR SAP HANA applies regardless of the business scenario you are
planning to implement. There is a minimum AFL revision for each SAP HANA database revision. Whichever AFL
revision you choose, it must be compatible with the SAP HANA database revision.
Compatible Minimum Revisions
Minimum Revision of SAP RTL AFL FOR SAP HANA
Compatible With This Revision of SAP HANA Database
AFL revision 50.1 (patch 1 of revision 50) SAP HANA database 2.0 revision 50
AFL revision 51.1 (patch 1 of revision 51) SAP HANA database 2.0 revision 51
AFL revision 52.1 (patch 1 of revision 52) SAP HANA database 2.0 revision 52
Common Installation Guide for SAP Customer Activity Repository applications bundle 5.0
Install the Prerequisites
PUBLIC 21

Minimum Revision of SAP RTL AFL FOR SAP HANA Compatible With This Revision of SAP HANA Database
AFL revision 53.0 (patch 0 of revision 53) SAP HANA database 2.0 revision 53
Note
For information on higher revisions, see SAP Note 2818378 (Which releases of SAP HANA Platform are
supported for which releases of SAP Customer Activity Repository applications bundle (SAP CARAB)?).
Caution
No matter which AFL revision you choose, always install the highest patch available for download.
Be aware that patches for dierent revisions can occur at dierent points in time.
Example
The AFL patch 51.1 was released later than the AFL patch 52.0.
If you decide to install a higher revision of SAP RTL AFL FOR SAP HANA, it must again be compatible
with the SAP HANA database revision.
When you download an AFL revision from the SAP Support Portal, the compatible SAP HANA database
revision is always indicated.
Note
SAP RTL AFL FOR SAP HANA contains back-end functionality for two modules of SAP Customer Activity
Repository: Unied Demand Forecast (UDF) and On-Shelf Availability (OSA). You must always install the
component, regardless of the scenario you are planning to implement. You only need to congure UDF
and/or OSA if you wish to use the functionality in your scenario.
SAP Landscape Transformation Replication Server
The minimum requirement for this release is SAP Landscape Transformation Replication Server 2.0 for SAP
HANA, regardless of the business scenario you are planning to implement.
Caution
If your source master data system is SAP S/4HANA 1909 or higher, be aware that the SAP LT Replication
Server is no longer available as a standalone component. For more information, see the Source Master Data
Systems section below.
For installation information and possible dependencies to other components, see the following:
● Installation Guide (Replicating Data to SAP HANA) at https://help.sap.com/viewer/p/
SAP_LANDSCAPE_TRANSFORMATION_REPLICATION_SERVER
● SAP Note 1605140 (SAP Landscape Transformation Replication Server (SLT)): This is the central note
for enabling trigger-based data replication (functional overview, download, installation, upgrade,
corrections, implementation).
● SAP Note 2014562 (FAQ: SAP HANA LT Replication Server (SLT))
● SAP Note 2707835 (SLT Licensing, licensing and deployment overview by source master data system)
22
PUBLIC
Common Installation Guide for SAP Customer Activity Repository applications bundle 5.0
Install the Prerequisites

● SAP Note 2572945 (DMIS compatibility with S/4HANA, integration of DMIS component into S4CORE
layer, release overview and guidance for SAP S/4HANA source master data systems)
SAP Fiori
SAP Fiori front-end server is an add-on product version. It contains the front-end software components
required to run SAP Fiori apps and the SAP Fiori launchpad.
The minimum requirement for this release is SAP FIORI FRONT-END SERVER 6.0 SPS02 (05/2020),
regardless of the business scenario you are planning to implement. The accompanying SAP_UI version is 7.54
SPS01. The accompanying
SAPUI5 version is 1.65.xx.
For more information, see the following:
● Planning:
○ Overview of SAP Fiori front-end server components and versions
○ SAP Fiori Deployment Options and System Landscape Recommendations (regularly updated,
includes helpful landscape diagrams)
○ For planning information and a helpful version overview (front-end server, application server ABAP,
SAP Gateway, SAPUI5), see SAP Note
2217489 (Maintenance and Update Strategy for SAP Fiori
Front-End Server).
○ SAP Note 2825540 (Release of Fiori Product Versions for SAP Fiori front-end server 6.0)
○ SAP Note 2977715 (Release of Fiori Product Versions for SAP Fiori front-end server 2020 for SAP S/
4HANA)
● Installation and implementation:
○ SAP Fiori Implementation Information (select your front-end server version at the top)
○ SAP Note 2590653 (SAP Fiori front-end server deployment for SAP S/4HANA)
○ SAP Note 2775163 (SAP-Fiori-Frontend-Server 6.0 - General Information)
○ SAP Note 2919182 (SAP Fiori front-end server 2020 for SAP S/4HANA)
Tip
If you wish to check what SAPUI5 version is currently installed, there is an easy way to do this. See SAP
Note 2282103 (How to check the version of SAPUI5 you have installed).
Source Master Data Systems
● Either SAP ERP or SAP S/4HANA must be installed.
Note
Unless otherwise specied, references in this guide to SAP ERP are comprehensive. That is, they apply
to SAP Retail and SAP Fashion Management.
The same is true for references to SAP S/4HANA. That is, they apply to SAP S/4HANA Retail for
merchandise management and to SAP S/4HANA for fashion and vertical business.
For more information on these and other important terms used in this guide, see Naming Conventions
[page 7].
Common Installation Guide for SAP Customer Activity Repository applications bundle 5.0
Install the Prerequisites
PUBLIC 23

● The minimum requirements for this release are as follows, regardless of the business scenario you are
planning to implement:
Source Master Data Sys
tem Minimum Requirement Installation Information
SAP ERP
○ SAP ERP 6.0 Enhancement Package 7 SP16
or higher
○ SAP ERP 6.0 Enhancement Package 8 SP09
or higher
Installation Guide at https://
help.sap.com/viewer/p/SAP_ERP
24 PUBLIC
Common Installation Guide for SAP Customer Activity Repository applications bundle 5.0
Install the Prerequisites

Source Master Data Sys
tem Minimum Requirement Installation Information
SAP S/4HANA
○ SAP S/4HANA 1709 FPS2 or higher
○ SAP S/4HANA 1809 Initial Shipment Stack
or higher
○ SAP S/4HANA 1909 Initial Shipment Stack
or higher
○ SAP S/4HANA 2020 Initial Shipment Stack
or higher
Caution
If you wish to use or are already using an em
bedded deployment scenario for SAP
Customer Activity Repository applications
bundle in the same system as the SAPS/
4HANA source master data system, care
fully read SAP Note 2948396 (Deploy
ment options for SAP Customer Activity Re
pository applications bundle and SAP S/
4HANA source master data system).
The note contains important deployment in
formation for the following scenario:
○ Your current source master data system
is SAP S/4HANA 1709 or 1809.
○ You want to install or upgrade to SAP S/
4HANA 1909 or higher.
○ You are using your source master data
system in an embedded deployment
scenario. That is, you are also using it as
your front-end system for SAP
Customer Activity Repository
applications bundle. In other words, you
have installed the front-end product ver
sion SAP FIORI FOR SAP CARAB
(containing the software component
UICAR001 with the SAP Fiori apps) on
your SAP S/4HANA system.
The advantage of this option is that you
do not require a separate front-end sys
tem.
○ Be aware that such an embedded sce
nario is no longer possible as of SAP S/
4HANA 1909. For more information and
for supported deployment alternatives,
please see SAP Note 2948396 .
○ Installation Guide at https://
help.sap.com/viewer/p/
SAP_S4HANA_ON-PREMISE
○ SAP Note 2482453 (SAP S/
4HANA 1709: Release Information
Note)
○ SAP Note 2625407 (SAP S/
4HANA 1809: Release Informa
tion Note)
○
SAP Note 2769531 (SAP S/
4HANA 1909: Release Informa
tion Note)
○
SAP Note 2884313 (SAP S/
4HANA 2020: Release Informa
tion)
Note
If your source master data sys
tem is SAP S/4HANA 1909 or
higher, be aware that the SAP LT
Replication Server is no longer
available as a standalone compo
nent. Instead, an embedded SAP
LT Replication Server is included
in SAP S/4HANA by default.
To set up the data replication
from SAP S/4HANA 1909 or
higher, you need to do some pre
paratory steps. This guide leads
you through the correct proce
dure in the data replication sec
tion (Create/Replicate Source
Master Data System Tables [page
91]). The preparatory steps
have the added advantage that
they give you the option to still
use a standalone SAP LT Replica
tion Server.
Common Installation Guide for SAP Customer Activity Repository applications bundle 5.0
Install the Prerequisites
PUBLIC 25

Tip
If you are planning to convert from SAP ERP to SAP S/4HANA, you can use the SAP Readiness Check
to check the readiness of your SAP ERP system. For more information, see SAP Note 2758146 (SAP
Readiness Check 2.0 & Next Generation SAP Business Scenario Recommendation).
Application-Specic Prerequisites
SAP Customer Activity Repository
Prerequisites for SAP Customer Activity Repository
Prerequisite Minimum Requirement Mandatory/Optional Installation Information
SAP Customer Relationship
Management (SAP CRM)
The minimum requirement
for this release is one of the
following:
● SAP Enhancement
Package 2 for SAP CRM
7.0
● SAP Enhancement
Package 2 for SAP CRM
7.0, Version for SAP
HANA or higher
Optional, depending on
whether or not you choose to
implement customer deter
mination with SAP CRM.
Installation Guide at https://
help.sap.com/viewer/p/
SAP_CUSTOMER_RELA
TIONSHIP_MANAGEMENT
SAP Smart Business SAP Smart Business founda
tion component 1.0, most re
cent SPS
Optional, depending on
whether or not you choose to
implement the SAP Smart
Business for Multichannel
Sales Analytics dashboard
within SAP Customer Activity
Repository.
SAP Note 2018360 (Re
lease Information Note for
SAP SMART BUSINESS)
SAP Marketing solution (SAP
Marketing or SAP Marketing
Cloud)
SAP Marketing 1.10 or higher Optional, depending on
whether or not you choose to
implement customer deter
mination with your SAP Mar
keting solution.
●
For SAP Marketing, see
the
Installation and Con
guration Guide at
https://help.sap.com/
viewer/p/
SAP_HYBRIS_MARKET
ING
.
● For SAP Marketing
Cloud, see https://
help.sap.com/viewer/p/
SAP_MARKET
ING_CLOUD.
26 PUBLIC
Common Installation Guide for SAP Customer Activity Repository applications bundle 5.0
Install the Prerequisites

Prerequisite Minimum Requirement Mandatory/Optional Installation Information
SAP Commerce SAP Commerce 1811 or
higher (in particular, the Ac
celerator, the Data Hub, and
SAP Asynchronous Order
Management)
Optional, depending on
whether or not you choose to
implement Omnichannel Ar
ticle Availability and Sourc
ing (OAA) or Omnichannel
Promotion Pricing (OPP)
within SAP Customer Activity
Repository.
https://help.sap.com/
viewer/p/SAP_COMMERCE/
SAP Commerce, integration
package for SAP for Retail
SAP Commerce, integration
package for SAP for Retail
1811 or higher
Optional, depending on
whether or not you choose to
implement Omnichannel Ar
ticle Availability and Sourc
ing (OAA) or Omnichannel
Promotion Pricing (OPP)
within SAP Customer Activity
Repository.
See the Administration Guide
delivered with the software
package or from https://
help.sap.com/viewer/p/IPR.
SAP Analytics Cloud Content Innovation 12 Optional, depending on
whether or not you choose to
implement Omnichannel Ar
ticle Availability and Sourc
ing (OAA) within SAP
Customer Activity
Repository.
You only need to run and
connect this application if
you want to use the set of
OAA analyses that has been
predened in SAP Analytics
Cloud and that is part of the
standard delivery of SAP An
alytics Cloud. If you are using
a dierent analytics tool, or if
you do not run analytics at
all, you do not need this ap
plication.
System Requirements and
Technical Prerequisites
SAP IQ SAP IQ 16.0, SP8 or higher Optional, depending on
whether or not you choose to
use the Table Content Aging
report to move data from
SAP Customer Activity
Repository to SAP IQ.
https://help.sap.com/
viewer/product/SAP_IQ/
16.1.latest/en-US?task=im
plement_task
Common Installation Guide for SAP Customer Activity Repository applications bundle 5.0
Install the Prerequisites
PUBLIC 27

Prerequisite Minimum Requirement Mandatory/Optional Installation Information
SAP HANA Dynamic Tiering SAP HANA Dynamic Tiering
is delivered with the SAP
HANA Platform. See the
Common Prerequisites sec
tion above.
Optional, depending on
whether or not you choose to
use the Table Content Aging
report to move data from
SAP Customer Activity
Repository to extended stor
age using SAP HANA Dy
namic Tiering.
SAP HANA Dynamic Tiering:
Installation and Update Guide
at https://help.sap.com/
viewer/p/
SAP_HANA_DYNAMIC_TIER
ING
SAP HANA extended applica
tion services, advanced
model (XSA)
SAP HANA XSA, version
1.0.88 or higher
We recommend that you use
the highest version available.
Optional, depending on
whether or not you choose to
use Omnichannel Promo
tion Pricing (OPP) within
SAP Customer Activity
Repository.
SAP HANA Server Installation
and Update Guide at https://
help.sap.com/viewer/p/
SAP_HANA_PLATFORM,
search for section Installing
XS Advanced Runtime
SAP Merchandise Planning
Prerequisites for SAP Merchandise Planning
Prerequisite Minimum Requirement Mandatory/Optional Installation Information
SAP Analysis SAP Analysis for Microsoft
Oce 2.8 SP02
Mandatory Administrator Guide at
https://help.sap.com/
viewer/p/SAP_BUSINES
SOBJECTS_ANALYSIS_OF
FICE
SAP Assortment Planning
Prerequisites for SAP Assortment Planning
Prerequisite Minimum Requirement Mandatory/Optional Installation Information
SAP Analysis SAP Analysis for Microsoft
Oce 2.8 SP02
Mandatory Administrator Guide at
https://help.sap.com/
viewer/p/SAP_BUSINES
SOBJECTS_ANALYSIS_OF
FICE
SAP Promotion Management
SAP Promotion Management requires only the common prerequisites.
SAP Allocation Management
SAP Allocation Management requires the common prerequisites.
In addition, the bar chart used to display the purchase order quantity by status requires the SAPUI5 library
version 1.71.14 or higher. In lower library versions, additional color is shown in the bar chart even if the
purchase order quantity is zero. This aects SAP Fiori apps (My Allocation Workload - Promotional Push, My
28
PUBLIC
Common Installation Guide for SAP Customer Activity Repository applications bundle 5.0
Install the Prerequisites

Order Workload - Promotional Buy, and My Allocation Plans for buy plans) in the business scenarios for
promotional push and promotional buy.
SAP Replenishment Planning
SAP Replenishment Planning requires the SAP XRP AFL.
Note
SAP XRP AFL is a back-end software component of SAP Customer Activity Repository applications
bundle. You must install this component before using SAP Replenishment Planning for the rst time but
you can do it after installing or upgrading the SAP CARAB back-end product version. This guide leads you
through the correct steps.
The minimum revision for SAP XRP AFL applies regardless of the business scenario you are planning to
implement. There is a minimum AFL revision for each SAP HANA database revision. Whichever AFL revision
you choose, it must be compatible with the SAP HANA database revision.
Compatible Minimum Revisions
Minimum Revision of SAP XRP AFL
Compatible With This Revision of SAP HANA Database
AFL revision 50.1 (patch 1 of revision 50) SAP HANA database 2.0 revision 50
AFL revision 51.1 (patch 1 of revision 51) SAP HANA database 2.0 revision 51
AFL revision 52.1 (patch 1 of revision 52) SAP HANA database 2.0 revision 52
AFL revision 53.0 (patch 0 of revision 53) SAP HANA database 2.0 revision 53
AFL revision 53.0 (patch 0 of revision 53) SAP HANA database 2.0 revision 53
Caution
No matter which AFL revision you choose, always install the highest patch available for download.
Be aware that patches for dierent revisions can occur at dierent points in time.
Example
The AFL patch 51.1 was released later than the AFL patch 52.0.
If you decide to install a higher revision of SAP XRP AFL, it must again be compatible with the SAP HANA
database revision.
When you download an AFL revision from the SAP Support Portal, the compatible SAP HANA database
revision is always indicated.
Common Installation Guide for SAP Customer Activity Repository applications bundle 5.0
Install the Prerequisites
PUBLIC 29
4 Prepare the Installation
Before you start with the actual installation of SAP Customer Activity Repository applications bundle 5.0, you
must rst perform several preparatory tasks.
1. Implement SAP Notes for the Installation [page 30]
This section lists SAP Notes (corrections) that you must read and — when appropriate — implement at
dierent points in the installation process. The section also points you to the release information
notes (RINs) for this release. There you can nd the back-end and front-end corrections that have
become available since the software was released. The RINs complement the SAP Notes listed in this
chapter.
2. Verify SAP HANA Users and Privileges [page 49]
SAP Customer Activity Repository applications bundle requires a multi-level system landscape: Level 1
is the SAP HANA database. Level 2 is the ABAP back-end server. Level 3 is the ABAP front-end server
with SAP Gateway and the SAP Fiori apps. Each level requires specic users with specic privileges. In
this procedure, you set up the authorizations for the SAP HANA database (level 1).
3. Verify Correct Schema Mapping [page 54]
In SAP HANA studio, verify that the authoring schemas delivered by SAP are mapped to the correct
physical schemas of your customer landscape. First do an n:1 mapping (all authoring schemas of SAP
Customer Activity Repository applications bundle to the same SAPHANADB physical schema). Then do
a 1:1 mapping (the authoring schema of each source master data system to the corresponding physical
schema). If necessary, create any mappings that are missing. This procedure is mandatory for all the
applications.
4. Generate Time Data for Gregorian Calendar [page 58]
Perform a generic calendar setting in SAP HANA studio. This generates the time data (calendar) for
several scenarios and SAP Fiori apps in SAP Customer Activity Repository applications bundle. Setting
up the Gregorian calendar is mandatory. Optionally, you can choose to set up the Fiscal calendar as
well.
5. Congure AFL Usage [page 59]
Perform conguration tasks to enable the usage of application function libraries (such as the PAL and
the OFL) for the applications SAP Assortment Planning and SAP Allocation Management.
6. Migrate to New Default Table for Sales Pricing Data (/DMF/PRC) [page 62]
Make sure that /DMF/PRC is the default table for sales pricing data in your customer system. This
procedure is mostly relevant for upgrade scenarios but might also apply to some new installation
scenarios.
4.1 Implement SAP Notes for the Installation
This section lists SAP Notes (corrections) that you must read and — when appropriate — implement at
dierent points in the installation process. The section also points you to the release information notes
(RINs) for this release. There you can nd the back-end and front-end corrections that have become available
since the software was released. The RINs complement the SAP Notes listed in this chapter.
30
PUBLIC
Common Installation Guide for SAP Customer Activity Repository applications bundle 5.0
Prepare the Installation

Prerequisites
● Make sure that you have the latest version of Note Assistant (transaction SNOTE) installed. This is required
so that notes can be implemented correctly. For more information, see the following:
○ Versions of Note Assistant: See https://support.sap.com/en/my-support/knowledge-base/note-
assistant.html#section_2043200365 .
○ Mandatory corrections for Note Assistant: See SAP Note 1668882 (Note Assistant: Important notes
for SAP_BASIS 730,731,740,750,751,752,753,754).
● Make sure that you have the up-to-date version of each SAP Note, which you can always nd on the SAP
Support Portal at http://support.sap.com/notes .
Release Information Notes (RINs) with Latest Corrections for all
Applications
After the publication of this guide, additional corrections might become available. You can nd these
additional corrections in the RINs for this release:
● For the latest back-end corrections, see SAP Note 2924956 .
● For the latest front-end corrections, see SAP Note 2924957 .
The RINs are regularly updated if new corrections become available.
Tip
If a note is particularly relevant for your scenario and you want to be informed of updates, you can easily set
up email notications. See SAP Note 2478289 (How to get notications for SAP Notes or KBAs).
Caution
Always consult the SAP Notes for SAP Customer Activity Repository, regardless of your scenario. Notes
listed here are often common corrections, applicable to all applications.
Common Installation Guide for SAP Customer Activity Repository applications bundle 5.0
Prepare the Installation
PUBLIC 31

SAP Notes for SAP Customer Activity Repository
SAP Notes for SAP Customer Activity Repository
Implement Area SAP Note Description
After the installation
Front-end
2998753
List of SAP
Notes required
to use Multi
channel Sales
Analytics apps
in SAP Cus
tomer Activity
Repository
with SAP Fiori
front-end
server 2020
for SAP S/
4HANA
Mandatory if you are using SAP Fiori front-end server 2020 for
SAP S/4HANA.
The note collects all the required SAP Notes for conguring and
querying Multichannel Sales Analytics apps in SAP Customer Ac
tivity Repository when using SAP Fiori front-end server 2020 for
SAP S/4HANA.
After the installation Back-end
2961153
Parallel proc
essing became
mandatory
though the ag
Parallel proc
essing is not
active in
DRFOUT
Mandatory correction if you are using omnichannel promotion
pricing (OPP).
After the installation Back-end
2986824
Performance
Optimization
price lookup
central PPS
Mandatory correction if you are using omnichannel promotion
pricing (OPP).
After the installation Back-end
2967391
OPP: DRFOUT
dump with out
bound imple
mentation
ROP_PRO_ST
Mandatory correction if you are using omnichannel promotion
pricing (OPP).
32 PUBLIC
Common Installation Guide for SAP Customer Activity Repository applications bundle 5.0
Prepare the Installation

Implement Area SAP Note Description
Prior to the installa
tion
Back-end
2548843
DD: data ele
ment changes
from DEC to
CURR, error for
dependent
views
Only relevant if your source master data system is ABAP FND
1709 ON HANA
(foundation 1709 on SAP NetWeaver AS for ABAP
7.52, version for SAP HANA):
If so, this is a mandatory correction for all the applications of SAP
Customer Activity Repository applications bundle.
During the installa
tion
Back-end
2330184
Appearance of
Non-Exis
tence/Activa
tion Errors of
Views/DDL
Sources within
installation of
CARAB 1.0
FP03 and
CARAB 2.0
If you get error messages during the installation, consult this note
for possible solutions.
The note provides troubleshooting information for errors that
might occur during ...RSDB02CK... phases in transaction SUM.
Example error messages:
● 2EETG002 View "/AMR/C_P_A_L_C" does not exist in the da
tabase
● 2EETG002 View "/AMR/V_APITSLOC" does not exist in the
database
After the installation Back-end
2623953
SADL GW: Ex
posure for An
notations on
Entity Con
tainer with
namespace
Mandatory if you are using omnichannel article availability and
sourcing (OAA) and using the functionality in sales channel mode.
Not required for functions other than OAA. Not required if you are
using OAA in OAA prole mode.
After the installation Back-end
2625428
SADL GW: Ex
posure for An
notations on
Entity Con
tainer with
namespace
Mandatory if you are using omnichannel article availability and
sourcing (OAA) and using the functionality in sales channel mode.
Not required for functions other than OAA. Not required if you are
using OAA in OAA prole mode.
After the installation SAP S/4HANA
1909 back-end
2835297
Missing OAA
ATP Change
Indicator en
tries for S/
4HANA 1909
Only required if your source master data system is SAP S/4HANA
1909.
Mandatory if you are using omnichannel article availability and
sourcing (OAA), for both sales channel mode and OAA prole
mode. Not required for functions other than OAA and source mas
ter data systems other than SAP S/4HANA 1909.
Common Installation Guide for SAP Customer Activity Repository applications bundle 5.0
Prepare the Installation
PUBLIC 33

Implement Area SAP Note Description
After the installation Back-end
2576497
SQL Error
Code 274: in
serted value
too large for
column
Troubleshooting information for errors that might occur if the ma
terial number is longer than 18 characters.
After the installation Back-end
2857334
Unsupported
data type DEC
FLOAT34 /
D34N when
replicating
from an SAP
S/4HANA
1909 on prem
ise system
Mandatory correction if your source master data system is SAP
S/4HANA 1909. In that case, the note is required for all the appli
cations of SAP Customer Activity Repository applications bundle.
After the installation Back-end
2991316
"Analyze Fore
cast" app: x
for overlapping
forecast cor
rections, per
formance im
provements
(SAP CARAB
5.0)
Mandatory note containing several corrections for the Analyze
Forecast app
After the installation Back-end
2994197
"Analyze Fore
cast" app: Per
formance im
provements for
time series
data (SAP
CARAB 5.0)
Mandatory performance correction for the Analyze Forecast app
34 PUBLIC
Common Installation Guide for SAP Customer Activity Repository applications bundle 5.0
Prepare the Installation
Implement Area SAP Note Description
After the installation Front-end
3000380
"Adjust Fore
cast" app: App
freezes on
closing the
chart personal
ization dialog
(SAP CARAB
5.0)
Mandatory correction for the Adjust Forecast app
After the installation Front-end
2986835
"Manage De
mand Inuenc-
ing Factors"
app: Input
elds not edit
able for new
DIF assign
ment (SAP
CARAB 5.0)
Mandatory note containing several corrections for the Manage
Demand Inuencing Factors app
After the installation Front-end
3000602
"Manage De
mand Inuenc-
ing Factors"
app: App
freezes on cre
ating new DIF
assignment
(SAP CARAB
5.0)
Mandatory correction for the Manage Demand Inuencing Factors
app
After the installation Back-end
2990476
RFC Authoriza
tions for Simi
lar Products
Search and
Price Binning
Mandatory note for two related services of Demand Data Founda
tion (DDF):
● similar products search (function module /DMF/PROD
UCT_SIMILARITY_FM)
● price binning (function module /DMF/GENER
ATE_PRICE_BINS)
After the installation Back-end
2996880
Calculate hier
archical priors
(delta run)
Highly recommended enhancement for Unied Demand Forecast
(UDF). The note extends the existing service Calculate
Hierarchical Priors with a new option. With this option, you can run
the service in delta mode, where the hierarchical priors (HPRs)
are only calculated for newly listed product locations.
Common Installation Guide for SAP Customer Activity Repository applications bundle 5.0
Prepare the Installation
PUBLIC 35

Implement Area SAP Note Description
After the installation Back-end
2948474
"Double en
tries (key viola
tion) in /DMF/
UMD_PRI"
Mandatory note for Unied Demand Forecast (UDF). This note
prevents a potential key violation which can occur within the serv
ice Calculate Hierarchical Priors.
After the installation Back-end
2988891
Timestream
data may be
come corrupt
after location
import
Mandatory note for Demand Data Foundation (DDF). This note
prevents multiple entries from being created for the same factory
calendar I.D. when importing locations.
SAP Notes for SAP Merchandise Planning
Note
Always consult the table for SAP Customer Activity Repository, regardless of your scenario. Notes listed
there are often common corrections, applicable to all consuming applications.
SAP Notes for SAP Merchandise Planning
Implement Area SAP Note Description
After the installation Back-end
1919631
Activating the
BPC imbedded
is necessary
Embedded BW-IP features explicitly needs the NW BPC10.1 li
cense along with the PAK.
After the installation Back-end
2906856
System error in
program
CL_RSR_RRI2_
LRECH and
form AGGRE
GATE_NO_UNI
TS-01-
This note provides troubleshooting information for errors in sys
tem CL_RSR_RRI2_LRECH and form AGGRE
GATE_NO_UNITS-01-.
36 PUBLIC
Common Installation Guide for SAP Customer Activity Repository applications bundle 5.0
Prepare the Installation

Implement Area SAP Note Description
After the installation Back-end
2913238
Error transfer
ring single key
value from var
iable to SID
If you receive an error when variables are submitted, consult this
note for possible solutions.
After the installation Back-end
2925634
Input help: Ex
clusion of
characteristic
values is not
taken into ac
count
Mandatory note if lter values are not taken into account for com
pound characteristics.
After the installation Back-end
2927392
Current Mem
ber and selec
tion for Partial
Time Charac
teristic
Mandatory correction if a BW query including a current member
variable, shows unexpected values.
After the installation Back-end
2932787
Minor perform
ance improve
ments
(BICS,BOLAP)
Mandatory note includes correction to runtime improvements.
After the installation Back-end
2935854
Current Mem
ber: Unique
value for scal
variant needed
in global lter
Mandatory correction if you receive query message Unique value
for scal variant needed in global lter" (BRAIN 073) although
there exists a lter for the scal variant.
After the installation Back-end
2938084
Current mem
ber and char
acteristics ref
erencing to
0FISC*
Mandatory correction if a gure or structure element isn’t calcu
lated correctly.
After the installation Back-end
2950567
BRAIN 629
when Save a
Planning Se
quence
Mandatory correction if a planning sequence uses a mandatory
variable without default value or error Specify a value for variable
(BRAIN 629) is received.
Common Installation Guide for SAP Customer Activity Repository applications bundle 5.0
Prepare the Installation
PUBLIC 37

Implement Area SAP Note Description
After the installation Back-end
2925895
Current mem
ber: value help
for characteris
tic
This note includes correction related to the value help returning
too many values or wrong (not shifted) values.
After the installation Back-end
2926663
Current mem
ber variable
with operator
and reference
to scal in
foObject
Mandatory correction when query aborts with error message
BRAIN 299.
After the installation Back-end
2929997
Current Mem
ber: scal year
variant not set
in x lter
Mandatory note that provides corrections for error messages:
● System error in program CL_RS_TIME_SERVICE and form
CALCULATE_REL_FUNC_GEN-1-
● System error in program LCL_CM_TIME_BUFFER and form
DERIVE_TIMES_AND_APPEND-1-
After the
installation Back-end
2935804
Current Mem
ber and selec
tion for Partial
Time Charac
teristic (2)
Mandatory correction if you have implemented a correction from
note 2927392 but query result still shows unexpected values.
After the installation Back-end
2938717
Key gure us
ing Current
Member varia
ble empty
Mandatory correction if a value for a key gure using a current
member variable is unexpectedly empty (NULL).
After the installation Back-end
2941202
Not required
part provider
access for cur
rent member
query
Mandatory correction if a global lter is deleted during query run
time.
After the installation Back-end
2946337
Wrong data in
current mem
ber query
Mandatory correction if a query shows incorrect data.
38 PUBLIC
Common Installation Guide for SAP Customer Activity Repository applications bundle 5.0
Prepare the Installation

SAP Notes for SAP Assortment Planning
Note
Always consult the table for SAP Customer Activity Repository, regardless of your scenario. Notes listed
there are often common corrections, applicable to all consuming applications.
SAP Notes for SAP Assortment Planning
Implement Area SAP Note Description
After the installation Back-End
2983914
APR 5.0 - Opti
mize copy as
sortment lIst
This mandatory note includes corrections to improve perform
ance when copying assortment lists.
After the installation Back-End
2987562
APR 5.0 - Opti
mize Option
Dening Attrib
utes retrieval in
Build Assort
ment
This mandatory correction improves performance in the Build As
sortment screen.
After the installation Back-end
2906856
System error in
program
CL_RSR_RRI2_
LRECH and
form AGGRE
GATE_NO_UNI
TS-01-
This note provides troubleshooting information for errors in sys
tem CL_RSR_RRI2_LRECH and form AGGRE
GATE_NO_UNITS-01-.
After the installation Back-end
2913238
Error transfer
ring single key
value from var
iable to SID
If you receive an error when variables are submitted, consult this
note for possible solutions.
After the installation Back-end
2925895
Current mem
ber: value help
for characteris
tic
This note includes correction related to the value help returning
too many values or wrong (not shifted) values.
Common Installation Guide for SAP Customer Activity Repository applications bundle 5.0
Prepare the Installation
PUBLIC 39

Implement Area SAP Note Description
After the installation Back-end
2926663
Current mem
ber variable
with operator
and reference
to scal in
foObject
Mandatory correction when query aborts with error message
BRAIN 299.
After the installation Back-end
2929997
Current Mem
ber: scal year
variant not set
in x lter
Mandatory note that provides corrections for error messages:
● System error in program CL_RS_TIME_SERVICE and form
CALCULATE_REL_FUNC_GEN-1-
● System error in program LCL_CM_TIME_BUFFER and form
DERIVE_TIMES_AND_APPEND-1-
After the
installation Back-end
2935804
Current Mem
ber and selec
tion for Partial
Time Charac
teristic (2)
Mandatory correction if you have implemented a correction from
note 2927392 but query result still shows unexpected values.
After the installation Back-end
2938084
Current mem
ber and char
acteristics ref
erencing to
0FISC*
Mandatory correction if a gure or structure element isn’t calcu
lated correctly.
After the installation Back-end
2938717
Key gure us
ing Current
Member varia
ble empty
Mandatory correction if a value for a key gure using a current
member variable is unexpectedly empty (NULL).
After the installation Back-end
2941202
Not required
part provider
access for cur
rent member
query
Mandatory correction if a global lter is deleted during query run
time.
After the installation Back-end
2946337
Wrong data in
current mem
ber query
Mandatory correction if a query shows incorrect data.
40 PUBLIC
Common Installation Guide for SAP Customer Activity Repository applications bundle 5.0
Prepare the Installation

Implement Area SAP Note Description
After the installation Back-end
2927392
Current Mem
ber and selec
tion for Partial
Time Charac
teristic
Mandatory correction if a BW query including a current member
variable, shows unexpected values.
After the installation Back-end
2935854
Current Mem
ber: Unique
value for scal
variant needed
in global lter
Mandatory correction if you receive query message Unique value
for scal variant needed in global lter" (BRAIN 073) although
there exists a lter for the scal variant.
After the installation Back-end
2950567
BRAIN 629
when Save a
Planning Se
quence
Mandatory correction if a planning sequence uses a mandatory
variable without default value or error Specify a value for variable
(BRAIN 629)” is received.
After the installation Back-end
2925634
Input help: Ex
clusion of
characteristic
values is not
taken into ac
count
Mandatory note if lter values are not taken into account for com
pound characteristics.
After the installation Back-end
2932787
Minor perform
ance improve
ments
(BICS,BOLAP)
Mandatory note includes correction to runtime improvements.
After the installation Back-end
2983526
APR 5.0 - As
sortment List
Select Prod
ucts for Plan
ning Area Op
tion Dening
Attributes re
trieval
This mandatory note improves performance in the Select
Products for Planning Area screen of the Manage Assortment Lists
app: If there is nothing related to option-dening attribute values
displayed or ltered, the values assigned to products are not re
trieved.
Common Installation Guide for SAP Customer Activity Repository applications bundle 5.0
Prepare the Installation
PUBLIC 41

Implement Area SAP Note Description
After the installation Back-end
2978543
APR 5.0 - As
sortment List
Performance
improvement
This note improves performance in the Manage Assortment Lists
app. It is mandatory after an upgrade to SAP HANA 2.0 database
revision 46 or higher.
After the installation Front-end
2995920
APR5.0 Re
useV2 – Bug
Fixes
This mandatory note xes bugs and improves layouts.
After the installation Back-end
3001133
APR 5.0 - Op
tion Planning
Capacity de
fault extractor
This correction is mandatory if SAP Merchandise Planning is not
installed..
SAP Notes for SAP Promotion Management
Note
Always consult the table for SAP Customer Activity Repository, regardless of your scenario. Notes listed
there are often common corrections, applicable to all consuming applications.
SAP Notes for SAP Promotion Management
Implement Area SAP Note Description
After the installation
Back-End
2844653
PMR Oer
Transfer - in
clude product
promo cost
price currency
Transfer oer from PMR to ERP including product promotion cost
price currency
After the installation
Back-End
2847080
BAPI_PROMO_
CREATE not
accepting
product pur
chase price
currency
Correction for BAPI_PROMO_CREATE to accept purchase price
currency at item level
42 PUBLIC
Common Installation Guide for SAP Customer Activity Repository applications bundle 5.0
Prepare the Installation

Implement Area SAP Note Description
After the installation
Back-End
2952618
Mandatory: SAP NWVC ABAP Runtime Patch 73
After the installation
Front-End
2984146
PMROFFERS -
Automatic
Maint Upload
This note contains corrections to error visibility while editing the
Manage Promotional Oers Attributes table.
After the installation
Front-End
2985671
Manage Prod
uct Groups -
Attributes Ta
ble Missing an
Error State
This note contains corrections to error visibility while editing the
Manage Product Groups Attributes table.
SAP Notes for SAP Allocation Management
Note
Always consult the SAP Notes for SAP Customer Activity Repository, regardless of your scenario. Notes
listed there are common corrections, applicable to all consuming applications.
Note
Some SAP Notes must be implemented before activation of SAP HANA content. If this is the case, this is
indicated in the description of the note. Otherwise, the note must be implemented after activation of SAP
HANA content.
SAP Notes for SAP Allocation Management
Implement Area SAP Note Description
After the installation Back-end
2995707
AMR 5.0 - Pre
wave Note be
fore HANA
Content Acti
vation
This note provides a missing SLT table name.
Please ensure that you implement this SAP Note before you
activate SAP HANA content for SAP Allocation Management.
Common Installation Guide for SAP Customer Activity Repository applications bundle 5.0
Prepare the Installation
PUBLIC 43

Implement Area SAP Note Description
After the installation Back-end
2986172
SAP Allocation
Management
5.0 - Collective
Note with All
Corrections
until RTC
This note comprises all back-end corrections of SAP Allocation
Management up to the RTC date of SAP Customer Activity
Repository applications bundle 5.0.
After the installation Front-end
2986856
SAP Allocation
Management
5.0 - Collective
Note with All
Corrections
until RTC for
Front End
This note comprises all front-end corrections of SAP Allocation
Management up to the RTC date of SAP Customer Activity
Repository applications bundle 5.0.
After the installation Back-end
2982741
SAP Allocation
Management -
BAdI Imple
mentation for
Real-Time In
ventory View
Starting with SAP Allocation Management 5.0, a BAdI implemen
tation is required for retrieving real-time inventory. This SAP Note
provides steps for implementing the standard BAdI logic.
After the installation Back-end
2994341
AM 5.0 - NW
ABAP 7.55 Cor
rections
Corrects an issue for the loading of SAP Allocation Management
apps if the SAP Customer Activity Repository system is running
on SAP NetWeaver AS for ABAP 7.55.
After the installation Back-end
2951092
RFC function
module to cre
ate allocation
table for SAP
Allocation
Management
in source sys
tem (Allocation
Management
5.0)
Provides an RFC function module for handling allocation tables in
the business scenarios for promotional push and promotional
buy.
44 PUBLIC
Common Installation Guide for SAP Customer Activity Repository applications bundle 5.0
Prepare the Installation

Implement Area SAP Note Description
After the installation Back-end
2777415
SAP Allocation
Management:
Activating /AM
R/* views ends
in Error
This note can be implemented if activation fails for CDS views for
SAP Allocation Management.
After the installation Back-end
2631613
SAP Allocation
Management -
Customizing -
Dene Busi
ness Scenarios
Follow the instructions to create a valid business scenario ID.
After the installation SAP S/4HANA
Retail for mer
chandise man
agement
2522603
Wrapper RFC
for ATP via
Controller
This note can be implemented for calling ATP (available-to-prom
ise) for multiple products in the target SAP S/4HANA or ECC sys
tem. This note is intended to increase the performance of the ATP
call to the target system
After the installation Back-end
2474287
Handling of
units of meas
ure inside SAP
Allocation
Management
This note resolves inconsistent maintenance of units of measure
between SAP ECC and SAP Customer Activity Repository.
After the installation Back-end
2441184
Static ABAP
generation er
ror of
classes /AMR/
CL... when in
stalling CARAB
1.0 FP03,
CARAB 2.0,
CARAB 4.0,
CARAB 5.0
The manual instructions in the note must be implemented for the
successful activation of SAP Allocation Management applications.
This note is mandatory.
Common Installation Guide for SAP Customer Activity Repository applications bundle 5.0
Prepare the Installation
PUBLIC 45
SAP Notes for SAP Replenishment Planning
Note
Always consult the table for SAP Customer Activity Repository, regardless of your scenario. Notes listed
there are often common corrections, applicable to all consuming applications.
SAP Notes for SAP Replenishment Planning
Implement Area SAP Note Description
After the installation Back-end
2991913
WUF Purge
Agent dumps
for location in
non-cascade
mode
This note can be implemented to cleanup location dumps when
trying to nd dependent order plan items in the Where Used
Framework for Purging.
After the installation Back-end
2991638
Consistency
check in re
plenishment
type main
tennce
This note can be implemented to activate a check on replenish
ment types that was removed as MRP type.
After the installation Back-end
2987852
DDF Tools Re
ports: ALV ex
port in Excel
and Word not
working
Mandatory note that corrects errors in the DDF tools reports that
occurred during the export of output lists into a Word or Excel
document.
After the installation Back-end
2985918
XRP Tools Re
ports: ALV ex
port in Excel
and Word not
working
Mandatory note that corrects errors in the SAP Replenishment
tools reports that occurred during the export of output lists into a
Word or Excel document.
After the installation Back-end
2985737
Wrong Data El
ement for Last
Change Time
in Order Plan
Purge Report
Mandatory note that corrects the eld help of the data element
Last Change Time in the Purging of Order Plan Items report.
46 PUBLIC
Common Installation Guide for SAP Customer Activity Repository applications bundle 5.0
Prepare the Installation

Implement Area SAP Note Description
After the installation Back-end
2980033
Separate con
trol option for
change history
of "Transfer in
Progress" up
date
This note can be implemented to avoid duplicate entries for order
plan outbound processing in the order plan item change history.
After the installation Back-end
2996488
Content of ta
bles /DMF/
C_OPI_R4CT
and /DMF/
C_OP_CHOPR
T not trans
lated
Entries delivered by SAP for Change Reasons for Order Plan Items
(/DMF/V_OPI_R4C) and Order Plan Change History Operation
(/DMF/V_OP_CHOPR) are only available in language english.
The changes will automatically be available with support pack
SP01.
After the installation Back-end
2982552
Real-Time In
ventory Status
not considered
as an assign
ment eld for
the validation
of Generic or
Specic as
signments in
Manage Con
guration As
signment Fiori
Application
Mandatory note that corrects the error that is displayed when
Real-Time Inventory Status is selected as a validation point for Ge
neric or Specic assignments.
After the installation Back-end
2985025
Replenishment
Engine Termi
nates Due to
Missing Client
Handling An
notation in
Conguration
Prole Core
Data Service
This note can be implemented to avoid replenishment engine ter
mination during execution due to missing client handling annota
tion in conguration proles core data services.
This note is applicable for Manage Cost Proles, Manage
Constraint Proles, Manage Shelf Cost proles, Manage
Procurement Schedules, Manage Conguration Assignments.
Common Installation Guide for SAP Customer Activity Repository applications bundle 5.0
Prepare the Installation
PUBLIC 47

Implement Area SAP Note Description
After the installation Back-end
2994441
Manage Alerts
Fiori Applica
tion related
DDIC Enhance
ments for
CARAB 5.0 re
lease
Mandatory note containing corrections for issues related to DDIC
Enhancements in CARAB 5.0.
After the installation Back-end
2986095
Corrections to
Replenishment
Alert Genera
tion
Report /DMF/
GENER
ATE_ALERTS
Mandatory note containing certain corrections for the Generate
Alerts report.
After the installation Back-end
2994442
Corrections
and Perform
ance Improve
ments in Man
age Alerts Fiori
Application
Mandatory note containing corrections and performance im
provements for the Manage Alerts app.
After the installation Back-end
2982245
Replenishment
Calculation:
Weekday proc
essing leads to
insucient de
mand records
Mandatory note for correcting errors that occur while reading the
demand forecasts.
After the installation Back-end
2986859
Corrections for
Review Order
Plan Items app
(Backend)
Mandatory note containing several corrections for the Review
Order Plan Items app (back-end)
After the installation Back-end
2997009
Corrections for
Purge Alerts
report
Mandatory note that corrects a few issues related to the Purge
Alerts report (back-end) and also improves its performance.
48 PUBLIC
Common Installation Guide for SAP Customer Activity Repository applications bundle 5.0
Prepare the Installation

Implement Area SAP Note Description
After the installation Back-end
2996815
Fix for global
search func
tionality in
Manage Con
guration As
signments app
Mandatory note that contains a x for the global search function
ality in the Manage Conguration Assignments app (back-end).
After the installation Front-end
2997222
Corrections in
UI for Manage
Alerts Fiori Ap
plication
Mandatory note containing several corrections for the errors dis
played while trying to navigate to the Review Order Plan Items or
Adjust Forecast app from the Manage Alerts app.
After the installation Front-end
2982687
Corrections in
Review Order
Plan Items app
Mandatory note containing several corrections for the Review
Order Plan Items app (front-end)
Parent topic: Prepare the Installation [page 30]
Next: Verify SAP HANA Users and Privileges [page 49]
4.2 Verify SAP HANA Users and Privileges
SAP Customer Activity Repository applications bundle requires a multi-level system landscape: Level 1 is the
SAP HANA database. Level 2 is the ABAP back-end server. Level 3 is the ABAP front-end server with SAP
Gateway and the SAP Fiori apps. Each level requires specic users with specic privileges. In this procedure,
you set up the authorizations for the SAP HANA database (level 1).
Overview
In the following diagram, you can see an overview of the three levels and the required authorizations:
Note
Depending on your deployment scenario, the concrete implementation in your customer system landscape
can vary. For example, if you have an embedded deployment scenario, you are using the ABAP back-end
server also as your front-end system, and have no separate ABAP front-end server.
Common Installation Guide for SAP Customer Activity Repository applications bundle 5.0
Prepare the Installation
PUBLIC 49

For more information, see Deployment Options [page 16]. For an overview diagram, see System Landscape
[page 14].
Authorization Levels for SAP Customer Activity Repository applications bundle
Caution
Level 1: You must always set up the SAP HANA users and privileges rst, that is, before installing SAP
Customer Activity Repository applications bundle on the ABAP back-end server and the ABAP front-end
server. This procedure is described below.
Note
Level 2 and Level 3: You can only set up these authorizations after the actual installation. In most cases,
you only need to do this if you are doing a new installation. If you are doing an upgrade from a lower support
package stack or feature package stack, the authorizations should already be available.
● Level 2: This procedure is described in section Verify Back-End Users and Roles.
● Level 3: The required authorizations depend on the consuming application and SAP Fiori apps that you
wish to use. For example, the procedures are described in the following sections:
SAP Customer Activity Repository: Set Up SAP Fiori Apps for SAP Customer Activity Repository; SAP
Assortment Planning: Assign Roles, Catalogs, and Groups in SAP Fiori Launchpad; SAP Allocation
Management: Assign Roles, Catalogs, and Groups in SAP Fiori Launchpad; SAP Replenishment
Planning: Set Up SAP Fiori Apps for SAP Replenishment Planning
50
PUBLIC
Common Installation Guide for SAP Customer Activity Repository applications bundle 5.0
Prepare the Installation

Prerequisites
● You are authorized to maintain users and assign privileges in the SAP HANA system.
Note
For more information or if you encounter any issues during the procedure below, see the SAP HANA
Administration Guide for SAP HANA Platform at https://help.sap.com/viewer/p/
SAP_HANA_PLATFORM. Select your version at the top. Search for section Managing SAP HANA Users
and section User Authorization.
● You know what the source master data system is (for example, SAP S/4HANA or SAP Retail).
● You know what the name of the SAPHANADB ABAP database schema is in your customer system
landscape.
Note
In this guide, SAPHANADB is used as a variable. Replace it with the name of the database user or
database schema in your ABAP back-end system. You might also come across documentation or user
interfaces that use SAPHANADB. Both variables mean the same.
For more information and an example, see the Important Variables in section Naming Conventions
[page 7].
For more information about database users and schemas, see SAP Note 2535951 (FAQ: SAP HANA
Users and Schemas).
Tip
If you don't know the SAPHANADB of your system, there are two easy ways to nd it:
○ Log on to your ABAP back-end system using SAP Logon. Choose System Status . In the
section titled Database data, see the name for Schema.
○ In SAP HANA studio, the schema name is listed under Catalog.
Procedure
To set up the authorizations, follow these steps:
1. Open SAP HANA studio and log on to your back-end system.
2. Choose Window Perspective Open Perspective SAP HANA Administration Console .
3. In the Systems view, choose Security Users to display the list of database users.
4. Verify that the following users exist and that they have the required privileges and roles. If necessary,
assign any missing privileges and roles.
Common Installation Guide for SAP Customer Activity Repository applications bundle 5.0
Prepare the Installation
PUBLIC 51

Caution
Users marked * must be identical on all three levels. Make sure these users have the same name on
the SAP HANA database level, on the ABAP back-end server, and on the ABAP front-end server.
Users Privileges / Roles
SAPHANADB
This is the generic database user
that you need for the connection
from the ABAP back-end server to
the SAP HANA database.
○ Privilege REPO.IMPORT
○ Privilege ROLE ADMIN
○ Privilege STRUCTUREDPRIVILEGE ADMIN
○ Privilege EXECUTE on procedure TRUNCATE_PROCEDURE_OBJECTS
○ Privilege EXECUTE on procedure GET_PROCEDURE_OBJECTS
○ Privilege SELECT on schema SAP_ECC (required if your source master
data system is SAP Retail)
○ Privilege SELECT on schema SAP_S4H (required if your source master
data system is SAP S/4HANA)
○ Role CONTENT_ADMIN
○ Role AFLPM_CREATOR_ERASER_EXECUTE
This role enables the user to execute functions of the PAL library (required
by SAP Assortment Planning, for example).
For more information, see Enable Usage of PAL Functions [page 60] and
SAP Note 2046767 .
○ Role AFL__SYS_AFL_OFL_AREA_EXECUTE
○ Additionally, grant the following privileges, with option Grantable to others,
on these schemas:
On schema _SYS_BIC:
○ Privilege CREATE ANY
○ Privilege ALTER
On schema <your SAP S/4HANA or SAP Retail schema name>:
○ Privilege SELECT
52
PUBLIC
Common Installation Guide for SAP Customer Activity Repository applications bundle 5.0
Prepare the Installation

Users Privileges / Roles
_SYS_REPO
○ Privilege SELECT, with option Grantable to others, on the following physical
database schemas:
○ Physical database schema of your back-end system (referred to as
SAPHANADB in this guide)
○ Physical database schema that contains the SAP S/4HANA or SAP
Retail tables
○ Physical database schema that contains the SAP CRM tables
○ Physical database schema that contains the SAP Marketing Cloud ta
bles
○ Authoring schema SAP_S4H (required if your source master data sys
tem is SAP S/4HANA)
○ Authoring schema SAP_ECC (required if your source master data sys
tem is SAP Retail)
Tip
You can use the following example SQL statement to grant the privi
lege:
GRANT SELECT ON SCHEMA <Your schema name> TO
_SYS_REPO WITH GRANT OPTION;
○ Role UDF_DEPLOY_SYS_REPO.
For information about the privileges automatically assigned with this role,
see Set Up Authorizations for Unied Demand Forecast (UDF) [page 87].
○ For SAP Allocation Management, grant the following additional privileges:
○ Privilege CREATE SCHEMA
This privilege enables the user to create a schema in the SAP HANA
database.
Common Installation Guide for SAP Customer Activity Repository applications bundle 5.0
Prepare the Installation
PUBLIC 53

Users Privileges / Roles
<Your User Name> *
○ Privilege SELECT on schema _SYS_BI
○ Privilege SELECT on schema SAPHANADB
○ Privilege EXECUTE on procedure REPOSITORY_REST
○ Privilege SELECT on schema SAP_S4H (if your source master data system
is SAP S/4HANA)
○ Privilege SELECT on schema SAP_ECC (if your source master data system
is SAP Retail)
○ Set the Session Client of this database user to the correct back-end sys
tem client.
This step is required to enable the SAP Assortment Planning planning
framework, where SAP Analysis for Microsoft Oce workbooks obtain
data from SAP HANA views.
Note
If you encounter issues with the steps below, see the Assign Default
Client section in the SAP HANA Modeling Guide at https://
help.sap.com/viewer/p/SAP_HANA_PLATFORM.
1.
Still under Security Users , select the user.
2. On the User tab, set the Session Client to the client number created in
the Set Up SAP Client section.
5. Save your changes.
Result
You have successfully set up the users and privileges in the SAP HANA back-end system. Continue with the
next section.
Parent topic: Prepare the Installation [page 30]
Previous: Implement SAP Notes for the Installation [page 30]
Next: Verify Correct Schema Mapping [page 54]
4.3 Verify Correct Schema Mapping
In SAP HANA studio, verify that the authoring schemas delivered by SAP are mapped to the correct physical
schemas of your customer landscape. First do an n:1 mapping (all authoring schemas of SAP Customer
Activity Repository applications bundle to the same SAPHANADB physical schema). Then do a 1:1 mapping (the
54
PUBLIC
Common Installation Guide for SAP Customer Activity Repository applications bundle 5.0
Prepare the Installation

authoring schema of each source master data system to the corresponding physical schema). If necessary,
create any mappings that are missing. This procedure is mandatory for all the applications.
Context
Why Schema Mapping?
Schema mapping is required if the source system and the target system have dierent physical schemas.
● Schema mapping allows you to transport SAP HANA objects from the source system to the target system.
For example, from the SAP delivery system to your test system, and from your test system to your
production system. After schema mapping, you can access and deploy the transported objects.
● Schema mapping is a prerequisite to activate the SAP HANA content.
● Schema mapping is a prerequisite to replicate the required SLT tables from the source master data system
to the target system (your SAP Customer Activity Repository back-end system).
What are Authoring Schemas and Physical Schemas?
The SAP HANA content of SAP Customer Activity Repository applications bundle is delivered with several
authoring schemas (for dierent scenarios and dierent source master data systems).
● The authoring schema is the logical database schema with which the SAP HANA objects were originally
created in the SAP source system. The authoring schema is listed in each object's properties in SAP HANA
studio. Dierent objects can have dierent authoring schemas.
● The physical schema is the logical database schema of your customer back-end system (referred to as
SAPHANADB, sometimes also as SAPHANADB).
In the procedure below, you must map the authoring schemas to the physical schemas of your customer back-
end system.
Prerequisites
● You have set up the authorizations as described in Verify SAP HANA Users and Privileges [page 49].
● You know what the name of the SAPHANADB database schema is in your customer back-end system. This is
the physical schema name that you will need to enter in the mapping procedure below.
Note
In this guide, SAPHANADB is used as a variable. Replace it with the name of the database user or
database schema in your ABAP back-end system. You might also come across documentation or user
interfaces that use
SAPHANADB. Both variables mean the same.
For more information and an example, see the Important Variables in section Naming Conventions
[page 7].
For more information about database users and schemas, see SAP Note 2535951 (FAQ: SAP HANA
Users and Schemas).
Common Installation Guide for SAP Customer Activity Repository applications bundle 5.0
Prepare the Installation
PUBLIC 55

Tip
If you don't know the SAPHANADB of your system, there are two easy ways to nd it:
○ Log on to your ABAP back-end system using SAP Logon. Choose System Status . In the
section titled Database data, see the name for Schema.
○ In SAP HANA studio, the schema name is listed under Catalog.
Authoring Schemas
The following tables show the two sets of authoring schemas that are relevant for this release. In the procedure
below, you map these authoring schemas to the physical schemas of your customer system landscape.
Table 1: Authoring Schemas for SAP Customer Activity Repository applications bundle
Schema Name Required For
SAP_CAR
SAP HANA objects for SAP Customer Activity Repository
SAP_DDF
SAP HANA objects for Demand Data Foundation and Unied
Demand Forecast
SAPOSA
SAP HANA objects for On-Shelf Availability
SAP_RAP
SAP HANA objects for consuming applications (for example,
SAP Assortment Planning, SAP Merchandise Planning, or
SAP Promotion Management)
SAP_RTLRAP_AMR
SAP HANA objects for SAP Allocation Management
Table 2: Authoring Schemas for Source Master Data Systems
Schema Name Required For
SAP_CRM
SAP Customer Relationship Management
SAP_CUAN
SAP Marketing Cloud
SAP_ECC
SAP ERP (SAP Retail)
SAP_S4H
SAP S/4HANA Retail
56 PUBLIC
Common Installation Guide for SAP Customer Activity Repository applications bundle 5.0
Prepare the Installation

Procedure
Note
If you encounter issues during the steps below, see the SAP HANA Modeling Guide (SAP HANA Studio) at
https://help.sap.com/viewer/p/SAP_HANA_PLATFORM. Select your version at the top. Search for section
Map Authoring Schema to Physical Schema and also consult the subsections.
1. In SAP HANA studio, log on to your back-end system.
2. Choose Window Perspective Open Perspective SAP HANA Modeler .
3. Choose Help Quick View Schema Mapping .
4. Select the system and choose Add.
5. Enter the authoring schemas and physical schemas that you want to map:
Caution
Make sure that you enter the names correctly.
Make sure there are no leading or trailing spaces before or after a name. Space characters cause issues
with schema mapping.
1. Map all authoring schemas from Table 1 to the same physical schema (SAPHANADB) of your customer
system. This is the n:1 mapping step. If necessary, add new mappings.
2. Map each authoring schema from Table 2 to the physical schema for the respective source master
data system in your customer system. This is the 1:1 mapping step. If necessary, add new mappings.
6. Choose OK.
Note
If you are using an SAP HANA system with multiple isolated tenant databases to perform cross-
database access between tenants, you must provide the authoring database name and the physical
database name in the schema mapping denition.
You maintain schema mapping denitions in the SYS_BI.M_DATABASE_SCHEMA_MAPPING table.
Parent topic: Prepare the Installation [page 30]
Previous: Verify SAP HANA Users and Privileges [page 49]
Next: Generate Time Data for Gregorian Calendar [page 58]
Common Installation Guide for SAP Customer Activity Repository applications bundle 5.0
Prepare the Installation
PUBLIC 57

4.4 Generate Time Data for Gregorian Calendar
Perform a generic calendar setting in SAP HANA studio. This generates the time data (calendar) for several
scenarios and SAP Fiori apps in SAP Customer Activity Repository applications bundle. Setting up the
Gregorian calendar is mandatory. Optionally, you can choose to set up the Fiscal calendar as well.
Use
Perform this procedure to generate the time data for the calendar type Gregorian.
Note
There is a second calendar type called Fiscal. It is used if the nancial year is not the same as the calendar
year (for example, April to March).
The Fiscal calendar is required for SAP Assortment Planning and for SAP Merchandise Planning.
You can set up both calendar types already now. Or you can set up the scal calendar type later on when
you get to the application-specic sections (Generate Time Data - Fiscal Calendar [page 283]).
Prerequisites
● You are familiar with the calendar information for SAP HANA Platform.
Note
For more information, see https://help.sap.com/viewer/p/SAP_HANA_PLATFORM and select your
version. Choose
Develop Development SAP HANA Modeling Guide (for SAP HANA Studio) .
Search for the Generate Time Data section and see also the subsections.
Procedure
1. Open SAP HANA studio and log in to your back-end system.
2. Open the SAP HANA Modeler perspective.
3. On the Quick View tab, choose Generate Time Data.
4. Select your back-end system and choose Next.
5. Set up the Gregorian calendar:
○ Select the calendar type Gregorian.
○ Enter a From Year and a To Year.
58
PUBLIC
Common Installation Guide for SAP Customer Activity Repository applications bundle 5.0
Prepare the Installation

Note
The range of years should include all the years of data that you plan to store in SAP Customer
Activity Repository.
Example
If you plan to start using SAP Customer Activity Repository on January 1, 2019, enter 2019 as your
starting year. But if you plan to access sales documents created in SAP Retail that date back to
January 2017, enter 2017 as your starting year.
○ Select the granularity.
Note
Day is the minimum granularity required for SAP Customer Activity Repository. You can choose a
ner level of granularity, for example Hour, if necessary.
○ Choose Finish.
6. (Optional) If you wish to set up the scal calendar as well, follow the instructions in Generate Time Data -
Fiscal Calendar [page 283].
Parent topic: Prepare the Installation [page 30]
Previous: Verify Correct Schema Mapping [page 54]
Next: Congure AFL Usage [page 59]
4.5 Congure AFL Usage
Perform conguration tasks to enable the usage of application function libraries (such as the PAL and the OFL)
for the applications SAP Assortment Planning and SAP Allocation Management.
Enable Usage of PAL Functions (SAP Assortment Planning) [page 60]
To enable the usage of the PAL algorithm for SAP Assortment Planning, perform the required setup
steps.
Check the OFL Installation [page 61]
Conrm that the OFL algorithm was installed successfully as prerequisite for SAP Assortment Planning
and SAP Allocation Management.
Parent topic: Prepare the Installation [page 30]
Previous: Generate Time Data for Gregorian Calendar [page 58]
Next: Migrate to New Default Table for Sales Pricing Data (/DMF/PRC) [page 62]
Common Installation Guide for SAP Customer Activity Repository applications bundle 5.0
Prepare the Installation
PUBLIC 59

4.5.1 Enable Usage of PAL Functions (SAP Assortment
Planning)
To enable the usage of the PAL algorithm for SAP Assortment Planning, perform the required setup steps.
Use
The installation of SAP HANA Platform includes the installation of the PAL algorithm, a prerequisite for SAP
Assortment Planning.
To enable the usage of the PAL algorithm, as required by SAP Assortment Planning, perform the following
procedure.
Note
You do not need to create the AFL_WRAPPER_GENERATOR or AFL_WRAPPER_ERASER procedures, nor do
you need to generate any special PAL procedures; this is done automatically.
Procedure
1. To conrm that the PAL functions were installed successfully, you can run SELECT statements in the three
relevant public views as follows:
○ SELECT * FROM SYS.AFL_AREAS WHERE AREA_NAME = 'AFLPAL';
In the case of a successful installation, the statement should return 1 row.
○ SELECT * FROM SYS.AFL_PACKAGES WHERE AREA_NAME = 'AFLPAL';
In the case of a successful installation, the statement should return 1 row.
○ SELECT * FROM SYS.AFL_FUNCTIONS WHERE AREA_NAME = 'AFLPAL';
In the case of a successful installation, the statement should return many rows. Verify that the function
KMEANS is part of the list.
More Information
● Section Install the Prerequisites [page 19] Common Prerequisites SAP HANA Platform
● http://help.sap.com/hana_platform <Version> Reference SAP HANA Predictive Analysis Library
(PAL)
60
PUBLIC
Common Installation Guide for SAP Customer Activity Repository applications bundle 5.0
Prepare the Installation

4.5.2 Check the OFL Installation
Conrm that the OFL algorithm was installed successfully as prerequisite for SAP Assortment Planning and
SAP Allocation Management.
Use
The installation of SAP HANA Platform includes the installation of the OFL algorithm, a prerequisite for SAP
Assortment Planning.
Procedure
1. To conrm that the OFL was installed successfully, you can run SELECT statements in the three relevant
public views as follows:
○ SELECT * FROM SYS.AFL_AREAS WHERE AREA_NAME = 'OFL_AREA';
In the case of a successful installation, the statement should return 1 row.
○ SELECT * FROM SYS.AFL_PACKAGES WHERE AREA_NAME = 'OFL_AREA';
In the case of a successful installation, the statement should return 1 row.
○ SELECT * FROM SYS.AFL_FUNCTIONS WHERE AREA_NAME = 'OFL_AREA';
In the case of a successful installation, the statement should return 4 rows. Verify that the function
GENIOS_SOLVE is part of the list.
Common Installation Guide for SAP Customer Activity Repository applications bundle 5.0
Prepare the Installation
PUBLIC 61

4.6 Migrate to New Default Table for Sales Pricing Data
(/DMF/PRC)
Make sure that /DMF/PRC is the default table for sales pricing data in your customer system. This procedure is
mostly relevant for upgrade scenarios but might also apply to some new installation scenarios.
Context
As of SAP Customer Activity Repository applications bundle 5.0, the default table for sales pricing data has
changed:
● New default table: /DMF/PRC (Product Pricing Data)
● Old default table: /DMF/PRODLOC_PRC (Product Location Price Data)
If you are upgrading from a lower release, you need to migrate to the new table for replicating sales pricing
data.
Tip
You can already perform this procedure now, prior to the actual upgrade. This enables you to schedule the
migration at a time that is convenient for you.
Note
The table /DMF/PRODLOC_PRC is still used when replicating purchase pricing data (moving average price).
This is not aected by the migration described here. Applications requiring knowledge of the moving
average price, such as SAP Replenishment Planning, continue to use the data from this table.
Procedure
1. Migrate the sales pricing data to the new table. Follow the instructions in the Enable Extended Sales Pricing
Data section of the SAP Customer Activity Repository Administration Guide.
2. Check your data replication settings. Make sure that the sales pricing data from the source master data
system is replicated to the new table. For replication instructions, see the Congure Data Replication from
SAP ERP and SAP S/4HANA to DDF section of the SAP Customer Activity Repository Administration Guide.
Parent topic: Prepare the Installation [page 30]
Previous: Congure AFL Usage [page 59]
62
PUBLIC
Common Installation Guide for SAP Customer Activity Repository applications bundle 5.0
Prepare the Installation

5 Install the Software
For a correct installation, you must rst install the required prerequisites and implement the pre-installation
SAP Notes. Then you install the back-end components and the front-end components. Finally, you implement
the SAP Notes that can only be applied after the installation.
Tip
If you encounter issues during these procedures, see the Troubleshooting [page 207] section for possible
solutions.
1. Verify Prerequisites and SAP Notes (Pre-Installation) [page 63]
Ensure that the required prerequisites and pre-installation SAP Notes have been implemented in your
system landscape.
2. Install ABAP Back-End Server [page 64]
First install the SAP HANA database together with the AFL components for this release. Then install the
SAP CARAB 5.0 back-end product version of SAP Customer Activity Repository applications bundle.
Complete the back-end installation by setting up one or more SAP clients.
3. Install ABAP Front-End Server [page 76]
Install the complete UI layer in the front-end system. The UI layer consists of three components: SAP
Gateway, the central SAP Fiori UI component (SAP Fiori front-end server with SAP Fiori launchpad),
and the product-specic SAP Fiori UI component (front-end product version SAP FIORI FOR SAP
CARAB 5.0 of SAP Customer Activity Repository applications bundle).
4. Verify SAP Notes and RINs (Post-Installation) [page 81]
There are SAP Notes (corrections) that can only be implemented after you have installed the back-end
product version and the front-end product version. You must therefore do this additional check and
implement the required notes, before you move on to the setup steps for the applications.
5.1 Verify Prerequisites and SAP Notes (Pre-Installation)
Ensure that the required prerequisites and pre-installation SAP Notes have been implemented in your system
landscape.
Procedure
1. Verify that you have installed and congured the prerequisites that are required for your scenario. In Install
the Prerequisites [page 19], see the Common Prerequisites and the Application-Specic Prerequisites.
2. Verify that all SAP Notes that must be applied before the installation have been implemented for your
scenario.
Common Installation Guide for SAP Customer Activity Repository applications bundle 5.0
Install the Software
PUBLIC 63

See Implement SAP Notes for the Installation [page 30].
Caution
Always consult the table for SAP Customer Activity Repository, regardless of your scenario. Notes
listed there are often common corrections, applicable to all consuming applications.
Parent topic: Install the Software [page 63]
Next: Install ABAP Back-End Server [page 64]
5.2 Install ABAP Back-End Server
First install the SAP HANA database together with the AFL components for this release. Then install the SAP
CARAB 5.0 back-end product version of SAP Customer Activity Repository applications bundle. Complete the
back-end installation by setting up one or more SAP clients.
Context
● The application function library (AFL) components run directly in the SAP HANA database. The revision of
each AFL component must be compatible with the revision of the SAP HANA database.
● The ABAP back-end server is based on the foundation component (SAP S/4HANA FOUNDATION).
● On the ABAP back-end server, you install the SAP CARAB 5.0 back-end product version. The back-end
product version provides the business logic and the back-end data (for example, users, roles, and
authorizations).
Note
In an embedded deployment scenario, you plan to use the ABAP back-end server also as your front-end
system. This means that when you get to the installation of the front-end components later on (Install
ABAP Front-End Server [page 76]), you perform this installation here on the ABAP back-end server.
For more information, see Deployment Options [page 16].
1. Download and Install SAP RTL AFL FOR SAP HANA (Mandatory) [page 65]
Install compatible revisions of the SAP HANA database and the application function library
components (SAP HANA AFL and SAP RTL AFL FOR SAP HANA). You must do this before you install
the SAP CARAB back-end product version of SAP Customer Activity Repository applications bundle.
This procedure is mandatory for all the scenarios.
2. Download and Install SAP XRP AFL (Only for SAP Replenishment Planning) [page 68]
This procedure is only required if you want to use SAP Replenishment Planning. Download a revision of
the SAP XRP AFL component that is compatible with the revision of your SAP HANA database and
install it in your SAP HANA system.
64
PUBLIC
Common Installation Guide for SAP Customer Activity Repository applications bundle 5.0
Install the Software
3. Install SAP CARAB Back-End Product Version [page 71]
Install the SAP CARAB 5.0 back-end product version of SAP Customer Activity Repository
applications bundle 5.0 in your ABAP back-end system. First create a stack XML le with Maintenance
Planner. Then install this le with Software Update Manager (SUM).
4. Set Up SAP Client [page 73]
Set up one or more SAP clients in your ABAP back-end system. Map the client of each source master
data system to a client in your ABAP back-end system. The steps to follow depend on whether your
scenario uses the Demand Data Foundation (DDF) module in SAP Customer Activity Repository or not.
Parent topic: Install the Software [page 63]
Previous: Verify Prerequisites and SAP Notes (Pre-Installation) [page 63]
Next: Install ABAP Front-End Server [page 76]
5.2.1 Download and Install SAP RTL AFL FOR SAP HANA
(Mandatory)
Install compatible revisions of the SAP HANA database and the application function library components (SAP
HANA AFL and SAP RTL AFL FOR SAP HANA). You must do this before you install the SAP CARAB back-end
product version of SAP Customer Activity Repository applications bundle. This procedure is mandatory for all
the scenarios.
Overview
There is one software component in SAP Customer Activity Repository applications bundle that you must
always install (or upgrade) rst:
● SAP RTL AFL FOR SAP HANA
You must install (upgrade) this component together with the following components of SAP HANA Platform:
● SAP HANA AFL
● SAP HANA DATABASE
The revision of each AFL component must be compatible with the revision of the SAP HANA database. Be
aware of the following dependencies.
Dependencies Between AFL Components and the SAP HANA Database
The AFL components (SAP HANA AFL, SAP RTL AFL FOR SAP HANA) run directly in the SAP HANA
database. Because of this, they are released in sync with the SAP HANA database.
Common Installation Guide for SAP Customer Activity Repository applications bundle 5.0
Install the Software
PUBLIC 65

The releases are called “revisions”. Whenever a new revision of the SAP HANA database is released, a new
revision of each AFL component is released. As a result, there are always several revisions of each component
available for download.
Caution
Compatible Revisions
For each revision of an AFL component, there is only one compatible revision of the SAP HANA database.
Whenever you upgrade the AFL components to a new revision, you must also upgrade the database.
Whenever you upgrade the database to a new revision, you must also upgrade the AFL components.
This applies not only during a new installation or an upgrade, but is equally relevant during normal
business operations.
Patches for Same Revision
Patches are the sole exception to this rule. Within the same revision, you can and should upgrade the AFL
components to the highest available patch. Here is an example:
● Your current revision is:
SAP RTL AFL FOR SAP HANA revision 50.1 for SAP HANA database 2.0 SPS05 revision 50
● A higher patch might be:
SAP RTL AFL FOR SAP HANA revision 50.2 for SAP HANA database 2.0 SPS05 revision 50
In this case, you should install the higher patch of the AFL. You do not need to update the database.
Tip
You can easily check which revision is currently installed:
1. Execute transaction DB02 to open the Diagnostics: Missing Tables and Indexes screen.
2. Choose Current Status Overview to open the SAP HANA database overview.
3. Under Installed Plug-Ins , choose RTL to open the table with the plug-in details.
4. Search for SAP RTL AFL and see the values for rev-number and rev-patchlevel.
Download and Install SAP RTL AFL FOR SAP HANA
Tip
When you download AFL components from the SAP Support Portal, the compatible revision of the SAP
HANA database is always indicated.
1. Determine which revision of the SAP HANA database and the AFL components you need.
To select the best revision for your scenario, see the Common Prerequisites in section Install the
Prerequisites [page 19]. Carefully read the information under SAP HANA Platform 2.0 and SAP RTL AFL
FOR SAP HANA:
○ Note the minimum revision of the SAP HANA database and the AFL components. You need at least
this revision for the current release.
○ Read the Caution to know what to do if you wish to select a higher revision than the minimum
revision.
66
PUBLIC
Common Installation Guide for SAP Customer Activity Repository applications bundle 5.0
Install the Software

Once you have selected a revision, this gives you the compatible revisions of the other components.
2. Download the compatible revisions from the SAP Support Portal at http://support.sap.com under
Software Downloads :
Tip
Alternatively, you can log in to the SAP ONE Support Launchpad at https://
launchpad.support.sap.com/#/softwarecenter/ and follow the navigation from there.
○ SAP RTL AFL FOR SAP HANA:
The component is included in the SAP CARAB back-end product version. To download one of the
available revisions, choose
By Alphabetical Index (A-Z) C CAR RETAIL APPLICATIONS BUNDLE
SAP CARAB 5.0 Support Packages and Patches DOWNLOADS COMPRISED SOFTWARE
COMPONENT VERSIONS
SAP RTL AFL FOR SAP HANA 200 .
Caution
Always select the highest available patch of a revision.
○ SAP HANA AFL and SAP HANA DATABASE:
These components are part of SAP HANA Platform. To download one of the available revisions, choose
By Alphabetical Index (A-Z) H SAP HANA PLATFORM EDITION SAP HANA PLATFORM
EDITION 2.0 Support Packages and Patches DOWNLOADS SAP HANA AFL 2.0 and SAP HANA
DATABASE 2.0.
3. Install the selected revisions of SAP RTL AFL FOR SAP HANA, SAP HANA AFL, and SAP HANA
DATABASE in your back-end system.
See SAP Note 2377894 and carefully follow the steps for the new installation scenario.
Tip
If you encounter issues, see the Troubleshooting [page 207] section for possible solutions.
Tip
For installation and upgrade information for SAP HANA Platform, see the following sections of the SAP
HANA Server Installation and Update Guide (select your release at the top):
○ Installing an SAP HANA System
○ Updating the SAP HANA System
Result
You have successfully installed the SAP RTL AFL FOR SAP HANA component.
Remember
For future updates of your system landscape, remember that the dependencies between the AFL
components and the SAP HANA database still apply:
● For example, should you decide to upgrade your SAP Customer Activity Repository applications bundle
scenario to a higher release requiring a higher AFL revision, you will also need to upgrade the database.
Common Installation Guide for SAP Customer Activity Repository applications bundle 5.0
Install the Software
PUBLIC 67

● Likewise, should you decide to upgrade your SAP HANA database to a higher revision (for example, to
use new features in SAP HANA), you will also need to upgrade the AFL components.
Parent topic: Install ABAP Back-End Server [page 64]
Next: Download and Install SAP XRP AFL (Only for SAP Replenishment Planning) [page 68]
5.2.2 Download and Install SAP XRP AFL (Only for SAP
Replenishment Planning)
This procedure is only required if you want to use SAP Replenishment Planning. Download a revision of the SAP
XRP AFL component that is compatible with the revision of your SAP HANA database and install it in your SAP
HANA system.
Context
Note
SAP XRP AFL is only required if you use SAP Replenishment Planning.
SAP XRP AFL is the application function library (AFL) component for SAP Replenishment Planning. Basically,
it is the calculation engine for your replenishment-related processes.
It is delivered as a component in the SAP CARAB 5.0 back-end product version of SAP Customer Activity
Repository applications bundle.
SAP XRP AFL runs in the database layer of your system landscape. Because of technical dependencies, the
component follows the release cycle of the SAP HANA database. The releases are called “revisions”.
This section describes where to download the correct revision of SAP XRP AFL and how to install it.
Prerequisites
● You are aware of the SAP HANA Platform prerequisites for this release of SAP Customer Activity
Repository applications bundle.
See section Install the Prerequisites [page 19] and consult the information under Common Prerequisites
SAP HANA Platform 2.0 . The information about minimum revisions and maintenance revisions also
applies to SAP XRP AFL.
● You know that the SAP XRP AFL revision must always be compatible with the SAP HANA DATABASE
revision.
See section Download and Install SAP RTL AFL FOR SAP HANA (Mandatory) [page 65] and consult the
information under Dependencies Between AFLs and the SAP HANA Database.
68
PUBLIC
Common Installation Guide for SAP Customer Activity Repository applications bundle 5.0
Install the Software
● You have already installed compatible revisions of the following components in your SAP HANA system:
○ Components of SAP HANA Platform: SAP HANA DATABASE and SAP HANA AFL
○ Component of SAP Customer Activity Repository applications bundle: SAP RTL AFL FOR SAP HANA
Procedure
To install SAP XRP AFL, follow these steps:
1. Select a revision:
Select the SAP XRP AFL revision that is compatible with your SAP HANA database revision.
2. Download the revision:
1. Navigate to the SAP Support Portal at http://support.sap.com and choose the Download Software
icon.
Alternatively, you can log in to the SAP ONE Support Launchpad at https://
launchpad.support.sap.com/#/softwarecenter/
and follow the navigation from there.
2. Choose By Alphabetical Index (A-Z) C CAR RETAIL APPLICATIONS BUNDLE SAP CARAB 5.0
Support Packages and Patches DOWNLOADS COMPRISED SOFTWARE COMPONENT VERSIONS
SAP XRP AFL 1.0 .
3. Download the selected revision (*.sar le).
Note
The compatible SAP HANA database revision is always indicated.
3. Install the revision:
Note
Your tool for this step is the SAP HANA database lifecycle manager (HDBLCM).
You have several options for installing or upgrading components with the HDBLCM. For more
information, see the SAP HANA Server Installation and Update Guide for your SAP HANA Platform
version at https://help.sap.com/viewer/p/SAP_HANA_PLATFORM under Installation and Upgrade.
In particular, consult the following sections:
○ Choosing the Correct SAP HANA HDBLCM for Your Task
○ Installing or Updating SAP HANA Components
○ Parameter Reference
If you encounter issues using the HDBLCM, see SAP Notes 2078425 (Troubleshooting note for SAP
HANA platform lifecycle management tool hdblcm) and 2082466 (Known Issues in SAP HANA
Platform Lifecycle Management (HDBLCM)) for possible solutions.
1. Log in as user root.
2. Load the SAP XRP AFL revision into your directory (<download path>).
3. Change to the SAP HANA resident directory where the HDBLCM is located:
cd /<sapmnt>/<SID>/hdblcm
Common Installation Guide for SAP Customer Activity Repository applications bundle 5.0
Install the Software
PUBLIC 69

Note
<SID> is your customer-dened database system ID.
4. Call the resident HDBLCM tool at command line level with the following option as user root:
./hdblcm --action=update_components --component_dirs=/<download path>/
SAP_XRP_AFL
5. Follow the on-screen instructions.
6. Check that the script server for the SAP HANA database is active. If it isn't, activate it as described in
SAP Note
1650957 (SAP HANA Database: Starting the Script Server).
7. Check that the SAP XRP AFL component is now installed and active in your SAP HANA database:
○ Follow the instructions in SAP Note 2188129 (Application Function Library (AFL): Check what
AFLs are installed and active in a SAP HANA Database).
○ You should get the message “registration was successful” (for PLUGIN_NAME = 'xrp' and
PLUGIN_NAME = 'afl' in view M_PLUGIN_STATUS).
○ If you get the message “registration failed”, repeat the installation steps above.
Then restart the server and the SAP HANA database.
○ If you encounter other issues, see section Troubleshooting [page 207] for possible solutions.
Result
You have successfully installed the SAP XRP AFL component. Continue with the next step.
Remember
For future updates of your system landscape, remember that the dependency between the AFL and the
SAP HANA database still applies.
For example, should you later decide to upgrade your SAP Replenishment Planning and SAP Customer
Activity Repository system to a higher release requiring a higher AFL revision, you will also need to upgrade
the revision of the SAP HANA database.
Vice versa, should you decide to upgrade your SAP HANA database to a higher revision (for example, to use
new features in SAP HANA), you will also need to upgrade the AFL to the compatible revision.
Parent topic: Install ABAP Back-End Server [page 64]
Previous: Download and Install SAP RTL AFL FOR SAP HANA (Mandatory) [page 65]
Next: Install SAP CARAB Back-End Product Version [page 71]
70
PUBLIC
Common Installation Guide for SAP Customer Activity Repository applications bundle 5.0
Install the Software

5.2.3 Install SAP CARAB Back-End Product Version
Install the SAP CARAB 5.0 back-end product version of SAP Customer Activity Repository applications bundle
5.0 in your ABAP back-end system. First create a stack XML le with Maintenance Planner. Then install this le
with Software Update Manager (SUM).
Prerequisites
● You have completed all of the procedures described in the previous sections of this guide. In particular, see
the tasks in section Prepare the Installation [page 30].
● You have installed compatible revisions of the SAP HANA database and the mandatory AFL components
(SAP HANA AFL and SAP RTL AFL FOR SAP HANA). For information on the minimum revisions for this
release, see Install the Prerequisites [page 19].
Overview
In the procedures below you do the following:
Use this tool... To do this...
Maintenance Planner
More information: https://help.sap.com/viewer/p/MAINTENANCE_PLANNER
Plan your system landscape and cre
ate a stack XML le based on the re
quired product versions.
Software Update Manager (SUM)
More information: https://support.sap.com/en/tools/software-logistics-tools/soft
ware-update-manager.html
Install or upgrade components using
the stack XML le.
Note
It may be possible to install or upgrade components using the SAP Add-On Installation Tool (transaction
SAINT) or the Support Package Manager (transaction SPAM). However, these alternative procedures are
not described in this guide. For information on whether they are supported for your implementation
scenario and on how to proceed in this case, see SAP Note 1803986 .
Common Installation Guide for SAP Customer Activity Repository applications bundle 5.0
Install the Software
PUBLIC 71

Create Stack XML File With Maintenance Planner
Note
If you encounter issues with Maintenance Planner, see the following sources for possible solutions:
● Maintenance Planner Troubleshooting Guide on the SAP Community Wiki
● SAP Note 2535751 : Can not select the higher release for Netweaver in Maintenance Planner
● SAP Note 2314463 : Required le K-XXXxxxxxxxx.SAR is not visible for your user Sxxxxxxx
1. Log on to Maintenance Planner at https://support.sap.com/en/alm/solution-manager/processes-72/
maintenance-planner.html
under Access Maintenance Planner .
2. Choose Plan a New System.
3. Choose Plan.
4. Choose the system type ABAP (Install an ABAP System) and enter a three-character system ID (SID).
5. Select the system type that you wish to install (SAP S/4HANA FOUNDATION).
6. Select a product version and a support package stack.
Note
You can nd the minimum version required for this release in section Install the Prerequisites [page 19]
under SAP S/4HANA FOUNDATION.
7. Select an instance (for example, product instance SAP S/4HANA Foundation).
8. Choose Conrm Selection.
9. Choose Install or Maintain an Add-On.
10. Select the back-end product version SAP CARAB 5.0 and the support package stack Initial
Shipment Stack (12/2020).
11. Select the instance CAR Retail Application Bundle.
12. Choose Conrm Selection.
13. Choose Next.
14. Select the operating system and database for your scenario.
15. Choose Conrm Selection.
16. Review the details of your stack dependent and stack independent les. If everything is OK, choose Next.
17. Choose Download Stack XML.
You have now created the stack XML le.
Install Stack XML File With Software Update Manager (SUM)
1. Download and install the SUM tool:
1. See the SAP Support Portal at https://support.sap.com/en/tools/software-logistics-tools/software-
update-manager.html .
2. Consult the information for SUM 2.0 SP xx and follow the instructions.
2. In SUM, install your add-on product using the stack XML le that you have created in the rst procedure.
72
PUBLIC
Common Installation Guide for SAP Customer Activity Repository applications bundle 5.0
Install the Software

Result
You have successfully installed the back-end product version.
Note
With this installation, several SAP HANA content packages have already been activated automatically. This
saves you manual activation steps later on.
Continue with the next section.
Parent topic: Install ABAP Back-End Server [page 64]
Previous: Download and Install SAP XRP AFL (Only for SAP Replenishment Planning) [page 68]
Next: Set Up SAP Client [page 73]
5.2.4 Set Up SAP Client
Set up one or more SAP clients in your ABAP back-end system. Map the client of each source master data
system to a client in your ABAP back-end system. The steps to follow depend on whether your scenario uses
the Demand Data Foundation (DDF) module in SAP Customer Activity Repository or not.
Prerequisites
Verify whether your scenario requires data replicated from the source master data system via the SAP System
Landscape Transformation Replication Server (SLT).
● The non-DDF scenarios all use the SLT replication.
● The DDF scenarios all use the data replication framework (DRF, transaction DRFOUT). However, some
scenarios can additionally use the SLT replication:
○ SAP Allocation Management: mandatory
○ SAP Assortment Planning: optional (depends on your customer-specic implementation)
○ SAP Merchandise Planning: optional (depends on your customer-specic implementation)
○ SAP Replenishment Planning: required if you want to use real-time inventory, otherwise optional
(depends on your customer-specic implementation)
If your scenario uses the SLT replication, you must dene SLT transformation rules to map the clients. You
must do this mapping before the actual replication. The procedures below describe how you do this for each
scenario.
Note
You dene an SLT transformation rule by matching a client number in the source master data system to a
client number in your SAP Customer Activity Repository applications bundle ABAP back-end system (SAP
Common Installation Guide for SAP Customer Activity Repository applications bundle 5.0
Install the Software
PUBLIC 73

Client MANDT). Without this mapping, errors may occur (for example, table joins can fail and the scenarios
relying on master data would not be functional).
Note
If you need more information about the client concept, see SAP NetWeaver Library: Function-Oriented View
and select your support package (SP). Choose Application Server ABAP Other Services Services for
Administrators
and consult the Client Concept section and the Multichannel Administration section.
Procedure for All Scenarios Using Demand Data Foundation
Follow this procedure in the following cases:
● You want to model and forecast demand using the UDF module in SAP Customer Activity Repository.
● You want to use the Omnichannel Promotion Pricing (OPP) module in SAP Customer Activity Repository.
● You want to use SAP Allocation Management.
● You want to use SAP Assortment Planning.
● You want to use SAP Merchandise Planning.
● You want to use SAP Promotion Management.
● You want to use SAP Replenishment Planning.
Follow these steps:
1. In transaction SCC4, create the necessary client in your ABAP back-end system.
Caution
If you are performing a client copy, only do this after you have successfully imported all related
software components. Also, only import or transfer Customizing tables after the client copy is
complete. For instructions, see SAP Note 337623 (Customizing after installation or upgrade).
2. In Customizing (transaction SPRO), choose Cross-Application Components Demand Data Foundation
Basic Settings Dene Logical Systems .
Note
If you have multiple source master data systems and/or clients, you must dene a logical system for
each system/client.
Note
For the DDF scenarios with SLT replication, you also use this Customizing activity to dene SLT
transformation rules. You do this by matching a Logical System (your back-end system client) to an
ERP Client (client number) for an MD Sys Typ (source master data system type).
1. Carefully read the activity documentation for detailed instructions and examples.
2. Dene the logical systems that you need and map the clients as required for your scenario.
74
PUBLIC
Common Installation Guide for SAP Customer Activity Repository applications bundle 5.0
Install the Software

Procedure for Scenarios Not Using Demand Data Foundation
Follow this procedure if you are implementing a non-DDF scenario:
Note
All of the following scenarios are modules in SAP Customer Activity Repository.
● POS Data Transfer and Audit
● Multichannel Transaction Data Management
● Inventory Visibility (including Omnichannel Article Availability and Sourcing, OAA)
● On-Shelf Availability
Follow these steps:
1. Verify the client numbers in the source master data systems:
○ source SAP Retail system
○ source SAP S/4HANA system
○ source systems of any optional products that you wish to implement with SAP Customer Activity
Repository (such as SAP CRM or SAP Marketing Cloud)
Note
SAP Customer Activity Repository includes SAP HANA content that provides views on a combination of
client-dependent data authored in these source master data systems. For instance, sales documents
are created in a source SAP Retail system and are replicated to SAP Customer Activity Repository.
Likewise, customer information can be optionally replicated from a source SAP CRM or SAP Marketing
Cloud system.
2. In transaction SCC4, create the necessary client in your ABAP back-end system.
Caution
If you are performing a client copy, only do this after you have successfully imported all related
software components. Also, only import or transfer Customizing tables after the client copy is
complete. For instructions, see SAP Note 337623 (Customizing after installation or upgrade).
Cross-system information is client-dependent. As a result, the SAP Client (MANDT) attribute must be used
as one of the join attributes in the SAP HANA views to combine cross-system sales and master data.
If you want to replicate data from only a single source master data system, all data (whether created or
replicated) must be aliated with the same client number. Note that this does not apply to scenarios with
multiple source master data systems (for more information, see the optional step below).
Caution
SLT Transformation Rules:
Using the same client number might not be possible due to the specics of your implementation and
client setup rules. In this case, you must use SLT transformation rules before replicating the data.
The rules allow you to transform the source SAP Retail or SAP S/4HANA clients and, optionally, the
source SAP CRM or SAP Marketing Cloud clients to match the client in your back-end system.
Common Installation Guide for SAP Customer Activity Repository applications bundle 5.0
Install the Software
PUBLIC 75

Example:
SAP Retail and SAP CRM (or SAP Marketing Cloud) are set up on client 100 in your implementation. In
this case, you should also set up your installation on client 100. If, for any reason, you are unable to do
so, you can transform the source client to 100 using SLT transformation rules.
3. (Optional) Do this step if you have multiple source master data systems:
1. For conguration options for scenarios with multiple source master data systems, see the Multiple
ECC Support section in the application help for SAP Customer Activity Repository.
2. In Customizing, do the client mapping:
Choose SAP Customer Activity Repository General Settings Client Mapping For Multiple ERP
Systems .
3. Carefully read the activity documentation.
4. Enable the multiple ERP support and map the clients for each of the systems.
Parent topic: Install ABAP Back-End Server [page 64]
Previous: Install SAP CARAB Back-End Product Version [page 71]
5.3 Install ABAP Front-End Server
Install the complete UI layer in the front-end system. The UI layer consists of three components: SAP Gateway,
the central SAP Fiori UI component (SAP Fiori front-end server with SAP Fiori launchpad), and the product-
specic SAP Fiori UI component (front-end product version SAP FIORI FOR SAP CARAB 5.0 of SAP Customer
Activity Repository applications bundle).
Context
● The ABAP front-end server contains all the infrastructure components to generate SAP Fiori app-specic
UIs for the client and to communicate with the back-end systems.
● The central SAP Fiori UI component (SAP Fiori front-end server) is a framework that provides the
common infrastructure for all SAP Fiori apps. The component contains the SAP Fiori launchpad, which is
the basis of all SAP Fiori apps and provides fundamental functions (such as logon, surface sizing,
navigation between apps, and role-based app catalogs). End-users access SAP Fiori apps from the SAP
Fiori launchpad.
● The product-specic SAP Fiori UI component (SAP FIORI FOR SAP CARAB 5.0 front-end product
version) contains the SAP Fiori apps delivered with this release of SAP Customer Activity Repository
applications bundle.
Note
Where you install the front-end components depends on your chosen deployment option. With the central
hub deployment, you install the front-end components in a separate front-end system. With the embedded
deployment, you install the front-end components in your ABAP back-end system. Please refer to SAP Note
76
PUBLIC
Common Installation Guide for SAP Customer Activity Repository applications bundle 5.0
Install the Software

2997851 (SAP Customer Activity Repository applications bundle 5.0: Front-end deployment options) to
help you decide which deployment option is the best for your scenario.
For more information, see Deployment Options [page 16].
1. Verify Installation of SAP Gateway Foundation [page 77]
SAP Gateway Foundation (SAP_GWFND) is a component in SAP NetWeaver. In this procedure, you verify
that the required version is installed in your front-end system.
2. Verify Installation of Central SAP Fiori UI Component [page 78]
The central SAP Fiori UI component includes the SAPUI5 control library and the SAP Fiori launchpad.
The component is delivered as part of the SAP Fiori front-end server. Verify that the required version of
SAP Fiori front-end server is installed in your front-end system.
3. Install SAP FIORI FOR SAP CARAB Front-End Product Version [page 79]
Install the SAP FIORI FOR SAP CARAB 5.0 front-end product version in your front-end system. The
product version contains the SAP Fiori apps for this release of SAP Customer Activity Repository
applications bundle. First create a stack XML le with Maintenance Planner and then install the stack
XML le with Software Update Manager (SUM).
Parent topic: Install the Software [page 63]
Previous: Install ABAP Back-End Server [page 64]
Next task: Verify SAP Notes and RINs (Post-Installation) [page 81]
5.3.1 Verify Installation of SAP Gateway Foundation
SAP Gateway Foundation (SAP_GWFND) is a component in SAP NetWeaver. In this procedure, you verify that the
required version is installed in your front-end system.
Context
As of SAP NetWeaver 7.40, the major components of SAP Gateway have been integrated into SAP NetWeaver
as SAP Gateway Foundation (SAP_GWFND). SAP Gateway Foundation has since been an integral part of SAP
NetWeaver.
SAP Gateway Foundation handles the communication between the ABAP back-end server and the client on the
front-end. It establishes a connection between SAP Business Suite or application data and the target clients,
platforms, and programming framework.
Common Installation Guide for SAP Customer Activity Repository applications bundle 5.0
Install the Software
PUBLIC 77
Procedure
1. Ensure that the required SAP NetWeaver version is installed on your front-end server. For more
information, see the following:
○ For the required version, see Install the Prerequisites [page 19] and choose Common Prerequisites
SAP S/4HANA FOUNDATION and SAP Fiori.
○ For information on deployment options, see the following:
○ Section Deployment Options [page 16]
○ Section Quick Conguration in the SAP Gateway Foundation Conguration Guide
○ For installation, conguration, and security information, see again the product documentation at SAP
Gateway Foundation (SAP_GWFND).
○ For installation and upgrade information for SAP Fiori, see https://help.sap.com/viewer/p/
FIORI_IMPLEMENTATION
and choose Implement Installation and Upgrade SAP Fiori: Setup and
Conguration Setup of SAP Fiori System Landscape . Here you can also nd a system landscape
diagram.
Parent topic: Install ABAP Front-End Server [page 76]
Next: Verify Installation of Central SAP Fiori UI Component [page 78]
5.3.2 Verify Installation of Central SAP Fiori UI Component
The central SAP Fiori UI component includes the SAPUI5 control library and the SAP Fiori launchpad. The
component is delivered as part of the SAP Fiori front-end server. Verify that the required version of SAP Fiori
front-end server is installed in your front-end system.
Context
The SAP Fiori front-end server contains the software components that are required to run SAP Fiori scenarios.
You can nd an overview of a typical system landscape and its components at Setup of SAP Fiori System
Landscape.
Note
Where you install the front-end components depends on your chosen deployment option. With the central
hub deployment, you install the front-end components in a separate front-end system. With the embedded
deployment, you install the front-end components in your ABAP back-end system. Please refer to SAP Note
2997851 (SAP Customer Activity Repository applications bundle 5.0: Front-end deployment options) to
help you decide which deployment option is the best for your scenario.
For more information, see Deployment Options [page 16].
78
PUBLIC
Common Installation Guide for SAP Customer Activity Repository applications bundle 5.0
Install the Software

Procedure
1. Verify what version of SAP Fiori front-end server is required for this release.
In section Install the Prerequisites [page 19], see under Common Prerequisites SAP Fiori . This
section also points you to the installation information.
2. Ensure that the required version is installed on your front-end server.
Note
For installation instructions, see Installing SAP Fiori in the Setup and Congure your SAP Fiori
Landscape documentation.
Parent topic: Install ABAP Front-End Server [page 76]
Previous: Verify Installation of SAP Gateway Foundation [page 77]
Next: Install SAP FIORI FOR SAP CARAB Front-End Product Version [page 79]
5.3.3 Install SAP FIORI FOR SAP CARAB Front-End Product
Version
Install the SAP FIORI FOR SAP CARAB 5.0 front-end product version in your front-end system. The product
version contains the SAP Fiori apps for this release of SAP Customer Activity Repository applications bundle.
First create a stack XML le with Maintenance Planner and then install the stack XML le with Software Update
Manager (SUM).
Prerequisites
You have completed the previous procedures in this guide.
Note
Where you install the front-end components depends on your chosen deployment option. With the central
hub deployment, you install the front-end components in a separate front-end system. With the embedded
deployment, you install the front-end components in your ABAP back-end system. Please refer to SAP Note
2997851 (SAP Customer Activity Repository applications bundle 5.0: Front-end deployment options) to
help you decide which deployment option is the best for your scenario.
For more information, see Deployment Options [page 16].
Common Installation Guide for SAP Customer Activity Repository applications bundle 5.0
Install the Software
PUBLIC 79

Overview
In the procedures below you do the following:
Use this tool... To do this...
Maintenance Planner
More information: https://help.sap.com/viewer/p/MAINTE
NANCE_PLANNER
Plan your system landscape and create a stack XML le
based on the required product versions.
Software Update Manager (SUM)
More information: https://support.sap.com/en/tools/soft
ware-logistics-tools/software-update-manager.html
Install or upgrade components using the stack XML le.
Note
It may be possible to install or upgrade components using the SAP Add-On Installation Tool (transaction
SAINT) or the Support Package Manager (transaction SPAM). However, these alternative procedures are
not described in this guide. For information on whether they are supported for your implementation
scenario and on how to proceed in this case, see SAP Note 1803986 .
Create Stack XML File With Maintenance Planner
Note
If you encounter issues with Maintenance Planner, see the following sources for possible solutions:
● Maintenance Planner Troubleshooting Guide on the SAP Community Wiki
● SAP Note 2535751 : Can not select the higher release for Netweaver in Maintenance Planner
● SAP Note 2314463 : Required le K-XXXxxxxxxxx.SAR is not visible for your user Sxxxxxxx
1. Log on to Maintenance Planner at https://support.sap.com/en/alm/solution-manager/processes-72/
maintenance-planner.html
under Access Maintenance Planner .
2. Choose Plan a New System.
3. Choose Plan.
4. Choose the system type ABAP (Install an ABAP System) and enter a three-character system ID (<SID>).
5. Select the system type that you wish to install.
6. Select a product version and a support package stack.
7. Select a product version instance.
8. Choose Conrm Selection.
9. Choose Install or Maintain an Add-On.
10. Select the SAP FIORI FOR SAP CARAB 5.0 front-end product version and the Initial Shipment
Stack (12/2020)
support package stack.
11. Select an instance of SAP Fiori front-end server.
80
PUBLIC
Common Installation Guide for SAP Customer Activity Repository applications bundle 5.0
Install the Software

12. Choose Conrm Selection.
13. Choose Next.
14. Select the operating system and database for your scenario.
15. Choose Conrm Selection.
16. Review the details of your stack dependent and stack independent les. If everything is OK, choose Next.
17. Choose Download Stack XML.
You have now created the stack XML le.
Install Stack XML File With Software Update Manager (SUM)
1. Download and install the SUM tool:
1. See the SAP Support Portal at https://support.sap.com/en/tools/software-logistics-tools/software-
update-manager.html .
2. Consult the information for SUM 2.0 SP xx and follow the instructions.
2. In SUM, install your add-on product using the stack XML le that you have created in the rst procedure.
Result
You have successfully installed the front-end product version for this release.
Continue with the next section.
Parent topic: Install ABAP Front-End Server [page 76]
Previous: Verify Installation of Central SAP Fiori UI Component [page 78]
5.4 Verify SAP Notes and RINs (Post-Installation)
There are SAP Notes (corrections) that can only be implemented after you have installed the back-end product
version and the front-end product version. You must therefore do this additional check and implement the
required notes, before you move on to the setup steps for the applications.
Prerequisites
Make sure that you have the up-to-date version of each SAP Note, which you can always nd on the SAP
Support Portal at http://support.sap.com/notes .
Common Installation Guide for SAP Customer Activity Repository applications bundle 5.0
Install the Software
PUBLIC 81
Procedure
Check whether there are SAP Notes that can only be implemented after the installation. See section Implement
SAP Notes for the Installation [page 30] and do the following:
a. Always check the release information notes (RINs) indicated there. The RINs list the installation- and
upgrade-relevant corrections that have become available since this guide was published and the software
was released. Implement any corrections from the RINs that are required for your scenario.
b. Always check the table for SAP Customer Activity Repository. SAP Notes listed there are often common
corrections, applicable to all consuming applications.
c. Then check the SAP Notes for your consuming application. Implement any corrections required for your
scenario.
Task overview: Install the Software [page 63]
Previous: Install ABAP Front-End Server [page 76]
82
PUBLIC
Common Installation Guide for SAP Customer Activity Repository applications bundle 5.0
Install the Software

6 Set Up the Applications
You have installed the back-end components and front-end components of SAP Customer Activity Repository
applications bundle. Now you must rst do the setup steps under SAP Customer Activity Repository Core
(Mandatory for All Applications) . These steps are required for all the applications. Then you either continue
with the setup steps under
SAP Customer Activity Repository Advanced (Optional) or do the setup steps
for your application.
For SAP Allocation Management, rst consult the information in section SAP Allocation Management. Then
do the setup steps under SAP Customer Activity Repository Core (Mandatory for All Applications) .
6.1 SAP Customer Activity Repository
First do the setup steps under SAP Customer Activity Repository Core (Mandatory for All Applications) .
Then you can continue with the setup steps under
SAP Customer Activity Repository Advanced
(Optional) or do the setup steps for your application.
Core (Mandatory for All Applications) [page 83]
Perform the core steps to set up SAP Customer Activity Repository as the common platform. The core
steps are mandatory for SAP Customer Activity Repository and for all the consuming applications.
Advanced (Optional) [page 119]
After you have completed the core steps, perform the advanced steps that are relevant to your
scenario. The advanced steps are optional. They enable specic functionality in SAP Customer Activity
Repository.
Troubleshooting [page 207]
Diagnose and resolve issues that may arise when you install, upgrade, and set up your scenario. If you
need to report a customer incident, see the information at the end of this section.
6.1.1 Core (Mandatory for All Applications)
Perform the core steps to set up SAP Customer Activity Repository as the common platform. The core steps
are mandatory for SAP Customer Activity Repository and for all the consuming applications.
Caution
Always do the core steps rst. Then you can continue with the Advanced (Optional) steps for SAP
Customer Activity Repository or with the setup steps for your application.
Common Installation Guide for SAP Customer Activity Repository applications bundle 5.0
Set Up the Applications
PUBLIC 83
1. Verify Back-End Users and Roles [page 84]
Ensure that the required users on the SAP HANA database level and on the back-end application level
have the privileges, roles, and authorizations required for your scenario.
2. Set Up Authorizations for On-Shelf Availability (OSA) [page 86]
In SAP HANA studio, grant the AFL__SYS_AFL_POSDM_AREA_EXECUTE role to the SAPHANADB user in
your back-end system. This short procedure is mandatory for all the applications, because it is
required for the successful activation of the SAP HANA content later on.
3. Set Up Authorizations for Unied Demand Forecast (UDF) [page 87]
In SAP HANA studio, create three roles for UDF, grant the required privileges, and assign two roles to
the SAP<SID> user and one role to the _SYS_REPO standard user. This procedure is mandatory for all
the applications
because the authorizations are needed for the successful activation of the SAP HANA
content later on.
4. Create/Replicate Source Master Data System Tables [page 91]
Create the tables in SAP Customer Activity Repository that are required for replicating data from your
source master data system. Then perform the actual replication of the data. You need SAP HANA
studio and the SAP Landscape Transformation Replication Server (SLT) for this procedure. For
reference, you can download a spreadsheet that lists the required tables for each source master data
system (SAP Retail, SAP S/4HANA).
5. Activate SAP HANA Content [page 95]
Activate the SAP HANA content for your scenario by running the /CAR/ACTIVATE_HTA report in the
back-end system. You can run this report as many times as required. For example, if you choose to
extend your scenario at a later point in time, simply run the report again to activate the SAP HANA
content for the added options.
6. Activate SAP HANA Content for Demand Data Foundation (DDF) [page 98]
If your scenario includes the calculation of Demand Data Foundation (DDF), do the additional steps
described here to activate the required SAP HANA content. All steps are mandatory.
7. Activate SAP HANA Script Server [page 101]
Activate the script server for the SAP HANA database. This step is mandatory for all the applications.
8. Congure Demand Data Foundation [page 102]
Congure the DDF module in SAP Customer Activity Repository as required for your scenario.
9. Congure SAP Gateway [page 107]
Perform several conguration steps for SAP Gateway and activate the OData services for the SAP Fiori
apps. The steps to follow depend on the SAP NetWeaver version on your front-end server.
6.1.1.1 Verify Back-End Users and Roles
Ensure that the required users on the SAP HANA database level and on the back-end application level have
the privileges, roles, and authorizations required for your scenario.
Prerequisites
● You are aware that user names in the front-end application must be the same as those in the SAP HANA
database and the back-end application.
● You have performed the steps in section Verify SAP HANA User and Privileges [page 49].
84
PUBLIC
Common Installation Guide for SAP Customer Activity Repository applications bundle 5.0
Set Up the Applications

Procedure
Ensure that your back-end application user has the following roles and authorizations:
User Role / Authorization
<Your User Name>*
● SAP_ISR_DDF_MASTER
● SAP_ISR_AP_MASTER
● /RAP/BW_AP_WORKBOOKS
● /RAP/BW_MPR_WORKBOOKS
● In transaction RS2HANA_VIEW, set SAP HANA User Mapping to C (DBMS
user, else SAP HANA user with same name as BW user).
● In transaction RS2HANA_CHECK, verify that authorizations for generating
SAP HANA views out of local BI Content objects are set up. Correct any re
sulting issues.
For more information, see Authorizations for Generated SAP HANA Views .
● If you need detailed information about PAK execution, the user prole must
have the following parameters maintained. Be aware that as a result of the
additional logging, these settings might slow down the performance.
In transaction SU3, select the Parameters tab. Enter the parameter and the
desired value as shown below and choose Save.
Parameter Value
RSPLS_HDB_PE_TRACE
Y
More Information
For information on setting up front-end application users, see the following:
● For SAP Assortment Planning: Assign Roles, Catalogs, and Groups in SAP Fiori Launchpad [page 298]
● For SAP Allocation Management: Assign Roles, Catalogs, and Groups in SAP Fiori Launchpad [page 316]
Parent topic: Core (Mandatory for All Applications) [page 83]
Next: Set Up Authorizations for On-Shelf Availability (OSA) [page 86]
Common Installation Guide for SAP Customer Activity Repository applications bundle 5.0
Set Up the Applications
PUBLIC 85

6.1.1.2 Set Up Authorizations for On-Shelf Availability
(OSA)
In SAP HANA studio, grant the AFL__SYS_AFL_POSDM_AREA_EXECUTE role to the SAPHANADB user in your
back-end system. This short procedure is mandatory for all the applications, because it is required for the
successful activation of the SAP HANA content later on.
Context
The AFL__SYS_AFL_POSDM_AREA_EXECUTE role enables the SAPHANADB user to call the OSA application
function library (part of the SAP RTL AFL FOR SAP HANA component) in the SAP HANA database.
Prerequisites
● You have mapped authoring schemas to physical schemas as described in Verify Correct Schema Mapping
[page 54].
● You have installed the SAP RTL AFL FOR SAP HANA component as described in Download and Install
SAP RTL AFL FOR SAP HANA (Mandatory) [page
65].
● You have database administrator rights so that you can grant roles to users.
● You have an SAPHANADB user and an SAPHANADB physical schema in your SAP HANA database. The
names must be identical.
Note
The name SAPHANADB is used as a variable. Replace it with the name of the database user or database
schema in your ABAP back-end system. Instead of SAPHANADB, you might also come across
documentation or user interfaces that mention SAPHANADB. Both variables mean the same.
For more information and an example, see the Important Variables in Naming Conventions [page 7].
If you need more information on database users and schemas, see section Verify Correct Schema
Mapping [page 54].
Procedure
Tip
● If you encounter issues related to authorization or authentication, see section Security-Related Issues
of the SAP HANA Troubleshooting and Performance Analysis Guide, which you can nd at https://
help.sap.com/viewer/p/SAP_HANA_PLATFORM for your SAP HANA Platform version.
● We have provided an example SQL statement below that you can adapt as needed for your system
landscape.
86
PUBLIC
Common Installation Guide for SAP Customer Activity Repository applications bundle 5.0
Set Up the Applications

1. In SAP HANA studio, access your back-end system and open the SAP HANA Administration Console.
2. Choose Security Users .
3. Select your SAPHANADB user and open the user details (or double-click the user).
4. On the Granted Roles tab, choose the plus icon and select AFL__SYS_AFL_POSDM_AREA_EXECUTE as the
role name.
Example
SQL example: grant AFL__SYS_AFL_POSDM_AREA_EXECUTE to SAPHANADB;
5. Save your changes by choosing the Deploy (F8) icon at the top right.
Result
You have successfully set up the authorizations for OSA. Continue with the next section.
Parent topic: Core (Mandatory for All Applications) [page 83]
Previous: Verify Back-End Users and Roles [page 84]
Next: Set Up Authorizations for Unied Demand Forecast (UDF) [page 87]
6.1.1.3 Set Up Authorizations for Unied Demand Forecast
(UDF)
In SAP HANA studio, create three roles for UDF, grant the required privileges, and assign two roles to the
SAP<SID> user and one role to the _SYS_REPO standard user. This procedure is mandatory for all the
applications because the authorizations are needed for the successful activation of the SAP HANA content
later on.
Context
The three roles for UDF have the following purpose:
Role Purpose
UDF_EXECUTE
Required to execute UDF. Enables the SAP<SID> user to call the UDF applica
tion function library (AFL) in the SAP HANA database.
Common Installation Guide for SAP Customer Activity Repository applications bundle 5.0
Set Up the Applications
PUBLIC 87

Role Purpose
UDF_DEPLOY
Required to activate the SAP HANA content for UDF. Enables the SAP<SID>
user to deploy the SAP HANA content for UDF.
UDF_DEPLOY_SYS_REPO
Required to activate the SAP HANA content. Denes additional privileges for
the _SYS_REPO standard user.
Note
If you require more information on standard users (such as _SYS_REPO), see the following guides for your
SAP HANA Platform version at https://help.sap.com/viewer/p/SAP_HANA_PLATFORM:
● SAP HANA Security Guide: Search for section SAP HANA User Management.
● SAP HANA Security Checklists and Recommendations: Search for section Recommendations for
Database Users, Roles, and Privileges.
Prerequisites
● You have mapped the authoring schemas to the physical schemas as described in Verify Correct Schema
Mapping [page 54].
● You have installed the SAP RTL AFL FOR SAP HANA component as described in Download and Install
SAP RTL AFL FOR SAP HANA (Mandatory) [page 65].
● You have database administrator rights so that you can grant roles to users.
● You have an SAP<SID> user and an SAP<SID> physical schema in your SAP HANA database. The names
must be identical.
Note
The name SAP<SID> is used as a variable. Replace it with the name of the database user or database
schema in your ABAP back-end system. Instead of SAP<SID>, you might also come across
documentation or user interfaces that mention SAPHANADB. Both variables mean the same.
For more information and an example, see the Important Variables in Naming Conventions [page 7].
If you need more information on database users and schemas, see Verify Correct Schema Mapping
[page 54].
Procedure
Tip
● If you encounter issues related to authorization or authentication, see the Security-Related Issues
section of the SAP HANA Troubleshooting and Performance Analysis Guide for your SAP HANA
Platform version at https://help.sap.com/viewer/p/SAP_HANA_PLATFORM.
88
PUBLIC
Common Installation Guide for SAP Customer Activity Repository applications bundle 5.0
Set Up the Applications

● We have provided example SQL statements below that you can adapt as needed for your system
landscape.
1. In SAP HANA studio, log on to your back-end system and open the SAP HANA Administration Console.
2. Navigate to Security Roles and select New Role from the context menu.
3. In the Role Name eld, enter UDF_EXECUTE.
Example
SQL example: create role UDF_EXECUTE;
4. Make the following settings for this role:
○ On the Granted Roles tab: Choose the plus icon and select the
AFL__SYS_AFL_UDFCORE_AREA_EXECUTE role from the list.
Example
SQL example: grant AFL__SYS_AFL_UDFCORE_AREA_EXECUTE to UDF_EXECUTE;
○ On the Object Privileges tab: Add the following catalog objects and grant them the following privileges:
○ Catalog object (schema name) SAP<SID>: privileges SELECT, INSERT, UPDATE, DELETE
Example
SQL example: grant SELECT, INSERT, UPDATE, DELETE on schema SAP<SID> to
UDF_EXECUTE;
○ Catalog object (schema name) _SYS_BIC: privileges SELECT, EXECUTE
Example
SQL example: grant SELECT, EXECUTE on schema _SYS_BIC to UDF_EXECUTE;
○ On the Analytic Privileges tab: Add the _SYS_BI_CP_ALL privilege.
Example
SQL example: call
GRANT_ACTIVATED_ANALYTICAL_PRIVILEGE('_SYS_BI_CP_ALL','UDF_EXECUTE');
5. Save your changes by choosing the Deploy (F8) icon at the top right.
6. Navigate to Security Users .
7. Select the SAP<SID> user from the list and open the details screen (or double-click the user).
8. On the Granted Roles tab, add the UDF_EXECUTE role.
Example
SQL example: grant UDF_EXECUTE to SAP<SID>
9. Save your changes by choosing the Deploy (F8) icon at the top right.
Note
You have created the rst role with the required privileges and granted the role to the SAP<SID> user.
Common Installation Guide for SAP Customer Activity Repository applications bundle 5.0
Set Up the Applications
PUBLIC 89

10. Now create the second role. Navigate again to Security Roles and select New Role from the context
menu.
11. In the Role Name eld, enter UDF_DEPLOY.
Example
SQL example: create role UDF_DEPLOY;
12. Make the following settings for this role:
○ On the Granted Roles tab: Choose the plus icon and select the CONTENT_ADMIN role from the list.
Example
SQL example: grant CONTENT_ADMIN to UDF_DEPLOY;
○ On the System Privileges tab: Add the CATALOG READ privilege.
Example
SQL example: grant CATALOG READ to UDF DEPLOY;
13. Save your changes by choosing the Deploy (F8) icon at the top right.
14. Navigate again to Security Users .
15. Select the SAP<SID> user from the list and open the details screen (or double-click the user).
16. On the Granted Roles tab, add the UDF_DEPLOY role.
Example
SQL example: grant UDF_DEPLOY to SAP<SID>;
17. Save your changes by choosing the Deploy (F8) icon at the top right.
Note
You have created the second role and granted the role to the SAP<SID> user.
18. Now create the third role. Navigate again to Security Roles and select New Role from the context
menu.
19. In the Role Name eld, enter UDF_DEPLOY_SYS_REPO.
Example
SQL example: create role UDF_DEPLOY_SYS_REPO;
20.On the Object Privileges tab, make these settings:
Add the catalog object (schema name) SAP<SID> and grant the privileges SELECT, INSERT, UPDATE, and
DELETE.
Example
SQL example: grant SELECT, INSERT, UPDATE, DELETE on schema SAP<SID> to
UDF_DEPLOY_SYS_REPO;
21. Save your changes by choosing the Deploy (F8) icon at the top right.
90
PUBLIC
Common Installation Guide for SAP Customer Activity Repository applications bundle 5.0
Set Up the Applications

22.Navigate again to Security Users .
23. Select the _SYS_REPO user from the list and open the details screen (or double-click the user).
24. On the Granted Roles tab, add the UDF_DEPLOY_SYS_REPO role.
Example
SQL example: grant UDF_DEPLOY_SYS_REPO to _SYS_REPO;
25. Save your changes by choosing the Deploy (F8) icon at the top right.
Note
You have created the third role with the required privileges and granted the role to the _SYS_REPO user.
Result
You have successfully set up the authorizations for UDF.
Parent topic: Core (Mandatory for All Applications) [page 83]
Previous: Set Up Authorizations for On-Shelf Availability (OSA) [page 86]
Next task: Create/Replicate Source Master Data System Tables [page 91]
6.1.1.4 Create/Replicate Source Master Data System
Tables
Create the tables in SAP Customer Activity Repository that are required for replicating data from your source
master data system. Then perform the actual replication of the data. You need SAP HANA studio and the SAP
Landscape Transformation Replication Server (SLT) for this procedure. For reference, you can download a
spreadsheet that lists the required tables for each source master data system (SAP Retail, SAP S/4HANA).
Prerequisites
● You have completed the previous procedures in this guide.
● You have installed the SAP Landscape Transformation Replication Server. For the minimum version
required, installation and implementation information, see Install the Prerequisites [page 19] and consult
the Common Prerequisites.
● If your source master data system is SAP S/4HANA 1909 or higher, be aware that as of that release, the
SAP LT Replication Server is no longer available as a standalone component. Instead, as of SAP S/4HANA
1909, an embedded SAP LT Replication Server is included by default.
Common Installation Guide for SAP Customer Activity Repository applications bundle 5.0
Set Up the Applications
PUBLIC 91
Caution
To be able to replicate the data from an SAP S/4HANA 1909 (or higher) system, you rst need to
prepare the replication. This preparation has the added advantage that it gives you the option to still
use a standalone SAP LT Replication Server. Follow the steps in SAP S/4HANA 1909 or Higher: Prepare
Data Replication with SAP Landscape Transformation Replication Server [page 94]. Then return to
this procedure here.
Context
The applications in SAP Customer Activity Repository applications bundle can use data originating from a
single or multiple source master data systems.
The list of tables to create and replicate depends on your leading source master data system:
● SAP Retail: for installations based on the SAP_ECC schema
● SAP S/4HANA Retail: for installations based on the SAP_S4H schema
In this procedure, you rst create and then replicate the required tables.
Note
It is possible to combine the steps create and replicate.
Procedure
1. Download the spreadsheet with the SLT tables for your version of SAP Customer Activity Repository
applications bundle:
a. Navigate to SAP Help Portal at https://help.sap.com/viewer/p/CARAB and select your version at the
top.
b. Choose Implement Implementation Help SLT Tables for SAP Customer Activity Repository
applications bundle 5.0
and download the archive.
c. Extract the spreadsheet and see the tables listed for your source master data system.
2.
Caution
You must always create and replicate all the tables listed for your source master data system in the
spreadsheet. This is necessary not only for the data replication itself but also for the successful
activation of the SAP HANA content later on.
Create all the tables listed for your source master data system.
a. Congure access from the SAP Landscape Transformation Replication Server to the source SAP Retail
or SAP S/4HANA Retail system (RFC connection), and from the SAP Landscape Transformation
Replication Server to the target SAP HANA database of your SAP Customer Activity Repository back-
end system.
92
PUBLIC
Common Installation Guide for SAP Customer Activity Repository applications bundle 5.0
Set Up the Applications

For more information, see the Installation Guide at https://help.sap.com/viewer/p/
SAP_LANDSCAPE_TRANSFORMATION_REPLICATION_SERVER. If necessary, select a dierent
version at the top.
b. Ensure that your SAP Customer Activity Repository back-end system is connected to SAP HANA
studio.
If necessary, set the connection as follows:
1. Log on to SAP HANA studio.
2. Right-click in the Navigator pane and select Add System.
3. In the Specify System dialog, enter the Host Name, Instance Number, and Description.
4. In the Connection Properties dialog, enter your system User Name and Password.
5. Save your changes.
c. Ensure that the database schemas are created on the SAP HANA database of your back-end system.
These are the schemas on your SAP HANA database to which the SAP Retail and/or SAP S/4HANA
data will be replicated.
Note
For more information, see the Create a Schema section of the SAP HANA Developer Guide.
d. Create all the tables for your source master data system.
1. Log on to the SAP Landscape Transformation Replication Server.
2. Execute transaction LTRC (SAP LT Replication Server Cockpit)).
3. Dene and select your replication conguration.
Note
For more information, see SAP Library at https://help.sap.com/viewer/p/
SAP_LANDSCAPE_TRANSFORMATION_REPLICATION_SERVER. Search for section Creating a
Conguration.
4. Choose Execute (F8) . A screen opens that shows the details of this replication conguration.
5. Select the table overview tab. You can now see the data provisioning function.
6. Execute the table overview function. On the subsequent pop-up, select the function for table
creation.
7. Choose the multiple selection push-button next to the table name eld.
8. In the next screen, you can either enter the table names manually or upload a text le with the
table names (recommended):
Create this text le from the spreadsheet that you downloaded before. Make sure that the text le
contains only the table names and no other data. Then upload the text le.
9. Choose Copy (F8) to return to the previous screen.
10. Choose Execute (F8) to trigger the creation of the tables.
You have successfully created the tables in your SAP Customer Activity Repository back-end system.
3. Replicate all the tables listed for your source master data system.
Note
If your SAP Retail or SAP S/4HANA Retail system and your back-end SAP Customer Activity
Repository system are co-deployed on the same SAP HANA database, you do not need to replicate the
tables.
Common Installation Guide for SAP Customer Activity Repository applications bundle 5.0
Set Up the Applications
PUBLIC 93

a. Save a CSV le of the required tables. You will later load the tables from this le.
b. In SAP HANA studio, choose Window Perspective Open Perspective SAP HANA Modeler .
c. In the Quick View panel, choose Data Provisioning to open the Data Provisioning Editor for your system.
If the Quick View panel is not displayed, choose Help Quick View .
d. In the Data Provisioning Editor, make any necessary adjustments: remove or add tables, select the
appropriate source system, and select the target schema for the replication.
e. Choose Replicate to open the Replicate Request screen.
f. Choose Load from le, browse to the location where you saved the CSV le, and select it.
g. The tables in the le are added to the Selected column on the right-hand side. Choose Finish.
Note
In the Data Provisioning Editor, you can monitor the action status of the tables using Data Load
Management.
Results
You have successfully replicated the tables from your source master data system into your SAP Customer
Activity Repository back-end system. Continue with the next section.
Task overview: Core (Mandatory for All Applications) [page 83]
Previous: Set Up Authorizations for Unied Demand Forecast (UDF) [page 87]
Next task: Activate SAP HANA Content [page 95]
6.1.1.4.1 SAP S/4HANA 1909 or Higher: Prepare Data
Replication with SAP Landscape Transformation
Replication Server
Only perform this procedure if your source master data system is SAP S/4HANA 1909 or higher. If so, you must
do the steps described here before doing the actual replication.
Context
If your source master data system is SAP S/4HANA 1909 or higher, be aware that the SAP LT Replication
Server is no longer available as a standalone component. Instead, an embedded SAP LT Replication Server is
included in SAP S/4HANA by default.
94
PUBLIC
Common Installation Guide for SAP Customer Activity Repository applications bundle 5.0
Set Up the Applications

To be able to replicate data from your SAP S/4HANA system into SAP Customer Activity Repository, you rst
need to prepare the replication as described below.
This preparation has the added advantage that it gives you the option to still use a standalone SAP LT
Replication Server.
Note
You do not need to perform this procedure if you are using SAP S/4HANA FOUNDATION 2020. This is
because the foundation provides a standalone SAP LT Replication Server by default. For more information,
see https://help.sap.com/viewer/product/
SAP_LANDSCAPE_TRANSFORMATION_REPLICATION_SERVER_FOR_SAP_S4HANA/latest/en-US?
task=implement_task, open the Installation Guide, and consult section SAP Landscape Transformation
Replication Server for SAP S/4HANA 1.0.
Procedure
Prepare data replication from SAP S/4HANA 1909 or higher to SAP Customer Activity Repository, using an
embedded or a standalone SAP LT Transformation Server:
1. Pause your current SLT replication routine with the SAP LT Replication Server.
2. Upgrade your source master data system to SAP S/4HANA 1909 or higher as described in the
corresponding product documentation. For more information, see SAP Help Portal for SAP S/4HANA
1909. Consult the Upgrade Guide and, if applicable, also the Conversion Guide.
If necessary, select a dierent version at the top.
3. Implement SAP Note 2857334 (Unsupported data type DECFLOAT34 / D34N when replicating from a
S/4 HANA OP1909 system) in your SAP S/4HANA system.
4. Adjust your SLT conguration as described in the note.
5. Now you can resume the data replication. Return to section Create/Replicate Source Master Data System
Tables [page 91] and follow the instructions.
6.1.1.5 Activate SAP HANA Content
Activate the SAP HANA content for your scenario by running the /CAR/ACTIVATE_HTA report in the back-end
system. You can run this report as many times as required. For example, if you choose to extend your scenario
at a later point in time, simply run the report again to activate the SAP HANA content for the added options.
Prerequisites
You have successfully completed all the previous procedures in this guide.
Common Installation Guide for SAP Customer Activity Repository applications bundle 5.0
Set Up the Applications
PUBLIC 95
Context
The /CAR/ACTIVATE_HTA report activates the SAP HANA Transport for ABAP (HTA) objects for your scenario.
For more information on the report, see the accompanying system documentation.
Tip
If you encounter issues during the activation, see the Troubleshooting [page 207] section for possible
solutions.
Procedure
1. Start transaction SE38.
2. Enter /CAR/ACTIVATE_HTA as the program (report) and choose Execute ( F8 ).
3. On the Activate SAP HANA Content for SAP CARAB screen, select all the options for which you wish to
activate the SAP HANA content. Use the following table for reference:
Caution
Always activate the SAP HANA content for SAP Customer Activity Repository rst. This content
must be active before you can activate the content for additional options.
Tip
If the SAP HANA content is already active for an option, you can see this directly on the screen.
To activate the SAP HANA content for... Select at least these options...
SAP Customer Activity Repository
○ ECC Mode: Select your source master data system.
○ Business Scenarios Activation: Select SAP Customer Activity
Repository.
○ Optional: If your system landscape includes more than one SAP ERP
or SAP S/4HANA master data system, select either Multiple SAP ERP
or Multiple S/4HANA under the scenario options.
SAP Allocation Management Follow the instructions in Activate SAP HANA Content for SAP Allocation
Management [page 305].
Calculation of Demand Data Foundation
(DDF) (without SAP Allocation
Management)
Follow the instructions in Activate SAP HANA Content for Demand Data
Foundation (DDF) [page 98].
SAP Assortment Planning No action required.
The SAP HANA content was already activated automatically during the in
stallation of the back-end product version.
96 PUBLIC
Common Installation Guide for SAP Customer Activity Repository applications bundle 5.0
Set Up the Applications

To activate the SAP HANA content for... Select at least these options...
Unied Demand Forecast (UDF) and SAP
Fiori apps for demand forecasting
No action required.
The SAP HANA content was already activated automatically during the in
stallation of the back-end product version.
On-Shelf Availability
○ ECC Mode: Select your source master data system.
○ Business Scenarios Activation: Select On-Shelf Availability and
Customer Activity Repository.
Omnichannel Article Availability and
Sourcing (OAA)
○ ECC Mode: Select your source master data system.
○ Business Scenarios Activation: Select Omnichannel Article Availability.
SAP Merchandise Planning No action required.
The SAP HANA content was already activated automatically during the in
stallation of the back-end product version.
SAP Replenishment Planning There is no specic SAP HANA content for SAP Replenishment Planning.
However, if you use the real-time inventory, select at least these options:
○ ECC Mode: Select your source master data system.
○ Business Scenarios Activation: Select Customer Activity Repository
and Demand Data Foundation.
○ Optional: If your system landscape includes more than one SAP ERP
or SAP S/4HANA master data system, select either Multiple SAP ERP
or Multiple S/4HANA under the scenario options.
SAP Promotion Management No action required.
4. Do a test run to verify your selections:
a. Select Perform Prerequisite Check and choose Execute ( F8 ).
b. Read the system log and rst resolve any issues found during the check. See the Troubleshooting
[page 207] section for possible solutions.
5. Activate the SAP HANA content for real:
a. Deselect Perform Prerequisite Check.
b. Choose Execute ( F8 ) again.
6. Verify that the activation was successful. There are three ways how you can do this:
a. Simply rerun the report. You can see all the options that are now active.
b. Or: Start transaction SCTS_HTA_DEPLOY. Specify an SAP HANA content package (for example,
sap.is.retail), select Include subpackages, and choose Execute ( F8 ). You can see all the packages
and objects including their status.
c. Or: Navigate to the same package in SAP HANA studio or SAP Web IDE and check whether all its views
are active.
Results
You have successfully activated the SAP HANA content for your scenario. Continue with the next section.
Common Installation Guide for SAP Customer Activity Repository applications bundle 5.0
Set Up the Applications
PUBLIC 97

Task overview: Core (Mandatory for All Applications) [page 83]
Previous task: Create/Replicate Source Master Data System Tables [page 91]
Next: Activate SAP HANA Content for Demand Data Foundation (DDF) [page 98]
6.1.1.6 Activate SAP HANA Content for Demand Data
Foundation (DDF)
If your scenario includes the calculation of Demand Data Foundation (DDF), do the additional steps described
here to activate the required SAP HANA content. All steps are mandatory.
Caution
If you wish to calculate distribution curves for SAP Allocation Management (that is, for the “distribution
curve analysis”
), skip the steps below and follow the instructions in Activate SAP HANA Content for SAP
Allocation Management [page 305].
Run the Report for Creating the Dummy Schema and Dummy Tables
The /DMF/CREATE_SLT_TABLES (Create SLT Tables) report checks for a missing physical schema and, if
necessary, creates this as a dummy schema together with the corresponding dummy tables.
Prerequisites
You have an SAP HANA database user in the ABAP back-end system with the authorization to create the
dummy schema (privilege CREATE SCHEMA). This should already be the case if the authorizations were set up
as described in section Verify SAP HANA Users and Privileges [page 49].
Procedure
1. Run the report /DMF/INSERT_SLT_TABLES_TO_DB (Insert SLT Table Entries to Database in insert mode
(by deselecting the simulation setting).
2. In your ABAP back-end system, start transaction SE38. Enter /DMF/CREATE_SLT_TABLES as the program
and choose Execute.
3. Select your source master data system. For SAP S/4HANA, also select the version.
4. For the Physical Source Schema, enter the name of the physical schema into which your SLT tables should
be replicated.
Note
If the physical source schema already exists in the SAP HANA database, only the dummy tables in this
schema are created when you execute the report.
98
PUBLIC
Common Installation Guide for SAP Customer Activity Repository applications bundle 5.0
Set Up the Applications
5. For the Physical Dummy Schema, enter the name of the schema to be created.
6. Select the simulation mode for a test run and execute the report. Check for errors in the application log
and resolve them.
7. Run the report again, this time without simulation mode.
Maintain Schema Mapping
Check the name of your physical schema:
1. If it is one of the default names below, no further action is required:
○ SAP_S4H, for SAP S/4HANA
○ SAP_ECC, for SAP Retail and SAP Fashion Management
2. If your physical schema has a dierent name, do the following:
In SAP HANA studio, create a schema mapping where your customer-specic name is used as authoring
schema for the physical schema. For instructions, see Verify Correct Schema Mapping [page 54].
Set PREWORK_DONE Indicator for DDF Packages
Demand Data Foundation (DDF) has a number of SAP HANA content packages that are relevant:
● sap.is.ddf.ecc
● sap.is.ddf.fms
● sap.is.ddf.fms_s4h
● sap.is.ddf.cross.ecc
● sap.is.ddf.cross.fms
● sap.is.ddf.cross.fms_s4h
● sap.is.ddf.cross
These packages have the activation mode P (Package and its objects deployed only after prework done). In this
procedure, you conrm that the prework has been done. You do this by setting the PREWORK_DONE indicator in
the CTS_HOT_PREWORK table to X for all the packages above.
Procedure
1. Start transaction SE16, enter CTS_HOT_PREWORK as the table, and choose Execute.
2. Enter sap.is.ddf.* as ABAP_HANA_PACKAGE_ID and choose Execute.
3. You now see a list that includes the DDF packages above. Switch to change mode to edit the entries.
4. Check whether all of the DDF packages above have the PREWORK_DONE indicator set to X.
5. If the setting is still missing for one of the DDF packages above, double-click the entry and set
PREWORK_DONE to X.
6. Save your changes.
Common Installation Guide for SAP Customer Activity Repository applications bundle 5.0
Set Up the Applications
PUBLIC 99

Note
Here is how you can always check the current settings and display details for each package:
1. Start transaction SE16, enter CTS_HOT_PACKAGE as the table, and choose Execute.
2. Enter sap.is.ddf.* as ABAP_HANA_PACKAGE_ID and choose Execute.
3. You now see a list that includes the DDF packages above. For each of the DDF packages above, double-
click the entry to display the package details.
4. For each package, verify the current setting in eld HOT ACTIVATION MODE (set to P).
Check and Activate the SAP HANA Content for Demand Data Foundation
(DDF)
Depending on your scenario, there might still be inactive DDF packages even though you have already activated
the content as described in the previous section (Activate SAP HANA Content [page 95]).
Now you make sure that those packages are activated as well.
Procedure
1. Execute transaction SCTS_HTA_DEPLOY (SAP HANA Transport for ABAP - Deployment).
2. Deploy each of the following packages in exactly the same order as listed below. One by one, enter the
package ID in SAP HANA Repository Package and choose Execute.
Caution
Do not select the Include subpackages option.
1. sap.is.ddf.ecc
2. sap.is.ddf.fms
3. sap.is.ddf.fms_s4h
4. sap.is.ddf.cross.ecc
5. sap.is.ddf.cross.fms
6. sap.is.ddf.cross.fms_s4h
7. sap.is.ddf.cross
Result
You have successfully activated the SAP HANA content for calculating Demand Data Foundation.
Parent topic: Core (Mandatory for All Applications) [page 83]
Previous task: Activate SAP HANA Content [page 95]
100
PUBLIC
Common Installation Guide for SAP Customer Activity Repository applications bundle 5.0
Set Up the Applications

Next task: Activate SAP HANA Script Server [page 101]
6.1.1.7 Activate SAP HANA Script Server
Activate the script server for the SAP HANA database. This step is mandatory for all the applications.
Context
The script server is an auxiliary SAP HANA server that is required to execute application function libraries
(AFLs). For example, this applies to the SAP HANA AFL component (which includes the SAP HANA Predictive
Analysis Library (PAL) and other libraries) and to the SAP RTL AFL FOR SAP HANA component (which
includes the libraries for Unied Demand Forecast and On-Shelf Availability).
Note
● The service name is scriptserver.
● The operating system process is hdbscriptserver.
● The operating system process can be started while the SAP HANA database is already running.
Procedure
1. In SAP HANA studio, verify that the script server is active.
2. If the script server is not active, restart it manually as described in SAP Note 1650957 (SAP HANA
Database: Starting the Script Server).
Task overview: Core (Mandatory for All Applications) [page 83]
Previous: Activate SAP HANA Content for Demand Data Foundation (DDF) [page 98]
Next: Congure Demand Data Foundation [page 102]
Common Installation Guide for SAP Customer Activity Repository applications bundle 5.0
Set Up the Applications
PUBLIC 101

6.1.1.8 Congure Demand Data Foundation
Congure the DDF module in SAP Customer Activity Repository as required for your scenario.
Required Conguration
The conguration of DDF is mandatory for the following scenarios:
● You want to model and forecast demand using the UDF module in SAP Customer Activity Repository.
● You want to use the Omnichannel Promotion Pricing (OPP) module in SAP Customer Activity Repository.
● You want to use SAP Allocation Management.
● You want to use SAP Assortment Planning.
● You want to use SAP Merchandise Planning.
● You want to use SAP Promotion Management.
● You want to use SAP Replenishment Planning.
Note
The conguration of DDF is optional for the following SAP Customer Activity Repository scenarios:
● POS Data Transfer and Audit
● Multichannel Transaction Data Management
● Inventory Visibility (including Omnichannel Article Availability and Sourcing, OAA)
● On-Shelf Availability
For additional conguration and integration information, see the following sources:
● In the application help for SAP Customer Activity Repository at http://help.sap.com/viewer/p/CARAB ,
search for section Master Data Replication from SAP ERP to Demand Data Foundation.
● In the SAP Customer Activity Repository Administration Guide, see section Congure Demand Data
Foundation (DDF) and section Congure Data Replication from SAP ERP to DDF.
Note
If you encounter issues during the conguration, see the Troubleshooting [page 207] section for possible
solutions.
Overview of DDF Conguration Tasks
1. Perform General Demand Data Foundation Conguration [page 103]
Perform various conguration steps in Customizing for DDF. DDF must be fully congured and
operational for all the scenarios for which it is mandatory.
2. Activate Services [page 104]
Activate services for DDF using transaction SICF.
102
PUBLIC
Common Installation Guide for SAP Customer Activity Repository applications bundle 5.0
Set Up the Applications
3. Congure Automatic Flattening of Hierarchies [page 104]
Congure the system so it automatically creates and updates at structures for the product and
location hierarchies in DDF. The at structures are required so that the consuming applications can
correctly recognize the hierarchies.
4. Import SAP NetWeaver Portal Roles for DDF [page 105]
Set up user authorizations for DDF using the PFCG roles from the SAP NetWeaver Business Client
(NWBC) and from the SAP NetWeaver Portal (optional). Both sets of roles operate in the same manner.
5. Check Performance-Related Conguration Options (Optional) [page 106]
Use additional conguration options for Demand Data Foundation (DDF) to optimize performance for
dierent use cases.
Parent topic: Core (Mandatory for All Applications) [page 83]
Previous task: Activate SAP HANA Script Server [page 101]
Next: Congure SAP Gateway [page 107]
6.1.1.8.1 Perform General Demand Data Foundation
Conguration
Perform various conguration steps in Customizing for DDF. DDF must be fully congured and operational for
all the scenarios for which it is mandatory.
Procedure
1. Perform all of the Customizing activities that are required for DDF.
For more information, see the Congure Demand Data Foundation (DDF) section of the SAP Customer
Activity Repository Administration Guide.
Parent topic: Congure Demand Data Foundation [page 102]
Next: Activate Services [page 104]
Common Installation Guide for SAP Customer Activity Repository applications bundle 5.0
Set Up the Applications
PUBLIC 103
6.1.1.8.2 Activate Services
Activate services for DDF using transaction SICF.
Procedure
1. Execute transaction SICF.
2. On the Maintain Service screen, expand the Virtual Hosts/Services node and activate all of the following
services:
1. default_host sap bc nwbc*
2. default_host sap bc webdynpro sap POWL*
3. default_host sap bc webdynpro dmf*
4. default_host sap public bc*
5. default_host sap public myssocntl
6. default_host sap bc Gui sap Its / webgui
*Activate all services.
Parent topic: Congure Demand Data Foundation [page 102]
Previous: Perform General Demand Data Foundation Conguration [page 103]
Next task: Congure Automatic Flattening of Hierarchies [page 104]
6.1.1.8.3 Congure Automatic Flattening of Hierarchies
Congure the system so it automatically creates and updates at structures for the product and location
hierarchies in DDF. The at structures are required so that the consuming applications can correctly recognize
the hierarchies.
Context
Flat structures describe the parent-child relationships of hierarchies in a attened format. A hierarchy can be
vertically or horizontally attened. Each row of the resulting at structure contains one parent-child
relationship.
When you create (or update) a product hierarchy, product group, location hierarchy, or location group in
Demand Data Foundation (DDF), the system should create (or update) the corresponding at structure.
Without this, you get hierarchy errors in the consuming applications.
104
PUBLIC
Common Installation Guide for SAP Customer Activity Repository applications bundle 5.0
Set Up the Applications

To congure the automatic attening of hierarchies, follow these steps:
Procedure
1. Carefully read SAP Note 1425876 and follow the instructions.
2. Execute transaction SWETYPV and ensure that you have activated all required event type linkages and have
enabled the specied event queues. In particular, check that the Linkage Activated and Enable Event Queue
options are for each of the following events: LOCATION_CREATED, LOCATION_UPDATED,
CREATE_LOC_HIER, CREATE_PROD_HIER. If you need to change a setting, you can do so in the Details
screen of each event.
For more information about event handling, see SAP Note 1098805 , in particular sections Events and
Transactions for troubleshooting.
Results
You have set up the automatic attening of the hierarchies. When you now create (or update) a hierarchy, the
system will automatically run the /DMF/TREE_FLATTENER_PROD_INS report (for product hierarchies) or
the /DMF/TREE_FLATTENER_LOC_INS report (for location hierarchies) and create (or update) the
corresponding at structure.
Task overview: Congure Demand Data Foundation [page 102]
Previous: Activate Services [page 104]
Next: Import SAP NetWeaver Portal Roles for DDF [page 105]
6.1.1.8.4 Import SAP NetWeaver Portal Roles for DDF
Set up user authorizations for DDF using the PFCG roles from the SAP NetWeaver Business Client (NWBC) and
from the SAP NetWeaver Portal (optional). Both sets of roles operate in the same manner.
Use
The roles have been designed for use in SAP NetWeaver Business Client. To use the functions of these roles in
SAP NetWeaver Portal, you must upload the roles from the SAP back-end system to the portal. The uploaded
objects are converted into portal objects.
Common Installation Guide for SAP Customer Activity Repository applications bundle 5.0
Set Up the Applications
PUBLIC 105

Procedure
1. Use the Role Upload tool to generate the SAP NetWeaver Portal roles automatically. For information about
this tool, see SAP Note 1685257 .
You can also enhance the SAP NetWeaver Portal roles; for example, you can create your own iViews.
You can upload the following roles for DDF:
○ SAP_ISR_DDF_MASTER
○ SAP_ISR_DDF_READONLY_MASTER
For descriptions of these roles and information about maintaining roles in SAP Customer Activity Repository,
see section Authorizations in the SAP Customer Activity Repository Administration Guide.
Parent topic: Congure Demand Data Foundation [page 102]
Previous task: Congure Automatic Flattening of Hierarchies [page 104]
Next: Check Performance-Related Conguration Options (Optional) [page 106]
6.1.1.8.5 Check Performance-Related Conguration
Options (Optional)
Use additional conguration options for Demand Data Foundation (DDF) to optimize performance for dierent
use cases.
Procedure
See the following options and implement those that are relevant for you:
Use Case Conguration Option
You have a great number of products and locations, so that
the resulting tables are very large.
Consider table partitioning.
For information, see the Partition Tables for UDF and DDF
section of the SAP Customer Activity Repository Administra
tion Guide.
You want to optimize workload distribution. Consider setting up load balancing.
For information, see https://help.sap.com/viewer/p/CARAB
<Version> Application Help SAP Customer Activity
Repository Demand Data Foundation General Services
Congure Load Balancing .
106 PUBLIC
Common Installation Guide for SAP Customer Activity Repository applications bundle 5.0
Set Up the Applications

Use Case Conguration Option
You are using DDF together with UDF to model and forecast
consumer demand.
Optimize performance for modeling and forecasting proc
esses.
For information, see the Optimize UDF PerformanceOptimize
UDF Performance section of the SAP Customer Activity
Repository Administration Guide.
Parent topic: Congure Demand Data Foundation [page 102]
Previous: Import SAP NetWeaver Portal Roles for DDF [page 105]
6.1.1.9 Congure SAP Gateway
Perform several conguration steps for SAP Gateway and activate the OData services for the SAP Fiori apps.
The steps to follow depend on the SAP NetWeaver version on your front-end server.
Perform General SAP Gateway Conguration [page 108]
Make several general conguration settings (for example, set prole parameters, activate ICF services,
or make language settings). The settings may vary depending on the SAP NetWeaver version installed
on your front-end server, or on other specics related to your system landscape.
Connect SAP Gateway to Your Back-End System [page 108]
Set up the connection between SAP Gateway on your front-end server and your back-end system. In
other words, set up the OData Channel (ODC).
Activate SAP Gateway [page 110]
Before you can use SAP Gateway, you must activate it globally on your front-end server.
Activate OData Services [page 111]
First activate all the common OData services for SAP Fiori (mandatory). Then select the OData
services for the application and SAP Fiori apps that you wish to use and activate these services as well.
Congure SAP Fiori Launchpad [page 115]
Perform the general conguration of SAP Fiori launchpad. You must do this before you can set up the
SAP Fiori apps for your application.
Calculate SAPUI5 Application Index for SAP Fiori Apps [page 117]
Congure and run the /UI5/APP_INDEX_CALCULATE (Calculation of SAPUI5 Application Index for
SAPUI5 Repositories) report in your front-end system. The report updates the SAPUI5 application
index. If the index is up-to-date, the system can nd data related to SAP Fiori apps signicantly faster.
Parent topic: Core (Mandatory for All Applications) [page 83]
Previous: Congure Demand Data Foundation [page 102]
Common Installation Guide for SAP Customer Activity Repository applications bundle 5.0
Set Up the Applications
PUBLIC 107

6.1.1.9.1 Perform General SAP Gateway Conguration
Make several general conguration settings (for example, set prole parameters, activate ICF services, or make
language settings). The settings may vary depending on the SAP NetWeaver version installed on your front-end
server, or on other specics related to your system landscape.
Use
The steps are not specic to this guide and are described in the product documentation of your SAP
NetWeaver version.
Procedure
1. Determine the SAP NetWeaver version on your front-end server.
2. Consult the product documentation for your SAP NetWeaver version to determine what settings to make.
For SAP Gateway for SAP NetWeaver 7.52, see https://help.sap.com/viewer/p/
SAP_NETWEAVER_AS_ABAP_752
and choose <Version> Application Help SAP Gateway Foundation
(SAP_GWFND) SAP Gateway Foundation Conguration Guide General Conguration Settings .
3. Perform the general SAP Gateway conguration specic to your SAP NetWeaver version.
Note
If you encounter issues, see SAP Note 1797736 (SAP Gateway Troubleshooting Guide) for possible
solutions.
6.1.1.9.2 Connect SAP Gateway to Your Back-End System
Set up the connection between SAP Gateway on your front-end server and your back-end system. In other
words, set up the OData Channel (ODC).
Use
The steps are not specic to this guide and are described in the product documentation for your SAP
NetWeaver version.
Note
As of SAP NetWeaver 7.40, the major components of SAP Gateway have been integrated into the SAP
NetWeaver system as SAP Gateway Foundation (SAP_GWFND). SAP Gateway Foundation has since been an
integral part of SAP NetWeaver.
108
PUBLIC
Common Installation Guide for SAP Customer Activity Repository applications bundle 5.0
Set Up the Applications

Procedure
1. Determine the SAP NetWeaver version on your front-end server.
2. Set up the OData Channel as described in the SAP Gateway Foundation Conguration Guide for your SAP
NetWeaver version.
Use SAP Help Portal for SAP NetWeaver as your entry point and navigate to the guide for your version.
Here are two examples:
Example
For SAP Gateway on Foundation for ABAP Platform, see the SAP Gateway Foundation Conguration
Guide.
If required, select a dierent version at the top.
Search for section Connection Settings for the SAP Gateway Hub System and follow the instructions.
Example
For SAP Gateway for SAP NetWeaver 7.52, see https://help.sap.com/viewer/p/
SAP_NETWEAVER_AS_ABAP_752.
Select your version at the top and choose Application Help SAP Gateway Foundation
(SAP_GWFND) SAP Gateway Foundation Conguration Guide SAP Gateway Conguration User,
Developer, and Administrator Roles
and Connection Settings for the SAP Gateway Hub System.
3. Set up the required roles on the front-end server and assign your user to these roles.
4. Specify the connection settings on the SAP Gateway hub system:
○ Connection from SAP Gateway to consumer systems
These settings allow you to connect the SAP Gateway host to the consumer systems (clients from
which you access the SAP Fiori apps).
○ Connection from SAP Gateway to SAP back-end system
These settings allow you to connect SAP Gateway to your back-end system. They include the following
steps:
○ Creating a type 3 connection from the SAP Gateway host to your back-end system
○ Dening a trust relationship between your back-end system and the SAP Gateway host
○ Conguring your back-end system to accept SAP assertion tickets from the SAP Gateway host
○ Conguring your SAP Gateway host to accept SAP assertion tickets from your back-end system
○ Conguring the necessary system aliases
Common Installation Guide for SAP Customer Activity Repository applications bundle 5.0
Set Up the Applications
PUBLIC 109

6.1.1.9.3 Activate SAP Gateway
Before you can use SAP Gateway, you must activate it globally on your front-end server.
Use
The steps are not specic to this guide and are described in the product documentation for your SAP
NetWeaver version.
Note
As of SAP NetWeaver 7.40, the major components of SAP Gateway have been integrated into the SAP
NetWeaver system as SAP Gateway Foundation (SAP_GWFND). SAP Gateway Foundation has since been an
integral part of SAP NetWeaver.
Procedure
1. Determine the SAP NetWeaver version on your front-end server.
2. Follow the steps in the Activating SAP Gateway section of the SAP Gateway Foundation Conguration Guide
for your SAP NetWeaver version.
Use SAP Help Portal for SAP NetWeaver as your entry point and navigate to the guide for your version.
Here are two examples:
Example
For SAP Gateway on Foundation for ABAP Platform, see the SAP Gateway Foundation Conguration
Guide.
If required, select a dierent version at the top.
Search for section Activating SAP Gateway and follow the instructions.
Example
For SAP Gateway for SAP NetWeaver 7.52, see https://help.sap.com/viewer/p/
SAP_NETWEAVER_AS_ABAP_752.
Select your version at the top and choose Application Help SAP Gateway Foundation
(SAP_GWFND)
SAP Gateway Foundation Conguration Guide SAP Gateway Conguration
Activating SAP Gateway .
110
PUBLIC
Common Installation Guide for SAP Customer Activity Repository applications bundle 5.0
Set Up the Applications

6.1.1.9.4 Activate OData Services
First activate all the common OData services for SAP Fiori (mandatory). Then select the OData services for the
application and SAP Fiori apps that you wish to use and activate these services as well.
Context
For security reasons, the OData services are delivered in an inactive state:
● The common OData services are delivered as part of the SAP Fiori front-end server. They are required for
the SAP Fiori launchpad and you must always activate them.
● The application-specic OData services are delivered with SAP Customer Activity Repository
applications bundle. You only need to activate the services that are relevant for your application and
scenario.
Procedures
Mandatory: Activate Common OData Services for SAP Fiori
1. Log on to your front-end server (your SAP Gateway system).
2. In transaction SPRO, navigate to SAP Reference IMG SAP NetWeaver SAP Gateway OData Channel
Administration General Settings Activate and Maintain Services and execute the Customizing
activity.
Tip
As a shortcut to the same screen, use transaction /n/IWFND/MAINT_SERVICE.
The Service Catalog shows you all the services that are currently active in your SAP Gateway system.
3. To add and activate more services, choose Add Service.
The Add Selected Services screen is displayed.
4. In System Alias, select the alias of your local back-end system.
This is the alias that you have created in Connect SAP Gateway to your Back-End System [page 108]. For
example, LOCAL.
5. In Technical Service Name, specify /UI2*.
6. Choose Get Services (or press ENTER ).
7. Select all the common OData services for SAP Fiori:
Common OData Services for SAP Fiori
/UI2/PAGE_BUILDER_CONF
/UI2/PAGE_BUILDER_CUST
Common Installation Guide for SAP Customer Activity Repository applications bundle 5.0
Set Up the Applications
PUBLIC 111

Common OData Services for SAP Fiori
/UI2/PAGE_BUILDER_PERS
/UI2/TRANSPORT
/UI2/INTEROP
8. Choose Add Selected Services and follow the instructions.
Result
The common OData services are now active in your SAP Gateway system.
Activate Application-Specic OData Services for SAP Customer Activity Repository
applications bundle
1. Log on to your front-end server (your SAP Gateway system).
2. In transaction SPRO, navigate to SAP Reference IMG SAP NetWeaver SAP Gateway OData Channel
Administration General Settings Activate and Maintain Services and execute the Customizing
activity.
Tip
As a shortcut to the same screen, use transaction /n/IWFND/MAINT_SERVICE.
The Service Catalog shows you all the services that are currently active in your SAP Gateway system.
3. Activate the services that are required for your application:
1. Choose Add Service.
The Add Selected Services screen is displayed.
2. In System Alias, select the alias of your back-end system.
3. Choose Get Services (or press ENTER ).
The available services are displayed.
4. Use the following table for reference and select the services for your application:
Tip
You can also see the required OData services for each app in the SAP Fiori Reference Library at
https://oriappslibrary.hana.ondemand.com/sap/x/externalViewer/. Search for the app name,
choose IMPLEMENTATION INFORMATION, and select a delivery. The OData services are listed
under Conguration.
112
PUBLIC
Common Installation Guide for SAP Customer Activity Repository applications bundle 5.0
Set Up the Applications

For this Application... Activate These OData Services...
SAP Customer
Activity Repository
○ For POS Data Transfer and Audit: No OData services for SAP Gateway
○ For Multichannel Transaction Data Management: No OData services for SAP Gateway
○ For Unied Demand Forecast and the apps for demand forecasting (Analyze Forecast,
Adjust Forecast, Manage Demand Inuencing Factors, Manage Alerts):
○ /DMF/ANALYZEFORECAST_SRV
○ /DMF/OD_FC_TIME_SERIES_VIZ_SRV
○ /DMF/DEMAND_PLAN_UTILITIES_SRV
○ /DPL/OD_ADJUST_FORECAST_SRV
○ /DPL/OD_DEMAND_PLANNING_SRV
○ /DMF/MANAGE_RTLPLNG_ALERTS_SRV
○ APS_CHANGE_DOCUMENTS_SRV
○ For Demand Data Foundation (optional; alternative to using the DRF data replication
framework for importing master data):
○ /DMF/API_DOCUMENT
○ /DMF/API_GENERIC_TIME_SERIES
○ /DMF/API_INVENTORY
○ /DMF/API_LOCATION
○ /DMF/API_LOCATION_HIERARCHY
○ /DMF/API_PRODUCT
○ /DMF/API_PRODUCT_HIERARCHY
○ /DMF/API_PRODUCT_LOCATION
○ /DMF/API_SALES_HISTORY
○ /DMF/API_TRANSPORTATION_LANE
○ /DMF/API_ATTRIBUTES
○ /DMF/API_IMAGES
○ /DMF/API_MERCHANDISE_PLAN_KPI
○ /DMF/API_PHPS
○ For the Manage Product Attributes app:
○ /DMF/API_ATTRIBUTES_SRV (optional, to import external attributes for inte
gration scenarios with non-SAP source master data systems)
○ For Omnichannel Promotion Pricing: none
○ For Omnichannel Article Availability and Sourcing (part of Inventory Visibility):
○ With SAP S/4HANA back-end:
/OAA/F3391_MSN_SRV
/OAA/F2586_MSS_SRV
/OAA/F2659_MSC_SRV
/OAA/F3392_MS_SRV
○ With SAP Retail back-end:
/OAA/F2530_MSN_SRV
/OAA/F2586_MSS_SRV
/OAA/F2659_MSC_SRV
/OAA/F3003_MS_SRV
Common Installation Guide for SAP Customer Activity Repository applications bundle 5.0
Set Up the Applications
PUBLIC 113

For this Application... Activate These OData Services...
○ For On-Shelf Availability:
○ /OSA/ON_SHELF_AVAILABILITY
○ For SAP Smart Business for Multichannel Sales Analytics: none
Distribution Curves For the Congure Distribution Curves app and the calculation of distribution curves:
○ /DMF/DIST_CURVE
SAP Allocation
Management
○ /AMR/OD_ALLOCATIONPLAN_SRV
○ /AMR/OD_COMMON_SRV
○ /AMR/OD_MARKETUNIT_SRV
○ /AMR/OD_PARAM_SRV
○ /AMR/OD_WORKLOAD_SRV
○ /AMR/OD_PRODUCT_FLOW_SRV
○ /AMR/OD_KPI_CONFIG_SRV
○ /AMR/OD_ALLOCATIONRESULT_SRV
○ /AMR/OD_BASKET_SRV
○ /AMR/OD_ALLOCATIONPLAN_SEARCH_SRV
○ /AMR/OD_CAPACITYMANAGEMENT_SRV
SAP Assortment
Planning
○ /DMF/CURRENCY_LIST_SRV
○ /DMF/LOCATION_CLUSTERSET_SRV
○ /DMF/MASTER_DATA_SRV
○ /DMF/MODULE_MANAGEMENT_SRV
○ /DMF/OBJ_ATTRIBUTE_SRV
○ /DMF/PLAN_CONFIG_SRV
○ /DMF/SEARCH_LOCATIONS_SRV
○ /DMF/SEARCH_PRODUCTS_SRV
○ /DMF/SEASONS_SRV
○ /RAP/ASSORTMENT_LIST_SRV
○ /RAP/OPTION_PLAN_SRV
○ /RAP/PHP_MATCH_SRV
○ /RAP/VALIDITY_PERIOD_SRV
○ /RAP/V_OP_KPI_Q_CDS_CDS
○ /RAP/OPT_PLN_KPI_SRV
○ /RAP/V_OP_OCLST_PRSL_Q_CDS_CDS
○ /RAP/STYLE_PLAN_SRV
SAP Merchandise
Planning
Not applicable (this application does not have SAP Fiori apps)
114 PUBLIC
Common Installation Guide for SAP Customer Activity Repository applications bundle 5.0
Set Up the Applications
For this Application... Activate These OData Services...
SAP Promotion
Management
○ /DMF/PROD_MD_SRV (Master Data Retrieval)
○ /DMF/OFFER_MANAGEMENT_V2_SRV (Manage Promotional Oers)
○ /DMF/PRODUCT_GROUP_SRV (Manage Product Groups)
○ /DMF/LOCATION_SUBGROUP_SRV (Manage Location Subgroups)
○ /PRM/OFFER_CONTENT_SRV (Oer Content Assignment)
○ /PRM/ EVENT_PREVIEW_SRV (Event Preview)
SAP Replenishment
Planning
For information about the OData services for SAP Replenishment Planning, see Set Up
SAP Fiori Apps for SAP Replenishment Planning [page 320] and refer to subsection Acti
vate Application-Specic OData Services for SAP Replenishment Planning.
4. Choose Add Selected Services and follow the instructions.
Note
User roles are only needed if you want to have connections to multiple back-end systems or multiple
clients on the same back-end. The user roles are system-specic and are not delivered by default. If
required, you must create them manually. If you dene multiple user roles for dierent connections,
make sure you have only one role assigned to your user at any time. If you need to change roles, rst
remove the old role from your user, then assign the new role.
Result
The application-specic OData services that you have selected are now active in your SAP Gateway system.
Tip
To ensure that your apps start quickly from the launchpad, you can schedule a report to enable regular
updating of cached OData metadata. For more information, see Scheduling Update of OData Metadata
Caching.
6.1.1.9.5 Congure SAP Fiori Launchpad
Perform the general conguration of SAP Fiori launchpad. You must do this before you can set up the SAP Fiori
apps for your application.
Context
SAP Fiori launchpad is the entry point to SAP Fiori apps on mobile and desktop devices. It gives users the
relevant information at a glance and centers on their needs and how they work. Technically, SAP Fiori
launchpad is a shell that hosts the SAP Fiori apps and provides them with services such as navigation,
personalization, embedded support, and conguration.
Common Installation Guide for SAP Customer Activity Repository applications bundle 5.0
Set Up the Applications
PUBLIC 115

For feature descriptions, administration and end user information, see the product documentation for SAP
Fiori Launchpad.
Prerequisite
You have installed SAP Fiori launchpad as described in section Verify Installation of Central SAP Fiori UI
Component [page 78].
Procedure
1. To set up and congure SAP Fiori launchpad, see the following sections of the SAP Fiori Launchpad
Administration Guide:
Note
If necessary, select a dierent version at the top, based on your deployment scenario and the SAP
NetWeaver version on your front-end system.
○ Initial Setup of the Launchpad (including all subsections; there you can nd information on embedded
deployment scenarios and central hub scenarios)
○ Managing Launchpad Settings
2. (Optional) Congure additional settings to improve the performance of SAP Fiori launchpad. These
settings are relevant for the following scenario:
○ Your source master data system is SAP S/4HANA 1809 or higher.
○ You are using Web Dynpro applications or SAP GUI for HTML transactions as tiles on SAP Fiori
launchpad.
See SAP Help Portal at https://help.sap.com/viewer/product/SAP_S4HANA_ON-PREMISE/latest/en-US?
task=implement_task and select your version at the top. Open the Upgrade Guide and search for section
SAP Fiori Launchpad Settings for Improved Performance.
More Information
For an overview of installation, upgrade, and implementation information for SAP Fiori, see SAP Help Portal at
https://help.sap.com/viewer/product/FIORI_IMPLEMENTATION/FES6.0/en-US?task=implement_task.
116
PUBLIC
Common Installation Guide for SAP Customer Activity Repository applications bundle 5.0
Set Up the Applications

6.1.1.9.6 Calculate SAPUI5 Application Index for SAP Fiori
Apps
Congure and run the /UI5/APP_INDEX_CALCULATE (Calculation of SAPUI5 Application Index for SAPUI5
Repositories) report in your front-end system. The report updates the SAPUI5 application index. If the index is
up-to-date, the system can nd data related to SAP Fiori apps signicantly faster.
Use
The SAPUI5 application index provides indexing and caching for data related to SAP Fiori apps, components,
and libraries. This data is contained in SAPUI5 repositories on the SAP NetWeaver Application Server for ABAP.
Initially, the index is empty. It is calculated and updated each time you run the report.
Prerequisites
You are familiar with the prerequisites, conguration options, and requirements of the /UI5/
APP_INDEX_CALCULATE report. For more information, see the following:
● SAP Note 2227577 (Recalculation of the SAPUI5 Application Index After Implementing an SAP Note)
● Report documentation in transaction SE38
● SAPUI5: UI Development Toolkit for HTML5: Here you can nd detailed information on the SAPUI5
application index and the report.
For more information, see SAPUI5 Application Index.
Conguration
To congure how the index should be calculated, you can choose from several options in the /UI5/
APP_INDEX_CALCULATE report:
● Tab Complete Index, option Depending on Expiry Period and Import of Transport Requests:
This option updates those SAPUI5 repositories and the distribution layer where either the specied
expiration period (in hours and minutes) has elapsed or where a transport has changed the content of the
repositories and the distribution layer since the last update.
Note
This is the default mode with an expiration period of 24 hours. We recommend that you use this mode
when scheduling the report for periodic execution.
● Tab Complete Index, option Full Calculation:
This option performs a full update of all SAPUI5 repositories and the distribution layer regardless of any
expiration dates.
Common Installation Guide for SAP Customer Activity Repository applications bundle 5.0
Set Up the Applications
PUBLIC 117

● Single SAPUI5 Repository Only: Here you select the repository for which you wish to update the index.
● SAPUI5 Distribution Layer Only: Here you update the index only based on the distribution layer.
Operation
Congure and run the report in all your front-end systems.
Tip
You can run the report manually, but we recommend the following best practices:
● Schedule the report as a periodic job for all follow-on systems to which the changes are transported.
This ensures that the application index is updated based on the transports imported by each system.
For example, you can use transaction SM36 for this purpose.
For more information, see Scheduling the Creation of the SAPUI5 Application Index.
● Always run the report in the following situations:
○ after any changes to the content of SAPUI5 ABAP repositories (for example, implementation of
SAP Notes, upgrades, changes to SAP Gateway systems)
○ after installing a new version of the distribution layer
○ after implementing an SAP Note containing changes to an SAP Fiori app
Procedure
Note
If you experience issues, see the following troubleshooting tips for possible solutions:
● SAP Note 2364579 (SAPUI5 application index is not calculated, is outdated or contains errors)
● SAP Community at Fiori - How to Troubleshoot SAPUI5 Application Index Specic Issues
1. Log on to your front-end system.
2. Execute transaction SE38, specify /UI5/APP_INDEX_CALCULATE as the program (report), and choose
Execute ( F8 ).
3. Congure the report.
4. Choose Execute ( F8 ) again to run the report manually.
Tip
Schedule the report to run on a regular basis in all your front-end systems.
Result
The SAPUI5 application index is updated based on your settings.
118
PUBLIC
Common Installation Guide for SAP Customer Activity Repository applications bundle 5.0
Set Up the Applications
6.1.2 Advanced (Optional)
After you have completed the core steps, perform the advanced steps that are relevant to your scenario. The
advanced steps are optional. They enable specic functionality in SAP Customer Activity Repository.
Prerequisites
You have completed the steps in Core (Mandatory for All Applications) [page 83].
Advanced Steps
Replicate Optional Tables [page 120]
Set up the table replication from your SAP CRM source system and from your SAP Marketing Cloud
source system. Both procedures are optional.
Congure SAP Smart Business for Multichannel Sales Analytics [page 124]
Do these procedures if you wish to use the SAP Smart Business for multichannel sales analytics
cockpit. The cockpit provides you with an overview of the most important key performance indicators
for a category manager. The KPI tiles are provided using the SAP Smart Business framework. They
serve as access points to analytical SAP Fiori apps.
Install Alternate Storage [page 126]
You only need to implement this procedure if you plan on using the Table Content Aging report delivered
with SAP Customer Activity Repository. This report allows you to copy your transaction log (TLOG)
data and its extensions from your SAP HANA database to an alternate storage technology (such as
SAP IQ or Apache Hadoop), thereby reducing your total cost of hardware ownership.
Ensure that Third-Party CRM Sales Orders are Transferred to SAP ERP [page 136]
Do this procedure if sales orders were created in a third-party customer relationship management
(CRM) system. You must ensure that this data is transferred to the source master data system. From
there, it can be replicated to (or accessed directly by) SAP Customer Activity Repository.
Partition /POSDW/TLOGF and Aggregation Tables [page 137]
If you wish to use the POS Data Transfer and Audit module, we recommend that you partition the /
POSDW/TLOGF table and several aggregation tables (such as /POSDW/TLOGF_EXT). This improves
standard database operations (such as inserting, updating, deleting, and reading) and mass operations
(such as archiving or index merging).
Customize Copies of SAP HANA Views [page 138]
Do this procedure if you have extended the delivered data model (for example, if you have added
custom elds to tables). First create copies of views included in SAP HANA Live for SAP ERP or in the
SAP HANA content for SAP Customer Activity Repository. Then customize these copies to reect your
specic data model extensions.
Complete UDF Setup [page 139]
Set up the Unied Demand Forecast (UDF) module in SAP Customer Activity Repository to enable
demand modeling and forecasting for dierent scenarios and consuming applications. To be able to
Common Installation Guide for SAP Customer Activity Repository applications bundle 5.0
Set Up the Applications
PUBLIC 119

use UDF, you must at least do the mandatory steps. We also point you to helpful performance
information for UDF.
Set Up SAP Fiori Apps for SAP Customer Activity Repository [page 146]
Perform common setup steps that are required for all the apps in SAP Customer Activity Repository.
For example, check the prerequisites and prepare the system landscape. Then set up the apps that you
want to use in your scenario.
Congure On-Shelf Availability [page 174]
Congure the On-Shelf Availability (OSA) module in SAP Customer Activity Repository. All steps are
optional and depend on your implementation scenario.
Congure Omnichannel Article Availability and Sourcing for Use with SAP Customer Activity Repository
[page 176]
To set up the OAA module, you need to integrate the source master data system (SAP S/4HANA or
SAP Retail), SAP Customer Activity Repository, SAP Commerce, and SAP Commerce, integration
package for SAP for Retail. You also need to set up asynchronous order management and the data
replication between SAP S/4HANA or SAP Retail, SAP Commerce, and SAP Customer Activity
Repository.
Congure Omnichannel Promotion Pricing for Use with SAP Customer Activity Repository [page 179]
To use the OPP module, you need to activate the functionality in Customizing and congure it for your
specic scenario.
6.1.2.1 Replicate Optional Tables
Set up the table replication from your SAP CRM source system and from your SAP Marketing Cloud source
system. Both procedures are optional.
6.1.2.1.1 Replicate SAP CRM Tables (Optional)
Set up the replication of tables from your SAP CRM source system. You only need to perform this procedure if
you have an SAP CRM system in your SAP Customer Activity Repository landscape and you are planning to use
the standard SAP implementation of customer identication delivered with the SAP Customer Activity
Repository.
Procedure
1. Ensure that the SAP LT Replication Server is installed and that a user with the appropriate authorizations is
set up in the target SAP HANA database.
If you have already ensured proper installation of the SAP LT Replication Server during previous
procedures, skip to the next step. Otherwise, refer to one of the following for more information:
○ http://help.sap.com/hana SAP HANA SAP HANA Options SAP HANA Real-Time Replication
SAP HANA Trigger-Based Data Replication Using SAP LT Replication Server Installation Information
120
PUBLIC
Common Installation Guide for SAP Customer Activity Repository applications bundle 5.0
Set Up the Applications

○ http://help.sap.com/hana SAP HANA SAP HANA Options SAP HANA Real-Time Replication
SAP HANA Trigger-Based Data Replication Using SAP LT Replication Server System Administration
and Maintenance Information
Technical Prerequisites and Authorization Aspects
2. Set up a user in the source SAP CRM system and grant relevant authorizations to this user.
For more information, see http://help.sap.com/hana SAP HANA SAP HANA Options SAP HANA
Real-Time Replication
SAP HANA Trigger-Based Data Replication Using SAP LT Replication Server
System Administration and Maintenance Information Conguration Information and Replication Concepts
System Connections and Authorizations .
3. Specify a conguration in SAP LT Replication Server, which contains the denition of the connections
between:
○ The source SAP CRM system and the SAP LT Replication Server
○ The SAP LT Replication Server and the target SAP HANA database
For more information, see http://help.sap.com/hana SAP HANA SAP HANA Options SAP HANA
Real-Time Replication SAP HANA Trigger-Based Data Replication Using SAP LT Replication Server
System Administration and Maintenance Information Accessing the Conguration and Monitoring
Dashboard .
The name that you assign to your conguration will be also be used as the name of the database catalog
schema that is automatically created on the target SAP HANA database. This is the schema to which you
will replicate the tables from the source SAP CRM system.
Once you save the conguration, a schema GUID and a mass transfer ID are automatically created and
assigned to the conguration. Furthermore, several dictionary tables are automatically replicated from
your source system to your target SAP HANA database.
For more information, see http://help.sap.com/hana SAP HANA SAP HANA Options SAP HANA
Real-Time Replication
SAP HANA Trigger-Based Data Replication Using SAP LT Replication Server
System Administration and Maintenance Information Important Transactions and Control Tables .
4. Dene client transformation rules for all the SAP CRM tables that you plan to replicate.
In most cases, you need to apply transformation rules to map the client of the source SAP CRM system to
the client on the target SAP Customer Activity Repository system.
Caution
Transformation rules must be dened prior to replicating tables.
For more information, refer to one of the following:
○ Set Up SAP Client section in the Common Installation Guide.
○ http://help.sap.com/hana SAP HANA SAP HANA Options SAP HANA Real-Time Replication
SAP HANA Trigger-Based Data Replication Using SAP LT Replication Server System Administration
and Maintenance Information Important Transactions and Control Tables Data Transformation
Capabilities within SAP Landscape Transformation Replication Server
○ SAP Note 1733714
5. Specify which SAP ERP tables to replicate using information from one of the two following sources:
○ SAP Note 2538135 , for installations based on the SAP_ECC schema
○ SAP Note 2538187 , for installations based on the SAP_S4H schema
Common Installation Guide for SAP Customer Activity Repository applications bundle 5.0
Set Up the Applications
PUBLIC 121

For more information, see:
○ http://help.sap.com/hba Installation, Security, Conguration, and Operations Information
Administrator's Guide Conguration Steps Replicate Data (Side-by-Side Only)
○ http://help.sap.com/hana SAP HANA SAP HANA Options SAP HANA Real-Time Replication
SAP HANA Trigger-Based Data Replication Using SAP LT Replication Server System Administration
and Maintenance Information
Conguration Information and Replication Concepts ( <Managing
the Replication Process Using the SAP HANA Studio> and <Important Transactions
and Control Tables>)
6. Map the authoring schema SAP_CRM to your particular physical database schema which contains the SAP
CRM tables. If the physical database schema is already named SAP_CRM,this schema mapping is not
required.
Authoring Schema Physical Schema
SAP_CRM <Name of Your Schema for Storing SAP_CRM
Data>
For more information, see http://help.sap.com/hana_platform Development and Modeling SAP
HANA Modeling Guide
Importing Table Denitions and Data Map Authoring Schema to the Physical
Schema .
Note
Every time you make changes to the schema mapping, the SAP HANA content must be redeployed.
You can do this using one of two methods:
○ Execute the /CAR/ACTIVATE_HANA_CONTENT report as described in SAP Note 2330386 .
○ Manually redeploy only those SAP HANA objects which are impacted by your schema mapping
change.
6.1.2.1.2 Replicate SAP Marketing Cloud Tables (Optional)
Set up the replication of tables from your SAP Marketing Cloud source system. You only need to perform this
procedure if you have a
SAP Marketing Cloud system in your SAP Customer Activity Repository landscape and
you are planning to use the standard SAP implementation of customer identication delivered with the SAP
Customer Activity Repository.
Procedure
1. If you plan to implement SAP Marketing Cloud co-deployed with SAP Customer Activity Repository, the
SAP Marketing Cloud tables will not be replicated because they already exist in the same SAP HANA
database and the same database schema.
122
PUBLIC
Common Installation Guide for SAP Customer Activity Repository applications bundle 5.0
Set Up the Applications

Note
Client transformation is not possible without table replication, therefore a co-deployed scenario is only
possible if the client numbers in the two back-end systems are identical.
For more information, see Set Up SAP Client section in the Common Installation Guide.
2. If you plan to implement SAP Marketing Cloud side-by-side with SAP Customer Activity Repository, do the
following:
1. Dene client transformation rules for all the SAP Marketing Cloud tables that you plan to replicate.
In most cases, you need to apply transformation rules to map the client of the source SAP Marketing
Cloud system to the client on the target SAP Customer Activity Repository system.
Caution
Transformation rules must be dened prior to replicating tables.
For more information, refer to one of the following:
○ Set Up SAP Client section in the Common Installation Guide.
○ http://help.sap.com/hana SAP HANA SAP HANA Options SAP HANA Real-Time
Replication SAP HANA Trigger-Based Data Replication Using SAP LT Replication Server System
Administration and Maintenance Information
Important Transactions and Control Tables Data
Transformation Capabilities within SAP Landscape Transformation Replication Server
○ SAP Note 1733714
2. Specify which SAP ERP tables to replicate using information from one of the two following sources:
○ SAP Note 2538135 , for installations based on the SAP_ECC schema
○ SAP Note 2538187 , for installations based on the SAP_S4H schema
For more information, see:
○ http://help.sap.com/hba Installation, Security, Conguration, and Operations Information
Administrator's Guide Conguration Steps Replicate Data (Side-by-Side Only)
○ http://help.sap.com/hana SAP HANA SAP HANA Options SAP HANA Real-Time
Replication
SAP HANA Trigger-Based Data Replication Using SAP LT Replication Server System
Administration and Maintenance Information Conguration Information and Replication Concepts
( <Managing the Replication Process Using the SAP HANA Studio> and
<Important Transactions and Control Tables>)
3. Regardless of whether you implement SAP Marketing Cloud co-deployed or side-by-side with SAP
Customer Activity Repository, map the authoring schema SAP_CUAN to your particular physical database
schema that contains the SAP CRM tables. If the physical database schema is already named SAP_CUAN,
this schema mapping is not required.
Authoring Schema Physical Schema
SAP_CUAN <Name of Your Schema for Storing SAP
Marketing Cloud Data>
Common Installation Guide for SAP Customer Activity Repository applications bundle 5.0
Set Up the Applications
PUBLIC 123

For more information, see http://help.sap.com/hana_platform Development and Modeling SAP
HANA Modeling Guide Importing Table Denitions and Data Map Authoring Schema to the Physical
Schema
.
Note
Every time you make changes to the schema mapping, the SAP HANA content must be redeployed.
You can do this using one of two methods:
○ Execute the /CAR/ACTIVATE_HANA_CONTENT report as described in SAP Note 2330386 .
○ Manually redeploy only those SAP HANA objects that are impacted by your schema mapping
change.
Side-by-Side Scenario (SLT)
1. Dene client transformation rules for all the SAP Marketing Cloud tables that you plan to replicate.
In most cases, you need to apply transformation rules to map the client of the source SAP Marketing Cloud
system to the client on the target SAP Customer Activity Repository system.
Caution
Transformation rules must be dened prior to replicating tables.
For more information, refer to one of the following:
○ Set Up SAP Client section in the Common Installation Guide.
○ http://help.sap.com/hana SAP HANA SAP HANA Options SAP HANA Real-Time Replication
SAP HANA Trigger-Based Data Replication Using SAP LT Replication Server System Administration
and Maintenance Information
Important Transactions and Control Tables Data Transformation
Capabilities within SAP Landscape Transformation Replication Server
○ SAP Note 1733714
2. Read SAP Note 1897025 and replicate the tables listed in the .txt le attached to this SAP Note.
For more information, see http://help.sap.com/hana SAP HANA SAP HANA Options SAP HANA
Real-Time Replication SAP HANA Trigger-Based Data Replication Using SAP LT Replication Server
System Administration and Maintenance Information .
6.1.2.2 Congure SAP Smart Business for Multichannel
Sales Analytics
Do these procedures if you wish to use the SAP Smart Business for multichannel sales analytics cockpit. The
cockpit provides you with an overview of the most important key performance indicators for a category
124
PUBLIC
Common Installation Guide for SAP Customer Activity Repository applications bundle 5.0
Set Up the Applications

manager. The KPI tiles are provided using the SAP Smart Business framework. They serve as access points to
analytical SAP Fiori apps.
Use
The steps in this section are optional and depend on your specic implementation requirements.
Note
For more information about the cockpit, see the application help for SAP Customer Activity Repository at
https://help.sap.com/viewer/p/CARAB. Search for section SAP Smart Business for Multichannel Sales
Analytics.
6.1.2.2.1 Install the SAP Smart Business Modeler Apps
Framework
The SAP Smart Business for Multichannel Sales Analytics apps included in this installation are based on the
SAP Smart Business Modeler Apps Framework. Installation and setup of this framework includes the following:
● Installation of SAP Smart Business Modeler apps on the front-end server
● Installation of SAP Smart Business products on the SAP HANA Server
● Installation of SAP Web Dispatcher
● Communication channels
● App implementation
For more information on these topics, see https://help.sap.com/viewer/p/UI_ADD-
ON_FOR_SAP_NETWEAVER_10 Application Help SAP Library SAPUI5: UI Development Toolkit for HTML5
SAPUI5 Application Frameworks SAP Smart Business Setting up the SAP Smart Business Modeler Apps
Framework .
Note
If you are installing User Interface Add-On 2.0 for SAP NetWeaver, you must download and install add-on
object UISAFND1 100 as described in SAP Note 2183947 .
Common Installation Guide for SAP Customer Activity Repository applications bundle 5.0
Set Up the Applications
PUBLIC 125

6.1.2.2.2 Congure SAP Web Dispatcher for the SAP Smart
Business Modeler Apps
SAP Web Dispatcher lies between the Internet and your SAP system. It is the entry point for HTTP(s) requests
into your system. As a “software web switch”, SAP Web Dispatcher can reject or accept connections. It
contributes to security and also balances the load in your SAP system.
Where to Find Conguration Information
To nd the SAP Web Dispatcher information for your SAP NetWeaver release, see the following:
● Central SAP Web Dispatcher note: 908097 SAP Web Dispatcher: Release, Installation, Patches,
Documentation
● Product documentation: https://help.sap.com/viewer/p/SAP_NETWEAVER. Choose your SAP NetWeaver
Platform and select the support package stack at the top right.
For conguration information, search for “Administration of the SAP Web Dispatcher”.
For a conguration example, search for “SAP Web Dispatcher Conguration Reference”.
For architecture information, search for “Architecture and Functions of the SAP Web Dispatcher”.
How to Congure SAP Web Dispatcher for the SAP Smart Business Modeler
Apps
The following parameters values are required:
● Source master data system: SAP ECC
Parameter wdisp/system_542 requires the following URL: /sap/is/retail/car/mcsa/odata
Resulting setting: wdisp/system_542 /sap/is/retail/car/mcsa/odata
● Source master data system: SAP S/4HANA
Parameter wdisp/system_542 requires the following URL: /sap/is/retail/car_s4h/mcsa/odata
Resulting setting: wdisp/system_542 /sap/is/retail/car_s4h/mcsa/odata
Other Solutions
If you use any other reverse proxy, see the manufacturer's documentation for more information.
6.1.2.3 Install Alternate Storage
You only need to implement this procedure if you plan on using the Table Content Aging report delivered with
SAP Customer Activity Repository. This report allows you to copy your transaction log (TLOG) data and its
126
PUBLIC
Common Installation Guide for SAP Customer Activity Repository applications bundle 5.0
Set Up the Applications
extensions from your SAP HANA database to an alternate storage technology (such as SAP IQ or Apache
Hadoop), thereby reducing your total cost of hardware ownership.
Use
For more information, see SAP Help Portal at https://help.sap.com/viewer/p/CARAB <Version> Use
Application Help SAP Customer Activity Repository POS Data Transfer and Audit Implementing a POS
Transaction Data Storage Strategy
Using the Table Content Aging Report .
Note
If your scenario includes demand modeling and forecasting with the Unied Demand Forecast (UDF)
module, we recommend retaining the historical sales data in memory.
Process Flow
In order to successfully install alternate storage, you must execute the following procedures:
1. Do one of the following:
○ Install and set up integration with SAP IQ, or
○ Install and set up integration with Apache Hadoop, or
○ Install and set up integration with SAP HANA Dynamic Tiering
2. Create the remote source in SAP HANA studio (not applicable for integration with SAP HANA Dynamic
Tiering).
3. Create the virtual table.
4. Set the deploy mode in SAP HANA Transport for ABAP.
6.1.2.3.1 Install and Set Up Integration with SAP IQ
You use these procedures to install and set up SAP IQ to support the Table Content Aging report
(transaction /CAR/TABLE_AGING) delivered with SAP Customer Activity Repository.
The SAP HANA database points to your SAP IQ database using SAP HANA smart data access (SDA), which
exposes data from SAP IQ remote sources as virtual tables.
For more information, see SAP Help Portal at https://help.sap.com/viewer/p/CARAB <your release> Use
Application Help SAP Customer Activity Repository POS Data Transfer and Audit Implementing a POS
Transaction Data Storage Strategy Using the Table Content Aging Report .
Common Installation Guide for SAP Customer Activity Repository applications bundle 5.0
Set Up the Applications
PUBLIC 127
Install SAP IQ
A detailed procedure is described in the SAP IQ Installation and Update Guide.
For more information, see SAP Help Portal at https://help.sap.com/viewer/p/SAP_IQ Implement
Installation and Upgrade SAP IQ Installation and Update Guide for <your operating system> .
Congure SAP IQ
1. Allocate sucient space into which your data will be loaded.
Note
The default DBSpaces provided during installation are intended to be used for SAP IQ system
management. You should create your own DBSpace under the Main store with a DB File that is large
enough to satisfy your sizing requirements.
For more information, see SAP Help Portal at https://help.sap.com/viewer/p/SAP_IQ Use
Reference SAP IQ SQL Reference SQL Statements CREATE DBSPACE Statement .
2. Create an in-memory row-level versioning (RLV) store.
For more information, see SAP Help Portal at https://help.sap.com/viewer/p/SAP_IQ Operate
Administration SAP IQ Administration: In-Memory Row-Level Versioning About In-Memory Row-Level
Versioning .
Note
Click View All if topic does not appear in initial list.
3. Create a database under the content created at the beginning of this procedure.
Note
Ensure the following:
○ The SAP IQ stores are congured with a large enough cache conguration, main memory, and
temporary memory.
○ The page size should be set to 128KB.
○ The concurrency aligns with the amount of processes that will be triggered during the data copy.
For more information, see SAP Help Portal at https://help.sap.com/viewer/p/SAP_IQ Implement
Conguration Performance and Tuning Guide .
4. Create the following tables in the DBSpace created at the beginning of the procedure:
○ /POSDW/TLOGF
○ /POSDW/TLOGF_EXT
○ /POSDW/TLOGF_X
○ /POSDW/PLOGF
128
PUBLIC
Common Installation Guide for SAP Customer Activity Repository applications bundle 5.0
Set Up the Applications

Note
These tables should have the same structure as the tables in your SAP HANA system. One possible
way is to export the table structure via Export SQL on the SAP HANA side, and import it on the SAP IQ
side using the SQL console.
The SQL statement requires some modications, such as:
○ Converting all the column names in the exported SQL statement to lower case (for example,
“RETAILSTOREID becomes “retailstoreid”).
You can simply convert the entire SQL statement into lower case and then only convert the table
name to upper case to keep the table name unchanged.
○ Renaming of NVARCHAR to VARCHAR.
○ Removing references to CS_* (for example, CS_FIXED).
5. Enable the RLV for the tables you just created.
6. Set the snapshot versioning property of the transaction to row-level.
Example
set option Snapshot_Versioning = 'Row-level';
7. Enable connection blocking and set the blocking timeout threshold.
Example
set option blocking = 'On';
set option blocking_timeout = '0';
Install SAP IQ Drivers
Install and congure the ODBC database drivers required to connect to the remote source.
Note
Each data source driver setup is described in its own section. The prerequisites are given as a simple guide;
you will need to consult the original driver documentation provided by the driver manufacturer for more
detailed information.
A detailed procedure is described in the SAP HANA Administration Guide.
For more information, see SAP Help Portal at http://help.sap.com/viewer/p/SAP_HANA_PLATFORM
Administration SAP HANA Administration Guide for SAP HANA Platform Data Access SAP HANA
Smart Data Access Setting Up ODBC Drivers SAP IQ ODBC Driver .
Common Installation Guide for SAP Customer Activity Repository applications bundle 5.0
Set Up the Applications
PUBLIC 129

6.1.2.3.2 Install and Set Up Integration with Apache
Hadoop
You use these procedures to install and set up Apache Hadoop to support the Table Content Aging report
(transaction /CAR/TABLE_AGING) delivered with SAP Customer Activity Repository.
The SAP HANA database points to your Hadoop cluster using SAP HANA smart data access (SDA), which
exposes data from Hadoop remote sources as virtual tables.
For more information, see SAP Help Portal at http://help.sap.com/viewer/p/CARAB <Version> Use
Application Help SAP Customer Activity Repository POS Data Transfer and Audit Implementing a POS
Transaction Data Storage Strategy Using the Table Content Aging Report .
Process Flow
To successfully install and set up integration with Apache Hadoop, you must execute the following procedures:
1. Install Apache Hadoop.
2. Do one of the following:
○ Install and set up the Apache Hive ODBC driver, or
○ Install and set up the SAP HANA Spark controller.
3. Create and partition tables in Apache Hive.
4. Create a NFS mount on SAP NetWeaver.
Install Apache Hadoop
According to the SAP HANA Administration Guide for SAP HANA Platform, SAP HANA smart data access is
supported by Hortonworks Distribution for Apache Hadoop: version 2.3 (supported on Intel-based hardware
platforms only).
For more information on integration between SAP HANA and Apache Hadoop, see SAP Help Portal at http://
help.sap.com/viewer/p/SAP_HANA_PLATFORM Administration SAP HANA Administration Guide for
SAP HANA Platform
Data Access SAP HANA Smart Data Access .
For more information on installing Apache Hadoop, see http://docs.hortonworks.com All HDP 2.3
HDP 2.3.0 (GA) .
Install and Set Up Apache Hive ODBC Driver
Note
Integration between SAP HANA and Apache Hadoop requires either an Apache Hive ODBC driver or an
SAP HANA Spark controller.
130
PUBLIC
Common Installation Guide for SAP Customer Activity Repository applications bundle 5.0
Set Up the Applications

Implement this procedure only if you wish to integrate SAP HANA with Apache Hadoop via the Apache Hive
ODBC driver.
1. According to the SAP HANA Administration Guide for SAP HANA Platform, SAP HANA smart data access is
supported by Hortonworks Distribution for Apache Hadoop: version 2.3 (This includes Apache Hadoop
version 1.0.3 and Apache Hive 0.9.0; supported on Intel-based hardware platforms only).
For more information on integration between SAP HANA and Apache Hadoop, see SAP Help Portal at
http://help.sap.com/viewer/p/SAP_HANA_PLATFORM Administration SAP HANA Administration
Guide for SAP HANA Platform Data Access SAP HANA Smart Data Access .
For more information on installing the Apache Hive ODBC driver, see http://docs.hortonworks.com All
HDP 2.3 HDP 2.3.0 (GA) .
2. Set up the driver as described in the SAP HANA Administration Guide for SAP HANA Platform at http://
help.sap.com/viewer/p/SAP_HANA_PLATFORM
Administration SAP HANA Administration Guide for
SAP HANA Platform Data Access SAP HANA Hadoop Integration .
Install and Set Up the SAP HANA Spark Controller
Note
Integration between SAP HANA and Apache Hadoop requires either an Apache Hive ODBC driver or an
SAP HANA Spark controller.
Implement this procedure only if you wish to integrate SAP HANA with Apache Hadoop via the SAP HANA
Spark controller.
1. Conrm the right combination of versions required between SAP HANA, Apache Spark, and the SAP HANA
Spark controller. Use the SAP HANA Spark Controller Compatibility Matrix to do this. This document is
available under https://help.sap.com/viewer/p/SAP_HANA_SPARK_CONTROLLER. Navigate to
Additional Information SAP HANA Spark Controller Compatibility Matrix .
2. Install and set up the SAP HANA Spark controller as described in SAP Note 2273047 .
For more information on installing and setting up the SAP HANA Spark controller, see SAP Help Portal at
http://help.sap.com/viewer/p/SAP_HANA_PLATFORM Administration SAP HANA Administration Guide
for SAP HANA Platform Data Access SAP HANA Hadoop Integration .
Create and Partition Tables
Create the SAP schema, tables, and table partitions as described in SAP Note 2317597 .
Common Installation Guide for SAP Customer Activity Repository applications bundle 5.0
Set Up the Applications
PUBLIC 131

Create a NFS Mount on SAP NetWeaver
The TLOG data and its extensions are copied from your SAP HANA database to Hadoop using the HDFS NFS
Gateway on your Hadoop system. To enable this you must create a mount point on your SAP NetWeaver
system for the data les to be created directly in the Hadoop File System (HDFS).
Note
The following steps are only guidelines which provide an example of how to mount Network File System
(NFS) on an SAP NetWeaver Linux-based client.
1. Make sure the NFS client is installed based on the examples provided:
Operating System Command
Red Hat, CentOS sudo yum install nfs-utils
Ubuntu sudo apt-get install nfs-common
SUSE sudo zypper install nfs-client
2. List the NFS shares exported on the server.
Example
showmount -e <host>
3. Set up a mount point for an NFS share.
Example
sudo mkdir <folder>
Note
You must ensure that the folder paths share the same naming conventions, as follows:
Temporary data folder /tmp/tct_csv_out/temp
Data folder /tmp/tct_csv_out/data
4. Mount the cluster using NFS.
Example
sudo mount -o hard, nolock <host> <folder>
On your HDFS, the dierent tables are stored under a folder using the following convention:
<data directory>/<schema>/<table>/<businessdaydate=partition_value>/{files}
On the SAP NetWeaver le system, the Hadoop les are stored under a physical path and le name that is
derived from a customer-denable logical path or le name. The conguration is provided via the FILE
transaction. Inside the FILE transaction, you also need to make use of parameters PARAM_1 and PARAM_2.
PARAM_1 will be populated during runtime by the program (generated le name) and PARAM_2 will be
populated by the program during runtime
<schema>/<table>/<businessdaydate=partition_value>.
Example (Data Directory)
132
PUBLIC
Common Installation Guide for SAP Customer Activity Repository applications bundle 5.0
Set Up the Applications

If the Hadoop data les are stored in Unix/Linux folder ,<schema>/<table>/businessdaydate=partition_value/
{les}PARAM_1.CSV and physical directory /tmp/tct_csv_out/data/hdp/apps/hive/warehouse/
<PARAM_2><FILENAME>
.
You create the following logical path in the FILE transaction as follows:
Logical path
/CAR/HDFS_DATA
Name HDFS Data
Syntax group UNIX
Physical path
/tmp/tct_csv_out/data/hdp/apps/hive/
warehouse/<PARAM_2><FILENAME>
You create the following logical le in the FILE transaction as follows:
Logical le
/CAR/HDFS_DATA
Name HDFS Data
Physical le
<PARAM_1>.CSV
Data format WK1
Application area IS
Logical path
/CAR/HDFS_DATA
Example (Temporary Directory)
/tmp/tct_csv_out/data/hdp/apps/hive/warehouse/On top of the Hadoop data les, you also need to provide
a temporary directory in which the program will populate script les and also temporarily store data les to be
compressed.
If the temporary les are stored in Unix/Linux folder /tmp/tct_csv_out/temp/{files}, you create the
following logical path in the FILE transaction as follows:
Logical path
/CAR/HDFS_TEMP
Name HDFS Temp
Syntax group UNIX
Physical path
/tmp/tct_csv_out/temp/<FILENAME>
You create the following logical le in the FILE transaction as follows:
Logical le
/CAR/HDFS_TEMP
Name HDFS Temp
Common Installation Guide for SAP Customer Activity Repository applications bundle 5.0
Set Up the Applications
PUBLIC 133

Physical le
<PARAM_1>.SH
Data format
Application area IS
Logical path
/CAR/HDFS_TEMP
6.1.2.3.3 Install and Set Up Integration with SAP HANA
Dynamic Tiering
You use these procedures to install and set up SAP HANA Dynamic Tiering to support the Table Content Aging
report (transaction /CAR/TABLE_AGING) delivered with SAP Customer Activity Repository.
SAP HANA Dynamic Tiering adds the SAP HANA dynamic tiering service to your SAP HANA system. You use
this service to create the extended store and extended tables. Extended tables behave like all other SAP HANA
tables, but their data resides in the disk-based extended store.
For more information, see SAP Help Portal at http://help.sap.com/viewer/p/CARAB <your release> Use
Application Help SAP Customer Activity Repository POS Data Transfer and Audit Implementing a POS
Transaction Data Storage Strategy
Using the Table Content Aging Report .
Install SAP HANA Dynamic Tiering
A detailed procedure is described in the SAP HANA Dynamic Tiering: Installation and Update Guide.
For more information, see SAP Help Portal at http://help.sap.com/hana_options_dt Implement
Installation and Upgrade .
Create Extended Storage
A detailed procedure is described in the SAP HANA Dynamic Tiering: Administration Guide.
For more information, see SAP Help Portal at http://help.sap.com/hana_options_dt Operate
Administration SAP HANA Dynamic Tiering: Administration Guide and consult the following subsections:
● System Administration Managing Extended Storage
● System Administration Managing Tables Extended Store Tables Convert HANA Tables to Extended
Store Tables Using the SAP HANA Cockpit
134
PUBLIC
Common Installation Guide for SAP Customer Activity Repository applications bundle 5.0
Set Up the Applications

6.1.2.3.4 Create the Remote Source in SAP HANA Studio
Note
This step is not applicable if you are integrating the alternate storage feature with SAP HANA Dynamic
Tiering.
Create a remote source by selecting the appropriate adapter and conguring the connection properties and
user credentials.
A detailed procedure is described in the SAP HANA Administration Guide for SAP HANA Platform.
For more information, see SAP Help Portal at http://help.sap.com/viewer/p/SAP_HANA_PLATFORM
Administration SAP HANA Administration Guide for SAP HANA Platform Data Access SAP HANA
Smart Data Access
Managing Remote Sources Creating a Remote Source .
6.1.2.3.5 Create the Virtual Table
Create the following virtual tables to access the data stored in remote tables:
Virtual Table Remote Table
VT_TLOGF_NLS /POSDW/TLOGF
VT_TLOGF_X_NLS /POSDW/TLOGF_X
VT_TLOGF_EXT_NLS /POSDW/TLOGF_EXT
VT_PLOGF_NLS /POSDW/PLOGF
A detailed procedure is described in the SAP HANA Administration Guide for SAP HANA Platform.
For more information, see SAP Help Portal at http://help.sap.com/viewer/p/SAP_HANA_PLATFORM
Administration SAP HANA Administration Guide for SAP HANA Platform Data Access SAP HANA
Smart Data Access Managing Virtual Tables .
6.1.2.3.6 Activate Alternate Storage
1. In your back-end system, execute report /CAR/ACTIVATE_HTA.
2. Conrm or set the following:
○ In the ECC Mode section, choose the relevant ECC mode for your system.
○ In the External Systems section, choose Nearline Storage.
3. Press Execute.
Common Installation Guide for SAP Customer Activity Repository applications bundle 5.0
Set Up the Applications
PUBLIC 135

This deploys package sap.is.retail.car.nls for ECC mode SAP ERP, or sap.is.retail.car_s4h.nls
for ECC mode S/4HANA. Each package contains views that combine TLOG data from SAP HANA with TLOG
data from the alternate storage system.
6.1.2.4 Ensure that Third-Party CRM Sales Orders are
Transferred to SAP ERP
Do this procedure if sales orders were created in a third-party customer relationship management (CRM)
system. You must ensure that this data is transferred to the source master data system. From there, it can be
replicated to (or accessed directly by) SAP Customer Activity Repository.
Use
Sales documents are accessed by SAP Customer Activity Repository (either through replication or direct data
access) from a source SAP ERP system.
One way that sales documents of type Sales Order can be generated in a SAP ERP system is through the
transfer of sales orders created using an SAP CRM source system or a third-party CRM system.
When customers create sales orders using SAP CRM systems, these sales orders are inherently compatible to
the sales document structure in SAP ERP. They are transferred to SAP ERP via the Data Exchange for Sales
Orders: CRM Enterprise - ERP System process. For more information, see SAP Library for SAP CRM on SAP
Help Portal at http://help.sap.com/crm . Select the applicable version of SAP CRM. Under Application Help,
open SAP Library and choose Basic Functions Business Transaction Data Exchange for Business
Transactions .
Customers who use third-party CRM systems to create sales orders, and who want to access these sales
orders from SAP Customer Activity Repository, must ensure that their sales order data meets the following
criteria:
● It includes the information required by SAP Customer Activity Repository.
● It has been transferred to SAP ERP so that SAP Customer Activity Repository can access the data.
Procedure
1. Ensure that the elds required by SAP Customer Activity Repository are lled during the transfer of sales
order data from your third-party CRM system to SAP ERP.
2. Ensure that sales order data has been transferred from your third-party CRM system to SAP ERP.
136
PUBLIC
Common Installation Guide for SAP Customer Activity Repository applications bundle 5.0
Set Up the Applications

6.1.2.5 Partition /POSDW/TLOGF and Aggregation Tables
If you wish to use the POS Data Transfer and Audit module, we recommend that you partition the /POSDW/
TLOGF table and several aggregation tables (such as /POSDW/TLOGF_EXT). This improves standard database
operations (such as inserting, updating, deleting, and reading) and mass operations (such as archiving or index
merging).
Use
SAP Customer Activity Repository contains the POS Data Transfer and Audit module, which is used to receive a
large volume of data from your connected stores. POS Data Transfer and Audit, or more specically, its POS
Inbound Processing Engine (PIPE), processes the incoming transactions and stores them in the /POSDW/
TLOGF table.
Since every point-of-sale transaction line item is stored as a separate row in the /POSDW/TLOGF table, the table
can quickly grow to become very large and should therefore be partitioned.
Also, you can select to store extension segments in a dedicated /POSDW/TLOGF_EXT table using the Store
Extensions in Separate Table option of the Dene General Settings Customizing activity. The /POSDW/
TLOGF_EXT table should be partitioned in the same way as the /POSDW/TLOGF table.
For more information about extension segments, see the Appendix section in the SAP Customer Activity
Repository Administration Guide.
Note
Partitioning is typically used in distributed systems, but it may also be benecial for single-host systems.
Procedure
1. Read the Table Partitioning in the SAP HANA Database section of the SAP HANA Administration Guide for
SAP HANA Platform at https://help.sap.com/viewer/p/SAP_HANA_PLATFORM.
2. Plan your partition specications in accordance to the following guidelines:
○ A single partition should not contain more than 1 billion rows.
○ The total number of partitions of a single table should not exceed 1000.
○ Because the actual act of partitioning a table also uses system resources, do not start partitioning
the /POSDW/TLOGF table until its volume has surpassed 250 million rows.
3. Partition the /POSDW/TLOGF table as required according to SAP Note 1719282 (POS TLOG Table
Partitioning Information).
4. Depending on your requirements, you may also optionally partition the following tables. The same SAP
Note is relevant for these as well.
○ /POSDW/TLOGF_EXT
○ /POSDW/AGGR01
○ /POSDW/ACCRTB
Common Installation Guide for SAP Customer Activity Repository applications bundle 5.0
Set Up the Applications
PUBLIC 137

6.1.2.6 Customize Copies of SAP HANA Views
Do this procedure if you have extended the delivered data model (for example, if you have added custom elds
to tables). First create copies of views included in SAP HANA Live for SAP ERP or in the SAP HANA content for
SAP Customer Activity Repository. Then customize these copies to reect your specic data model extensions.
Use
For example, you need to execute this procedure if you have extended your POS transaction data model. The
views delivered with the SAP HANA content for SAP Customer Activity Repository are built on the standard /
POSDW/TLOGF table. If you have added custom elds to the /POSDW/TLOGF table, you have to create views that
expose these elds.
Caution
Do not modify standard SAP HANA content.
In general, if you have extended any standard SAP data models, you must copy and adapt the standard SAP
HANA content.
Caution
If you have created a copy of a view shipped as part of the standard SAP HANA content and have made
modications to this copy, a subsequent upgrade of SAP HANA Live for SAP ERP or SAP HANA content for
SAP Customer Activity Repository will not update your copied and modied version of the view. SAP Notes
or enhancements shipped by SAP will also have to be manually implemented on the copied, and
subsequently modied, SAP HANA content.
Procedure
1. Log on to SAP HANA studio.
2. Open the Modeler and use the Navigator to access the folder that contains the view that you want to copy.
For example,
<Your System Name> Content sap is retail car Calculation Views .
3. Identify the view you want to copy. For example, sap.is.retail.car/POSSalesQuery.
4. Use the Auto Documentation feature of SAP HANA studio to identify all reuse and private views that are
consumed by your selected view, as well as any query views that might consume your view:
1. Right-click on the selected view, and choose Auto Documentation from the context menu.
2. Browse to the location where you want to save the le and choose Finish.
3. Open the generated *.pdf le, and locate the Cross-References section of the document.
The Cross-References section displays the hierarchy of calculation (query, reuse, and private) views
that are accessed by the selected view. Aected underlying, as well as all consuming views, in this
hierarchy must also be copied and modied as a result of your extension.
138
PUBLIC
Common Installation Guide for SAP Customer Activity Repository applications bundle 5.0
Set Up the Applications

Example
Calculation views sap.is.retail.car/POSSales, sap.is.retail.car/POSLogItem, and
sap.is.retail.car/TLOGF_ITEM_COM are all consuming the /POSDW/ TLOGF table and are
consumed by the sap.is.retail.car/POSSalesQuery view.
Therefore, if you have extended the /POSDW/TLOGF table, all these views must be copied and
modied.
5. For each view identied in the previous step, do the following:
1. In the Navigator panel, select an object and in the context menu, choose Copy.
2. Navigate to the package where you want to paste the view and choose Paste.
Note
You must have write permissions on the target package to which you are pasting the view. Also, you
should copy the view to your own package. Do not modify the original sap package.
3. Modify the copied view as required.
For more information, see the Creating Views section of the SAP HANA Developer Guide.
4. Right-click on the copied and modied view and select Activate.
6.1.2.7 Complete UDF Setup
Set up the Unied Demand Forecast (UDF) module in SAP Customer Activity Repository to enable demand
modeling and forecasting for dierent scenarios and consuming applications. To be able to use UDF, you must
at least do the mandatory steps. We also point you to helpful performance information for UDF.
Use
UDF supports the following scenarios:
Scenario Set Up and Congure UDF
SAP Fiori apps for demand forecasting: Mandatory for all the apps (Analyze Forecast, Adjust
Forecast, Manage Demand Inuencing Factors, Manage
Alerts)
SAP Replenishment Planning Mandatory
SAP Promotion Management Mandatory (if you want to use UDF to generate what-if fore
casts)
Optional (without what-if forecasts)
Common Installation Guide for SAP Customer Activity Repository applications bundle 5.0
Set Up the Applications
PUBLIC 139

Scenario Set Up and Congure UDF
SAP Assortment Planning
SAP Allocation Management
Optional in general, but depends on your customer scenario
Both applications oer functionality that can use UDF fore
cast data. For more information, see SAP Help Portal at
https://help.sap.com/viewer/p/CARAB and consult the Ap
plication Help and Administration Guide of either application.
SAP Merchandise Planning
There is currently no integration between UDF and SAP
Merchandise Planning.
Prerequisites
● You have congured the DDF module as described in Congure Demand Data Foundation [page 102].
● You have set up the users, roles, and privileges for UDF as described in Set Up Authorizations for Unied
Demand Forecast (UDF) [page 87].
Procedure
Tip
If you encounter issues during the setup, see the Troubleshooting [page 207] section for possible solutions.
Perform Mandatory Setup Steps
1. Log on to your ABAP back-end system.
2. In transaction SPRO, do the Customizing for UDF that is required for all scenarios:
Note
For more information about each Customizing activity, see the accompanying system documentation.
140
PUBLIC
Common Installation Guide for SAP Customer Activity Repository applications bundle 5.0
Set Up the Applications
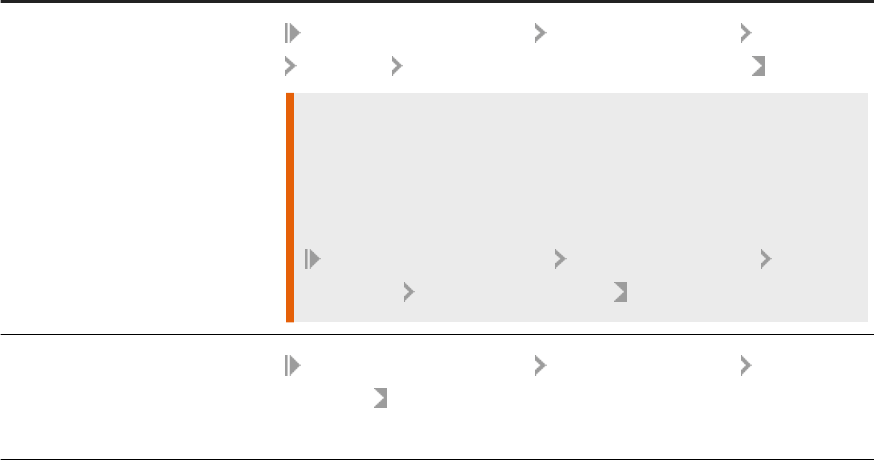
Customizing for UDF (All Scenarios)
Do These Steps Here in Customizing
Dene the time series source with
historical demand data that you
wish to import to DDF.
Cross-Application Components Demand Data Foundation Imported Data
Time Series Dene Time Series for Key Figure Conguration
Caution
Additional Customizing for SAP Promotion Management
If you wish to use what-if forecasts in SAP Promotion Management, addi
tionally congure this second activity:
Cross-Application Components Demand Data Foundation Data
Maintenance
Dene Time Series Source
Dene general settings for modeling
and forecasting.
Cross-Application Components Demand Data Foundation Modeling and
Forecasting :
See all activities under this node.
Common Installation Guide for SAP Customer Activity Repository applications bundle 5.0
Set Up the Applications
PUBLIC 141

Do These Steps Here in Customizing
Review the default conguration of
the UDF exceptions; if necessary,
adjust the conguration.
Cross-Application Components Demand Data Foundation Basic Settings
Exception Management :
○ Maintain Conguration Data for High Level Exceptions
1. Execute the activity to display the table of exceptions (messages).
2. Filter the table by the application area /DMF/UDF_BUSINESS. This is
where you nd the business exceptions for UDF.
3. In the Default Priority column, check the setting for each exception. If
required, switch to edit mode and adjust the setting for your scenario.
Typically, business exceptions have the eect that the aected product
location is not processed.
If you wish to deactivate an exception, set the priority to Not Relevant/
Switched O.
Note
If you wish to display details for an exception, select it in the table
and double-click Assignment Business Area.
○ Maintain Conguration Data for Low Level Exceptions:
(Optional) This activity works similarly to the previous one. Here you can
nd the technical exceptions for UDF in the application area /DMF/
UDF_TECHNICAL.
Each technical exception is already assigned to a business exception. Tech
nical exceptions typically indicate issues that need to be solved by system
administrators.
Tip
We recommend that you keep the default priorities.
○ Dene Customer-Specic Replacement Messages:
(Optional) Congure this activity if you wish to use dierent message texts
than the ones provided by default.
○ Dene Customizable Message Status:
(Optional) Congure this activity if you wish to use dierent or more sta
tuses than the ones provided by default.
3. Check and, if necessary, change the setting for how the covariance matrix is generated during modeling.
1. Navigate to Cross-Application Components Demand Data Foundation Modeling and Forecasting
Dene Modeling Control Settings and execute the Customizing activity.
2. Check that the MOD_COV_REDUCED parameter is congured correctly for your scenario.
142
PUBLIC
Common Installation Guide for SAP Customer Activity Repository applications bundle 5.0
Set Up the Applications

The parameter controls whether the “full covariance matrix” (default) or the “reduced covariance
matrix” should be generated:
For These Scenarios Use this Setting
You want to use UDF to generate
the forecast condence index
(FCI) for SAP Promotion
Management.
The full covariance matrix is mandatory for the FCI.
Note
Be aware that the generation of the full covariance matrix is perform
ance-intensive.
Correct setting of MOD_COV_REDUCED:
○ Either the parameter is not listed at all under Conguration Type Code.
○ Or the parameter is listed under Conguration Type Code and the
Conguration Value is empty.
Either setting activates the default (full covariance matrix is generated).
All other scenarios, that is:
○ You want to calculate hier
archical priors (HPRs).
○ You want to use SAP
Promotion Management, but
without generating the FCI.
○ You want to use other con
suming applications, but not
SAP Promotion
Management.
The reduced covariance matrix is sucient for those scenarios and also
saves runtime.
Correct setting of MOD_COV_REDUCED:
○ The parameter is listed under Conguration Type Code and the
Conguration Value is set to X.
This setting overrides the default.
Make any other settings as required for your scenario and save your changes.
4. Congure the modeling and forecasting features that you wish to use in your scenario.
See the Congure Unied Demand Forecast (UDF) section of the SAP Customer Activity Repository
Administration Guide.
Note
You can nd detailed conguration information for a number of UDF features in this section. Use it to
ne-tune UDF for your customer scenario and requirements.
5. Set up your forecast scenario for best performance.
See the following sections of the SAP Customer Activity Repository Administration Guide:
Tip
We highly recommend that you read this information carefully and implement any performance tips
that are relevant for your scenario.
1. Optimize the performance of modeling, forecasting, and the calculation of hierarchical priors. See
Optimize UDF Performance.
Common Installation Guide for SAP Customer Activity Repository applications bundle 5.0
Set Up the Applications
PUBLIC 143

2. Set up routines for regular data housekeeping. For example, schedule reports to regularly delete
obsolete data. See Performance — Optimize the Data Lifecycle and Administration Tools.
6. Set up the integration and data replication between your source master data system and your SAP
Customer Activity Repository system.
See the following sections of the SAP Customer Activity Repository Administration Guide:
○ For integration information for UDF and DDF, see Introduction to SAP Customer Activity Repository and
Congure DDF Integration Scenarios.
○ For setup information on the data replication framework (DRF, transaction DRFOUT) for replicating
master and transactional data, see Congure Data Replication from SAP ERP and SAP S/4HANA to
DDF.
7. Verify that pricing data is replicated correctly:
Note
As of SAP Customer Activity Repository applications bundle 5.0, the default table for pricing data has
changed:
○ New default table: /DMF/PRC (Product Pricing Data)
○ Old default table: /DMF/PRODLOC_PRC (Product Location Price Data)
All UDF features that require pricing data use the new table.
Check your data replication settings. Make sure the pricing data from the source master data system is
replicated to the new table /DMF/PRC. For instructions, see the Enable Extended Sales Pricing Data section
in the SAP Customer Activity Repository Administration Guide.
144
PUBLIC
Common Installation Guide for SAP Customer Activity Repository applications bundle 5.0
Set Up the Applications

8. In the future development of your scenario, you might implement custom code or change UDF output
tables. Carefully read the following information to ensure that such adaptations will continue to function
correctly for your scenario:
Caution
With the release of SAP Customer Activity Repository 4.0 FPS03, the UDF database storage design
was refactored to enhance system performance. Be aware that as a result, the following open SQL
statements are no longer supported for the following UDF tables:
Do not use any of these SQL statements...
… with any of these tables
UPDATE FROM wa
UPDATE FROM TABLE itab
DELETE FROM wa
DELETE FROM TABLE itab
DELETE WHERE UP TO N ROWS
MODIFY FROM wa
MODIFY FROM TABLE itab
ORDER BY PRIMARY KEY
SELECT SINGLE FOR UPDATE
Usage of Table Buffer
EXPORT/IMPORT
/DMF/UMD_TSD
/DMF/UMD_TS
/DMF/UFC_TSD
/DMF/UFC_TS
/DMF/UFC_TRC
/DMF/UMD_PAR
/DMF/UMD_PAR_COV
/DMF/UMD_PRI
/DMF/TS_PS
Perform Optional Setup Steps
If relevant for your scenario, implement any of the following additional options:
1. (Recommended) Set up the apps for demand forecasting.
See the Set Up SAP Fiori Apps for SAP Customer Activity Repository [page 146] section.
2. (Recommended) Extend the existing service Calculate Hierarchical Priors with a new option. With this
option, you can run the service in delta mode, where the hierarchical priors (HPRs) are only calculated for
newly listed product locations. See SAP Note 2996880 (Calculate hierarchical priors (delta run)).
3. Verify the data replication results that are relevant for UDF:
For example, verify that the following data is replicated correctly from the source master data system:
product hierarchy, location hierarchy, product prices, delisting information for product locations
(table /DMF/PRODLOC_TD), closing days and public holidays for locations (tables /DMF/LOC, /DMF/
TSTRM, /DMF/LOC_TSTRM, /DMF/TSTRM_DAY).
Note
For information on the data replication, see Congure Data Replication from SAP ERP and SAP S/
4HANA to DDF section in the SAP Customer Activity Repository Administration Guide.
Common Installation Guide for SAP Customer Activity Repository applications bundle 5.0
Set Up the Applications
PUBLIC 145

4. To achieve a high forecast accuracy right from the beginning, provide ample promotional data:
○ Load the historical promotions into UDF (if this data is available).
○ Dene user DIFs in the past to account for historical promotions.
○ Check the oer lift type codes of oers that were created in SAP Promotion Management and
transferred (translated) to UDF. In particular, check for the oer lift type codes 98 and 99 and solve the
underlying issues. For more information, see Verify Integration with SAP Promotion Management.
5. Implement SAP Note 2161484 : Here you can nd information about an ABAP validation report that you
can use to check the input data for modeling and forecasting and solve potential issues.
6.1.2.8 Set Up SAP Fiori Apps for SAP Customer Activity
Repository
Perform common setup steps that are required for all the apps in SAP Customer Activity Repository. For
example, check the prerequisites and prepare the system landscape. Then set up the apps that you want to use
in your scenario.
Context
For a list of the apps included in SAP Customer Activity Repository, see the SAP Fiori for SAP Customer Activity
Repository section of the application help.
Note
Depending on your scenario, some of the following prerequisites might already be available in your system
landscape. If so, you can skip the corresponding step.
Tip
For a helpful graphical overview, see SAP Fiori: App Implementation - UI Content and Authorization
Concept and consult the Dependencies between SAP Fiori UI Entities, OData Services, and Authorizations
section.
General Prerequisites
● SAP Fiori front-end server: You have installed the SAP FIORI FRONT-END SERVER version required for
this release. For the minimum version, see section Install the Prerequisites [page 19] and consult the
information under Common Prerequisites SAP Fiori .
Tip
There is a quick way how you can check the SAPUI5 version currently installed in your system. See SAP
Note 2282103 (How to check the version of SAPUI5 you have installed).
146
PUBLIC
Common Installation Guide for SAP Customer Activity Repository applications bundle 5.0
Set Up the Applications

● SAP Fiori launchpad: You have set up the launchpad as described in section Congure SAP Fiori
Launchpad [page 115].
● SAP Fiori launchpad designer: You have set up the designer as described in the Initial Setup of the
Launchpad Designer section in the product documentation of SAP Fiori launchpad. Depending on your
front-end system, select a dierent version at the top.
● SAP Gateway: You have done the general SAP Gateway conguration and you have activated the common
OData services and Internet Communication Framework (ICF) services. See the following:
○ Section Congure SAP Gateway [page 107]
○ SAP Note 1560585 (SAP Gateway 2.0 Release Note)
Prerequisites Specic to SAP Customer Activity Repository applications
bundle
1. You have installed the correct SAP RTL AFL FOR SAP HANA revision in the SAP HANA database. See
section Download and Install SAP RTL AFL FOR SAP HANA (Mandatory) [page 65].
2. You have installed the back-end components. See section Install ABAP Back-End Server [page 64].
3. You have installed the front-end components. See Install ABAP Front-End Server [page 76].
4. You have implemented all the SAP Notes (corrections) for the apps that you wish to set up. See section
Implement SAP Notes for the Installation [page 30] and consult the release information notes (RINs)
mentioned there and also the table for SAP Customer Activity Repository.
5. You have performed all mandatory setup steps for SAP Customer Activity Repository. For example, this
includes activating the OData services for the apps or calculating the SAPUI5 application index. For a
complete list of the steps, see section Core (Mandatory for All Applications) [page 83].
6. You have set up the system connections:
○ You have set up dedicated RFC connections between your front-end system and your back-end
system, and between your front-end system and your source master data system.
○ You have dened a system alias for your back-end system.
7. (Optional) These prerequisites apply if you wish to set up any of the apps for demand forecasting (Analyze
Forecast, Adjust Forecast, Manage Demand Inuencing Factors, Manage Alerts):
1. You have set up Unied Demand Forecast (UDF). UDF is the common forecasting engine in the back-
end. You must at least do the mandatory setup steps for UDF. See section Complete UDF Setup [page
139].
2. (Optional, recommended) You have enabled the in-app help with the underlying Web Assistant
framework. See section Enable In-App Help (Web Assistant) [page 359].
Note
After a successful setup, you can see the Help icon (question mark) at the top of each app. Simply
choose this icon to display on-screen help directly in the app and easily call up a detailed app
description.
8. (Optional) If you wish to set up the apps included in OAA, follow the steps in section Congure
Omnichannel Article Availability and Sourcing for Use with SAP Customer Activity Repository.
Common Installation Guide for SAP Customer Activity Repository applications bundle 5.0
Set Up the Applications
PUBLIC 147

Result
After you have prepared the system landscape in this way, you can now set up the apps that you wish to use.
Tip
If you encounter issues during the setup, see section Troubleshooting SAP Fiori Apps in the SAP Fiori:
Operations documentation.
Set Up the Analyze Forecast App [page 148]
Perform several tasks on the front-end server and the back-end server to set up the Analyze Forecast
app.
Set Up the Adjust Forecast App [page 155]
Perform several tasks on the front-end server and the back-end server to set up the Adjust Forecast app
and the related tiles Forecast Correction Classication and Forecast Correction Overlapping Rules.
Set Up the Manage Demand Inuencing Factors App [page 161]
Perform several tasks on the front-end server and the back-end server to set up the Manage Demand
Inuencing Factors app and the related tile Demand Inuencing Factors Library.
Set Up the Manage Alerts App [page 166]
Perform several tasks on the front-end server and the back-end server to set up the transactional app
Manage Alerts. This is one of the apps for demand forecasting (UDF) included in SAP Customer Activity
Repository.
Set Up the Demand Data Foundation (DDF) Apps [page 169]
Do this procedure to set up the DDF apps for standalone scenarios. The DDF apps are: Congure
Distribution Curves, Manage Location Clusters, Manage Product Attributes, Manage Product Groups,
Manage Promotional Oers. To access any of these apps, you need to assign the required role(s) to your
front-end user. This gives you access to the relevant business catalogs and business catalog groups so
that you can then open the apps in SAP Fiori launchpad.
6.1.2.8.1 Set Up the Analyze Forecast App
Perform several tasks on the front-end server and the back-end server to set up the Analyze Forecast app.
Context
This app is one of the “apps for demand forecasting”, a group of forecast-related apps delivered with SAP
Customer Activity Repository. All apps for demand forecasting have the following in common:
● The forecasting engine in the back-end is Unied Demand Forecast (UDF). The UDF application function
library (delivered via the SAP RTL AFL FOR SAP HANA component) runs directly in the SAP HANA
database.
● Cross-navigation is supported. For example, users can navigate directly between Analyze Forecast, Adjust
Forecast, and Manage Demand Inuencing Factors.
148
PUBLIC
Common Installation Guide for SAP Customer Activity Repository applications bundle 5.0
Set Up the Applications

Note
Be aware that the app is not meant to be a reporting UI on enterprise level, but a tool to analyze specic
forecast issues on lower levels.
Prerequisites
● You have set up Unied Demand Forecast as described in Complete UDF Setup [page 139].
● You have veried the prerequisites and prepared the system landscape as described in Set Up SAP Fiori
Apps for SAP Customer Activity Repository [page 146].
● You know where to nd additional information on Analyze Forecast if necessary:
○ Technical details for each delivery are available in the SAP Fiori apps reference library. For the latest
delivery (latest wave), see https://oriappslibrary.hana.ondemand.com/sap/x/externalViewer/
index.html?appId=F1773A.
○ For information on the app features and supported time series, see the application help for SAP
Customer Activity Repository at https://help.sap.com/viewer/p/CARAB. Search for section Analyze
Forecast.
Procedure
To set up the Analyze Forecast app, follow these steps:
Note
The steps point you to dierent sections of the SAP Fiori implementation information. When following a
link, you might need to select a dierent version at the top, depending on your front-end system release.
You can always use the following link as your main entry point to SAP Fiori implementation information:
https://help.sap.com/viewer/product/FIORI_IMPLEMENTATION/latest/en-US?task=implement_task.
Tip
If you encounter issues during the setup, see the Troubleshooting [page 207] section in this guide and also
the Troubleshooting SAP Fiori Apps section in the SAP Fiori: Operations documentation.
1. Log on to your front-end server.
2. Congure the SAP Fiori launchpad designer for the app.
1. Launch the SAP Fiori launchpad designer in one of the following modes:
○ The CUST mode is for client-specic congurations. Use the following URL and replace <client>
with the respective system client:
https://<server>:<port>/sap/bc/ui5_ui5/sap/arsrvc_upb_admn/main.html?sap-
client=<client>#/Catalog/X-SAP-UI2-CATALOGPAGE:SAP_ISR_CAR_TC_A
Common Installation Guide for SAP Customer Activity Repository applications bundle 5.0
Set Up the Applications
PUBLIC 149

○ The CONF mode is for global congurations across all clients. It additionally includes the <CONF>
parameter. Use the following URL:
https://<server>:<port>/sap/bc/ui5_ui5/sap/arsrvc_upb_admn/main.html?sap-
client=<client>&scope=<CONF>#/Catalog/X-SAP-UI2-
CATALOGPAGE:SAP_ISR_CAR_TC_A
2. Congure the app tile in the SAP Fiori launchpad designer.
Note
You can congure tiles only in catalogs. By default, the tiles of the apps for demand forecasting are
in the technical catalog SAP_DPL_TC_T. The catalog is shipped with the launchpad conguration.
For more information on catalogs and tiles, see the UI Content and Authorization Concept section
in the SAP Fiori: App Implementation documentation.
If the app tile has not yet been created, create it as a static tile using the following settings:
○ Title: Analyze Forecast
○ Icon: sap-icon://Fiori5/F0812
○ Use semantic object navigation: Select this option.
○ Semantic Object: ForecastDemand
○ Action: showUDFAnalyzeForecast
○ Leave the other options empty.
3. Congure the target mapping in the SAP Fiori launchpad designer.
Note
If you need more information on conguring target mappings, see the Maintaining Business
Catalogs and Business Groups section in the SAP Fiori: App Implementation information.
If the target mapping has not yet been created, choose Target Mappings and create a new entry with
the following settings:
○ Semantic Object: ForecastDemand
○ Action: showUDFAnalyzeForecast
○ Application Type: SAPUI5 Fiori App
○ Title: Analyze Forecast
○ URL: /sap/bc/ui5_ui5/sap/analyzfcst_v2
○ ID: retail.udf.analyzeforecastv2
○ Device Types: Select Desktop.
○ Allow additional parameters: Select this option.
3. Complete the app setup on the front-end server.
Note
You can nd the general SAP Fiori help for this step in the Implementation Tasks on Front-End Server
section in the SAP Fiori: App Implementation information.
Use this section as your starting point. However, to congure the app, you only need to do some of the
steps described there.
150
PUBLIC
Common Installation Guide for SAP Customer Activity Repository applications bundle 5.0
Set Up the Applications

1. Verify that the SAP Gateway OData services for Unied Demand Forecast and the apps for demand
forecasting have been activated. If a service is not active, activate it.
See section Activate OData Services [page 111].
2. Activate the following Internet Communication Framework (ICF) services for the app:
ICF Services for Analyze Forecast
Combined Service Path and Name
Service Path Service Name
/sap/bc/bsp/sap/
analyzfcst_v2
/sap/bc/bsp/sap/ analyzfcst_v2
/sap/bc/lrep /sap/bc/ lrep
/sap/bc/ui5_ui5/sap/
analyzfcst_v2
/sap/bc/ui5_ui5/sap/ analyzfcst_v2
/sap/bc/bsp/sap/udfreuse /sap/bc/bsp/sap/ udfreuse
/sap/bc/ui5_ui5/sap/
udfreuse
/sap/bc/ui5_ui5/sap/ udfreuse
1. Execute transaction SICF (Dene Services) and search for each service from the table above.
1. As Hierarchy Type, select SERVICE.
2. Enter the Service Path from the table.
3. Enter the Service Name from the table.
4. Execute the search ( F8 ).
2. Once you have found a service, activate it:
In the Virtual Hosts/Services column, select the analyzfcst_v2 entry and choose More
Service/Host Activate .
Note
If you need more information on activating services, see section Activating ICF Services of SAPUI5
Application.
3. Create your custom copy of the SAP_CAR_TCR_A standard role on the front-end server:
Note
SAP_CAR_TCR_A is the front-end server authorization role delivered for analytical apps in SAP
Customer Activity Repository. The role contains the catalogs, groups, and start authorizations for
the OData services required to access the app.
Caution
Standard roles are delivered as templates. They begin with the prex SAP_*. Never change the
standard roles, but only your custom copies of these roles (Z_*). Otherwise, any standard roles
that you have changed will be overwritten by newly delivered standard roles during a later upgrade
or release change.
1. Execute transaction PFCG (Role Maintenance) and search for the SAP_CAR_TCR_A standard role.
2. Choose Role Copy and enter a name from the customer namespace for your copied role.
Common Installation Guide for SAP Customer Activity Repository applications bundle 5.0
Set Up the Applications
PUBLIC 151

3. Switch to change mode and adjust the copied role as needed for your scenario.
4. Assign the required launchpad catalogs and groups.
Follow the steps in Creating PFCG Role on Front-End and Assigning Launchpad Catalogs and
Groups.
5. Save your changes.
4. Create your custom copy of the SAP_DPL_TCR_T standard role on the front-end server:
Note
SAP_DPL_TCR_T is the front-end server authorization role for the apps for demand forecasting. It
contains the catalogs, groups, and start authorizations for the OData services required to access
the apps.
Caution
Standard roles are delivered as templates. They begin with the prex SAP_*. Never change the
standard roles, but only your custom copies of these roles (Z_*). Otherwise, any standard roles
that you have changed will be overwritten by newly delivered standard roles during a later upgrade
or release change.
Note
This step is similar to the previous one, and you can consult the same references.
1. Execute transaction PFCG to open the Role Maintenance screen. Search for the role.
2. Choose Role Copy and enter a name from the customer namespace for your copied role.
3. Switch to change mode and adjust the copied role as needed for your scenario.
4. Assign the required launchpad catalogs and groups.
Follow the steps in Creating PFCG Role on Front-End and Assigning Launchpad Catalogs and
Groups
.
5. Save your changes.
4. Set up the catalogs, groups, and roles in the SAP Fiori launchpad.
Follow the steps in Maintaining Business Catalogs and Business Groups.
5. Assign the two custom copies (which you created from the two standard roles) to the users of the
app.
Follow the steps in Assigning Roles to Users on Front End.
Tip
If you already have an SAP Fiori launchpad open, clear your browser cache to see your changes on the
user interface.
6. Complete the setup on the back-end server.
1. Log on to the back-end server.
152
PUBLIC
Common Installation Guide for SAP Customer Activity Repository applications bundle 5.0
Set Up the Applications

2. Create your custom copy of the /DMF/DPL standard role:
Note
/DMF/DPL (Demand Planner (Retail)) is the back-end authorization role for the apps for demand
forecasting.
Caution
Standard roles are delivered as templates. They begin with the prex SAP_*. Never change the
standard roles, but only your custom copies of these roles (Z_*). Otherwise, any standard roles
that you have changed will be overwritten by newly delivered standard roles during a later upgrade
or release change.
1. Execute transaction PFCG to open the Role Maintenance screen.
2. Search for the role.
3. Choose Role Copy and enter a name from the customer namespace for your copied role.
4. Switch to change mode and adjust the copied role as needed for your scenario. For example,
assign users to the role.
5. Assign the required launchpad catalogs and groups.
Follow the steps in Creating PFCG Role on Back End for Launchpad Catalogs.
6. Save your changes.
Optional Setup Steps
Implement any of the following steps that are relevant for your scenario:
Highly Recommended Steps
● Set Up Single Sign-On (SSO): Set up single sign-on between the front-end server and the back-end
server.
The available SSO mechanisms can dier depending on your customer system landscape. For more
information, see SAP Fiori: Security and choose <your version> User Authentication and Single Sign-
On (SSO)
.
● Assign an Area of Responsibility (AOR): Assign an AOR to each user of the app.
Note
This step is required if you wish to use the Product Hierarchy lter or the Market Hierarchy lter in the
app. If so, each front-end user of the app must have a user in the ABAP back-end system. Assign an
AOR to the ABAP back-end user. The front-end user can then see the assigned hierarchies or nodes in
the app.
To assign an AOR, use the Maintain Area of Responsibility service in transaction NWBC. For instructions, see
the Maintain Area of Responsibility section in the application help for SAP Customer Activity Repository.
● Set Up Other Apps for Demand Forecasting:
See the following sections: Set Up the Adjust Forecast App [page 155], Set Up the Manage Demand
Inuencing Factors App [page 161], Set Up the Manage Alerts App [page 166].
Common Installation Guide for SAP Customer Activity Repository applications bundle 5.0
Set Up the Applications
PUBLIC 153

Additional Steps
● Enable Display of Future Prices:
If you wish to display future prices in Analyze Forecast, you must rst enable forecast tracing in Unied
Demand Forecast (UDF). This is because the app uses the price information from the tracing results table
(/DMF/UFC_TRC). Forecast tracing is available for all supported time series.
Tip
Be aware that forecast tracing can have an impact on performance (sizing, runtime).
You enable forecast tracing in Customizing:
1. Execute transaction SPRO and choose Cross-Application Components Demand Data Foundation
Modeling and Forecasting Dene Forecasting Control Settings .
2. Choose New Entries.
3. Add an entry with the following settings:
○ Conguration Type Code: FC_OUTPUT_TRACE
○ Conguration Value: X (=ON)
4. Save your changes.
5. Run forecasting.
● Enable Demand Decomposition for Specic Analyses:
To be able to see the decomposition time series in the Decomposition Chart, you must previously have
enabled the demand decomposition for the modeling or forecasting job that you want to view in the app.
For more information, see the Congure Demand Decomposition section in the SAP Customer Activity
Repository Administration Guide.
Caution
The demand decomposition can have a considerable impact on performance. Enable it only for specic
jobs that require further analysis or troubleshooting. Do not enable it for production modeling or
production forecasting.
● App Extensibility: Extend the app with custom content.
For information on the available extension points and controller hooks, see the SAP Fiori apps reference
library at https://oriappslibrary.hana.ondemand.com/sap/x/externalViewer/index.html?appId=F1773A.
Choose IMPLEMENTATION INFORMATION, select the delivery, and consult the information under
Extensibility.
Result
You have successfully set up the Analyze Forecast app.
154
PUBLIC
Common Installation Guide for SAP Customer Activity Repository applications bundle 5.0
Set Up the Applications

6.1.2.8.2 Set Up the Adjust Forecast App
Perform several tasks on the front-end server and the back-end server to set up the Adjust Forecast app and
the related tiles Forecast Correction Classication and Forecast Correction Overlapping Rules.
Context
This app is one of the “apps for demand forecasting”, a group of forecast-related apps delivered with SAP
Customer Activity Repository. All apps for demand forecasting have the following in common:
● The forecasting engine in the back-end is Unied Demand Forecast (UDF). The UDF application function
library (delivered via the SAP RTL AFL FOR SAP HANA component) runs directly in the SAP HANA
database.
● Cross-navigation is supported. For example, users can navigate directly between Analyze Forecast, Adjust
Forecast, and Manage Demand Inuencing Factors.
Prerequisites
● You have set up Unied Demand Forecast as described in Complete UDF Setup [page 139].
● You have veried the prerequisites and prepared the system landscape as described in Set Up SAP Fiori
Apps for SAP Customer Activity Repository [page 146].
● You have set up Analyze Forecast as described in Set Up the Analyze Forecast App [page 148].
● You know where to nd additional information on Adjust Forecast if necessary:
○ Technical details for each delivery of the app are available in the SAP Fiori apps reference library. For
the latest delivery (latest wave), see https://oriappslibrary.hana.ondemand.com/sap/x/
externalViewer/index.html?appId=F3479.
○ If you need information on the app features and the app history, see SAP Help Portal at https://
help.sap.com/viewer/p/CARAB. Choose your version at the top, open the application help for SAP
Customer Activity Repository, and search for the Adjust Forecast section.
Procedure
To set up the Adjust Forecast app, follow these steps:
Note
The steps point you to dierent sections of the SAP Fiori implementation information. When following a
link, you might need to select a dierent version at the top, depending on your front-end system release.
You can always use the following link as your main entry point to SAP Fiori implementation information:
https://help.sap.com/viewer/product/FIORI_IMPLEMENTATION/latest/en-US?task=implement_task.
Common Installation Guide for SAP Customer Activity Repository applications bundle 5.0
Set Up the Applications
PUBLIC 155

Tip
If you encounter issues during the setup, see the Troubleshooting [page 207] section in this guide and also
the Troubleshooting SAP Fiori Apps section in the SAP Fiori: Operations documentation.
1. Log on to your front-end server.
2. Congure the SAP Fiori launchpad designer for the app.
1. Launch the SAP Fiori launchpad designer in one of the following modes:
○ The CUST mode is for client-specic congurations. Use the following URL and replace <client>
with the respective client:
https://<server>:<port>/sap/bc/ui5_ui5/sap/arsrvc_upb_admn/main.html?sap-
client=<client>#/Catalog/X-SAP-UI2-CATALOGPAGE:SAP_DPL_TC_T
○ The CONF mode is for global congurations across all clients. It additionally includes the <CONF>
parameter. Use the following URL:
https://<server>:<port>/sap/bc/ui5_ui5/sap/arsrvc_upb_admn/main.html?sap-
client=<client>&scope=CONF#/Catalog/X-SAP-UI2-CATALOGPAGE:SAP_DPL_TC_T
2. Congure the app tiles in the SAP Fiori launchpad designer.
Note
You can congure tiles only in catalogs. By default, the tiles of the apps for demand forecasting are
in the technical catalog SAP_DPL_TC_T. The catalog is shipped with the launchpad conguration.
For more information on catalogs and tiles, see the UI Content and Authorization Concept section
in the SAP Fiori: App Implementation documentation.
If the app tiles have not yet been created, create them as static tiles using the following settings:
For Adjust Forecast:
○ Title: Adjust Forecast
○ Icon: sap-icon://Fiori5/F0819
○ Use semantic object navigation: Select this option.
○ Semantic Object: ForecastDemand
○ Action: editUDFAdjustForecast
○ Leave the other options empty.
For Forecast Correction Classication:
○ Title: Forecast Correction Classification
○ Icon: sap-icon://group-2
○ Information: /DMF/FCC_MAINT_CLSCF
○ Use semantic object navigation: Select this option.
○ Semantic Object: DemandPlanConfiguration
○ Action: create
○ Leave the other options empty.
For Forecast Correction Overlapping Rules:
○ Title: Forecast Correction Overlapping Rules
○ Icon: sap-icon://Fiori2/F0306
○ Information: /DMF/FCC_MAINT_RULES
○ Use semantic object navigation: Select this option.
156
PUBLIC
Common Installation Guide for SAP Customer Activity Repository applications bundle 5.0
Set Up the Applications

○ Semantic Object: DemandPlanConfiguration
○ Action: manage
○ Leave the other options empty.
3. Congure the target mapping in the SAP Fiori launchpad designer.
Note
If you need more information on conguring target mappings, see the Maintaining Business
Catalogs and Business Groups section in the SAP Fiori: App Implementation information.
If the target mappings have not yet been created, choose Target Mappings and create new entries with
the following settings:
For Adjust Forecast:
○ Semantic Object: ForecastDemand
○ Action: editUDFAdjustForecast
○ Application Type: SAPUI5 Fiori App
○ Title: Adjust Forecast
○ URL: /sap/bc/ui5_ui5/sap/adjustforecast
○ ID: retail.dpl.adjustforecast
○ Device Types: Select Desktop.
○ Allow additional parameters: Select this option.
For Forecast Correction Classication:
○ Semantic Object: DemandPlanConfiguration
○ Action: create
○ Application Type: Transaction
○ Title: Forecast Correction Classification
○ Transaction: /DMF/FCC_MAINT_CLSCF
○ System Alias: <replace the delivered default entry with your customer-specific
system alias>
○ Information: Transaction /DMF/FCC_MAINT_CLSCF
○ Device Types: Select Desktop.
○ Allow additional parameters: Select this option.
For Forecast Correction Overlapping Rules:
○ Semantic Object: DemandPlanConfiguration
○ Action: manage
○ Application Type: Transaction
○ Title: Forecast Correction Overlapping Rules
○ Transaction: /DMF/FCC_MAINT_RULES
○ System Alias: <replace the delivered default entry with your customer-specific
system alias>
○ Information: Transaction /DMF/FCC_MAINT_RULES
○ Device Types: Select Desktop.
○ Allow additional parameters: Select this option.
3. Complete the app setup on the front-end server.
Common Installation Guide for SAP Customer Activity Repository applications bundle 5.0
Set Up the Applications
PUBLIC 157

Note
You can nd the general SAP Fiori help for this step in the Implementation Tasks on Front-End Server
section in the SAP Fiori: App Implementation information.
Use this section as your starting point. However, to congure the app, you only need to do some of the
steps described there.
1. Verify that the SAP Gateway OData services for Unied Demand Forecast and the apps for demand
forecasting have been activated. If a service is not active, activate it.
See Activate OData Services [page 111].
2. Activate the Internet Communication Framework (ICF) service for the app:
1. Execute transaction SICF (Dene Services).
2. As Hierarchy Type, select SERVICE.
3. As Service Path, enter /sap/bc/ui5_ui5/sap/.
4. As Service Name, enter adjustforecast.
5. Execute the search ( F8 ).
6. In the Virtual Hosts / Services column, select the ADJUSTFORECAST entry and choose More
Service/Host Activate .
Note
If you need more information on activating services, see section Activating ICF Services of SAPUI5
Application.
3. Check the OData Services for the app.
Execute transaction /IWFND/MAINT_SERVICE (Activate and Maintain Services) and check if the
following services are listed in the service catalog:
○ Adjust Forecast OData Service:
○ Type: BEP
○ Technical Service Name: ZOD_ADJUST_FORECAST_SRV
○ Service Description: DPL Fiori Adjust Forecast App OData Service
○ External Service Name: OD_ADJUST_FORECAST_SRV
○ Namespace: /DPL/
○ Time Series OData Service:
○ Type: BEP
○ Technical Service Name: ZOD_FC_TIME_SERIES_VIZ_SRV
○ Service Description: OData Srv. for Forecast-Related Time Series Visualization
○ External Service Name: OD_FC_TIME_SERIES_VIZ_SRV
○ Namespace: /DMF/
○ Demand Plan OData Service for Reuse:
○ Type: BEP
○ Technical Service Name: ZDEMAND_PLAN_UTILITIES_SRV
○ Service Description: Demand Plan OData Service for Reuse
○ External Service Name: DEMAND_PLAN_UTILITIES_SRV
○ Namespace: /DMF/
158
PUBLIC
Common Installation Guide for SAP Customer Activity Repository applications bundle 5.0
Set Up the Applications

If a service is not listed, do the following:
1. Choose Add Service, enter your back-end system alias, and choose Get Services.
2. Search for the service that you want to add:
○ /DPL/OD_ADJUST_FORECAST_SRV
○ /DMF/OD_FC_TIME_SERIES_VIZ_SRV
○ /DMF/DEMAND_PLAN_UTILITIES_SRV
3. Select the entry and choose Add Selected Services.
4. Take over the provided data and enter the local package assignment.
4. Create your custom copy of the SAP_DPL_TCR_T standard role on the front-end server:
Note
SAP_DPL_TCR_T is the front-end server authorization role for the apps for demand forecasting. It
contains the catalogs, groups, and start authorizations for the OData services required to access
the apps.
Caution
Standard roles are delivered as templates. They begin with the prex SAP_*. Never change the
standard roles, but only your custom copies of these roles (
Z_*). Otherwise, any standard roles
that you have changed will be overwritten by newly delivered standard roles during a later upgrade
or release change.
1. Execute transaction PFCG to open the Role Maintenance screen.
2. Search for the role.
3. Choose Role Copy and enter a name from the customer namespace for your copied role.
4. Switch to change mode and adjust the copied role as needed for your scenario.
5. Assign the required launchpad catalogs and groups.
Follow the steps in Creating PFCG Role on Front-End and Assigning Launchpad Catalogs and
Groups.
6. Save your changes.
5. Set up the catalogs, groups, and roles in the SAP Fiori launchpad.
Follow the steps in Maintaining Business Catalogs and Business Groups.
6. Assign the custom copy of the role (which you created from the standard role) to the users of the app.
Follow the steps in Assigning Roles to Users on Front End.
Tip
If you already have an SAP Fiori launchpad open, clear your browser cache to see your changes on the
user interface.
4. Complete the setup on the back-end server.
1. Log on to the back-end server.
2. Create your custom copy of the /DMF/DPL standard role:
Note
/DMF/DPL (Demand Planner (Retail)) is the back-end authorization role for the apps for demand
forecasting.
Common Installation Guide for SAP Customer Activity Repository applications bundle 5.0
Set Up the Applications
PUBLIC 159

Caution
Standard roles are delivered as templates. They begin with the prex SAP_*. Never change the
standard roles, but only your custom copies of these roles (Z_*). Otherwise, any standard roles
that you have changed will be overwritten by newly delivered standard roles during a later upgrade
or release change.
1. Execute transaction PFCG to open the Role Maintenance screen.
2. Search for the role.
3. Choose Role Copy and enter a name from the customer namespace for your copied role.
4. Switch to change mode and adjust the copied role as needed for your scenario. For example,
assign users to the role.
5. Assign the required launchpad catalogs and groups.
Follow the steps in Creating PFCG Role on Back End for Launchpad Catalogs.
6. Save your changes.
5. Perform optional setup steps.
Tip
Perform the same optional steps as for Analyze Forecast. For more information, see the Optional Setup
Steps in the Set Up the Analyze Forecast App [page 148] section.
Result
You have successfully set up the Adjust Forecast app and the related tiles Forecast Correction Classication and
Forecast Correction Overlapping Rules.
Tip
After this technical setup, you can now congure the app for your specic business scenario. For example:
● Dene overlapping rules for percentage, additive, and absolute forecast corrections.
For more information, see the Settings for Forecast Corrections section in the application help for SAP
Customer Activity Repository.
● Schedule the /DPL/REORG_DRAFT_TABLES report as a periodic task to delete obsolete forecast
correction drafts.
For more information, see the Autosave of Drafts in the Adjust Forecast and Manage Demand
Inuencing Factors Apps section in the SAP Customer Activity Repository Administration Guide.
160
PUBLIC
Common Installation Guide for SAP Customer Activity Repository applications bundle 5.0
Set Up the Applications

6.1.2.8.3 Set Up the Manage Demand Inuencing Factors
App
Perform several tasks on the front-end server and the back-end server to set up the Manage Demand
Inuencing Factors app and the related tile Demand Inuencing Factors Library.
Context
This app is one of the “apps for demand forecasting”, a group of forecast-related apps delivered with SAP
Customer Activity Repository. All apps for demand forecasting have the following in common:
● The forecasting engine in the back-end is Unied Demand Forecast (UDF). The UDF application function
library (delivered via the SAP RTL AFL FOR SAP HANA component) runs directly in the SAP HANA
database.
● Cross-navigation is supported. For example, users can navigate directly between Analyze Forecast, Adjust
Forecast, and Manage Demand Inuencing Factors.
Prerequisites
● You have set up Unied Demand Forecast as described in Complete UDF Setup [page 139].
● You have veried the prerequisites and prepared the system landscape as described in Set Up SAP Fiori
Apps for SAP Customer Activity Repository [page 146].
● You know where to nd additional information on Manage Demand Inuencing Factors if necessary:
○ Technical details for each delivery of the app are available in the SAP Fiori apps reference library. For
the latest delivery (latest wave), see https://oriappslibrary.hana.ondemand.com/sap/x/
externalViewer/index.html?appId=F3885.
○ If you need information on the app features and the app history, see https://help.sap.com/viewer/p/
CARAB. Choose your version at the top, open the application help for SAP Customer Activity
Repository, and search for section Manage Demand Inuencing Factors.
Procedure
To set up the Manage Demand Inuencing Factors app, follow these steps:
Note
The steps point you to dierent sections of the SAP Fiori implementation information. When following a
link, you might need to select a dierent version at the top, depending on your front-end system release.
You can always use the following link as your main entry point to SAP Fiori implementation information:
https://help.sap.com/viewer/product/FIORI_IMPLEMENTATION/latest/en-US?task=implement_task.
Common Installation Guide for SAP Customer Activity Repository applications bundle 5.0
Set Up the Applications
PUBLIC 161

Tip
If you encounter issues during the setup, see the Troubleshooting [page 207] section in this guide and also
the Troubleshooting SAP Fiori Apps section in the SAP Fiori: Operations documentation.
1. Log on to your front-end server.
2. Congure the SAP Fiori launchpad designer for the app:
1. Launch the SAP Fiori launchpad designer in one of the following modes:
○ The CUST mode is for client-specic congurations. Use the following URL and replace <client>
with the respective system client:
https://<server>:<port>/sap/bc/ui5_ui5/sap/arsrvc_upb_admn/main.html?sap-
client=<client>#/Catalog/X-SAP-UI2-CATALOGPAGE:SAP_DPL_TC_T
○ The CONF mode is for global congurations across all clients. It additionally includes the <CONF>
parameter. Use the following URL:
https://<server>:<port>/sap/bc/ui5_ui5/sap/arsrvc_upb_admn/main.html?sap-
client=<client>&scope=CONF#/Catalog/X-SAP-UI2-CATALOGPAGE:SAP_DPL_TC_T
2. Congure the app tiles in the SAP Fiori launchpad designer.
Note
You can congure tiles only in catalogs. By default, the tiles of the apps for demand forecasting are
in the technical catalog SAP_DPL_TC_T. The catalog is shipped with the launchpad conguration.
For more information on catalogs and tiles, see the UI Content and Authorization Concept section
in the SAP Fiori: App Implementation documentation.
If the app tiles have not yet been created, create them as static tiles using the following settings:
For Manage Demand Inuencing Factors:
○ Title: Manage Demand Influencing Factors
○ Icon: sap-icon://create-entry-time
○ Use semantic object navigation: Select this option.
○ Semantic Object:
○ Action: manage
○ Leave the other options empty.
For Demand Inuencing Factors Library:
○ Title: Demand Influencing Factors Library
○ Icon: sap-icon://FioriInAppIcons/Hierarchical Tree
○ Information: /DMF/DIF_LIBRARY
○ Use semantic object navigation: Select this option.
○ Semantic Object: ForecastDemand
○ Action: change
○ Leave the other options empty.
3. Congure the target mappings in the SAP Fiori launchpad designer.
Note
If you need more information on conguring target mappings, see the Maintaining Business
Catalogs and Business Groups section in the SAP Fiori: App Implementation information.
162
PUBLIC
Common Installation Guide for SAP Customer Activity Repository applications bundle 5.0
Set Up the Applications

If the target mapping has not yet been created, choose Target Mappings and create entries with the
following settings:
For Manage Demand Inuencing Factors:
○ Semantic Object: ForecastDemand
○ Action: manage
○ Application Type: SAPUI5 Fiori App
○ Title: Manage Demand Influencing Factors
○ URL: /sap/bc/ui5_ui5/sap/managedifs
○ ID: retail.dpl.managedif
○ Device Types: Select Desktop.
○ Allow additional parameters: Select this option.
For Demand Inuencing Factors Library:
○ Semantic Object: ForecastDemand
○ Action: change
○ Application Type: Transaction
○ Title: Demand Influencing Factors Library
○ Transaction: /DMF/DIF_LIBRARY
○ System Alias: <replace the delivered default entry with your customer-specific
system alias>
○ Device Types: Select Desktop.
○ Allow additional parameters: Select this option.
3. Complete the app setup on the front-end server.
Note
You can nd the general SAP Fiori help for this step in the Implementation Tasks on Front-End Server
section in the SAP Fiori: App Implementation information.
Use this section as your starting point. However, to congure the app, you only need to do some of the
steps described there.
1. Verify that the SAP Gateway OData services for Unied Demand Forecast and the apps for demand
forecasting have been activated. If a service is not active, activate it.
See Activate OData Services [page 111].
2. Activate the Internet Communication Framework (ICF) service for the app:
1. Execute transaction SICF (Dene Services).
2. As Hierarchy Type, select SERVICE.
3. As Service Path, enter /sap/bc/ui5_ui5/sap/.
4. As Service Name, enter managedifs.
5. Execute the search ( F8 ).
6. In the Virtual Hosts / Services column, select the MANAGEDIFS entry and choose More
Service/Host Activate .
Note
If you need more information on activating services, see Activating ICF Services of SAPUI5
Application.
Common Installation Guide for SAP Customer Activity Repository applications bundle 5.0
Set Up the Applications
PUBLIC 163

3. Check the OData Services for the app.
Execute transaction /IWFND/MAINT_SERVICE (Activate and Maintain Services) and check if the
following services are listed in the service catalog:
○ Demand Plan OData Service:
○ Type: BEP
○ Technical Service Name: ZOD_DEMAND_PLANNING_SRV
○ Service Description: Demand Plan OData Service
○ External Service Name: OD_DEMAND_PLANNING_SRV
○ Namespace: /DMF/
○ Demand Plan OData Service for Reuse:
○ Type: BEP
○ Technical Service Name: ZDEMAND_PLAN_UTILITIES_SRV
○ Service Description: Demand Plan OData Service for Reuse
○ External Service Name: DEMAND_PLAN_UTILITIES_SRV
○ Namespace: /DMF/
If a service is not listed, do the following:
1. Choose Add Service, enter your back-end system alias, and choose Get Services.
2. Search for the external service name, select the entry, and choose Add Selected Services.
3. Take over the provided data and enter the local package assignment.
4. Create your custom copy of the SAP_DPL_TCR_T standard role on the front-end server:
Note
SAP_DPL_TCR_T is the front-end server authorization role for the apps for demand forecasting. It
contains the catalogs, groups, and start authorizations for the OData services required to access
the apps.
Caution
Standard roles are delivered as templates. They begin with the prex SAP_*. Never change the
standard roles, but only your custom copies of these roles (Z_*). Otherwise, any standard roles
that you have changed will be overwritten by newly delivered standard roles during a later upgrade
or release change.
1. Execute transaction PFCG to open the Role Maintenance screen.
2. Search for the role.
3. Choose Role Copy and enter a name from the customer namespace for your copied role.
4. Switch to change mode and adjust the copied role as needed for your scenario.
5. Assign the required launchpad catalogs and groups.
Follow the steps in Creating PFCG Role on Front-End and Assigning Launchpad Catalogs and
Groups.
6. Save your changes.
5. Set up the catalogs, groups, and roles in the SAP Fiori launchpad.
Follow the steps in Maintaining Business Catalogs and Business Groups.
6. Assign the custom copy of the role (which you created from the standard role) to the users of the app.
Follow the steps in Assigning Roles to Users on Front End.
164
PUBLIC
Common Installation Guide for SAP Customer Activity Repository applications bundle 5.0
Set Up the Applications

Tip
If you already have an SAP Fiori launchpad open, clear your browser cache to see your changes on the
user interface.
4. Complete the setup on the back-end server.
1. Log on to the back-end server.
2. Create your custom copy of the /DMF/DPL standard role:
Note
/DMF/DPL (Demand Planner (Retail)) is the back-end authorization role for the apps for demand
forecasting.
Caution
Standard roles are delivered as templates. They begin with the prex SAP_*. Never change the
standard roles, but only your custom copies of these roles (Z_*). Otherwise, any standard roles
that you have changed will be overwritten by newly delivered standard roles during a later upgrade
or release change.
1. Execute transaction PFCG to open the Role Maintenance screen.
2. Search for the role.
3. Choose Role Copy and enter a name from the customer namespace for your copied role.
4. Switch to change mode and adjust the copied role as needed for your scenario. For example,
assign users to the role.
5. Assign the required launchpad catalogs and groups.
Follow the steps in Creating PFCG Role on Back End for Launchpad Catalogs.
6. Save your changes.
5. Perform optional setup steps.
Tip
Perform the same optional steps as for Analyze Forecast. For more information, see the Optional Setup
Steps in the Set Up the Analyze Forecast App [page 148] section.
Result
You have successfully set up the Manage Demand Inuencing Factors app and the related tile Demand
Inuencing Factors Library.
Tip
After this technical setup, you can now congure the app for your specic business scenario. For example:
● Congure technical user DIFs for modeling and forecasting so that you can start working with the DIF
Library.
Common Installation Guide for SAP Customer Activity Repository applications bundle 5.0
Set Up the Applications
PUBLIC 165

For more information, see the following:
○ Section Working with the DIF Library in the application help for SAP Customer Activity Repository
○ Section Congure User DIFs in the SAP Customer Activity Repository Administration Guide
● Schedule the /DPL/REORG_DIF_DRAFT_TABS report as a periodic task to delete obsolete DIF
assignment drafts.
For more information, see the Autosave of Drafts in the Adjust Forecast and Manage Demand
Inuencing Factors Apps section in the SAP Customer Activity Repository Administration Guide.
6.1.2.8.4 Set Up the Manage Alerts App
Perform several tasks on the front-end server and the back-end server to set up the transactional app Manage
Alerts. This is one of the apps for demand forecasting (UDF) included in SAP Customer Activity Repository.
Context
The Manage Alerts app supports dierent scenarios and consuming applications, such as SAP Replenishment
Planning. The app enables demand planners to review, manage and change status of alerts for High Forecast
alert type.
Prerequisites
● You have set up Unied Demand Forecast as described in Complete UDF Setup [page 139].
● You have veried the prerequisites and prepared the system landscape as described in Set Up SAP Fiori
Apps for SAP Customer Activity Repository [page 146].
● You know where to nd additional information on Manage Alerts if necessary:
○ Technical details for each delivery of the app are available in the SAP Fiori apps reference library. For
the latest delivery (latest wave), see https://oriappslibrary.hana.ondemand.com/sap/x/
externalViewer/index.html#?appId=F5163.
○ If you need information on the app features see https://help.sap.com/viewer/p/CARAB. Choose your
version at the top, open the application help for SAP Customer Activity Repository, and search for
section Manage Alerts.
Generate and Maintain Alerts
● You can run the Generate Alerts report to generate alerts. All the alerts are created with the status New. You
can access the Generate Alerts report either in the system on the SAP Easy Access Menu screen
(transaction /DMF/ALERTS_GEN) or from the SAP Fiori Launchpad (Generate Alerts tile).
166
PUBLIC
Common Installation Guide for SAP Customer Activity Repository applications bundle 5.0
Set Up the Applications

● You can use the Purging of Alerts report to delete obsolete alerts from the database. You can access the
Purging of Alerts report either in the system on the SAP Easy Access Menu screen (transaction /DMF/
ALERTS_PURGE) or from the SAP Fiori Launchpad (Purge Alerts tile).
Dene Alert Statuses
You can add, maintain and delete alert statuses using the Customizing activity Dene Alert Statuses in
Customizing for
Cross-Application Components under Demand Data Foundation Basic Settings
Exception Management . Several standard statuses are available by default. You can also add custom statuses
based on your scenario.
Activate ICF Services
Context
For security reasons, the Internet Communication Framework (ICF) services are delivered in an inactive state.
You must activate the services that are required for the app.
Procedure
1. Log on to your front-end server.
2. Execute transaction SICF.
3. In the Dene Services screen, make the following selections:
○ Hierarchy Type: SERVICE
○ Virtual Host: DEFAULT_HOST
○ Service Path: /sap/bc/ui5_ui5/sap/rtlplngalrtman
4. Choose Execute ( F8 ).
5. Under Virtual Hosts / Services, double-click the rtlplngalrtman service to open the Create/Change a
Service
screen.
6. To activate a service, choose Service/Host Activate .
Note
You can check the activation status by selecting the service and opening the context menu. If the
Activate Service option is grayed out, this means the service is already active.
7. Repeat steps 3 to 6, this time using /sap/bc/ui5_ui5/sap/udfreuse/ as the service path.
8. Repeat steps 3 to 6, this time using /sap/bc/ui5_ui5/sap/nw_aps_chd_lib/ as the service path.
Activate OData Services
1. See section Activate OData Services [page 111] and consult the table for SAP Customer Activity
Repository.
Common Installation Guide for SAP Customer Activity Repository applications bundle 5.0
Set Up the Applications
PUBLIC 167

2. Make sure that all mandatory OData services for the app are active.
Front-End Server
Component Technical Name
OData Service (Version Number) /DMF/MANAGE_RTLPLNG_ALERTS_SRV (1)
Re-Use Component Technical Name
OData Service (Version Number) APS_CHANGE_DOCUMENTS_SRV (1)
Enable the App for SAP Fiori Launchpad
Context
To be able to access the app from the SAP Fiori launchpad, your front-end system user must have the
necessary role(s) assigned. This allows you to access the business catalogs and technical catalogs required for
to access the app.
The app requires the following business role SAP_DPL_TCR_T and technical catalog.
Front End Server: Catalog Details
Component Technical Name
Technical Catalog SAP_DPL_TC_T
Note
You can select the Manage Alerts tile manually from the technical catalog to add it to the Fiori launchpad.
Procedure
1. Log on to your front-end system.
2. Execute transaction SU01 to open the User Maintenance screen.
3. Enter your front-end user name in the User eld and choose Change.
4. On the Roles tab, assign the (SAP_DPL_TCR_T) role to your user.
5. Save your changes.
Tip
If you already have an SAP Fiori launchpad open, clear your browser cache or you won't be able to see
the changes.
168
PUBLIC
Common Installation Guide for SAP Customer Activity Repository applications bundle 5.0
Set Up the Applications
Back-End Server: Set Up Authorizations
Context
For the Manage Alerts app, the following authorization objects are relevant:
Authorization Object
Authorization Object
Description Field Value Field Description
/DMF/MNGAT
Authorization to dis
play and change alert
status by using the
Manage Alerts app.
ACTVT
Display
Maintain
Activity
6.1.2.8.5 Set Up the Demand Data Foundation (DDF) Apps
Do this procedure to set up the DDF apps for standalone scenarios. The DDF apps are: Congure Distribution
Curves, Manage Location Clusters, Manage Product Attributes, Manage Product Groups, Manage Promotional
Oers. To access any of these apps, you need to assign the required role(s) to your front-end user. This gives
you access to the relevant business catalogs and business catalog groups so that you can then open the apps
in SAP Fiori launchpad.
Context
The DDF apps are available as part of SAP Customer Activity Repository. They support dierent scenarios and
consuming applications.
Dierent Scenarios for DDF Apps
● Standalone scenarios: You can use the apps standalone, that is, to support generic scenarios in SAP
Customer Activity Repository.
● Integrated scenarios: Or you can integrate the apps with the consuming application installed on top of
SAP Customer Activity Repository (for example, SAP Assortment Planning, SAP Allocation Management,
or SAP Promotion Management).
Note
Some apps support only specic consuming applications. For more information, see the product
documentation of the application that you wish to use.
Common Installation Guide for SAP Customer Activity Repository applications bundle 5.0
Set Up the Applications
PUBLIC 169

Procedure
Note
The steps are always the same, regardless of how many of the DDF apps you wish to use.
1. Determine the scenario for which you want to use the apps. Follow the instructions for your scenario:
Scenario Instructions
Standalone — SAP Customer Activity Repository Continue with step 2 below.
Integrated — SAP Assortment Planning Assign Roles, Catalogs, and Groups in SAP Fiori Launch
pad [page 298]
Integrated — SAP Allocation Management Assign Roles, Catalogs, and Groups in SAP Fiori Launch
pad [page 316]
Integrated — SAP Promotion Management Activate Internet Communication Framework (ICF) Serv
ices [page 304]
2. Log on to your front-end system.
3. Execute transaction SU01 to open the User Maintenance screen.
4. Enter your front-end user name in the User eld and choose Change.
5. On the Roles tab, assign the Demand Data Foundation Administrator (SAP_ISR_BR_DDF_ADMIN) role to
your user.
6. Save your changes.
7. Execute transaction LPD_CUST to open the Overview of Launchpads.
8. Verify that the following two roles are listed:
○ UIPMR001
○ UIRAP001
9. Open SAP Fiori launchpad and verify that you can see and access the tiles for the apps.
Tip
If you already have an SAP Fiori launchpad open, clear your browser cache to see the changes.
10. If your app is Manage Product Attributes, continue with the Set Up the Manage Product Attributes App
[page 171] section and do any steps not covered here.
170
PUBLIC
Common Installation Guide for SAP Customer Activity Repository applications bundle 5.0
Set Up the Applications

6.1.2.8.5.1 Set Up the Manage Product Attributes App
Perform several tasks on the front-end server and the back-end server to set up the transactional app Manage
Product Attributes. This is one of the Demand Data Foundation (DDF) apps included in SAP Customer Activity
Repository.
Context
The Manage Product Attributes app supports dierent scenarios and consuming applications (such as SAP
Allocation Management, SAP Assortment Planning, the similar products search, or the calculation of
distribution curves). The app enables planning administrators to create, congure, assign, and maintain
product attributes for a selected product hierarchy.
Prerequisites
● You are aware of the technical implementation information for the app in the SAP Fiori apps reference
library:
For the latest delivery (latest wave), see: https://oriappslibrary.hana.ondemand.com/sap/x/
externalViewer/index.html?appId=F0829A
● You have performed all setup tasks under Core (Mandatory for All Applications) in this guide.
● You have checked whether there are any corrections for the app in the current release:
See section Implement SAP Notes for the Installation [page 30]. Implement any corrections relevant for
the app.
● You have done the general setup for the DDF apps. See Set Up the Demand Data Foundation (DDF) Apps
[page 169].
Note
To set up the app, do the steps in the following sections.
If your scenario includes SAP Allocation Management or SAP Assortment Planning, some steps might
already have been performed in your system landscape. If so, skip the step and continue with the next one.
Activate ICF Services
Context
For security reasons, the Internet Communication Framework (ICF) services are delivered in an inactive state.
You must activate the services that are required for the app.
Procedure
1. Log on to your front-end server.
Common Installation Guide for SAP Customer Activity Repository applications bundle 5.0
Set Up the Applications
PUBLIC 171

2. Execute transaction SICF.
3. In the Dene Services screen, make the following selections:
○ Hierarchy Type: SERVICE
○ Virtual Host: DEFAULT_HOST
○ Service Path: /sap/bc/ui5_ui5/sap/attribmgmt_v2/
4. Choose Execute ( F8 ).
5. Under Virtual Hosts / Services, double-click the attribmgmt_v2/ service to open the Create/Change a
Service screen.
6. To activate a service, choose Service/Host Activate .
Note
You can check the activation status by selecting the service and opening the context menu. If the
Activate Service option is grayed out, this means the service is already active.
7. Repeat steps 3 to 6, this time using /sap/bc/ui5_ui5/sap/ddfreuse_v2/ as the service path.
Activate OData Services
1. See section Activate OData Services [page 111] and consult the table for SAP Customer Activity
Repository.
2. Make sure that all mandatory OData services for the app are active.
Enable the App for SAP Fiori Launchpad
Context
To be able to access the app from the SAP Fiori launchpad, your front-end system user must have the
necessary role(s) assigned. This allows you to access the business catalogs and business catalog groups
required for the app.
The app requires the following business role: Demand Data Foundation Administrator
(SAP_ISR_BR_DDF_ADMIN)
Note
Should you wish to use the app for SAP Allocation Management or SAP Assortment Planning, use the
Planning Administrator (SAP_RAP_BCR_PLANNING_ADMIN) business role instead.
Procedure
1. Log on to your front-end system.
2. Execute transaction SU01 to open the User Maintenance screen.
3. Enter your front-end user name in the User eld and choose Change.
4. On the Roles tab, assign the Demand Data Foundation Administrator (SAP_ISR_BR_DDF_ADMIN) role to
your user.
172
PUBLIC
Common Installation Guide for SAP Customer Activity Repository applications bundle 5.0
Set Up the Applications

5. Save your changes.
Tip
If you already have an SAP Fiori launchpad open, clear your browser cache or you won't be able to see
the changes.
6. Verify role settings for SAP Fiori launchpad.
1. Execute transaction LPD_CUST to open the Overview of Launchpads.
2. Double-click the role UIRAP001 to view the role details.
3. Expand the role Planning Administrator and select the Manage Product Attributes app.
4. Display the advanced parameters and check that the app has all the mandatory settings listed below.
You do not need to make any additional settings.
○ Link Text: Manage Product Attributes
○ Application Type: URL
○ URL: /sap/bc/ui5_ui5/sap/attribmgmt_v2
○ Application Alias: AssignProductAttribute
○ Additional Information: SAPUI5.Component=retail.ddf.attributemgmtv2
○ Navigation Mode: EXT_HEAD Leaderless Portal Window
○ History Mode: 1 Navigation Entry can Occur Once in History
○ Parameter Forwarding: G Get Parameters
If you have updated any settings, save your changes.
Assign Area of Responsibility (AOR) to ABAP Back-End User
You can only display and select product hierarchies in the app that have been assigned as the area of
responsibility to your ABAP back-end user.
1. Log on to your ABAP back-end system.
2. Execute transaction NWBC to open the SAP NetWeaver Business Client.
3. Choose Services Maintain Area of Responsibility Product Hierarchy .
4. Select your ABAP back-end user, choose Continue, and dene the AOR.
Tip
For step-by-step instructions, see the application help for SAP Customer Activity Repository at https://
help.sap.com/viewer/p/CARAB. Search for section Maintain Area of Responsibility and follow the
instructions.
Common Installation Guide for SAP Customer Activity Repository applications bundle 5.0
Set Up the Applications
PUBLIC 173

6.1.2.9 Congure On-Shelf Availability
Congure the On-Shelf Availability (OSA) module in SAP Customer Activity Repository. All steps are optional
and depend on your implementation scenario.
Note
The conguration of OSA is mandatory if you want to generate intraday forecasts. For this feature, you
need the combined functionality of OSA and Unied Demand Forecast (UDF). For more information, see
https://help.sap.com/viewer/p/CARAB and open the application help for SAP Customer Activity
Repository. Search for the Generate Intraday Forecasts section.
Tip
If you encounter any issues, see the Troubleshooting [page 207] section for possible solutions.
Generate Run IDs for OSA Processing Steps [page 174]
Dene the range of run IDs for the four processing steps of On-Shelf Availability (OSA): Intraweek
Pattern, Estimation, Monitoring, and Analysis.
Check Field Contents in SAP HANA Content for On-Shelf Availability [page 175]
Check the elds of the customizable SAP HANA views for OSA.
6.1.2.9.1 Generate Run IDs for OSA Processing Steps
Dene the range of run IDs for the four processing steps of On-Shelf Availability (OSA): Intraweek Pattern,
Estimation, Monitoring, and Analysis.
Use
Each scheduled run of a processing step of On-Shelf Availability (OSA) has a generated run ID. This is the
unique identier of a job.
The run ID is used to distinguish several runs within one period. Each processing step has its own ID generator:
Processing Step Transaction for the ID Generator
Intraweek Pattern
/OSA/NR_IWP
Estimation
/OSA/NR_EST
Monitoring
/OSA/NR_MON
Analysis
/OSA/NR_ANA
For each of the four ID generator transactions, you must dene the range of run IDs.
174
PUBLIC
Common Installation Guide for SAP Customer Activity Repository applications bundle 5.0
Set Up the Applications

Procedure
Do the following steps for each transaction:
1. Log on to your back-end system.
2. Execute the transaction by specifying either /n<transaction> or /o<transaction>.
Example
For the rst transaction: /n/OSA/NR_IWP
3. Choose Intervals in change mode.
4. In the rst row of the table, enter the following values for the following elds:
○ Field No: 01
○ Field From No.: 0000000000000001
○ Field To Number: 9999999999999999
5. Save your changes.
6.1.2.9.2 Check Field Contents in SAP HANA Content for
On-Shelf Availability
Check the elds of the customizable SAP HANA views for OSA.
Use
There are two OSA-specic SAP HANA views that can be customized:
● AN_TRANSACTION
● PROMOTION_TRANS
You must check if the elds in these views contain the mappings or formulas you need.
Caution
If you need to modify a view, be aware that a new installation will rewrite the modications. We therefore
recommend that you perform a back-up of the modied views.
Procedure
To change the mapping or the formula of a eld, follow these steps:
1. Dene the data foundation that is the source for the view, that is, the table /POSDW/TLOGF.
2. Dene lters for the view.
Common Installation Guide for SAP Customer Activity Repository applications bundle 5.0
Set Up the Applications
PUBLIC 175

3. Map the elds from source to target.
4. Create measures and calculation elds.
For more information, see the documentation under https://help.sap.com/viewer/p/SAP_HANA_PLATFORM
<Version> Development .
Example
Example: Denitions for the AN_TRANSACTION View
The following denitions are set by default for the AN_TRANSACTION view:
● The source of the view is the table /POSDW/TLOGF.
● Examples of lters for the views:
○ RECORDQUALIFIER = '5': Only sales records are used.
○ DATASTATUS in ('2' , '3'): Only those records are used that passed the SAP Customer Activity
Repository validation.
○ RETAILQUANTITY > 0.0: Negative quantities are not used by On-Shelf Availability.
○ VOIDEDLINE = '': Canceled transactions are not used by On-Shelf Availability.
● Examples of elds mappings:
○ MANDT: Client ID. This eld is mapped to the MANDT column of the /POSDW/TLOGF table.
○ STORE_ID: Store ID. This eld is mapped to the RETAILSTOREID column of the /POSDW/TLOGF table.
○ BUSINESSDAYDATE: Business day. This eld is mapped to the BUSINESSDAYDATE column of the /
POSDW/TLOGF table.
● Examples of measures:
○ RETAILQUANTITY: Amount of units sold. Refers to the SALESUOM (Sales Unit of Measure) eld that is
also dened in the /POSDW/TLOGF table. Contains the value of the RETAILQUANTITY eld.
○ PRICE: Price specied in the store currency. Contains the value of the ACTUALUNITPRICE eld.
● Examples of calculated elds:
○ TRANS_TIME_DBL: Value of the TRANS_TIME output eld of type DOUBLE. The format of the
transaction time that is stored in BEGINTIMESTAMP and ENDTIMESTAMP is <YYYYMMDDhhmmss>.
○ DISCOUNT: Total relative discount applied on the item (product).
Calculated as (ITEMDISC + DISTDISC) / (RETAILQUANTITY * ACTUALUNITPRICE). If the price
is not a positive number, 0 is returned.
Denitions:
○ DISTDISC: global discount on the whole purchase; currently not used.
○ ITEMDISC: item-specic discount; currently used.
6.1.2.10 Congure Omnichannel Article Availability and
Sourcing for Use with SAP Customer Activity
Repository
To set up the OAA module, you need to integrate the source master data system (SAP S/4HANA or SAP Retail),
SAP Customer Activity Repository, SAP Commerce, and SAP Commerce, integration package for SAP for
176
PUBLIC
Common Installation Guide for SAP Customer Activity Repository applications bundle 5.0
Set Up the Applications

Retail. You also need to set up asynchronous order management and the data replication between SAP S/
4HANA or SAP Retail, SAP Commerce, and SAP Customer Activity Repository.
6.1.2.10.1 Set up Data Replication Between SAP S/4HANA or
SAP Retail, and SAP Commerce
In SAP S/4HANA or SAP Retail, and SAP Commerce, set up the asynchronous order management scenario
as follows:
1. Set up asynchronous replication of articles via the Data Hub from SAP S/4HANA or SAP Retail to SAP
Commerce.
For more information, see the documentation for SAP Commerce at https://help.sap.com/viewer/
50c996852b32456c96d3161a95544cdb/latest/en-US/8bc6b884866910148532f2e1e500f95f.html
Getting Started with SAP S/4HANA or SAP ERP Integration. Follow the steps for the asynchronous order
management scenario.
2. Set up asynchronous replication of orders via the Data Hub from SAP Commerce to SAP S/4HANA or
SAP Retail (see link above).
3. Congure asynchronous order management.
For more information, see the documentation for SAP Commerce at https://help.sap.com/viewer/
50c996852b32456c96d3161a95544cdb/latest/en-US/e2be57a501da41cc9ebdf7cf7d3aa229.html
Conguring Order Management for SAP Commerce with One or More SAP Back Ends.
6.1.2.10.2 Set Up Data Replication Between SAP Commerce
and SAP Customer Activity Repository
1. In SAP Commerce, in the Backoce application under SAP Integration HTTP Destination , create the
HTTP destination of SAP Customer Activity Repository that is used for availability calculation and sourcing.
2. In SAP Commerce, in the Backoce application under SAP Integration SAP Global Conguration
Backend Connectivity , enter the HTTP destination of SAP Customer Activity Repository created before.
Note
In the standard Solr conguration for products in SAP Commerce, ProductStoreStockValueProvider
is used to replicate the store availability situation from the SAP Commerce database into the Solr index.
If you use OAA, availability information is provided through synchronous calls into SAP Customer Activity
Repository for every article/store combination instead. If your product catalog is rather large, this is why
indexing the complete product catalog can take very long. In this case, we recommend to either deactivate
the value provider or to create a custom one. If you deactivate the value provider, faceted search according
to store availability is not possible in the product catalog. OAA functionality is not aected.
Common Installation Guide for SAP Customer Activity Repository applications bundle 5.0
Set Up the Applications
PUBLIC 177

6.1.2.10.3 Set Up Live Connection Between SAP Customer
Activity Repository and SAP Analytics Cloud
This step is optional. You only need to execute it if you want to use the set of OAA analyses that has been
predened in SAP Analytics Cloud and that is part of the standard delivery of SAP Analytics Cloud. If you are
using a dierent analytics tool, or if you do not run analytics at all, you may skip this step.
Context
Procedure
1. Congure SAP Customer Activity Repository to support cross-origin resource sharing (CORS), for cross-
domain communication from the browser.
For more information, see Live Data Connection to SAP BW Using a Direct Connection and Password
Authentication, steps 1 and 2 of the procedure.
2. In SAP Analytics Cloud, navigate to Home Connection and select live connection SAPRTOAA (SAP
Retail Omnichannel Article Availability and Sourcing). This connection is part of the standard delivery.
3. Click Edit Connection and enter your custom details for Host, HTTPS Port, and Client.
6.1.2.10.4 Activate OData Services for Omnichannel Article
Availability and Sourcing
A number of OData services are required to run the SAP Fiori apps for omnichannel article availability and
sourcing (OAA).
Context
Make sure that you have activated the OData services required for OAA, as described and listed in Activate
OData Services [page 111]. Depending on your back end, dierent services are required.
178
PUBLIC
Common Installation Guide for SAP Customer Activity Repository applications bundle 5.0
Set Up the Applications

6.1.2.10.5 Trigger Initial Full Run of ATP Snapshot Replication
(SAP S/4HANA 1909 Only, Sales Channel Mode
Only)
Sales channel mode only; SAP S/4HANA 1909 only: With SAP Customer Activity Repository 4.0 FPS02, the
delta mode of the ATP snapshot replication was changed.
Context
The delta mode of the ATP snapshot replication works correctly only after an initial full run of the replication.
Trigger a full run of report /OAA/ATP_SNP_CALC (Generation and Replication of ATP Snapshot).
6.1.2.11 Congure Omnichannel Promotion Pricing for Use
with SAP Customer Activity Repository
To use the OPP module, you need to activate the functionality in Customizing and congure it for your specic
scenario.
Tip
For information on how to congure the promotion pricing service in SAP Commerce, see the Administrator
Guide of SAP Commerce, integration package for SAP for Retail on SAP Help Portal under https://
help.sap.com/viewer/p/IPR <Version> Administration Omnichannel Promotion Pricing
Conguration .
Related Information
Activate Omnichannel Promotion Pricing (OPP) [page 180]
Activate the Data Replication Framework (DRF) [page 182]
Congure the Transformation of Oers into OPP Promotions [page 180]
Congure the Local Deployment of the Promotion Pricing Service [page 181]
Congure the Central Deployment of the Promotion Pricing Service [page 195]
Update the PPS SAP HANA XSA Application
Use the Extended Sales Pricing Model (DDF) [page 205]
Common Installation Guide for SAP Customer Activity Repository applications bundle 5.0
Set Up the Applications
PUBLIC 179

6.1.2.11.1 Activate Omnichannel Promotion Pricing (OPP)
To use omnichannel promotion pricing for the calculation of the eective sales price, you have to activate the
functionality.
In Customizing for SAP Customer Activity Repository, choose Omnichannel Promotion Pricing Congure
Omnichannel Promotion Pricing Activate OPP .
6.1.2.11.2 Congure the Transformation of Oers into OPP
Promotions
Related Information
Enforce the Compatibility to Transform Oers into OPP Promotions [page 180]
Enable Oers with Enhanced Product Groups [page 180]
Enable Oers with Zero Discount [page 181]
6.1.2.11.2.1 Enforce the Compatibility to Transform Oers
into OPP Promotions
To transform oers into OPP promotions, it is recommended to enforce the compatibility to make sure that an
oer can only be set to an operative status, for example Approved, if the transformation into an OPP promotion
was successful.
In Customizing for SAP Customer Activity Repository under Omnichannel Promotion Pricing (OPP)
Congure Omnichannel Promotion Pricing Enforce Compatibility .
6.1.2.11.2.2 Enable Oers with Enhanced Product Groups
If you want to include or exclude product groups from your oers or use them in mix-and-match oers, you
have to enable enhanced product groups.
In Customizing for SAP Customer Activity Repository under Omnichannel Promotion Pricing (OPP)
Congure Omnichannel Promotion Pricing Enable Product Groups .
Additionally, you have to enable product groups for the promotion pricing service. For more information about
the conguration of product groups, see the Development and Extension Guide for OPP on SAP Help Portal at
180
PUBLIC
Common Installation Guide for SAP Customer Activity Repository applications bundle 5.0
Set Up the Applications

https://help.sap.com/viewer/p/CARAB <Version> Development Development and Extension Guide for
Omnichannel Promotion Pricing under Promotion Pricing Service PPS Module calcengine-gk Default
Settings and Properties
.
6.1.2.11.2.3 Enable Oers with Zero Discount
By default oers with discount type Everyday Low Price (EDLP) are transformed into OPP promotions like
oers with discount type Regular Price. If a monetary discount of zero should be applied to the previous price,
you can enable the discount type Zero Discount. In this case, a retail price modier is returned in the calculation
response, but the previous price does not change.
You can enable this discount type in Customizing for SAP Customer Activity Repository under Omnichannel
Promotion Pricing (OPP) Congure Omnichannel Promotion Pricing Enable Zero Discount .
6.1.2.11.3 Congure the Local Deployment of the Promotion
Pricing Service
For a local deployment scenario, you have to replicate regular prices and OPP promotions from the central
price and promotion repository (SAP Customer Activity Repository) to an external system to create a local
storage for prices and promotions. This replication can be done via IDocs. For that, you have to congure
application link enabling (ALE) and Data Replication Framework (DRF). For OPP promotions, there are two
options to congure this replication: the promotion-centric outbound processing and the location-specic
outbound processing.
Prerequisites
● You have dened receiving systems and clients in the system landscape directory (SLD).
Procedure
1. Activate OPP functionality as described in Activate Omnichannel Promotion Pricing (OPP) [page 180].
2. Activate DRF functionality as described in Activate the Data Replication Framework (DRF) [page 182].
3. Dene number ranges as described in Dene Number Ranges [page 182].
4. Congure the Application Link Enabling for the outbound processing of regular prices and OPP promotions
(promotion-centric or location-specic outbound processing):
○ Congure Application Link Enabling for the outbound processing of regular prices and promotion-
centric OPP promotions. [page 182]
○ Congure Application Link Enabling for the location-specic outbound processing of OPP promotions
[page 190]
Common Installation Guide for SAP Customer Activity Repository applications bundle 5.0
Set Up the Applications
PUBLIC 181

5. Congure the Data Replication Framework for the outbound processing of regular prices and OPP
promotions (promotions-centric or location-specic outbound processing):
○ Congure the data replication for the outbound processing of regular prices and OPP promotions
(promotion-centric outbound processing) [page 185]
○ Congure the data replication for OPP promotions (location-specic outbound processing) [page 193]
6.1.2.11.3.1 Activate the Data Replication Framework (DRF)
To send regular prices and OPP promotion to an external system via IDocs, you have to activate the Data
Replication Framework (DRF) functionality.
In transaction SFW5, activate business function DRF_FOUNDATION.
6.1.2.11.3.2 Dene Number Ranges
To send OPP promotions to an external system via IDocs, you can dene number ranges to generate unique
identiers for all promotion-related entities.
In Customizing for SAP Customer Activity Repository, choose Omnichannel Promotion Pricing (OPP)
Dene Number Ranges .
6.1.2.11.3.3 Congure the Outbound Processing for Regular
Prices and OPP Promotions
Conguration of the outbound processing of regular prices and promotion-centric OPP promotions.
Application Link Enabling
In Customizing for SAP NetWeaver, under Application Server IDoc Interface / Application Link Enabling
(ALE) , see the system documentation to check the settings for distributing data between application
systems based on Application Link Enabling and IDoc interface technology. With omnichannel promotion
pricing, this functionality is used to distribute OPP promotions and regular prices from SAP Customer Activity
Repository to an external system, for example an SAP Commerce system. You need to perform the following
steps:
Transaction BD54: Dening a Logical System
With ALE IDoc distribution, you can exchange data between logical systems. You use the logical system name
to identify a system uniquely within the network. If you already use ALE IDoc distribution, the logical system for
182
PUBLIC
Common Installation Guide for SAP Customer Activity Repository applications bundle 5.0
Set Up the Applications

the sending system has already been dened. In this case, you only need to dene a logical system for the
receiving system. In SAP Customer Activity Repository, do the following:
In Display View "Logical System": Overview, create a new logical system. Enter the following values:
Field Name Value
Log. System
<receiving system>
Name
<receiving system>
Transaction SM59: Dening an RFC Destination
1. Create the RFC destination in the HTTP Connections to External Server folder and enter the following
values:
Field Name Value
RFC Destination
<name of the RFC destination>
Connection Type Enter connection type G HTTP Connection to External
Server.
Description Enter at least Description 1 in the description section.
2. In Technical Settings, enter the following values for Target System Settings:
Field Name Value
Target Host
<name of the target host>
Path Prex
/sapppspricing/idocinbound
Port
<service number for https or http
connection>
Note
With OPP, an https connection is recommended.
3. In Logon and Security, select Basic Authentication for Logon with User, and enter the following values:
Field Name Value
User
<user name that you have created in SAP
Commerce Backoffice>
Common Installation Guide for SAP Customer Activity Repository applications bundle 5.0
Set Up the Applications
PUBLIC 183

Field Name Value
Password
<password that you have created in SAP
Commerce Backoffice>
In Security Options select SSLActive to send your data via https connection and enter an appropriate
certicate.
Note
We strongly recommend to use Secure protocols (SSL, SCN) whenever possible.
For more information, see Transport Layer Security and Web Services Security in the SAP NetWeaver
Security Guide.
Transaction WE21: Dening a Port
1. Create this ALE port in the XML HTTP folder and enter the following values:
Field Name Value
Port
<name of port>
Description
<description of port>
RFC destination
<name of the RFC destination created in
the previous step>
2. Select Text/XML for Content Type.
Transaction WE20: Dening a Partner Prole
A partner prole contains parameters that dene the electronic interchange of data between systems using the
IDoc interface. There is only one partner prole required for the receiving system and it needs to contain all the
parameters that your scenario requires for sending OPP promotions and regular prices to that receiving
system.
Basic Partner Prole Information
To set up the basic partner prole information, do the following:
1. In Partner Proles, create a logical system partner. Enter the following values:
Field Name Value
Partner No.
<partner number>, which must be the same as the receiving system that you
dened in section
Dening a Logical System
Partner Type
LS for regular prices and OPP promotions sent via promotion-centric outbound
processing
184 PUBLIC
Common Installation Guide for SAP Customer Activity Repository applications bundle 5.0
Set Up the Applications

2. In the Post processing: permitted agent tab, enter the following values:
Field Name Value
Ty.
US (for User)
Agent
<users to be notified> should be an agent who can process IDocs with
errors
Lang.
<notification language>
Outbound Parameters
Field Name Value
Message Type
● /ROP/BASE_PRICE for regular prices
● /ROP/PROMOTION for OPP promotions
Outbound Options tab
Receiver port
<receiver port> as dened in section Dening a Port
Output Mode
● Pass IDoc Immediately
○ Select this option to transfer IDocs directly after creation for a better integra
tion to the DRF transfer log.
○ Select this option to make sure that IDocs are sent in the same order in
which they have been created.
● Collect IDocs
○ Select this option to collect IDocs and transfer them sequentially with trans
action WE14.
IDoc Type
● /ROP/BASE_PRICE01 for regular prices
● Depending on the receiving system /ROP/PROMOTION01 or /ROP/PROMOTION02
for OPP promotions
Cancel Processing After Syntax
Error
Ensure that this eld is selected to avoid sending erroneous IDocs.
Data Replication Framework
In Customizing for Cross-Application Components under Processes and Tools for Enterprise Applications
Master Data Governance, Central Governance General Settings Data Replication Overall Information ,
see the system documentation to check how data is sent to one or more target systems. With OPP, the Data
Common Installation Guide for SAP Customer Activity Repository applications bundle 5.0
Set Up the Applications
PUBLIC 185

Replication Framework functionality is used to send regular prices and OPP promotions from an SAP Customer
Activity Repository system to external systems. You need to perform the following steps:
Transaction DRFIMG: Dening Custom Settings for Data Replication
In Customizing, you have to perform the following conguration steps under Data Replication Dene
Custom Settings for Data Replication :
1. In Customizing activity Dene Technical Settings for Business Systems, dene a business system and a
logical system for the receiving systems. The following business object types are available to send OPP
promotions and regular prices, and can be assigned to the business system:
Business Object Type Description Communication Channel
ROP_PROMO OPP promotion Replication via IDoc
ROP_PRICE Regular price Replication via IDoc
2. In Customizing activity Dene Replication Models, specify the content of the replication model (regular
prices or OPP promotions), the outbound implementation that is to be used, and the business system to
which this object is to be sent. You can specify a dierent destination system for each outbound
implementation that contains business object, lter object, and business logic. You can also add an
expiration time for the log. The following predened outbound implementations exist:
Outbound Imple
mentation Description
Supported Replication
Model Filter Object
ROP_PRICE Outbound implementation
for regular prices
Initialization, Change, and
Manual
ROP_PRICE
Note
For this outbound implementa
tion, the lter application time
needs to be set to Filter Before
Change Analysis.
ROP_PROMO Outbound implementation
for OPP promotions sent
via promotion-centric out
bound processing
Initialization, Change, and
Manual
ROP_PROMO
186 PUBLIC
Common Installation Guide for SAP Customer Activity Repository applications bundle 5.0
Set Up the Applications

Outbound Imple
mentation Description
Supported Replication
Model Filter Object
ROP_PRC_MG Outbound implementation
for multi-level generated
regular prices
Use this additional out
bound implementation for
regular prices instead of
ROP_PRICE to support the
extended sales pricing
model for Demand Data
Foundation (DDF).
For more information, see
Use the Extended Sales
Pricing Model (DDF) [page
205].
Initialization, Change, and
Manual
ROP_PRICE
Note
For this outbound implementa
tion, the lter application time
needs to be set to Filter Before
Change Analysis.
Outbound Parameters
The following outbound parameters must be assigned to each replication model:
Outbound Parameter for
Regular Prices Description Typical Value*
/ROP/PACK_SIZE_BULK This parameter sets the maximum number of regular prices that
are processed per IDoc. This is an approximate value because
regular prices are assigned to dierent IDocs for each group of
business unit with items and prices.
Note
If this parameter is set to 0, restricting regular prices is not
possible and it is only the number of products that deter
mines the IDoc size.
20,000-100,000
PACK_SIZE_BULK This parameter controls the number of products for which regu
lar prices can be stored in a compressed format at the same
time, and sets the maximum number of products that are proc
essed per IDoc.
Note
If this parameter is not set, the default is 1. If you increase
this value, performance at runtime is improved since fewer
IDocs need to be processed.
200-1,000
Common Installation Guide for SAP Customer Activity Repository applications bundle 5.0
Set Up the Applications
PUBLIC 187

Outbound Parameter for
Regular Prices Description Typical Value*
TASK_SIZE_PROCMSG This parameter is only relevant if you execute the data replication
using parallel processing . This parameter sets the maximum
number of products that are processed per parallel package. It
must be greater or equal to the PACK_SIZE_BULK parameter.
Note
This parameter value does not dene the number of regular
prices per package. If this parameter is set to 0, all products
are processed in one package. This means that parallel proc
essing is not possible.
400-2,000
/ROP/SEQ_READ_SIZE This parameter sets the maximum number of products for which
the regular prices are read in one select statement. In this way
you can limit memory consumption for products with a large
number of regular prices.
Note
If this parameter is set to 0, all products of the correspond
ing package are read within one call.
100-200
/ROP/DAY_OFFSET_PAST This parameter is only used, if the selection of prices in the past
is restricted with the validity end date as a lter criteria and if the
validity end date is not too far in the past.
During a delta replication, this parameter denes a time range in
days that lies before the date of the last replication run. The sys
tem subtracts this value from the last replication date and uses
the resulting date to construct the select-option for the validity
end date.
During an initial replication the system calculates a date (current
date minus the time range in days dened in this parameter). If
the date that you entered for the validity end is earlier than the
calculated date, the calculated date is used automatically.
In this way you ensure that also regular prices with a validity end
date in the specied past time range are transferred.
Note
If this parameter is not set, relevant regular prices might not
be transferred. See SAP Note
2338714 . In this case the
default is set to 30 days.
30
188 PUBLIC
Common Installation Guide for SAP Customer Activity Repository applications bundle 5.0
Set Up the Applications

Outbound Parameter for
OPP Promotions Description Typical Value*
PACK_SIZE_BULK This parameter sets the maximum number of OPP promotions
that are processed per IDoc. It must be smaller than the
TASK_SIZE_PROCMSG parameter and is relevant for both, the se
quential and the parallel execution of DRF outbound.
Note
If this parameter is not set, the default is 1. If you increase
this value, performance at runtime is improved since fewer
IDocs need to be processed.
100-1,000
TASK_SIZE_PROCMSG This parameter is only relevant with parallel processing . It sets
the maximum number of OPP promotions that are processed
per parallel package. It must be greater or equal to the
PACK_SIZE_BULK parameter.
Note
This parameter value does not dene the number of OPP
promotions per package. If this parameter is set to 0, inde
pendently of the value that you enter in transaction
DRFOUT, parallel processing is not possible.
100-5,000
/ROP/Generic_ENH_MAP This parameter activates the automatic mapping of customer-
specic elds that are stored in the CI-Inlcudes of promotional
entities to the corresponding extension segments in the OPP
promotion IDocs.
Note
Internal tables, structures, and so on, are not supported.
x
*This value gives you an idea of usable values for the replication of regular prices and OPP promotions, it is
not a recommendation.
3. Optional: In Customizing activity Dene Business Object Settings, specify the application link enabling
(ALE) message type that is to be used for each business object. In this way, you can determine the
retention period for change pointers that are related to the business object. For the outbound processing of
regular prices, no change pointers are used and the retention period is not relevant. The following message
types are relevant for the outbound processing of regular prices and OPP promotions from the central
price and promotion repository:
Business Object Type Message Type
ROP_PRICE /ROP/BASE_PRICE
Common Installation Guide for SAP Customer Activity Repository applications bundle 5.0
Set Up the Applications
PUBLIC 189

Business Object Type Message Type
ROP_PROMO /ROP/PROMOTION
For more information, see Customizing for Cross Application Components under Processes and Tools for
Enterprise Applications Master Data Governance, Central Governance General Settings Data
Replication
Overall Information .
Transaction DRFF: Dening Filter Criteria
In Dene Filter Criteria, specify your data selection for each replication model and business object. The lter
criteria are valid for Initial replication and Change replication.
Parallel Processing for Regular Prices and OPP Promotions
DRF enables outbound implementations to be executed by using parallel tasks. This feature is supported for
both, the outbound implementation for regular prices and the outbound implementation for OPP promotions.
You can transfer the dierent tasks to dierent servers by dening and choosing server groups. Before
replicating the data, you can dene the maximum number of work processes that can run in parallel. These
parameters combined with the outbound parameters mentioned above provide a exible conguration.
6.1.2.11.3.4 Congure the Location-Specic Outbound
Processing of OPP Promotions
The location-specic outbound processing of OPP promotions enables you to distribute a location-specic
view of OPP promotions. With this outbound option OPP promotions are sent from the central price and
promotion repository to its assigned locations. You can use this option if you, for example, want to send OPP
promotions to POS systems in your physical stores. This section describes how to congure the Application
Link Enabling (ALE) layer and Data Replication Framework (DRF) for the sending of IDocs.
Application Link Enabling
In Customizing for SAP NetWeaver, under Application Server IDoc Interface / Application Link Enabling
(ALE) , see the system documentation to check the settings for distributing data between application
systems based on Application Link Enabling and IDoc interface technology. With omnichannel promotion
pricing, this functionality is used to distribute OPP promotions and regular prices from SAP Customer Activity
Repository to an external system, for example an SAP Commerce system. You need to perform the following
steps:
Transaction SM59: Dening an RFC Destination
For each receiving system that initially receives the created IDocs, you have to create an RFC destination. If you
use a middleware, this RFC destination refers to the host in which the middleware is running, If you use a 1:1
connection, all receiving systems require a separate RFC destination. The attributes of the RFC destination are
determined by the receiving system. In the following we assume that we want to setup a location-specic
190
PUBLIC
Common Installation Guide for SAP Customer Activity Repository applications bundle 5.0
Set Up the Applications

outbound processing to a local promotion pricing service in a SAP Commerce system that is directly
connected to the SAP Customer Activity Repository.
1. In Technical Settings, enter the following values for Target System Settings:
Field Name Value
Target Host
<name of the target host>
Path Prex
/sapppspricing/idocinbound
Port
<service number for https or http
connection>
Note
With OPP, an https connection is recommended.
2. In Logon and Security, select Basic Authentication for Logon with User, and enter the following values:
Field Name Value
User
<user name that you have created in SAP
Commerce Backoffice>
Password
<password that you have created in SAP
Commerce Backoffice>
In Security Options select SSLActive to send your data via https connection and enter an appropriate
certicate.
Note
We strongly recommend to use Secure protocols (SSL, SCN) whenever possible.
For more information, see Transport Layer Security and Web Services Security in the SAP NetWeaver
Security Guide.
Transaction WE21: Dening a Port
1. Create this ALE port in the XML HTTP folder and enter the following values:
Field Name Value
Port
<name of port>
Description
<description of port>
RFC destination
Common Installation Guide for SAP Customer Activity Repository applications bundle 5.0
Set Up the Applications
PUBLIC 191

2. Text/XML.
Transaction WE20: Dening a Partner Prole
A partner prole contains parameters that dene the electronic interchange of data between systems using the
IDoc interface. There is only one partner prole required for the receiving system and it needs to contain all the
parameters that your scenario requires for sending OPP promotions and regular prices to that receiving
system.<name of the RFC destination created in the previous step>
Basic Partner Prole Information
To set up the basic partner prole information, do the following:
1. In Partner Proles<, create a logical system partner. Enter the following values:
Field Name Value
Partner No. External ID of the receiving DDF location
Partner Type
LO for OPP promotions replicated via location-specic outbound processing
Note
For this partner type, only the rst 10 characters of the DDF location ID are taken into account, the
location type and logical system are ignored. If you want to use a dierent logic, use transaction WE44
to dene a dierent partner type or to change the validation logic.
Select a content type supported with the receiving system. If you congure a localIf you need a
dierent implementation of BAdI /ROP/PROMO_STORE_OUTBOUND, see Customizing for SAP Customer
Activity Repository and choose Omnichannel Promotion Pricing (OPP) Business Add-Ins (BAdIs)
Outbound Processing of OPP Promotions BAdI: Location-Specic Outbound Processing .
2. In the Post processing: permitted agent tab, enter the following values:
Field Name Value
Ty.
US (for User)
Agent
<users to be notified>, which should be an agent who can process IDocs
with errors.
Lang.
<notification language>
Outbound Parameters
Field Name Value
Message Type /ROP/PROMOTION for OPP promotions
Outbound Options tab
192 PUBLIC
Common Installation Guide for SAP Customer Activity Repository applications bundle 5.0
Set Up the Applications

Field Name Value
Receiver port
<receiver port> as dened in section Dening a Port
Output Mode
● Pass IDoc Immediately
○ Select this option to transfer IDocs directly after creation for a better integra
tion to the DRF transfer log.
○ Select this option to make sure that IDocs are sent in the same order in
which they have been created.
● Collect IDocs
○ Select this option to collect IDocs and transfer them sequentially with trans
action WE14.
IDoc Type Depending on the receiving system /ROP/PROMOTION01 or /ROP/PROMOTION02 for
OPP promotions
Cancel Processing After Syntax
Error
Ensure that this eld is selected to avoid sending erroneous IDocs.
Data Replication Framework
In Customizing for Cross-Application Components under Processes and Tools for Enterprise Applications
Master Data Governance, Central Governance General Settings Data Replication Overall Information ,
see the system documentation to check how data is replicated to one or more target systems. With OPP, the
Data Replication Framework functionality is used to send regular prices and OPP promotions from an SAP
Customer Activity Repository system to external systems. You need to perform the following steps:
Transaction DRFIMG: Dening Custom Settings for Data Replication
In Customizing, you have to perform the following conguration steps under Data Replication Dene
Custom Settings for Data Replication
:
1. In Customizing activity Dene Technical Settings for Business Systems, dene a business system and a
logical system for the receiving systems. The following business object types are available to replicate OPP
promotions and regular prices, and can be assigned to the business system:
Business Object Type Description Communication Channel
ROP_PRO_ST Location-specic outbound process
ing of OPP promotions
Replication via IDoc
2. In Customizing activity Dene Replication Models, specify the content of the replication model (regular
prices or OPP promotions), the outbound implementation that is to be used, and the business system to
which this object is to be sent. You can specify a dierent destination system for each outbound
Common Installation Guide for SAP Customer Activity Repository applications bundle 5.0
Set Up the Applications
PUBLIC 193
implementation that contains business object, lter object, and business logic. You can also add an
expiration time for the log. The following predened outbound implementations exist:
Outbound Imple
mentation Description
Supported Replication
Model Filter Object
ROP_PRO_ST Outbound implementation
for OPP promotions sent
via location-specic out
bound processing
Initialization, Change, and
Manual
ROP_PRO_ST
Outbound Parameters
The following outbound parameters must be assigned to each replication model:
Outbound Parameter for
OPP Promotions Description Typical Value*
PACK_SIZE_BULK This parameter sets the maximum number of OPP promotions
that are processed per IDoc. It must be smaller than the
TASK_SIZE_PROCMSG parameter and is relevant for both, the se
quential and the parallel execution of DRF outbound.
Note
If this parameter is not set, the default is 1. If you increase
this value, performance at runtime is improved since fewer
IDocs need to be processed.
100-1,000
TASK_SIZE_PROCMSG This parameter is only relevant with parallel processing . It sets
the maximum number of OPP promotions that are processed
per parallel package. It must be greater or equal to the
PACK_SIZE_BULK parameter.
Note
This parameter value does not dene the number of OPP
promotions per package. If this parameter is set to 0, inde
pendently of the value that you enter in transaction
DRFOUT, parallel processing is not possible.
100-5,000
/ROP/Generic_ENH_MAP This parameter activates the automatic mapping of customer-
specic elds that are stored in the CI-Inlcudes of promotional
entities to the corresponding extension segments in the OPP
promotion IDocs.
Note
Internal tables, structures, and so on, are not supported.
x
194 PUBLIC
Common Installation Guide for SAP Customer Activity Repository applications bundle 5.0
Set Up the Applications

*This value gives you an idea of usable values for the replication of regular prices and OPP promotions, it is
not a recommendation.
3. Optional: In Customizing activity Dene Business Object Settings, specify the application link enabling
(ALE) message type that is to be used for each business object. In this way, you can determine the
retention period for change pointers that are related to the business object. For the outbound processing of
regular prices, no change pointers are used and the retention period is not relevant. The following message
types are relevant for the outbound processing of regular prices and OPP promotions from the central
price and promotion repository:
Business Object Type Message Type
ROP_PRICE /ROP/BASE_PRICE
ROP_PROMO /ROP/PROMOTION
For more information, see Customizing for Cross Application Components under Processes and Tools for
Enterprise Applications Master Data Governance, Central Governance General Settings Data
Replication
Overall Information .
Transaction DRFF: Dening Filter Criteria
In Dene Filter Criteria, specify your data selection for each replication model and business object. The lter
criteria are valid for Initial replication and Change replication.
6.1.2.11.4 Congure the Central Deployment of the
Promotion Pricing Service
The promotion pricing service (PPS) is an SAP HANA XS advanced (XSA) application. Therefore the
conguration of, for example, database services and back-end connection information, is done before or during
the deploy time. The needed conguration settings are provided via command line interface, or in an extension
descriptor le. Authentication conguration and authorization conguration is done after deploy time.
Prerequisites
● You have installed SAP HANA XSA version 1.0.88 or higher.
● You have access to the XSA command-line tool version 1.0.82 or higher.
● You have an XSA user with the following role collections:
○ XS_CONTROLLER_ADMIN
○ XS_USER_ADMIN
○ XS_USER_PUBLIC
○ XS_AUTHORIZATION_ADMIN
Common Installation Guide for SAP Customer Activity Repository applications bundle 5.0
Set Up the Applications
PUBLIC 195

Note
In the following documentation this user will be referred to as XSA PPS admin user.
● You have an XSA user with the business role XS_USER_PUBLIC.
Note
In the following documentation this user will be referred to as XSA PPS business user.
● You have a database user that can access the standard schema of your SAP Customer Activity Repository
system via the SQL port, in which the database tables of the PPS are located.
● You have created and congured the organization and the space in which you want to install the promotion
pricing service application.
● You have downloaded the SCV le XSACOPPPPS00_<patch level>-80004642.ZIP (for example patch
level
0 for the initial delivery) for the PPS from the SAP Support Portal at https://support.sap.com .
Used XSA Services
The PPS application uses the following XSA services:
Service Instance Service Plan Resource Type Description
ppeHANA User-dened n/a org.cloudfoundry.exist
ing-service
Service to access the
database.
ppServiceUaa xsuaa space com.sap.xs.uaa-space Service for for authen
tication and authoriza
tion services.
Plan space allows the
installation of the PPS
app in dierent XSA
spaces.
ppServiceAuditLog auditlog free com.sap.xs.auditlog Audit log broker on the
XSA platform.
Note
The services ppServiceUaa and ppServiceAuditLog are created and bound automatically during the
installation of the PPS application.
Procedure
1. Create the ppeHana Database Service [page 197]
196
PUBLIC
Common Installation Guide for SAP Customer Activity Repository applications bundle 5.0
Set Up the Applications
2. Create the Extension Descriptor File [page 199]
3. Congure Authentication and Authorization Settings [page 201]
4. Advanced Conguration Settings [page 203]
Related Information
● For more technical information about SAP HANA XS advanced, see the SAP HANA Developer Guide for SAP
HANA XS Advanced Model on SAP Help Portal at https://help.sap.com/viewer/product/
SAP_HANA_PLATFORM/
<Version> Development SAP HANA Developer Guide .
● For more information about the installation of SAP HANA XS advanced, see the SAP HANA Server
Installation and Update Guide on SAP Help Portal at https://help.sap.com/viewer/product/
SAP_HANA_PLATFORM/2.0.04/en-US <Version> Installation and Upgrade SAP HANA Server
Installation and Upgrade Guide
Installing an SAP HANA System Installing XS Advanced Runtime .
● For more administration information about SAP HANA XS advanced, see the SAP HANA Administration
Guide for SAP HANA Platform on SAP Help Portal at https://help.sap.com/viewer/product/
SAP_HANA_PLATFORM/2.0.04/en-US <Version> Administration SAP HANA Administration Guide
for SAP HANA Platform Application Run-Time Services Maintaining the SAP HANA XS Advanced Model
Run Time
.
6.1.2.11.4.1 Create the ppeHana Database Service
To make the PPS run, you have to create the database service ppeHana. How to create this service depends on
your SSL (Secure Socket Layer) conguration settings in your SAP HANA database.
SSL Not Activated in SAP HANA
If SSL is not activated in SAP HANA, proceed as follows:
1. Execute the following xs command to create the database service depending on your local environment
For Windows Command Line use:
Source Code
xs create-user-provided-service ppeHana -p "{\"user\":\"<DB_USER>\",
\"password\":\"<DB_USER_PASSWORD>\",\"url\":\"jdbc:sap://<HOSTNAME>:<PORT>
\",\"driver\":\"com.sap.db.jdbc.Driver\",\"port\":\"<PORT>\",\"host\":
\"<HOSTNAME>\"}"
For Linux Shell use:
Source Code
xs create-user-provided-service ppeHana -p
'{"user":"<DB_USER>","password":"<DB_USER_PASSWORD>","url":"jdbc:sap://
Common Installation Guide for SAP Customer Activity Repository applications bundle 5.0
Set Up the Applications
PUBLIC 197
<DB_USER_PASSWORD>","driver":"com.sap.db.jdbc.Driver","port":"<PORT>","host
":"<HOSTNAME>"}'
2. Adjust the following entries in angle brackets (<...>) in the command line:
Entry Comment
<DB_USER> Replace this entry with a valid database user of your SAP
Customer Activity Repository system.
With this user, you must be able to access the standard
schema of your SAP Customer Activity Repository system
via the SQL port, in which the database tables of the PPS
are located.
<DB_USER_PASSWORD> Replace this entry with the password of your database
user (in clear text) in your SAP Customer Activity
Repository system.
Note
If your password policy forces a password change af
ter the rst login, it must be changed before you cre
ate ppeHana.
<HOSTNAME> Replace this entry with the database host name of your
SAP Customer Activity Repository system.
<PORT> Replace this entry with the database SQL port of your SAP
Customer Activity Repository system.
Tip
When you have created the database service, clear the command history to prevent unauthorized
disclosure of the password.
SSL Activated in SAP HANA
If SSL is activated in SAP HANA proceed as follows:
1. Execute the following xs command to create the database service depending on your local environment
For Windows Command Line use:
Source Code
xs create-user-provided-service ppeHana -p "{\"user\":\"<DB_USER>\",
\"password\":\"<DB_USER_PASSWORD>\",\"url\":\"jdbc:sap://<HOSTNAME>:<PORT>
\",\"driver\":\"com.sap.db.jdbc.Driver\",\"port\":\"<PORT>\",\"host\":
\"<HOSTNAME>\"}"
198
PUBLIC
Common Installation Guide for SAP Customer Activity Repository applications bundle 5.0
Set Up the Applications

For Linux Shell use:
Source Code
xs create-user-provided-service ppeHana -p
'{"user":"<DB_USER>","password":"<DB_USER_PASSWORD>","url":"jdbc:sap://
<DB_USER_PASSWORD>","driver":"com.sap.db.jdbc.Driver","port":"<PORT>","host
":"<HOSTNAME>"}'
2. If you want to validate the server certicate, set <VALUE> of validateCerticate to true. In this case, you
either have to ensure that your Java VM trusts the server certicate, or you must set the parameter
certicate as shown in the following example of a ppeHana service instance:
Sample Code
{
"name" : "ppeHana",
"credentials" : {
"password" : "<DB_USER_PASSWORD>",
"driver" : "com.sap.db.jdbc.Driver",
"port" : "<PORT>",
"host" : "<HOSTNAME>",
"user" : "<DB_USER>",
"url" : "jdbc:sap://<HOSTNAME>:<PORT>/?
encrypt=true&validateCertificate=true",
"certificate" : "-----BEGIN CERTIFICATE-----\nMIIFpzCww[…]----END
CERTIFICATE-----\n"
}
}
Tip
When you have created the database service, clear the command history to prevent unauthorized
disclosure of the password.
6.1.2.11.4.2 Create the Extension Descriptor File
To store the PPS-specic conguration settings, you must create an extension descriptior le.
1. Create a text le with sux .mtaext, for example config-op.mtaext.
2. To create the extension descriptor le, copy the following content to the new le that you have created in
step 1:
Note
This content includes the minimum settings that are necessary to create the extension descriptior le.
Further conguration settings, for example settings for caching, can be added to this le as required.
Source Code
_schema-version: "2.0.0"
ID: com.sap.retail.ppservice.XSAC_OPP_PPS
extends: com.sap.retail.ppservice.XSAC_OPP_PPS
modules:
Common Installation Guide for SAP Customer Activity Repository applications bundle 5.0
Set Up the Applications
PUBLIC 199

- name: ppservice-approuter
parameters:
memory: 128M
- name: ppservice-webapp-central
parameters:
memory: 1024M
properties:
sap.dataaccess-common.db.client: "<DB_CLIENT>"
sap.dataaccess-common.logSys: "<LOGSYS>"
DISABLE_SUCCESSFUL_LOGIN_AUDIT_LOG: "<AUDIT_LOG_FLAG>"
JBP_CONFIG_RESOURCE_CONFIGURATION: "['tomcat/webapps/ROOT/WEB-INF/
classes/ppe-schema-orm.xml': {'sap.dataaccess-
common.schema':'<DB_SCHEMA>'},'tomcat/webapps/ROOT/META-INF/context.xml':
{'ppeHana-service-name':'ppeHana'}]"
JBP_CONFIG_JAVA_OPTS: 'java_opts: -D'
provides:
- name: java
Note
This conguration is written in YAML format. Make sure that you copy the format of the code block
correctly.
3. Adjust the following entries in angle brackets (<...>) in the le:
Entry Comment
<AUDIT_LOG_FLAG> If you set this ag to true, the system creates audit log
messages only for failed login attempts. If you set this ag
to false, every login is recorded. This is of limited use for
an A2A communication. To achieve optimal performance,
SAP recommends to set this ag to true.
<DB_SCHEMA> Replace this entry with the standard database schema of
your SAP Customer Activity Repository system.
<DB_CLIENT> Replace this entry with the client of your SAP Customer
Activity Repository system.
<LOGSYS> Replace this entry with the logical system ID of your mas
ter data system that is connected to your SAP Customer
Activity Repository client.
If you want to support multiple master data systems in
your SAP Customer Activity Repository client, you need
one promotion pricing service for each system (in dier-
ent spaces).
Tip
If you need higher values for default memory settings, especially for ppservice-webapp-central,
you can choose larger cache sizes.
200
PUBLIC
Common Installation Guide for SAP Customer Activity Repository applications bundle 5.0
Set Up the Applications

4. Assuming that your extension descriptor le is called config-op.mtaext and that the command is called
from the directory in which your extension descriptor le is stored, execute the following command to
install the application:
Source Code
xs install <pathToScvFile>/XSACOPPPPS<software_component_version>.ZIP -e
config-op.mtaext
5. Save the extension descriptor le for later update or patch activities.
Note
If you want to reinstall the same software component version, add the following parameter to the install
command -o ALLOW_SC_SAME_VERSION.
For more information about possible additional parameters, see the documentation of this install
command.
6.1.2.11.4.3 Congure Authentication and Authorization
Settings
To use the central promotion pricing service, you must have the necessary roles created and assigned.
Creating and Assigning a PPS Role Collection
Execute the following steps with your XSA PPS admin user.
1. Create a role collection for the PPS with the following xs command:
Source Code
xs create-role-collection <NAME> [<DESCRIPTION>]
e.g., xs create-role-collection PPE_ROLE_COLLECTION "PPE ROLE COLLECTION"
2. Navigate to the organisation and space in which the PPS has been installed.
Tip
You can change organisations and spaces with the xs command xs target -o <ORG_NAME> -s
<SPACE_NAME>.
3. Check if the role template ppservice-webapp-central is listed in the space.
Note
If the installation has been successful, this role template must be listed in this space. You can verify this
by listing all role templates with xs command xs role-templates.
Common Installation Guide for SAP Customer Activity Repository applications bundle 5.0
Set Up the Applications
PUBLIC 201

4. Create a role with the PPS role template:
Source Code
xs create-role <APP> <ROLE_TEMPLATE> <ROLE_NAME> <DESCRIPTION>
e.g., xs create-role ppservice-webapp-central PPE_ROLE_TEMPLATE
PPE_ROLE_XYZ "PPE role for xyz"
5. Add the new role to the new role collection:
Source Code
xs update-role-collection <ROLE_COLLECTION> --add-role <ROLE>
e.g., xs update-role-collection PPE_ROLE_COLLECTION --add-role PPE_ROLE_XYZ
6. Assign the new role collection to the XSA PPS business user:
Source Code
xs assign-role-collection <ROLE_COLLECTION> <USER>
e.g., xs assign-role-collection PPE_ROLE_COLLECTION PPSUSER
Tip
You can call xs help -a to get an overview of other xs commands regarding role management.
7. Verify that the PPS user that you have created in the prior step is working. For this, you have to enter the
following request details in your REST Client (like Postman for Chrome) to send a calculation request:
Request Details
Value
HTTP Request Method POST
Authorization Type = Basic Authentication
User name = <name of the XSA PPS business
user>
Password = <password of the XSA PPS
business user>
Note
If your password policy prompts users to change their
password when they log on to the system for the rst
time, this needs to be done before a request is sent
via Rest Client.
Headers Accept = application/xml
Content-Type = application/xml
202 PUBLIC
Common Installation Guide for SAP Customer Activity Repository applications bundle 5.0
Set Up the Applications

Request Details Value
URL
1. Call the command xs apps and check for the URL
of the
ppservice-approuter app.
2. Append /restapi/ to the URL and enter this infor
mation in your REST Client.
Body <PriceCalculate xmlns="http://
www.sap.com/IXRetail/namespace/"/>
Note
If you send this request, you get HTTP response code 400 (Bad Request) because you send an empty
request body.
If you receive HTTP response code 401 (Unauthorized) or 403 (Forbidden), there is something wrong with
your service user, or application. Double-check all steps that you have performed in this chapter.
6.1.2.11.4.4 Advanced Conguration Settings
The following settings are not mandatory in a default setup but help you to adapt the PPS to your specic
needs. Some settings become mandatory if you use the Demand Data Foundation (DDF) extended sales
pricing model.
Conguration of Caches
By default, all database accesses to OPP promotion and regular price entities are cached. You can use the
following two types of caches:
● Object cache based on JPA
In this case, OPP promotions and their child entities (price derivation rules, texts, and so on) are stored in
the L2 object cache of the JPA provider.
● Query result cache based on Spring Framework
In this case, regular prices and the results of search queries for IDs of price derivation rule eligibilities are
stored in a cache. This cache is used via Spring cache abstraction. The cache provider determines the
settings for the query result cache (regular prices, eligibility IDs). Google Guava is the default cache
provider and allows the conguration of the cache via a cache specication string per cache region.
Query Result Caches for OPP Promotions and Regular Prices
The following example shows the setting of the query caches for OPP promotions and regular prices:
Source Code
# Use Spring caching for promotions and regular prices - true is the default
setting
sap.dataaccess-common.cachenamedqueries=true
# Spring cache for promotions
Common Installation Guide for SAP Customer Activity Repository applications bundle 5.0
Set Up the Applications
PUBLIC 203
sap.dataaccess-
common.promocachespec=maximumSize=10000,expireAfterAccess=10m,expireAfterWrite
=20m
# Spring cache for regular prices
sap.dataaccess-
common.basepricecachespec=maximumSize=10000,expireAfterAccess=10m,expireAfterW
rite=20m
To apply these settings, they have to be part of the extension descriptor in the properties section. The
following example, merchandise sets are supported and dynamic weaving is activated. It also shows how multi-
line strings can be set in the MTAEXT le which follows the YAML syntax:
properties:
sap.dataaccess-common.db.client: "<DB_CLIENT>"
sap.dataaccess-common.logSys: <LOGSYS>
sap.dataaccess-common.cachenamedqueries: "true"
sap.dataaccess-common.promocachespec:
"maximumSize=10000,expireAfterAccess=10m,expireAfterWrite=20m"
sap.dataaccess-common.basepricecachespec:
"maximumSize=10000,expireAfterAccess=10m,expireAfterWrite=20m"
JBP_CONFIG_JAVA_OPTS: >
java_opts: -DmerchandiseSetsEnabled=true
-Dspring.profiles.active=sapweaving
Note
● It is also possible to set the PPS conguration properties via -D in the java_opts element of
JBP_CONFIG_JAVA_OPTS. In this case, changing the environment variables, for example via xs set-
env followed by a restart of the application, has no eect.
● Spring proles and the PCE-related conguration, such as enabling the support for merchandise sets,
must be set in the java_opts element of JBP_CONFIG_JAVA_OPTS. The list of conguration
properties is part of the Functional Guide for the Promotion Calculation Engine on SAP Help Portal at
https://help.sap.com/viewer/p/CARAB <Version> Development Functional Guide for the
Promotion Calculation Engine
.
If you want to use the Demand Data Foundation (DDF) extended sales pricing model for OPP, you have to
activate the spring prole sapmultilevelprc, which supports multi-level generated regular prices:
properties:
sap.dataaccess-common.db.client: "<DB_CLIENT>"
sap.dataaccess-common.logSys: <LOGSYS>
sap.dataaccess-common.cachenamedqueries: "true"
sap.dataaccess-common.promocachespec:
"maximumSize=10000,expireAfterAccess=10m,expireAfterWrite=20m"
sap.dataaccess-common.basepricecachespec:
"maximumSize=10000,expireAfterAccess=10m,expireAfterWrite=20m"
JBP_CONFIG_JAVA_OPTS: >
java_opts: -DmerchandiseSetsEnabled=true
-Dspring.profiles.active=sapmultilevelprc
For more information on the DDF extended sales pricing model, see Use the Extended Sales Pricing Model
(DDF) [page 205].
To support both dynamic weaving and the DDF extended sales pricing model, both proles must be activated:
properties:
sap.dataaccess-common.db.client: "<DB_CLIENT>"
sap.dataaccess-common.logSys: <LOGSYS>
204
PUBLIC
Common Installation Guide for SAP Customer Activity Repository applications bundle 5.0
Set Up the Applications

sap.dataaccess-common.cachenamedqueries: "true"
sap.dataaccess-common.promocachespec:
"maximumSize=10000,expireAfterAccess=10m,expireAfterWrite=20m"
sap.dataaccess-common.basepricecachespec:
"maximumSize=10000,expireAfterAccess=10m,expireAfterWrite=20m"
JBP_CONFIG_JAVA_OPTS: >
java_opts: -DmerchandiseSetsEnabled=true
-Dspring.profiles.active=sapweaving,sapmultilevelprc
Related Information
● For more information about optional properties that can be set via the extension descriptor, see the
module descriptions and the corresponding property les in the Development and Extension Guide for
Omnichannel Promotion Pricing on SAP Help Portal at https://help.sap.com/viewer/p/CARAB <Version>
Development Development and Extension Guide .
● For more information about caching options, see the Development and Extension Guide for Omnichannel
Promotion Pricing on SAP Help Portal at https://help.sap.com/viewer/p/CARAB <Version>
Development under Promotion Pricing Service PPS Module dataaccess-common .
6.1.2.11.5 Use the Extended Sales Pricing Model (DDF)
To use the Demand Data Foundation (DDF) extended sales pricing model for omnichannel promotion pricing,
you have to perform several steps for the central and local deployment scenario.
Overview
As of CARAB 5.0, omnichannel promotion pricing (OPP) supports the DDF extended sales pricing model.
Pricing data available in the DDF module of SAP Customer Activity Repository (CAR) has been extended to
include additional levels of sales prices created in the source master data system. The former model stores
prices on product location level only. For more information on the extended sales pricing model, see the DDF
documentation: Denition and Use of Extended Sales Pricing Data.
You must activate the extended sales pricing model and using it is highly recommended. To facilitate a smooth
migration for you, the old model is still available. If you want to use the old model during your migration phase,
prices are replicated for both the extended and old pricing model and stored twice in SAP Customer Activity
Repository. The OPP pricing model itself remains the same as in previous releases because the DDF pricing
model is mapped to the OPP pricing model. Both central and local deployment scenarios for OPP are
compatible with the extended sales pricing model.
Note
If you are setting up OPP for the rst time, you don't migrate as such but you still have to perform the
following steps.
Common Installation Guide for SAP Customer Activity Repository applications bundle 5.0
Set Up the Applications
PUBLIC 205
Prerequisites
● You have migrated to the DDF extended sales pricing model for the replication of sales prices from SAP
ERP or S/4HANA to SAP Customer Activity Repository as described in Denition and Use of Extended
Sales Pricing Data
. This part is not OPP-specic and concerns your conguration of SAP Customer Activity
Repository.
● If you want to use the old pricing model for the local or central deployment of the promotion pricing service
(PPS), the regular prices must be replicated on product location level from SAP ERP or S/4HANA .
Restrictions
Omnichannel promotion pricing supports the DDF extended sales pricing model but provides the same
functionality and features as with the old model.
With the extended sales pricing model, you can have dierent regular prices per distribution chain, even for
prices dened per individual DDF location. However, OPP always reads the regular prices for the default
distribution chain of a given business unit (location).
Procedure
To migrate from the old to the extended sales pricing model, you have to dierentiate between the local and
central deployment scenario.
Migration in the Local Deployment Scenario
In a local deployment scenario, the price data replication from the central price and promotion repository (SAP
Customer Activity Repository) to an external system, for example SAP Commerce system, takes place. This
data replication is done via iDocs and the Data Replication Framework (DRF) using replication models and
outbound implementations.
To migrate to the extended sales pricing model, you have to use the Data Replication Framework (DRF) with the
outbound implementation for regular prices ROP_PRC_MG (outbound implementation for multi-level generated
regular prices) instead of ROP_PRICE (outbound implementation for regular prices). For a migration in one go,
you have to use the DRF replication model Initialization for all locations (stores). Afterwards, you can
apply the replication model Changes as usual. This one-step migration must be handled just as if you would
start with the data replication from the beginning.
For instructions, see Congure the Outbound Processing for Regular Prices and OPP Promotions → Data
Replication Framework [page 185].
Alternatively, you can do the migration in stages. This is recommended if you have a high data volume. A
common approach is to start with a small amount of data and then gradually increase the data volumes in an
iterative manner until all necessary data has been included. Here, you migrate only groups of locations stage by
stage. For this, you also have to use the DRF replication model Initialization for each location of the group
you want to migrate.
206
PUBLIC
Common Installation Guide for SAP Customer Activity Repository applications bundle 5.0
Set Up the Applications
Migration in the Central Deployment Scenario
In a central deployment scenario, the SAP HANA XS advanced (XSA) application for the promotion pricing
service (PPS) is concerned. To use the extended sales pricing model for the central deployment, you have to
deploy the PPS to XSA again and apply a specic conguration for caches. With the spring prole
sapmultilevelprc, you can migrate to the extended sales pricing model. This setting is part of the extension
descriptor in the properties section. For instructions, see Advanced Conguration Settings [page 203].
You can deploy the XSA application for the PPS twice to use either the extended or old pricing model per
deployment according to your price requests. The migration is managed by DDF based on the SAP ERP or S/
4HANA replication scenario.
For more information on the central deployment process, see Congure the Central Deployment of the
Promotion Pricing Service [page 195].
Note
During your migration phase, you can decide which pricing model you want to use for the respective
deployment scenarios. For example, you can migrate to the extended sales pricing model for the local
scenario and keep using the old model for applying XSA (central deployment).
6.1.3 Troubleshooting
Diagnose and resolve issues that may arise when you install, upgrade, and set up your scenario. If you need to
report a customer incident, see the information at the end of this section.
Tip
For quick access to support information, log in to the SAP ONE Support Launchpad at https://
launchpad.support.sap.com/#/productsearch . Search for SAP CARAB (back-end product version) or
SAP FIORI FOR SAP CARAB (front-end product version). Find related SAP Knowledge Base articles,
documentation, guided answers, questions & blogs, and download information — all on one page.
Common Installation Guide for SAP Customer Activity Repository applications bundle 5.0
Set Up the Applications
PUBLIC 207

Troubleshoot Installation, Upgrade, and Implementation Issues
Installation, Upgrade, and Implementation Issues
Area Symptom Cause Possible Solutions
Installation / Upgrade You want to upgrade the on-
shelf availability dispatcher
(transaction /OSA/
DISPATCH
). However, you get
the error SQL Error Code
274 : inserted value too large
for column.
Local temporary tables
(LOCAL_EXCL_PRODUCT,
LOCAL_LISTED_PRODUCT,
and LOCAL_PS_CONF), which
are created and used by OSA
for internal dispatcher proc
essing, are not dropped auto
matically during runtime. As
a result, new tables (such as
any containing CHAR40
elds) cannot be created.
This causes an SQL error
when a CHAR40 material is
supplied. If the tables already
exist, subsequent structural
changes to their denition re
quire a manual intervention.
SAP Note
2576497
Installation / Upgrade
When upgrading to SAP
Customer Activity Repository
5.0 using the zero downtime
option, you get the following
error in the log le: Error
when deploying HDI objects;
see SAPC-* INRTLCAR and
SAP Note 2602571.
Not relevant, as the error
doesn't impact functionality
and can be ignored.
The error doesn't impact
functionality and can be ig
nored.
Installation / Upgrade You want to download a revi
sion of software component
SAP RTL AFL FOR SAP
HANA.
You need the exact download
path on the SAP Support
Portal at http://
support.sap.com
.
See section Download and
Install SAP RTL AFL FOR SAP
HANA (Mandatory) [page
65].
Installation / Upgrade You want to know which revi
sion of the SAP RTL AFL
FOR SAP HANA
component
is currently installed.
You are looking for an easy
way to look up the revision in
formation.
1.
Execute transaction
db02 to open the
Diagnostics: Missing
Tables and Indexes
screen.
2. Choose Current
Status Overview
Installed Plug-Ins and
click on RTL.
208 PUBLIC
Common Installation Guide for SAP Customer Activity Repository applications bundle 5.0
Set Up the Applications

Area Symptom Cause Possible Solutions
Installation / Upgrade You get an error indicating
that software component
SAP RTL AFL FOR SAP
HANA is not compatible.
You must install compatible
releases (“revisions”) of the
following:
● SAP RTL AFL FOR
SAP HANA
● SAP HANA DATABASE
● SAP HANA AFL
● Section Download and
Install SAP RTL AFL FOR
SAP HANA (Mandatory)
[page
65].
● SAP Note 2818378
(Which releases of SAP
HANA Platform are sup
ported for which releases
of SAP Customer Activ
ity Repository applica
tions bundle (SAP
CARAB)?)
Installation / Upgrade You want to know what AFLs
(application function libra
ries) are installed and active
in your SAP HANA database.
For example, you want to
check if an AFL was installed
or upgraded correctly.
SAP Note 2188129
Installation / Upgrade You want to verify if your revi
sion of SAP HANA Platform
is compatible with your ver
sion of SAP HANA studio.
For example, you might be
experiencing compatibility is
sues following an upgrade.
SAP Note 2375176
Installation / Upgrade You have installed compati
ble revisions of the following
components but are still ex
periencing issues: SAP RTL
AFL FOR SAP HANA
, SAP
HANA AFL, SAP HANA
DATABASE
Something went wrong dur
ing the installation.
Revisit SAP Note 2377894
and make sure that you have
carefully followed all the
steps for your scenario.
Installation / Upgrade You want to install or upgrade
an application function li
brary (such as SAP RTL AFL
FOR SAP HANA
) and are ex
periencing issues with the
SAP HANA Lifecycle Man
agement tool (hdblcm,
hdblcmgui).
You need information on pos
sible causes and solutions.
● SAP Note 2078425
● SAP Note 2082466
● SAP HANA Server Instal
lation and Update Guide
for your SAP HANA Plat
form version under
https://help.sap.com/
viewer/p/
SAP_HANA_PLATFORM
<Version>
Installation and
Upgrade
Common Installation Guide for SAP Customer Activity Repository applications bundle 5.0
Set Up the Applications
PUBLIC 209

Area Symptom Cause Possible Solutions
Installation / Upgrade You want to know whether
you need to activate any
business functions for either
Unied Demand Forecast
(UDF) or Demand Data Foun
dation (DDF).
The activation of business
functions might have been
necessary in older releases.
You want to make sure that
you set up UDF or DDF cor
rectly.
You don't need to take action
and you don't need to acti
vate any business functions
for UDF or DDF. While busi
ness functions might still ex
ist as objects in the systems,
they are not needed for the
setup any longer.
Installation / Upgrade You get the error CAR RETAIL
APPLSAP DBTech JDBC:
[258]: insucient privilege:
Not authorized.
You are using the SAP HANA
AFL
software component and
have performed an upgrade
of your SAP HANA Platform.
Previously assigned privi
leges might have been lost
during the upgrade.
SAP Note 2022080
Installation / Upgrade In an upgrade, you get the
following error when running
program RUTDDLSCREATE:
3 ETW678Xstart export of
R3TRDDLS<CDS view
name> ...
3WETW000 DDLS <CDS
view name> is not activated.
2EETW190 "DDLS" <CDS
view name> has no active
version.
4 ETW679 end export of
R3TRDDLS<CDS view
name>.
An issue with CDS views
must be xed.
SAP Note 2340418
Installation / Upgrade You need information about
the Software Provisioning
Manager.
For example, you have a
question regarding the instal
lation, copy, transformation,
or deletion of a system based
on SAP NetWeaver ABAP on
SAP HANA.
SAP Note 2568783 (Re
lease Note for Software Provi
sioning Manager 2.0 (recom
mended: SWPM 2.0 SP05))
210 PUBLIC
Common Installation Guide for SAP Customer Activity Repository applications bundle 5.0
Set Up the Applications

Area Symptom Cause Possible Solutions
Installation / Upgrade You have implemented an
SAP Note with a correction
for the SAPUI5 application or
for the calculation of the ap
plication index. The SAPUI5
application index is not recal
culated automatically.
You need to start the recalcu
lation manually.
SAP Note 2227577
Installation / Upgrade You want to install or upgrade
to a release of SAP Customer
Activity Repository
applications bundle using the
Software Update Manager
(transaction SUM). During the
SAP HANA deployment
phase, you get errors such as
the following:
● Datatype string(1333) of
JOIN
$A""TTRIBUTE_VALUE
$IMAGE_ID does no""t
match to datatype
raw(16) of"" attribute
IMAGE_ID in node CLTT
As of SAP HANA Platform 2.0
SPS04, a message that was
considered a “warning” in
older releases is now consid
ered an “error”. This error
prevents the SUM process
from completing.
● Workaround: SAP Note
2789289 (Activation
of Calculation View Fails
With Error "column store
error: [34011] Inconsis
tent calculation model")
● Alternative: Convert the
SAP HANA error mes
sage back into a warn
ing, then rerun SUM:
1. Execute the follow
ing SQL statement:
ALTER SYSTEM
ALTER
CONFIGURATION
('indexserver
.ini',
'SYSTEM' )
SET
('calcengine'
,
'enable_depre
cated_compone
nt_flags') =
'8192' WITH
RECONFIGURE;
2. Restart transaction
SUM and repeat the
installation or up
grade step.
Common Installation Guide for SAP Customer Activity Repository applications bundle 5.0
Set Up the Applications
PUBLIC 211

Area Symptom Cause Possible Solutions
Installation / Upgrade You want to install or upgrade
to a release of SAP Customer
Activity Repository
applications bundle using the
Software Update Manager
(transaction SUM). You get
the following error:
● Could not create catalog
object: invalid name of
function or procedure;
no procedure with name
UDFCORE_AREA_FORE
CAST_15_PROC.
The software component SAP
RTL AFL FOR SAP HANA
that is currently installed in
your back-end system is not
up to date.
You must install a higher revi
sion of SAP RTL AFL FOR
SAP HANA
. For the minimum
revision required for this re
lease, see the Common Pre
requisites in Install the Pre
requisites [page 19]. Consult
the requirements for SAP
HANA Platform 2.0 and for
SAP RTL AFL FOR SAP
HANA.
SAP HANA Platform You are experiencing per
formance issues after instal
ling or upgrading to a new
SAP HANA revision.
You need performance rec
ommendations to investigate
the issue and improve the
SAP HANA performance in
your customer scenario.
See the Performance — Opti
mize Processes in SAP HANA
section of the SAP Customer
Activity Repository Adminis
tration Guide.
SAP HANA content You have run the /CAR/
ACTIVATE_HTA
activation re
port but the selected SAP
HANA content is not acti
vated.
You want to know which ob
jects have not been activated
correctly and what errors
have occurred.
●
Execute transaction
SLG1 to display the re
port log:
Towards the bottom of
the log you will generally
nd a section that lists
the objects with activa
tion errors. Keep in
mind, though, that those
objects might not have
any issues themselves
but that the root cause
can also be in depend
ent objects.
● In transaction
SCTS_HTA_DEPLOY,
try to reproduce the er
rors by manually rede
ploying the objects.
212
PUBLIC
Common Installation Guide for SAP Customer Activity Repository applications bundle 5.0
Set Up the Applications

Area Symptom Cause Possible Solutions
SAP HANA content You want to perform schema
mapping in SAP HANA stu
dio. That is, you want to map
the authoring schemas of
this release to the physical
schemas of your customer
system landscape. However,
you are encountering issues
and the mapping doesn’t
work.
Dierent causes are possible
that can lead to mapping is
sues in SAP HANA studio.
●
Check that you have en
tered the correct
schema names.
● In particular, make sure
that there are no leading
or trailing spaces before
or after the schema
names. Space charac
ters cause issues during
schema mapping.
● For step-by-step instruc
tions, see Verify Correct
Schema Mapping [page
54].
SAP HANA content You have run the /CAR/
ACTIVATE_HTA
activation re
port but get the error
Insucient privilege: Not
authorized.
The SAP HANA user needs
additional authorizations
(privileges).
SAP Note 2586850
SAP HANA content You have run the /CAR/
ACTIVATE_HTA
activation re
port but the selected SAP
HANA content is not acti
vated.
You might have an authoriza
tion issue.
● Check if SAP HANA da
tabase user
_SYS_REPO
has been assigned privi
lege SELECT with option
Grantable to others. If
not, you can grant the
missing privilege using
the following example
SQL statement:
GRANT SELECT ON
SCHEMA <your
schema name> TO
_SYS_REPO WITH
GRANT OPTION;
● Check that other re
quired authorizations
have been set up cor
rectly. For more informa
tion, see section Verify
Back-End Users and
Roles [page 84].
Common Installation Guide for SAP Customer Activity Repository applications bundle 5.0
Set Up the Applications
PUBLIC 213

Area Symptom Cause Possible Solutions
SAP HANA content You have run the /CAR/
ACTIVATE_HTA
activation re
port but the selected SAP
HANA content is not acti
vated.
You might have a circular de
pendency issue. In particular,
you get an error that a
SQLScript procedure (such
as
SP_SR_GET_PROD_HR_XR_B
Y_DATE) cannot be acti
vated.
SAP Note 2404872
SAP HANA content You have run the /CAR/
ACTIVATE_HTA
activation re
port but the selected SAP
HANA content is not acti
vated.
You might have a deployment
error in SAP HANA Transport
for ABAP (HTA).
● SAP Note 2109690
(Error in SAP HANA re
pository deployment im
port step)
● SAP Note 2321486
(Troubleshooting for SAP
HANA Transport for
ABAP (HTA) deploy
ment)
SAP HANA content You want to activate SAP
HANA content for scenarios
of SAP Customer Activity
Repository applications
bundle using the /CAR/
ACTIVATE_HTA
report in
transaction SE38. However,
you are getting errors.
Several causes are possible.
Open the error log le and
search for
udf.cor. For ex
ample, the following errors
can occur:
● Could not create catalog
object
● Invalid name of function
or procedure
● No procedure with name
UDFCORE_AREA_MODE
L_POS_XX_PRO
Check that you have done
the following tasks as descri
bed in this guide:
● Have you installed com
patible revisions
of the
SAP HANA database
and the AFL compo
nents (SAP HANA AFL,
SAP RTL AFL FOR
SAP HANA)? See the
Common Prerequisites
in section Install the Pre
requisites [page 19]. See
also section Download
and Install SAP RTL AFL
FOR SAP HANA (Manda
tory) [page 65].
● Have you done the
schema mapping as de
scribed in this guide?
See Verify Correct
Schema Mapping [page
54].
214
PUBLIC
Common Installation Guide for SAP Customer Activity Repository applications bundle 5.0
Set Up the Applications

Area Symptom Cause Possible Solutions
SAP HANA content You want to activate SAP
HANA content for scenarios
of SAP Customer Activity
Repository applications
bundle using the /CAR/
ACTIVATE_HTA
report in
transaction SE38. However,
you are getting errors.
Several causes are possible.
Open the error log le and
search for
udf.cor. For ex
ample, the following errors
can occur:
● There is neither a default
value nor a data input
mapping for …"
● A2EESCTS_HOT 532
● Workaround and list of
aected SAP HANA da
tabase revisions: SAP
Note
2525644 (Input
Variables are set to an
Empty String When not
Mapped in Top-Level
Calculation Scenario)
● If possible for your sce
nario, consider upgrad
ing to an SAP HANA da
tabase revision not af
fected by the issue.
SAP HANA content After running the /CAR/
ACTIVATE_HTA
activation re
port, you get two conicting
messages:
●
The following scenario
was deployed
successfully...
● But returned error/
warning/information
message(s)...
You want to know whether
the activation was successful
and whether any additional
action is required.
SAP Note 2467113
SAP HANA content You want to generate pre-
season sales projections in
SAP Assortment Planning
but get an error.
You might not have activated
all the required SAP HANA
content.
When you run the /CAR/
ACTIVATE_HTA
activation re
port, make sure to select the
required options. See Acti
vate SAP HANA Content
[page 95].
SAP HANA content You want to check the de
pendencies of a specic view.
You might need this informa
tion to solve a dependency or
activation issue for SAP
HANA views.
●
In SAP HANA studio: Se
lect the view and choose
Auto Documentation
from the context menu.
This generates a le with
detailed information on
the view. Consult the
Cross References sec
tion.
● If you are using the SAP
HANA Live View Browser
app: Select the view and
choose Cross
References.
Common Installation Guide for SAP Customer Activity Repository applications bundle 5.0
Set Up the Applications
PUBLIC 215

Area Symptom Cause Possible Solutions
SAP HANA content You have a question regard
ing users or schemas in SAP
HANA.
For example, you want to
know what the names of the
standard SAP HANA users
and schemas are.
●
In this guide, search for
schema mapping.
● SAP Note 2535951
(FAQ: SAP HANA Users
and Schemas)
SAP HANA content You get an error indicating
that you are attempting to
access inactive or invalid SAP
HANA content.
You have not installed soft
ware component SAP RTL
AFL FOR SAP HANA
. The
component contains back-
end functionality for the Uni
ed Demand Forecast mod
ule and the On-Shelf Availa
bility module in SAP
Customer Activity
Repository. If you don't in
tend to use those modules,
you don't need to congure
them. However, you must al
ways install the software
component.
See section Download and
Install SAP RTL AFL FOR SAP
HANA (Mandatory) [page
65].
SAP HANA content You get the error Table
ABAP:/DMF_ORG_ASSIGN
not found.
A program error must be
xed.
● SAP Note 2218875
● SAP Note 2224582
SAP HANA content You get the error Object
DDF_ORG_ASSIGN
(Calculation View), package
sap.is.ddf.udf.data_validation,
was processed with errors.
A program error must be
xed.
SAP Note 2224582
SAP HANA content You get the error SQLScript:
Could not derive table type
for variable
"UDF_FC_HORIZON".
A program error must be
xed.
SAP Note 2125672
SAP HANA content SAP HANA views in the
sap.is.ddf.fms package
do not activate properly.
A program error must be
xed.
SAP Note 2203930
216 PUBLIC
Common Installation Guide for SAP Customer Activity Repository applications bundle 5.0
Set Up the Applications

Area Symptom Cause Possible Solutions
SAP HANA content You need to manually deploy
SAP HANA objects and pack
ages.
The automatic deployment
to the SAP HANA repository
of the target system has
failed.
●
Search for the following
sections in the product
documentation of your
SAP NetWeaver plat
form at https://
help.sap.com/viewer/p/
SAP_NETWEAVER: SAP
HANA Transport for
ABAP and Manually De
ploying SAP HANA Ob
jects and Packages. Fol
low the instructions.
● Execute transaction
SCTS_HTA_DEPLOY
for the manual deploy
ment of SAP HANA con
tent and consult the ac
companying system
documentation.
SAP HANA content You get any of the following
errors:
● View "/AMR/..." does not
exist in data base
● "DDL Source" "/
AMR/...." could not be
activated
● "DDL Source" "/DMF/
DIST_..." could not be
activated
The root cause is the usage
of CDS (Core Data Services)
on top of external views.
You can ignore the error mes
sages and continue with the
installation or upgrade proc
ess. For explanations, see
SAP Note
2330184 .
SAP HANA content You get the error SQL Script
message: invalid table name:
Could not nd table/
view /AMR/V.
The root cause is the usage
of CDS (Core Data Services)
on top of external views.
You can ignore the error mes
sages and continue with the
installation or upgrade proc
ess. For explanations, see
SAP Note
2441184 .
Common Installation Guide for SAP Customer Activity Repository applications bundle 5.0
Set Up the Applications
PUBLIC 217

Area Symptom Cause Possible Solutions
SAP HANA content You get the error View with
par. <CDS view name>: data
element <data element> par.
& does not exist or not active.
A data element that is new or
has been redened is used in
the new denition in a Core
Data Services (CDS) view
with parameters for the de-
nition of a parameter.
The system does not con
sider the dependency be
tween data elements and the
type denition of the param
eters for views with parame
ters.
SAP Note
2289913
SAP HANA content When doing ATC (ABAP Test
Cockpit) checks of database
objects or runtime objects,
you get errors related to ref
erence tables and reference
elds:
● Priority 1 error: View
<view_name> is not
consistent
● Priority 1 error:
<view_name-eld> is not
consistent
● Inconsistencies in elds
related to reference ta
bles and reference elds
The system does not con
sider base information of the
AMDP table function entity.
SAP Note 2374190
SAP HANA Platform You cannot install the SAP
HANA XS advanced (XSA)
runtime.
For example, you need XSA
to use the Omnichannel Pro
motion Pricing (OPP) module
in SAP Customer Activity
Repository.
You cannot install XSA as
long as SAP HANA dynamic
tiering is active on the same
host.
SAP Note 2388443
218 PUBLIC
Common Installation Guide for SAP Customer Activity Repository applications bundle 5.0
Set Up the Applications

Area Symptom Cause Possible Solutions
SAP HANA Platform You are experiencing per
formance issues in the SAP
HANA Platform.
Several causes are possible.
● SAP Note 2600030
(Parameter Recommen
dations in SAP HANA En
vironments)
● SAP Note 2100040
(FAQ: SAP HANA CPU)
● SAP HANA Trouble
shooting and Perform
ance Analysis Guide for
your SAP HANA Plat
form version under
https://help.sap.com/
viewer/p/
SAP_HANA_PLATFORM
SAP HANA Platform You want to perform an SAP
HANA database analysis to
investigate a complex issue.
The information that you
want to retrieve is not or is
only partially available in
standard tools (such as SAP
HANA studio).
You need information on spe
cial SQL statements for such
an analysis.
SAP Note 1969700 (SQL
Statement Collection for SAP
HANA)
Note
For additional trouble
shooting and perform
ance tips, see the FAQ: ...
notes under References.
SAP HANA Platform You are not sure if the instal
led SAP HANA revision is
compatible with the installed
SAP HANA studio version.
You need a list of the compat
ible revisions.
SAP Note 2375176 (SAP
HANA Revisions and Compat
ible SAP HANA Studio Ver
sions)
SAP HANA Platform You are experiencing network
or performance issues in
your SAP HANA environ
ment.
You need information on net
work settings and analyses in
SAP HANA environments.
SAP Note 2222200 (FAQ:
SAP HANA Network)
Common Installation Guide for SAP Customer Activity Repository applications bundle 5.0
Set Up the Applications
PUBLIC 219

Area Symptom Cause Possible Solutions
Hierarchies You get errors when creating
or updating location hierar
chies and/or product hierar
chies.
The system does not gener
ate the at structures for the
hierarchies. You need to do
some conguration steps so
that the hierarchies get at-
tened automatically.
● Follow the steps in Con
gure Automatic Flat
tening of Hierarchies
[page
104].
● See the following sec
tions of the SAP
Customer Activity
Repository Administra
tion Guide at https://
help.sap.com/viewer/p/
CARAB:
○ Congure Demand
Data Foundation
(DDF)
○ Congure Data Rep
lication from SAP
ERP to DDF
Hierarchies You get errors when import
ing article hierarchies (prod
uct hierarchies) from your
master data system.
A program error must be
xed.
● SAP Note 2244521
● SAP Note 2245134
Hierarchies You want to know which loca
tions are included in each
version of an oer.
You can implement an easy
enhancement for ta
ble /DMF/OFR_LG_LOC.
SAP Note 2208619
Hierarchies An error occurs for a DDL
SQL view when you execute
the CREATE VIEW state
ment.
A program error must be
xed.
SAP Note 2377525
DRF data replication frame
work (transaction
DRFOUT)
You have deleted a vendor
from the /DMF/D_VENDOR
table but this deletion is not
replicated to the master data
system.
A program error must be
xed.
SAP Note 1872136
220 PUBLIC
Common Installation Guide for SAP Customer Activity Repository applications bundle 5.0
Set Up the Applications

Area Symptom Cause Possible Solutions
DRF data replication frame
work (transaction
DRFOUT)
You get an error when using
the DRF with the PMPL SAP
ERP outbound implementa
tion.
A program error must be
xed.
● SAP Note 1904782
● SAP Note 2167629
● See the application help
for SAP Customer
Activity Repository at
https://help.sap.com/
viewer/p/CARAB
<Version>
Application Help SAP
Customer Activity
Repository Demand
Data Foundation
Integration Information
Master Data
Replication from SAP
ERP to Demand Data
Foundation
DRF data replication frame
work (transaction
DRFOUT)
You get the error Product &1,
location &2: The Valid From
time for &3 must be
00:00:00 (message 364 in
message class /DMF/
MSG_HL
).
A program error must be
xed.
SAP Note 2163602
DRF data replication frame
work (transaction
DRFOUT)
You have changed the listing
information in your source
master data system and re
plicated the changes to your
SAP Customer Activity
Repository system. However,
the listing information there
is not updated correctly.
A program error must be
xed.
SAP Note 1932525
Performance You are experiencing per
formance issues in your SAP
HANA database.
You need information on how
to troubleshoot and resolve
those issues and how to en
hance performance in gen
eral.
See the SAP HANA Trouble
shooting and Performance
Analysis Guide under https://
help.sap.com/viewer/p/
SAP_HANA_PLATFORM
<Version>
Administration .
Common Installation Guide for SAP Customer Activity Repository applications bundle 5.0
Set Up the Applications
PUBLIC 221

Area Symptom Cause Possible Solutions
Performance You get a runtime error or
exit message and need infor
mation about possible
causes and solutions.
Dierent causes are possible. Use the ABAP dump analysis
(transaction
ST22) to search
for short dumps and call up
detailed error information.
Performance You are using the Update
Sales Projection function in
SAP Assortment Planning
(workbooks Product Planning
and Size Planning). You are
experiencing performance is
sues when using the function
with large data volumes.
You can enhance the per
formance by implementing
an SAP Note.
SAP Note 2080423
OData During the execution of an
OData service based on
SADL with CDS, an assertion
fails in class
CL_SADL_SQL_STATEMENT,
method
EXECUTE_PREPARED_STATE
MENT
. The OData request
uses the system query option
$count.
The Core Data Services
(CDS) view uses a table func
tion that is not active in the
database. The trigger that is
supposed to activate it fails
because of missing parame
ters if only
$count is quer
ied.
SAP Note 238998
Support You have a customer incident
and need to set up a service
connection to SAP.
You need information on how
to set up the service connec
tion.
● SAP Note 35010
(overview)
● SAP Note 1634848
(service connection for
SAP HANA database)
● SAP Note 1592925
(service connection for
SAP HANA studio)
Source Master Data Systems You get the error
SYSTEM_ABAP_ACCESS_DE
NIED.
The error is caused by the
“Blacklist Monitor” in SAP S/
4HANA.
SAP Note 2249880
SAP Fiori
● You want to start an SAP
Fiori app for a key user
and get the error
Application is not
congured. Find details
in SAP Note 2283716
.
● You want to activate ex
tensibility for key users.
You must set up the adapta
tion transport organizer
(ATO) to be able to transport
key user extensions.
SAP Note 2283716
222 PUBLIC
Common Installation Guide for SAP Customer Activity Repository applications bundle 5.0
Set Up the Applications

Area Symptom Cause Possible Solutions
SAP Fiori You want to check the SA
PUI5 version installed in your
system.
There are several methods
how you can check the ver
sion.
SAP Note 2282103
Common Installation Guide for SAP Customer Activity Repository applications bundle 5.0
Set Up the Applications
PUBLIC 223

Area Symptom Cause Possible Solutions
SAP Fiori You cannot open the Analyze
Forecast app.
Several reasons are possible.
See the checklist at the right
and verify that the app is set
up correctly.
Use section Set Up the Ana
lyze Forecast App [page 148]
for reference and check the
following:
1. In transaction SE80,
navigate to package
UICAR001, subpackage
UISCAR01. Check that
the BSP Applications for
the app
(ANALYZFCST_V2) and
the reuse library
(UDFREUSE) are de
ployed.
2. In Launchpad
Customizing (transac
tion LPD_CUST), check
that the Internet Com
munication Framework
(ICF) services for
ANALYZFCST_V2 and for
UDFREUSE are active.
3. Clear the cache on the
server side by running
the following reports in
transaction SE38:
○ /UI5/
APP_INDEX_CALCU
LATE: Select Single
SAPUI5 Repository
Only and run the re
port once for
ANALYZFCST_V2
and once for
UDFREUSE.
○ /UI2/
INVALIDATE_GLOB
AL_CACHES: Run
this report in execu
tion mode.
○ /UI2/
INVALIDATE_CLIE
NT_CACHES: Run
224
PUBLIC
Common Installation Guide for SAP Customer Activity Repository applications bundle 5.0
Set Up the Applications
Area Symptom Cause Possible Solutions
this report for all
users.
4. Clear the browser cache.
5. Check if you can now ac
cess the app.
Support You have an issue that in
volves modeling and fore
casting with the Unied De
mand Forecast (UDF) mod
ule in SAP Customer Activity
Repository. You cannot de
bug the issue yourself. You
need assistance from SAP
via a remote support session.
Various causes are possible.
For example, the issue might
be in the ABAP layer, the
foundation component (such
as SAP S/4HANA founda
tion), or in the SAP HANA da
tabase.
For a successful remote sup
port session, make sure that
the required authorizations
and debugging privileges for
UDF are all set up. Otherwise,
the support team cannot ac
cess your UDF system envi
ronment.
See SAP Note 2920776 .
Help Portal You cannot access the con
tent on the SAP Help Portal.
For example, you might get
one of the following errors:
● We're sorry, but this con
tent is not accessible
● HTTP 403 forbidden
Customers and partners
need to log on with their S-
user IDs (NOT their email ad
dress) to see content author
ized specically for custom
ers/partners.
See SAP Note 2499831
(SAP Help Portal S-User Man
agement).
Troubleshoot Operation Issues
You also may experience issues during the day-to-day running of your application. For troubleshooting
information, see the application-specic Administration Guides at https://help.sap.com/viewer/p/CARAB:
● SAP Customer Activity Repository Administration Guide: section Troubleshooting for SAP Customer Activity
Repository Modules
● SAP Allocation Management Administration Guide: section Troubleshooting
● SAP Assortment Planning Administration Guide: section Troubleshooting
● SAP Merchandise Planning Administration Guide: section Troubleshooting
● SAP Promotion Management Administration Guide: section Management of SAP Promotion Management
Report a Customer Incident
● If you experience an issue with your back-end or front-end system, we recommend that you rst search for
existing solutions in the SAP Support Portal at http://support.sap.com/ . There you can nd SAP Notes
(corrections), SAP Knowledge Base articles, and a wealth of information in the SAP Community.
Common Installation Guide for SAP Customer Activity Repository applications bundle 5.0
Set Up the Applications
PUBLIC 225

● To view or report an incident, see again http://support.sap.com/ and choose My Support Product
Support Report an Incident .
● For more information on reporting incidents for SAP Customer Activity Repository, see the Support Desk
Management section of the SAP Customer Activity Repository Administration Guide.
6.2 SAP Merchandise Planning
Post-installation of SAP Merchandise Planning .
Note
Some of the activities in this section may have already been performed in the corresponding section under
SAP Customer Activity Repository. Such activities do not need to be repeated during the setup and
installation of consuming applications.
6.2.1 Perform Core Steps for SAP Customer Activity
Repository
To set up this application, you must rst perform the Core (Mandatory) steps for SAP Customer Activity
Repository. The core steps are mandatory for all the consuming applications.
Procedure
Perform all steps listed under Core (Mandatory for All Applications) [page 83].
6.2.2 Congure SAP Merchandise Planning
Use
SAP Merchandise Planning is a consuming application of SAP Customer Activity Repository, which contains
data that is imported from SAP ERP or SAP S/4HANA into the following:
● SAP HANA for SAP ERP using SAP LT Replication Server (SLT), which is saved in the SAP_ECC authoring
schema.
Or
SAP S/4HANA using SLT, which is saved in the SAP_S4H authoring schema.
● Demand Data Foundation (DDF)
226
PUBLIC
Common Installation Guide for SAP Customer Activity Repository applications bundle 5.0
Set Up the Applications

Customizing Activities
There are key Customizing activities required to use the SAP Merchandise Planning application. These steps
are performed using transaction SPRO and navigating to the required Customizing activity.
Demand Data Foundation Customizing Node
This node is accessible under Cross-Application Components .
1. Perform the necessary conguration steps in DDF.
The mandatory activities are marked in the conguration document Congure Demand Data Foundation
(DDF).
2. Congure data replication from SAP ERP to DDF.
SAP Merchandise Planning uses master data (such as product, location, and product hierarchy) as well as
organizational data (such as sales organization and distribution channel) that is replicated from SAP ERP
to DDF using DRFOUT.
This step was performed during installation as described in section SAP Customer Activity Repository
Core (Mandatory for All Applications) . See http://help.sap.com/viewer/p/CARAB <Version>
Common Installation Guide for SAP Customer Activity Repository applications bundle Set Up the
Applications .
For more information on setting up this data replication, see the following document Conguring Data
Replication from SAP ERP to DDF.
3. Verify you have entered the Merchandise Planning and Planning Conguration relevant sections in
Customizing activity
Cross-Application Components Demand Data Foundation Basic Settings
Dene Default Values . For more information see the documentation attached to each activity or the eld
level help (F1).
Note
Geo Hierarchy ID is only for Merchandise Planning for Retail version 1.1 or prior.
Merchandise Planning Customizing Node
As of SAP Merchandise Planning 2.0 FP2, there is a Cross Application Components Merchandise
Planning node containing mandatory steps for your implementation. Review the table below for applicable
activities for your environment. Each Customizing activity has attached documentation to further explain the
activity.
Technical Name
Customizing Path Description
/RAP/
MPOC_CALC_SALES_KP
I
Cross-Application
Components Merchandise
Planning Enhancements Using
Business Add-Ins
BAdI:
Calculate Sales KPIs for Retail
and E-Comm Channel
You use this BAdI to overwrite the logic and calculate the
sales-related KPIs in case the default implementation is not
suitable for the intended planning scenario.
Common Installation Guide for SAP Customer Activity Repository applications bundle 5.0
Set Up the Applications
PUBLIC 227
Technical Name Customizing Path Description
/RAP/
MPOC_SALES_ORDER_K
PIS
Cross-Application
Components Merchandise
Planning Enhancements Using
Business Add-Ins
BAdI:
Calculation Sales Order and
Shipment Related KPIs
You use this BAdI to overwrite the logic to calculate the sales
order and shipment related KPIs like sales-type revenue,
cost, and unit. The KPIs that are related to the rejected and
returned sales orders are calculated in case default
implementation is not suitable for the intended planning
scenario.
/RAP/
MPOC_PLANNABLE_L
OCAT
Cross-Application
Components Merchandise
Planning Enhancements Using
Business Add-Ins
BAdI:
Calculate Inventory KPIs like BOP
Units / Cost
You use this BAdI to overwrite logic to calculate the
Beginning of Period inventory KPIs in case default
implementation is not suitable for the intended planning
scenario.
/RAP/
MPR_CALCULATE_ECC_
KPI
Cross-Application
Components Merchandise
Planning Enhancements Using
Business Add-Ins
BAdI: ECC
Calculate Open Qty, Goods
Receipt and Returns KPI
You use this BAdI to overwrite logic in case default
implementation is not suitable for the intended planning
scenario.
/RAP/
MPR_CALCULATE_FMS_
KPI
Cross-Application
Components Merchandise
Planning Enhancements Using
Business Add-Ins
BAdI: FMS
Calculate Open Qty, Goods
Receipt and Returns KPI
You use this BAdI to overwrite logic in case default
implementation is not suitable for the intended planning
scenario.
/RAP/
MPR_CALCULATE_S4H_
KPI
Cross-Application
Components Merchandise
Planning Enhancements Using
Business Add-Ins
BAdI: S4H
Calculate Open Qty, Goods
Receipt and Returns KPI
You use this BAdI to overwrite logic in case default
implementation is not suitable for the intended planning
scenario.
/RAP/
MPR_COST_PRC_DETE
RM
Cross-Application
Components Merchandise
Planning Enhancements Using
Business Add-Ins
BAdI: Cost
You use this BAdI to determine the purchase price for goods
receipts, open purchase order and returns to vendor KPIs.
The default implementation assumes moving average price
is always available in the unit of measure.
228 PUBLIC
Common Installation Guide for SAP Customer Activity Repository applications bundle 5.0
Set Up the Applications

Technical Name Customizing Path Description
Determination for Receipt, Open
Qty and Returns
/RAP/
MPOC_CALC_PO_RECE
IPTS_KPI
Cross-Application
Components Merchandise
Planning Enhancements Using
Business Add-Ins
BAdI:
Calculate Goods Receipt KPIs by
Segmentation & Channel
You use this BAdI to determine the calculation for goods
receipt, open purchase order quantity and returns to vendor
KPIs are based on segmentation and channel.
/RAP/
MPOC_CALC_INVENTO
RY_KPI
Cross-Application
Components Merchandise
Planning Enhancements Using
Business Add-Ins
BAdI:
Calculate Inventory KPIs Based
on Segmentation & Channel
You use this BAdI to Calculate Inventory KPIs like Beginning
of Period Cost and Unit Values for Distribution Centre, Store
and Excess Inventory Stock based on segmentation and
channel.
/RAP/
MPOC_STORE_COMP_
DATA
Cross-Application
Components Merchandise
Planning Enhancements Using
Business Add-Ins
BAdI:
Extension to Store Comparability
by Fiscal Period
You use this BAdI to calculate Location (Store Only)
comparability by scal periods.
/RAP/
MPOC_PLANNING_YSC
T
Cross-Application
Components Merchandise
Planning Enhancements Using
Business Add-Ins
BAdI: Select
Season Year, Season, Collection
and Theme
You use this BAdI: to select the season year, season,
collection and theme relevant data for Merchandise
Planning.
Implementation Tasks
Use of Workbook Versions
The version concept allows you to plan and view dierent working versions, and to create special versions for
released and nalized plans. Each workbook can display up to two dierent versions in parallel, with the
capability to copy or provide a working plan version from any other available version to begin the planning
process
The version and planning levels are decided during installation. These concepts will aect your planning
conguration set and integration with SAP Assortment Planning. The recommended standard is planning at
Common Installation Guide for SAP Customer Activity Repository applications bundle 5.0
Set Up the Applications
PUBLIC 229

the 5th node level of the product hierarchy (1-7 levels available). The installation will prompt you to create levels
5 and 7. The workbook versions are named by concatenating the level with the version. For example the
merchandise nancial plan for level 5 versions are:
● ○ Working Version - M51
○ Simulated Version - M52
○ Released Version - M5R
○ Final Version - M5F
○ In Season Version - M5P
Planning Conguration Sets
A Planning Conguration Set (PCS) is a prerequisite to creating a merchandise plan. A planning conguration
denes entry and exit levels for merchandise and option plans based on a market hierarchy (representing an
organizational view on top of retail stores and wholesale customers) and a product hierarchy. The PCS must be
specically dened in order for the data to render properly in the workbook.
Note
You must have an area of responsibility assigned for the product hierarchy and market hierarchy you will be
using. From your
SAP Easy Access menu, use transaction code NWBC and navigate to menu Services
Maintain Area of Responsibility .
For more information about Planning Congurations see https://help.sap.com/viewer/p/CARAB and navigate
to <your version> SAP Assortment Planning Assortment Planning Manage Planning Conguration
Sets .
Integration with SAP Assortment Planning.
SAP Assortment Planning is not aware of the nalized version maintained in SAP Merchandise Planning. This
means if you want to send your merchandise plans to an assortment plan, there are setup tasks. The standard
integration is implemented in an AMDP BAdI named /DMF/MPR_READ_KPI_DATA which resides in fallback
class /DMF/CL_MPR_READ_DATA_DEFAULT. The BAdI works as follows:
● While calling the API to fetch nalized version, the assortment plan interface selects product hierarchy
node(s) of the same level as the plan. For example, based on the product hierarchy node of level 3 (or 4, 5,
6, 7), the system will automatically look for version M3F (or M4F, M5F, etc.) in case the version is not being
passed as part of the API call.
● If standard integration is used, it is recommended that nal released versions should be named as M<level
of product hierarchy node>F.
● A specic custom extension is possible by implementing AMDP BAdI /DMF/MPR_READ_KPI_DATA if your
planning version used for the merchanise plan does not follow the recommended naming convention.
○ The BAdI is available using transaction code SPRO and navigating to Customizing node SAP
Customizing Implementation Guide
SAP Customer Activity Repository Demand Data Foundations
Data Maintenance Planning Conguration Enhancements Using Business Add-Ins BAdI: Read
Merchandise Planning KPI Data
.
230
PUBLIC
Common Installation Guide for SAP Customer Activity Repository applications bundle 5.0
Set Up the Applications

6.2.3 Verify the Connection Between the SAP Merchandise
Planning System and SAP Analysis for Microsoft
Oce
The SAP Merchandise Planning application includes several SAP Analysis for Microsoft Oce workbooks.
These workbooks, which are installed on your back-end system as part of the local BI Content, can only be
opened using SAP Analysis for Microsoft Oce.
In this step, you verify that you can open the SAP Merchandise Planning workbooks from SAP Analysis for
Microsoft Oce.
1. Open SAP Analysis for Microsoft Oce from Start All Programs SAP Business Intelligence SAP
BusinessObjects Analysis Analysis for Microsoft Excel .
2. From the File menu, select Analysis Open Workbook (Open Workbook from SAP NetWeaver) .
3. Select your back-end system.
Tip: The list of systems corresponds to the systems available in your SAP Logon.
4. If single sign-on is not congured provide your user information.
5. Search for /RAP/MP* on the Search tab.
6. Open any of the workbooks from the list of SAP Merchandise Planning workbooks.
The opening of the workbook indicates that there are no issues with the connection between your back-
end system and SAP Analysis for Microsoft Oce.
6.2.4 Activate SAP Merchandise Planning Omnichannel BI
Planning Framework Content
The planning framework used by SAP Merchandise Planning consists of the following elements:
● Business Intelligence Content (BI Content) Objects: A collection of local BI Content objects is used as
the basis for the SAP Analysis for Microsoft Oce workbooks.
SAP Analysis for Microsoft Oce workbooks are designed to consume data from BI Content objects. The
local BI Content objects that are provided with the SAP Merchandise Planning application use the
integrated planning engine in SAP Business Warehouse (SAP BW). These local BI Content objects are used
as an interface between the SAP HANA views and the SAP Analysis for Microsoft Oce workbooks.
Note
The local BI Content provided with the SAP Merchandise Planning application is entirely independent
of the SAP Business Warehouse BI Content and BI Content Extensions add-on.
● SAP Analysis for Microsoft Oce Workbooks: Microsoft Excel-based spreadsheets that you use to plan
assortments for the dierent locations in your retail business.
This section of the guide provides information on the SAP HANA content activation, BI Content activation and
conguration, and data upload activities required to set up the SAP Merchandise Planning planning framework.
Common Installation Guide for SAP Customer Activity Repository applications bundle 5.0
Set Up the Applications
PUBLIC 231

6.2.4.1 Verify SAP HANA Content for SAP Merchandise
Planning
Verify all SAP HANA Transport for ABAP (HTA) objects that are required for SAP Merchandise Planning
application.
Prerequisites
As a mandatory prerequisite for a successful activation of SAP HANA content for SAP Merchandise Planning,
you must have successfully completed all of the procedures listed in the previous sections of this guide as
pertains to SAP Customer Activity Repository Core (Mandatory for All Applications) . In particular, you
must have created all the necessary tables, as described in Create/Replicate Source Master Data System
Tables [page 91].
You must also have mapped all the necessary schemas, as described in Verify Correct Schema Mapping [page
54].
Context
In this procedure you perform the nal activation of SAP HANA content (views and stored procedures) required
by the SAP Merchandise Planning application. This nal activation results in a full activation of the SAP HANA
content for SAP Merchandise Planning. Several SAP HANA views depend on local BI Content objects. The SAP
HANA views must be in active state before activating the BI Content objects as described in Activate
Application BI Content [page 234] .
For more information, see https://help.sap.com/viewer/p/SAP_HANA_PLATFORM, choose the SAP HANA
Developer Guide and search for section Activating Objects.
Procedure
1. Log on to SAP HANA studio.
2. Open the Modeler and use the Navigator to access your back-end system.
3. Expand the Content folder located under your system name in the Navigator.
4. Expand the listed packages to verify the underlying folders listed below are active.
Based on the selected ECC Mode in the above report the following packages should exist:
○ SAP ERP:
○ sap.is.ddf.ecc
○ Fashion Management:
○ sap.is.ddf.ecc
○ sap.is.ddf.fms
232
PUBLIC
Common Installation Guide for SAP Customer Activity Repository applications bundle 5.0
Set Up the Applications

○ S/4HANA:
○ sap.is.ddf.fms_s4h
5. The following packages should exist resulting from the standard installation:
○ sap.is.ddf.ddf
○ sap.is.retail.rap.ap
○ sap.is.retail.rap.common_bw
○ sap.is.retail.rap.mpr
○ sap.is.retail.rap.mpr_oc
If any of these packages are missing, you must activate those relative to the order above due to
dependencies. Use transaction SCTS_HTA_DEPLOY to activate each missing package, don’t include sub-
packages in case you decide to activate the above mentioned packages using this transaction .
6.2.4.2 Activate SAP Merchandise Planning Technical BI
Content
Procedure
1. On your back-end system, open the Data Warehousing Workbench (transaction RSA1).
2. In the Replicate Metadata dialog box, choose Only Activate.
3. If a message appears that you are only authorized to work in client. (Brain 009), then refer to SAP Note
316923 (do not import the support package, but use the description under section Workaround).
4. Select Do not show this question Again in the dialog that appears.
5. Choose Yes.
Make sure that the current job has nished before you proceed with the next step. Check the status of the
background job using transaction SM37or SLG1. If there are problems, you must rst solve them.
You can use transaction RSTCO_ADMIN to restart the activation of the technical content and to verify the
status of the activation.
Note
In the case that you get the short-dump "RAISE_EXCEPTION" when installing InfoObjects from the BI
content, see SAP Note
1637935 for a possible solution.
Also, see SAP Note 2090845 for important information on technical content activation.
Following activation, you can locate the technical content in the Data Warehousing Workbench as follows:
1. Selecting Modeling in the left-hand frame.
2. Expand InfoObjects.
3. In the right-hand frame, locate Technical Content.
Common Installation Guide for SAP Customer Activity Repository applications bundle 5.0
Set Up the Applications
PUBLIC 233

6.2.4.3 Activate Application BI Content
Use
Caution
Proper authorization is required to complete these steps.
These instructions are to activate content for the InfoArea Merchandise Planning Omni Channel (/RAP/MPOC).
This will activate the following object types:
● InfoObjects
● Advanced DataStore Objects (aDSO)
● Composite Providers
● Aggregation Levels
● Planning Sequences
● Queries
● Workbooks
After completing the activate sections, see the last section of this topic, Verify Installed Objects to insure all
objects have been installed and activated.
Roles/Authorization
1. The application user running the activation/deployment should have the following roles:
○ SAP_ISR_DDF_MASTER
○ SAP_ISR_AP_MASTER
○ /RAP/BW_AP_WORKBOOKS
○ /RAP/BW_MPR_WORKBOOKS
2. The database user should have the following privileges/roles:
○ Privilege ROLE ADMIN
○ Privilege STRUCTUREDPRIVILEGE ADMIN
○ Privilege EXECUTE on procedure TRUNCATE_PROCEDURE_OBJECTS
○ Privilege EXECUTE on procedure GET_PROCEDURE_OBJECTS
○ Role CONTENT_ADMIN
○ Role USER
○ Privilege EXECUTE on procedure TRUNCATE_PROCEDURE_OBJECTS
○ Privilege EXECUTE on procedure GET_PROCEDURE_OBJECTS
3. Ensure that each SAP BW/HANA application user have at least the following set of privileges to activate BI
contents:
○ Privilege SELECT on schema _SYS_BI
○ Privilege SELECT on schema SAP<SID>
○ Privilege EXECUTE on procedure REPOSITORY_REST
234
PUBLIC
Common Installation Guide for SAP Customer Activity Repository applications bundle 5.0
Set Up the Applications

○ Privilege REPO.READ on package bw2hana/SAP<SID>_/RAP/<Infocube>_REPORTING
○ The corresponding privileges are created automatically when activating BI content
See Perform Core Steps for SAP Customer Activity Repository [page 226] to ensure all core mandatory steps
are performed.
Activate InfoObjects
Note
A window being referenced, may be hidden. Use the Data Warehousing Workbench menu in the main
window title bar to hide/unhide the following windows: Navigation, All Objects, and Collected Objects.
● Use transaction RSOR to launch the BW workbench BI Content.
● In the navigation window, locate and select Object Types. In the window All Objects According to Types,
expand node InfoObjects and double click Select Objects. In the popup window, select the following objects
and select button Transfer Selections.
InfoObject
InfoObject Description
InfoObject
Month Of Supply /RAP/MOSUP
Month Of Supply at DC /RAP/MOSUPD
Weeks of Supply /RAP/WKOSUP
Week of Supply DC /RAP/WKSUPD
● Select Yes to the system prompt Do you want to add the objects to the personal list.
● When prompted for Source System, do not choose any and select OK.
● For each InfoObject, right click on the object and select option Install All Below.
● Install and Activate each InfoObject.
Activate Advanced DataStore Objects
Note
A window being referenced, may be hidden. Use the Data Warehousing Workbench menu in the main
window title bar to hide/unhide the following windows: Navigation, All Objects, and Collected Objects.
● Use transaction RSOR to launch the BW workbench BI Content.
● In the navigation window, locate and select Object Types. In the window All Objects According to Types,
expand node DataStore Objects (advanced) and double click Select Objects. In the popup window, select
the following objects and select button Transfer Selections.
Common Installation Guide for SAP Customer Activity Repository applications bundle 5.0
Set Up the Applications
PUBLIC 235

DataStore Object (advanced)
aDSO Description
aDSO
Market Hierarchy CR based on Planning Conguration Set /RAP/MHDS1
Market Hierarchy CR aDSO for LY and LLY /RAP/MHDS2
aDSO for actuals of LY and LLY KPIs /RAP/MPDS0
MP - Regional Month Sales Target for Omni Channel /RAP/MPDS1
MP - Local Month Sales Inventory Targets for Retail and E-
Co
/RAP/MPDS2
MP - Local Month Sales and Inventroy Targets for Whol
sale
/RAP/MPDS3
Product Hierarchy CR based on Planning Conguration
Set
/RAP/PHDS1
Product Hierarchy CR aDSO for LY and LLY /RAP/PHDS2
Merchandise Plan YSCT Characteristic Relationship /RAP/SCTDS
● Select Yes to the system prompt Do you want to add the objects to the personal list.
● When prompted for Source System, do not choose any and select OK.
● For each aDSO, right click on the object and select option Install All Below.
● Install and Activate each aDSO.
Activate Analysis Oce Excel Workbooks 2.0
In this section you will continue from the above step and activate the workbooks. :
● From the left navigation panel for BI Content locate and expand folder More Types. Expand Analysis Oce
Excel Workbook and double click Select Objects. Use the lter in the popup window to dene a lter on
column Object Name having values of /RAP/MP_*.
In the pop up window, select the following objects and select button Transfer Selections.
Workbooks
Object Name
/RAP/MP_ECOM_PHN5_WB_01
/RAP/MP_OTB_OTS_PHN5_WB_01
/RAP/MP_OTB_OTS_PHN5_WB_02
/RAP/MP_RTL_PHN5_WB_01
236 PUBLIC
Common Installation Guide for SAP Customer Activity Repository applications bundle 5.0
Set Up the Applications
Object Name
/RAP/MP_RT_PHN5_M_WB_01
/RAP/MP_RT_PHN7_WB_01
/RAP/MP_RT_SSN_PHN5
/RAP/MP_WHS_PHN5_M_WB_01
● Select Yes to the system prompt Do you want to add the objects to the personal list.
● For each workbook, right click and select option Install All Below.
● Install and Activate each workbook.
Activate Planning Sequence
In this section you will activate the Planning Sequence, Planning Function used for loading last year actual data,
From the left navigation panel for BI Content locate and select Object Types. In the All Objects According to Type
window, perform the following:
● Locate and expand Planning, Planning Sequence.
1. Planning Sequences that begin with the value /RAP/C15A belong to the Merchandise Planning 4.0
application and should be activated.
2. Double click Select Objects and use the lter in the popup window to dene a lter on column Object
Name having values of /RAP/MPDS* or /RAP/MHDS*. In the results, use the Transfer Selections button
to transfer the planning sequences listed in the table below to the Collected Objects, then Install.
Planning Sequence
Planning Sequence
/RAP/MHDS2_A3_PS01
/RAP/MHDS2_A3_PS02
/RAP/MPDS0_A0_PS01
/RAP/MPDS0_A0_PS02
/RAP/MPDS0_A0_PS03
/RAP/MPDS0_A2_PS01
/RAP/MPDS1_A1_PS01
/RAP/MPDS1_A1_PS02
Verify Installed Objects
Verify the installed objects exist using the associated tables below.
Common Installation Guide for SAP Customer Activity Repository applications bundle 5.0
Set Up the Applications
PUBLIC 237

DataStore Object (advanced)
aDSO Description
aDSO
Market Hierarchy CR based on Planning Conguration Set /RAP/MHDS1
Market Hierarchy CR aDSO for LY and LLY /RAP/MHDS2
aDSO for actuals of LY and LLY KPIs /RAP/MPDS0
MP - Regional Month Sales Target for Omni Channel /RAP/MPDS1
MP - Local Month Sales Inventory Targets for Retail and E-Co /RAP/MPDS2
MP - Local Month Sales and Inventroy Targets for Wholsale /RAP/MPDS3
Product Hierarchy CR based on Planning Conguration Set /RAP/PHDS1
Product Hierarchy CR aDSO for LY and LLY /RAP/PHDS2
Merchandise Plan YSCT Characteristic Relationship /RAP/SCTDS
InfoObject Catalog (RAP)
Catalog Description Catalog Name
RAP Character InfoObject Catalog /RAP/CHAR_CAT
RAP Key Figure InfoObject Catalog /RAP/KYF_CAT
InfoObjects Characteristics
InfoObject Description InfoObject Name
Logical System ID /RAP/LOGSYS
Planning Conguration Node /RAP/PLCND
Planning Conguration Set /RAP/PLCSET
Market Hierarchy Node on Level 1 /RAP/PLNHN1
Market Hierarchy Node on Level 2 /RAP/PLNHN2
Market Hierarchy Node on Level 3 /RAP/PLNHN3
Market Hierarchy Node on Level 4 /RAP/PLNHN4
Market Hierarchy Node on Level 5 /RAP/PLNHN5
Market Hierarchy Node on Level 6 /RAP/PLNHN6
Market Hierarchy Node on Level 7 /RAP/PLNHN7
Market Hierarchy Node on Level 8 /RAP/PLNHN8
Market Hierarchy Node on Level 9 /RAP/PLNHN9
Market Hierarchy /RAP/PLNHR
Planning Process Level /RAP/PLPLVL
238 PUBLIC
Common Installation Guide for SAP Customer Activity Repository applications bundle 5.0
Set Up the Applications

InfoObject Description InfoObject Name
Markdown Sales Revenue /RAP/MRKDRV
Markdown Sales Units /RAP/MRKDSU
Product Hierarchy Node on Level 1 /RAP/PRDHN1
Product Hierarchy Node on Level 2 /RAP/PRDHN2
Product Hierarchy Node on Level 3 /RAP/PRDHN3
Product Hierarchy Node on Level 4 /RAP/PRDHN4
Product Hierarchy Node on Level 5 /RAP/PRDHN5
Product Hierarchy Node on Level 6 /RAP/PRDHN6
Product Hierarchy Node on Level 7 /RAP/PRDHN7
Product Hierarchy Node on Level 8 /RAP/PRDHN8
Product Hierarchy Node on Level 9 /RAP/PRDHN9
Product Hierarchy /RAP/PRDHR
Promotion Sales Revenue /RAP/PROMRV
Promotion Sales Units /RAP/PROMSU
Returns Revenue Loss /RAP/RETRRV
Regular Sales Revenue /RAP/RSLSRV
Regular Sales Units /RAP/RSLSUN
Collection /RAP/SCOLL
Sales Cost /RAP/SLSCV
Sales Revenue /RAP/SLSRV
Sales Units /RAP/SLSUN
Season /RAP/SSEAS
Season Year /RAP/SSYR
Theme /RAP/STHEME
Version /RAP/VERSN
InfoObjects Key Figures
InfoObject Description InfoObject Name
BOP DC Excess Stock at Cost
/RAP/BDEXCV
BOP DC Stock at Cost
/RAP/BDCCV
BOP Store Stock at Cost
/RAP/BSTCV
Channel Count
/RAP/CHCNT
End of Period Stock DC Cost Value
/RAP/EDCCV
Common Installation Guide for SAP Customer Activity Repository applications bundle 5.0
Set Up the Applications
PUBLIC 239

InfoObject Description InfoObject Name
EOP DC Excess Stock at Cost
/RAP/EDEXCV
EOP Store Stock at Cost
/RAP/ESTCV
Inventory Adjustment at Cost
/RAP/IADCV
Markdown Budget
/RAP/MRKBUD
Markdown Sales Revenue
/RAP/MRKDRV
Markdown Sales Units
/RAP/MRKDSU
Month Of Supply Store
/RAP/MOSUP
Month Of Supply at DC
/RAP/MOSUPD
On Order Cost DC
/RAP/DCOCV
On Order Units DC
/RAP/DCOUN
On Order Units Store
/RAP/ONOUN
On Order Cost Store
/RAP/ONOCV
Open Sales Order Cost
/RAP/SOOCV
Open Sales Order Units
/RAP/SOOUN
Open to Sale at Cost
/RAP/OTSC
OTB at Cost
/RAP/OTBC
Promotion Budget
/RAP/PROBUD
Promotion Sales Revenue
/RAP/PROMRV
Promotion Sales Units
/RAP/PROMSU
Receipt DC at Cost
/RAP/RDCCV
Receipt Store at Cost
/RAP/RDTCV
Receipt Units DC
/RAP/RCPUND
Receipt Units Store
/RAP/RCPUNS
Regular Sales Revenue
/RAP/RSLSRV
Regular Sales Units
/RAP/RSLSUN
Return Units DC
/RAP/DCREUN
240 PUBLIC
Common Installation Guide for SAP Customer Activity Repository applications bundle 5.0
Set Up the Applications

InfoObject Description InfoObject Name
Return Units Store
/RAP/RETRUN
Returns at Cost DC
/RAP/DCRECV
Returns at Cost Store
/RAP/RETRCV
Returns Revenue Loss
/RAP/RETRRV
Sales at Cost
/RAP/SLSCV
Sales Order Intake Revenue
/RAP/SOIRV
Sales Order Rejection Cost
/RAP/SORCV
Sales Order Rejection Units
/RAP/SORUN
Sales Revenue
/RAP/SLSRV
Sales Store Fullled at Cost
/RAP/STSCV
Sales Units
/RAP/SLSUN
Shipment Fullled at Cost
/RAP/SHPCV
Weeks of Supply
/RAP/WKOSUP
Week of Supply DC
/RAP/WKSUPD
Write O Adjustment at Cos
/RAP/WOFFAD
Composite Providers
Composite Provider Description Composite Provider
Merchandise Financial Plan Omni Channel
/RAP/CP15
Aggregation Levels
Aggregation Description Aggregation Name
MP Regional Targets Sales Mix - PHN 5
/RAP/C15A01
MP Regional Targets SSN Sales Mix - PHN 5
/RAP/C15A02
MP Regional Targets SSN Sales Mix - PHN 7
/RAP/C15A03
MP Local Targets - ECommerce - Sales Mix - PHN 5
/RAP/C15A11
MP Local Targets - ECommerce - Sales Mix - PHN 5 - PF
RAP/C15A12
MP Local Targets - Retail - Sales Mix - PHN 5
/RAP/C15A21
Common Installation Guide for SAP Customer Activity Repository applications bundle 5.0
Set Up the Applications
PUBLIC 241

Aggregation Description Aggregation Name
MP Local Targets - Retail - Sales Mix - PHN 5 - PF
/RAP/C15A22
MP Local Targets - WHS - Sales Mix - PHN 5
/RAP/C15A31
MP Local Targets - WHS - Sales Mix - PHN 5 - PF
/RAP/C15A32
MP - OTB - Retail - ECom - WHS
/RAP/C15A41
AL for Market Hier CR for LY and LLY
/RAP/MHDSA2
Product Hierarchy CR based on Planning Conguration Set
/RAP/PHDSA1
SCT CR based on Planning Conguration Set
/RAP/SCTDA1
AL for Product Hier CR for LY and LLY
/RAP/PHDSA2
Market Hierarchy Aggregation Level
/RAP/MHDSA1
AL for Actuals of LY and LLY KPIs
/RAP/MPDSA0
Planning Sequence
Workbook Function Planning Sequence
1.1 Regional Monthly Plan Planning sequence for Ribbon in AO
/RAP/C15A01_PS00
1.1 Regional Monthly Plan Delete
/RAP/C15A01_PS01
1.1 Regional Monthly Plan Release
/RAP/C15A01_PS02
1.1 Regional Monthly Plan Copy
/RAP/C15A01_PS03
1.1 Regional Monthly Plan Bottom Up
/RAP/C15A01_PS04
1.2 Regional Seasonal Plan Planning sequence for Ribbon in AO
/RAP/C15A02_PS00
1.2 Regional Seasonal Plan Delete
/RAP/C15A02_PS01
1.2 Regional Seasonal Plan Release
/RAP/C15A02_PS02
1.2 Regional Seasonal Plan Top Down
/RAP/C15A02_PS03
1.2 Regional Seasonal Plan Copy
/RAP/C15A02_PS04
1.2 Regional Seasonal Plan Bottom Up
/RAP/C15A02_PS05
1.3 Regional Seasonal Plan Planning sequence for Ribbon in AO
/RAP/C15A03_PS00
1.3 Regional Seasonal Plan Delete
/RAP/C15A03_PS01
1.3 Regional Seasonal Plan Release
/RAP/C15A03_PS02
242 PUBLIC
Common Installation Guide for SAP Customer Activity Repository applications bundle 5.0
Set Up the Applications

Workbook Function Planning Sequence
1.3 Regional Seasonal Plan Top Down
/RAP/C15A03_PS03
1.3 Regional Seasonal Plan Copy
/RAP/C15A03_PS04
4.1 Ecommerce Monthly Plan Planning sequence for Ribbon in AO
/RAP/C15A12_PS00
4.1 Ecommerce Monthly Plan Delete
/RAP/C15A12_PS01
4.1 Ecommerce Monthly Plan Release
/RAP/C15A12_PS02
4.1 Ecommerce Monthly Plan Copy
/RAP/C15A12_PS03
4.1 Ecommerce Monthly Plan Top Down
/RAP/C15A12_PS04
4.1 Ecommerce Monthly Plan Initialize BOP - M
/RAP/C15A12_PS05
4.1 Ecommerce Monthly Plan Re-calculate BOP
/RAP/C15A12_PS06
4.1 Ecommerce Monthly Plan Initialize BOP - T
/RAP/C15A12_PS07
4.1 Ecommerce Monthly Plan Initialize BOP - P
/RAP/C15A12_PS08
2.1 Retail Monthly Plan Planning sequence for Ribbon in AO
/RAP/C15A22_PS00
2.1 Retail Monthly Plan Delete
/RAP/C15A22_PS01
2.1 Retail Monthly Plan Release
/RAP/C15A22_PS02
2.1 Retail Monthly Plan Copy
/RAP/C15A22_PS03
2.1 Retail Monthly Plan Initialize BOP - M
/RAP/C15A22_PS04
2.1 Retail Monthly Plan Top Down
/RAP/C15A22_PS05
2.1 Retail Monthly Plan Initialize BOP - T
/RAP/C15A22_PS06
2.1 Retail Monthly Plan Initialize BOP - P
/RAP/C15A22_PS07
2.1 Retail Monthly Plan Re-calculate BOP
/RAP/C15A08_PS08
3.1 Wholesale Monthly Plan Planning sequence for Ribbon in AO
/RAP/C15A32_PS00
3.1 Wholesale Monthly Plan Delete
/RAP/C15A32_PS01
3.1 Wholesale Monthly Plan Release
/RAP/C15A32_PS02
3.1 Wholesale Monthly Plan Copy
/RAP/C15A32_PS03
3.1 Wholesale Monthly Plan Top Down
/RAP/C15A32_PS04
3.1 Wholesale Monthly Plan Initialize BOP - M
/RAP/C15A32_PS05
Common Installation Guide for SAP Customer Activity Repository applications bundle 5.0
Set Up the Applications
PUBLIC 243

Workbook Function Planning Sequence
3.1 Wholesale Monthly Plan Initialize BOP - T
/RAP/C15A32_PS06
3.1 Wholesale Monthly Plan Initialize BOP - P
/RAP/C15A32_PS07
3.1 Wholesale Monthly Plan Re-calculate BOP
/RAP/C15A32_PS08
5.1 OTB & OTS Reconciliation Planning sequence for Ribbon in AO
/RAP/C15A41_PS00
5.1 OTB & OTS Reconciliation MP - OTB - Reconciliation
/RAP/C15A41_PS01
5.1 OTB & OTS Reconciliation MP - OTB - Reconciliation - Finalize
/RAP/C15A41_PS02
5.2 OTB & OTS Reconciliation - Season Planning sequence for Ribbon in AO
/RAP/C15A42_PS00
5.2 OTB & OTS Reconciliation - Season MP - OTB - Reconciliation
/RAP/C15A42_PS01
5.2 OTB & OTS Reconciliation - Season
Final
MP - OTB - Reconciliation - Finalize
/RAP/C15A42_PS02
Queries
Query Name Technical Name
MP - Regional Targets - Prompt Query - PHN5 /RAP/CP15A01_Q01
MP - Regional Targets - Sales Mix - PHN5 /RAP/CP15A01_IRQ01
MP - Regional Targets - Season Prompt Query - PHN5 /RAP/CP15A02_Q01
MP - Regional Targets - Season Flow - PHN5 /RAP/CP15A02_IRQ00
MP - Regional Targets - Season Sales Mix - PHN5 /RAP/CP15A02_IRQ01
MP - Regional Targets - Season Flow Chart - PHN5 /RAP/CP15A02_Q00
MP - Regional Targets - Season Flow - PHN7 /RAP/C15A03_IRQ00
MP - Regional Targets - Season Sales Mix - PHN7 /RAP/CP15A03_IRQ01
MP - Regional Targets - Season Flow Chart - PHN7 /RAP/CP15A03_Q00
MP - Regional Targets - Prompt Query - PHN7 /RAP/CP15A03_Q01
MP - Local Targets - ECom - Sales Mix - PHN5 /RAP/CP15A11_IRQ01
MP - Local Targets - ECom - Inventory Mix - PHN5 /RAP/CP15A11_IRQ02
MP - Local Targets - ECom - Prompt Query - PHN5 /RAP/CP15A11_Q01
MP - Local Targets - Rtl - Sales Mix - PHN5 /RAP/CP15A21_IRQ01
244 PUBLIC
Common Installation Guide for SAP Customer Activity Repository applications bundle 5.0
Set Up the Applications

Query Name Technical Name
MP - Local Targets - Rtl - Inventory Mix - PHN5 /RAP/CP15A21_IRQ02
MP - Local Targets - Rtl - Prompt Query - PHN5 /RAP/CP15A21_Q01
MP - Local Targets- WHS - Sales Mix - PHN5 /RAP/CP15A31_IRQ01
MP - Local Targets - WHS - Inventory Mix - PHN5 /RAP/CP15A31_IRQ02
MP - Local Targets - WHS - Prompt Query - PHN5 /RAP/CP15A31_Q01
MP - OTB Reconciliation Report - Prompt Query /RAP/CP15_Q001
MP - OTB Reconciliation Report /RAP/CP15_Q01
MP - OTB Reconciliation Season Prompt Query /RAP/CP15_Q002
MP - OTB Reconciliation Report - Season /RAP/CP15_Q02
Workbooks
Workbook Description Workbook Technical Name
1.1 Regional Monthly Plan
/RAP/MP_RT_PHN5_M_WB_01
1.2 Regional Seasonal Plan
/RAP/MP_RT_SSN_PHN5
1.3 Regional Seasonal Plan
/RAP/MP_RT_PHN7_WB_01
2.1 Retail Monthly Plan
/RAP/MP_RTL_PHN5_WB_01
3.1 Wholesale Monthly Plan
/RAP/MP_WHL_PHN5_M_WB_01
4.1 Ecommerce Monthly Plan
/RAP/MP_ECOM_PHN5_WB_01
5.1 OTB & OTS Reconciliation
/RAP/MP_OTB_OTS_PHN5_WB_01
5.2 OTB & OTS Seasonal Reconciliation
/RAP/MP_OTB_OTS_PHN5_WB_02
Change aDSO Behavior
You must change the loading behavior for each aDSO. Select the InfoProvider node under Modeling. Locate the
central InfoProvider column and expand the Merchandise Planning Omni Channel change the loading
behavior for each aDSO. To change the loading the behavior, locate each object in the DataStore (advanced)
table above and then right click to select Planning-Specic Properties Change Real-Time Load Behavior.
Select radio button Real-Time Target Can Be Planned; Data Loading Not Allowed.
Common Installation Guide for SAP Customer Activity Repository applications bundle 5.0
Set Up the Applications
PUBLIC 245

Remember
BI Content developed on top of aggregation levels /RAP/T15A23, /RAP/T15A24, /RAP/T15A25, /RAP/
T15A27, /RAP/T15A34 and /RAP/T15A35 are for internal testing and do not need to be activated.
6.2.4.4 Congure SAP Merchandise Planning Local BI
Content
6.2.4.4.1 Enable the Planning Application Kit (PAK)
Use
To be able to use the SAP Analysis for Microsoft Oce workbooks provided as part of the SAP Assortment
Planning planning framework content, you must enable the Planning Application Kit.
Procedure
1. Read SAP Note 1637199 .
2. In your back-end system, launch table/view maintenance (transaction SM30).
3. Enter RSPLS_HDB_ACT in the Table/View eld and choose Maintain.
4. Choose New Entries.
5. In the HANA Integration Active column select Deep HANA Integration Active and in the Function
Active column, enable the checkbox.
6.2.4.4.2 Maintain RSADMIN Parameter for Input Cells
In this procedure, you maintain the RSADMIN parameter for Input Cells in the SAP BW application to suppress
zero values for actual data versions.
1. Log on to your back-end system.
2. Open the ABAP Editor (transaction SE38).
3. Run program SAP_RSADMIN_MAINTAIN
4. In RSAD Table Maintenance, insert ZERO_SUPPRESSION_ON_INPUTCELLS in OBJECT and Execute.
Posting Instructions
Refer to 1126478
for further information.
246
PUBLIC
Common Installation Guide for SAP Customer Activity Repository applications bundle 5.0
Set Up the Applications

6.2.4.4.3 Generate Missing Data Reports
Use
There are two reports required to populate supporting tables for SAP Merchandise Planning for Omnichannel
2.0 and above.
Procedure
The rst report will generate entries for /RAP/RS_VARCUSTS table.
● Use transaction code. SE38 and enter /RAP/SEED_BW_CUSTOMIZING_DATA in the Program eld. Use the
Execute button to run the report.
6.2.4.4.4 Maintain Fiscal Year Variants
Use
In this section you maintain the required scal year variant values for the Retail Month (RM) and the Retail
Week
(RW). These instructions are for SAP Merchandise Planning 1.0 FP2 or later. In addition, the years used in
the examples are to depict the relationship between the years. You will need to create the range of years
applicable for your implementation.
Caution
SAP Merchandise Planning uses activated time objects 0FISCPER (scal year period) and 0FISCVARNT
(scal year variant), provided as part of the technical BI Content If you are supporting both Retail Week
and Month Variants, begin with the RW procedure and then RM thereafter.
Note
SAP Merchandise Planning 1.0 Workbooks supports time hierarchy YR/MON. For more information please
see Maintain Time Hierarchy [page 256].
Related Information
Retail Weekly [page 248]
Retail Monthly [page 249]
Common Installation Guide for SAP Customer Activity Repository applications bundle 5.0
Set Up the Applications
PUBLIC 247

6.2.4.4.4.1 Retail Weekly
In this procedure you maintain the required scal year variant ( 0FISCVARNT 'RW').
The steps provided in this procedure allow you to maintain 0FISCVARNT 'RW' using the standard 4-5-4
calendar entries. If you are using alternative scal periods in your retail business, for example, each week
starting on a Sunday instead of Saturday, you can provide your own entries instead of the ones suggested in
this guide.
Procedure
1. Log on to your back-end system.
2. Launch scal year variant maintenance (transaction GVAR).
3. Choose New Entries.
4. On the New Entries: Overview of Added Entries screen make the following sets of entries:
Create New Fiscal Year Variant
5. Choose Enter.
An information message is displayed about creating more than 16 periods, choose Continue.
6. Choose Back.
You can see the newly created entry.
7. Mark the entry RW and select Shortened Fiscal Years from the Dialog Structure.
Shortened Fiscal Years in Dialog Structure
8. In the Fiscal year dialog, enter the year (for example, 2015 ) in the Fiscal year eld and choose Continue.
9. On the Change View "Shortened Fiscal Years": Overview screen, choose New Entries.
10. In the Shortened Fiscal Years table, enter 52 in the No. of posting periods eld.
11. Choose Back twice.
12. On the Change View "Fiscal Year variants": Overview screen, mark the entry RW and select Periods from the
Dialog Structure.
13. In the Calendar yr dialog, enter the year (for example, 2015 ) in the Calendar yr eld and choose Continue.
Data for the previous year must be maintained.
14. On the Change View "Periods": Overview screen, choose New Entries.
248
PUBLIC
Common Installation Guide for SAP Customer Activity Repository applications bundle 5.0
Set Up the Applications

15. In the Periods table, enter the data (month, day, period, year shift) for each period according to your scal
calendar. For an example, see the following table. For more examples, see SAP Note 2112634 . If you
want to copy data from this note, locate the required year and enter the data by copy-and-paste.
2015 Weekly Calendar
Month Day Period Year Shift
1 3 48 -1
1 10 49 -1
1 17 50 -1
1 24 51 -1
1 31 52 -1
2 7 1 0
2 14 2 0
... .. ... ...
16. Repeat steps 7-15 to maintain the weekly scal year variant for all of the required years, entering each year
as shortened scal year. The corresponding tables are available in SAP Note 2112634 .
17. Choose Save.
18. Launch transaction RSRHIERARCHYVIRT and ensure that the dates specied in the From and To elds
under Time Interval cover the years maintained for the scal year variant in the previous steps.
6.2.4.4.4.2 Retail Monthly
In this section, you maintain the required scal year variant values for the scal month, 'RM'.
Procedure
Fiscal Variant Retail Month
You must maintain 0FISCVARNT 'RM' using the standard 12 month calendar entries. If you are using
alternative scal periods in your business, you can provide your own entries instead of the ones suggested in
this guide.
1. Log on to your back-end system.
2. Launch the scal year variant maintenance (transaction GVAR). Choose New Entries.
3. In the Fiscal Year Variants view, choose New Entries.
Common Installation Guide for SAP Customer Activity Repository applications bundle 5.0
Set Up the Applications
PUBLIC 249

4. On the New Entries: Overview of Added Entries screen make the following sets of entries:
Field Name User Entry
FV
RM
Description Planning month
Calendar yr Do not select
Year-
dependent
Select
Number of
period
postings
12
No.of
special
periods
5. Choose Enter.
6. Choose Back.
You can see the newly created entry.
7. Mark the entry RM and select Periods from the Dialog Structure and double click to open the Calendar year
dialog.
8. Enter the year, for example 2014, in the Calendar yr eld and choose Continue.
9. Choose New Entries. For the year selected to enter the information that will dene each period.
10. Enter the last valid calendar date of the period being added in the Month and Day elds.
11. Enter the relevant Period number.
12. In the Year Shift eld, enter +1 if the scal year is later than the calendar year enter. Enter -1 if the scal year
is before the calendar year.
13. Press Enter to accept the rst row.
14. Continue adding each period to complete the scal year. Choose Save after you have nished the entries
for a year.
15. Continue adding the scal year variants for each year required by your scenario by repeating steps 2-13.
16. For more information about setting up the calendar for additional years, see SAP Note 2112634 . Note
that this SAP Note is applicable for both SAP Merchandise Planning and SAP Assortment Planning.
17. Choose Save after you have nished the maintenance for the last year.
Example: If the current year is 2020, you can maintain scal year variant values for the previous three years and
future three years.
250
PUBLIC
Common Installation Guide for SAP Customer Activity Repository applications bundle 5.0
Set Up the Applications

Common Installation Guide for SAP Customer Activity Repository applications bundle 5.0
Set Up the Applications
PUBLIC 251

6.2.4.4.5 Generate Time Relations Data for Planning based
on the Fiscal Calendar
Use
Execution of the RSR_TIME_RELATION_HDB report is required to populate supporting tables for the time
relations data for planning based on the scal calendar.
Prerequisite
This report requires that scal calendars are currently maintained for the scal variants that are expected to be
used for planning.
Procedure
The report will generate entries for the RSR_REL_TIME_FIS table and the RSR_TIME_REL_FIS table.
Use transaction code SE38 and enter RSR_TIME_RELATION_HDB in the program eld. Use the Execute button
to run the report.
6.2.4.4.6 Maintain Versions
In this step, you maintain the master data for the InfoObject /RAP/VERSN to support versions in workbooks.
1. Launch HANA Studio, and open perspective BW Modeler. Open your BW Project and expand BW
Repository. Navigate to /RAP/MPOC Aggregation Level . Expand any object built on /RAP/C15A*
and navigate to a query. Open the query and navigate to the InfoProvider tab.
2. Expand InfoProvider Fields General . Open eld /RAP/VERSN. In the Properties tab select the Master
Data link.
3. You are on the Change Master Data of InfoObject /RAP/VERSN maintenance screen.
4. Select the section below matching the scenario of workbooks you will be using to enter the correct
information.
Be sure to save your entries and close the window.
252
PUBLIC
Common Installation Guide for SAP Customer Activity Repository applications bundle 5.0
Set Up the Applications

Merchandise Planning 2.0 and Above
The default workbooks are planned at product hierarchy node levels 5 and 7. Entries for those are listed in the
table below. For more information about versions see
https://help.sap.com/viewer/p/CARAB <Version>
Administration SAP Merchandise Planning Administration Guide Conguration Information Congure
SAP Merchandise Planning
Implementation Tasks .
Merchandise Planning Versions 2.0
Version Text
M51 Working Version
M52 Simulation Version
M5F Finalized Version
M5R Reporting Version
M71 Working Version
M72 Simulation Version
M7F Finalized Version
M7R Reporting Version
0 Actuals
6.2.4.4.7 Activate Internet Communication Framework
(ICF) Services
For security reasons, all Internet Communication Framework (ICF) services relevant to your SAP Merchandise
Planning application are made available in an inactive state.
In this procedure, you activate the ICF service.
1. Log on to your back-end system.
2. Open the HTTP Service Hierarchy Maintenance screen (transaction SICF).
3. Enter the following data:
Field name User action and values
Hierarchy Type
SERVICE
4. Choose Execute.
5. On the Maintain Service screen, expand the hierarchy of Default_host.
6. Expand SAP.
Common Installation Guide for SAP Customer Activity Repository applications bundle 5.0
Set Up the Applications
PUBLIC 253

7. Select the BW entry.
8. From the context menu choose Activate service.
9. In the conrmation dialog box, choose Yes to activate all sub-nodes below the BW node in the hierarchy.
10. Choose Back.
6.2.4.4.8 Connect File System in SAP BW (Optional)
In this procedure, you perform the settings that are necessary for the connectivity for an external system - PC
les on the Workstation (for example Excel les) or les on the application server in SAP BW.
1. Log on to your back-end system.
2. Open the Data Warehouse Workbench: Modeling screen (transaction RSA1).
3. Choose Modeling.
4. Choose Source Systems.
5. In the right-hand frame, mark the entry File.
6. Right-click the folder of File.
7. Choose Create.
8. Enter the following data:
Field name User action and values
Logical system name
FILE
Source system name
FILE
9. Choose Continue.
10. Right-click the FILE Source System.
11. Follow the context menu path Activate.
6.2.4.4.9 SAP Merchandise Planning for Retail 1.0
Workbooks
These steps are for users who are choosing to continue using the SAP Merchandise Planning for Retail 1.0
workbooks.
6.2.4.4.9.1 Retail Version 1.0 Workbooks
You may choose to use the original retail workbooks contained in this conguration.
The following topics are not used in SAP Merchandise Planning 2.0 FP2. If you are conguring for the 1.0
workbooks you must complete these next topics.
254
PUBLIC
Common Installation Guide for SAP Customer Activity Repository applications bundle 5.0
Set Up the Applications

Create Geographical Location Hierarchies [page 255]
Maintain Article and Geographical Hierarchy [page 262]
Reporting Currency for Geo Hierarchy Level 2 [page 262]
6.2.4.4.9.1.1 Maintain BEX Variables
In this step, you maintain the variables /RAP/HIEID_MSM_01and /RAP/UNIT_MSM_01. To do this launch the
Query Designer and follow the steps below.
1. Log in to the system desired and select the Open query icon. In the prompt, search the InfoAreas for
Merchandise, Financial Planning for Retail and select.
2. Open query Channel Mix - query/PF ( /RAP/CP11A02_IRQ01).
3. In the Filter panel, Characteristic Restrictions and select Hierarchy ID and expand. Choose the variable
Hierarchy ID beneath to focus the value in the Properties panel.
4. Select the Default Values tab and enter the same hierarchy id used in the Customizing activity.
5. Return to the Filter panel, Characteristic Restrictions and select Unit of Measure and expand. Choose the
variable Unit of Measure beneath to focus the value in the Properties panel.
6. Select the Default Values tab and enter the value 'PC' to represent the default unit of measure value for
pieces.
7. Save the Query and exit.
6.2.4.4.9.1.2 Create Geographical Location Hierarchies
Note
This step is relevant to SAP Merchandise Planning for Retail versions prior to SAP Merchandise Planning 2.0
FP2.
SAP Merchandise Planning for Retail supports up to 2 levels of geographical location hierarchies. For
example, you create the rst level for the world regions, the second level for countries, and then the location
hierarchy. The location hierarchy node assigned to a geographical location hierarchy must be a distribution
chain hierarchy (DC), which is a type 04 or a promotion location hiearchy which is a type 05.
Do the following steps to create a geographical location hierarchy:
1. Log in to the application server using SAP GUI and execute transaction code NWBC.
2. Select the Services menu.
3. In the left navigation menu select Location Services Location Hierarchy .
In the POWL menu on the right, select the Create button, then Market Hierarchy in the dropdown.
4. Enter the location hierarchy name, description and the master data system for your new geographical
location hierarchy.
5. Select the Editor tab.
Common Installation Guide for SAP Customer Activity Repository applications bundle 5.0
Set Up the Applications
PUBLIC 255

Note
○ The Location and Import tabs are disabled.
Enter or search for the distribution chain location hierarchy or promotion location hierarchy that you want
to add to your geographical location hierarchy.
6. Add the desired DC location hierarchy or promotion location hierarchy to your geographical location
hierarchy. You may have either or both types of hierarchies added to the same geographical location
hierarchy node.
7. Save your entries.
In the example below you have two level 2 hierarchies. The level 3 hierarchies are the actual distribution chain
location hierarchies and/or promotion location hierarchies that were selected (created in a previous activity).
● GLOBAL (GEOLEVEL1)
○ NORTH_AMERICA (GEOLEVEL2)
○ DC Hierarchy for Sales Org/Dist. Channel XYZ (GEOLEVEL3)
This will assign all locations for the sales org / distribution channel XYZ to North America's node.
○ Promotion location hierarchy PL123 (GEOLEVEL3)
This will assign all locations for the promotion location hierarchy PL123 to North America's node.
○ SOUTH_AMERICA (GEOLEVEL2)
○ DC Hierarchy for Sales Org/Dist. Channel ABC (GEOLEVEL3)
This will assign all locations for the sales org / distribution channel ABC to South America's node.
6.2.4.4.9.1.3 Maintain Time Hierarchy
The time hierarchy is used to summarize the scal periods for planning. In this step, you create 2 time
hierarchies: YR/MON and YR/SEASON/MON/WK. Use transaction RSH1 to create the hierarchies for the
InfoObject 0FISCPER. The instructions are an example of the required steps that will be repeated for each year
and time period
256
PUBLIC
Common Installation Guide for SAP Customer Activity Repository applications bundle 5.0
Set Up the Applications

InfoObject Time hierarchy example
0FISCPER
● Create the 0RP_FISCHIER02 hierarchy name with the entry YR/SEASON in the
Short Description eld.
● Create the Year hierarchy node with Year in the Short Description.
● Choose the Year hierarchy node, and create the Spring hierarchy node with the
Spring in the Short Description eld under the Year hierarchy node. Click continue
● Choose the Spring hierarchy node, use the Characteristic Nodes Button to insert the
Fiscal Year/Period value for each period for that season.
● Continue the process for each year, season and period. Save and activate the hierarchy
when completed.
● Create the 0RP_FISCHIER01 hierarchy name with the entry YR/SEASON/MON/WK
in the Short Description eld.
● Create the Year hierarchy node with Year value in the Short Description eld.
● Choose the Year hierarchy node, and create the Spring hierarchy node with
Spring in the Short Description eld under the Year hierarchy node.
● Choose the Spring hierarchy node, and create the February hierarchy node with
February in the Short Description eld under the Spring hierarchy node.
● Choose the February hierarchy node, use the Characteristic Nodes Button to insert
the Fiscal Year/Period value for each period for that month.
● Continue the process for each year, season and period as desired. Save and activate
the hierarchy when completed.
Merchandise Planning for Retail 1x
Merchandise Planning for Retail
Version Text
MO1 MO Working Version
MO2 MO Simulation Version
MOR MO Reporting Version
MOP MO In Season Version
MD1 MD Working Version
MD2 MD Simulation Version
MDR MD Reporting Version
MDP MD In Season Version
MP1 MP Working Version
Common Installation Guide for SAP Customer Activity Repository applications bundle 5.0
Set Up the Applications
PUBLIC 257

Version Text
MP2 MP Simulation Version
MPR MP Reporting Version
MPP MP In Season Version
MM1 MM Working Version
MM2 MM Simulation Version
MMR MM Reporting Version
MMP MM In Season Version
MMF MM Final Version
FO1 FO Working Version
FO2 FO Simulation Version
FOR FO Reporting Version
FOP FO In Season Version
FD1 FD Working Version
FD2 FD Simulation Version
FDR FD Reporting Version
FDP FD In Season Version
FM1 FM Working Version
FM2 FM Simulation Versio
FMR FM Reporting Version
FMP FM In Season Version
FL1 FL Working Version
FL2 FL Simulation Versio
FLR FL Reporting Version
FLP FL In Season Version
SAP Store Area Plan
258 PUBLIC
Common Installation Guide for SAP Customer Activity Repository applications bundle 5.0
Set Up the Applications

6.2.4.4.9.1.4 Maintain Fiscal Year Variants
Use
In this section you maintain the required scal year variant values for week and month; 0FISCVARNT 'RW' and
'RM'.
Caution
SAP Merchandise Planning for Retail uses activated time objects 0FISCPER (scal year period) and
0FISCVARNT (scal year variant), provided as part of the technical BI Content.
If you are also using the SAP Assortment Planning application, you use the same scal year variant that
was created for this application.
Procedure
Fiscal Variant RW
The steps provided in this procedure allow you to maintain 0FISCVARNT 'RW' using the standard 4-5-4
calendar entries. If you are using alternative scal periods in your retail business, for example, each week
starting on a Sunday instead of Saturday, you can provide your own entries instead of the ones suggested in
this guide.
1. Log on to your back-end system.
2. Launch scal year variant maintenance (transaction GVAR).
3. Choose New Entries.
4. On the New Entries: Overview of Added Entries screen make the following sets of entries:
Field Name User Entry
FV
RW
Description Planning week
Year-
dependent
Select
Calendar yr Do not select
Number of
period
postings
53
Common Installation Guide for SAP Customer Activity Repository applications bundle 5.0
Set Up the Applications
PUBLIC 259

Field Name User Entry
No.of
special
periods
5. Choose Enter.
An information message is displayed about creating more than 16 periods, choose Continue.
6. Choose Back.
You can see the newly created entry.
7. Mark the entry RW and select Periods from the Dialog Structure.
8. Enter 2012 in the Calendar yr eld and choose Continue.
Data for the previous year must be maintained.
9. Choose New Entries.
10. Open SAP Note 2112634 , locate the entries for year 2012, and enter the data by copy-and-paste. Note
that this SAP Note is applicable for both SAP Merchandise Planning and SAP Assortment Planning.
11. Choose Enter to nish your input.
While making the scal year entries, an information message might be displayed stating that there are
Gaps in nancial year variant periods RW. This is an information message only, and the entered scal year
data is saved.
12. Maintain the weekly scal year variant in the same way for the year 2017. The entries for year 2017 are also
available in SAP Note
2112634 .
13. Select Shortened Fiscal Years from the Dialog Structure.
14. Enter 2013 in the Fiscal year eld and choose Continue.
15. Choose New Entries.
16. Enter 52 in the No. of posting periods eld.
17. Choose Back twice.
18. Maintain the weekly scal year variant in the same way for the shortened scal years, that is, years 2013,
2014, 2015, 2016, and 2017. The corresponding tables are available in SAP Note 2112634 .
19. Choose Save after you have nished the maintenance for year 2018.
Fiscal Variant RM
The next steps allow you to maintain 0FISCVARNT 'RM' using the standard 12 month calendar entries. If you
are using alternative scal periods in your retail business, you can provide your own entries instead of the ones
suggested in this guide. These month entries must align with the week values used in the prior step.
1. In the Fiscal Year Variants view, choose New Entries.
2. On the New Entries: Overview of Added Entries screen make the following sets of entries:
Field Name User Entry
FV
RM
Description Planning month
Year-
dependent
Select
260 PUBLIC
Common Installation Guide for SAP Customer Activity Repository applications bundle 5.0
Set Up the Applications

Field Name User Entry
Calendar yr Do not select
Number of
period
postings
12
No.of
special
periods
3. Choose Enter.
4. Choose Back.
You can see the newly created entry.
To get the information to enter in the next step, open SAP Note 2112634 . Note that this SAP Note is
applicable for both SAP Merchandise Planning and SAP Assortment Planning. If you have used these dates
for your weekly calendar, then align the month end dates to match. An example is contained in the table
below using the 2015 calendar entries from the SAP Note.
5. Mark the entry RM and select Periods from the Dialog Structure and double click to open the Calendar year
dialog.
6. Enter 2012 in the Calendar yr eld and choose Continue.
7. Choose New Entries. For the year selected to enter the information that will dene each period.
8. Enter the last valid calendar date of the period being added in the Month and Day elds.
9. Enter the relevant Period number.
10. In the Year Shift eld, enter +1 if the scal year is later than the calendar year enter. Enter -1 if the scal year
is before the calendar year.
11. Press Enter to accept the rst row.
12. Continue adding each period to complete the scal year.
Maintain the monthly scal year variant in the same way for the remaining years.
13. Choose Save after you have nished the maintenance for year 2018.
Choose Save after you have nished the maintenance for the last year.
2015 Monthly Calendar (sample)
Month Day Period Year Shift
1 31 12 -1
2 28 1 0
3 28 2 0
5 2 3 0
5 30 4 0
6 27 5 0
Common Installation Guide for SAP Customer Activity Repository applications bundle 5.0
Set Up the Applications
PUBLIC 261

Month Day Period Year Shift
8 1 6 0
8 29 7 0
9 26 8 0
10 31 9 0
11 28 10 0
12 26 11 0
12 31 12 0
6.2.4.4.9.1.5 Maintain Article and Geographical Hierarchy
Use
This information is relevant to versions prior to SAP Merchandise Planning 2.0 FP2. There are two types of
hierarchies used in SAP Merchandise Planning for Retail, the geographical and the article hierarchy.
Procedure
There is a Customizing activity to dene the required hierarchies. Use transaction code SPRO and in the Dialog
Structure navigate to Cross-Application Components Demand Data Foundation Basic Settings and
choose Dene Default Values.
● In the Hierarchy ID eld use the prompt to select the applicable article hierarchy id.
● In the Geo Hierarchy ID eld, use the prompt to select the applicable geo hierarchy ID.
6.2.4.4.9.1.5.1 Reporting Currency for Geo Hierarchy Level 2
This information is relevant to versions prior to SAP Merchandise Planning 2.0 FP2. The geographical hierarchy
level 2 requires a reporting currency. Do the following steps to create a geographical location hierarchy
currency:
1. In your back-end system, launch table/view maintenance transaction code SM30.
2. In the Maintain Table Views: Initial Screen enter /RAP/GEOLVL_CUST in the Table/view eld and select the
Maintain button
3. Choose New Entries .
262
PUBLIC
Common Installation Guide for SAP Customer Activity Repository applications bundle 5.0
Set Up the Applications
4. Use the F4 help to select the Geographical Level 02 desired.
5. Use the F4 help to select the Reporting Currency associated with the Geographical Level 02 selected.
6. Repeat for each Geographical Level 02 required.
7. Save your entries.
6.2.4.4.9.1.5.1.1 Maintain Process Chain Related
Maintain BW process chain variants relevant for SAP Merchandise Planning for Retail.
Context
In this optional procedure, you activate the following infoobjects and maintain the BW process chain variants .
Planning: Characteristic Relationships
InfoObject Description InfoObject Name
Characteristic Rels. for Financial Merchandise Planning Plan /RAP/MPRC01
Characteristic Rels. for Channel Planning Plan /RAP/MPRC02
Planning: Data Slices
InfoObject Description InfoObject Name
Data Slices for Financial Merchandise Planning, Plan
/RAP/MPRC01
Data Slices for Channel Planning, Plan
/RAP/MPRC02
Process Chain Doc Process Chain
InfoObject Name
/RAP/MPPC01_01
Process Chain Starter
InfoObject Name
/RAP/MPPC01_01
Procedure
In this process you will create variants and activate the BW process chains.
1. Planning Sequence Data Slice Activation
1. Go to transaction RSPLAN
2. Select the Planning Sequence button.
Common Installation Guide for SAP Customer Activity Repository applications bundle 5.0
Set Up the Applications
PUBLIC 263
3. In the planning sequence eld, enter /RAP/C11A02_PS08 and choose Edit button.
4. Select the Variables button.
5. Select the Geographical Level 1 Input help and select a value.
6. Select the Save As Button.
7. In the Variables prompt, choose F9 to turn Cross User-variant on.
8. Enter a variant name. For description enter Data Slice Activation and select the Cross-User
Variant check box.
9. Select the Continue button.
10. Select the Continue button in the variables screen.
11. Go to transaction RSA1.
12. In the navigation panel, select the Modeling button, then Process Chain.
13. In the process chain panel, right click on Merchandise Planning - Actualization and choose Edit.
14. In the right tree, right click on Execute Planning Sequence Data Slice Activation (/RAP/
MPPC01_10) and choose Maintain Variant.
15. Load the variant created in step h (if not already loaded).
16. Select the Transfer button and save.
2. Planning Sequence Deactivation of Data Slice
1. Go to transaction RSPLAN
2. Select the Planning Sequence button.
3. In the planning sequence eld, enter /RAP/C11A02_PS09 and choose Edit button.
4. Select the Variables button.
5. Select the Geographical Level 1 Input help and select a value.
6. Select the Save As Button.
7. In the Variables prompt, choose F9 to turn Cross User-variant on.
8. Enter a variant name. For description enter Data Slice Deactivation and select the Cross-User
Variant check box.
9. Select the Continue button.
10. Select the Continue button in the variables screen.
11. Go to transaction RSA1.
12. In the navigation panel, select the Modeling button, then Process Chain.
13. In the process chain panel, right click on Merchandise Planning - Actualization and choose Edit.
14. In the right tree, right click on Execute Planning Sequence Data Slice Deactivation (/RAP/
MPPC01_11) and choose Maintain Variant.
15. Load the variant created in step h (if not already loaded).
16. Select the Transfer button and save.
3. Planning Sequence Channel Mix - Actualization
1. Go to transaction RSPLAN
2. Select the Planning Sequence button.
3. In the planning sequence eld, enter /RAP/C11A02_PS07 and choose Edit button.
4. Select the Variables button.
5. Select the Geographical Level 1 Input help and select a value.
6. Select the Save As Button.
7. In the Variables prompt, choose F9 to turn Cross User-variant on.
8. Enter a variant name. For description enter Channel Mix - Actualization and select the Cross-
User Variant check box.
264
PUBLIC
Common Installation Guide for SAP Customer Activity Repository applications bundle 5.0
Set Up the Applications
9. Select the Continue button.
10. Select the Continue button in the variables screen.
11. Go to transaction RSA1.
12. In the navigation panel, select the Modeling button, then Process Chain.
13. In the process chain panel, right click on Merchandise Planning - Actualization and choose edit.
14. In the right tree, right click on Execute Planning Sequence Channel Mix - Actualization (/RAP/
MPPC01_02) and choose Maintain Variant.
15. Load the variant created in step h (if not already loaded).
16. Select the Transfer button and save.
4. Planning Sequence Financial Merchandise Plan - Division - Actualization
1. Go to transaction RSPLAN
2. Select the Planning Sequence button.
3. In the planning sequence eld, enter /RAP/C11A07_PS11 and choose Edit button.
4. Select the Variables button.
5. Select the Geographical Level 1 Input help and select a value.
6. Select the Save As Button.
7. In the Variables prompt, choose F9 to turn Cross User-variant on.
8. Enter a variant name. For description enter MP - Division - Actualization and select the
Cross-User Variant check box.
9. Select the Continue button.
10. Select the Continue button in the variables screen.
11. Go to transaction RSA1.
12. In the navigation panel, select the Modeling button, then Process Chain.
13. In the process chain panel, right click on Merchandise Planning - Actualization and choose edit.
14. In the right tree, right click on Execute Planning Sequence Financial Merchandise Plan - Division -
Actualization(/RAP/MPPC01_03) and choose Maintain Variant.
15. Load the variant created in step h (if not already loaded).
16. Select the Transfer button and save.
5. Planning Sequence Financial Merchandise Plan - Department - Actualization
1. Go to transaction RSPLAN
2. Select the Planning Sequence button.
3. In the planning sequence eld, enter /RAP/C11A03_PS10 and choose Edit button.
4. Select the Variables button.
5. Select the Geographical Level 1 Input help and select a value.
6. Select the Save As Button.
7. In the Variables prompt, choose F9 to turn Cross User-variant on.
8. Enter a variant name. For description enter MP - Department - Actualization and select the
Cross-User Variant check box.
9. Select the Continue button.
10. Select the Continue button in the variables screen.
11. Go to transaction RSA1.
12. In the navigation panel, select the Modeling button, then Process Chain.
13. In the process chain panel, right click on Merchandise Planning - Actualization and choose edit.
14. In the right tree, right click on Execute Planning Sequence Financial Merchandise Plan - Department
- Actualization(/RAP/MPPC01_04) and choose Maintain Variant.
Common Installation Guide for SAP Customer Activity Repository applications bundle 5.0
Set Up the Applications
PUBLIC 265
15. Load the variant created in step h (if not already loaded).
16. Select the Transfer button and save.
6. Planning Sequence Financial Merchandise Plan - Class - Actualization
1. Go to transaction RSPLAN
2. Select the Planning Sequence button.
3. In the planning sequence eld, enter /RAP/C11A08_PS10 and choose Edit button.
4. Select the Variables button.
5. Select the Geographical Level 1 Input help and select a value.
6. Select the Save As Button.
7. In the Variables prompt, choose F9 to turn Cross User-variant on.
8. Enter a variant name. For description enter MP - Class - Actualization and select the Cross-
User Variant check box.
9. Select the Continue button.
10. Select the Continue button in the variables screen.
11. Go to transaction RSA1.
12. In the navigation panel, select the Modeling button, then Process Chain.
13. In the process chain panel, right click on Merchandise Planning - Actualization and choose edit.
14. In the right tree, right click on Execute Planning Sequence Financial Merchandise Plan - Class -
Actualization(/RAP/MPPC01_05) and choose Maintain Variant.
15. Load the variant created in step h (if not already loaded).
16. Select the Transfer button and save.
7. Planning Sequence Financial Merchandise Plan - Subclass - Actualization
1. Go to transaction RSPLAN
2. Select the Planning Sequence button.
3. In the planning sequence eld, enter /RAP/C11A09_PS13 and choose Edit button.
4. Select the Variables button.
5. Select the Geographical Level 1 Input help and select a value.
6. Select the Save As Button.
7. In the Variables prompt, choose F9 to turn Cross User-variant on.
8. Enter a variant name. For description enter MP - Subclass - Actualization and select the
Cross-User Variant check box.
9. Select the Continue button.
10. Select the Continue button in the variables screen.
11. Go to transaction RSA1.
12. In the navigation panel, select the Modeling button, then Process Chain.
13. In the process chain panel, right click on Merchandise Planning - Actualization and choose edit.
14. In the right tree, right click on Execute Planning Sequence Financial Merchandise Plan - Subclass -
Actualization(/RAP/MPPC01_06) and choose Maintain Variant.
15. Load the variant created in step h (if not already loaded).
16. Select the Transfer button and save.
8. Planning Sequence Channel Plan - Store Comp - Actualization
1. Go to transaction RSPLAN
2. Select the Planning Sequence button.
3. In the planning sequence eld, enter /RAP/C11A19_PS04 and choose Edit button.
4. Select the Variables button.
266
PUBLIC
Common Installation Guide for SAP Customer Activity Repository applications bundle 5.0
Set Up the Applications
5. Select the Geographical Level 1 Input help and select a value.
6. Select the Save As Button.
7. In the Variables prompt, choose F9 to turn Cross User-variant on.
8. Enter a variant name. For description enter CP - Store Comp - Actualization and select the
Cross-User Variant check box.
9. Select the Continue button.
10. Select the Continue button in the variables screen.
11. Go to transaction RSA1.
12. In the navigation panel, select the Modeling button, then Process Chain.
13. In the process chain panel, right click on Merchandise Planning - Actualization and choose edit.
14. In the right tree, right click on Execute Planning Sequence Channel Plan - Store Comp -
Actualization(/RAP/MPPC01_07) and choose Maintain Variant.
15. Load the variant created in step h (if not already loaded).
16. Select the Transfer button and save.
9. Planning Sequence Channel Plan - Multi Store - Actualization
1. Go to transaction RSPLAN
2. Select the Planning Sequence button.
3. In the planning sequence eld, enter /RAP/C11A18_PS05 and choose Edit button.
4. Select the Variables button.
5. Select the Geographical Level 1 Input help and select a value.
6. Select the Save As Button.
7. In the Variables prompt, choose F9 to turn Cross User-variant on.
8. Enter a variant name. For description enter CP - Multi Store - Actualization and select the
Cross-User Variant check box.
9. Select the Continue button.
10. Select the Continue button in the variables screen.
11. Go to transaction RSA1.
12. In the navigation panel, select the Modeling button, then Process Chain.
13. In the process chain panel, right click on Merchandise Planning - Actualization and choose edit.
14. In the right tree, right click on Execute Planning Sequence Channel Plan - Multi Store -
Actualization(/RAP/MPPC01_08) and choose Maintain Variant.
15. Load the variant created in step h (if not already loaded).
16. Select the Transfer button and save.
10. Planning Sequence Channel Plan - Single Store - Actualization
1. Go to transaction RSPLAN
2. Select the Planning Sequence button.
3. In the planning sequence eld, enter /RAP/C11A16_PS08 and choose Edit button.
4. Select the Variables button.
5. Select the Geographical Level 1 Input help and select a value.
6. Select the Save As Button.
7. In the Variables prompt, choose F9 to turn Cross User-variant on.
8. Enter a variant name. For description enter CP - Single Store - Actualization and select the
Cross-User Variant check box.
9. Select the Continue button.
10. Select the Continue button in the variables screen.
Common Installation Guide for SAP Customer Activity Repository applications bundle 5.0
Set Up the Applications
PUBLIC 267

11. Go to transaction RSA1.
12. In the navigation panel, select the Modeling button, then Process Chain.
13. In the process chain panel, right click on Merchandise Planning - Actualization and choose edit.
14. In the right tree, right click on Execute Planning Sequence Channel Plan - Single Store -
Actualization(/RAP/MPPC01_09) and choose Maintain Variant.
15. Load the variant created in step h (if not already loaded).
16. Select the Transfer button and save.
6.2.5 Congure Data Replication Steps
6.2.5.1 Initial Load of Data to DDF Using DRFOUT
Use
SAP Merchandise Planning uses master data, such as product, location, and product hierarchy, that is
replicated from SAP ERP to the DDF module in SAP Customer Activity Repository using the DRFOUT data
replication framework.
Note
Not all of the master data is replicated into DDF using DRFOUT. Some data must be replicated separately
using SLT replication.
Additionally, DRFOut integration and DDF do not support leading zeros in the product IDs.
SAP Merchandise Planning requires that the following master data is replicated from a connected SAP ERP
system using DRFOUT:
Sequence Master Data Technical Details For more information, see:
1 Product Hierarchy
● SAP ERP Description: Material Group
Hierarchy
● DRFOUT Outbound Implementation:
PMCH
● DDF Inbound Interface: /DMF/
MDIF_PROD_HIER_INBOUND
http://help.sap.com/car <your
release> Application Help <>
Demand Data Foundation Integration
Information Inbound Interfaces For
Remote Function Call (RFC)
Communication
Product Hierarchy
Master Data
268 PUBLIC
Common Installation Guide for SAP Customer Activity Repository applications bundle 5.0
Set Up the Applications

Sequence Master Data Technical Details For more information, see:
2 Product
● SAP ERP Description: Material
● DRFOUT Outbound Implementation:
PMAT
● DDF Inbound Interface: /DMF/
MDIF_PRODUCT_INBOUND
http://help.sap.com/car <your
release> Application Help Demand
Data Foundation
Integration Information
Inbound Interfaces For Remote Function
Call (RFC) Communication
Product
Master Data
3 Location
● SAP ERP Description: Plant
● DRFOUT Outbound Implementation:
PPLT
● DDF Inbound Interface: /DMF/
MDIF_LOCATION_INBOUND
http://help.sap.com/car <your
release> Application Help Demand
Data Foundation
Integration Information
Inbound Interfaces For Remote Function
Call (RFC) Communication
Product
Location Master Data
4 Product Location
● SAP ERP Description: Material/Plant
● DRFOUT Outbound Implementation:
PMPL
● DDF Inbound Interface: /DMF/
MDIF_PROD_LOC_INBOUND
http://help.sap.com/car <your
release> Application Help Demand
Data Foundation
Integration Information
Inbound Interfaces For Remote Function
Call (RFC) Communication
Product
Location Master Data
5 Product Location
● SAP ERP Description: Sales Price
● DRFOUT Outbound Implementation:
PSPR
● DDF Inbound Interface: /DMF/
MDIF_PROD_LOC_INBOUND
http://help.sap.com/car <your
release> Application Help Demand
Data Foundation
Integration Information
Inbound Interfaces For Remote Function
Call (RFC) Communication
Product
Location Master Data
6 Inventory
● SAP ERP Description: Inventory
● DRFOUT Outbound Implementation:
PINV
● DDF Inbound Interface: /DMF/
OPIF_INVENTORY_INBOUND
http://help.sap.com/car <your
release> Application Help Demand
Data Foundation
Integration Information
Inbound Interfaces For Remote Function
Call (RFC) Communication
Inventory
Master Data
Common Installation Guide for SAP Customer Activity Repository applications bundle 5.0
Set Up the Applications
PUBLIC 269

Sequence Master Data Technical Details For more information, see:
7 Product Location
● SAP ERP Description: Moving Aver
age Price
● DRFOUT Outbound Implementation:
PMAP
● DDF Inbound Interface: /DMF/
MDIF_PROD_LOC_INBOUND
http://help.sap.com/car <your
release> Application Help Demand
Data Foundation
Integration Information
Inbound Interfaces For Remote Function
Call (RFC) Communication
Product
Location Master Data
9 Location
● SAP ERP Description: Vendor
● DRFOUT Outbound Implementation:
PVEN
● DDF Inbound Interface: /DMF/
MDIF_LOCATION_INBOUND
http://help.sap.com/car <your
release> Application Help Demand
Data Foundation
Integration Information
Inbound Interfaces For Remote Function
Call (RFC) Communication
Location
Master Data
10 Product Hierarchy
● SAP ERP Description: Article Hierar
chy
● DRFOUT Outbound Implementation:
PAHY
● DDF Inbound Interface: /DMF/
MDIF_PROD_HIER_INBOUND
http://help.sap.com/car <your
release> Application Help Demand
Data Foundation
Integration Information
Inbound Interfaces For Remote Function
Call (RFC) Communication
Product
Hierarchy Master Data
11
Sales Order and
Shipment
● SAP ERP Description: Sales Orders
● DRFOUT Outbound Implementation:
SALES_ORDR
● DDF Inbound Interface: /DMF/
OPIF_DOCUMENT_INBOUND
Note
This data is only required if Wholesale
or E-Commerce planning scenarios
are used productively.
http://help.sap.com/car <your
release> Application Help Demand
Data Foundation
Integration Information
Inbound Interfaces For Remote Function
Call (RFC) Communication
Sales Order
and Shipment Master Data
Prerequisites
Before replicating data from SAP ERP to DDF using DRFOUT, the following prerequisites must be fullled:
● The following business functions are activated in SAP ERP:
○ ISR_APPL_OUTBOUND_DMF
○ ISR_RETAIL_OUTBOUND_DMF
270
PUBLIC
Common Installation Guide for SAP Customer Activity Repository applications bundle 5.0
Set Up the Applications

● You have noted the dierent terms for the following objects:
SAP ERP SAP Retail
DDF / SAP Merchandise Planning
for Retail
Material Article Product
Plant Site Location
6.2.5.2 Initial Load of Sales Data from BW
Use
If you have accumulated large amounts of historical sales data using SAP POS Data Management or SAP
Customer Activity Repository, it is possible that you are storing these large data sets in a connected SAP BW
system. In such a case, you can perform the initial load of the sales time series (historical POS data) data into
DDF using the BI Interface for Time Series report.
Note
These instructions extract historical sales data from an Infocube in BW. If you are using BW/4HANA,
additional project work will be required to re-implement the BAdI /DMF/BI_IF_READ_BI. For technical
details, see 2764634 .
Procedure
1. Log on to your back-end system.
2. Execute transaction SE38.
3. Specify /DMF/BI_IF_TS in the Program eld and choose Execute.
4. Read the documentation associated with the report, carry out the described customizing, and run the
report accordingly.
More Information
http://help.sap.com/car Application Help Demand Data Foundation Integration Information Inbound
Interfaces For Remote Function Call (RFC) Communication
Sales Time Series .
Common Installation Guide for SAP Customer Activity Repository applications bundle 5.0
Set Up the Applications
PUBLIC 271

6.2.5.3 Initial Load of Goods Movement KPIs
Load goods movement Key Performance Indicators (KPI) for returns, receipts, and open quantity.
Context
The goods movement data is stored in the SLT replicated tables EKPO, EKET, and EKBE in the Customer
Activity Repository. You perform the initial load of this data into Demand Data Foundation (DDF) using the
report /RAP/MPR_ECC_KPI_CALC. When run in initial mode, this report will load 2 years of data from the
current date. Further information is available in the documentation attached to the report.
Master Data SAP ERP Table
Purchasing Document Header EKKO
Purchasing Document Item EKPO
History per Purchasing Document EKBE
Scheduling Agreement Schedule Lines EKET
In addition there are some prequisite steps to follow.
● You have maintained scal year variants using SPRO. Navigate to SAP Customizing Implementation
Guide Cross-Application Components Demand Data Foundation Basic Settings Dene Default
Values .
Procedure
1. Log on to your back-end system.
2. Verify your user has the role /RAP/BW_MPR_WORKBOOKS assigned.
3. You have maintained scal year variants using SPRO. Navigate to SAP Customizing Implementation
Guide Cross-Application Components Demand Data Foundation Basic Settings Dene Default
Values
.
4. Execute transaction SE38.
5. Specify /RAP/MPR_ECC_KPI_CALC in the Program eld, select radio button Initial and select Execute.
6. Refer Documentation for report /RAP/MPR_ECC_KPI_CALC and /RAP/MPR_BOP_KPI table for details,
uses, and descriptions.
272
PUBLIC
Common Installation Guide for SAP Customer Activity Repository applications bundle 5.0
Set Up the Applications

Next Steps
It is recommended you run this report weekly to update the aggregated KPIs with the ongoing ERP activity
.
6.2.5.4 Delta Load of Data to DDF Using DRFOUT
We recommend that you schedule a weekly periodic task to replicate inventory data (outbound implementation
PINV) from the SAP ERP system to the system for SAP Merchandise Planning. This replication builds up the
inventory history data that is needed by SAP Merchandise Planning.
6.2.5.5 Delta Load of Sales Data in SAP Customer Activity
Repository
Use
Once the initial load of historical sales data is completed or, if you are working on a brand new system
implementation and do not have to perform an initial sales data load, you need to congure the periodic delta
load of sales data in SAP Customer Activity Repository.
Procedure
1. Ensure that you have properly congured the POS Sales Transfer and Audit functionality in SAP Customer
Activity Repository to receive transaction data from your connected POS systems.
For more information, see https://help.sap.com/viewer/p/CARAB <Version> Application Help
SAP Customer Activity Repository POS Data Transfer and Audit .
2. Ensure that you have congured the Supply - DMF-Based Applications outbound tasks to load sales data
from POS Sales Transfer and Audit to DDF.
For more information, see https://help.sap.com/viewer/p/CARAB <Version> Application Help
SAP Customer Activity Repository POS Data Transfer and Audit Task Processing Tasks for Sending
Data to Follow-On Applications .
Recommendation
If you are not storing aggregated sales data in an SAP BW system, and have historical sales data that
you would like to load into DDF from POS Sales Transfer and Audit, you can congure the Supply - DMF-
Based Applications outbound tasks to perform this initial load.
3. Monitor the transfer of sales time series data as described in https://help.sap.com/viewer/p/CARAB
<Version> Application Help SAP Customer Activity Repository Demand Data Foundation
Integration Information Inbound Processing .
Common Installation Guide for SAP Customer Activity Repository applications bundle 5.0
Set Up the Applications
PUBLIC 273

More Information
https://help.sap.com/viewer/p/CARAB <Version> Application Help SAP Customer Activity Repository
Demand Data Foundation Integration Information Inbound Interfaces For Remote Function Call (RFC)
Communication
Sales Time Series .
6.2.5.6 Delta Load of Goods Movement KPIs
Once the initial load of historical goods movement KPIs data is completed you should continue to update your
data on a recurring basis. As data is replicated from SAP ERP activity, the values for goods movement KPIs can
only be added to the Demand Data Foundation when you execute the report /RAP/MPR_ECC_KPI_CALC . The
delta load sets the timeframe to start one month (30 days) prior to the current date and one year in the future
from the current date.
To execute the report, log on to your back-end system and execute transaction SE38. Specify /RAP/
MPR_ECC_KPI_CALC
in the Program eld and use the Execute button. Select radio button Delta and select
Execute. For further information see the documentation attached to the report by selecting Documentation,
Display on the ABAP Editor: Initial Screen.
6.2.5.7 Replicate SAP ERP Tables for SAP Merchandise
Planning
Use
Verify that all SAP ERP or SAP S/4HANA tables that are relevant for SAP Merchandise Planning KPIs have not
only been created but have also been lled with data.
Note
You have already replicated all of the relevant tables in a prior step, Create/Replicate Source Master Data
System Tables [page 91].
In particular, SAP Merchandise Planning requires that the following master data table are replicated in order to
calculate KPIs:
Master Data SAP ERP Table
Purchasing Document Header EKKO
Purchasing Document Item EKPO
History per Purchasing Document EKBE
274 PUBLIC
Common Installation Guide for SAP Customer Activity Repository applications bundle 5.0
Set Up the Applications

Master Data SAP ERP Table
Scheduling Agreement Schedule Lines EKET
6.2.6 Create Market Hierarchy
SAP Merchandise Planning supports market hierarchies, a logical structuring of selling locations (stores,
wholesale customers, digital customers) that align with your goals for planning.
The market hierarchy allows you to group locations by markets or across multiple sales organizations. In
addition, your Area of Responsibility (AOR) must be aligned with your market hierarchy before using the
planning applications. Do the following steps to create a market hierarchy:
1. Log in to the application server using SAP GUI and execute transaction code NWBC.
2. Select the Services menu.
3. In the left navigation menu select Location Services Location Hierarchy .
In the POWL menu on the right, select the Create button, then Market Hierarchy in the dropdown.
4. Enter the location hierarchy name, description and the master data system for your new hierarchy.
5. Select the Editor tab. Enter or search for the locations that you want to add to your market hierarchy.
6. Add the locations to your market hierarchy by selecting the row or rows and selecting the move arrow.
Note
The same location ID cannot be used more than once in a market hierarchy. For example location ID
ABC can exist as multiple location types. It can exist as a distribution chain (DC) type, a store type, and
a customer type. You may not have the type of DC and store in the same hierarchy
7. Save your entries.
More Information
For more information regarding location and market hierarchies, see Maintain Location Hierarchies located at
https://help.sap.com/viewer/p/CARAB <version> Application Help SAP Customer Activity Repository
applications bundle Demand Data Foundation General Services Maintenance Services
For more information about AOR see Maintain Area of Responsibility located at https://help.sap.com/viewer/p/
CARAB
<version> Application Help SAP Customer Activity Repository applications bundle Demand
Data Foundation General Services .
.
6.2.7 Specify Analysis Workbook Settings
Common Installation Guide for SAP Customer Activity Repository applications bundle 5.0
Set Up the Applications
PUBLIC 275

6.2.7.1 Enable Macros
Use
In this procedure, you enable your SAP Analysis for Microsoft Oce workbooks to use macros.
Procedure
1. Open the SAP Analysis for Microsoft Oce from Start All Programs SAP Business Intelligence
Analysis for Microsoft Excel .
2. Choose File Options Customize Ribbon .
3. Under Customize the Ribbon, select Main Tabs.
4. Enable the entry Developer and conrm by choosing OK.
5. Now you will see the new Developer tab in your SAP Analysis for Microsoft Oce.
6. Select the Developer Tab and choose Macro Security.
7. Choose Enable all macros.
6.2.7.2 General Workbook Settings
Use
You use SAP Analysis for Microsoft Oce to launch the planning workbooks.
Procedure
If you are unable to see the Analysis , MP Selection, and MP Info options on the menu of Analysis for Microsoft
Excel, perform the following steps in the Options, Add-Ins of the Excel options:
1. Enter COM in the Manage eld and choose Go.
2. In the COM Add-Ins box, select the Analysis and Planning options and choose Go. If you do not nd them
in the list, Enter Disabled in the Manage eld and choose Go.
Now you are able to view the Analysis , MP Selection and MP Info options.
276
PUBLIC
Common Installation Guide for SAP Customer Activity Repository applications bundle 5.0
Set Up the Applications

6.3 SAP Assortment Planning
Note
Some of the activities in this section may have already been performed in the corresponding section under
SAP Customer Activity Repository. Such activities do not need to be repeated during the setup and
installation of consuming applications.
The following diagram depicts the main steps of the post-installation process for SAP Assortment Planning and
contains links to the descriptions of these steps. There are two further steps in the back-end system following
Congure Assortment Planning [page 278]:
● Maintain Fiscal Year Variant for Retail Week [page 279]
● Generate Time Data - Fiscal Calendar [page 283]
● Perform Core Steps for SAP Customer Activity Repository [page 226]
● Congure Assortment Planning [page 278]
● Activate Planning Framework Content (SAP Assortment Planning) [page 284]
Common Installation Guide for SAP Customer Activity Repository applications bundle 5.0
Set Up the Applications
PUBLIC 277

● Congure Data Replication [page 293]
● Run the Validation Report [page 293]
● Perform General SAP Gateway Conguration [page 108]
● Congure SAP Fiori Launchpad [page 115]
● Activate OData Services [page 111]
● Activate SAP Assortment Planning ICF Services [page 295]
● Dene System Alias for Back-End Transactions [page 296]
● Assign Roles, Catalogs, and Groups in SAP Fiori Launchpad [page 298]
● Congure Index Calculation [page 295]
6.3.1 Perform Core Steps for SAP Customer Activity
Repository
To set up this application, you must rst perform the Core (Mandatory) steps for SAP Customer Activity
Repository. The core steps are mandatory for all the consuming applications.
Procedure
Perform all steps listed under Core (Mandatory for All Applications) [page 83].
6.3.2 Congure Assortment Planning
Use
To use SAP Assortment Planning, you must dene several application-specic settings in Customizing.
Procedure
1. Specify assortment list settings.
In the Assortment List Settings Customizing activity, found under Cross-Application Components
Assortment Planning Assortment Lists , you can specify general settings for assortment lists. For
example, you can dene whether you can assign an assortment list product to more than one module.
2. Verify settings under Cross-Application Components Assortment Planning Imported Demand Data
Foundation Settings
Although you might have specied most of these settings when conguring DDF, the activities under
Imported Demand Data Foundation Settings are particularly important for the SAP Assortment Planning
application.
278
PUBLIC
Common Installation Guide for SAP Customer Activity Repository applications bundle 5.0
Set Up the Applications

3. Dene the required number ranges.
You must set all of the number ranges under SAP Customizing Implementation Guide Cross-
Application Components Assortment Planning Number Range
4. Dene the business week (using transaction SPRO) under Cross-Application Components Demand
Data Foundation Basic Settings Dene Business Week
5. Verify the default implementations of BAdIs under SAP Customizing Implementation Guide Cross-
Application Components Assortment Planning Enhancements Using Business Add-Ins and if
necessary, provide custom implementations.
Note
We recommend that you activate BAdI implementations that enable the use of the Omnichannel SAP
BW Structure. For more information, see Activate Planning Framework Content (SAP Assortment
Planning) [page 284].
6. To use forecasted values in the Sales & Inventory Analysis view within the My Assortment Lists app,
congure Unied Demand Forecast (UDF). For more information, see the SAP Customer Activity Repository
Administration Guide, section Congure Unied Demand Forecast (UDF).
Related Information
Conguration Information
6.3.3 Maintain Fiscal Year Variant for Retail Week
Use
In this procedure you maintain the required scal year variant ( 0FISCVARNT 'RW'). SAP Assortment Planning
uses time objects 0FISCPER (scal year period) and 0FISCVARNT (scal year variant), provided as part of the
technical BI Content, and activated in the Activate Technical Content [page 284] procedure.
Caution
You must maintain scal year variants for a period far enough into the past and into the future to cover the
full range required for your planning activities. For example, two years into the past and ve years into the
future.
The steps provided in this procedure allow you to maintain 0FISCVARNT 'RW' using the standard 4-5-4
calendar entries. If you are using alternative scal periods in your retail business, for example, each week
starting on a Sunday instead of Saturday, you can provide your own entries instead of the ones suggested in
this guide.
Common Installation Guide for SAP Customer Activity Repository applications bundle 5.0
Set Up the Applications
PUBLIC 279

Procedure
1. Log on to your back-end system.
2. Launch scal year variant maintenance (transaction GVAR).
3. Choose New Entries.
4. On the New Entries: Overview of Added Entries screen make the following sets of entries:
Create New Fiscal Year Variant
5. Choose Enter.
An information message is displayed about creating more than 16 periods, choose Continue.
6. Choose Back.
You can see the newly created entry.
7. Mark the entry RW and select Shortened Fiscal Years from the Dialog Structure.
Shortened Fiscal Years in Dialog Structure
8. In the Fiscal year dialog, enter the year (for example, 2015 ) in the Fiscal year eld and choose Continue.
9. On the Change View "Shortened Fiscal Years": Overview screen, choose New Entries.
10. In the Shortened Fiscal Years table, enter 52 in the No. of posting periods eld.
11. Choose Back twice.
12. On the Change View "Fiscal Year variants": Overview screen, mark the entry RW and select Periods from the
Dialog Structure.
13. In the Calendar yr dialog, enter the year (for example, 2015 ) in the Calendar yr eld and choose Continue.
Data for the previous year must be maintained.
14. On the Change View "Periods": Overview screen, choose New Entries.
15. In the Periods table, enter the data (month, day, period, year shift) for each period according to your scal
calendar. For an example, see the following table. For more examples, see SAP Note 2112634 . If you
want to copy data from this note, locate the required year and enter the data by copy-and-paste.
2015 Weekly Calendar
Month Day Period Year Shift
1 3 48 -1
1 10 49 -1
280 PUBLIC
Common Installation Guide for SAP Customer Activity Repository applications bundle 5.0
Set Up the Applications
Month Day Period Year Shift
1 17 50 -1
1 24 51 -1
1 31 52 -1
2 7 1 0
2 14 2 0
... .. ... ...
16. Repeat steps 7-15 to maintain the weekly scal year variant for all of the required years, entering each year
as shortened scal year. The corresponding tables are available in SAP Note
2112634 .
17. Choose Save.
18. Launch transaction RSRHIERARCHYVIRT and ensure that the dates specied in the From and To elds
under Time Interval cover the years maintained for the scal year variant in the previous steps.
6.3.4 Maintain Fiscal Year Variant for Month
Context
In this section, you maintain the required scal year variant values for the scal month, 'RM'. This is especially
required for using the Sales & Inventory Analysis view in the My Assortment Lists app.
Caution
You must maintain scal year variants for a period far enough into the past and into the future to cover the
full range required for your planning activities. For example, two years into the past and ve years into the
future.
If you are using alternative scal periods in your retail business, you can provide your own entries instead of the
ones suggested in this guide.
Procedure
1. Log on to your back-end system.
2. Launch scal year variant maintenance (transaction GVAR).
3. Choose New Entries.
Common Installation Guide for SAP Customer Activity Repository applications bundle 5.0
Set Up the Applications
PUBLIC 281

4. On the New Entries: Overview of Added Entries screen make the following sets of entries:
Field Name User Entry
FV RM
Description Planning month
Calendar year Do not select
Year-dependent Select
Number of posting periods 12
No. of special periods
5. Choose Enter.
6. Choose Back.
You can see the newly created entry.
To get the information to enter in the next step, open SAP Note 2112634 .
7. Mark the entry RM and select Periods from the Dialog Structure and double click to open the Calendar year
dialog.
8. Enter the year (for example, 2015) in the Calendar yr eld and choose Continue.
9. On the Change View "Periods": Overview screen, choose New Entries.
10. In the Periods table, enter the data (month, day, period, year shift) for each period according to your scal
calendar. For an example, see the following table.
2015 Monthly Calendar (sample)
Month Day Period Year Shift
1 31 12 -1
2 28 1 0
3 28 2 0
5 2 3 0
5 30 4 0
6 27 5 0
8 1 6 0
8 29 7 0
9 26 8 0
10 31 9 0
282 PUBLIC
Common Installation Guide for SAP Customer Activity Repository applications bundle 5.0
Set Up the Applications

Month Day Period Year Shift
11 28 10 0
12 26 11 0
12 31 12 0
11. Enter the last valid calendar date of the period being added in the Month and Day elds.
12. Enter the relevant Period number.
13. In the Year Shift eld, enter +1 if the scal year is later than the calendar year enter. Enter -1 if the scal year
is before the calendar year.
14. Press Enter to accept the rst row.
15. Continue adding each period to complete the scal year. Choose Save after you have nished the entries
for a year.
16. Continue adding the scal year variants for each year required by your scenario by repeating steps 3 to 15.
17. Choose Save after you have nished the maintenance for the last year.
6.3.5 Generate Time Data - Fiscal Calendar
In this procedure, you generate time data (Fiscal calendar) required for SAP Assortment Planning.
Use
Execute this procedure to generate time data (Fiscal calendar). This is especially required for using the Sales &
Inventory Analysis view in the My Assortment Lists app.
Procedure
1. Log on to SAP HANA studio.
2. In the Modeler perspective, on the Quick Launch tab, select your SAP Customer Activity Repository
applications bundle system and choose Generate Time Data.
3. Select Fiscal as the Calendar Type.
4. Enter the same range of years as dened in the previous procedure, Maintain Fiscal Year Variant for Retail
Week [page 279].
5. In the Variant Schema eld, enter the name of the database schema that contains the tables holding the
scal year variant data.
For SAP Assortment Planning, these are tables T009 and T009B, which you lled with data in the previous
procedure, Maintain Fiscal Year Variant for Retail Week [page 279].
6. Select the RW scal year variant, dened in the previous procedure, Maintain Fiscal Year Variant for Retail
Week [page 279].
Common Installation Guide for SAP Customer Activity Repository applications bundle 5.0
Set Up the Applications
PUBLIC 283

7. Choose Generate.
For more information, see:
● https://help.sap.com/viewer/p/SAP_HANA_LIVE Installation and Upgrade Administrator's Guide
Conguration Steps Generate Time Data
● https://help.sap.com/viewer/p/SAP_HANA_PLATFORM Development SAP HANA Modeling Guide (for
SAP HANA studio) Creating Information Views and Previewing its Output Generate Time Data
6.3.6 Activate Planning Framework Content (SAP
Assortment Planning)
In a new installation, only the Omnichannel SAP BW structure is supported in SAP Assortment Planning. The
Retail SAP BW Structure is supported in an existing installation with maintenance, however no new
functionality will be developed for this structure.
Prerequisite
To use the Omnichannel SAP BW structure, the following prerequisites must be met:
● Enable the usage of planning congurations under Cross-Application Components Assortment
Planning
Imported Demand Data Foundation Settings Basic Settings Dene Default Values . The
Omnichannel SAP BW structure only works when planning congurations are used.
● If you are integrating with SAP Merchandise Planning, enable the implementation of BAdI: Read
Merchandise Planning KPI Data under Cross-Application Components Demand Data Foundation Data
Maintenance Planning Conguration Enhancements Using Business Add-Ins .
The Omnichannel SAP BW structure consists of local BI Content only. To create workbooks on top of the
Omnichannel SAP BW structure, contact SAP Digital Business Services for a custom implementation project.
The following subsections describe the activation steps.
6.3.6.1 Activate Technical BI Content
Use
The rst time you enter the Data Warehousing Workbench, the system runs a background job to activate
technical content. Technical content consists of technical information that is generated by the system, for
example, data required for the general operation of BI Content, or time data.
Procedure
1. On your back-end system, open the Data Warehousing Workbench (transaction RSA1).
284
PUBLIC
Common Installation Guide for SAP Customer Activity Repository applications bundle 5.0
Set Up the Applications

2. If prompted, in the Replicate Metadata dialog box, choose Only Activate.
3. If a message appears that you are only authorized to work in client ... (Brain 009), then refer to SAP Note
316923 (do not import the support package, but use the description under section Workaround).
4. Select Do not show this question Again in the dialog that appears.
5. Choose Yes.
Make sure that the current job has nished before you proceed with the next step. Check the status of the
background job using transaction SM37or SLG1. If there are problems, you must rst solve them.
Note
If you get the short dump "RAISE_EXCEPTION" when installing InfoObjects from the BI content, see
SAP Note 1637935 for a possible solution.
Also, see SAP Notes 2090845 and 2056106 for important information on technical content
activation.
Following activation, you can locate the technical content in the Data Warehousing Workbench as follows:
1. Selecting Modeling in the left-hand frame.
2. Expand InfoObjects.
3. In the right-hand frame, locate Technical Content.
6. You can use transaction RSTCO_ADMIN to restart the activation of the technical content and to verify the
status of the activation.
6.3.6.2 Enable Optimized In-Memory Planning Capabilities
of SAP BW Integrated Planning
Use
To be able to use the SAP Analysis for Microsoft Oce workbooks built on top of the SAP Assortment Planning
planning framework content, you must enable the optimized in-memory planning capabilities of the integrated
planning engine in SAP Business Warehouse (SAP BW Integrated Planning). This includes the enabling of the
Planning Application Kit (PAK).
Procedure
1. Read SAP Note 1919631 .
2. In your back-end system, launch table/view maintenance (transaction SM30).
3. Enter RSPLS_HDB_ACT in the Table/View eld and choose Maintain.
4. Choose New Entries.
5. In the HANA Integratn. Active column select Deep HANA Integration Active and in the Functn. Active
column, enable the checkbox.
6. In the HANA Integratn. Active column select BPC Embedded Model Active and in the Functn. Active
column, enable the checkbox.
Common Installation Guide for SAP Customer Activity Repository applications bundle 5.0
Set Up the Applications
PUBLIC 285

6.3.6.3 Activate Application BI Content (Omnichannel SAP
BW Structure)
Context
In this procedure, you perform a sequential, step-by-step activation of the local BI Content objects delivered in
the Omnichannel SAP BW structure of the SAP Assortment Planning application. SAP Assortment Planning
uses this application BI Content to consume data stored in the back-end system
Note
To ensure correct activation of the BI Content objects, carry out the activation sequentially, as specied in
the following procedures. Resolve any activation warnings, except for the ones listed under Result [page
293], which can be ignored.
Also, do not disable the default BI setting to collect and activate all dependencies. The instructions below
activate a minimum subset of objects, and it assumed that all their dependencies are collected and
activated.
The consumed data from the back-end system can be created by the SAP Assortment Planning application, or
be replicated from a source master data system. In both cases, beware of limitations with regard to the
characters allowed by SAP BW. For more information, see:
● SAP Assortment Planning Administration Guide under Initial Load of Data to DDF Using DRFOUT
● 173241
● Customizing activity Maintain permitted extra characters under SAP NetWeaver Business Warehouse
General Settings .
Procedure
1. On your back-end SAP Assortment Planning system, open the Data Warehousing Workbench (transaction
RSA1).
2. Verify transport connections.
1. Select Transport Connection in the left-hand frame.
2. Select Object Types.
3. Expand Source System.
286
PUBLIC
Common Installation Guide for SAP Customer Activity Repository applications bundle 5.0
Set Up the Applications

Selecting Source Systems
4. Use Select Objects to ensure that the back-end system is selected as the source system.
5. Choose Transfer Selections.
6. At the top of the right-hand frame, above the list of Collected objects, choose Grouping and select Only
Necessary Objects.
7. At the top of the right-hand frame, choose Collection Mode and select Collect Automatically.
Grouping and Collection Settings
3. Determine if you need to enable to Match (X) or copy option for the BI Content, which you will activate in
the subsequent steps.
Match(X) or copy Selection
Installation Type Selection
New Installation Do not enable the Match (X) or copy option for any of the BI Content objects.
Common Installation Guide for SAP Customer Activity Repository applications bundle 5.0
Set Up the Applications
PUBLIC 287

Installation Type Selection
Upgrade
(Previously installed/
activated any of
the /RAP/* BI Content)
Standard /RAP/* BI Content ob
jects have not been modied in
your local environment
1
Standard /RAP/* BI Content objects have been
modied in your local environment
1
Do not enable the Match (X) or copy
option for any of the BI Content ob
jects.
Enable the Match (X) or copy option.
During the activation of each BI Content object type,
you will be asked to carry out an additional Transfer
selections step. In this step, select to install the
Active Version (that is, your modied version) or the
Content Version (that is, the SAP delivered, and pos
sibly updated version of the object). The project im
plementation team should advise you on which op
tion is required for each object.
Caution
When you choose to install the Content Version,
the SAP delivered objects included in the current
release will be installed regardless of any modi-
cations made to the currently existing BI Con
tent objects.
1
As a system administrator, you may need to contact the SAP Assortment Planning project implementation team to
learn if standard, SAP-delivered, BI Content objects have been modied in your local environment.
4. Activate InfoObject catalogs.
If at any point during the installation of BI Content objects you are presented with a dialog asking you to
add objects to a personal list, we recommend that you select No.
Remember
You can ignore activation warnings listed under Result [page 293].
1. Select BI Content in the left-hand frame.
2. Select Object Types and expand InfoObject Catalog.
288
PUBLIC
Common Installation Guide for SAP Customer Activity Repository applications bundle 5.0
Set Up the Applications

3. Use Select Objects to select the /RAP/CHAR_CAT and the /RAP/KYF_CAT catalogs.
4. Choose Transfer Selections.
5. In the right-hand frame, in the list of Collected objects, verify that both InfoObject catalogs are listed.
6. Right-click on each of the InfoObject catalogs, and choose Install all Bellow.
7. Choose Install.
If an information dialog box appears, choose Continue. Choose Local Object or enter a package if you
need to transport the objects.
5. Activate Variables.
Remember
You can ignore activation warnings listed under Result [page 293].
1. Select BI Content in the left-hand frame.
2. Select Object Types and expand Query Elements followed by Variable.
3. Use Select Objects to select the following variables:
○ /RAP/PLCND_ESM_02
○ /RAP/PLCSET_ESM_02
○ /RAP/PCYCLE_EMM_01
○ /RAP/PLNHR_MSO_01
○ /RAP/PLNHN1_MSO_01 to /RAP/PLNHN9_MSO_01 (inclusive)
○ /RAP/PRDHN1_MMO_01 to /RAP/PRDHN9_MMO_01 (inclusive)
Common Installation Guide for SAP Customer Activity Repository applications bundle 5.0
Set Up the Applications
PUBLIC 289

4. Choose Transfer Selections.
5. In the right-hand frame, in the list of Collected objects, verify that all of the selected variables are listed
and that the option in the Install column is enabled .
6. Choose Install.
If an information dialog box appears, choose Continue. Choose Local Object or enter a package if you
need to transport the objects.
6. Maintain version master data.
1. In the left-hand frame, select Modeling InfoObjects .
2. In the right-hand frame under Assortment Planning for Retail RAP Character InfoObject Catalog ,
search in the object list for the InfoObject /RAP/VERSN.
3. Right-click the InfoObject /RAP/VERSN, choose Maintain Master Data from the context menu, and
maintain the following entries on the Time Independent tab:
Version Short description
# An empty version value that you must maintain
ALV Assortment List Vsn
APF Vsn of nal plan
Note
Save your changes and activate them.
7. Activate Advanced DataStore Objects.
If during the installation, you are presented with a message stating that your source system is not active,
navigate to the Modeling tab, locate your source system under Source Systems, and activate it by right-
clicking and selecting Activate. If prompted, choose Only Activate .
Remember
You can ignore activation warnings listed under Result [page 293].
1. Select BI Content in the left-hand frame.
2. Select Object Types and expand DataStore Object (advanced).
3. Use Select Objects to select all DataStore Objects starting with /RAP/DS*.
4. Choose Transfer Selections.
5. In the list of Collected objects, verify that the option in the Install column is enabled for each of the
objects.
6. Choose Display List .
7. Right-click the tree node DataStore Object (advanced) and choose Install all Below.
8. Choose Install. If an information dialog box appears, choose Continue. Choose Local Object or enter a
package if you need to transport the objects.
8. Activate CompositeProviders.
290
PUBLIC
Common Installation Guide for SAP Customer Activity Repository applications bundle 5.0
Set Up the Applications

Remember
You can ignore activation warnings listed under Result [page 293].
1. Select BI Content in the left-hand frame.
2. Select Object Types and expand CompositeProvider.
3. Use Select Objects to select all CompositeProviders from /RAP/CP40 to /RAP/CP46 (inclusive).
4. Choose Transfer Selections.
5. In the list of Collected objects, verify that the option in the Install column is enabled for each of the
objects.
6. Choose Display List .
7. Right-click the tree node DataStore Object (advanced) and choose Install all Below.
8. Choose Install. If an information dialog box appears, choose Continue. Choose Local Object or enter a
package if you need to transport the objects.
9. Activate Aggregation Levels.
Remember
You can ignore activation warnings listed under Result [page 293].
1. Select BI Content in the left-hand frame.
2. Select Object Types and expand Planning Aggregation Level .
3. Use Select Objects to select the following Aggregation Level:
Aggregation Levels
Aggregation Levels
/RAP/C44A01
/RAP/C44A02
/RAP/C44A03
/RAP/C44A04
/RAP/C46A02
4. Choose Transfer Selections.
5. In the list of Collected objects, verify that the option in the Install column is enabled for each of the
objects.
6. Choose Install. If an information dialog box appears, choose Continue. Choose Local Object or enter a
package if you need to transport the objects.
10. Activate Planning Sequence Objects.
Remember
You can ignore activation warnings listed under Result [page 293].
1. Select BI Content in the left-hand frame.
Common Installation Guide for SAP Customer Activity Repository applications bundle 5.0
Set Up the Applications
PUBLIC 291

2. Select Object Types and expand Planning Planning Sequence .
3. Use Select Objects to select the following Planning Sequences:
Planning Sequences
Planning Sequences
/RAP/D50A01_PS01
/RAP/D57A01_PS01
/RAP/C40A01_PS01
/RAP/C40A05_PS01
/RAP/C46A01_PS01
/RAP/C46A03_PS01
/RAP/C46A04_PS01
/RAP/C46A04_PS02
4. Choose Transfer Selections.
5. In the list of Collected objects, verify that the option in the Install column is enabled for each of the
objects.
6. Choose Install. If an information dialog box appears, choose Continue. Choose Local Object or enter a
package if you need to transport the objects.
11. Activate Planning Function Type Objects.
Remember
You can ignore activation warnings listed under Result [page 293].
1. Select BI Content in the left-hand frame.
2. Select Object Types and expand Planning Function Type for Planning .
3. Use Select Objects to select the following Planning Function:
Planning Functions
Planning Functions
/RAP/OP_BUFFER_DATA
4. Choose Transfer Selections.
5. In the list of Collected objects, verify that the option in the Install column is enabled for each of the
objects.
6. Choose Install. If an information dialog box appears, choose Continue. Choose Local Object or enter a
package if you need to transport the objects.
12. Choose Exit to leave the transaction.
292
PUBLIC
Common Installation Guide for SAP Customer Activity Repository applications bundle 5.0
Set Up the Applications
Results
If activation warnings similar to the ones displayed below appear, you can ignore them.
● CMP problem occurred in characteristic <CHAR> for InfoProvider <INFO_PROV>
● Rounding inaccuracies occur with data type FLOAT for AMOUNT and QUANTITY
● Characteristic <CHAR>: Lower case makes selection of char. values dicult
● Data type of char. <CHAR> (<TYPE1>) is not equal to data type of attribute <ATTR> (<TYPE2>)
● Length of characteristic <TEXT CHAR> (<LENGTH1>) and assigned attribute <ATTR> (<LENGTH2>) not
same
● The short text of DataSource <SOURCE> is not maintained in language <LANG>
● Skip key gure <KYF>: aggregation type NO2 not supported
● Attribute <ATTR>: Conversion routine <CONV> ignored
● Attribute <ATTR>: Compounding ignored
● Datatype FLTP for dataeld <FIELD> of the DSO is not allowed
● Conversion problems possible for source eld <FIELD1> / target eld <FIELD2>
6.3.7 Congure Data Replication
SAP Assortment Planning uses master data, sales history data, inventory data, and merchandise planning data
originating from connected systems, such as SAP Retail (SAP ERP) or SAP BW.
For more information, see SAP Assortment Planning Administration Guide under Congure Data Replication.
6.3.8 Run the Validation Report
1. Run transaction /DMF/VAL_CAR_INSTALL.
Alternatively, run transaction SE38 and execute the /DMF/VALIDATE_CAR_INSTALLATION report.
2. Select the Assortment Planning scenario and select Execute.
In the dialog that appears, select whether to validate the Retail SAP BW structure, the Omnichannel SAP
BW structure, or both. The SAP BW structure to validate depends on the structure that you have selected
to activate during the previous step Activate Planning Framework Content (SAP Assortment Planning)
[page 284] .
Common Installation Guide for SAP Customer Activity Repository applications bundle 5.0
Set Up the Applications
PUBLIC 293

Running this report allows you to verify the success of the installation, providing a log of potential issues.
For example, you may be presented with the following results:
Validation Report Results
View the long text associated with each message to see the link to the documentation describing the
procedure you have to troubleshoot.
Related Information
Activate Planning Framework Content (SAP Assortment Planning) [page 284]
6.3.9 Congure Front-End
6.3.9.1 Congure SAP Gateway
For information about the conguration and activation of SAP Gateway as well as the activation of all the
common OData services for SAP Fiori, see Congure SAP Gateway [page 107].
294
PUBLIC
Common Installation Guide for SAP Customer Activity Repository applications bundle 5.0
Set Up the Applications

6.3.9.2 Congure Index Calculation
We recommend that you schedule the Calculation of SAPUI5 Application Index for SAPUI5 Repositories report
(/UI5/APP_INDEX_CALCULATE) to run as a background job on your front-end server.
This is one of the mandatory tasks under SAP Customer Activity Repository Core (Mandatory for All
Applications) that you have most likely performed already. If not, see Calculate SAPUI5 Application Index for
SAP Fiori Apps [page 117].
6.3.9.3 Activate SAP Assortment Planning ICF Services
Use
For security reasons, all Internet Communication Framework (ICF) services relevant to your SAP Assortment
Planning application are made available in an inactive state.
You have activated the central ICF services as described in Perform General SAP Gateway Conguration [page
108] and Congure SAP Fiori Launchpad [page 115]. This procedure provides the instructions to activate ICF
services required for the SAP Assortment Planning SAP Fiori apps.
Procedure
1. Log on to your front-end server.
2. Open service maintenance (transaction SICF).
3. In the Dene Services screen, select the Location Clustering service by specifying the following:
○ Hierarchy Type: SERVICE
○ Virtual Host: DEFAULT_HOST
○ Service Path: /sap/bc/ui5_ui5/sap/locclsts_v2/
4. Choose Execute.
5. To activate the service, choose Service/host Activate.
6. Repeat steps 3 to 5 to ensure that all of the following services are activated:
○ /sap/bc/ui5_ui5/sap/attribmgmt_v2/
○ /sap/bc/ui5_ui5/sap/assortlist/
○ /sap/bc/ui5_ui5/sap/ddfreuse_v2/
○ /sap/bc/ui5_ui5/sap/locclsts_v2/
○ /sap/bc/ui5_ui5/sap/modulemgmt_v2/
○ /sap/bc/ui5_ui5/sap/optionplan_v2/
○ /sap/bc/ui5_ui5/sap/phpmatch_v2/
○ /sap/bc/ui5_ui5/sap/plnconfig/
○ /sap/bc/ui5_ui5/sap/optionplanning
○ /sap/bc/ui5_ui5/sap/styleplan
Common Installation Guide for SAP Customer Activity Repository applications bundle 5.0
Set Up the Applications
PUBLIC 295
○ /sap/bc/ui5_ui5/sap/rankingkey
○ /sap/bc/ui5_ui5/sap/businessrule
6.3.9.4 Dene System Alias for Back-End Transactions
Use
A number of SAP Fiori apps, installed on your front-end system, launch transactions directly on the back-end
system. For example, the Manage Products tile actually launches the Demand Data Foundation (DDF)
POWL_EASY WebDynpro application.
To enable this behavior, you need to create a dedicated RFC connection between the front-end system and the
back-end system.
Procedure
1. Log on to your front-end system, that is, the system where you have installed the user interface (UI)
components of your application.
2. Launch Conguration of RFC Connections (transaction SM59).
3. Create an RFC connection with the following settings:
○ RFC Destination: SAP_ISR_CARAB
Connection Type: H (HTTP connection)
Ensure to maintain all of the settings required to connect to your back-end system, in particular, the Target
Host entry on the Technical Settings tab.
4. Save your changes.
5. Create another RFC connection with the following settings:
○ RFC Destination: SAP_ERP_ISR_CARAB
Connection Type: H (HTTP connection)
Ensure to maintain all of the settings required to connect your front-end system to the source master data
system, in particular, the Target Host entry on the Technical Settings tab.
6. Save your changes.
7. Open Launchpad Customizing (transaction LPD_CUST).
8. Select the SAP Assortment Planning role ( UIRAP001), and choose Display.
The two catalogs, Assortment Planner and Planning Administrator, are displayed.
296
PUBLIC
Common Installation Guide for SAP Customer Activity Repository applications bundle 5.0
Set Up the Applications
9. In each of the catalogs, selecting one app at a time, make the following settings:
Catalog App System Alias Description
Assortment
Planner
View Log SAP_ISR_CARAB This setting allows the My Assortment Lists app to
launch transaction SLG1 on the back-end system.
Note
This application is only used to congure a link to
the back-end system, you do not need to add this
app to your SAP Fiori launchpad.
View ExtAssort
Listing Conditions
SAP_ERP_ISR_CAR
AB
This setting allows the My Assortment Lists app to
launch transaction WSL10 on the connected SAP Retail
or SAP S/4HANA system.
Note
This application is only used to congure a link to
the SAP Retail or SAP S/4HANA system, you do not
need to add this app to your SAP Fiori launchpad.
View External
Assortments
SAP_ERP_ISR_CAR
AB
This setting allows the My Assortment Lists app to
launch:
Transaction WRF_WS0A3 on the connected SAP Retail
system
Transaction WS0A3 on the connected SAP S4HANA sys
tem.
Note
This application is only used to congure a link to
the SAP Retail or SAP S/4HANA system, you do not
need to add this app to your SAP Fiori launchpad.
Planning
Administrator
Manage Category
responsibilities
SAP_ISR_CARAB This setting allows the Manage Category Responsibilities
app to launch the corresponding DDF WebDynpro appli
cation.
Manage Market
responsibilities
SAP_ISR_CARAB This setting allows the Manage Market Responsibilities
app to launch the corresponding DDF WebDynpro appli
cation.
Manage Products SAP_ISR_CARAB This setting allows the Manage Products app to launch
the corresponding DDF WebDynpro application.
Common Installation Guide for SAP Customer Activity Repository applications bundle 5.0
Set Up the Applications
PUBLIC 297

Catalog App System Alias Description
Manage Locations SAP_ISR_CARAB This setting allows the Manage Locations app to launch
the corresponding DDF WebDynpro application.
6.3.9.5 Assign Roles, Catalogs, and Groups in SAP Fiori
Launchpad
Use
To be able to access SAP Fiori apps that constitute the SAP Assortment Planning user interface from the SAP
Fiori launchpad, your front-end system user must have the necessary roles assigned. Based on the role(s)
assigned to your user, you can access certain business catalogs and business catalog groups.
Your SAP Assortment Planning application is delivered with two predened roles, catalogs, and groups. These
include technical content as well as business content:
Front-End Server Business Content Front-End Technical Content
Business Role Business Catalog Business Catalog Group Technical Role
Technical
Catalog
SAP_RAP_BCR_AP_PL
ANNER
SAP_RAP_BC_AP_PLA
NNER
SAP_RAP_BCG_AP_PLANNER SAP_RAP_TCR_T SAP_RAP_TC
_T
SAP_RAP_BCR_PLANN
ING_ADMIN
SAP_RAP_BC_PLANNI
NG_ADMIN
SAP_RAP_BCG_PLANNING_ADM
IN
To test the installation of SAP Assortment Planning from the SAP Fiori launchpad, you need to assign the roles
above to your user on the front-end system.
Procedure
1. Log on to your front-end system.
2. Launch User Maintenance (transaction SU01).
3. Enter your user name in the User eld and choose Change.
4. On the Roles tab, assign the roles SAP_RAP_BCR_AP_PLANNER and SAP_RAP_BCR_PLANNING_ADMIN to
your user.
Caution
If you already have an SAP Fiori launchpad open, you must clear your browser cache to apply any
modications made to your user roles. Otherwise, your changes will not be reected in the SAP Fiori
user interface.
298
PUBLIC
Common Installation Guide for SAP Customer Activity Repository applications bundle 5.0
Set Up the Applications

More Information
Security Information section of the SAP Assortment Planning Administrator's Guide.
6.3.10 Additional Information for Retail SAP BW Structure
6.3.10.1 Specify Analysis Workbooks Settings
The Retail SAP BW Structure of SAP Assortment Planning is delivered with some SAP Analysis for Microsoft
Oce workbooks. These are template workbooks that you can adapt to use in your retail business. However,
you should not use the Retail SAP BW Structure in a new installation but the Omnichannel SAP BW Structure.
For an example of how to create customized versions of the workbooks, see Workbook Design Example [page
302].
6.3.10.1.1 Enable Macros
Use
In this procedure, you enable your SAP Analysis for Microsoft Oce workbooks to use macros.
Procedure
1. Open SAP Analysis for Microsoft Oce from Start All Programs SAP Business Intelligence SAP
BusinessObjects Analysis Analysis for Microsoft Excel .
2. Choose File Options Customize Ribbon .
3. Under Customize the Ribbon, select Main Tabs.
4. Enable the entry Developer and conrm by choosing OK.
5. Now you will see the new Developer tab in your SAP Analysis for Microsoft Oce.
6. Select the Developer Tab and choose Macro Security.
7. Choose Enable all macros.
Common Installation Guide for SAP Customer Activity Repository applications bundle 5.0
Set Up the Applications
PUBLIC 299

6.3.10.1.2 Set Language for Ribbons and Buttons in
Workbooks
Use
In this procedure, you can set the desired language of the following user interface objects that are specic to
the workbooks of SAP Assortment Planning:
● Ribbons Planning Functions, Renement Functions, and Extended Features
● Tooltips for planning functions
● Message texts
● Buttons.
The content of the workbooks consists of multiple parts:
● The language of the standard menus and standard ribbons depends on the language set for Microsoft
Excel.
● The language of the contents in the cells (mainly KPIs) depends on the user-selected system language of
the back-end system.
● The language of the user interface objects that are specic to the workbooks of SAP Assortment Planning,
is not set by the selected system language of the back-end system, but you can change it for each
workbook according to the following procedure. The default language is English.
Procedure
1. Unhide the worksheet SAP_TEXT_CUSTOMIZING using standard functionality of Microsoft Excel.
2. On the worksheet SAP_TEXT_CUSTOMIZING, copy the column of the desired language to column B -
Custom Text.
3. Hide the worksheet SAP_TEXT_CUSTOMIZING.
4. Save your changes in the worksheet on the SAP NetWeaver Server by choosing File Analysis Save
Workbook to SAP NetWeaver
.
Note
To allow for correct interpretation of the texts by screen readers, make sure that the language for all parts
of the workbooks is set to the same desired one. Set the language as described in this section.
300
PUBLIC
Common Installation Guide for SAP Customer Activity Repository applications bundle 5.0
Set Up the Applications

6.3.10.1.3 Set ResultSetSizeLimit Registry Setting
Use
By default, SAP Analysis for Microsoft Oce workbooks are set to display 500,000 cells. This setting might not
be sucient for the productive use of SAP Assortment Planning. For example, if you have more than 300
products in your assortment plan, you might encounter the following error message:
Size Limit Error
To resolve this issue, you need to increase the default setting of the ResultSetSizeLimit registry setting.
Procedure
Read and implement SAP Note 1662968 .
Note
As the administrator overseeing the installation of SAP Assortment Planning, you need to carry out the
steps listed in this procedure on the workstation of each SAP Assortment Planning user.
Common Installation Guide for SAP Customer Activity Repository applications bundle 5.0
Set Up the Applications
PUBLIC 301

6.3.10.2 Workbook Design Example
Use
In this procedure, you walk through an example of creating an SAP Analysis for Microsoft Oce workbook. You
can use steps of this procedure to create customized versions of the SAP-delivered assortment planning
workbooks.
Prerequisites
The necessary BI queries must exist in the back-end system.
Procedure
1. Open SAP Analysis for Microsoft Oce from Start All Programs SAP Business Intelligence SAP
BusinessObjects Analysis Analysis for Microsoft Excel .
2. Select the cell in the worksheet where the crosstab with the data from the selected data source should be
inserted.
3. From the menu, choose Analysis Insert Select Data Source .
4. Choose Skip on the popup window Logon to SAP BusinessObjects BI Platform.
5. In the Select Data Source dialog box, select the source system, then choose Next.
6. In the Logon to system <Your System Name> dialog box, enter your logon data, then choose OK.
7. In the Select Data Source dialog box, choose tab Search.
8. In the Search tab, you can search for the description or technical name of a data source, that is, the name
of the BI query that will provide the data for your workbook.
For example, search for /RAP/M01A01_IRQ02 or /RAP/M01A01_IRQ01. In general, you can search for /
RAP* to nd any SAP Assortment Planning query.
9. Select the required data source, and then choose OK.
10. On the Prompts screen, make the relevant entries base on the selected query in the Specify Value for
Prompts area.
11. Choose OK, and then you will see the table is inserted in the sheet. You can now analyze the data and
change the displayed data set according to your needs. You can also add other components to your
analysis, for example charts.
12. Choose menu Analysis Display to open the design panel.
13. Choose the Components tab in the bottom right corner, and right-click Book1 and choose Use Planning
Sequence.
14. In the Search For eld of the Open Planning Sequence dialog box enter your planning sequence and choose
Search.
15. Select the required planning sequence, and then choose OK. The planning sequence will be displayed
under Book1 Planning Objects in the design panel.
302
PUBLIC
Common Installation Guide for SAP Customer Activity Repository applications bundle 5.0
Set Up the Applications

16. Select the cell in the worksheet where a button should be inserted.
17. From the menu, choose Developer Insert Button (Form Control) , and insert the button using drag
and drop.
18. In the Assign Macro dialog box, choose New.
19. In the VB edit, maintain the relevant code in the Sub ButtonX_Click area.
20.Choose Close.
21. Right-click the button, and choose Edit Text. Replace the button name with a meaningful name.
22.Position your cursor where the condition will be dened, and make the relevant entries.
23. Select the sheet and position the cursor where the variable list will be inserted, for example cell H1 in
sheet1.
24. Choose menu Analysis Info Field Variables , and the variables will be inserted into the relevant
sheet.
25. Maintain the relevant entries in the sheet.
26. Choose your Planning Sequence in the design panel.
27. In the section of Variables of Planning Sequence, make the relevant entries.
28.Choose Save Button.
29. Provide a le name and save the workbook as type Excel Macro-Enabled Workbook (*.xlsm).
30.Choose Save.
Result
The customized workbook is created.
6.4 SAP Promotion Management
Using SAP Promotion Management functions
For full use of the SAP Promotion Management application, you must have a license for use of SAP Promotion
Management.
Note
Limited functionality is available to users without an SAP Promotion Management license.
To use the FIORI-based user interface, implement the /DMF/IMPL_FIORI_PMR_SW BAdI from Customizing
Cross-Application Components Demand Data Foundation Data Maintenance Oer Implementation: Fiori
Oers Switch .
Common Installation Guide for SAP Customer Activity Repository applications bundle 5.0
Set Up the Applications
PUBLIC 303
6.4.1 Perform Core Steps for SAP Customer Activity
Repository
To set up this application, you must rst perform the Core (Mandatory) steps for SAP Customer Activity
Repository. The core steps are mandatory for all the consuming applications.
Procedure
Perform all steps listed under Core (Mandatory for All Applications) [page 83].
6.4.2 Activate Internet Communication Framework (ICF)
Services
For security reasons, all Internet Communication Framework (ICF) services relevant to your SAP Promotion
Management application are made available in an inactive state. In this procedure, you activate an ICF service
required for the SAP Manage Promotional Oers Fiori app.
1. Log on to your front-end system.
2. Open service maintenance (transaction SICF).
3. In the Maintain Service screen, select the service by specifying the following:
○ Hierarchy Type: SERVICE
○ Virtual Host: DEFAULT_HOST
○ Service Path: /sap/bc/bsp/sap/
4. Choose Execute
5. To activate the service, choose Service/host Activate
6. Repeat steps 3 to 5 to ensure that all of the following services are activated:
○ pmroffers
○ pmrcontent
○ prodgrps
○ locsubgrp
○ eventprv
6.5 SAP Allocation Management
Post-installation setup for SAP Allocation Management
1. Perform Core Steps for SAP Customer Activity Repository [page 226]
2. Activate SAP HANA Content for SAP Allocation Management [page 305]
3. Check Procedure Associated with Function GENIOS_SOLVE Is Active [page 309]
304
PUBLIC
Common Installation Guide for SAP Customer Activity Repository applications bundle 5.0
Set Up the Applications

4. Congure SAP Allocation Management [page 310]
5. Congure Data Replication [page 311]
6. Congure Front End [page 315]
7. Implement BAdI for Real-Time Inventory [page 317]
6.5.1 Perform Core Steps for SAP Customer Activity
Repository
To set up this application, you must rst perform the Core (Mandatory) steps for SAP Customer Activity
Repository. The core steps are mandatory for all the consuming applications.
Procedure
Perform all steps listed under Core (Mandatory for All Applications) [page 83].
6.5.2 Activate SAP HANA Content for SAP Allocation
Management
Once all previous steps are successfully completed, you can activate SAP HANA content for SAP Allocation
Management.
Prerequisites
Before starting with the activation of the SAP HANA content for SAP Allocation Management, you must do the
following:
● Ensure that you have at least one of the SAP_ECC or SAP_S4H schemas in the SAP HANA database. Based
on your source system for all SAP ERP data, you have either an
SAP_ECC schema or an SAP_S4H schema
(either physical schemas with these names, or at least authoring schemas). If you have both these
systems, you must have two schemas.
● Ensure that all tables listed for SLT replication are available in the relevant schemas. The spreadsheet with
tables that are relevant for replication and SAP HANA content activation is available on SAP Help Portal at
https://help.sap.com/viewer/p/CARAB. Select the relevant version of SAP Customer Activity Repository at
the top and choose Implement. Download the SLT Tables for SAP Customer Activity Repository applications
bundle 5.0 archive and extract the spreadsheet. Also ensure that you have implemented SAP Note
2995707 (Prewave Note before HANA Content Activation).
Ensure that you have successfully set up the SLT tables in the schemas.
Common Installation Guide for SAP Customer Activity Repository applications bundle 5.0
Set Up the Applications
PUBLIC 305

SAP HANA Content Activation Steps
1. Run the report /AMR/INSERT_SLT_TABLES_TO_DB (Insert SLT Table Entries to Database) in insert mode
(by deselecting the simulation setting).
2. Deploy SAP Allocation Management delivered procedures, functions, and views.
SAP Allocation Management delivers several native HANA objects as a part of the application. These
objects are delivered via HANA transport for ABAP (HTA) and must be explicitly deployed into the SAP
HANA database. Without this deployment, you do not see these objects in the SAP HANA database. Once
deployed, you can nd the content via the path sap.is.retail.rap.amr.db.
3. Activate SAP Customer Activity Repository and Demand Data Foundation (DDF) SAP HANA content.
Note
If the SAP Customer Activity Repository and DDF SAP HANA content is already active, you can skip this
step.
SAP Allocation Management depends on active SAP HANA content for SAP Customer Activity Repository
and DDF. Therefore, it is recommended that you rst activate the SAP HANA content for SAP Customer
Activity Repository and DDF.
Run the program Activate SAP HANA Content for SAP CARAB (/CAR/ACTIVATE_HTA) and select the ECC
Mode relevant to your installation. Under Business Scenario Activation, select the Customer Activity
Repository and Demand Data Foundation options.
Run the activation report. As a result, you have successfully activated and deployed the SAP HANA content
for SAP Customer Activity Repository and DDF.
Caution
Do not select Allocation Management in this activation run for a simultaneous activation of SAP
Allocation Management SAP HANA content. Simultaneous activation leads to activation problems.
4. Check and maintain schema mapping.
Check the names you use for your physical schema. If you are using the default names below, no further
action is required:
○ SAP_S4H, for your S/4HANA schema
○ SAP_ECC, for your ECC or FMS schema
If the names you have chosen for your physical schema are dierent from the names above, you must do
the following:
Maintain a schema mapping in your SAP HANA database, where your customer-specic names are used
as authoring schemas for the physical schema.
5. Run the dummy schema and dummy table creation reports.
The reports check for a missing physical schema and create this physical schema and the corresponding
dummy tables in the schema if necessary. The successful completion of this step is a prerequisite for a
successful SAP HANA content activation for SAP Allocation Management.
Note
The running of the report requires a database user in the ABAP system with the authorization to create
the dummy schema. Check the application log for the report if there were errors.
In your back-end system, start transaction SE38 and execute the following two reports, in the sequence in
which they are listed:
306
PUBLIC
Common Installation Guide for SAP Customer Activity Repository applications bundle 5.0
Set Up the Applications

○ /DMF/CREATE_SLT_TABLES (Create SLT Tables)
1. Select your source system. For S/4HANA, enter the release.
2. Enter the physical source and dummy schema names. For the Physical Source Schema, enter the
physical schema name into which your SLT tables are replicating. For the Physical Dummy Schema,
enter the name for the schema to be created. If the physical source schema already exists in the SAP
HANA database, then only the dummy tables in this schema are created when you execute the report.
3. Select the simulation mode for a test run. After the simulation run, you can check for errors in the
application log.
4. Run the report again, this time without simulation mode.
5. If you have chosen a dummy schema name that is neither SAP_ECC nor SAP_S4H, maintain schema
mapping for the dummy schema. Follow the guidelines mentioned in Step 4.
○ /AMR/CREATE_DYNAMIC_SLT_TABLES (Create SLT Tables Dynamically)
1. Select your source system. For S/4HANA, enter the release.
2. Enter the physical source and dummy schema names. For the Physical Source Schema, enter the
physical schema name into which your SLT tables are replicating. For the Physical Dummy Schema,
enter the name for the schema to be created. If the physical source schema already exists in the SAP
HANA database, then only the dummy tables in this schema are created when you execute the report.
3. Select the simulation mode for a test run. After the simulation run, you can check for errors in the
application log.
4. Run the report again, this time without simulation mode.
5. If you have chosen a dummy schema name that is neither SAP_ECC nor SAP_S4H, maintain schema
mapping for the dummy schema. Follow the guidelines mentioned in Step 4.
6. Activate relevant inactive SAP HANA content for DDF.
Based on your scenario, there may be inactive packages in DDF, even though you have activated the
content earlier via the report /CAR/ACTIVATE_HTA (Activate SAP HANA Content for SAP CARAB).
For the following packages in DDF, perform these actions:
○ In the table CTS_HOT_PREWORK, set the PREWORK_DONE indicator to X for these packages.
○ Call up transaction SCTS_HTA_DEPLOY (SAP HANA Transport for ABAP - Deployment) to check and to
deploy (if not already deployed) these packages, strictly in the sequence they are listed. Do not select
the option to Include subpackages:
○ sap.is.ddf.ecc
○ sap.is.ddf.fms
○ sap.is.ddf.fms_s4h
○ sap.is.ddf.cross.ecc
○ sap.is.ddf.cross.fms
○ sap.is.ddf.cross.fms_s4h
○ sap.is.ddf.cross
Note
The package names are case-sensitive.
If your SAP Retail release has tables that do not contain any FMS elds, some views might not be
activated successfully in the fms and fms_s4h packages. You can nevertheless continue with further
activation steps.
7. Grant authorization.
Common Installation Guide for SAP Customer Activity Repository applications bundle 5.0
Set Up the Applications
PUBLIC 307

The two SLT table creation reports use the database user maintained in the ABAP system to create the
dummy schemas. The _SYS_REPO user needs the exact same authorizations on the newly created dummy
schema that this user already has on the physical source schema. In addition, to display the schema in the
navigator, a SELECT authorization on the schema (with GRANT option) must be provided to the database
user for the content activation.
Note
This step must be performed by the SAP HANA database administrator who has the authorization for
these activities.
8. Set Prework Done for SAP Allocation Management packages.
A precondition for SAP HANA Transport for ABAP (HTA) activation is that the PREWORK_DONE indicator is
set for all packages with activation mode P – prework needed. You can check this setting in the table
CTS_HOT_PACKAGE in eld HOT_ACTIVATION_MODE.
You can set the PREWORK_DONE indicator for all packages relevant for SAP Allocation Management
manually or by implementing an SAP Note. To make the setting manually, follow the additional steps listed
in this step. Alternatively, implement SAP Note 2861929 (Setting the PREWORK_DONE ag in table
CTS_HOT_PREWORK for AMR HANA Content packages) instead of setting the indicator manually.
The manual steps are as follows:
1. Set the PREWORK_DONE indicator to X for all packages in the CTS_HOT_PREWORK table. The indicator
shows that the SAP HANA content in all packages relevant for SAP Allocation Management is ready for
deployment.
2. Call transaction SE16 (Data Browser) and display the content of table CTS_HOT_PACKAGE.
Search for package names sap.is.retail.rap.amr* in the eld HANA_PACKAGE_ID. Please note
that the package names are case-sensitive.
You should nd 163 entries that match the search criterion. Copy the package names from the result
list of your search.
3. Run the program Activate SAP HANA Content for SAP CARAB (/CAR/ACTIVATE_HTA) with the
following settings:
○ Select the relevant setting under ECC Mode.
○ Under Business Scenario Activation, select the Allocation Management option.
○ Under Processing Control, select Perform Prerequisite Check.
4. Display the selection screen of table CTS_HOT_PREWORK. Enter the HANA_PACKAGE_ID for all
packages from the result list of your search in table CTS_HOT_PACKAGE.
9. Once you have successfully deployed all content as described in the previous steps, call up transaction SAP
HANA Transport for ABAP - Deployment (SCTS_HTA_DEPLOY). To deploy the SAP Allocation Management
packages, enter package name sap.is.retail.rap.amr* and choose Execute.
Note
With this step, the SAP HANA content for SAP Allocation Management is nally deployed. This is the
last and most critical activation step.
Checking for Missing Views
If content activation errors occur, check for missing views in the database. For more information, see
Troubleshooting: Missing Views in Database [page 309].
308
PUBLIC
Common Installation Guide for SAP Customer Activity Repository applications bundle 5.0
Set Up the Applications

Related Information
Create/Replicate Source Master Data System Tables [page 91]
Activate SAP HANA Content [page 95]
6.5.2.1 Troubleshooting: Missing Views in Database
After the SAP HANA content activation, you can check for missing views in transaction DB02.
Check if SAP Allocation Management views are highlighted as objects missing in the database. There could be
some missing objects, despite having received success messages from the previous step of activating SAP
Allocation Management SAP HANA content.
1. Call up transaction Diagnostics: Missing Tables and Indexes (DB02)
2. Select Diagnostics Tables/Views and enter the technical name.
3. Check if any SAP Allocation Management views are displayed as missing in the database.
4. If there are views missing in the database, raise a support ticket.
6.5.3 Check Procedure Associated with Function
GENIOS_SOLVE Is Active
For SAP Allocation Management, conrm that the procedure associated with function GENIOS_SOLVE is active
in the _SYS_AFL catalog.
Prerequisites
You have congured the AFL usage and conrmed that the OFL algorithm was installed successfully as
described in section Check the OFL Installation [page 61].
Context
Procedure
1. Go to SAP HANA Systems view in the SAP HANA Development Perspective.
2. In your system, lter for catalog _SYS_AFL.
Common Installation Guide for SAP Customer Activity Repository applications bundle 5.0
Set Up the Applications
PUBLIC 309

3. In the _SYS_AFL catalog, lter on procedures to search for OFL_AREA_GENIOS_DOLVE_PROC
4. Conrm that this procedure OFL_AREA_GENIOS_SOLVE_PROC is available.
6.5.4 Congure SAP Allocation Management
To use SAP Allocation Management, you must dene several application-specic settings in Customizing.
General Settings
Dene the settings under SAP Implementation Guide Cross-Application Components Allocation
Management .
SAP Allocation Management provides optional integration scenarios with:
● UDF (Unied Demand Forecast)
● SAP Assortment Planning
Both scenarios require additional installation steps, which are described in sections SAP Assortment Planning
[page 277] and Complete UDF Setup [page 139] of this guide.
Allocation information from allocation plans can be transferred to follow-on systems to create the
corresponding allocation tables. You set up the transfer of allocation plans with the implementation of SAP
Notes in the follow-on systems. For more information, see Implement SAP Notes for the Installation [page 30].
Activation of Notications
As part of the promotional business scenarios, you can enable the creation of push notications for users.
These notications inform responsible users about important changes that aect existing allocation plans, for
example, the deletion of an oer or product or a change in the oer validity period.
To activate these notications in your SAP Customer Activity Repository system, proceed as follows:
1. Under SAP Implementation Guide SAP NetWeaver Notication Channel Notication Channel
Provider Enablement Administration Notication Provider Settings , access the Register Notication
Providers Customizing activity.
2. In this activity, make sure that the following information is available:
○ Provider ID: /AMR/NOTIF_PROMO_PUSH
○ Provider class: /AMR/CL_NOTIF_PROVIDER
3. Then activate this provider in the Manage Notication Providers activity in the Notication Provider Settings
group that you accessed in Step 1.
310
PUBLIC
Common Installation Guide for SAP Customer Activity Repository applications bundle 5.0
Set Up the Applications

6.5.5 Congure Data Replication
SAP Allocation Management uses master data such as product, store, and product hierarchy that is imported
to the Demand Data Foundation (DDF) and Unied Demand Forecast (UDF) modules using the data replication
framework (DRF, transaction DRFOUT).
Note
Not all of the master data is replicated using the data replication framework. Some data must be replicated
separately using SAP Landscape Transformation Replication Server (SLT).
For detailed information about the SLT replication procedure, see Create/Replicate Source Master Data
System Tables [page 91].
6.5.5.1 Initial Load of Data to DDF Using DRFOUT
SAP Allocation Management uses master data, such as product, location, and product hierarchy, that is
replicated from SAP Retail or SAP S/4HANA to DDF using DRFOUT.
Procedure
SAP Allocation Management specically requires that the following data is replicated sequentially from a
connected SAP ERP system using DRFOUT:
Sequence Master Data Technical Details For more information, see:
1 Product Hierarchy
● SAP ERP Description: Material Group
Hierarchy
● DRFOUT Outbound Implementation:
PMCH
● DDF Inbound Interface: /DMF/
MDIF_PROD_HIER_INBOUND
https://help.sap.com/car <your release>
and then the Use tab, application help for
SAP Customer Activity Repository:
Demand Data Foundation Integration
Information Inbound Interfaces For
Remote Function Call (RFC)
Communication
Product Hierarchy
Master Data
Common Installation Guide for SAP Customer Activity Repository applications bundle 5.0
Set Up the Applications
PUBLIC 311

Sequence Master Data Technical Details For more information, see:
2 Product
● SAP ERP Description: Material
● DRFOUT Outbound Implementation:
PMAT
● DDF Inbound Interface: /DMF/
MDIF_PRODUCT_INBOUND
https://help.sap.com/car <your release>
and then the Use tab, application help for
SAP Customer Activity Repository:
Demand Data Foundation Integration
Information Inbound Interfaces For
Remote Function Call (RFC)
Communication
Product Master Data
3 Location
● SAP ERP Description: Plant
● DRFOUT Outbound Implementation:
PPLT
● DDF Inbound Interface: /DMF/
MDIF_LOCATION_INBOUND
https://help.sap.com/car <your release>
and then the Use tab, application help for
SAP Customer Activity Repository:
Demand Data Foundation Integration
Information Inbound Interfaces For
Remote Function Call (RFC)
Communication
Product Location
Master Data
4 Product Location
● SAP ERP Description: Material/Plant
● DRFOUT Outbound Implementation:
PMPL
● DDF Inbound Interface: /DMF/
MDIF_PROD_LOC_INBOUND
https://help.sap.com/car <your release>
and then the Use tab, application help for
SAP Customer Activity Repository:
Demand Data Foundation Integration
Information Inbound Interfaces For
Remote Function Call (RFC)
Communication
Product Location
Master Data
5 Product Location
● SAP ERP Description: Sales Price
● DRFOUT Outbound Implementation:
PSPR
● DDF Inbound Interface: /DMF/
MDIF_PROD_LOC_INBOUND
https://help.sap.com/car <your release>
and then the Use tab, application help for
SAP Customer Activity Repository:
Demand Data Foundation Integration
Information Inbound Interfaces For
Remote Function Call (RFC)
Communication
Product Location
Master Data
312 PUBLIC
Common Installation Guide for SAP Customer Activity Repository applications bundle 5.0
Set Up the Applications

Sequence Master Data Technical Details For more information, see:
6 Inventory
● SAP ERP Description: Inventory
● DRFOUT Outbound Implementation:
PINV
● DDF Inbound Interface: /DMF/
OPIF_INVENTORY_INBOUND
https://help.sap.com/car <your release>
and then the Use tab, application help for
SAP Customer Activity Repository:
Demand Data Foundation Integration
Information Inbound Interfaces For
Remote Function Call (RFC)
Communication
Inventory Master
Data
7 Transportation
Lane
● SAP ERP Description: Source of Sup
ply
● DRFOUT Outbound Implementation:
PSOS
● DDF Inbound Interface: /DMF/
MDIF_LANE_INBOUND
Note
Before transferring the planned deliv
ery time to DDF, implement a BAdI to
update the planned delivery time val
ues as described in SAP Note
2357255
).
https://help.sap.com/car <your release>
and then the Use tab, application help for
SAP Customer Activity Repository:
Demand Data Foundation Integration
Information Inbound Interfaces For
Remote Function Call (RFC)
Communication
Transportation Lane
Master Data
8 Location
● SAP ERP Description: Vendor
● DRFOUT Outbound Implementation:
PVEN
● DDF Inbound Interface: /DMF/
MDIF_LOCATION_INBOUND
https://help.sap.com/car <your release>
and then the Use tab, application help for
SAP Customer Activity Repository:
Demand Data Foundation Integration
Information Inbound Interfaces For
Remote Function Call (RFC)
Communication
Location Master
Data
9 Product Hierarchy
● SAP ERP Description: Article Hierar
chy
● DRFOUT Outbound Implementation:
PAHY
● DDF Inbound Interface: /DMF/
MDIF_PROD_HIER_INBOUND
https://help.sap.com/car <your release>
and then the Use tab, application help for
SAP Customer Activity Repository:
Demand Data Foundation Integration
Information Inbound Interfaces For
Remote Function Call (RFC)
Communication
Product Hierarchy
Master Data
Common Installation Guide for SAP Customer Activity Repository applications bundle 5.0
Set Up the Applications
PUBLIC 313
Sequence Master Data Technical Details For more information, see:
10 Oer
● SAP ERP Description: Oer
● DRFOUT Outbound Implementation:
POFF
● DDF Inbound Interface: /DMF/
OPIF_OFFER_INBOUND
https://help.sap.com/car <your release>
and then the Use tab, application help for
SAP Customer Activity Repository:
Demand Data Foundation Integration
Information Inbound Interfaces For
Remote Function Call (RFC)
Communication
Oer Master Data
You can import the data into staging tables, and then transfer this data to production tables using report /DMF/
PROCESS_STAGING_TABLES. Alternatively, you can skip the staging tables and import the data directly into
the production tables. For more information, see:
● https://help.sap.com/car <your release> and then the Use tab, application help for SAP Customer Activity
Repository: Demand Data Foundation Integration Information Inbound Processing
● https://help.sap.com/car <your release> and then the Use tab, application help for SAP Customer Activity
Repository: Demand Data Foundation General Services Monitor Imports Process Inbound Staging
Tables
More Information
For more information on monitoring the replication, see:
● https://help.sap.com/car <your release> and then the Use tab, application help for SAP Customer Activity
Repository: Demand Data Foundation General Services Monitor Imports
● The Periodic Tasks section of the Administration Guide for SAP Allocation Management.
Related Information
Periodic Tasks
6.5.5.2 Delta Load of Data to DDF Using DRFOUT
When performing a delta load of data from the source master data system using the DRFOUT framework, you
must ensure that the product location data required to enhance the sales records with historical sales cost is
loaded prior to the sales data.
Furthermore, we recommend that you schedule a daily periodic task to replicate data from the source system
to the SAP Allocation Management system.
314
PUBLIC
Common Installation Guide for SAP Customer Activity Repository applications bundle 5.0
Set Up the Applications
6.5.6 Congure Front End
Check if you have performed the SAP Gateway conguration and that you have activated the OData Services
for distribution curve and SAP Allocation Management.
Activate SAP Allocation Management ICF Services [page 315]
Perform these steps to activate Internet Communication Framework (ICF) services for SAP Allocation
Management.
Assign Roles, Catalogs, and Groups in SAP Fiori Launchpad [page 316]
To be able to access SAP Fiori apps that constitute the SAP Allocation Management user interface from
the SAP Fiori launchpad, your front-end system user must have the necessary roles assigned. Based on
the roles assigned to your user, you can access certain business catalogs and business catalog groups.
Related Information
Congure SAP Gateway [page 107]
Activate OData Services [page 111]
6.5.6.1 Activate SAP Allocation Management ICF Services
Perform these steps to activate Internet Communication Framework (ICF) services for SAP Allocation
Management.
For security reasons, all Internet Communication Framework (ICF) services relevant to your SAP Allocation
Management application are made available in an inactive state.
You have activated the central ICF services while conguring the SAP Gateway. This procedure provides the
instructions to activate ICF services required for the SAP Allocation Management SAP Fiori apps.
Procedure
1. Log on to your front-end server.
2. Open service maintenance (transaction SICF).
3. In the Maintain Service screen, select the Location Clustering service by specifying the following:
○ Hierarchy Type: SERVICE
○ Virtual Host: DEFAULT_HOST
○ Service Path: /sap/bc/ui5_ui5/sap/amr_alloplan/
4. Choose Execute.
5. To activate the service, choose Service/host Activate.
6. Repeat steps 3–5 to ensure that all of the following services are activated:
○ /sap/bc/ui5_ui5/sap/amr_alloplan
Common Installation Guide for SAP Customer Activity Repository applications bundle 5.0
Set Up the Applications
PUBLIC 315

○ /sap/bc/ui5_ui5/sap/amr_allo_params
○ /sap/bc/ui5_ui5/sap/amr_dist_config
○ /sap/bc/ui5_ui5/sap/amr_lib_reuse
○ /sap/bc/ui5_ui5/sap/amr_marketunit
○ /sap/bc/ui5_ui5/sap/amr_workload
○ /sap/bc/ui5_ui5/sap/amr_kpiconfig
○ /sap/bc/ui5_ui5/sap/amr_result
○ /sap/bc/ui5_ui5/sap/amr_capacity
6.5.6.2 Assign Roles, Catalogs, and Groups in SAP Fiori
Launchpad
To be able to access SAP Fiori apps that constitute the SAP Allocation Management user interface from the
SAP Fiori launchpad, your front-end system user must have the necessary roles assigned. Based on the roles
assigned to your user, you can access certain business catalogs and business catalog groups.
Your SAP Allocation Management application is delivered with a predened role, catalog, and group. These
include technical content as well as business content:
Front-End Server Business Content Front-End Technical Content
Business Role Business Catalog Business Catalog Group Technical Role
Technical
Catalog
SAP_AMR_BCR_ALLOC
ATOR_T
SAP_AMR_BC_ALLOCA
TOR_T
SAP_AMR_BCG_ALLOCATOR_T SAP_AMR_TCR_T SAP_AMR_TC
_T
To test the installation of SAP Allocation Management from the SAP Fiori launchpad, you need to assign the
roles to your user on the front-end system.
Procedure
1. Log on to your front-end system.
2. Launch User Maintenance (transaction SU01).
3. Enter your user name in the User eld and choose Change.
4. On the Roles tab, assign the roles SAP_AMR_BCR_ALLOCATOR_T and SAP_AMR_TCR_T to your user.
Caution
If you already have an SAP Fiori launchpad open, you must clear your browser cache to apply any
modications made to your user roles. Otherwise, your changes are not reected in the SAP Fiori user
interface.
316
PUBLIC
Common Installation Guide for SAP Customer Activity Repository applications bundle 5.0
Set Up the Applications

More Information
See the Security Information section of the Administration Guide for SAP Allocation Management.
6.5.7 Implement BAdI for Real-Time Inventory
You must implement a BAdI to use real-time inventory in SAP Allocation Management.
As of SAP Customer Activity Repository applications bundle 5.0, a BAdI implementation is required to obtain
real-time data inventory data for SAP Allocation Management.
You can implement a BAdI using standard logic or implement your own logic. For more information and detailed
steps, please see SAP Note
2982741 - SAP Allocation Management - BAdI Implementation for Real-Time
Inventory View.
6.6 SAP Replenishment Planning
Post-installation setup for SAP Replenishment Planning
1. Ensure that the SAP XRP AFL component is installed. For more information, see Download and Install SAP
XRP AFL (Only for SAP Replenishment Planning) [page
68].
2. Perform Core Steps for SAP Customer Activity Repository [page 226]
3. Complete UDF Setup [page 139]
4. Implement SAP Notes for the Integration of SAP Replenishment Planning with SAP ERP or SAP S/4HANA
[page 318]
5. Specify RFC Destinations for Source Master Data Systems [page 319]
6. Enable the Use of Scheduling Groups [page 319]
7. Set Up SAP Fiori Apps for SAP Replenishment Planning [page 320]
8. Set Up Database Roles and Authorizations [page 343]
9. Set Up Back-End Roles and Authorizations [page 344]
10. Set Up Authorizations for Transfer of Order Plan Items to Source Master Data System [page 349]
11. Perform Conguration Steps in SAP Customer Activity Repository [page 350]
12. Congure SAP Replenishment Planning [page 351]
13. Dene the Parameterization Proles and the Assignment [page 353]
14. Congure Exception Management [page 354]
15. Set Up Real-Time Inventory Integration [page 356]
Common Installation Guide for SAP Customer Activity Repository applications bundle 5.0
Set Up the Applications
PUBLIC 317

6.6.1 Perform Core Steps for SAP Customer Activity
Repository
To set up this application, you must rst perform the Core (Mandatory) steps for SAP Customer Activity
Repository. The core steps are mandatory for all the consuming applications.
Procedure
Perform all steps listed under Core (Mandatory for All Applications) [page 83].
6.6.2 Implement SAP Notes for the Integration of SAP
Replenishment Planning with SAP ERP or SAP S/
4HANA
There are notes that provide the functionality for receiving order plan items from SAP Customer Activity
Repository and notes that provide the functionality for the replication of additional information relevant for SAP
Replenishment Planning from SAP ERP or SAP S/4HANA.
To decide whether you have to install these notes on your SAP ERP or SAP S/4HANA system or not, please
check if the following notes are already included in the support packages that you have installed (by checking
the Support Packages & Patches section of these notes).
SAP Notes for Receiving Order Plan Items from SAP Customer Activity Repository
SAP Note Description
2806257
Enhancement of table EKPO by the eld EXTERNALREFER
ENCEID
This note provides the reference eld EXTERNALREFEREN
CEID in table EKPO for receiving the order plan item ID.
2800988
Grouping of Order List Items: External Reference persisted
(EXTERNALREFERENCEID)
This note provides the enhancement for persisting the infor
mation about the origin of the purchase order item and the
corresponding reference number.
2679390
Integration Proxy for CAR-based Replenishment (Order Plan
to Purchase Order)
This note provides the proxy functionality in SAP ERP and
SAP S/4 HANA for the transfer of order plan items.
2834608
Automatic implementation of manual changes for note
2679390 (SAP S/4)
This note contains instructions for creating DDIC objects
that are required for implementing SAP note 2679390.
318 PUBLIC
Common Installation Guide for SAP Customer Activity Repository applications bundle 5.0
Set Up the Applications

SAP Notes for Replicating Additional Information Relevant for SAP Replenishment Planning from SAP ERP or SAP S/4HANA
SAP Note Description
2918510
How to nd notes to get integration up to date for DRFOUT to
DDF
This note describes how to determine which notes are re
quired for the data integration from a source master data
system (SAP ERP or SAP S/4HANA) to the Demand Data
Foundation module of SAP Customer Activity Repository.
2774819
DRFOUT Implementations by scenario for Customer Activity
Repository Application Bundle
This note lists the DRF outbound implementations that are
available to replicate master and transaction data from a
source master data system (SAP ERP or SAP S/4HANA) to
the applications of SAP Customer Activity Repository.
6.6.3 Specify RFC Destinations for Source Master Data
Systems
To transfer order plan items to a source master data system (SAP ERP or SAP S/4HANA), you must specify an
RFC destination for each master data system to which you want to transfer order plan items for purchase order
creation.
You specify an RFC destination as follows in the Customizing for Demand Data Foundation:
1. In transaction SPRO, navigate to Cross-Application Components Replenishment Planning Basic
Settings Maintain RFC Mapping and execute this Customizing activity.
2. For each master data system to which you want to transfer order plan items for purchase order creation,
create a mapping entry with the following values:
○ Application: Order Plan Export to Purchasing
○ Sender System: Name of the master data system to which order plan items are to be sent
○ RFC Destination: Name of the RFC destination assigned to the master data system
6.6.4 Enable the Use of Scheduling Groups
The scheduling group is a master data attribute of product and product location in the Demand Data
Foundation (DDF) that can be used as selection criterion for the workload selection of the replenishment
calculation or as condition for conguration assignments. There is no standard replication of the scheduling
group from SAP ERP or SAP S/4HANA Retail to DDF.
To use scheduling groups for SAP Replenishment Planning, implement one or both of the following Business
Add-Ins (BAdI) of enhancement spot ES_DMF_BADI in the source master data system. These BAdIs serve to
replicate information from SAP ERP or SAP S/4HANA to the DDF scheduling group at product or product
location level:
● DMF_BADI_PRODUCT_SCHED_GRP for mapping of information to product scheduling group
● DMF_BADI_PRODLOC_SCHED_GRP for mapping of information to product location scheduling group
Use one or both BAdIs depending on the level where you store or where you use the data. Both BAdIs provide
an example implementation (class) for mapping the loading group from the source master data system to the
Common Installation Guide for SAP Customer Activity Repository applications bundle 5.0
Set Up the Applications
PUBLIC 319

scheduling group in DDF, either at article (product) level (MAW1-WLADG) to product scheduling group, or at
article/site (product/location) level (MARC-LADGR) to product location scheduling group.
Once a BAdI is implemented, you must implement the change pointer for the eld you are mapping the
scheduling group to. For detailed information, see the documentation of the Business Add-Ins that you plan to
implement in the source master data system.
6.6.5 Set Up SAP Fiori Apps for SAP Replenishment Planning
After you have set up and congured your system landscape, you implement the SAP Fiori apps for SAP
Replenishment Planning by performing dierent tasks on the front-end server and on the back-end server.
Context
The SAP Fiori launchpad is the single entry point for the SAP Fiori apps delivered with SAP Replenishment
Planning. In addition to these setup instructions, technical implementation information is available for each
app.
● App Implementation: Manage Conguration Assignments [page 326]
● App Implementation: Manage Constraint Proles [page 328]
● App Implementation: Manage Cost Proles [page 330]
● App Implementation: Manage Procurement Schedules [page 332]
● App Implementation: Manage Shelf Cost Proles [page 334]
● App Implementation: Review Order Plan Items [page 336]
● App Implementation: Simulate Replenishment [page 339]
● App Implementation: Manage Alerts [page 341]
Prerequisites
● You have installed and congured the system landscape.
For information, see Implement the Prerequisites.
● You have congured SAP Gateway.
Note
The common OData services are delivered as part of the SAP Fiori front-end server and are located in
the SAP Gateway system. They are required for the SAP Fiori launchpad and you must always activate
them.
For information, see Activate OData Services [page 111].
● You have installed the UDF reuse component (SAP UI5 Application UDFREUSE and OData service /DMF/
DEMAND_PLAN_UTILITIES
). For information, see Set Up the UDF Reuse Component [page 324].
320
PUBLIC
Common Installation Guide for SAP Customer Activity Repository applications bundle 5.0
Set Up the Applications

● (Optional, recommended) To be able to display on-screen help directly in the app and easily call up a
detailed app description, you must have enabled the in-app help with the underlying Web Assistant
framework. See section Enable In-App Help (Web Assistant) [page 359].
Process Steps
To set up the SAP Fiori apps for SAP Replenishment Planning, perform the following steps.
Activate ICF Services
For security reasons, the Internet Communication Framework (ICF) services are delivered in an inactive state.
You must activate the services that are required for the apps.
Note
After an upgrade, you must ensure that the Internet Communication Framework (ICF) services required for
the apps are still active.
To activate the ICF services required for the apps:
1. Log on to your front-end server.
2. Execute transaction SICF.
3. In the Dene Services screen, make the following selections:
○ Hierarchy Type: SERVICE
○ Virtual Host: DEFAULT_HOST
○ Service Path:
App
Service Path
Manage Conguration Assignments /sap/bc/ui5_ui5/sap/configassignman
Manage Constraint Proles /sap/bc/ui5_ui5/sap/prflconstrntman
Manage Cost Proles /sap/bc/ui5_ui5/sap/prflcostsman
Manage Procurement Schedules /sap/bc/ui5_ui5/sap/procschedeman
Manage Shelf Cost Proles /sap/bc/ui5_ui5/sap/prflshlfcapman
Review Order Plan Items /sap/bc/ui5_ui5/sap/review_opi
Simulate Replenishment /sap/bc/ui5_ui5/sap/repl_simulation
Manage Alerts /sap/bc/ui5_ui5/sap/rtlplngalrtman
4. Choose Execute ( F8 ).
5. Under Virtual Hosts / Services, double-click a service to open the Create/Change a Service screen.
App
ICF Service
Manage Conguration Assignments configassignman
Common Installation Guide for SAP Customer Activity Repository applications bundle 5.0
Set Up the Applications
PUBLIC 321

App ICF Service
Manage Constraint Proles Prflconstrntman
Manage Cost Proles prflcostsman
Manage Procurement Schedules procschedeman
Manage Shelf Cost Proles prflshlfcapman
Review Order Plan Items review_opi
Simulate Replenishment repl_simulation
Manage Alerts Rtlplngalrtman
6. To activate a service, choose Service/Host Activate .
Note
You can check the activation status by selecting the service and opening the context menu. If the
Activate Service option is grayed out, this means the service is already active.
7. Repeat steps 3 to 6, this time using /sap/bc/ui5_ui5/sap/udfreuse/ as the service path.
Activate Application-Specic OData Services for SAP Replenishment Planning
To activate the application-specic OData services required for SAP Replenishment Planning:
1. Log on to your front-end server (your SAP Gateway system).
2. In transaction SPRO, navigate to SAP Reference IMG SAP NetWeaver SAP Gateway OData Channel
Administration General Settings Activate and Maintain Services and execute the Customizing
activity.
Tip
As a quick shortcut to the same screen, use transaction /n/IWFND/MAINT_SERVICE.
The Service Catalog shows you all the services that are currently active in your SAP Gateway system.
3. Activate the services that are required for the SAP Replenishment Planning application:
1. Choose Add Service.
The Add Selected Services screen is displayed.
2. In System Alias, select the alias of your back-end system.
3. Choose Get Services (or press ENTER ).
The available services are displayed.
4. Use the following table for reference and select the services:
App
OData Service
Manage Conguration Assignments /DMF/PARAMETER_ASSIGNMENT_SRV
Manage Constraint Proles /DMF/PROFILE_CONSTRAINT_PARAM_SRV
Manage Cost Proles /DMF/PROFILE_COST_PARAM_SRV
Manage Procurement Schedules /DMF/PROCUREMENT_SCHEDULE_SRV
322 PUBLIC
Common Installation Guide for SAP Customer Activity Repository applications bundle 5.0
Set Up the Applications
App OData Service
Manage Shelf Cost Proles /DMF/PRFL_SHLFCAP_VIOLTN_PARAM_SRV
Review Order Plan Items /XRP/REVIEW_ORDER_PLAN_ITEMS_SRV
Simulate Replenishment /XRP/OD_REPLNMT_COST_SIMLN_SRV
Manage Alerts /DMF/MANAGE_RTLPLNG_ALERTS_SRV
4. Choose Add Selected Services and follow the instructions.
Note
User roles are only needed if you want to have connections to multiple back-end systems or multiple
clients on the same back-end. The user roles are system-specic and are not delivered by default. If
required, you must create them manually. If you dene multiple user roles for dierent connections,
make sure you have only one role assigned to your user at any time. If you need to change roles, rst
remove the old role from your user, then assign the new role.
Enable the Apps for SAP Fiori Launchpad
To be able to access the apps from the SAP Fiori launchpad, your front-end system user must have the
necessary role(s) assigned. This allows you to access the business catalogs and business groups required for
the apps.
You can use the following role as a template for your own roles: Replenishment Planner (SAP_XRP_TCR_T). The
following catalogs and business groups are assigned to this role:
Component Technical Name
Technical Catalog SAP_XRP_TC_REPL (Replenishment Planning)
Business Catalog SAP_XRP_BC_REPL (Replenishment Planning)
Business Group SAP_XRP_BCG_REPL_CONFIG (Replenishment
Conguration
)
Business Group SAP_XRP_BCG_REPL_PLANNING (Replenishment Planning)
Business Group SAP_XRP_BCG_SIMULATION (Replenishment Simulation)
Business Group SAP_XRP_BCG_ALERT_MANAGEMENT (Alert Management)
To enable the apps for SAP Fiori launchpad:
1. Log on to your front-end system.
2. Execute transaction SU01 to open the User Maintenance screen.
3. Enter your front-end user name in the User eld and choose Change.
4. On the Roles tab, assign the Replenishment Planner (SAP_XRP_TCR_T) role to your user or assign a
custom role that was created by using the Replenishment Planner (SAP_XRP_TCR_T) role as a template.
5. Save your changes.
Common Installation Guide for SAP Customer Activity Repository applications bundle 5.0
Set Up the Applications
PUBLIC 323

Tip
If you already have an SAP Fiori launchpad open, clear your web browser cache to see the changes.
Note
To access the Analyze Forecast app either from the SAP Fiori launchpad or in the Review Order Plan Items
app and to run the UDF reuse component, the Demand Planner (Retail) (SAP_DPL_TCR_T) business role is
required.
Assign Area of Responsibility (AOR) to ABAP Back-End User
You can only display and select product hierarchies in the app that have been assigned as an AOR to your ABAP
back-end user.
To assign an area of responsibility (AOR) to an ABAP back-end user:
1. Log on to your ABAP back-end system.
2. Execute transaction NWBC to open the SAP NetWeaver Business Client.
3. Choose Services Maintain Area of Responsibility Product Hierarchy .
4. Select your ABAP back-end user, choose Continue, and dene the AOR.
For instructions, see the application help for SAP Customer Activity Repository at https://help.sap.com/
viewer/p/CARAB. Search for Maintain Area of Responsibility and follow the instructions.
6.6.5.1 Set Up the UDF Reuse Component
Before implementing an app for SAP Replenishment Planning, you must install the UDF reuse component.
Context
The UDF reuse component consists of two parts:
● Front-end server: SAP UI5 Application UDFREUSE
● Back-end server: OData service /DMF/DEMAND_PLAN_UTILITIES
Process Steps
To set up the UDF reuse component, perform the following steps:
Activate ICF Services
For security reasons, the Internet Communication Framework (ICF) services are delivered in an inactive state.
You must activate the services that are required for the UDF reuse component.
324
PUBLIC
Common Installation Guide for SAP Customer Activity Repository applications bundle 5.0
Set Up the Applications

Note
After an upgrade, you must ensure that the Internet Communication Framework (ICF) services required for
the UDF reuse component are still active.
To activate the ICF services required for the UDF reuse component:
1. Log on to your front-end server.
2. Execute transaction SICF.
3. In the Dene Services screen, make the following selections:
○ Hierarchy Type: SERVICE
○ Virtual Host: DEFAULT_HOST
○ Service Path:
Component
Service Path
UDF reuse component /sap/bc/ui5_ui5/sap/udfreuse
4. Choose Execute ( F8 ).
5. Under Virtual Hosts / Services, double-click a service to open the Create/Change a Service screen.
Component
ICF Service
UDF reuse component udfreuse
6. To activate a service, choose Service/Host Activate .
Note
You can check the activation status by selecting the service and opening the context menu. If the
Activate Service option is grayed out, this means the service is already active.
Create your custom copy of the /DMF/DPL role on the back-end server
1. Log on to the back-end server.
2. Execute transaction PFCG to open the Role Maintenance screen.
3. Search for the /DMF/DPL role.
Note
/DMF/DPL (Demand Planner (Retail)) is the back-end server authorization role required for the apps for
demand forecasting (Analyze Forecast, Adjust Forecast, Manage Demand Inuencing Factors) and SAP
Replenishment Planning (Review Order Plan Items, Simulate Replenishment).
Caution
/DMF/DPL is one of the standard roles delivered by SAP.
Standard roles are delivered as templates (most begin with the prex SAP_*). Never change the
standard roles, but only your custom copies of these roles (
Z_*). Otherwise, any standard roles that
you have changed will be overwritten by newly delivered standard roles during a later upgrade or
release change.
Common Installation Guide for SAP Customer Activity Repository applications bundle 5.0
Set Up the Applications
PUBLIC 325

4. Create your custom copy of /DMF/DPL on the back-end server:
Choose Role Copy and enter a name from the customer namespace for your copied role.
5. Save your changes.
The authorization object /DMF/DPL is assigned to the role /DMF/DPL. This authorization object implements
the following components:
● Product and product hierarchy lters
● Location and location hierarchy lters
● Chart component consisting of time series chart, decomposition chart and table view
Among others, these components are used by the Review Order Plan Items and Simulate Replenishment apps.
6.6.5.2 App Implementation: Manage Conguration
Assignments
Tip
You can also nd the data required to implement the Manage Conguration Assignments app in the SAP
Fiori apps reference library at https://oriappslibrary.hana.ondemand.com/sap/x/externalViewer/
index.html#?appId=F4644.
Prerequisites
Before implementing the app, you must ensure the following:
● You have installed the UDF reuse component (SAP UI5 Application UDFREUSE and OData service
/DMF/DEMAND_PLAN_UTILITIES). For information see Set Up the UDF Reuse Component [page 324].
System Landscape Requirements
For information about the system requirements, see Implement the Prerequisites.
Implementation Tasks
The following section lists tasks that have to be performed to implement this app. The tables contain the app-
specic data required for these tasks.
326
PUBLIC
Common Installation Guide for SAP Customer Activity Repository applications bundle 5.0
Set Up the Applications

Front-End Server: Activate OData Services
Component Technical Name
OData Service (Version Number) /DMF/PARAMETER_ASSIGNMENT_SRV (1)
For more information about activating OData services, see Set Up SAP Fiori Apps for SAP Replenishment
Planning [page 320] under Activate Application-Specic OData Services for SAP Replenishment Planning.
Front-End Server: Activate SAPUI5 Application
Component Technical Name
SAP UI5 Application
CONFIGASSIGNMAN
For more information about how to activate the ICF service, see Set Up SAP Fiori Apps for SAP Replenishment
Planning [page 320] under Activate ICF Services.
Front-End Server: Enable App for Access in SAP Fiori Launchpad
The SAP Fiori launchpad is the entry point to apps. In the launchpad, the user can see and access those apps
that have been assigned by an administrator to the catalog designed for this user's role. For more information,
see Set Up SAP Fiori Apps for SAP Replenishment Planning [page 320] under Enable the Apps for SAP Fiori
Launchpad.
SAP delivers technical catalogs for groups of SAP Fiori apps as repositories to create your own catalogs in the
launchpad designer. Along with these catalogs, more technical content is delivered for each SAP Fiori app.
Front End Server: Catalog Details
Component Technical Name
Technical Catalog
SAP_XRP_TC_REPL
Business Catalog
SAP_XRP_BC_REPL
Business Group
SAP_XRP_BCG_REPL_CONFIG
Common Installation Guide for SAP Customer Activity Repository applications bundle 5.0
Set Up the Applications
PUBLIC 327

Back-End Server: Set Up Authorizations
On the back-end server, set up the authorizations for SAP Replenishment Planning as described in Set Up
Back-End Roles and Authorizations [page 344]. For the Manage Conguration Assignments app, the following
authorization objects are relevant:
Authorization Object
Authorization Object
Description Field Value Field Description
/DMF/DPL
Authorization to use
the product and prod
uct hierarchy lters
and the location and
location hierarchy l-
ters in the Manage
Conguration
Assignments app.
ACTVT
Execute Activity
/DMF/MCASG
Authorization to dis
play and change con
guration assignments
by using the Manage
Conguration
Assignments app.
ACTVT
Display
Change
Activity
6.6.5.3 App Implementation: Manage Constraint Proles
Tip
You can also nd the data required to implement the Manage Constraint Proles app in the SAP Fiori apps
reference library at https://oriappslibrary.hana.ondemand.com/sap/x/externalViewer/index.html#?
appId=F4477 .
System Landscape Requirements
For information about the system requirements, see Implement the Prerequisites.
Implementation Tasks
The following section lists tasks that have to be performed to implement this app. The tables contain the app-
specic data required for these tasks.
328
PUBLIC
Common Installation Guide for SAP Customer Activity Repository applications bundle 5.0
Set Up the Applications

Front-End Server: Activate OData Services
Component Technical Name
OData Service (Version Number) /DMF/PROFILE_CONSTRAINT_PARAM_SRV (1)
For more information about activating OData services, see Set Up SAP Fiori Apps for SAP Replenishment
Planning [page 320] under Activate Application-Specic OData Services for SAP Replenishment Planning.
Front-End Server: Activate SAPUI5 Application
Component Technical Name
SAP UI5 Application
PRFLCONSTRNTMAN
For more information about how to activate the ICF service, see Set Up SAP Fiori Apps for SAP Replenishment
Planning [page 320] under Activate ICF Services.
Front-End Server: Enable App for Access in SAP Fiori Launchpad
The SAP Fiori launchpad is the entry point to apps. In the launchpad, the user can see and access those apps
that have been assigned by an administrator to the catalog designed for this user's role. For more information,
see Set Up SAP Fiori Apps for SAP Replenishment Planning [page 320] under Enable the Apps for SAP Fiori
Launchpad.
SAP delivers technical catalogs for groups of SAP Fiori apps as repositories to create your own catalogs in the
launchpad designer. Along with these catalogs, more technical content is delivered for each SAP Fiori app.
Front End Server: Catalog Details
Component Technical Name
Technical Catalog
SAP_XRP_TC_REPL
Business Catalog
SAP_XRP_BC_REPL
Business Group
SAP_XRP_BCG_REPL_CONFIG
Common Installation Guide for SAP Customer Activity Repository applications bundle 5.0
Set Up the Applications
PUBLIC 329

Back-End Server: Set Up Authorizations
On the back-end server, set up the authorizations for SAP Replenishment Planning as described in Set Up
Back-End Roles and Authorizations [page 344]. For the Manage Constraint Proles app, the following
authorization objects are relevant:
Authorization Object
Authorization Object
Description Field Value Field Description
/DMF/PRFLM
Authorization to dis
play and change con
straint proles by us
ing the Manage
Constraint Proles app.
ACTVT
Display
Change
Activity
6.6.5.4 App Implementation: Manage Cost Proles
Tip
You can also nd the data required to implement the Manage Cost Proles app in the SAP Fiori apps
reference library at https://oriappslibrary.hana.ondemand.com/sap/x/externalViewer/index.html#?
appId=F4478.
System Landscape Requirements
For information about the system requirements, see Implement the Prerequisites.
Implementation Tasks
The following section lists tasks that have to be performed to implement this app. The tables contain the app-
specic data required for these tasks.
330
PUBLIC
Common Installation Guide for SAP Customer Activity Repository applications bundle 5.0
Set Up the Applications

Front-End Server: Activate OData Services
Component Technical Name
OData Service (Version Number) /DMF/PROFILE_COST_PARAM_SRV (1)
For more information about activating OData services, see Set Up SAP Fiori Apps for SAP Replenishment
Planning [page 320] under Activate Application-Specic OData Services for SAP Replenishment Planning.
Front-End Server: Activate SAPUI5 Application
Component Technical Name
SAP UI5 Application
PRFLCOSTSMAN
For more information about how to activate the ICF service, see Set Up SAP Fiori Apps for SAP Replenishment
Planning [page 320] under Activate ICF Services.
Front-End Server: Enable App for Access in SAP Fiori Launchpad
The SAP Fiori launchpad is the entry point to apps. In the launchpad, the user can see and access those apps
that have been assigned by an administrator to the catalog designed for this user's role. For more information,
see Set Up SAP Fiori Apps for SAP Replenishment Planning [page 320] under Enable the Apps for SAP Fiori
Launchpad.
SAP delivers technical catalogs for groups of SAP Fiori apps as repositories to create your own catalogs in the
launchpad designer. Along with these catalogs, more technical content is delivered for each SAP Fiori app.
Front End Server: Catalog Details
Component Technical Name
Technical Catalog
SAP_XRP_TC_REPL
Business Catalog
SAP_XRP_BC_REPL
Business Group
SAP_XRP_BCG_REPL_CONFIG
Common Installation Guide for SAP Customer Activity Repository applications bundle 5.0
Set Up the Applications
PUBLIC 331

Back-End Server: Set Up Authorizations
On the back-end server, set up the authorizations for SAP Replenishment Planning as described in Set Up
Back-End Roles and Authorizations [page 344]. For the Manage Cost Proles app, the following authorization
objects are relevant:
Authorization Object
Authorization Object
Description Field Value Field Description
/DMF/PRFLM
Authorization to dis
play and change cost
proles by using the
Manage Cost Proles
app.
ACTVT
Display
Change
Activity
6.6.5.5 App Implementation: Manage Procurement
Schedules
Tip
You can also nd the data required to implement the Manage Procurement Schedules app in the SAP Fiori
apps reference library at https://oriappslibrary.hana.ondemand.com/sap/x/externalViewer/
index.html#?appId=F4475.
System Landscape Requirements
For information about the system requirements, see Implement the Prerequisites.
Implementation Tasks
The following section lists tasks that have to be performed to implement this app. The tables contain the app-
specic data required for these tasks.
332
PUBLIC
Common Installation Guide for SAP Customer Activity Repository applications bundle 5.0
Set Up the Applications

Front-End Server: Activate OData Services
Component Technical Name
OData Service (Version Number) /DMF/PROCUREMENT_SCHEDULE_SRV (1)
For more information about activating OData services, see Set Up SAP Fiori Apps for SAP Replenishment
Planning [page 320] under Activate Application-Specic OData Services for SAP Replenishment Planning.
Front-End Server: Activate SAPUI5 Application
Component Technical Name
SAP UI5 Application
PROCSCHEDEMAN
For more information about how to activate the ICF service, see Set Up SAP Fiori Apps for SAP Replenishment
Planning [page 320] under Activate ICF Services.
Front-End Server: Enable App for Access in SAP Fiori Launchpad
The SAP Fiori launchpad is the entry point to apps. In the launchpad, the user can see and access those apps
that have been assigned by an administrator to the catalog designed for this user's role. For more information,
see Set Up SAP Fiori Apps for SAP Replenishment Planning [page 320] under Enable the Apps for SAP Fiori
Launchpad.
SAP delivers technical catalogs for groups of SAP Fiori apps as repositories to create your own catalogs in the
launchpad designer. Along with these catalogs, more technical content is delivered for each SAP Fiori app.
Front End Server: Catalog Details
Component Technical Name
Technical Catalog
SAP_XRP_TC_REPL
Business Catalog
SAP_XRP_BC_REPL
Business Group
SAP_XRP_BCG_REPL_CONFIG
Common Installation Guide for SAP Customer Activity Repository applications bundle 5.0
Set Up the Applications
PUBLIC 333

Back-End Server: Set Up Authorizations
On the back-end server, set up the authorizations for SAP Replenishment Planning as described in Set Up
Back-End Roles and Authorizations [page 344]. For the Manage Procurement Schedules app, the following
authorization objects are relevant:
Authorization Object
Authorization Object
Description Field Value Field Description
/DMF/MPSCH
Authorization to dis
play and change pro
curement schedules by
using the Manage
Procurement
Schedules app.
Display
Change
Activity
6.6.5.6 App Implementation: Manage Shelf Cost Proles
Tip
You can also nd the data required to implement the Manage Shelf Cost Proles app in the SAP Fiori apps
reference library at https://oriappslibrary.hana.ondemand.com/sap/x/externalViewer/index.html#?
appId=F4476.
System Landscape Requirements
For information about the system requirements, see Implement the Prerequisites.
Implementation Tasks
The following section lists tasks that have to be performed to implement this app. The tables contain the app-
specic data required for these tasks.
334
PUBLIC
Common Installation Guide for SAP Customer Activity Repository applications bundle 5.0
Set Up the Applications

Front-End Server: Activate OData Services
Component Technical Name
OData Service (Version Number) /DMF/PRFL_SHLFCAP_VIOLTN_PARAM_SRV (1)
For more information about activating OData services, see Set Up SAP Fiori Apps for SAP Replenishment
Planning [page 320] under SAP Replenishment Planning.
Front-End Server: Activate SAPUI5 Application
Component Technical Name
SAP UI5 Application
PRFLSHLFCAPMAN
For more information about how to activate the ICF service, see Set Up SAP Fiori Apps for SAP Replenishment
Planning [page 320].
Front-End Server: Enable App for Access in SAP Fiori Launchpad
The SAP Fiori launchpad is the entry point to apps. In the launchpad, the user can see and access those apps
that have been assigned by an administrator to the catalog designed for this user's role. For more information,
see Set Up SAP Fiori Apps for SAP Replenishment Planning [page 320] under Enable the Apps for SAP Fiori
Launchpad.
SAP delivers technical catalogs for groups of SAP Fiori apps as repositories to create your own catalogs in the
launchpad designer. Along with these catalogs, more technical content is delivered for each SAP Fiori app.
Front End Server: Catalog Details
Component Technical Name
Technical Catalog
SAP_XRP_TC_REPL
Business Catalog
SAP_XRP_BC_REPL
Business Group
SAP_XRP_BCG_REPL_CONFIG
Common Installation Guide for SAP Customer Activity Repository applications bundle 5.0
Set Up the Applications
PUBLIC 335

Back-End Server: Set Up Authorizations
On the back-end server, set up the authorizations for SAP Replenishment Planning as described in Set Up
Back-End Roles and Authorizations [page 344]. For the Manage Shelf Cost Proles under app, the following
authorization objects are relevant:
Authorization Object
Authorization Object
Description Field Value Field Description
/DMF/PRFLM
Authorization to dis
play and change shelf
cost proles by using
the Manage Shelf Cost
Proles app.
ACTVT
Display
Change
Activity
6.6.5.7 App Implementation: Review Order Plan Items
Tip
You can also nd the data required to implement the Review Order Plan Items app in the SAP Fiori apps
reference library at https://oriappslibrary.hana.ondemand.com/sap/x/externalViewer/index.html?
appId=F4235.
Prerequisites
Before implementing the app, you must ensure the following:
● You have installed the UDF reuse component (SAP UI5 Application UDFREUSE and OData service /DMF/
DEMAND_PLAN_UTILITIES). For information, see Set Up the UDF Reuse Component [page 324].
● You have implemented the Analyze Forecast app as the target for the navigation from the Review Order Plan
Items app (with this, the reuse component is already installed). For information about how to set up the
Analyze Forecast app, see Set Up the Analyze Forecast App [page 148] and follow the instructions.
System Landscape Requirements
For information about the system requirements, see Implement the Prerequisites.
336
PUBLIC
Common Installation Guide for SAP Customer Activity Repository applications bundle 5.0
Set Up the Applications

Implementation Tasks
The following sections list tasks that have to be performed to implement this app. The tables contain the app-
specic data required for these tasks.
Front-End Server: Activate OData Services
Component Technical Name
OData Service (Version Number) /XRP/REVIEW_ORDER_PLAN_ITEMS (1)
For more information about activating OData services, see Set Up SAP Fiori Apps for SAP Replenishment
Planning [page 320] under Activate Application-Specic OData Services for SAP Replenishment Planning.
Front-End Server: Activate SAPUI5 Application
Component Technical Name
SAPUI5 Application
REVIEW_OPI
For more information about how to activate the ICF service, see Set Up SAP Fiori Apps for SAP Replenishment
Planning [page 320] under Activate ICF Services.
Front-End Server: Enable App for Access in SAP Fiori Launchpad
The SAP Fiori launchpad is the entry point to apps. In the launchpad, the user can see and access those apps
that have been assigned by an administrator to the catalog designed for this user's role. For more information,
see Set Up SAP Fiori Apps for SAP Replenishment Planning [page 320] under Enable the Apps for SAP Fiori
Launchpad.
SAP delivers technical catalogs for groups of SAP Fiori apps as repositories to create your own catalogs in the
launchpad designer. Along with these catalogs, more technical content is delivered for each SAP Fiori app.
Front End Server: Catalog Details
Component Technical Name
Technical Catalog SAP_XRP_TC_REPL (Replenishment Planning)
Business Catalog SAP_XRP_BC_REPL (Replenishment Planning)
Common Installation Guide for SAP Customer Activity Repository applications bundle 5.0
Set Up the Applications
PUBLIC 337

Component Technical Name
Business Group SAP_XRP_BCG_REPL_PLANNING (Replenishment Planning)
Back-End Server: Set Up Authorizations
On the back-end server, set up the authorizations for SAP Replenishment Planning as described in Set Up
Back-End Roles and Authorizations [page 344]. For the Review Order Plan Items app, the following
authorization objects are relevant:
Authorization Object Authorization Object
Description
Field Value Field Description
/DMF/DPL
Authorization to:
● Use the product
and product hier
archy lters and
the location and
location hierarchy
lters in the
Review Order Plan
Items app.
● Create forecast
corrections in the
Adjust Forecast
app.
● Create demand in
uencing factors
assignments in
the Manage
Demand
Inuencing
Factors app.
ACTVT
Execute Activity
/XRP/ROPI
Authorization to dis
play and change order
plan items by using the
Review Order Plan
Items app.
ACTVT
Display
Change
Activity
338 PUBLIC
Common Installation Guide for SAP Customer Activity Repository applications bundle 5.0
Set Up the Applications

6.6.5.8 App Implementation: Simulate Replenishment
Tip
You can also nd the data required to implement the Simulate Replenishment app in the SAP Fiori apps
reference library at https://oriappslibrary.hana.ondemand.com/sap/x/externalViewer/index.html?
appId=F4396.
Prerequisites
Before implementing the app, you must ensure the following:
● You have installed the UDF reuse component (SAP UI5 Application UDFREUSE and OData service /DMF/
DEMAND_PLAN_UTILITIES). For information, see Set Up the UDF Reuse Component [page 324].
System Landscape Requirements
For information about the system requirements, see Implement the Prerequisites.
Implementation Tasks
The following sections list tasks that have to be performed to implement this app. The tables contain the app-
specic data required for these tasks.
Front-End Server: Activate OData Services
Component Technical Name
OData Service (Version Number) /XRP/OD_REPLNMT_COST_SIMLN_SRV (1)
OData Service (Version Number) /DMF/DEMAND_PLAN_UTILITIES_SRV (1)
For more information about activating OData services, see Set Up SAP Fiori Apps for SAP Replenishment
Planning [page 320] under Activate Application-Specic OData Services for SAP Replenishment Planning.
Common Installation Guide for SAP Customer Activity Repository applications bundle 5.0
Set Up the Applications
PUBLIC 339

Front-End Server: Activate SAPUI5 Application
Component Technical Name
SAPUI5 Application
retail.xrp.simulation
For more information about how to activate the ICF service, see Set Up SAP Fiori Apps for SAP Replenishment
Planning [page 320] under Activate ICF Services.
Front-End Server: Enable App for Access in SAP Fiori Launchpad
The SAP Fiori launchpad is the entry point to apps. In the launchpad, the user can see and access those apps
that have been assigned by an administrator to the catalog designed for this user's role. For more information,
see Set Up SAP Fiori Apps for SAP Replenishment Planning [page 320] under Enable the Apps for SAP Fiori
Launchpad.
SAP delivers technical catalogs for groups of SAP Fiori apps as repositories to create your own catalogs in the
launchpad designer. Along with these catalogs, more technical content is delivered for each SAP Fiori app.
Front End Server: Catalog Details
Component Technical Name
Technical Catalog SAP_XRP_TC_REPL (Replenishment Planning)
Business Catalog SAP_XRP_BC_REPL (Replenishment Planning)
Business Group SAP_XRP_BCG_SIMULATION (Replenishment Simulation)
340 PUBLIC
Common Installation Guide for SAP Customer Activity Repository applications bundle 5.0
Set Up the Applications

Back-End Server: Set Up Authorizations
On the back-end server, set up the authorizations for SAP Replenishment Planning as described in Set Up
Back-End Roles and Authorizations [page 344]. For the Simulate Replenishment app, the following
authorization objects are relevant:
Authorization Object Authorization Object
Description
Field Value Field Description
/DMF/DPL
Authorization to per
form several actions in
dierent SAP Fiori
apps. For more infor
mation, see
Set Up
Back-End Roles and
Authorizations [page
344].
ACTVT
Execute Activity
/XRP/SIM
Authorization to exe
cute the Simulate Re
plenishment app and
the replenishment sim
ulation with re
port
/XRP/
REPLENISHMENT_SIM.
ACTVT
Execute Activity
6.6.5.9 App Implementation: Manage Alerts
Tip
You can also nd the data required to implement the Manage Alerts app in the SAP Fiori apps reference
library at https://oriappslibrary.hana.ondemand.com/sap/x/externalViewer/index.html#?appId=F5163.
Prerequisites
Before implementing the app, you must ensure the following:
● You have installed the UDF reuse component (SAP UI5 Application UDFREUSE and OData service
/DMF/DEMAND_PLAN_UTILITIES). For information see Set Up the UDF Reuse Component [page 324].
System Landscape Requirements
For information about the system requirements, see Implement the Prerequisites.
Common Installation Guide for SAP Customer Activity Repository applications bundle 5.0
Set Up the Applications
PUBLIC 341

Implementation Tasks
The following section lists tasks that have to be performed to implement this app. The tables contain the app-
specic data required for these tasks.
Front-End Server: Activate OData Services
Component Technical Name
OData Service (Version Number) /DMF/MANAGE_RTLPLNG_ALERTS_SRV (1)
Re-Use Component Technical Name
OData Service (Version Number) APS_CHANGE_DOCUMENTS_SRV (1)
For more information about activating OData services, see Set Up SAP Fiori Apps for SAP Replenishment
Planning [page 320] under Activate Application-Specic OData Services for SAP Replenishment Planning.
Front-End Server: Activate SAPUI5 Application
Component Technical Name
SAP UI5 Application
Rtlplngalrtman
For more information about how to activate the ICF service, see Set Up SAP Fiori Apps for SAP Replenishment
Planning [page 320] under Activate ICF Services.
Front-End Server: Enable App for Access in SAP Fiori Launchpad
The SAP Fiori launchpad is the entry point to apps. In the launchpad, the user can see and access those apps
that have been assigned by an administrator to the catalog designed for this user's role. For more information,
see Set Up SAP Fiori Apps for SAP Replenishment Planning [page 320] under Enable the Apps for SAP Fiori
Launchpad.
SAP delivers technical catalogs for groups of SAP Fiori apps as repositories to create your own catalogs in the
launchpad designer. Along with these catalogs, more technical content is delivered for each SAP Fiori app.
342
PUBLIC
Common Installation Guide for SAP Customer Activity Repository applications bundle 5.0
Set Up the Applications
Front End Server: Catalog Details
Component Technical Name
Technical Catalog
SAP_XRP_TC_REPL
Business Catalog
SAP_XRP_BC_REPL
Business Group
SAP_XRP_BCG_ALERT_MANAGEMENT
Back-End Server: Set Up Authorizations
On the back-end server, set up the authorizations for SAP Replenishment Planning as described in Set Up
Back-End Roles and Authorizations [page 344]. For the Manage Alerts app, the following authorization objects
are relevant:
Authorization Object
Authorization Object
Description Field Value Field Description
/DMF/MNGAT
Authorization to dis
play and change alert
status by using the
Manage Alerts app.
ACTVT
Display
Maintain
Activity
6.6.6 Set Up Database Roles and Authorizations
In SAP HANA studio, grant the AFL__SYS_AFL_XRP_EXECUTE role to the SAPHANADB user. This short
procedure is mandatory for the successful execution of SAP Replenishment Planning.
Note
In this guide, SAPHANADB is used as a variable. Replace it with the name of the database user or database
schema in your ABAP back-end system. You might also come across documentation or user interfaces that
use SAPHANADB. Both variables mean the same.
For more information and an example, see the Important Variables in section Naming Conventions [page 7].
For more information about database users and schemas, see SAP Note 2535951 (FAQ: SAP HANA
Users and Schemas).
Context
The AFL__SYS_AFL_XRP_EXECUTE role enables the SAPHANADB user to call the XRP application function
library (part of the SAP XRP AFL component) in the SAP HANA database.
Common Installation Guide for SAP Customer Activity Repository applications bundle 5.0
Set Up the Applications
PUBLIC 343

Prerequisites
● You have installed the SAP XRP AFL component as described in section Download and Install SAP XRP
AFL (Only for SAP Replenishment Planning) [page
68] in this guide.
● You have database administrator rights so that you can grant roles to users.
Procedure
Tip
● If you encounter issues related to authorization or authentication, see the Security-Related Issues
section of the SAP HANA Troubleshooting and Performance Analysis Guide, which you can nd under
https://help.sap.com/viewer/p/SAP_HANA_PLATFORM <Version> Administration .
● We have also provided an example SQL statement below that you can adapt as needed for your system
landscape.
1. In SAP HANA studio, access your back-end system and open the SAP HANA Administration Console.
2. Choose Security Users .
3. Select your SAPHANADB user and open the user details (or double-click the user).
4. On the Granted Roles tab, choose the plus icon and select AFL__SYS_AFL_XRP_EXECUTE as the role
name.
SQL example: grant AFL__SYS_AFL_XRP_EXECUTE to SAPHANADB;
5. Save your changes by choosing the Deploy (F8) icon at the top right.
Result
You have successfully set up the authorizations for SAP Replenishment Planning.
6.6.7 Set Up Back-End Roles and Authorizations
To access the relevant Customizing activities and core SAP Replenishment Planning application functionality,
you must have a user on the ABAP back-end server.
Create roles with the suitable authorization objects according to your demand and based on the segregation of
duties. Then assign the roles to the users depending on their tasks.
Example
Users who are responsible for the parameter maintenance receive a role that contains only the authorization
object for the parameter maintenance. Users who are responsible for running the operative replenishment
344
PUBLIC
Common Installation Guide for SAP Customer Activity Repository applications bundle 5.0
Set Up the Applications
process receive a role that contains only the authorization objects for executing the replenishment calculation
and transferring order plan items.
Standard Authorization Objects
The following table shows the security-relevant authorization objects that are used by SAP Replenishment
Planning.
Common Installation Guide for SAP Customer Activity Repository applications bundle 5.0
Set Up the Applications
PUBLIC 345

Authorization Object Authorization Object
Description
Field Value Field Description
/DMF/DPL
Authorization to do the
following:
● Create forecast
corrections in the
Adjust Forecast
app.
● Create demand in
uencing factors
assignments in
the Manage
Demand
Inuencing
Factors app.
● Filter for product
and product hier
archy in the apps
for demand fore
casting (Analyze
Forecast, Adjust
Forecast, Manage
Demand
Inuencing
Factors) and SAP
Replenishment
Planning (Review
Order Plan Items,
Simulate
Replenishment).
● Filter for location
and location hier
archy in the apps
for demand fore
casting (Analyze
Forecast, Adjust
Forecast, Manage
Demand
Inuencing
Factors) and SAP
Replenishment
Planning (Review
Order Plan Items,
Simulate
Replenishment).
ACTVT
Execute Activity
346 PUBLIC
Common Installation Guide for SAP Customer Activity Repository applications bundle 5.0
Set Up the Applications

Authorization Object Authorization Object
Description
Field Value Field Description
● Use/display the
chart component
consisting of time
series chart, de
composition chart
and table view in
the apps for de
mand forecasting
(Analyze Forecast,
Adjust Forecast,
Manage Demand
Inuencing
Factors).
/DMF/OPPRG
Authorization for purg
ing order plan items
with report /DMF/
ORDERPLAN_PURGE
.
ACTVT Execute Activity
/DMF/PRFLM
Authorization to dis
play and maintain pa
rameter proles by us
ing the Manage Cost
proles, Manage
Constraint Proles and
Manage Shelf Cost
Proles apps.
ACTVT Display
Maintain
Activity
/DMF/MPSCH
Authorization to dis
play and maintain pro
curement schedules by
using the Manage
Procurement
Schedules app.
ACTVT Display
Maintain
Activity
/DMF/MCASG
Authorization to dis
play and maintain con
guration assignments
by using the Manage
Conguration
Assignments app.
ACTVT Display
Maintain
Activity
/DMF/MNGAT
Authorization to dis
play and review alerts
by using the Manage
Alerts app.
ACTVT Display
Maintain
Activity
Common Installation Guide for SAP Customer Activity Repository applications bundle 5.0
Set Up the Applications
PUBLIC 347

Authorization Object Authorization Object
Description
Field Value Field Description
/DMF/ALERT
Authorization for gen
erating alerts with re
port /DMF/
GENERATE_ALERTS
ACTVT Add
Create
Activity
/DMF/PRGAT
Authorization for purg
ing alerts with re
port /DMF/
PURGE_ALERTS
ACTVT Delete Activity
/XRP/OPOUT
Authorization to trans
fer order plan items
into an ERP system
with report /XRP/
ORDERPLAN_OUTBOUN
D
.
ACTVT Execute Activity
/XRP/OPUST
Authorization to adapt
the status of order plan
items with re
port /XRP/
ORDERPLAN_ADAPT_S
TATUS
.
ACTVT Execute Activity
/XRP/PASGN
Authorization to main
tain parameter assign
ments with re
port /XRP/
PARAM_ASSIGNMENT
.
ACTVT Execute Activity
/XRP/REPL
Authorization to exe
cute the replenishment
calculation with re
port /XRP/
REPLENISHMENT_CAL
C
.
ACTVT Execute Activity
/XRP/ROPI
Authorization to dis
play and change order
plan items by using the
Review Order Plan
Items app.
ACTVT
Display
Change
Activity
348 PUBLIC
Common Installation Guide for SAP Customer Activity Repository applications bundle 5.0
Set Up the Applications

Authorization Object Authorization Object
Description
Field Value Field Description
/XRP/SIM
Authorization to exe
cute the Simulate
Replenishment
app
and the replenishment
simulation with re
port
/XRP/
REPLENISHMENT_SIM.
ACTVT
Execute Activity
6.6.8 Set Up Authorizations for Transfer of Order Plan Items
to Source Master Data System
To transfer order plan items from SAP Customer Activity Repository to SAP ERP or SAP S/4HANA the user
needs a role with authorization objects in the source master data system.
The following authorization objects are required to transfer order plan items to the source master data system:
Authorization Object Authorization Object
Description
Field Value Field Description
M_BEST_BSA
Document Type in Or
der
ACTVT
● Create or gener
ate
● Change
● Display change
documents
● Display prices
Activity
BSART Type of purchasing
document to be cre
ated. The type can be
NB (Standard pur
chase order), UB
(Stock transport or
der), or customized.
Purchasing document
type
M_BEST_EKG
Purchasing Group in
Purchase Order
ACTVT
● Create or gener
ate
● Change
● Display change
documents
● Display prices
Activity
Common Installation Guide for SAP Customer Activity Repository applications bundle 5.0
Set Up the Applications
PUBLIC 349

Authorization Object Authorization Object
Description
Field Value Field Description
EKGRP Purchasing group for
which purchase orders
may be processed
Purchasing group
M_BEST_EKO
Purchasing Organiza
tion in Purchase Order
ACTVT
● Create or gener
ate
● Change
● Display change
documents
● Display prices
Activity
EKORG Purchase organization
for which purchase or
ders may be processed
Purchasing organiza
tion
M_BEST_WRK
Plant (location) in Pur
chase Order
ACTVT
● Create or gener
ate
● Change
● Display change
documents
● Display prices
Activity
WERKS Plants (locations) for
which purchase orders
may be processed
Plant (location)
6.6.9 Perform Conguration Steps in SAP Customer Activity
Repository
The following conguration steps in SAP Customer Activity Repository that are required for the operation of
SAP Replenishment Planning should have been already done during the conguration of SAP Customer
Activity Repository.
You nd detailed information about these conguration steps in the following sections of the SAP Customer
Activity Repository Administration Guide as follows:
● Enabling Demand Data Foundation and Creating Demand Forecast
You must enable Demand Data Foundation (DDF) to support planning, analysis, and forecasting in
consuming applications of SAP Customer Activity Repository and to create a demand forecast with Unied
Demand Forecast (UDF).
● Congure Demand Data Foundation (DDF)
Set up and enable the DDF module in SAP Customer Activity Repository for creating demand forecasts
with Unied Demand Forecast (UDF) and supporting the consuming applications.
● Set Up and Congure DDF Services
350
PUBLIC
Common Installation Guide for SAP Customer Activity Repository applications bundle 5.0
Set Up the Applications

Set up and congure services that the Demand Data Foundation module in SAP Customer Activity
Repository provides for dierent scenarios and consuming applications.
● Congure Unied Demand Forecast (UDF)
Congure the UDF module in SAP Customer Activity Repository to adjust demand modeling and
forecasting for your scenario. You can select from multiple UDF features, optimize performance for your
scenario, and congure parameters for modeling and for forecasting. Additionally, you can set up the
demand planning apps.
6.6.10 Congure SAP Replenishment Planning
To customize automated replenishment processes in SAP Replenishment Planning according to your business
needs, set up Customizing activities and use BAdIs.
SAP Replenishment Planning is a consuming application of the Demand Data Foundation module. Therefore, to
set up SAP Replenishment Planning, in addition to make application-specic settings, you also need to make
settings in Customizing in transaction SPRO under Cross-Application Components Demand Data
Foundation
. The DDF Customizing activities that are mandatory for SAP Replenishment Planning can be
found in Customizing for Replenishment Planning. Which additional DDF Customizing activities are relevant for
SAP Replenishment Planning can be found in the organizational activities in Customizing for Replenishment
Planning.
Note
Depending on your existing settings and your business requirements, you might not need to make settings
for all activities; however, we recommend that you check all relevant DDF settings during the initial setup of
SAP Replenishment Planning.
Note
For alert statuses, you need to ensure that the data from client 000 is cascaded to other relevant clients.
Use the following Customizing activities and Business Add-Ins in transaction SPRO under Cross-Application
Components
Replenishment Planning to set up and customize SAP Replenishment Planning:
Mandatory Customizing Activities
Basic Settings
● Maintain Number Range for Replenishment Run ID
Use this Customizing activity to maintain the number range for the replenishment run ID
● Maintain RFC Mapping
With this Customizing activity, you specify an RFC destination for each master data system to which you
want to transfer order plan items for purchase order creation.
● Dene Replenishment Types Relevant for Replenishment Planning
With this Customizing activity, you dene whether a product location is considered in replenishment
planning by dening replenishment types relevant for replenishment planning.
Common Installation Guide for SAP Customer Activity Repository applications bundle 5.0
Set Up the Applications
PUBLIC 351

Optional Customizing Activities and Business Add-Ins
Source of Supply Determination
Note
If you want internal sources of supply to be considered in the source of supply determination, you need to
include Supplying Site transportation lanes in the transfer of transportation lanes from the ERP source
system to SAP Customer Activity Repository. You can access the relevant Customizing activity in the ERP
system in transaction
SPRO under Logistics General Merchandise Lifecycle Optimization Outbound
Handling of Control Parameters Maintain Control Parameters for Source of Supply .
● Dene Client-Specic Settings for Source of Supply Determination
With this Customizing activity, you can activate an optional listing check for a product at a receiving
location. If the listing check is activated, the listing is considered as ranking criterion for the selection of the
preferred source of supply.
● BAdI: Determination of Valid Transportation Lanes
You can use this BAdI to implement your own logic for identifying valid transportation lanes during source
of supply determination.
● BAdI: Adaptation of Valid Transportation Lanes
You can use this BAdI to implement your own logic to add new valid transportation lanes and to change or
remove existing transportation lanes during source of supply determination.
● BAdI: Selection of Preferred Transportation Lanes
You can use this BAdI to implement your own logic for selecting preferred transportation lanes during
source of supply determination.
Scheduling
● BAdI: Adaptation of Replenishment Schedule
You can use this BAdI to adapt the replenishment schedule that was calculated by the system.
● BAdI: Deactivation of Listing Check for Schedule Items
You can use this BAdI to deactivate the listing check on procurement schedule items that are used as a
basis for calculating replenishment schedules.
Open Goods Movements
● BAdI: Adaptation of Open Goods Movements Based on Order Plan
You can use this BAdI to adapt open goods movements that have been derived from order plan items.
● BAdI: Adaptation of Open Goods Movements Based on Purchase Orders
You can use this BAdI to adapt open goods movements that have been derived from purchase orders.
Order Plan Processing
● Dene Change Reasons for Order Plan Items
With this Customizing activity, you can dene reasons for manual changes of order plan items.
● Congure Order Plan Item Change History
With this Customizing activity, you can enable and congure the order plan item change history.
● BAdI: Selection of Order Plan Items
You can use this BAdI to implement your own logic to select order plan items for the order plan outbound
processing.
352
PUBLIC
Common Installation Guide for SAP Customer Activity Repository applications bundle 5.0
Set Up the Applications

● BAdI: Adaptation of Order Plan Items
You can use this BAdI to implement your own logic to add new order plan items and to change or remove
existing order plan items for the order plan outbound processing.
Alert and Exception Management
● Dene Alert Statuses
With this Customizing activity, you can dene alert statuses for the Manage Alerts app.
Note
If you want to add several custom statuses based on your scenario, you must dene them using this
Customizing activity. For more information on how to access this Customizing, see the SAP
Replenishment Planning application help and search for Alert Management.
● Maintain Conguration Data for High Level Exceptions
With this Customizing activity, you can change conguration settings for exceptions. For more information,
see Congure Exception Management [page 354].
6.6.11 Dene the Parameterization Proles and the
Assignment
This section provides an overview of the conguration steps for creating conguration objects and
assignments that are valid for every product location that is supposed to be processed by the replenishment
calculation.
The conguration objects comprise single control parameters, groups of parameters (so-called proles), as
well as other structured objects (such as an entire procurement schedule). For a comprehensive list of the
conguration objects, see the subsection Replenishment Conguration in the Application Help for SAP
Replenishment Planning at https://help.sap.com/viewer/product/CARAB/latest/en-US?task=use_task.
Prerequisites
1. You have set up the authorizations for SAP Replenishment Planning as described in Set Up Back-End Roles
and Authorizations [page 344].
2. You are familiar with the conguration concept, especially with the various conguration objects and the
ways to assign them to product locations. For information about the conguration concept, see subsection
Replenishment Conguration in the Application Help for SAP Replenishment Planning.
3. You are familiar with the various use cases. The conguration hints therein will help you to nd the right
parameterization matching to your specic business requirements. As an entry point, you can use the use
case Use Basic Cost-Optimized Ordering and rene your conguration with further use cases. For
information about the use cases, see subsection Use Cases in the Application Help for SAP Replenishment
Planning.
Common Installation Guide for SAP Customer Activity Repository applications bundle 5.0
Set Up the Applications
PUBLIC 353
Create and Assign Conguration Objects
1. Create or import procurement schedules. For more information about the maintenance of the
procurement schedules using an app, see the section Manage Procurement Schedules in the application
help. For more information about importing procurement schedules from another system (inbound
processing of procurement schedules), see the documentation of the function module /DMF/
MDIF_PRCSCHD_INBOUND in the system.
2. Congure the parameters in proles according to your business requirements. For more information about
the conguration of the parameters using apps, see the following sections in the application help:
○ Manage Cost Proles
○ Manage Shelf Cost Proles
○ Manage Constraint Proles
3. You can assign conguration objects to the product locations based on product hierarchy nodes and
location hierarchy nodes. For uniqueness and unambiguity, these assignments can only use hierarchy
nodes from one product hierarchy and one location hierarchy. In turn, these hierarchies must contain all
the nodes relevant for assignments. You have to select these hierarchies prior to creating assignments.
To select these hierarchies, use the transaction /DMF/CONFIGHIER_SET in your ABAP back-end system
according to the following steps:
○ You can access the Dene Hierarchies for Conguration Assignments transaction either in the system
on the SAP Easy Access screen (transaction /DMF/CONFIGHIER_SET) or from the SAP Fiori
Launchpad ( Dene Hierarchies Conguration Assignments) tile.
○ Ensure that one record exists for each connected master data system which hosts product locations
that are subject to SAP Replenishment Planning. Within these records, specify the product and
location hierarchies that should be used for assignments of conguration objects to product locations
originating from the respective master data system.
4. Assign the parameters and proles to the product locations. We recommend that you assign them on
global level initially so that they are valid for all product locations without corresponding parameter or
prole assignments on any lower level. Depending on your business requirements, you can create more
specic assignments. For more information, see section Manage Conguration Assignments in the
application help.
5. Assign procurement schedules to product locations depending on your business requirements. Common
procurement schedules are usually applicable for groups of product locations based on special
characteristics. You have to create the assignments accordingly. If, for example, all products in a location
which share the same scheduling group should share the same procurement schedule, you would have to
create assignments specifying the procurement schedule on the assignment level Location, with specic
conditions based on the Scheduling Group attribute. Unlike for the parameters, it is rather unusual that
there is one procurement schedule which can be assigned on global level as a fallback. For more
information, see section Manage Conguration Assignments in the application help.
6.6.12 Congure Exception Management
Standard settings for exception management are delivered so that nothing is missing from a functional point of
view. This includes that all exceptions specic for SAP Replenishment Planning are switched on. If necessary,
you can then adjust the settings to meet the needs of your specic business processes.
We recommend that you check especially the settings for high-level exceptions.
354
PUBLIC
Common Installation Guide for SAP Customer Activity Repository applications bundle 5.0
Set Up the Applications

Settings for High-Level exceptions
You can change the settings for high-level exceptions using the Customizing activity Maintain Conguration
Data for High Level Exceptions in Customizing for Cross-Application Components under Replenishment
Planning Alert and Exception Management .
We recommend that you check especially the following settings:
Assignment to Business Areas
Exceptions that might occur during the replenishment calculation or the order plan transfer are assigned to
one or two of the following business areas by default:
● 61 Replenishment Order Plan Transfer
● 62 Replenishment Review Order Plan Items
● 63 Replenishment Calculation
You can change the assignments according to your needs. Further business areas are relevant for SAP
Replenishment Planning. For more information, see the subsection Exception Management of the Application
Help for SAP Replenishment Planning at https://help.sap.com/viewer/product/CARAB/5.latest/en-US?
task=use_task
.
Validity Period
You can set the validity period (maximum number of days that an exception object is stored) until the exception
can be deleted by the Purging Exceptions from the Database report. You can access this report in the system on
the SAP Easy Access screen (transaction /DMF/PURGE_EWB_MSG). For more information about purging
exceptions, see subsection
Monitor Exceptions in the application help for SAP Customer Activity Repository at
https://help.sap.com/viewer/product/CARAB/latest/en-US?task=use_task.
Priority
You can adjust the priority for each exception. Exceptions that are not relevant are switched o; that is, they are
not generated during runtime.
Relevant DDF settings
We also recommend that you check all relevant DDF settings during the initial setup of SAP Replenishment
Planning.
This includes the following optional settings:
● You can replace standard exception texts by user-dened texts using the Customizing activity Dene
Customer-Specic Replacement Messages.
● You can create custom statuses for exception messages using the Customizing activity Dene
Customizable Message Status.
For more information about these settings, see the organizational Customizing activity Alert and Exception
Management (DDF) in Customizing for Cross-Application Components under Replenishment Planning Alert
and Exception Management .
Common Installation Guide for SAP Customer Activity Repository applications bundle 5.0
Set Up the Applications
PUBLIC 355

6.6.13 Set Up Real-Time Inventory Integration
Check the setup regarding data replication framework (DRF), SAP client(s) in your ABAP back-end system,
tables for replicating data from your source master data system, SAP HANA content with the required options,
and the population of the /POSDW/TLOGUS table.
Ensure that the following steps have been done to enable the use of real-time inventory data (RTI stock) in SAP
Replenishment Planning.
● The data replication framework (DRF, transaction DRFOUT) for replicating master and transactional data is
set up. For more information, see section Complete UDF Setup [page 139] and Congure Data Replication
from SAP ERP and SAP S/4HANA to DDF in the SAP Customer Activity Repository Administration Guide.
Note
If you activate the real-time inventory determination, make sure that the information about purchase
orders, which are replicated via DRF outbound from SAP ERP or SAP S/4HANA to SAP Customer
Activity Repository, is up to date as well. Only if this information about purchase orders is up to date,
the current state of purchase orders that are considered as open goods movements in the
replenishment calculation is in sync with the stock information. If the stock and the open goods
movements are not in sync, the stock might be considered as too high.
● One or more SAP clients in your ABAP back-end system have been set up and the mapping for the client of
each source master data system to a client in your ABAP back-end system is congured. For more
information, see section Set Up SAP Client [page 73]. In this section, you must execute both Procedure for
All Scenarios Using Demand Data Foundation and Procedure for Scenarios Not Using Demand Data
Foundation.
● Creation of tables in SAP Customer Activity Repository that are required for replicating data from your
source master data system: For more information, see Create/Replicate Source Master Data System
Tables [page 91].
● The SAP HANA content for SAP Customer Activity Repository and Demand Data Foundation (DDF) is
activated with the options that are listed in section Activate SAP HANA Content [page 95].
● The /POSDW/TLOGUS table must be continuously populated with unprocessed POS sales transactions. For
more information, see the following sections in the application help for SAP Customer Activity Repository:
○ Procedure for populating the /POSDW/TLOGUS table: section Creating Worklists for POS Transactions.
○ Background information about the access to the /POSDW/TLOGUS table with the inventory visibility
view (InventoryVisibilityCurrentStock): section Inventory Visibility.
You can activate the use of real-time inventory with the Real-Time Inventory Status parameter in the Manage
Conguration Assignments app.
356
PUBLIC
Common Installation Guide for SAP Customer Activity Repository applications bundle 5.0
Set Up the Applications

6.7 Congure Access to Documentation Provided on SAP
Help Portal (Optional for All Applications)
In transaction SR13, you can congure your back-end system to access the documentation for your application
on SAP Help Portal.
Context
You can congure your back-end system to access the documentation that is provided on SAP Help Portal for
SAP Customer Activity Repository applications bundle at https://help.sap.com/viewer/p/CARAB. For example,
if your application is SAP Customer Activity Repository, you can congure access to the application help for
SAP Customer Activity Repository.
Prerequisites
● The documentation you want to access must be available on SAP Help Portal.
● The users who access the documentation must have access to the Internet.
● You can congure an ABAP system to connect to only one combination of product and version. These are
the values that you will specify under Path in the procedure below.
Note
The product CARAB is valid for all the applications delivered with SAP Customer Activity Repository
applications bundle.
The version depends on the release. For example, version 5.0 is valid for all the application versions
delivered with SAP Customer Activity Repository applications bundle 5.0.
If these prerequisites cannot all be fullled, you must install the documentation in your local system landscape
using the download packages or DVDs/CDs provided.
Note
For more information about installing the documentation in your local system landscape, see the User
Guides for System Provisioning with Software Provisioning Manager - SAP Library. Select your operating
system and following the instructions.
Procedure
1. Open transaction SR13.
2. Select the tab PlainHtmlHttp.
3. Choose New Entries.
Common Installation Guide for SAP Customer Activity Repository applications bundle 5.0
Set Up the Applications
PUBLIC 357

Caution
When selecting an Area, you must create entries for Documentation and for XML Documentation, for
each platform you are using and each language in which you want to provide documentation.
4. To create entries for the Documentation area, enter the following values:
Name
Value to be entered
Variant Enter a name for the variant.
Platform Select the platform relevant for your implementation from
the list of available platforms (for example, WN32).
Area Select Documentation from the list; this will display as
IWBHELP in the table.
Server Names https://help.sap.com/http.svc/ahp2
Path (<Product/Version>) CARAB/5.0
Note
Make sure to enter the exact combination of upper
case and lowercase characters.
Language
Select the language you need from the list.
5. To create entries for the XML Documentation area, enter the following values:
Name
Value to be entered
Variant Enter a name for the variant.
Platform Select the platform relevant for your implementation from
the list of available platforms (for example, WN32).
Area Select XML Documentation from the list; this will display
as XML_DOCU in the table.
Server Names https://help.sap.com/http.svc/ahp2
Path (<Product/Version>) CARAB/5.0
Note
Make sure to enter the exact combination of upper
case and lowercase characters.
Language
Select the language you need from the list.
6. Repeat steps 4 and 5 for each relevant platform and language.
7. Select one entry as the default language for each platform and area.
8. Save your entries.
Results
You have congured your back-end system to point to documentation that is provided on SAP Help Portal.
358
PUBLIC
Common Installation Guide for SAP Customer Activity Repository applications bundle 5.0
Set Up the Applications

Related Information
SAP Note 2149786 Customizing help settings in transaction SR13
SAP Note 2652009 Connecting the help to the SAP Help Portal
SAP Note 2572047 SAP provides user assistance (documentation) as HTML, PDF, or directly via SAP Help
Portal
6.8 Enable In-App Help (Web Assistant)
In-app help is available for several SAP Fiori apps of SAP Customer Activity Repository applications bundle. To
enable the in-app help, you need to make it available in the SAP Fiori launchpad and to set up the underlying
Web Assistant framework.
Context
After a successful setup, you can see the Help icon (question mark) in the SAP Fiori launchpad and at the top of
each app that supports in-app help. Simply choose this icon to display the in-app help and easily call up a
detailed app description.
Note
For example, the in-app help is available for the following apps:
● Apps for demand forecasting (Analyze Forecast, Adjust Forecast, Manage Demand Inuencing Factors,
Manage Alerts)
● Apps for SAP Replenishment Planning, for example Review Order Plan Items
The in-app help is not available for the SAP Smart Business apps in SAP Customer Activity Repository.
Procedure
1. Install and Congure SAP Web Dispatcher [page 360]
To make in-app help (Web Assistant) available in the SAP Fiori launchpad, install and congure SAP
Web Dispatcher.
2. Set Up the In-App Help (Web Assistant) Plugin [page 362]
To make in-app help (Web Assistant) available in the SAP Fiori Launchpad, set up the in-app help plugin
in the relevant front-end systems.
Common Installation Guide for SAP Customer Activity Repository applications bundle 5.0
Set Up the Applications
PUBLIC 359

6.8.1 Install and Congure SAP Web Dispatcher
To make in-app help (Web Assistant) available in the SAP Fiori launchpad, install and congure SAP Web
Dispatcher.
Installation
Install the latest SAP Web Dispatcher version as the reverse proxy. For more information, see SAP Fiori
Implementation Information and search for section Installing SAP Web Dispatcher.
Conguration
1. Adjust the SAP Web Dispatcher prole le.
In the sapwebdisp_pf.txt le, add the following parameters:
○ For the User Assistance Content Platform:
wdisp/system_<number> = SID=<SID1>, EXTSRV=https://cp.hana.ondemand.com:443,
SRCURL=/sap/dfa/help/, SRCSRV=*:*, PROXY=<your proxy>:<your proxy port>,
STANDARD_COOKIE_FILTER=OFF
○ For the script server in your production system:
wdisp/system_<number> = SID=<SID2>, EXTSRV=https://xray.hana.ondemand.com:
443, SRCURL=/resources/sap/dfa/help/, SRCSRV=*:*, PROXY=<your proxy>:<your
proxy port>, STANDARD_COOKIE_FILTER=OFF
Note
○ Make sure that the numbers following wdisp/system_ are smaller than the numbers that you use
for all your application server. The rules for the context-sensitive user assistance need to come
before the rules for the application servers.
○ Make sure that the SIDs are not the same as your system IDs.
2. Activate the usage of the modication handler:
icm/HTTP/mod_0 = PREFIX=/, FILE=$(DIR_PROFILE)/redirect.txt
For more information about the prole parameter, see SAP Help Portal at ABAP Platform under
Application Server ABAP - Infrastructure Components of Application Server ABAP SAP Web
Dispatcher
Administration of the SAP Web Dispatcher SAP Web Dispatcher Parameter Reference
icm/HTTP/mod_<xx>: .
3. Adjust the SAP Web Dispatcher redirect le.
In the redirect.txt le, add the following parameters:
# User Assistance Content Platform - rewrite rule
if %{SID} = <SID1>
begin
SetHeader HOST cp.hana.ondemand.com:443
RegRewriteRawUrl ^/sap/dfa/help/(.*) /dps/$1
end
# Script Server - rewrite rule
360
PUBLIC
Common Installation Guide for SAP Customer Activity Repository applications bundle 5.0
Set Up the Applications

if %{SID} = <SID2>
begin
SetHeader HOST xray.hana.ondemand.com:443
RegRewriteRawUrl ^/resources/sap/dfa/help/(.*) /xRayControls/
resources/sap/dfa/help/$1
end
Note
Make sure that the SIDs in the redirect.txt le are the same as in the sapwebdisp_cf.txt le.
4. You can check if the content platform is working properly through the proxy connection by accessing:
https://<your server>:<your port>/sap/dfa/help/odata.svc/?$format=json
Example
If the content platform is connected correctly, you can see the following output on your screen, for
example:
{"d":{"EntitySets":
["Transport","DeliverableForReplication","Tile","Project","Deliverable","Tran
sportHistory","TourIssue","ReplicationTourIssue","Hotspot","Product","Context
"]}}
5. You can check if the help script server is working properly through the proxy connection by accessing:
https://<yourserver>:<yourport>/resources/sap/dfa/help/sap/cfg/
XrayBootstrapHelpConfig.json
Example
If the help script server is connected correctly, you can see the following output on your screen, for
example:
{
"description":"This configuration registers the Xray bootstrap plug-in",
"modulePaths":{
"sap.dfa.help":"/resources/sap/dfa/help/~201509221536~"
},
"bootstrapPlugins":{
"BootstrapXrayPlugin":{
"module":"sap.dfa.help.utils.adapters.fiori.BootstrapXrayHelpPlugin"
}
}
}
Result
The in-app help (Web Assistant) is available in the SAP Fiori launchpad.
Parent topic: Enable In-App Help (Web Assistant) [page 359]
Next: Set Up the In-App Help (Web Assistant) Plugin [page 362]
Common Installation Guide for SAP Customer Activity Repository applications bundle 5.0
Set Up the Applications
PUBLIC 361

6.8.2 Set Up the In-App Help (Web Assistant) Plugin
To make in-app help (Web Assistant) available in the SAP Fiori Launchpad, set up the in-app help plugin in the
relevant front-end systems.
Procedure
1. Log on to your front-end system.
2. Execute transaction /UI2/FLP_CUS_CONF.
3. Under FLP Conguration, click on Change → Display and then on New Entries.
4. In the eld FLP Property ID, select or enter ENABLE_HELP.
5. Enter the property value true.
6. Click on Save.
7. Double-click on FLP Plugins.
8. Click on Change → Display and then on New Entries.
9. In the eld FLP Plugin ID, select or enter WEB_ASSISTANT_HELP_PLUGIN, and in the eld Activity State,
choose
Active.
10. Highlight the entry WEB_ASSISTANT_HELP_PLUGIN and double-click on Conguration.
11. Click on New Entries.
12. Enter the following values:
FLP Property ID Property Value
BUTTON_LOCATION head
CAROUSEL_ORIENTATION vertical
DATA_URL_UACP https://help.sap.com/webassistant
EDITOR false
LA_COMMUNITY_URL https://community.sap.com/
LEARNING_APP_BACKEND_URL https://education.hana.ondemand.com/education/
LEARNING_APP_WORKSPACE CARAB
NO_HELP_MODE Carousel
PRODUCT CARAB
RO_MODEL UACP
RW_MODEL WPB
SERVICE_LAYER_VERSION UACP
362 PUBLIC
Common Installation Guide for SAP Customer Activity Repository applications bundle 5.0
Set Up the Applications

FLP Property ID Property Value
USE_GLOBAL_HELP true
VERSION 5.0
13. Optionally, you can congure that Web Assistant opens immediately when the SAP Fiori launchpad or an
app is opened. To congure this behavior, add the following property:
FLP Property ID Property Value
PARAMETERS openImmediately=full
To open Web Assistant in minimized mode, specify the property value openImmediately=minimized.
Note that this property causes Web Assistant to open for all apps irrespective if Web Assistant content is
available or not.
14. Click on Save.
After you have made these settings, the question mark icon for the in-app help is available for the SAP Fiori
launchpad.
Parent topic: Enable In-App Help (Web Assistant) [page 359]
Previous: Install and Congure SAP Web Dispatcher [page 360]
Common Installation Guide for SAP Customer Activity Repository applications bundle 5.0
Set Up the Applications
PUBLIC 363

Important Disclaimers and Legal Information
Hyperlinks
Some links are classied by an icon and/or a mouseover text. These links provide additional information.
About the icons:
● Links with the icon : You are entering a Web site that is not hosted by SAP. By using such links, you agree (unless expressly stated otherwise in your
agreements with SAP) to this:
● The content of the linked-to site is not SAP documentation. You may not infer any product claims against SAP based on this information.
● SAP does not agree or disagree with the content on the linked-to site, nor does SAP warrant the availability and correctness. SAP shall not be liable for any
damages caused by the use of such content unless damages have been caused by SAP's gross negligence or willful misconduct.
● Links with the icon : You are leaving the documentation for that particular SAP product or service and are entering a SAP-hosted Web site. By using such
links, you agree that (unless expressly stated otherwise in your agreements with SAP) you may not infer any product claims against SAP based on this
information.
Videos Hosted on External Platforms
Some videos may point to third-party video hosting platforms. SAP cannot guarantee the future availability of videos stored on these platforms. Furthermore, any
advertisements or other content hosted on these platforms (for example, suggested videos or by navigating to other videos hosted on the same site), are not within
the control or responsibility of SAP.
Beta and Other Experimental Features
Experimental features are not part of the ocially delivered scope that SAP guarantees for future releases. This means that experimental features may be changed by
SAP at any time for any reason without notice. Experimental features are not for productive use. You may not demonstrate, test, examine, evaluate or otherwise use
the experimental features in a live operating environment or with data that has not been suciently backed up.
The purpose of experimental features is to get feedback early on, allowing customers and partners to inuence the future product accordingly. By providing your
feedback (e.g. in the SAP Community), you accept that intellectual property rights of the contributions or derivative works shall remain the exclusive property of SAP.
Example Code
Any software coding and/or code snippets are examples. They are not for productive use. The example code is only intended to better explain and visualize the syntax
and phrasing rules. SAP does not warrant the correctness and completeness of the example code. SAP shall not be liable for errors or damages caused by the use of
example code unless damages have been caused by SAP's gross negligence or willful misconduct.
Gender-Related Language
We try not to use gender-specic word forms and formulations. As appropriate for context and readability, SAP may use masculine word forms to refer to all genders.
364
PUBLIC
Common Installation Guide for SAP Customer Activity Repository applications bundle 5.0
Important Disclaimers and Legal Information
Common Installation Guide for SAP Customer Activity Repository applications bundle 5.0
Important Disclaimers and Legal Information
PUBLIC 365

www.sap.com/contactsap
© 2020 SAP SE or an SAP aliate company. All rights reserved.
No part of this publication may be reproduced or transmitted in any form
or for any purpose without the express permission of SAP SE or an SAP
aliate company. The information contained herein may be changed
without prior notice.
Some software products marketed by SAP SE and its distributors
contain proprietary software components of other software vendors.
National product specications may vary.
These materials are provided by SAP SE or an SAP aliate company for
informational purposes only, without representation or warranty of any
kind, and SAP or its aliated companies shall not be liable for errors or
omissions with respect to the materials. The only warranties for SAP or
SAP aliate company products and services are those that are set forth
in the express warranty statements accompanying such products and
services, if any. Nothing herein should be construed as constituting an
additional warranty.
SAP and other SAP products and services mentioned herein as well as
their respective logos are trademarks or registered trademarks of SAP
SE (or an SAP aliate company) in Germany and other countries. All
other product and service names mentioned are the trademarks of their
respective companies.
Please see https://www.sap.com/about/legal/trademark.html for
additional trademark information and notices.
THE BEST RUN
