
RealPort Installation
Microsoft Windows and Linux operating systems
User Guide

Revision history—90000630
Revision Date Description
G May 2024
Updated the installation process.
F December 2021
Updated information for the encryption feature.
Add information for shared secret authentication.
E May 2021 Updated to include only supported operating systems.
Trademarks and copyright
Digi, Digi International, and the Digi logo are trademarksor registered trademarks in the United States
and other countries worldwide. All other trademarks mentioned in this document are the property of
their respective owners.
© 2024 Digi International Inc. All rights reserved.
Disclaimers
Information in thisdocument is subject to change without noticeand does not represent a
commitment on the part of Digi International. Digi providesthis document “as is,” without warranty of
any kind, expressed or implied, including, but not limited to, the implied warranties of fitness or
merchantability for a particular purpose. Digi may make improvementsand/or changes in this manual
or in the product(s) and/or the program(s) described in this manual at any time.
Warranty
To view product warranty information, go to the following website:
www.digi.com/howtobuy/terms
Send comments
Documentation feedback: To provide feedback on this document, send your comments to
techcomm@digi.com.
Customer support
Digi Technical Support: Digi offers multiple technical support plansand servicepackages to help our
customersget the most out of their Digi product. For information on Technical Support plansand
pricing, contact usat +1 952.912.3444 or visit us at www.digi.com/support.
RealPort Installation User Guide
2

Contents
RealPort Installation User Guide
Device support 5
About this guide 5
Purpose 5
Audience 5
Conventions: special fonts 5
Conventions: square brackets 5
Conventions: italics 6
Conventions: vertical bar 6
Get started: Install RealPort for Microsoft Windowsand Microsoft
WindowsServer
Configurethe Digi device for RealPort 7
Install RealPort on the computer 8
Download and install RealPort 8
Configurethe Encrypted RealPort feature 9
ConfigureEncrypted RealPort 9
View the device's TLSconnection certificate 11
Remove the device's TLSconnection certificate 11
ConfigureShared Secret authentication 11
Optional configuration 12
Configurea printer 12
Configurea modem 12
Manage the RealPort driver 12
Upgrade the RealPort driver 13
Remove RealPort 13
Access and change the RealPort configuration 14
Start and stop the RealPort driver 15
Get started: Install RealPort for LINUX
Before you begin: RealPort requirements for Linux 16
Requirements and considerations 16
Information to gather 17
Configurethe Digi device for RealPort 17
Install the RealPort driver 18
Install the Driver: RPMmethods 18
Install the driver: TGZ method 22
RealPort Installation User Guide
3

RealPort Installation User Guide
4
RealPort devicescreated for each Digi device port 25
Manage a Digi device with Digi RealPort Manager 26
Add a Digi device 26
Delete a Digi device 27
Start a RealPort daemon 27
Stop a RealPort daemon 28
Monitor port status 28
Digi RealPort Manager screen 29
Ports Window information 29
Manage a Digi Device with dgrp_cfg_node 30
init operation 30
uninit operation 31
stop operation 32
start operation 32
Uninstall the driver 32
Uninstall with RPM 33
Uninstall from a TGZ archive 33
Linux configuration and technical information 33
Device configuration overview 34
Configurea device for a terminal 35
Configurea device for a printer 36
Configurea device for a modem 36
Configuring transparent printers 37
Setting TTYoptions 39
Fastbaud data rate mapping 41
Troubleshooting
Troubleshooting requirements 43
Make sure device isproperly configured for use with RealPort 43
Verify the configuration and operation of the driver 44
Verify in Windows 44
Verify in Linux 45
Test communications 45
Advanced configuration 46
Serial port problems 46
Make sure the port server is configured correctly 46
Check for stuck processes 47
Make sure the RealPort host can reach the Digi device 48
Conduct a loopback test to test ports outsideRealPort (all UNIXand Microsoft Windows
operating systems) 48
Loopback plug pin-out information 49
Trouble accessing port 50
Cabling 50
Troubleshoot issues in Windows 50
None of the ports work 50
Some of the ports do not work 51
Key concept: port mapping offsets 52
Troubleshoot port issues in Linux 52
If noneof the ports work 52
If some of the ports do not work 53

RealPort Installation User Guide
Digi’s patented RealPort software provides serial connectivity over IPNetworks, no matter where the
devices reside. The software isinstalled directly on the server and allows applications to talk to
devices acrossa network as though the devices were directly attached to the server. In actuality, the
devices are connected to a Digi device server or terminal server somewhere on the network.
RealPort isunique among COMport re-directors. It isthe only implementation that allowsmultiple
connectionsto multiple ports over a single TCP/IPconnection. Other implementations require a
separate TCP/IPconnection for each serial port. Unique features also include full hardware and
software flow control, as well astunable latency and throughput.
Device support
Digi's RealPort software works with most of Digi's productsincuding ConnectPort TSand LTS,
PortServer, Digi One Connect ESand SPaswell as the majority of Digi's Cellular routersand
Intelligent gateways.
About thisguide
Purpose
Use thisguide to install and configure RealPort on a variety of operating systems.
Audience
This guideisintended for the person responsible for installing and configuring RealPort. This person
should have experience configuring network devicesand be familiar with networking concepts.
Conventions: special fonts
This font isused for any input or examplesyou need to enter:
set config
Conventions: square brackets
Optional parametersare displayed within square brackets.
set config [dhcp=on]
RealPort Installation User Guide
5

RealPort Installation User Guide About thisguide
RealPort Installation User Guide
6
Note The square brackets themselves arenot actually part of thecommand, and should not be
entered.
Conventions: italics
Variablesare displayed in italics.
set config ip=ip-address
Note Substitute an appropriate IPaddressfor ip-addressin the preceding command.
Conventions: vertical bar
Avertical bar character (|) isused to denote a choice (logical "or").
set flow={on|off}
The preceding command would beentered aseither:
set flow=on
or
set flow=off

Get started: Install RealPort for Microsoft Windows
and Microsoft Windows Server
To use RealPort software, you must configure your Digi devicesto use RealPort and then install
RealPort on a server.
1. Configurethe Digi device for RealPort
2. Install RealPort on the computer
If your data issensitive, you should enablethe Encrypted RealPort feature. Encrypted RealPort is a
security measure to maintain data integrity.
n
Configurethe Encrypted RealPort feature
For added security, you can configure the shared secret authentication feature.
n
ConfigureShared Secret authentication
When installation iscomplete, you can configure peripheralson RealPort ports.
n
Configurea printer
n
Configurea modem
You can upgrade, remove, or change the RealPort configuration. See Manage the RealPort driver.
If you have RealPort installation or management questions, see Troubleshoot issuesin Windows .
Configure the Digi device for RealPort
Use thisprocedure to configure the Digi device for use with Digi RealPort drivers.
Note See the appropriate Command Reference or Configuration and Administration Guidefor the Digi
device for device-specific information on how to perform the steps below.
For the ConnectPort TS/LTSand PortServer/Digi One product lines:
1. Access a root prompt on the Digi device.
2. Set the Digi device’s IPaddress.
3. Verify that the RealPort TCPport number is set to 771. If you need to change the default value,
you need to change it on both the device and on the computer where you installed the driver.
RealPort Installation User Guide
7

Get started: Install RealPort for Microsoft Windowsand Microsoft Windows
Server
Install RealPort on the
computer
RealPort Installation User Guide
8
4. For all ports that will use RealPort, set the device type to realport. The syntax below sets ports
2 through 16 to RealPort:
n
For the Portserver TSand Digi One product lines:
#> set profile ra=2-16 profile=realport
n
For the Connectport TS/LTSand Digi Connect product lines:
#> set profile profile_type=realport port=2-16
For other productsnot listed, please refer to the appropriate product hardware manual for the exact
steps required.
Install RealPort on the computer
You must download and run the RealPort utility.
Download and install RealPort
1. Download theRealPort driver.
a. Navigate to the Digi RealPort support page.
b. Scroll down to the Product Resourcessection.
c. From theDrivers & Patchessection, click RealPort Driver. The RealPort Driver
page displays.
d. From the list box, select the appropriate Microsoft Windows OSoption.
e. Click the download option to download a .zip file.
f. Open a WindowsFile Explorer window and display the downloaded file, and then
extract the files to a location on your computer.
2. Install the RealPort driver.
a. Open a Windows File Explorer window and navigate to the location to which you
extracted the RealPort driver files.
b. Double-click on setup.exe. Installation must be done as an administrator. If
needed, setup.exe automatically generates a prompt to elevate to administrator
privileges.
Note Asan alternative, you can right-click on setup.exe and choose Run as
administrator.
The Digi RealPort Setup Wizard displays.

Get started: Install RealPort for Microsoft Windowsand Microsoft
WindowsServer
Configurethe Encrypted RealPort
feature
RealPort Installation User Guide
9
3. Follow theprompts in the Digi RealPort Setup Wizard.
a. In the Welcome page, click Next. The Select Device page displays.
b. From thedevice list, select the device you want to use. If your device isnot listed,
select Device not listed.
c. Click Next. The Describe the Device page displays.
d. Enter the information for the device you want to use.
e. Click Finish.
Configure the Encrypted RealPort feature
Encrypted RealPort isa security feature that maintainsdata integrity. It prevents unauthorized
changesin data, including intentional destruction or alteration, tampering, duplication, or accidental
loss. Encrypted RealPort also preventsdisclosure to unauthorized individualsor processes. If your
data issensitive, Encrypted RealPort isstrongly recommended.
When the first encrypted connection isestablished, a certificate for the TLSconnection ispinned to
the device. The device must then present the same certificate on each subsequent connection to
ensure a TLS connection. If thesame certificate isnot presented to the device, the connection is
rejected and a message issent to the event log.
RealPort serverssupport the following TLSversions: 1.0, 1.1, 1.2, and 1.3. Note that thisisdependent
on the TLS version that is supported on your device.
Configure Encrypted RealPort
This section explainshow to configure encryped RealPort.
Note These instructionsare for ConnectPort TS/LTSor PortServer/Digi One. The instructionsfor other
productsare similar, but for detailed instructionsconsult your product's user guide.
1. Follow thestandard Windowsprocess to accessthe Device Manager from your computer's
operating system.
a. Select Multi-port Serial Adapters.
b. Right-click on your device. Click the Propertiesmenu option. The Properties
dialog appears.
c. Click the Advanced tab.
d. Click Properties. The Advanced Propertiesdialog appears
e. Click the Security tab.

Get started: Install RealPort for Microsoft Windowsand Microsoft
WindowsServer
Configurethe Encrypted RealPort
feature
RealPort Installation User Guide
10
2. Select the Encrypt Network Trafficcheck box to enable encrypted network traffic. When you
select thisoption, the TCP Port for Encrypted Traffic field becomes available.
3. Select the TLS v 1.2 Minimum if you want to forcethe RealPort service to refuse connection to
servers that do not support TLS1.2or above.
4. In the TCP Port for Encrypted Trafficfield, enter the TCPport for the device that should be
used for TLS connections. The default is1027. The entry must match the device'sTCPport
setting.
(Optional) You can verify the setting on the device using the web interface on the device.
a. Open browser window.
b. Enter the device's IPaddress in the URL address bar to accessthe web interface.
c. Choose Network > Network ServicesSettings.
d. Select the Enable Encrypted RealPort option and verify that the port number is
1027.
e. Click Apply.
5. Click OK.
6. Click Apply.

Get started: Install RealPort for Microsoft Windowsand Microsoft Windows
Server
ConfigureShared Secret
authentication
RealPort Installation User Guide
11
View the device's TLSconnection certificate
You can display the TLS connection certificate in the default Windowscertificate viewer.
1. Follow thestandard Windowsprocess to accessthe Device Manager from your computer's
operating system.
a. Select Multi-port Serial Adapters.
b. Right-click on your device. Click the Propertiesmenu option. The Properties
dialog appears.
c. Click the Advanced tab.
d. Click Properties. The Advanced Propertiesdialog appears
e. Click the Security tab.
2. In the Network Security section, click View Device Certificate. The device certificate displays
in the default Windowscertificate viewer.
3. Click OKto close the viewer.
Remove the device'sTLSconnection certificate
You can choose to remove the copy of the certificate for the TLSconnection that is stored on the
device. If you remove the device certificate, a new certificate ispinned on the next TLSconnection.
1. Follow thestandard Windowsprocess to accessthe Device Manager from your computer's
operating system.
a. Select Multi-port Serial Adapters.
b. Right-click on your device. Click the Propertiesmenu option. The Properties
dialog appears.
c. Click the Advanced tab.
d. Click Properties. The Advanced Propertiesdialog appears
e. Click the Security tab.
2. In the Network Security section, click Remove Device Certificate. The device certificate is
removed without warning.
Configure Shared Secret authentication
You can configure RealPort to use shared secret authentication if thedevice supports thisfeature. If
the device does not support shared secret authentication, the optionsare grayed out and not
available.

Get started: Install RealPort for Microsoft Windowsand Microsoft WindowsServer Optional configuration
RealPort Installation User Guide
12
1. Follow thestandard Windowsprocess to accessthe Device Manager from your computer's
operating system.
a. Select Multi-port Serial Adapters.
b. Right-click on your device. Click the Propertiesmenu option. The Properties
dialog appears.
c. Click the Advanced tab.
d. Click Properties. The Advanced Propertiesdialog appears
e. Click the Security tab.
2. The authentication options are available if the device supports shared secret authentication.
3. From the Authentication Method list box, specify the method you want to use. If you choose a
Shared Secret option, the option selected for RealPort must match the authentication
configured for the device.
n
None: Thisisthe default.
n
Shared Secret - SHA256
n
Shared Secret - MD5 (Deprecated): This option iscompatible with devices that do not
havean explicit authentication method selection.
4. If you chose either of the Shared Secret options, the Shared Secret field isenabled. Enter the
password that should be used for authentication.
5. Click Apply.
6. Click OK.
7. Click Apply.
Optional configuration
These devices can beoptionally configured.
Configure a printer
Use the standard Windowsprocedures to configure a printer on supported versions of Microsoft
Windows running RealPort. Make sure you select the printer attached to the RealPort port.
Configure a modem
Use the standard Windowsprocedures to configure a modem on supported versions of Microsoft
Windows running RealPort. Make sure you select the modem attached to the RealPort port.
Manage the RealPort driver
You can upgrade, remove, or change the RealPort configuration.

Get started: Install RealPort for Microsoft Windowsand Microsoft WindowsServer ManagetheRealPort driver
RealPort Installation User Guide
13
Upgrade the RealPort driver
RealPort can be upgraded using the RealPort Setup Wizard. Complete the following steps download
and launch the Wizard, and then upgrade RealPort.
1. Download theRealPort driver.
a. Navigate to the Digi RealPort support page.
b. Scroll down to the Product Resourcessection.
c. From theDrivers & Patchessection, click RealPort Driver. The RealPort Driver
page displays.
d. From the list box, select the appropriate Microsoft Windows OSoption.
e. Click the download option to download a .zip file.
f. Open a WindowsFile Explorer window and display the downloaded file, and then
extract the files to a location on your computer.
2. Install the RealPort driver.
a. Open a Windows File Explorer window and navigate to the location to which you
extracted the RealPort driver files.
b. Double-click on setup.exe. Installation must be done as an administrator. If
needed, setup.exe automatically generates a prompt to elevate to administrator
privileges.
Note Asan alternative, you can right-click on setup.exe and choose Run as
administrator.
The Digi RealPort Setup Wizard displays.
3. Follow theprompts in the Digi RealPort Setup Wizard.
a. In the Welcome page, select Update Digi RealPort Software. The Updating Digi
RealPort software page displays, and updates RealPort.
b. Click Finish.
Remove RealPort
RealPort can be removed from your computer using the RealPort Setup Wizard. Complete the
following steps download and launch the Wizard, and then remove RealPort.

Get started: Install RealPort for Microsoft Windowsand Microsoft WindowsServer ManagetheRealPort driver
RealPort Installation User Guide
14
1. Download theRealPort driver.
a. Navigate to the Digi RealPort support page.
b. Scroll down to the Product Resourcessection.
c. From theDrivers & Patchessection, click RealPort Driver. The RealPort Driver
page displays.
d. From the list box, select the appropriate Microsoft Windows OSoption.
e. Click the download option to download a .zip file.
f. Open a WindowsFile Explorer window and display the downloaded file, and then
extract the files to a location on your computer.
2. Install the RealPort driver.
a. Open a Windows File Explorer window and navigate to the location to which you
extracted the RealPort driver files.
b. Double-click on setup.exe. Installation must be done as an administrator. If
needed, setup.exe automatically generates a prompt to elevate to administrator
privileges.
Note Asan alternative, you can right-click on setup.exe and choose Run as
administrator.
The Digi RealPort Setup Wizard displays.
3. Follow theprompts in the Digi RealPort Setup Wizard.
a. In the Welcome page, select Remove an Existing Device.
b. Click Next. The Select Device(s) to Remove page displays.
c. From thelist of devices, select the device that you want to remove, or click Select
All to select all the devices.
d. Click Next to remove the devices. Aprogress bar displays.
e. When complete, click Finish.
Accessand change the RealPort configuration
Use these procedures to access and/or change the RealPort configuration. Configuration changes
might include adding or removing ports or changing port attributes.
Note These instruction are for ConnectPort TS/LTSor PortServer/Digi One. The instruction for other
productsare similar, and for detailed instructionsconsult your product's user guide.
1. Use the standard Windowsprocess to access the Device Manager.
2. Select Multi-port Serial Adaptersand expand the list if necessary.
3. Right-click on the Digi terminal server device and select Properties. The Propertiesdialog
appreas.
4. Click the Advanced tab.

Get started: Install RealPort for Microsoft Windowsand Microsoft WindowsServer ManagetheRealPort driver
RealPort Installation User Guide
15
5. Click Properties. The Advanced Propertiesdialog appears.
6. Make changes asneeded. Click Help in the Propertiestab for help in making configuration
changes.
Start and stop the RealPort driver
Use thisprocedure to start or stop the RealPort driver on the supported Microsoft Windows Server.
1. Use the standardsWindows processto access the Device Manager.
2. Expand the Multi-port Serial Adapterslist if necessary and select the terminal server.
3. Right-click on the terminal server to display the menu options.
n
Select Disable to stop the service.
n
Select Enable to start the RealPort driver.

Get started: Install RealPort for LINUX
To install RealPort software, you must first configure your Digi devicesto use RealPort, and then
install RealPort on the Linux server.
1. Before you begin: RealPort requirements for Linux
2. Configurethe Digi device for RealPort
3. Install the RealPort driver
4. Add and configure your Digi device in Linux. Use oneof the following methods:
n
Graphical interface: Manage a Digi device with Digi RealPort Manager
n
Command-line interface: Manage a Digi Device with dgrp_cfg_node
5. Configureyour portsfor operation. See Device configuration overview.
Before you begin: RealPort requirements for Linux
Before you begin the installation process, review the RealPort requirements for Linux.
Requirementsand considerations
Read this section before beginning the RealPort driver installation.
n
To determine if a particular version of the Linux RealPort driver supportsa particular version of
Linux, check the release notesfor that driver. To find therelease notes:
a. Navigate to the Digi RealPort support page.
b. Scroll down to the Product Resourcessection.
c. From theDrivers & Patchessection, click RealPort Driver. The RealPort Driver page
displays.
d. From the list box, select the Linux option.
e. For the Linux version that you want to review, click the release notesoption. Adialog
window opens.
f. Click Release Notesto open the release notes.
n
RealPort utilities are located in /usr/bin/dgrp.
RealPort Installation User Guide
16

Get started: Install RealPort for LINUX Configurethe Digi device for RealPort
RealPort Installation User Guide
17
n
Once the RealPort driver isinstalled, man pagesare available for a number of the utilities
associated with the package, including:
Utility Description
ditty-rp
Sets and displaysRealPort TTYdevice options.
dgrp_cfg_node
Used to add and remove Digi devicesfrom the RealPort driver.
drpd
Digi RealPort network daemon.
dgrp.o
RealPort driver module. These are placed in /usr/bin/dgrp. The actual
man page entry associated with the drgp.o module isdgrp.
dgrp_gui
Digi RealPort Manager for x-windows.
Information to gather
Before you install RealPort, determine:
n
The hostname or IPaddress to assign each unconfigured Digi device.
n
The number of ports for each Digi device. Include any PORTS/em Modulesthat are attached to
the Digi device.
n
Determine the link speed between the host machine and the Digi device if a slow WAN link (for
example, a cellular or a legacy leased line connection) connects them.
Configure the Digi device for RealPort
Use thisprocedure to configure the Digi device for use with Digi RealPort drivers.
Note See the appropriate Command Reference or Configuration and Administration Guidefor the Digi
device for device-specific information on how to perform the steps below.
For the ConnectPort TS/LTSand PortServer/Digi One product lines:
1. Access a root prompt on the Digi device.
2. Set the Digi device’s IPaddress.
3. Verify that the RealPort TCPport number is set to 771. If you need to change the default value,
you need to change it on both the device and on the computer where you installed the driver.
4. For all ports that will use RealPort, set the device type to realport. The syntax below sets ports
2 through 16 to RealPort:
n
For the Portserver TSand Digi One product lines:
#> set profile ra=2-16 profile=realport
n
For the Connectport TS/LTSand Digi Connect product lines:
#> set profile profile_type=realport port=2-16

Get started: Install RealPort for LINUX Install theRealPort driver
RealPort Installation User Guide
18
For other productsnot listed, please refer to the appropriate product hardware manual for the exact
steps required.
Install the RealPort driver
Digi supportstwo distribution methodsfor the RealPort device driver package that isinstalled on the
Linux server: RPMand TGZ.
When installation iscomplete, the Linux RealPort driver creates three different devicesfor each
physical port of each Digi device: a standard TTYdevice, a callout device, and a transparent print
device. See RealPort devicescreated for each Digi device port.
The installation methodsare described in the table below.
Method Description
RPM
This method usesa source RPMpackage. The source RPMmethod depends
on rpm tools. If your Linux distribution does not support RPMpackages, or if
your system does not have the RPMtoolsinstalled, you must either locate
and install the RPMmanipulation toolsor use the TGZ method. To install with
thismethod, see Install the Driver: RPMmethods.
Digi does not support the distribution of theRealPort software via binary
RPMs.
TGZ
This method usesa compressed archive of the source. The TGZ method,
while relatively simple, does not have the advantage of the common package
management operations of RPM-based packages. It does, however, havethe
advantage that far more systemswill support the TGZ method out-of-the-box.
To install with thismethod, see Install the driver: TGZ method .
Install the Driver: RPM methods
There aretwo methodsof installing with RPM:
n
Standard installation procedure: Thismethod isautomated, but thereisuser control at every
step.
n
Custom installation procedure: Thismethod is intended for userswho wish to customize the
installation; for example, to change the destination directoriesof certain tools. This method is
the most complex and should be used only if necessary.
The proceduresin thistopic should be used only in Linux environmentsthat support the installation
and building of packagesfrom an RPMrepository. The procedures require that the following RPM
directories exist and are used by RPMon your Linux system:
n
/usr/src/redhat/BUILD
n
/usr/src/redhat/RPMS
n
/usr/src/redhat/RPMS
n
/usr/src/redhat/SOURCES
n
/usr/src/redhat/SPECS
n
/usr/src/redhat/SRPMS

Get started: Install RealPort for LINUX Install theRealPort driver
RealPort Installation User Guide
19
Package version and revision
Certain commandsused in the following procedures must be entered with the correct package
version and revision number.
To determine package version and revision numbers, use this command:
#> rpm -qp filename
Example:
If the package version of the Linux driver is1.9 and the revision is38, enter the version and revision
level as follows:
For this command variable: Use thisvalue:
version
1.9
revision
38
For this command: Enter:
rpm -ivv dgrp-
version revision
.src.rpm rpm -ivv dgrp-1.9-38.src.rpm
Standard installation procedure
Use thisprocedure to install the RealPort Linux driver. See Install the Driver: RPMmethodsfor
information on entering commandsin this procedure. See the release notes for additional
information.
1. Download thesource RPMpackage located on the Digi Support site. For consistency, consider
downloading the source RPMto the directory /usr/src/redhat/SRPMS.
a. Navigate to Digi RealPort support page.
b. Scroll down to the Product Resourcessection.
c. From theDrivers & Patchessection, click RealPort Driver. The RealPort Driver
page displays.
d. From the list box, select the Linux option.
e. Click download for the RealPort Driver for Linux, src.rpm version option to
download thefile.
2. Install the source code in the SOURCESdirectory used by RPM
(/usr/src/redhat/SOURCES) with this command:
#> rpm -ivv dgrp-version-revision.src.rpm
This command also copiesthe specification file
(/usr/src/redhat/SPECS/dgrp-v.v.spec) to theSPECSdirectory.

Get started: Install RealPort for LINUX Install theRealPort driver
RealPort Installation User Guide
20
3. Create an RPMspecific to your platform by executing the appropriate commands for your
platform, as shown in the following table.
OS version Commands
Red Hat # rpmbuild --rebuild --define DISTRO=REDHAT_XX (package)
# rpm -ivv /usr/src/redhat/RPMS/i386/dgrp-#.#-#.i386.rpm
# insmod dgrp
Actual DISTROValues:
Red Hat AS/ES/WS2.1= REDHAT_21
Red Hat AS/ES/WS3.0= REDHAT_ES3
Red Hat Fedora Core 1,2, or 3= FEDORA
Red Hat 9.0 = REDHAT_90
Red Hat 8.0 = REDHAT_80
Red Hat 7.3 = REDHAT_73
Red Hat 7.2 = REDHAT_72
There isno DISTROflag required for Red Hat AS/ES/WS4
SuSE8.x # rpm --rebuild (package)
# rpm -i /usr/src/packages/RPMS/i586/dgrp-#.#-#.i586.rpm
# insmod dgrp
SuSE9.x # rpmbuild --rebuild (package)
# rpm -i /usr/src/packages/RPMS/i586/dgrp-#.#-#.i586.rpm
# insmod dgrp
Mandrake # rpmbuild --rebuild (package)
# rpm -i /usr/src/RPM/RPMS/i586/dgrp-#.#-#.i586.rpm
# insmod dgrp
Debian # rpmbuild --rebuild (package)
# cd /usr/src/rpm/RPMS/i386
# alien -d dgrp-#.#-#.i386.rpm
# dpkg -i dgrp_#.#-#_i386.deb
# insmod dgrp
For example, for the Red Hat platform, the commandsare:
cd /usr/src/redhat/SPECS
rpmbuild --rebuild --define DISTRO=REDHAT_XX (package)
rpm -ivv /usr/src/redhat/RPMS/i386/dgrp-#.#-#.i386.rpm

Get started: Install RealPort for LINUX Install theRealPort driver
RealPort Installation User Guide
21
insmod dgrp
()
4. Install the RPMcreated by the previous step using the following commands.
cd /usr/src/redhat/RPMS/arch
rpm -ivv dgrp-version-revision.arch.rpm
The arch value should bereplaced with a string representing your architecture, such asi386 or
alpha. This value issystem-dependent, and ischosen by your system when the RPMisbuilt.
To install the RealPort driver on another system of thesame architecture and Linux version,
copy the following binary to the same location on the other system and execute the rpm
command in this step:
/usr/src/redhat/RPMS/arch/dgrp-version-revision.arch.rpm
5. Use the following commands to verify that all files are installed correctly:
cd /usr/src/redhat/SPECS
rpm -bl dgrp-version.spec
Custom installation procedure
This custom installation procedure is reserved for userswho need to change a portion of the
installation procedure or its contents in their specific environment. Reasonsfor such changes include
the need to change the directory where filesare installed or to modify the source code.
Note Modifications to the source package may cause Digi to refuse support for that package in that
environment.
See Install the Driver: RPMmethodsfor important information on entering commandsin this
procedure.
1. Download theRPMpackage from Digi's Support site. For consistency, consider downloading
the source RPMto the directory /usr/src/redhat/SRPMS.
a. Navigate to Digi RealPort support page.
b. Scroll down to the Product Resourcessection.
c. From theDrivers & Patchessection, click RealPort Driver. The RealPort Driver
page displays.
d. From the list box, select the Linux option.
e. Click download for the RealPort Driver for Linux, src.rpm version option to
download thefile

Get started: Install RealPort for LINUX Install theRealPort driver
RealPort Installation User Guide
22
2. Install the source code in the SOURCESdirectory used by RPM,
/usr/src/redhat/SOURCES, with thiscommand:
rpm -ivv dgrp-version-revision.src.rpm
This command also copiesthe specification file
/usr/src/redhat/SPECS/dgrp-version.specto the SPECSdirectory.
3. Use the RPMtools to open the source archive:
cd /usr/src/redhat/SPECS
rpm -bp dgrp-version.spec
The -bp option specifies that only the preparation section (%prep) of the specification file
should be executed. This might result in the source filesbeing uncompressed, removed from
the archive, and placed in the following directory:
/usr/src/redhat/BUILD/dgrp-version
4. Make desired modifications to the source filesand/or the specification file. The source files are
found in the directory.
/usr/src/redhat/BUILD/dgrp-version
The specification file is named:
/usr/src/redhat/SPECS/dgrp-version.spec
Additionally:
n
Save the original and final versions of any changed file after making and testing the
changes. Put these backup copies somewhere other than the /usr/src/redhat tree.
n
If you change the final location of any of the files in the package, update the %file list in
the specification file. Otherwise, a message that the installation wasincomplete is
displayed, because some files were not found.
n
Digi recommendsthat you document changes in the %description section of the
specification file.
Install the driver: TGZ method
The following procedure can beused in any Linux environment. It is the only choice available for
environmentswhich do not support RPM.
Certain commandsused in the following procedure need to be entered with the correct package
version and revision number. Refer to the release notes for version and revision (release) numbers.

Get started: Install RealPort for LINUX Install theRealPort driver
RealPort Installation User Guide
23
For this command: Enter:
tar -xvzf dgrp-version revision.tgz tar -xzvf dgrp-1.0-2.tgzrpm
1. Download theLinux RealPort TGZfile from the Digi Support site.
a. Navigate to Digi RealPort support page.
b. Scroll down to the Product Resourcessection.
c. From theDrivers & Patchessection, click RealPort Driver. The RealPort Driver
page displays.
d. From the list box, select the Linux option.
e. Click download for the RealPort Driver for Linux, tgz version option to
download thefile.
2. Select a directory (such as /usr/src) where the source tree will reside, and unpack the
compressed archive file there. For example:
cd /usr/src
tar -xvzf dgrp-version-revision.tgz
This will create a subdirectory called dgrp-version containing all of the RealPort source files.
3. Change directory to the root of the source directory tree.
cd /usr/src/dgrp-version

Get started: Install RealPort for LINUX Install theRealPort driver
RealPort Installation User Guide
24
4. Create the Makefile script.
./configure
Note Occasionally a Linux vendor will ship a kernel that cannot be autodetected to add the
various changesthat might be required for that specific kernel. Because of this, there isan
option for both srpm and tgz to indicate exactly what distribution you have. Currently, the
recognized options are for:
n
Red Hat 7.2 - REDHAT_72
n
Red Hat 7.3 - REDHAT_73
n
Red Hat 8.0 - REDHAT_80
n
Red Hat 9.0 - REDHAT_90
n
Red Hat Fedora Core 1, 2, or 3- FEDORA
n
Red Hat AS/ES/WS2.1- REDHAT_AS_21, REDHAT_ES_21, REDHAT_WS_21
n
Red Hat AS/ES/WS3.0- REDHAT_AS_3 / REDHAT_ES_3 / REDHAT_WS_3
For example, to indicate to srpm that you haveRed Hat 9, run this command instead:
* rpmbuild --rebuild --define DISTRO=REDHAT_9 DRIVER_PACKAGE_NAME.srpm
To indicate to tgz that you have Red Hat AS3, run this during the configure phase:
* ./configure DISTRO=REDHAT_AS_3
5. Examinethe Makefile and make modifications as required by your system environment.
Common items to check would include destination directories, naming conventions, and
compiler details.
6. When satisfied with the state of the Makefile and other source files, compile the driver and its
support toolsby entering:
make all
7. Install the package components with:
make install
8. Register your module with the system initialization scripts by entering:
make postinstall
Note Do not delete the source tree since the makefiles are necessary for the uninstall
procedure.

Get started: Install RealPort for LINUX Install theRealPort driver
RealPort Installation User Guide
25
RealPort devicescreated for each Digi device port
When RealPort isinstalled on the Linux server, the Linux RealPort driver creates three different
devices for each physical port of each Digi device: a standard TTYdevice, a callout device, and a
transparent print device.
The devicesare named according to the following convention:
[prefix][ID][port]
These elementsare defined asfollows.
Element Description
prefix
Standard TTYdeviceshave the prefix tty, callout deviceshave the prefix cu, and
transparent print deviceshave the prefix pr.
ID
The RealPort IDfor the Digi device associated with thisport. ARealPort IDconsists of
oneor two alphanumeric characters. An underscore character may be used for any of
the two IDcharacters. See About the RealPort ID.
port
The port number must consist of two digits. The portsare numbered beginning with
00.
The following are examples of the devices that would be created for the first port of a Digi device with
the RealPort IDaa:
Device Type Full Path Name
Standard TTYdevice /dev/ttyaa00
Callout device /dev/cuaa00
Transparent print device /dev/praa00
Standard TTYdevices
The behavior of the standard TTYdevices is that of a modem controlled port. They requirethe Data
Carrier Detect (DCD) signal to be high before they can operate. When used on a dial-in modem, the
ports will wait for DCDbefore sending out the login prompt.
When these devices are used with a terminal or other locally connected device, you should wire the
DCDsignal to the remote equipment's Request To Send (RTS) line. When a terminal isthen used for
log-in, the system generates a prompt when the terminal ispowered-on (RTS, and thusDCDis
asserted). It also kills the user session if theterminal ispowered-off (lowering the signals).
Callout devices
Callout devices will be obsoleted in a future version of Linux, so they should generally be avoided.
Data Carrier Detect (DCD) need not be present to open the device.
Once a connection isestablished and DCDbecomes active, these devicesbehave in the same way as
the standard TTYdevices. Subsequent lossof the DCDsignal will cause active processes on the port to
be killed.

Get started: Install RealPort for LINUX Managea Digi devicewith Digi RealPort Manager
RealPort Installation User Guide
26
Transparent print devices
Transparent print devices can be used with auxiliary printer ports on terminals. Output to the pr
device goesout the auxiliary port of a terminal while you continue to use the terminal normally.
Manage a Digi device with Digi RealPort Manager
Digi RealPort Manager can be used to perform these tasks.
Note The wish interpreter is used to support the GUI. The wish tcl interpreter needs to be in the Linux
"path" before the dgrp_gui command will work.
n
Add a Digi device
n
Delete a Digi device
n
Start a RealPort daemon
n
Stop a RealPort daemon
n
Monitor port status
n
Digi RealPort Manager screen
n
Ports Window information
Add a Digi device
Use thisprocedure to add a Digi device to your Linux System.
Note The wish interpreter is used to support the GUI. The wish tcl interpreter needs to be in the Linux
"path" before the dgrp_gui command will work.
1. Access Digi RealPort Manager by entering thiscommand at a Linux prompt:
/usr/bin/dgrp-version/config/dgrp_gui
2. There aretwo ways to register a new Digi device with the RealPort package. From the RealPort
Manager:
n
Press the Add button that appears at the bottom of the main screen.
n
Choose the PortServer >Add New from the menu.
The Digi device settingswindow appears.

Get started: Install RealPort for LINUX Managea Digi devicewith Digi RealPort Manager
RealPort Installation User Guide
27
3. Specify valuesfor each of the fieldsin the window. Someof the fieldshave defaults.
Aprompt to install encrypted RealPort displays.
Would you like this RealPort session to be encrypted?
NOTE: Not all RealPort products support encrypted RealPort sessions.
Please check your RealPort product's firmware release notes
or product literature before selecting "always".
If in doubt, select "never".
(always/never) : (never): always
The following device will be configured,
0 10.1.3.68 16 aa secure (always)
Is this correct (y to add or x to abort) ? y
4. Click Commit. The RealPort Command Logger window appears, with an appropriate dgrp_
cfg_node command.
5. Click Run It to execute the command and finish adding and initializing your Digi device.
Observe any errorsin the log window.
Delete a Digi device
Use thisprocedure to delete a Digi device from your Linux System. The Digi devices is removed, along
with all itsdevice nodes.
Note The wish interpreter is used to support the GUI. The wish tcl interpreter needs to be in the Linux
"path" before the dgrp_gui command will work.
1. Access Digi RealPort Manager by entering thiscommand at a Linux prompt:
/usr/bin/dgrp-version/config/dgrp_gui
2. Select the appropriate Digi device in the list box.
3. Use oneof the following methodsto start the deletion process:
n
Click Delete on the bottom of the main screen.
n
Choose PortServer >Delete/Uninitialize from themenu.
The Digi PortServer Settingswindow appears.
4. Confirm that the correct PortServer is being deleted and click Remove. The RealPort
Command Logger window appears with an dgrp_cfg_node command.
5. Click Run It to execute the command and complete the removal of the Digi device, along with
all of its device nodes.
Start a RealPort daemon
Use thisprocedure to start a RealPort daemon for a Digi device.

Get started: Install RealPort for LINUX Managea Digi devicewith Digi RealPort Manager
RealPort Installation User Guide
28
Note The wish interpreter is used to support the GUI. The wish tcl interpreter needs to be in the Linux
"path" before the dgrp_gui command will work.
1. Access Digi RealPort Manager by entering thiscommand at a Linux prompt:
/usr/bin/dgrp-version/config/dgrp_gui
2. Select the appropriate Digi device in the list box.
3. Choose Daemon > Start Daemon from the menu. The Command Logger screen appears, with
a dgrp_cfg_node command.
4. Click Run It to execute the command and attempt to start the daemon. If thedaemon is
already running, the command silently exits.
Stop a RealPort daemon
Use thisprocedure to stop a RealPort daemon or Digi device.
Note The wish interpreter is used to support the GUI. The wish tcl interpreter needs to be in the Linux
"path" before the dgrp_gui command will work.
1. Access Digi RealPort Manager by entering thiscommand at a Linux prompt:
/usr/bin/dgrp-version/config/dgrp_gui
2. Select the appropriate Digi device in the list box.
3. Select Daemon > Stop Daemon from the menu. The Command Logger screen appears and a
dgrp_cfg_node command displays.
4. Click Run It to execute the command and attempt to stop thedaemon. If the daemon isnot
running, the command silently exits.
Monitor port status
When monitoring ports, you can change the port monitoring delay by using the sliding scale along the
bottom of the Portswindow. Modem signal valuesare only correct for open ports. Ports in the closed
or waiting state may not display the correct modem signals. When monitoring ports, the Refresh
button can be selected at any time to update the port fields.
Note The wish interpreter is used to support the GUI. The wish tcl interpreter needs to be in the Linux
"path" before the dgrp_gui command will work.
Use the following procedure to monitor the statusof a RealPort port.
1. Access Digi RealPort Manager by entering thiscommand at a Linux prompt:
/usr/bin/dgrp-version/config/dgrp_gui
2. Choose the appropriate Digi device in the list box.
3. Choose View > Ports. The PortsWindow appears.

Get started: Install RealPort for LINUX Managea Digi devicewith Digi RealPort Manager
RealPort Installation User Guide
29
4. Choose the appropriate port in the PortsWindow.
5. Click Modem Statusor select the Ports> Modem Status. The Port Statuswindow appears. A
signal shows a red box if theport isactive or a gray box if it isinactive.
Digi RealPort Manager screen
The main screen of the Digi RealPort Manager is used to manage the Digi devicesregistered with the
RealPort driver. It listsall currently configured Digi devices in the central window, and provides
buttonsand menu optionsto manipulate these Digi devices.
Menu Field Description
RealPort ID The RealPort IDisused to designate your TTYdevices for RealPort. It
must be one or two alphanumeric charactersand must be unique to
your system. An underscore character can be used for an IDcharacter.
For example, a RealPort device name where the lettersrp are used
would be TTYrp01. See About the RealPort ID.
address The addressmay be specified asan IPnumber or IPname. No attempt
ismade to validate this address, nor to connect to the specified
addressduring the installation.
ports An integer indicating the number of device files which should be
created for this Digi device. This does not have to match the physical
number of ports, but physical portsbeyond the number specified will
not be available. The maximum port count allowed is 64.
IP Port The Digi device IPport number. Normally thisshould be left at the
default.
AccessMode Sets the file protection mode for any device filescreated.
Owner Sets the user IDof the file owner for any device files created. The value
must be an integer.
Group Sets the group IDof the fileowner for any device files created. The
valuemust be an integer.
Link Speed Sets the link speed string. The default isauto, and can be used under
most circumstances. See the drpd(8) man page for information on the
custom speed parameters.
Ports Window information
These are the fieldsof the PortsWindow:
Fields Description
Port Port isthe port number of an individual port. The first port on a
Digi device isport number 0.

Get started: Install RealPort for LINUX Managea Digi Devicewith dgrp_cfg_node
RealPort Installation User Guide
30
Fields Description
Status The value of this field iseither open, closed, or waiting. Aport
moves into the waiting state when there aredeviceswaiting to
open the port: either waiting for an event, or for another
processto release the port.
Speed The last known speed (in bps) of the port. If unknown (for
instance, before the port is used for the first time), the value 0 is
shown.
Description This field isnot yet active. The default value isNA.
Manage a Digi Device with dgrp_cfg_node
The dgrp_cfg_node tool isa command-line based configuration program designed to automate a
number of steps required to enable the serial ports on Digi devices for general use. The path to the
dgrp_cfg_node executable is/usr/bin/dgrp/config.
The dgrp_cfg_node tool hasfour modes of operation:
Operation Description
init Can be used to add or reinitialize a Digi device in Linux. See init operation.
uninit Removes a Digi device from Linux. See uninit operation.
stop Stops a RealPort daemon. See stop operation.
start Attempts to start a RealPort daemon. See start operation.
init operation
The init operation has the following effects:
n
Attempts, if necessary, to load the driver module.
n
Determines whether a daemon isalready running for the specified node. If it isnot running, it
startsthe daemon.
n
Creates all necessary device filesin the /dev directory. If a device file exists, the ownership and
permissionsarepreserved.
The standard usage requiresa command such as:
dgrp_cfg_node init IDIPaddrports
Where the parameters are defined asfollows:
Parameter Definition
init
Indicates the operation being requested
ID
Assignsthe supplied IDto theDigi device. ARealPort IDconsistsof one or two
alphanumeric characters. See About the RealPort ID.

Get started: Install RealPort for LINUX Managea Digi Devicewith dgrp_cfg_node
RealPort Installation User Guide
31
Parameter Definition
IPaddr Either an IPaddressor an IPname may be assigned to the daemon via this
parameter.
ports
Indicates the number of device files which should be created for this particular Digi
device. This number does not have to match the physical number of ports, but any
physical ports beyond the portsvalue specified will be unavailable. The maximum
number of ports supported by the tool is 64.
For further details, see the dgrp_cfg_node man page, installed with thispackage.
About the RealPort ID
The RealPort IDrefers to an individual Digi device with an ID. You must choose the IDto use for each
Digi device, and this IDmust be unique within your system. The dgrp_cfg_node init operation allows
you to assign an IDto a Digi device.
ARealPort IDconsists of one or two alphanumeric characters.
Once a RealPort IDisassigned, the device files in the /dev directory, which are created by the
package, encode the IDinto thedevice name. Thisallowsyou to determine the Digi device IDfor a
particular device. For more information on the device naming, see RealPort devicescreated for each
Digi device port.
uninit operation
The uninit operation has the following effects:
n
Determines whether a daemon isrunning for the specified Digi device. If a daemon isrunning,
thisoperation will kill it.
n
Erases all information about this Digi device from itsinternal database. This isdifferent from
the behavior of the stop operation. See stop operation.
The standard usage requiresa command like:
dgrp_cfg_node uninit ID
The parametersare defined asfollows:
Parameter Definition
uninit Indicates the operation being requested.
ID Specifies which Digi device to unconfigure.
Note The command fails if any ports are in use. Be sure to kill all applicationsusing the Digi device
ports before uninitialization.
Note Even if you have removed all of the Digi devices you havepreviously registered with the driver,
the dgrp_cfg_node utility doesnot unload thedriver module.
For further details, see the dgrp_cfg_node man page, which isinstalled with thispackage.

Get started: Install RealPort for LINUX Uninstall thedriver
RealPort Installation User Guide
32
stop operation
The stop operation hasthe following effect:
n
Determines whether a daemon isrunning for the specified Digi device. If a daemon isrunning,
thisoperation will kill it.
n
The RealPort software retainsthe information associated with this IDso that the daemon can
be restarted with a minimum of information.
The simplest usage requiresone to execute a command with a form similar to:
dgrp_cfg_node stop ID
The parametersare defined asfollows:
Parameter Definition
stop Indicates the operation being requested.
ID Specifies which Digi device's daemon to stop.
For example, you can stop a daemon in order to change the daemon'sparameters, such as the IP
address. In this case, you would use the stop operation to stop a daemon, change the parameters,
and then use the start operation to restart the daemon with new parameters.
For further details, please see the dgrp_cfg_node man page installed with thispackage.
start operation
The start operation determines whether a daemon isrunning for the specified node, and if not,
attempts to execute a daemon based on the supplied parameters.
The simplest usage requiresone to execute a command with a form similar to:
dgrp_cfg_node start ID IPaddr
The parametersare defined asfollows:
Parameter Definition
start Indicates the operation being requested
ID Specifies which Digi device's daemon to start.
IPaddr The (possibly new) IPaddress or IPname to use when referring to the Digi device
with the specified ID.
For further details, see the dgrp_cfg_node man page, which isinstalled with thispackage.
Uninstall the driver
Use oneof the following methodsto uninstall the Linux driver.

Get started: Install RealPort for LINUX Linuxconfiguration and technical information
RealPort Installation User Guide
33
Uninstall with RPM
The proceduresin thistopic should be used only in Linux environmentsthat support the installation
and building of packagesfrom an RPMrepository. These proceduresrequire that the following RPM
directories exist and that they are used by RPMon your Linuxsystem:
n
/usr/src/redhat/BUILD
n
/usr/src/redhat/RPMS
n
/usr/src/redhat/SOURCES
n
/usr/src/redhat/SPECS
n
/usr/src/redhat/SRPMS
1. Use the dgrp_cfg_node command with the uninit option for each PortServer. Thiscommand
killseach PortServer daemon and erases all information of that PortServer from the system.
dgrp_cfg_node uninit ID
Where IDspecifiesthe IDof the PortServer daemon.
2. Remove the driver package using thiscommand:
rpm -e -vv dgrp-version
Uninstall from a TGZ archive
Note If you have deleted thesource repository that was created when you installed thisdriver
package, then there isno automated mechanism to remove the package files.
1. Access a command prompt at the root on the Linux system.
2. Change directoriesto the root of the source tree:
cd /usr/src/dgrp-version
Substitute your driver version numbers for version in the previous command. For example, if
the driver version is1.0, the command is:
cd /usr/src/dgrp-1.0
3. Enter these two make commands:
make preuninstall
make uninstall
Linux configuration and technical information

Get started: Install RealPort for LINUX Linuxconfiguration and technical information
RealPort Installation User Guide
34
Device configuration overview
Use these overviewsof device configuration topics to decide which tool(s) you should use to configure
your devices.
ditty-rp
Characteristics Actions
Featuresor Description Digi's device configuration program.
Run from a command prompt.
The ditty-rp commands are normally included in a system
startup file.
Uses Manually configure Digi-specific device settingssuch as altpin or
forcedcd.
Configureprinter devices. See Configurea device for a printer.
Resources Refer to the man page for ditty-rp.
Configure a port
Device to be configured Information location
Terminal See Configurea device for a terminal. This procedure
describes how to configure a device for a terminal.
Printer See Configurea device for a printer. This procedure
describes how to configure a device for a printer.
Modem See Configure a device for a modem. This procedure
describes how to configure a device for a modem.
Miscellaneoustopics
Topic Description
altpin This option should be enabled on a port when an RJ-45 8-pin cable
isused and the Data Carrier Detect (DCD) signal is required. For
example, altpin should be enabled on a port wherean RJ-45 8-pin
cable isused with a modem. See About transparent printing, and
refer to the Cable Guide for your Digi product.
fastbaud RealPort devicessupport baud rates in excess of the maximum
baud rate supported by Linux. To enablethe use of these fast baud
rates, a ditty-rp parameter, fastbaud, has been provided. See
Fastbaud data rate mapping.

Get started: Install RealPort for LINUX Linuxconfiguration and technical information
RealPort Installation User Guide
35
Topic Description
Data Carrier
Detect (DCD)
In some cases, depending on your operating system requirements
and/or your device requirements, it may be necessary for the Data
Carrier Detect (DCD) signal to be active on a port before it will
function. There aretwo ways to fulfill this requirement:
n
Cabling: One way to fulfill the DCDrequirement is to create
a cable and have your device force the signal high. See the
Digi One RealPort and PortServer Cable Guide.
n
ditty-rp: Another way to fulfill the DCDrequirement isto
enablethe forcedcd ditty-rp option. See About transparent
printing.
Configure a device for a terminal
Use thisprocedure to configure a Digi serial device for a terminal. See your operating system
documentation for more information on configuring a serial device for a terminal.
Procedure
1. Connect a serial cable between the port and terminal.
2. Edit the /etc/inittab file and add a getty entry for the device. The getty name that configures
your device can vary from system to system. The following examples are only meant to serve
as a guide. Substitute your device for ttyaa011 in these examples:
Example 1: RedHat getty_ps
ARedHat terminal install script where getty isgetty_psis:
dl:2345:respawn:/sbin/getty_ps ttyaa11 DT9600 vt100
Example 2: Debian agetty
Acommon Debian terminal install script where getty isagetty is:
D1:23:respawn:sbin/agetty -L ttyaa11 19200 vt100
This isan agetty example for a hard-wired terminal:
D000:2345:respawn:/sbin/agetty -L 9600 ttya01
The -L flag must be used with agetty for proper functionality if DCDisnot wired on the cable. Please
exclude the -Lflag for DCDsensitivity.
Example 3: mgetty
Amgetty modem script which isavailable in both RedHat and Debian is:
T3:23:respawn: /sbin/mgetty -x0 -s 115200 ttyaa11
The mgetty command ishardcoded to use hardware flow control, - , which meansthat a 3-wire
connection will not work and that an 8-wire cable isrequired.

Get started: Install RealPort for LINUX Linuxconfiguration and technical information
RealPort Installation User Guide
36
Enable the port for login by rebooting the system or by entering this command at your Linux
command prompt:
init q
Configure a device for a printer
You havetwo optionswhen configuring your printers with Linux drivers.
1. Connect a serial cable between the port and printer.
2. Use either the Linux printtool command to configure your printer or set up the printers
manually. To install a printer manually, add linessimilar to this example to the /etc/inittab
file:
DG01:2345:once: cat < /dev/ttyaa11 > /dev/null &
dg01:2345:once: ditty-rp 38400 ctspace altpin -ixon -ixoff -ixany /dev/ttyaa11
The device /dev/ttyaa11 isused as an example here. Substitute your particular device name in
the previous commands. Thisexample also setstheport speed to 38400, enables altpin,
enables hardware flow control (ctspace and rtspace), and disables software flow control (-
ixon, -ixoff, -ixany) on the port. Configure the ditty-rp parametersas required by your
specific printer and cableconfiguration. For more information on ditty-rp, see About
transparent printing.
Note There isa single bit in the line control register for setting stop bits. If this bit is set with 6,
7, or 8 data bitsit gives 2 stop bits. With 5 data bits, however, it actually gives1.5 stop bits. The
driver and firmware simply set this line control register bit if 2stop bits are requested. So with
5 data bits you actually get 1.5 stop bits, not 2.
Configure a device for a modem
Use thisprocedure to configure a Digi device for a dial-in/dial-out modem connection. Configuring a
device for a modem requiresfamiliarity with both the operating system and the modem being used.
The following procedure issufficient for most cases. It may be necessary, however, to take additional
steps to properly configure your modem or to set up the operating system for a specific application.
1. Connect a serial cable between the port and modem.
2. Power the modem on. The example in this section depicts hardware flow control configuration.
3. At the command prompt enter:
chown uucp:uucp /dev/ttyaa00
Here ttyaa00 isthe name of thedevice and uucp isan UNIXapplication.
4. Connect to themodem by entering this command at a command prompt:
cu -l /dev/ttyaa00 -s 38400
Here ttyaa00 isthe name of thenon modem control device for the port.

Get started: Install RealPort for LINUX Linuxconfiguration and technical information
RealPort Installation User Guide
37
5. Set the modem to answer after the first ring with this command:
ats0=1
6. Train the modem to the port speed with this command:
at&w
7. Enter any other desired modem commands.
8. Terminate the connection to the modem with a tilde followed by a period:
~.
9. To manually configure the port to use hardware flow control, insert this command in a Linux
startup file:
ditty-rp rtspace ctspace /device
Here /device isthe name of the Digi device. Insert the command in a startup file so it remains
in effect after a reboot.
Alternately, use a gettydef entry that uses hardware flow control (see the next step)
10. Edit the /etc/inittab file and add a getty entry for the device. The getty name that configures
your device can vary from system to system. An example of an mgetty modem script, which is
available both in RedHat and Debian, islisted below (and only meant to serve as a guide):
T3:23:respawn: /sbin/mgetty -x0 -s 115200 ttyaa00
Here ttyaa00 isthe name of thedevice.
11. Enable the port for login by rebooting the system or by entering this command at your Linux
command prompt:
init q
Configuring transparent printers
Use thisprocedure to set up transparent printers on terminals.
Note This procedure sets up the communication characteristics for transparent printers. Once a
transparent printer hasbeen set up, you can use it as you would a printer connected directly to a
serial port. See your UNIXdocumentation for information on setting up print queues.
At the command prompt, enter:
ditty -n ttyname [options]
Here ttyname isthe name of the terminal device and optionsare selected from the list below.

Get started: Install RealPort for LINUX Linuxconfiguration and technical information
RealPort Installation User Guide
38
Option Description
maxcpsn Limits the maximum printer port character-per-second data rate. n
should be set to the minimum character rate the printer can sustain
in typical use.
maxchar n Limits the number of characters queued to the printer ahead of
terminal output. Lower numbersincrease system overhead. Higher
numbers result in keystroke echo delays. Avalueof 50 isgenerally a
good compromise at 9600 baud.
bufsize n This parameter should be set to a value just below the printer's buffer
size. After a period of inactivity, the driver will burst up to this many
characters to the printer to fill the print buffer before slowing to the
maxcpsrate.
onstr "s" Defines the terminal escape sequence to direct subsequent data to
the transparent printer.
sis a string of ASCII characters, enclosed in quotes, that command
the terminal to enter transparent printing mode. An arbitrary octal
character xxx may be given as\xxx.
For example, the sequence "<Esc>[5i" would be entered as:
"\033[5i".
offstr "s" Defines the terminal escape sequence to stop directing data to the
printer.
sis a string of ASCII characters, enclosed in quotes, that command
the terminal to enter transparent printing mode. An arbitrary octal
character xxx may be given as\xxx.
For example, the sequence "<Esc>[4i" would be entered as:
"\033[4i".
term t Sets the transparent printer on/off strings to valuesfound in the
internal default table. Internal defaultsare used for the following
terminal types: adm31, ansi, dg200, dg210, hz1500, mc5, vt100, vt220,
vt320, vt420, wang2x36, wyse30, wyse50, wyse60, or wyse75.
If the terminal typeisnot found in the internal default table, then
ditty readsthe terminfo entry for the terminal type and sets the
transparent print on/off strings to the valuesgiven by the mc5/mc4
attributesfound there.
About transparent printing
Most terminalshavean auxiliary port that can be connected to a serial printer. When this port is
configured as a transparent printer port, print jobsmay be run simultaneously with normal terminal
operation.
Data bound for the printer ispreceded by a terminal escape sequence which turnson transparent
printing. It is followed by a sequence which turnstransparent printing off.
Set up a transparent printer in the same way you would set up a printer wired directly to a serial port.
Data sent to a transparent printer device is automatically wrapped in the transparent print on/off
command strings for the specified printer.

Get started: Install RealPort for LINUX Linuxconfiguration and technical information
RealPort Installation User Guide
39
Setting TTYoptions
The RealPort Linux device driver package includesa command, ditty-rp, which isa superset of stty. It
may be used to set and display the device options for Digi RealPort devices.
The general command format is:
ditty-rp [-a] [-n ttyname] [option(s)] [ttyname]
With no options, ditty-rp displaysall Digi special driver settings, modem signals, and all standard
parametersdisplayed by stty(1) for the TTYdevice referenced by standard input.
Command optionsare provided to change flow control settings, set transparent print options, force
modem control lines, and display all TTYsettings. Any unrecognized options are passed to stty(1) for
interpretation.
The ditty-rp commands may be executed from the command line or placed in a startup script to be
run whenever the system isbooted.
The optionsare:
Command Results
-a Display all of the unique Digi option settings, aswell asall of the standard TTY
settingsreported by stty -a.
-n ttyname Set and display optionsfor the given TTYdevice, instead of standard input.
This option may be specified multiple timesto perform the same operation on
multiple TTYs.
ttyname Set and display optionsfor the specified TTYdevice. Replace ttyname with the
TTYpathname (such as /dev/ttya01s, /dev/term/a01 or /dev/dty/a001s,
depending on your operating system). Thisoption may be used on a modem
control line when no carrier ispresent.
The following options specify transient actionsto be performed immediately:
Command Results
break Send a 250 MSbreak signal out on the TTYline.
flush Immediately flush (discard) TTYinput and output.
flushin Flush TTYinput only.
flushout Flush TTYoutput only.
The following options specify actionswhich are not sticky. This meansthat the changesare cancelled
when the device isclosed and that the device will use the default values the next time it isopened.
Command Results
stopout Stop output exactly as if an XOFFcharacter were received.
startout Restart stopped output exactly asif an XON character were received.

Get started: Install RealPort for LINUX Linuxconfiguration and technical information
RealPort Installation User Guide
40
Command Results
stopin Activate flow control to stop input.
startin Flush TTYoutput only.
[
-
]
dtr
Raise [drop] the DTRmodem control line, unless DTRhardware flow control is
selected.
[
-
]
rts
Raise [drop] the RTSmodem control line, unless RTShardware flow control is
selected.
The following options aresticky. Thismeansthe effectscontinue until the system isrebooted or until
the options arechanged.
Command Results
[-]fastbaud Alter the baud rate tables to permit the use of data rates that are beyond the
range supported by the operating system. See Fastbaud data rate mapping.
[-]rtspace Enable [disable] RTShardware input flow control, so RTSdropsto pause
remote transmission.
[-]ctspace Enable [disable] CTShardware output flow control, so local transmission
pauses when CTSdrops.
[-]dsrpace Enable [disable] DSRhardware output flow control, so local transmission
pauses when DSRdrops.
[-]dcdpace Enable [disable] DCDhardware output flow control, so local transmission
pauses when DCDdrops.
[-]dtrpace Enable [disable] DTRhardware input flow control, so DTRdrops to pause
remote transmission.
[-]forcedcd Disable [re-enable] carrier sense, so the TTYmay be opened and used even
when carrier is not present.
startc c Sets the XON flow control character. The character may be given asa decimal,
octal, or hexadecimal number. Octal numbers are recognized by the presence
of a leading zero and hexadecimal numbers are denoted by a leading "0x". For
example, the standard XON character, <CTRL-Q>, can be entered as"17"
(decimal), "021" (octal) or "0x11" (hexadecimal).
stopc c Sets the XOFFflow control character. The character may be given asa decimal,
octal, or hexadecimal number (see startc, above, for format of octal and
hexadecimal numbers).
astartc c Sets auxiliary XONflow control character. The character may be given asa
decimal, octal, or hexadecimal number (see startc, above, for format of octal
and hexadecimal numbers).
astopc c Sets auxiliary XOFFflow control character. The character may be given asa
decimal, octal, or hexadecimal number (see startc, above, for format of octal
and hexadecimal numbers).

Get started: Install RealPort for LINUX Linuxconfiguration and technical information
RealPort Installation User Guide
41
Command Results
[-]aixon Enables auxiliary flow control, so that two unique characters are used for XON
and XOFF. If both XOFFcharacters are received, transmission will not resume
until both XONcharacters are received.
maxcpsn Sets the maximum Characters Per Second (CPS) rate at which characters are
output to the transparent print device. The rate chosen should be just below
the average print speed. If the number is too low, printer speed isreduced. If
the number is too high, the printer resorts to flow control, and user entry on
the terminal isimpaired correspondingly. Default is100 CPS.
maxchar n Setsthe maximum number of transparent print characters the driver will place
in the output queue. Reducing thisnumber increasessystem overhead.
Increasing thisnumber delays operator keystroke echo timeswhen the
transparent printer is in use. Default is50 characters.
bufsize n Sets the driver’s estimate of the size of the transparent printer’s input buffer.
After a period of inactivity, the driver bursts this many characters to the
transparent printer before reducing to themaxcpsrate selected above. Default
is100 characters.
onstr "s" Defines the terminal escape sequence to direct subsequent data to the
transparent printer.
sis a string of ASCII characters, enclosed in quotes, that command the terminal
to enter transparent printing mode. An arbitrary octal character xxx may be
given as \xxx.
For example, the sequence <Esc>[5i would be entered as "\033[5i".
offstr "s" Defines the terminal escape sequence to stop directing data to the printer.
sis a string of ASCII characters, enclosed in quotes, that command the terminal
to enter transparent printing mode. An arbitrary octal character xxx may be
given as \xxx.
For example, the sequence <Esc>[5i would be entered as "\033[5i".
term t Sets the transparent printer on/off strings to valuesfound in the internal
default table. Internal defaults areused for the following terminals: adm31,
ansi, dg200, dg210, hz1500, mc5, microterm, multiterm, pcterm, tvi, vp-a2, vp-
60, vt52, vt100, vt220, wyse30, wyse50, wyse60, or wyse75. If the terminal type
isnot found in the internal default table, then ditty readsthe terminfo entry
for the terminal type. It also setstransparent print on/off strings to values
given by the mc5/mc4 attributes found there.
Fastbaud data rate mapping
Use the table below to see how setting fastbaud affectsRealPort data rates.
Specified Data Rate Data Rate Mapped to
50 57600
75 76800
110 115200

Get started: Install RealPort for LINUX Linuxconfiguration and technical information
RealPort Installation User Guide
42
Specified Data Rate Data Rate Mapped to
134 131657
150 153600
200 230400
300 460800

Troubleshooting
The troubleshooting steps in this section should be done in the following order to try to eliminate
your problem.
1. Review troubleshooting requirements.
2. Make sure device isproperly configured for use with RealPort.
3. Verify the configuration and operation of the driver.
4. Verify that data isflowing back and forth via the Data In and Data Out counters. See Test
communications.
5. Verify data packet timing. See Advanced configuration.
6. Check connection issue. See Serial port problems.
7. Conduct a loopback test to test ports outsideRealPort (all UNIXand Microsoft Windows
operating systems).
If, after working through these steps, your problem isnot solved, try the resources listed below.
n
Visit our Support Knowledge Base to look for articlesrelated to your situation.
n
Visit our support forums at www.digi.com/support/forum and search for possible posts from
other userswith similar situations.
n
If the knowledge base or support forumsdo not have the information you need, fill out an
onlinesupport request via www.digi.com/support/eservice/eservicelogin.jsp. You must create a
new user account.
n
You may also email our support staff at tech.support@digi.com.
Troubleshooting requirements
The following software and equipment isrequired to troubleshoot RealPort:
n
Terminal Emulation software (Hyperterm, TeraTermPro, PuTTy, or similar)
n
Loopback plug (supplied with device)
Make sure device isproperly configured for use with RealPort
1. Configurethe IPaddressfor the device.
2. Configurethe serial portsof the device for use with RealPort.
RealPort Installation User Guide
43

Troubleshooting Verify the configuration and operation of thedriver
RealPort Installation User Guide
44
Note Most devices support use of the Digi Discovery Utility for discovery on a local LAN. This utility
performsinitial configuration of the IPaddressif the device isin the default configuration.
Log into the web interface and set the configuration of the serial ports for use with RealPort. You can
use the following web UI path to configure the serial portsfor most devices:
Configuration >Serial Ports> [Select Serial Port] >Choose Profile > RealPort > Apply
Complete thisstep for each port that supports RealPort.
Verify the configuration and operation of the driver
Complete the following steps to test RealPort communications:
1. Use the Terminal Emulator to open a connection to port.
2. Use the loopback plug to confirm that data echoes when theloopback isinserted in the correct
port.
3. Verify the driver is communicating with the Digi Serial to Network device.
RealPort mapsWindowsCOMports and Linux TTYports to physical serial ports on the Digi Serial to
Network device. This mapping is defined on thecomputer as part of the driver installation.
Verify in Windows
1. Click Device Manager >Multiport Serial Adapters>Verify IP address of target Digi Serial
to Network device.
2. Double-click on the device.
3. Click the Advanced tab.
4. Verify the following:
n
Connection indicates Connected.
n
No. of Ports iscorrect.
5. Click Properties. Note the mapping of the computer’sCOMportsto the physical ports on the
device.
In the example, Serial port 1 on the device iscontrolled by COM11 on the computer.
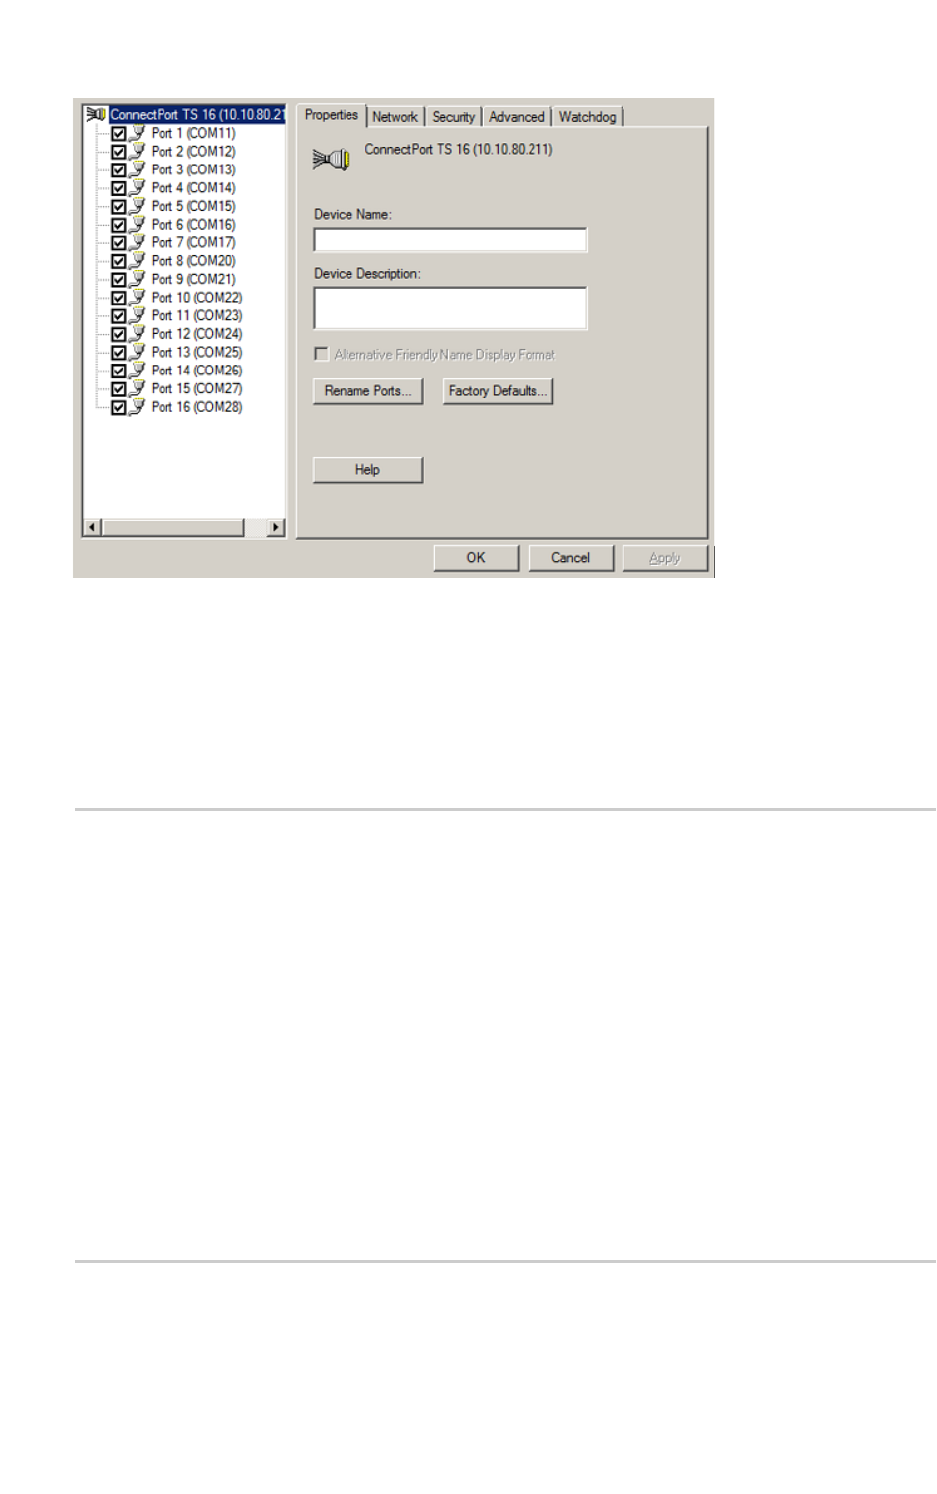
Troubleshooting Test communications
RealPort Installation User Guide
45
This information isalso available from the command lineusing the setup.com/examine function or
from thecommand line using cmd or PowerShell. Use setup.com/help to show the full command
syntax for configuring RealPort via command line.
Verify in Linux
You can view the configuration in the following directory:
/etc/dgrp.backing.store
# ID IP PortCount SpeedString IPPort Mode Owner Group Encrypt EncryptPort
#
# If any of the last seven options should use the default, the
# string "default" appears instead.
#
a 192.168.1.123 16 auto default default default default default default
Where the target device is IP address 192.168.1.123 and this device has 16
ports.
Confirm that the ports exist in the /dev directory:
These ports will be created as:
/dev/tty_dgrp_a_0
/dev/tty_dgrp_a_1
…
/dev/tty_dgrp_z_16
Where /dev/tty_dgrp_a_0 will be physical serial port 1 on the device.
Test communications
Verify that data isflowing back and forth via the Data In and Data Out counters.

Troubleshooting Advanced configuration
RealPort Installation User Guide
46
1. Log into the web interface of thedevice, and select Administration > System Information >
Serial.
2. Select a serial port.
3. Open the correct COMor TTYport that mapsto this port.
4. You can see the signal state for the port change and verify that the following serial settings are
reflected in the web interface:
n
Baud rate
n
Flow control
n
Data and stop bits
5. Insert the loopback plug into the port, and type a message. The message echoes back to you,
and the Data In and Data Out reflectsthe number of characters you type.
If successful, communication isestablished and the driver is installed correctly.
6. If you have established communication and your device isnot communicating with your
application, check thecabling and use the web interface to verify data isflowing back and
forth via the Data In and Data Out counters.
Advanced configuration
Use the Advanced configuration of RealPort to help ensure data packet timing.
Serial port problems
Serial port problemsusually involve configuration or connection issues.
Make sure the port server isconfigured correctly
Note This procedure isnot applicable for EtherLite, Digi CMdevices, or Digi Passport devices.

Troubleshooting Serial port problems
RealPort Installation User Guide
47
1. Review the port settings by entering the set port command:
n
For the Portserver TSand Digi One product lines:
#> set ports range=2-16 dev=rp
n
For the Connectport TS/LTSand Digi Connect product lines:
#> set profile profile_type=realport port=2-16
n
Any port that will have a RealPort device attached should be configured as follows:
Port type Should be set to
dev rp or prn
auto off
You can use the Web Interface to verify the device typeaswell.
n
Any port that will have a RealPort device attached should have all signalsoff except
ixon and ixoff (which can be on or off) and altpin (which should beoff for a 10 wire
cable and on for anything else).
You can use the Web Interface to verify the port setting aswell.
2. Enter a set auth command
#> set auth
Results will be similar to the following:
Ind IPaddr Mask RealPort Login Unrestricted
1 0.0.0.0 0.0.0.0 oooo-ooo
--------
oooooooo
o-oooooo
--------
oooooooo
The Realport column should show 0 for all RealPort ports. The ports are indicated across in
groups of eight dashes (--) In the example above, all ports are set correctly in the RealPort
column except ports5 and 10 (which are possibly being used for non-RealPort connections as
indicated by the dash(-) in position 5and 10). This can only be verified in the command line.
Check for stuck processes
Note This procedure isnot applicable for EtherLite, Digi CMdevices, or Digi Passport devices.

Troubleshooting Conduct a loopback test to test portsoutsideRealPort (all UNIXand Microsoft Windows
operating systems)
RealPort Installation User Guide
48
1. At the root command prompt, type:
#> who
If a process (RealPort or otherwise) isrunning on the port, type:
#> kill tty=[port_number]
If this does not work, unplug the serial device and reboot the Digi device.
Check the LEDs on the port to see if OFCison. This can be monitored using our DPARemote
software available for download on our website. Go to www.digi.com/support, enter your
device and operating system, and then search for DPARemote.
2. If still not working, try typing control-Qfrom a terminal (or PCrunning terminal emulation
software) attached to the port. Otherwise the port will need to be flushed from the operating
system level.
Make sure the RealPort host can reach the Digi device
Note This procedure isnot applicable for EtherLite, Digi CMdevices, or Digi Passport devices.
Verify that there are no processes on the port. Use the whocommand process in Check for stuck
processes to verify. Once the who command showsno processes on the port, from the UNIXRealPort
host root prompt, type:
telnet [IP_of_digi_unit] 771
From a Windows PC, go to Start >Run and enter the above command.
If the host cannot telnet to the 771 socket, RealPort cannot connect to it. This indicates that the IP
addressor theRealPort (771) socket is in use, isbeing blocked, or isfirewalled. If the connection
succeeds, disconnect using <Ctrl> ] <Enter>, followed by typing quit at the telnet prompt.
If you are unable to communicate with the individual ports on the Digi device, first confirm the port
dip switches areconfigured to match your peripheral devicescommunication protocol for RS-232 (1-
up; 2-, 3-, and 4-down), RS-485, or RS-422.
Conduct a loopback test to test portsoutside RealPort (all UNIX
and Microsoft Windowsoperating systems)
Note This procedure isnot applicable for EtherLite, Digi passport, or Digi CMdevices. Refer to Test
communications for procedure for testing ports within RealPort.

Troubleshooting Conduct a loopback test to test portsoutsideRealPort (all UNIXand Microsoft Windows
operating systems)
RealPort Installation User Guide
49
1. Plug the RJ-45 loopback plug into the serial port to betested.
2. From the command prompt (or Start > Run in Windows), telnet to the IPaddress of theDigi
device using the following command from your UNIXprompt, replacing ###.###.###.### with
the actual IPaddressof the unit:
telnet ###.###.###.###
3. Login as root (default password of dbps).
From the Digi device root prompt:
#> set line baud=(baud_rate) range=(port_number)
#> set port dev=prn auto=off range=(port_number)
To configure testing at 9600 baud:
#> set serial port=(port_number) baud=9600
4. Kill any residual processes on the port:
#> kill tty=(port_number)
5. Connect directly to the port:
#> connect (port_number)
You will connect directly to the port and see any incoming data from any device attached to
the port. By inserting the loopback plug shipped with the Digi product into the appropriate
port, you will be able to view any data typed on your connect session. Removing the loopback
plug will not display data typed on the connect session. If the loopback test worked, you have
successfully tested the integrity of theport.
6. Close the connect session:
<Ctrl> [ . <Enter>
Type <ctrl> [ followed by a period and the Enter key to close the connect session
Loopback plug pin-out information
More information can be found at www.digi.com/support.

Troubleshooting Troubleshoot issuesin Windows
RealPort Installation User Guide
50
Trouble accessing port
1. Verify that there are no processes currently running on the port from the Digi device root
prompt:
#> who
2. If there appear to be processes on the port, the following command will kill non-RealPort
processes. If the Connected To field shows RealPort, this will need to be killed at the operating
system level of the RealPort server/host (see your operating system documentation for
information about killing a process).
#> kill tty=#
Rebooting the unit can also clear the process.
Cabling
If the loopback test performed in the previous sections passed but you are unable to communicate to
your device, you will need to verify:
n
You are using the proper cabling: www.digi.com/support.
n
Altpin settings: When altpin isenabled, DCDbecomes available on pin 1 of an 8-pin RJ-45
connector (set flow altpin=on range=(port_number).
If you have not resolved your problem at thispoint, please write down how far you were able to get in
the above procedures(and the results) to help describe your problem to Digi support personnel.
Troubleshoot issuesin Windows
RealPort problems in Windows usually involve all or someof the ports not working.
Before you begin, make sure device firmware is correctly configured on your product.
None of the ports work
Follow this process to verify that the Digi Device/Terminal Server is running and configured properly.
1. Verify that the Digi Device/Terminal Server is running the latest firmware version available from
the Digi Support site, www.digi.com/support.
2. Verify that the Digi Device/Terminal Server is configured properly. From a command prompt
(or Start >Run), type:
telnet [IP_of_digi_unit] 20xx
Where 20XXwould be replaced by 20+[port number]. For example, to connect to port 1, type:
telnet [IP_of_digi_unit] 2001

Troubleshooting Troubleshoot issuesin Windows
RealPort Installation User Guide
51
3. Insert the loopback plug shipped with the Digi Device/Terminal Server into the port. This plug
allowsyou to view any data being typed. You will not be able to view any data typed if you
remove the loopback plug.
n
If the loopback test fails, the Digi Device/Terminal Server is not configured properly.
n
If the loopback test works, the Digi Device/Terminal Server is configured properly.
4. Verify that the RealPort host can reach the Digi Device/Terminal Server. Type the following
from a command prompt (or Start > Run):
telnet [IP_of_digi_unit] 771
Ablank window with a cursor should be diplayed. If it is not displayed, RealPort cannot
connect to theDigi Device/Terminal Server because the socket it uses to communicate (771) is
in use, being blocked, or firewalled.
Note You will not be able to type anything in this window, but two lines || may be displayed.
These charactersare the driver’s built-in keepaliveand can be ignored.
5. If you still cannot communicate after verifying that the RealPort host can reach the Digi
Device/Terminal Server, try reinstalling the driver. See Install RealPort on the computer.
If this does not resolve the problem, see Troubleshooting.
Some of the ports do not work
Follow this process to verify that the Digi Device/Terminal Server is running and configured properly.
1. Check for active processes that may be running on that port by logging into the Digi
Device/Terminal Server via telnet.
a. To configure testing at 9600 baud:
#> set serial port=(port_number) baud=9600
b. At the root prompt, type:
#> who
c. If thereappears to be an active process on the port, try killing it with the following
command:
#> kill tty=#
Note Rebooting the unit can also clear the process.
2. Test the non-working port with Hyperterminal by choosing Start > Accessories>
Communications>Hyperterminal.
3. Type in a name and select an icon of your choice. Click OKwhen finished.

Troubleshooting Troubleshoot port issuesin Linux
RealPort Installation User Guide
52
4. In the Connect To dialog box, go to the connect using the drop-down list and choose the com
port you wish to test. Click OKwhen finished.
5. For testing with the loopback, the default port settings are fine. Click OK.
6. Insert the loopback plug, which ships with the Digi Device/Terminal Server, into whichever port
you decided to test. You should see a blinking cursor on themain Hyperterminal screen. If you
get an Unable to open comXmessage, this meansthe port isalready open. You should then
make sure all applications that might be accessing the port are closed, or their serviceshave
been stopped (faxing applications, RAS, Citrix MetaFrame, etc.).
7. Type Hello! on the Hyperterminal screen. The characters should appear as you type them.
If the loopback test does not pass, see Troubleshooting.
8. Test your serial device on a standard COMport (i.e. COM1/COM2).
If the loopback test passed and the serial device workson a standard COMport (that is,
COM1/COM2, verify the following:
n
Cabling: See www.digi.com/support.
If you have not resolved your problem at thispoint, record how far you were able to get in the
above procedure—and the results—to describe the problem. See Troubleshooting for contact
information and additional troubleshooting recommendations.
Key concept: port mapping offsets
The number of local ports on the supported WindowsServer host offsets the port number on the Digi
device. For example, if you have two local COMports, Port 1 of the Digi device will be installed by the
RealPort software as COM3. Once the RealPort driver has been installed, you can modify the COM
port numbering scheme.
Troubleshoot port issuesin Linux
RealPort problems in Linux usually involve all or someof the ports not working.
If none of the ports work
Follow this process to verify that the Digi Device/Terminal Server is running and configured properly.

Troubleshooting Troubleshoot port issuesin Linux
RealPort Installation User Guide
53
1. Check the statusof the RealPort Daemon. From the Linux root prompt, type:
ps -ef | grep drpd
You should see an entry for each Digi device similar to the following. Please verify the
respective IPaddress.
root 2254 1 0 Dec 13 ? 0:03/usr/bin/dgrp-version/daemon/drpd a
192.168.2.2
There areentries for the IPaddress and node name. Use only one or the other, not both. Make
surethat it isthe correct IPaddress or node name for the particular unit. If using the node
name, make sure that the host can pingor telnet to that nodename (ping nodename).
2. To restart the daemon, type the following from theLinux root prompt using an Xterm capable
session:
/usr/bin/dgrp-version/config/dgrp_gui
This graphical utility allowsyou to highlight the desired entry, then to select the Daemon
Menu item from the top to be able to check, stop, and start RealPort daemons.
3. To stop and start the RealPort daemonsfrom a non-graphical interface, use the following
commands:
n
To stop the RealPort daemon, where x represents the IDletter of theunit, type the
following from the Linux root prompt:
/usr/bin/dgrp-version/config/dgrp_cfg_node –v –v stop x
n
To start the daemon, type the following from the Linux root prompt:
/usr/bin/dgrp-version/config/dgrp_cfg_node –v –v start x
###.###.###.###
Here x represents the unit IDletter and ###.###.###.### represents the IPaddress.
If some of the portsdo not work
Check for carrier detect. Check theserial signalsby typing display port range=[port_number] from
the Device root prompt. For a graphical utility to display port signals, please download and install DPA
Remote. Go to www.digi.com/support and enter your device and operating system then search DPA
Remote.
If an 8-pin RJ45 cable isbeing used and DSRis asserted but not DCD, use the following command:
#> set flow altpin=on ra=[port_number]
