
TIBCO EBX® Data Exchange Add-
on (New)
Version 4.4.0
June 2022
Important Information
SOME TIBCO SOFTWARE EMBEDS OR BUNDLES OTHER TIBCO SOFTWARE. USE OF SUCH
EMBEDDED OR BUNDLED TIBCO SOFTWARE IS SOLELY TO ENABLE THE FUNCTIONALITY
(OR PROVIDE LIMITED ADD-ON FUNCTIONALITY) OF THE LICENSED TIBCO SOFTWARE. THE
EMBEDDED OR BUNDLED SOFTWARE IS NOT LICENSED TO BE USED OR ACCESSED BY ANY
OTHER TIBCO SOFTWARE OR FOR ANY OTHER PURPOSE.
USE OF TIBCO SOFTWARE AND THIS DOCUMENT IS SUBJECT TO THE TERMS AND
CONDITIONS OF A LICENSE AGREEMENT FOUND IN EITHER A SEPARATELY EXECUTED
SOFTWARE LICENSE AGREEMENT, OR, IF THERE IS NO SUCH SEPARATE AGREEMENT, THE
CLICKWRAP END USER LICENSE AGREEMENT WHICH IS DISPLAYED DURING DOWNLOAD
OR INSTALLATION OF THE SOFTWARE (AND WHICH IS DUPLICATED IN THE LICENSE FILE) OR
IF THERE IS NO SUCH SOFTWARE LICENSE AGREEMENT OR CLICKWRAP END USER LICENSE
AGREEMENT, THE LICENSE(S) LOCATED IN THE “LICENSE” FILE(S) OF THE SOFTWARE.
USE OF THIS DOCUMENT IS SUBJECT TO THOSE TERMS AND CONDITIONS, AND YOUR USE
HEREOF SHALL CONSTITUTE ACCEPTANCE OF AND AN AGREEMENT TO BE BOUND BY THE
SAME.
ANY SOFTWARE ITEM IDENTIFIED AS THIRD PARTY LIBRARY IS AVAILABLE UNDER
SEPARATE SOFTWARE LICENSE TERMS AND IS NOT PART OF A TIBCO PRODUCT. AS SUCH,
THESE SOFTWARE ITEMS ARE NOT COVERED BY THE TERMS OF YOUR AGREEMENT WITH
TIBCO, INCLUDING ANY TERMS CONCERNING SUPPORT, MAINTENANCE, WARRANTIES, AND
INDEMNITIES. DOWNLOAD AND USE OF THESE ITEMS IS SOLELY AT YOUR OWN DISCRETION
AND SUBJECT TO THE LICENSE TERMS APPLICABLE TO THEM. BY PROCEEDING TO
DOWNLOAD, INSTALL OR USE ANY OF THESE ITEMS, YOU ACKNOWLEDGE THE FOREGOING
DISTINCTIONS BETWEEN THESE ITEMS AND TIBCO PRODUCTS.
This document is subject to U.S. and international copyright laws and treaties. No part of this document may
be reproduced in any form without the written authorization of TIBCO Software Inc.
TIBCO and TIBCO EBX are either registered trademarks or trademarks of TIBCO Software Inc. in the
United States and/or other countries.
All other product and company names and marks mentioned in this document are the property of their
respective owners and are mentioned for identification purposes only.
This software may be available on multiple operating systems. However, not all operating system platforms
for a specific software version are released at the same time. Please see the readme.txt file for the availability
of this software version on a specific operating system platform.
THIS DOCUMENT IS PROVIDED “AS IS” WITHOUT WARRANTY OF ANY KIND, EITHER
EXPRESS OR IMPLIED, INCLUDING, BUT NOT LIMITED TO, THE IMPLIED WARRANTIES OF
MERCHANTABILITY, FITNESS FOR A PARTICULAR PURPOSE, OR NON-INFRINGEMENT.
THIS DOCUMENT COULD INCLUDE TECHNICAL INACCURACIES OR TYPOGRAPHICAL
ERRORS. CHANGES ARE PERIODICALLY ADDED TO THE INFORMATION HEREIN; THESE
CHANGES WILL BE INCORPORATED IN NEW EDITIONS OF THIS DOCUMENT. TIBCO
SOFTWARE INC. MAY MAKE IMPROVEMENTS AND/OR CHANGES IN THE PRODUCT(S) AND/OR
THE PROGRAM(S) DESCRIBED IN THIS DOCUMENT AT ANY TIME.
THE CONTENTS OF THIS DOCUMENT MAY BE MODIFIED AND/OR QUALIFIED, DIRECTLY
OR INDIRECTLY, BY OTHER DOCUMENTATION WHICH ACCOMPANIES THIS SOFTWARE,
INCLUDING BUT NOT LIMITED TO ANY RELEASE NOTES AND "READ ME" FILES.
This and other products of TIBCO Software Inc. may be covered by registered patents. Please refer to
TIBCO's Virtual Patent Marking document (https://www.tibco.com/patents) for details.
Copyright 2006-2022. TIBCO Software Inc. All rights reserved.

TIBCO EBX® Data Exchange Add-on (New) 5
Table of contents
User Guide
1. About the TIBCO EBX® Data Exchange Add-on (New)............................................................................. 8
2. Connecting a database and data model.........................................................................................................11
3. Enabling data integration in workflows and perspectives............................................................................ 13
Importing data
4. Import overview....................................................................................................................................... 16
5. Importing to a table................................................................................................................................. 17
6. Importing to multiple tables.................................................................................................................... 27
Exporting data
7. Export overview....................................................................................................................................... 36
8. Exporting a table......................................................................................................................................37
9. Exporting multiple tables.........................................................................................................................43
10. Exporting labels and related data.......................................................................................................... 51
Transferring data
11. Transfer overview.................................................................................................................................. 60
12. Transferring to a table............................................................................................................................61
13. Transferring to multiple tables...............................................................................................................65
14. Using templates........................................................................................................................................... 71
Mapping and transforming data
15. Map and transform overview.................................................................................................................76
16. Mapping interface reference.................................................................................................................. 79
17. Transformation function reference.........................................................................................................87

TIBCO EBX® Data Exchange Add-on (New) 6
Release Notes
18. Version 4.4.0................................................................................................................................................90
19. All release notes..........................................................................................................................................93

TIBCO EBX® Data Exchange Add-on (New) 7
User Guide

Documentation > User Guide > About the TIBCO EBX® Data Exchange Add-on (New)
TIBCO EBX® Data Exchange Add-on (New) 8
CHAPTER 1
About the TIBCO EBX® Data
Exchange Add-on (New)
This chapter contains the following topics:
1.
Overview
2.
Data transformation overview
3.
Your role with the add-on
4.
What's next?
1.1 Overview
The EBX® Data Exchange Add-on (New) enables integration and transformation of data from one
data store to another. The current version of the add-on can:
•
Import and export data between tables in your TIBCO EBX® repository and external files.
•
Transfer data between tables within your EBX® repository.
•
Import and export data between tables in your EBX® repository and SQL databases.
1.2 Data transformation overview
When requirements between your data source and target differ, you can use the add-on's transformation
functions to reconcile the differences. These transformations provide the flexibility to change data
values and convert data format between sources and targets. For example, a source might use the
following codes for states 1, 2, 3, etc. But, the target expects Alabama, Alaska, and Arizona. You can
use a transformation to populate the target with the expected value.

Documentation > User Guide > About the TIBCO EBX® Data Exchange Add-on (New)
TIBCO EBX® Data Exchange Add-on (New) 9
1.3 Your role with the add-on
As a business user you interaction with the add-on likely includes the tasks outlined in the following
image:
Note
Where you access data integration services determines the source for exports and targets
for imports.

Documentation > User Guide > About the TIBCO EBX® Data Exchange Add-on (New)
TIBCO EBX® Data Exchange Add-on (New) 10
1.4 What's next?
The following table outlines the topics covered in the documentation sections:
Importing
For an introduction to the import process, see Import
overview [p 16].
For instructions on importing, see Importing to a table [p
17].
Exporting
For an introduction to the export process, see Export
overview [p 36].
For instructions on exporting, see Exporting a table [p 37].
Data transfer
For an introduction to the transfer process, see Transfer
overview [p 60].
For instructions on transferring data, see Transferring to a
table [p 61].
Mapping and transformations
Map and transform overview [p 76] provides a look at
how the add-on implements the concepts of mappings and
transformations.
Mapping interface reference [p 79] highlights the user
interface used for mapping and transformation tasks during
data integration. Additionally, it provides an example of
using a transformation function.
You can refer to Transformation function reference [p
87] to see a list and description of the add-on's built-in
transformation functions.

Documentation > User Guide > Connecting a database and data model
TIBCO EBX® Data Exchange Add-on (New) 11
CHAPTER 2
Connecting a database and data
model
This chapter contains the following topics:
1.
Overview
2.
Configuring a database connection
3.
Connecting a database and data model
2.1 Overview
Integration with an database requires an administrator to set up database connections in the add-on.
Additionally, the administrator must configure a connection between a database and an EBX® data
model. This ensures that end users can only access the database tables that are approved data sources
and targets for a given data model.
To successfully complete these tasks, start with the database connection information [p 11]. This is
a prerequisite for connecting a database and data model [p 12].
2.2 Configuring a database connection
To connect to a database:
1.
In the Administration panel, select TIBCO EBX® Data Exchange Add-on (New).
2.
From the Reference data group, select the Databases table and create a new record.
3.
Supply the required information:
•
Name: The name used to identify this connection.
•
URL: The URL used by the database for incoming connections. When using:
•
The External system authentication method, enter the URL for AWS.
•
The Direct authentication method, enter the URL specific to your database. For example:
•
MySQL: jdbc:sqlserver://<server>:<port>;databaseName=<databaseName>
•
Oracle: jdbc:oracle:<drivertype>:@<server>:<port>:<databaseName>
•
Postresql: jdbc:postgresql://<server>:<port>/<databaseName>
Documentation > User Guide > Connecting a database and data model
TIBCO EBX® Data Exchange Add-on (New) 12
•
Authentication: Sets the authentication type for this connection. A direct connection uses a
username and password; external system requires an access key.
•
Username and Password: The login credentials for this database connection.
•
Access key: The access key required to access the external database.
4.
Optionally, test the connection.
5.
Save and close.
This connection information is now available to use when connecting a database with a data
model.
2.3 Connecting a database and data model
The option to import or export SQL is not available to end users until an administrator configures a
connection between a database and a data model. To connect a database with a data model:
1.
In the Administration panel, select TIBCO EBX® Data Exchange Add-on (New).
2.
From the Reference data group, select Database to data model connections and create a new
record.
3.
Supply the following information:
•
Database: Select the database from the dropdown menu. This list populates with databases
that you provided connection information for using the Databases table.
•
Data model: Select the data model to enable import and export between it and the selected
database.
•
Optionally, provide a Table name pattern, Schema name pattern, and Description.
4.
Save and close.
Users that have access to data in the specified data model can integrate data between the tables
in the connected database and EBX®.

Documentation > User Guide > Enabling data integration in workflows and perspectives
TIBCO EBX® Data Exchange Add-on (New) 13
CHAPTER 3
Enabling data integration in
workflows and perspectives
Administrators can enable add-on import, export, and transfer functionality in workflows and
perspectives. These actions are available as services and actions in workflows and perspectives,
respectively. See the EBX® product documentation for more information on working with
perspectives and workflows.
To enable data integration in a perspective or workflow:
1.
When configuring a:
•
Perspective: select the appropriate action from the drop-down menu.
The add-on specific actions begin with [ebx-addon-dint]. There are two options for each
import, export and transfer type. This allows you to specify whether the action applies to the
selected table, or dataset.
•
Workflow: select the appropriate service from the drop-down menu.

Documentation > User Guide > Enabling data integration in workflows and perspectives
TIBCO EBX® Data Exchange Add-on (New) 14
The add-on specific actions begin with [ebx-addon-dint]. There are two options for each
import, export and transfer type. This allows you to specify whether the action applies to the
selected table, or dataset.
2.
Use the required Input parameters to specify the location where you want to service or action
to be active.
3.
Optionally, specify a Template parameter.
If you specify a template, users cannot change the template during import, export, or transfer.
Additionally, you might want to keep in mind that not all users can access each template.
4.
Complete remaining workflow or perspective configuration steps. See the EBX® product
documentation for more information on creating workflows and perspectives and how they work.

Documentation > User Guide
TIBCO EBX® Data Exchange Add-on (New) 15
Importing data

Documentation > User Guide > Importing data > Import overview
TIBCO EBX® Data Exchange Add-on (New) 16
CHAPTER 4
Import overview
The services provided by the add-on allow you to import data from source locations outside of EBX®
to your EBX® repository. The location you initiate the import from determines the target for the
import. For instance, running the import service from a table's Actions menu, sets the table as the
target. Running the service from a dataset's Actions menu sets its tables as the targets. Overall, steps
to complete these procedures are the same, except some details such as mapping differ. As outlined
below, the import process includes:
•
Selecting the source data. Currently supported source formats include XLS, XLSX, CSV and
SQL. Importing from SQL is supported at the table level only and requires administrative
configuration [p 11].
•
Defining any required mappings or transformations. The add-on automatically maps source fields
with those in the target that have the same name. If required, you can use the add-on's drag-n-drop
functionality to create or update mappings. If you want to apply transformations to your data, you
can use built-in functions to modify data during import. For more information on the topics of
mapping and transformations, see Map and transform overview [p 76].
•
Saving settings as a template for later reuse. When import operations require the use of
transformations or custom mappings, you can use templates to store these settings. This alleviates
you from having to redo the same tasks each time you perform a specific import.
See also
Importing to a table [p 17]
Map and transform overview [p 76]
Mapping interface reference [p 79]
Export overview [p 36]
Documentation > User Guide > Importing data > Importing to a table
TIBCO EBX® Data Exchange Add-on (New) 17
CHAPTER 5
Importing to a table
To import data from a CSV file, Excel file, or SQL data source to an individual table:
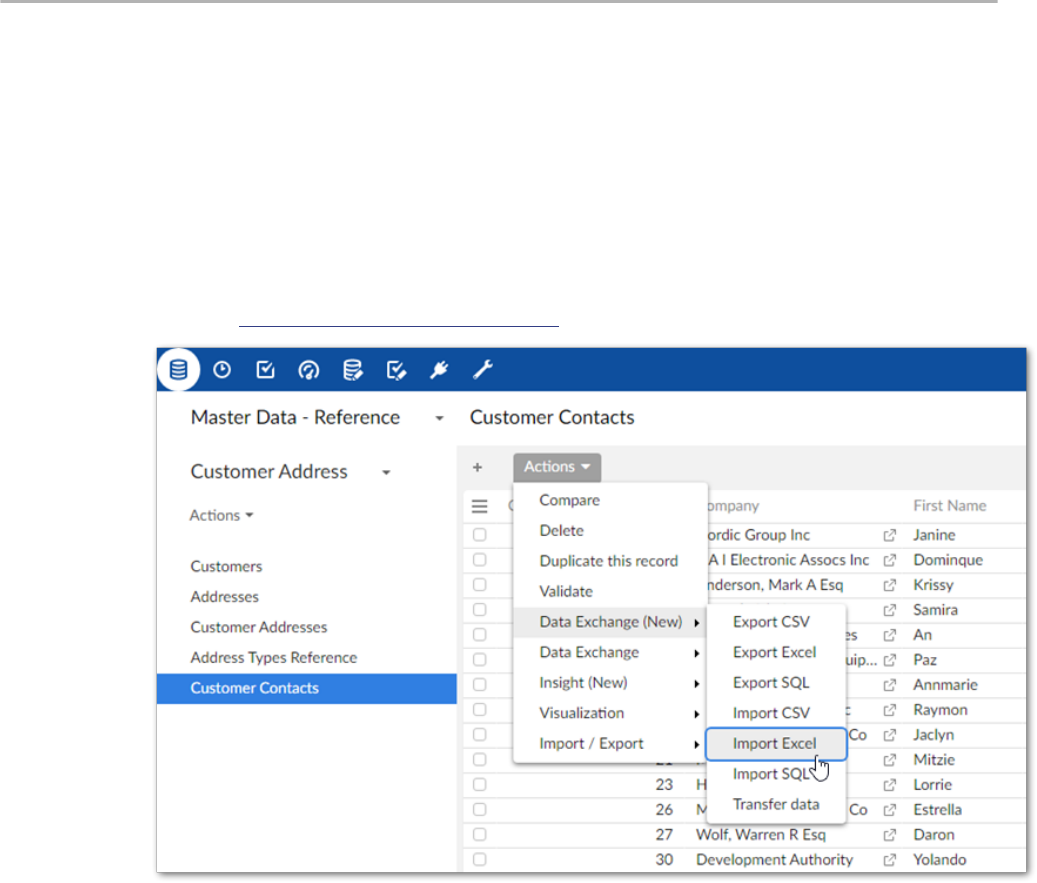
1.
Initiate the import process:
1.
Navigate to the table you want to use as the target.
2.
Initiate the import process from the table by selecting Actions > Data Exchange (New) and
one of the following options: Import CSV, Import Excel, or Import SQL. Administrators
must configure the available SQL sources [p 11] to enable the SQL import option.
2.
Choose the data source:
•
For CSV and Excel: Browse to select the file containing the source data for the import and
optionally the template to use.
•
For SQL: Use the SQL data source and SQL table dropdown menus to select the source
table or view for the import.
3.
Optionally, use the Load template option to select any previously saved template to load its
configuration and mapping options. After loading, you still have the ability to make changes
Documentation > User Guide > Importing data > Importing to a table
TIBCO EBX® Data Exchange Add-on (New) 18
to options. Note that changes to certain import options will impact the template's mappings.
Depending on the circumstances, the add-on can automatically create default mappings. In other
cases you might have to update mappings and transformations manually.
4.
Update format-specific options:

Documentation > User Guide > Importing data > Importing to a table
TIBCO EBX® Data Exchange Add-on (New) 19
1.
The following image and list highlight some of the options when importing from Excel:
1) Data table starts at and
Includes column headers:
Data table starts at: Specifies the location in the
spreadsheet where the data table begins.
Includes column headers: Use this option to
indicate whether the data table contains a header
row at the position specified by the Data table
starts at property. The add-on will match the text
in the first row of each source column with the field
labels in the target location. Automatic mappings
are generated when the values in the source and
target match. When this option is set to No, the add-
on maps columns sequentially. It begins by mapping
the first column in the source with the first column
in the target and so forth until one or both run out
of columns.
2) Advanced options:
Import mode: Specifies how target data is updated.
See the tooltip in the UI for descriptions of each
mode.
Note
Depending on your deployment
environment's resources, you might
have issues using the Insert only and
Delete only modes when importing
a large volume of data. If this issue
occurs, use any of the other import
modes.

Documentation > User Guide > Importing data > Importing to a table
TIBCO EBX® Data Exchange Add-on (New) 20
Case-sensitive label comparison: Determines
whether the add-on pays attention to letter case
when matching the labels in the source and target.
Ignore empty or null values: Determines whether
existing records are updated with empty or null
values from the imported file.
Check empty and null primary keys: Specifies
whether all primary keys are matched and validated
between source and target. This option is enabled
by default.

Documentation > User Guide > Importing data > Importing to a table
TIBCO EBX® Data Exchange Add-on (New) 21
2.
The following image and list highlight some of the options when importing from CSV:
1)
Basic options: The data source for this import
operation.
Includes column headers: Use this option to
indicate whether the data table contains a header
row at the position specified by the Data table
starts at property. The add-on will match the text
in the first row of each source column with the field
labels in the target location. Automatic mappings
are generated when the values in the source and
target match. When this option is set to No, the add-
on maps columns sequentially. It begins by mapping
the first column in the source with the first column
in the target and so forth until one or both run out
of columns.
Field separator: The value used by the source file
to denote a field.
List separator: The value used by the source file
to denote a list.
Cell delimiter: The value used by the source file to
denote the beginning and end of a cell in the source
file.
2)
Advanced options:
Import mode: Specifies how target data is updated.

Documentation > User Guide > Importing data > Importing to a table
TIBCO EBX® Data Exchange Add-on (New) 22
Case-sensitive label comparison: Determines
whether the add-on pays attention to letter case
when matching the labels in the source and target.
Decimal symbol: Specifies how the source file
represents the decimal symbol.
Ignore empty or null values: Specifies whether to
import values that are null or empty.
Check empty and null primary keys: Specifies
whether all primary keys are matched and validated
between source and target. This option is enabled
by default.
3.
The following image and list highlight some of the options when importing from SQL:
•
Import mode: Specifies how target data is updated. Use the property's tooltip for more
information about import modes.
•
Ignore empty or null values: Specifies whether to import values that are null or empty.
•
Check empty and null primary keys: Specifies whether all primary keys are matched and
validated between source and target. This option is enabled by default.
5.
Optionally, update or create mappings:
Note
The following steps provide only high-level mapping instructions. See Mapping
interface reference [p 79] for more detailed information on mapping and
transformations.
1.
Select Mapping to enter the mapping screen where you can update the default data mappings
or add data transformations. For Excel and CSV import, the add-on automatically creates
mappings where the source and target have the same labels. For SQL import, mappings are
automatically created when the label and data type match. A mapping identifies which data
is extracted from the source and where it is extracted to in the target.

Documentation > User Guide > Importing data > Importing to a table
TIBCO EBX® Data Exchange Add-on (New) 23
The following image and list describe some features of table and field mapping:
1)
Source (pink) and target (blue) tables: By default,
the data source displays on the left and the target
on the right. Each table header has a label and uses
an icon to show its type and selecting the small
arrow collapses and expands the table. The headers
also have connection points. Drag this top point to
automatically generate mappings between tables.
2)
Mappings: Each line is a mapping. An orange color
and icon indicates there is a warning for a mapping.
Select the icon to view the warning. Drag from
one field's connection point to another to create a
mapping.
3)
Delete selected: To delete a mapping, select it and
then the garbage icon.
6.
Optionally, add transformation functions:
Transformation functions allow you change the source data to meet technical or business
requirements in the target. The add-on ships with several transformation functions that support
common business cases. The available API also allows you to implement custom transformation
functions. For more details on how to use transformation functions, see Mapping interface
reference [p 79]. For information on the available transformations and their descriptions, see
Transformation function reference [p 87].

Documentation > User Guide > Importing data > Importing to a table
TIBCO EBX® Data Exchange Add-on (New) 24
1.
To add a transformation, select and drag the desired transformation function to the mapping
screen.
2.
Select and drag fields from the source to the function's input (left) and connect the function's
output (right) to target fields.
3.
Double-click the transformation function to edit its parameters. Each function is different,
for a complete list, see Transformation function reference [p 87].
7.
Optionally, select Save to store your settings as a template for re-use. For more information on
using templates, see Using templates [p 71].
8.
Click Import to complete the process.
See also
Map and transform overview [p 76]
Mapping interface reference [p 79]

Documentation > User Guide > Importing data > Importing to a table
TIBCO EBX® Data Exchange Add-on (New) 26

Documentation > User Guide > Importing data > Importing to multiple tables
TIBCO EBX® Data Exchange Add-on (New) 27
CHAPTER 6
Importing to multiple tables
To import data from an archive of CSV files or an Excel file to multiple tables in a dataset:
1.
Initiate the import process:
1.
Navigate to the dataset that contains the target tables.
2.
Initiate the import process from the dataset by selecting: Actions > Data Exchange (New) >
Import CSV or Import Excel.
2.
Browse to select the file containing the source data for the import.
After selecting the file, additional options display.
3.
Optionally, select any previously saved template to load its configuration and mapping options.
After loading, you can still make changes to configuration options. Changes to some import
options impact the template's mappings. Depending on the circumstances, the add-on can
automatically create default mappings. In other cases you might have to update mappings and
transformations manually.
4.
Update format-specific options:

Documentation > User Guide > Importing data > Importing to multiple tables
TIBCO EBX® Data Exchange Add-on (New) 28
1.
The following image and list highlight some of the options when importing from Excel:
1) Includes column headers:
Use this option to indicate whether the data tables
contain a header row. The starting position of the
data is specified below in the Select source/target
tables option. The add-on will match the text in
the first (header) row of each source column with
the field labels in the target location. The add-on
automatically generates links between tables when
the values in the source and target match. When
this option is set to No, the add-on maps columns
sequentially. It begins by mapping the first column
in the source with the first column in the target and
so forth until one or both run out of columns.
2) Advanced options:
Import mode: Specifies how target data is updated.
See the tooltip in the UI for descriptions of each
mode.
Note
Depending on your deployment
environment's resources, you might
have issues using the Insert only and
Delete only modes when importing
a large volume of data. If this issue

Documentation > User Guide > Importing data > Importing to multiple tables
TIBCO EBX® Data Exchange Add-on (New) 29
occurs, use any of the other import
modes.
List separator: Specifies the character used in the
source file to separate lists.
Case-sensitive label comparison: Determines
whether the add-on pays attention to letter case
when matching the labels in the source and target.
Ignore empty or null values: By default, existing
records are not updated with empty or null values
from the imported file. Disable this option to update
the target with these values.
Check empty and null primary keys: Specifies
whether all primary keys are matched and validated
between source and target. This option is enabled
by default.
Ignore table failure: Ensures that when one or
more tables fails to import, the system still imports
valid tables from the dataset. When disabled, the
system rolls back all data when it fails to import a
single table.
3) Select source/target
tables
Determines the tables to import from the source,
specifies the data starting point for each source
table, and sets the target tables. Where possible,
the add-on automatically pairs source and target
tables. Deselect any sources that you want to
exclude. If a source table is included, it must have a
corresponding target table selection. Add multiple
targets to a source to import the same data to
multiple tables.
Note
You can add a maximum of 20 target
tables.

Documentation > User Guide > Importing data > Importing to multiple tables
TIBCO EBX® Data Exchange Add-on (New) 30
2.
The following image and list highlight some of the options when importing from CSV:
1) Basic options:
Includes column headers: Use this option to
indicate whether the data table contains a header
row at the position specified by the Data table
starts at property. The add-on will match the text
in the first row of each source column with the field
labels in the target location. Automatic mappings
are generated when the values in the source and
target match. When this option is set to No, the add-
on maps columns sequentially. It begins by mapping
the first column in the source with the first column
in the target and so forth until one or both run out
of columns.
Field separator: The value used by the source file
to denote a field.
List separator: The value used by the source file
to denote a list.
Cell delimiter: The value used by the source file to
denote the beginning and end of a cell in the source
file.
2) Advanced options:
Import mode: Specifies how target data is updated.

Documentation > User Guide > Importing data > Importing to multiple tables
TIBCO EBX® Data Exchange Add-on (New) 31
Case-sensitive label comparison: Determines
whether the add-on pays attention to letter case
when matching the labels in the source and target.
Decimal symbol: Specifies how the source file
represents the decimal symbol.
Ignore empty or null values: Specifies whether to
import values that are null or empty.
Check empty and null primary keys: Specifies
whether all primary keys are matched and validated
between source and target. This option is enabled
by default.
3) Select source/target
tables
Determines the tables to import from the source
and sets their targets. Where possible, the add-
on automatically pairs source and target tables.
Deselect any sources that you want to exclude.
If a source table is included, it must have a
corresponding target table selection. Add multiple
targets to a source to import the same data to
multiple tables.
Note
You can add a maximum of 20 target
tables.
If you do not select all source tables and later decide
to include one or more of the remaining tables,
you can accomplish this using the options in the
Mapping screen. See the next step for more details.
5.
Optionally, update or create mappings:
Note
The following steps provide only high-level mapping instructions. See Mapping
interface reference [p 79] for more detailed information on mapping and
transformations.
1.
Select Mapping to enter the mapping screen where you can update the default data mappings
or add data transformations. The add-on automatically creates mappings where the source
and target have the same labels. A mapping identifies which data is extracted from the source
and specifies its target destination.

Documentation > User Guide > Importing data > Importing to multiple tables
TIBCO EBX® Data Exchange Add-on (New) 32
The following image and list describe some features of table and field mapping:
1) Table mapping tabs
Each tab contains the mappings between a different
pair of source and target tables. The icons to the
right allow you to locate and navigate between
tabs. Additionally, you can create new tabs, and add
any unmapped source and target tables by dragging
them from the Overview box to the mapping pane.
Note that the '+' icon is disabled when all sources
are already included in a mapping tab.
Please note that:
•
You can use the same source or target only
once in the mapping screen. In other words, you
cannot use a source or target in more than one
table mapping tab.
•
Sources can have multiple targets, but targets
can only have one source.
2) Source (pink) and target
(blue) tables
By default, the data source displays on the left and
the target on the right. Each table header has a label
and uses an icon to show its type and selecting the
small arrow collapses and expands the table. The
headers also have connection points. Drag this top
point to automatically generate mappings between
tables.

Documentation > User Guide > Importing data > Importing to multiple tables
TIBCO EBX® Data Exchange Add-on (New) 33
3) Mappings
Each line is a mapping. An orange color and icon
indicates there is a warning for a mapping. Select
the icon to view the warning. Drag from one field's
connection point to another to create a mapping. To
delete a mapping, select it and then select the trash
icon. To create a mapping, drag from a source field's
connection point to a connection point in the target.
6.
Optionally, add transformation functions:
Transformation functions allow you change the source data to meet technical or business
requirements in the target. The add-on ships with several transformation functions that support
common business cases. For more details on how to use transformation functions, see
Mapping interface reference [p 79]. For information on the available transformations and their
descriptions, see Transformation function reference [p 87].
1.
To add a transformation, select and drag the desired transformation function to the mapping
screen.

Documentation > User Guide > Importing data > Importing to multiple tables
TIBCO EBX® Data Exchange Add-on (New) 34
2.
Select and drag fields from the source to the function's input (left) and connect the function's
output (right) to target fields.
3.
Double-click the transformation function to edit its parameters. Each function is different,
for a complete list, see Transformation function reference [p 87].
7.
Optionally, select Save to store your settings as a template for re-use. For more information on
using templates, see Using templates [p 71].
8.
Click Import to complete the process.
See also
Map and transform overview [p 76]
Mapping interface reference [p 79]
Export overview [p 36]

Documentation > User Guide
TIBCO EBX® Data Exchange Add-on (New) 35
Exporting data

Documentation > User Guide > Exporting data > Export overview
TIBCO EBX® Data Exchange Add-on (New) 36
CHAPTER 7
Export overview
The services provided by the add-on allow you to export data from your EBX® repository. The
location you initiate the export from determines the source for the export. For instance, running the
export service from a table's Actions menu, sets the table as the source. Running the service from a
dataset's Actions menu sets its tables as sources. Overall, steps to complete these procedures are the
same, except some details such as mapping differ. As outlined below, the export process includes:
•
Specifying the source file name and any format-specific options for CSV and Excel export, or
selecting the desired target location when exporting SQL. See Exporting a table [p 37] for
instructions. Exporting to SQL is supported at the table level only and requires administrative
configuration [p 11].
•
Defining any required mappings or transformations. The add-on automatically generates a map
of all source fields to target fields. If your circumstances require it, use the add-on's drag-n-drop
functionality to update the mappings. If you want to apply transformations to your data, you can
use built-in functions to modify data during export. For more information on the topics of mapping
and transformations, see Map and transform overview [p 76].
•
Saving settings as a template. When export operations require the use of transformations or
custom mappings, you can use templates to store these settings. This alleviates you from having
to redo the same tasks each time you perform a specific export.
See also
Exporting a table [p 37]
Map and transform overview [p 76]
Mapping interface reference [p 79]
Import overview [p 16]

Documentation > User Guide > Exporting data > Exporting a table
TIBCO EBX® Data Exchange Add-on (New) 37
CHAPTER 8
Exporting a table
To export data to a CSV file, Excel file, or SQL table:
1.
Initiate the export process:
1.
Navigate to the table you want to use as the source.
2.
Initiate the export process from the table by selecting Actions > Data Exchange (New)
and choosing one of the following options: Export CSV, Export Excel, or Export SQL.
Administrators must configure the available SQL sources [p 11] to enable the SQL export
option.
2.
Specify target information:
•
For CSV and Excel: Provide a file name and check the default options.
•
For SQL: Select the SQL data source, SQL target table, and check the default options.

Documentation > User Guide > Exporting data > Exporting a table
TIBCO EBX® Data Exchange Add-on (New) 38
If you have questions about the default options, hover your mouse over the label and select the
'?' icon to see a description:
3.
Optionally, update or create mappings:
Note
The following steps provide only high-level mapping instructions. See Mapping
interface reference [p 79] for more detailed information on mapping and
transformations.
1.
Select Mapping to enter the mapping screen where you can update the default data mappings
or add data transformations. For Excel and CSV export, the add-on automatically creates
mappings where the source and target have the same labels. For SQL export, mappings are
automatically created when the label and data type match. A mapping identifies which data
is extracted from the source and where it is extracted to in the target.

Documentation > User Guide > Exporting data > Exporting a table
TIBCO EBX® Data Exchange Add-on (New) 39
The following image and list describe some features of table and field mapping:
1)
Mappings: Each line is a mapping. Drag from
one field's connection point to another to create a
mapping. An orange color and icon indicates there
is a warning for a mapping. Select the icon to view
the warning. In these cases, where possible, the add-
on will perform a default transformation.
2)
Source (pink) and target (blue) tables: By default,
the data source displays on the left and includes data
type an cardinality for fields. The target table on
the right shows the field names that are included in
the exported file. Each table header has a label and
uses an icon to show its type and selecting the small
arrow collapses and expands the table. The headers
also have connection points. Drag this top point to
automatically generate mappings between tables.
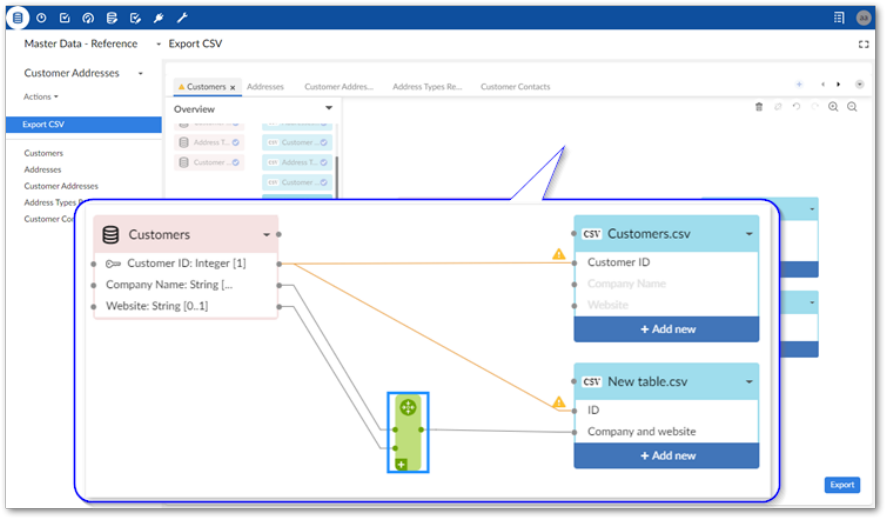
3)
Adding, editing, and removing fields (not
available for SQL export): You can add additional
fields in the target file by selecting Add new. For
instance you might want to use a transformation
function to split a Full Name field into First Name
and Last Name in the target. Double-click to edit
field names. Hover your mouse over the field and
select the 'x' icon to remove them.
4.
Optionally, add transformation functions:

Documentation > User Guide > Exporting data > Exporting a table
TIBCO EBX® Data Exchange Add-on (New) 40
Transformation functions allow you change the source data to meet technical or business
requirements in the target. The add-on ships with several transformation functions that support
common business cases. For more details on how to use transformation functions, see
Mapping interface reference [p 79]. For information on the available transformations and their
descriptions, see Transformation function reference [p 87].
1.
To add a transformation, select and drag the desired transformation function to the mapping
screen.
2.
Select and drag fields from the source to the function's input (left) and connect the function's
output (right) to target fields. In the example shown below a constant value is output to the
target, so only the function's output is mapped.
3.
Double-click the transformation function to edit its parameters. Each function is different,
for a complete list, see Transformation function reference [p 87].
5.
Optionally, select Save to store your settings as a template for re-use. For more information on
using templates, see Using templates [p 71].

Documentation > User Guide > Exporting data > Exporting a table
TIBCO EBX® Data Exchange Add-on (New) 42

Documentation > User Guide > Exporting data > Exporting multiple tables
TIBCO EBX® Data Exchange Add-on (New) 43
CHAPTER 9
Exporting multiple tables
To export data to an Excel file or an archive (as CSV files):
1.
Initiate the export process:
1.
Navigate to the dataset containing the source tables.
2.
Initiate the export process by selecting: Actions > Data Exchange (New) > Export CSV or
Export Excel.

Documentation > User Guide > Exporting data > Exporting multiple tables
TIBCO EBX® Data Exchange Add-on (New) 44
2.
Supply a file name and check default options. If you have questions about individual settings,
hover your mouse over the label and select the '?' icon to see a description:
3.
Specify the tables you want to export with the Choose the tables to export property.
If you do not select all source tables and later decide to include one or more of the remaining
tables, you can accomplish this using the options in the Mapping screen. See the next step for
more details.
4.
Optionally, update or create mappings:
Note
The following steps provide only high-level mapping instructions. See Mapping
interface reference [p 79] for more detailed information on mapping and
transformations.
1.
Select Mapping to enter the mapping screen where you can update the default data mappings
or add data transformations. The add-on automatically creates mappings where the source
and target have the same labels. A mapping identifies which data is extracted from the source
and where it is extracted to in the target.

Documentation > User Guide > Exporting data > Exporting multiple tables
TIBCO EBX® Data Exchange Add-on (New) 45
The following image and list describe some features of table and field mapping:
1) Table mapping tabs
Each tab contains the mappings between a different
pair of source and target tables. The icons to the
right allow you to locate and navigate between
tabs. Additionally, you can create new tabs, and add
any unmapped source and target tables by dragging
them from the Overview box to the mapping pane.
Note that the '+' icon is disabled when all sources
are already included in a mapping tab.
2) Mappings
Each line is a mapping. Drag from one field's
connection point to another to create a mapping. An
orange color and icon indicates there is a warning
for a mapping. Select the icon to view the warning.
In these cases, where possible, the add-on will
perform a default transformation.
3) Source (pink) and target
(blue) tables
By default, the data source displays on the left
and includes data type an cardinality for fields.
The target table on the right shows the field names
that are included in the exported file. Each table
header has a label and uses an icon to show its
type and selecting the small arrow collapses and
expands the table. The headers also have connection
points. Drag this top point to automatically generate
mappings between tables.

Documentation > User Guide > Exporting data > Exporting multiple tables
TIBCO EBX® Data Exchange Add-on (New) 46
You can add, and map to additional target tables.
See Adding tables to the export [p 47] for more
information.
Please note that:
•
You can use the same source or target only
once in the mapping screen. In other words, you
cannot use a source or target in more than one
table mapping tab.
•
Sources can have multiple targets, but targets
can only have one source.
4) Adding, editing, and
removing fields
You can add additional fields in the target file by
selecting Add new. For instance you might want to
use a transformation function to split a Full Name
field into First Name and Last Name in the target.
Double-click to edit field names. Hover your mouse
over the field and select the 'x' icon to remove them.
5.
Optionally, add transformation functions:
Transformation functions allow you change the source data to meet technical or business
requirements in the target. The add-on ships with several transformation functions that support
common business cases. For more details on how to use transformation functions, see
Mapping interface reference [p 79]. For information on the available transformations and their
descriptions, see Transformation function reference [p 87].
1.
To add a transformation, select and drag the desired transformation function to the mapping
screen.

Documentation > User Guide > Exporting data > Exporting multiple tables
TIBCO EBX® Data Exchange Add-on (New) 47
2.
Select and drag fields from the source to the function's input (left) and connect the function's
output (right) to target fields. In the example shown below a constant value is output to the
target, so only the function's output is mapped.
3.
Double-click the transformation function to edit its parameters. Each function is different,
for a complete list, see Transformation function reference [p 87].
6.
Optionally, select Save to store your settings as a template for re-use. For more information on
using templates, see Using templates [p 71].
7.
Click Export to complete the process.
See also
Map and transform overview [p 76]
Mapping interface reference [p 79]
Export overview [p 36]
This chapter contains the following topics:
1.
Adding tables to the export
9.1 Adding tables to the export
You can include additional target tables in an export from the Mapping screen. One source table can
map to multiple targets. This allows you to split source data into multiple tables.
The following steps assume you have already initiated the export process and outline how to add target
tables to an export:
1.
Add a new target table:

Documentation > User Guide > Exporting data > Exporting multiple tables
TIBCO EBX® Data Exchange Add-on (New) 48
1.
From the Overview box in the Mapping screen, select New table.
2.
Drag the new table to the mapping screen.
2.
Add fields to the new table by selecting Add new.
After adding a field, you can double-click to edit its name, or select the 'x' icon to remove it.
3.
Drag from fields in the source table to fields in the new target to create mappings.
Documentation > User Guide > Exporting data > Exporting multiple tables
TIBCO EBX® Data Exchange Add-on (New) 49
As shown below, you can also include a transformation function to manipulate data if required.
4.
Repeat the previous steps until you have all required target tables.
Documentation > User Guide > Exporting data > Exporting multiple tables
TIBCO EBX® Data Exchange Add-on (New) 50

Documentation > User Guide > Exporting data > Exporting labels and related data
TIBCO EBX® Data Exchange Add-on (New) 51
CHAPTER 10
Exporting labels and related data
This chapter contains the following topics:
1.
Overview
2.
Exporting labels
3.
Exporting related data
10.1 Overview
Instructional details for some of the add-on's export options and example output are included in the
following sections:
•
Exporting labels [p 51]
•
Exporting related data [p 54]
10.2 Exporting labels
When exported data includes a primary key, foreign key, or enumeration, the resulting file might be
difficult to parse. The values contained in these fields are often numbers or other identifiers, and make
it challenging to extract meaningful information. To alleviate this, the add-on allows you to export the
labels for these fields. Note, that labels for these fields must be defined in the data model and can only
be set by someone with administrative access to edit the data model. See Setting labels [p 53] below
for high-level information on where to set the labels.
To include labels in an exported file:
1.
Initiate the export process.
Note that label export options are available at the dataset and table levels for CSV and Excel, but
only the table level for SQL. This example demonstrates exporting from one table to Excel and
including labels from a foreign key. With the exception of the following differences, the process
and results are similar for the other export formats and label options:
•
The option to export static enumerations is only available for Excel export.
•
When exporting at the dataset level: each sheet in an Excel file will contain data for one table
included in the export.
•
If you do not have permission to view a field it is not included in the export.
See Exporting a table [p 37] or Exporting multiple tables [p 43] for detailed instructions on exporting.
Documentation > User Guide > Exporting data > Exporting labels and related data
TIBCO EBX® Data Exchange Add-on (New) 52
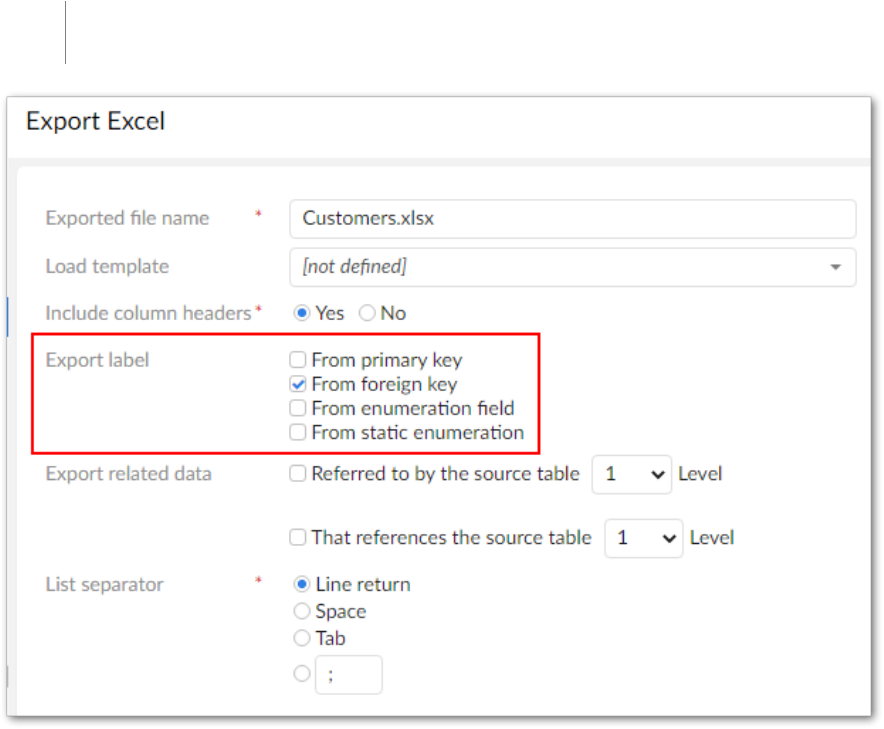
2.
Choose the types of labels to export by selecting the corresponding options.
Note
You cannot use a transformation function on a field that is a static enumeration.
3.
Optionally, change mappings.

Documentation > User Guide > Exporting data > Exporting labels and related data
TIBCO EBX® Data Exchange Add-on (New) 53
As shown in the example below, you can find the label mappings in an expandable section in
the source table.
4.
Complete the export process.
The following image shows the file resulting from the export with the label column (Company
- Label) included:
Setting labels
If you have administrative access to edit a data model in the Data Model Assistant (DMA), you can
determine the exported labels for each field type by adding a label in the following locations:
•
Enumerations: select the field and navigate to Simple controls > Enumeration > Items > Label.
•
Primary keys: select the table and navigate to Advanced properties > Table > Presentation >
Record labeling.

Documentation > User Guide > Exporting data > Exporting labels and related data
TIBCO EBX® Data Exchange Add-on (New) 54
•
Foreign keys: select the field and navigate to Advanced controls > Foreign key constraint >
Record labeling.
Note
You can view the TIBCO EBX® product documentation for more details on this topic.
10.3 Exporting related data
You can export data from related tables when exporting to Excel or CSV formats. You have the option
of including data from related tables up to 5 levels from the main source table (the table where you
run the export service). Only data related to records selected for export in the export's source table
are exported.
When exporting to:
•
CSV: The add-on exports a ZIP file containing individual CSV files. Each file contains data from
one table and one of the files includes metadata about the related tables included in the export.
•
Excel: The add-on exports a single Excel file. The first sheet in the file contains the export's source
data. Each additional sheet—one for each table—contains the related data. The final sheet in the
file contains metadata about the related tables included in the export.
To export related data:
1.
Initiate the export process for CSV or Excel.
See Exporting a table [p 37] for detailed instructions on exporting.
Note
Label export options are only available at the table level.
2.
Include data from related tables using one of the following options:
1.
Select the related data to export using the following options:
•
Referred to by the source table
•
That references the source table

Documentation > User Guide > Exporting data > Exporting labels and related data
TIBCO EBX® Data Exchange Add-on (New) 55
2.
Optionally, use the Level drop down menu to determine how much related data should be
included.
3.
Optionally, change or update mappings.
4.
Complete the export process.

Documentation > User Guide > Exporting data > Exporting labels and related data
TIBCO EBX® Data Exchange Add-on (New) 56
The following image and list include a data model diagram and export results to highlight the behavior
of exporting related data:
1) Source table
The export service was run from the Customer table.
2) Referenced by the source
table
The Customer table holds a FK to the Product table, but not
directly to Price, or Currency. The related data from Price
was included in the export because it was within the number
of levels specified (2), whereas Currency was not.
3) Tables that reference the
source table
Data from the Region table, which has a direct FK to
Customer, and Tax table was included in the export.
4) Results
The reference sheet includes metadata about all related
tables included in the export.
See also
Exporting a table [p 37]
Map and transform overview [p 76]

Documentation > User Guide > Exporting data > Exporting labels and related data
TIBCO EBX® Data Exchange Add-on (New) 58

Documentation > User Guide
TIBCO EBX® Data Exchange Add-on (New) 59
Transferring data

Documentation > User Guide > Transferring data > Transfer overview
TIBCO EBX® Data Exchange Add-on (New) 60
CHAPTER 11
Transfer overview
The Transfer data service allows you to move data between tables within your EBX® repository.
The table or dataset you initiate the action from sets the data source. You can then choose the targets
and specify any required mappings or transformations.
Note
All EBX® permissions apply to data transfer operations. You cannot transfer to target
tables and fields unless you have permission to write data in these locations.
As outlined below, the transfer process includes:
•
Running the Transfer data service from a table or dataset's Actions menu.
•
Defining any required mappings or transformations. The add-on automatically maps source fields
with those in the target that have the same name. If required, you can use the add-on's drag-n-drop
functionality to create or update mappings. If you want to apply transformations to your data, you
can use built-in functions to modify data during transfer. For more information on the topics of
mapping and transformations, see Map and transform overview [p 76].
•
Saving settings as a template for later reuse. When import operations require the use of
transformations or custom mappings, you can use templates to store these settings. This alleviates
you from having to redo the same tasks each time you perform a specific import.
See also
Transferring to a table [p 61]
Map and transform overview [p 76]
Mapping interface reference [p 79]
Export overview [p 36]
Documentation > User Guide > Transferring data > Transferring to a table
TIBCO EBX® Data Exchange Add-on (New) 61
CHAPTER 12
Transferring to a table
To transfer data between two EBX® tables:
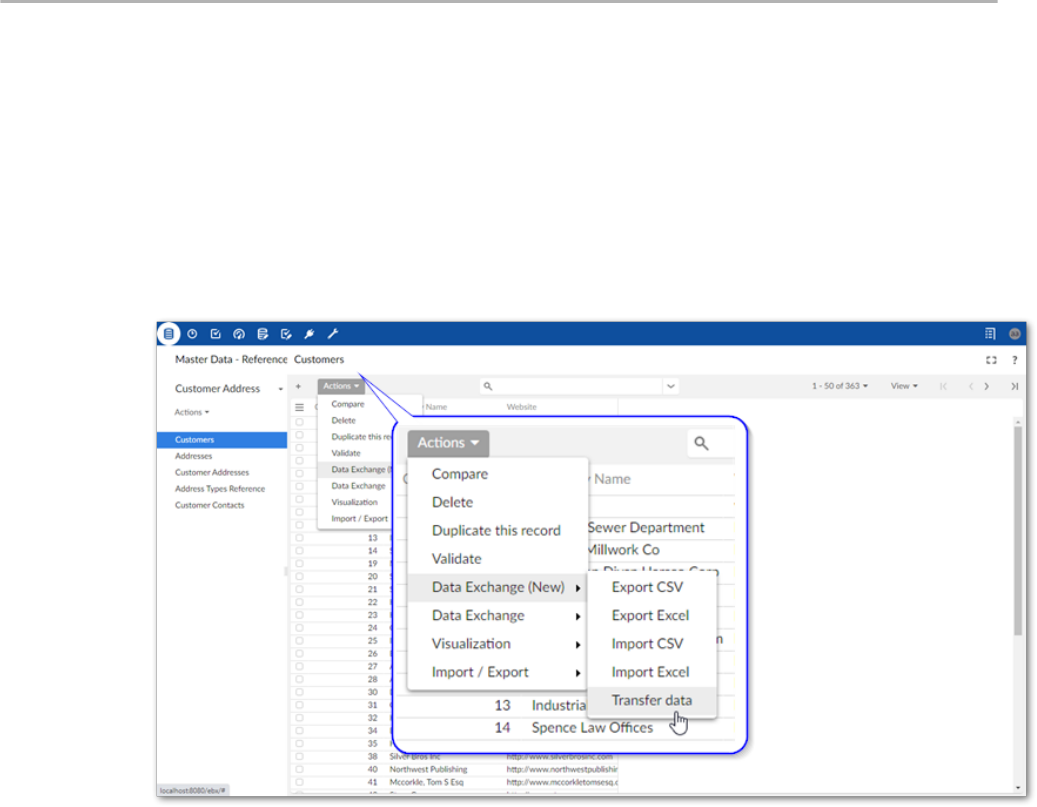
1.
Initiate the transfer process:
1.
Navigate to the table containing the source data you want to transfer.
2.
Initiate the import process from the table by selecting: Actions > Data Exchange (New) >
Transfer data.
2.
Set transfer options:

Documentation > User Guide > Transferring data > Transferring to a table
TIBCO EBX® Data Exchange Add-on (New) 62
1.
The following image and list highlight some of the options when transferring data:
1)
Load template: Optionally, select a template to
populate all data transfer settings and mappings.
Transfer mode: Select the desire transfer mode.
2)
Source: displays the source table information.
3)
Target: Use the menus to select the target table for
this transfer.
4)
Specify whether this transfer: includes computed
values, ignores null and empty values, and checks
empty and null primary keys.
3.
Optionally, update or create mappings:
Note
The following steps provide only high-level mapping instructions. See Mapping
interface reference [p 79] for more detailed information on mapping and
transformations.
1.
Select Mapping to enter the mapping screen where you can update the default data mappings
or add data transformations. The add-on automatically creates mappings where the source
and target have the same labels. A mapping identifies which data is extracted from the source
and where it is extracted to in the target.

Documentation > User Guide > Transferring data > Transferring to a table
TIBCO EBX® Data Exchange Add-on (New) 63
The following image and list describe some features of table and field mapping:
1)
Source (pink) and target (blue) tables: By default,
the data source displays on the left and the target
on the right. Each table header has a label and uses
an icon to show its type and selecting the small
arrow collapses and expands the table. The headers
also have connection points. Drag this top point to
automatically generate mappings between tables.
2)
Mappings: Each line is a mapping. An orange color
and icon indicates there is a warning for a mapping.
Select the icon to view the warning. Drag from
one field's connection point to another to create a
mapping.
3)
Delete selected: To delete a mapping, select it and
then the garbage icon.
4.
Optionally, add transformation functions:
Transformation functions allow you change the source data to meet technical or business
requirements in the target. The add-on ships with several transformation functions that support
common business cases. For more details on how to use transformation functions, see
Mapping interface reference [p 79]. For information on the available transformations and their
descriptions, see Transformation function reference [p 87].
Documentation > User Guide > Transferring data > Transferring to a table
TIBCO EBX® Data Exchange Add-on (New) 64
1.
To add a transformation, select and drag the desired transformation function to the mapping
screen.
2.
Select and drag fields from the source to the function's input (left) and connect the function's
output (right) to target fields.
3.
Double-click the transformation function to edit its parameters. Each function is different,
for a complete list, see Transformation function reference [p 87].
5.
Optionally, select Save to store your settings as a template for re-use. For more information on
using templates, see Using templates [p 71].
6.
Click Transfer data to complete the process.
See also
Map and transform overview [p 76]
Mapping interface reference [p 79]
Export overview [p 36]

Documentation > User Guide > Transferring data > Transferring to multiple tables
TIBCO EBX® Data Exchange Add-on (New) 65
CHAPTER 13
Transferring to multiple tables
To transfer data between multiple EBX® tables:
1.
Initiate the transfer process:
1.
Navigate to the dataset containing the source data you want to transfer.
2.
Initiate the import process from the table by selecting: Actions > Data Exchange (New) >
Transfer data.
2.
Set transfer options:

Documentation > User Guide > Transferring data > Transferring to multiple tables
TIBCO EBX® Data Exchange Add-on (New) 66
1.
The following image and list highlight some of the options when transferring data:
1)
Load template: Optionally, select a template to
populate all data transfer settings and mappings.
Transfer mode: Select the desire transfer mode.
2)
Target: Use the menus to select the target table
for this transfer. You can add additional targets by
selecting the '+' icon in the bottom-left corner of the
target group.
Note
You can add up to 7 target groups at
a time. To add more, you must first
select Save.
3)
Specify whether this transfer: includes computed
values, ignores null and empty values, and checks
empty and null primary keys.

Documentation > User Guide > Transferring data > Transferring to multiple tables
TIBCO EBX® Data Exchange Add-on (New) 67
3.
Optionally, update or create mappings:
Note
The following steps provide only high-level mapping instructions. See Mapping
interface reference [p 79] for more detailed information on mapping and
transformations.
1.
Select Mapping to enter the mapping screen where you can update the default data mappings
or add data transformations. The add-on automatically creates mappings where the source
and target have the same labels. A mapping identifies which data is extracted from the source
and where it is extracted to in the target.

Documentation > User Guide > Transferring data > Transferring to multiple tables
TIBCO EBX® Data Exchange Add-on (New) 68
The following image and list describe some features of table and field mapping:
1) Table mapping tabs
Each tab contains the mappings between a different
pair of source and target tables. The icons to the
right allow you to locate and navigate between
tabs. Additionally, you can create new tabs, and add
any unmapped source and target tables by dragging
them from the Overview box to the mapping pane.
Note that the '+' icon is disabled when all sources
are already included in a mapping tab.
2) Source (pink) and target
(blue) tables
By default, the data source displays on the left and
the target on the right. Each table header has a label
and uses an icon to show its type and selecting the
small arrow collapses and expands the table. The
headers also have connection points. Drag this top
point to automatically generate mappings between
tables.
Please note that:
•
You can use the same source or target only
once in the mapping screen. In other words, you
cannot use a source or target in more than one
table mapping tab.
•
Sources can have multiple targets, but targets
can only have one source.

Documentation > User Guide > Transferring data > Transferring to multiple tables
TIBCO EBX® Data Exchange Add-on (New) 69
3) Mappings
Each line is a mapping. An orange color and icon
indicates there is a warning for a mapping. Select
the icon to view the warning. Drag from one field's
connection point to another to create a mapping. To
delete a mapping, select it and then the trash icon.
4.
Optionally, add transformation functions:
Transformation functions allow you change the source data to meet technical or business
requirements in the target. The add-on ships with several transformation functions that support
common business cases. For more details on how to use transformation functions, see
Mapping interface reference [p 79]. For information on the available transformations and their
descriptions, see Transformation function reference [p 87].
1.
To add a transformation, select and drag the desired transformation function to the mapping
screen.
2.
Select and drag fields from the source to the function's input (left) and connect the function's
output (right) to target fields.
3.
Double-click the transformation function to edit its parameters. Each function is different,
for a complete list, see Transformation function reference [p 87].
5.
Optionally, select Save to store your settings as a template for re-use. For more information on
using templates, see Using templates [p 71].
6.
Click Transfer data to complete the process.
See also
Map and transform overview [p 76]
Mapping interface reference [p 79]
Export overview [p 36]
Documentation > User Guide > Transferring data > Transferring to multiple tables
TIBCO EBX® Data Exchange Add-on (New) 70

Documentation > User Guide > Using templates
TIBCO EBX® Data Exchange Add-on (New) 71
CHAPTER 14
Using templates
The TIBCO EBX® Data Exchange Add-on (New) allows you to store configuration settings in
templates. Each template holds an import, export or data transfer operation's option settings and
mapping details.
The option to save a template is available after entering the Mapping screen. At this point, you already
entered source/target information and specified any format specific options to apply. The add-on auto-
generated mappings where possible. You can save a template with the current configuration, or update
mappings and add transformations before saving. As shown below, to create a template, you specify
a unique name, optional description, owner, and template permissions:
This chapter contains the following topics:
1.
Working with existing templates

Documentation > User Guide > Using templates
TIBCO EBX® Data Exchange Add-on (New) 72
14.1 Working with existing templates
During an import, export, or data transfer operation you can select an existing template using the Load
template field on the Options page. After choosing a template, the add-on automatically populates
the option fields and mappings. You can:
•
Change configuration options.
•
View and update mappings.
•
Initiate the import, export, or transfer operation.
If you have sufficient permission when viewing a template, you can select Update to change template
settings. Additionally, you can create a copy of the current template by selecting Save as. After making
changes, you have the option of removing the original template via the Delete current template
option.
Some changes to configuration settings impact the mappings stored in a template. If you make changes
to settings that impact mappings, or directly change mappings:
•
Select Mapping to open Mapping screen. The add-on prompts you to either accept changes
and automatically update the mappings where possible or revert changes and use the template's
original options and mappings. When in the mapping screen you can make additional
modifications. You can save these changes to the template by selecting Update.
•
Select Import, Export, or Transfer to complete the operation. The add-on prompts you to accept
changes and automatically update mappings or revert changes and use the template's original
mappings. Note: if you confirm or reject, the add-on still proceeds with the import or export

Documentation > User Guide > Using templates
TIBCO EBX® Data Exchange Add-on (New) 73
operation. If you want to cancel, you can select the 'x' in the upper-right corner of the confirmation
dialog as shown below.
Documentation > User Guide > Using templates
TIBCO EBX® Data Exchange Add-on (New) 74

Documentation > User Guide
TIBCO EBX® Data Exchange Add-on (New) 75
Mapping and
transforming data

Documentation > User Guide > Mapping and transforming data > Map and transform overview
TIBCO EBX® Data Exchange Add-on (New) 76
CHAPTER 15
Map and transform overview
This chapter contains the following topics:
1.
Mapping overview
2.
Transformation overview
15.1 Mapping overview
Data integration involves the movement of data from one data store to another. The process requires
data to be directed between a source and target. A goal, and sometimes requirement, is to make the
source data available in the format and structure required by the target. In the context of the add-on,
this goal is addressed using the concept of mapping.
Mapping refers to:
•
The process of specifying the following:
•
Which data is extracted from a data source.
•
The data's destination in the target location.
•
Any required changes, or transformations, to the data along the way.
•
The implementation results of the above process. For example, the mappings between fields in
a source and target table.
See also
Mapping interface reference [p 79]
Import overview [p 16]
Export overview [p 36]
15.2 Transformation overview
Data transformations are added to mappings when types, formatting, or other constraints prevent
successful movement of the data. A transformation makes the data compatible with the structure of
the target.
Transformation types can include:
•
Format changes: converting between technical formats, such as from String to Integer data types.

Documentation > User Guide > Mapping and transforming data > Map and transform overview
TIBCO EBX® Data Exchange Add-on (New) 77
•
Structure changes: changing the data's form. For example, splitting a Full name field into First
Name and Last Name fields.
•
Semantic conversion: converting the value to meet semantic requirements. For example, a source
might use the following codes for states 1, 2, 3, etc. But, the target expects Alabama, Alaska, and
Arizona. You can use a transformation to populate the expected value to the target.
See also
Mapping interface reference [p 79]
Transformation function reference [p 87]
Documentation > User Guide > Mapping and transforming data > Map and transform overview
TIBCO EBX® Data Exchange Add-on (New) 78

Documentation > User Guide > Mapping and transforming data > Mapping interface reference
TIBCO EBX® Data Exchange Add-on (New) 79
CHAPTER 16
Mapping interface reference
This chapter contains the following topics:
1.
Overview
2.
Mapping screen overview
3.
Anatomy of a transformation function
4.
Sample transformation use case
16.1 Overview
When moving data with the add-on, you use the Mapping screen to perform all mapping related tasks,
including those related to transforming data. The following sections describe the user interfaces for
mapping and transformations:
•
Mapping screen overview [p 80]
•
Anatomy of a transformation function [p 82]

Documentation > User Guide > Mapping and transforming data > Mapping interface reference
TIBCO EBX® Data Exchange Add-on (New) 80
16.2 Mapping screen overview
The image below and following list describe elements in the Mapping screen:
1) Overview box
This box shows you which tables are available to add to the
mapping pane and which are currently in the mapping pane.
To add an available table, select and drag it to the mapping
pane.
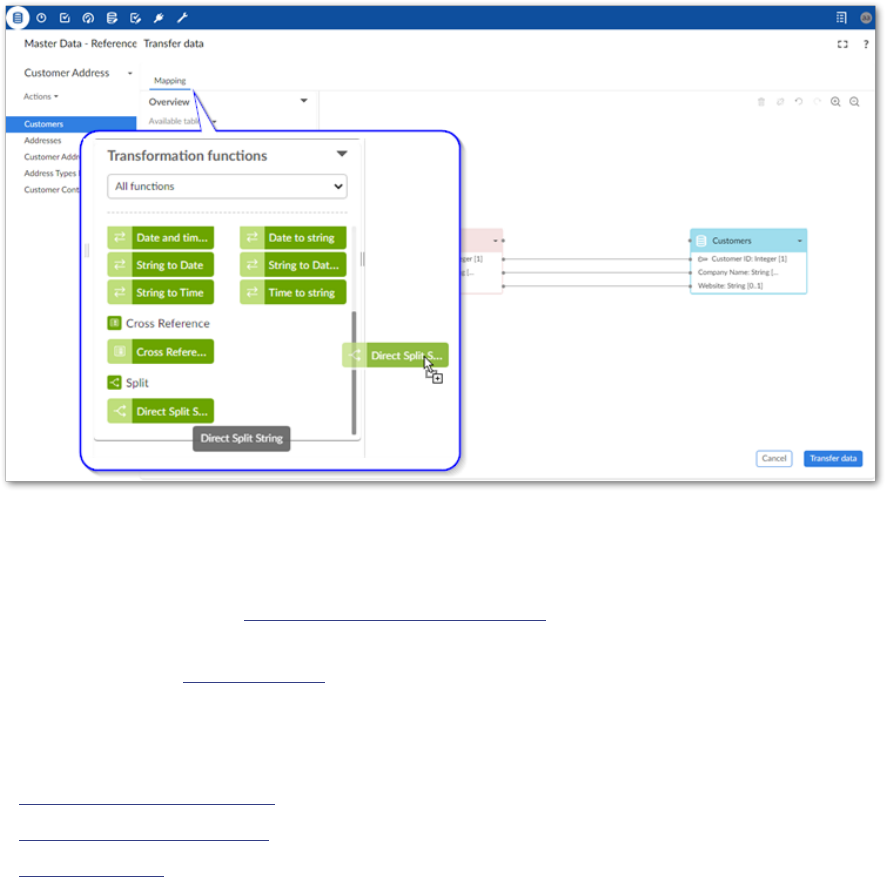
2) Transformation functions
palate
This palate contains all available transformation functions.
To add a function to the mapping pane, select and drag it
over.
3) Mapping pane
The mapping pane shows all tables included in this
operation. To create a mapping, select and drag one
connection point to another. For a mapping to be successful,
it can only be mapped to the same type of component. For
example, table to table and field to field.
4) Button bar
These icons allow you to:
•
Delete selected mappings.
•
Unlink a selected table's mappings.
•
Undo and redo actions in the mapping pane.
•
Zoom in and out.
5) Back to Options, Save as,
Save/Update
These buttons allow you to: return to the Options screen and
save your mapping configuration as a template for later use.

Documentation > User Guide > Mapping and transforming data > Mapping interface reference
TIBCO EBX® Data Exchange Add-on (New) 81
If you make changes to an existing template, select Update
to save the changes.
The image below and following list describe some of the Mapping screen features specific to data
integration with multiple tables:
1 & 3) Table mapping tabs and
navigation
Each tab contains a table mapping. If many tabs make it
difficult to locate the one you want, you can use the icons
to the right to page through the tabs. You can use the
downwards-facing arrow to open the list of all tabs and
select the one you want to view.
Use the '+' icon to add a blank tab. You can then drag
unmapped source and target tables to the Mapping pane to
create mappings. Note that if all sources are mapped, this
option is disabled.
2) Overview box
The paired tables on the selected mapping tab display
normally and the others are slightly obfuscated. Tables that
are not obfuscated can be added to a mapping.
Blue check marks indicate that a table is included in a
mapping.
Select New table to create a new target table. After you
drag it to the mapping pane, you can add fields, mappings,
transformations, etc. This option is only available when
exporting.
Documentation > User Guide > Mapping and transforming data > Mapping interface reference
TIBCO EBX® Data Exchange Add-on (New) 82
16.3 Anatomy of a transformation function
As implied by its name, transformation functions transform data. Their input accepts data from a
source, they operate on this data, and they output the changed data to a target location. One exception
to this behavior is the constant value function which only has an output. As UI components, they
have connection points that allow you to map incoming data from the source to the left-hand side and
outgoing data to the target from the right-hand side.

Documentation > User Guide > Mapping and transforming data > Mapping interface reference
TIBCO EBX® Data Exchange Add-on (New) 83
The image below and following descriptions highlights transformation function options and
components:
1) Input connection points
Each connection point accepts a mapping from one field in
the source. The '-' icon allows you to remove an incoming or
outgoing connection when there are more than the default
number of connections.
Note
Transformation function inputs are always
located on the left-hand side.
2) Output connection points
Each connection point can be mapped to one field in the
target. Note in the image shown above there is only one
point. However, some transformation functions can have
more than one output.
Note
Transformation function outputs are always
located on the right-hand side.
3) Add connection point
The '+' icon allows you to add additional connection points.
Selecting this icon will add points automatically to the
allowable side (input/output).
Available actions:
In addition to the functionality related to adding and
removing connection points, you can double-click to edit
the transformation function's configuration. The options
vary depending on the function. But generally you can
assign names and descriptions to the inputs and outputs.
Additionally, you can edit parameters that determine
certain aspects of the transformation function's behavior.


Documentation > User Guide > Mapping and transforming data > Mapping interface reference
TIBCO EBX® Data Exchange Add-on (New) 85
16.4 Sample transformation use case
The following provides an example of adding a transformation function during the import process to
split a string in the source into multiple target fields:
Action Description
Drag the function from
the Transformation
functions palate to the
mapping pane.
Connect the source
to the input and the
output to the target.
Drag from connection point to connection point. The order you map the connection points can matter.
Transformation functions that split values order the output values from top (first) to bottom (last). So in
this example the source Contact Name field contains names in the following order: 'John Smith'. When
the system splits this string, the first value will be 'John'. So the topmost connection point is mapped to
the First name field in the target. The same order of operations applies to concatenation.

Documentation > User Guide > Mapping and transforming data > Mapping interface reference
TIBCO EBX® Data Exchange Add-on (New) 86
Action Description
Edit the transformation
function.
Double-click to edit the function. Note that the input/output names and descriptions are optional.
Although, it does not display on the screen the important property to note here is the Parameter. A
space has been entered in the Value field.
See also
Mapping interface reference [p 79]
Import overview [p 16]
Export overview [p 36]

Documentation > User Guide > Mapping and transforming data > Transformation function reference
TIBCO EBX® Data Exchange Add-on (New) 87
CHAPTER 17
Transformation function reference
This chapter contains the following topics:
1.
Overview
2.
Format conversion
3.
Structure changing
4.
Semantic conversion
17.1 Overview
The add-on provides several built-in transformation functions. These are designed to cover common
business use cases: format conversion, structure changing, and semantic conversion.
17.2 Format conversion
The following convert the technical format:
Icon Description
The add-on includes the following transformation functions
that convert from one technical format to another:
•
Date and time --> String
•
Date --> String
•
String --> Date
•
String --> Date and time
•
String --> Time
•
Time --> String
Parameters: For each transformation function of this type
you can use the parameter to format the function's output
to meet business requirements. For example, specify that a
date value is output as yyyy-MM-dd or dd-MM-yyyy.

Documentation > User Guide > Mapping and transforming data > Transformation function reference
TIBCO EBX® Data Exchange Add-on (New) 88
17.3 Structure changing
The following functions change the data structure. For example denormalized to normalized.
Icon Description
The add-on includes the following:
Aggregate of integer numbers: takes as integers as input
and outputs the sum of those integers. Parameters: N/A
Concatenate string: takes multiple strings as input and
outputs them joined together as a single string. The output
string is in the same order as the input fields. Parameters:
the value to separate each input string.
Split string: takes a string contained in a single field and
outputs parts of the string to other fields. A delimiter is used
to tell the system how to partition the string. For example,
a full name field might be split into first and last fields
using the space character as a separator. Parameters: the
separator used to determine where the string is split.
17.4 Semantic conversion
The add-on includes:
Icon Description
Constant value: you supply a value which this function
outputs to the given field. Parameters: the data type and
value to output.
Cross reference: looks up the value and outputs a value
contained in a cross reference table. Parameters: the
location of the source and target fields.
Digital asset UUID lookup: takes file names in the
import source, looks up their UUIDs, and attaches the
corresponding digital assets to the target field. Instead of
having to manually open and attach assets to records, this
function allows you to perform a bulk import operation
to attach digital assets. The digital assets must already be
located in a Drive. For instructions on completing this
task, see the TIBCO EBX® Digital Asset Manager Add-on
documentation.

TIBCO EBX® Data Exchange Add-on (New) 89
Release Notes

Documentation > Release Notes > Version 4.4.0
TIBCO EBX® Data Exchange Add-on (New) 90
CHAPTER 18
Version 4.4.0
Released: June 2022
This chapter contains the following topics:
1.
New features
2.
Changes in Functionality
3.
Changes to third-party libraries
4.
Closed Issues
5.
Known Issues
18.1 New features
This release contains the following new features:
•
You can save templates for SQL import and export operations.
•
When importing SQL, you can import from configured database views.
•
When exporting to Excel or CSV at the table level, you can include data from related tables.
•
You can include Primary Key, Foreign Key and Enumeration labels when exporting to CSV, Excel
and SQL. Excel export also allows you to export Static Enumeration labels.
•
You can specify the Date and Date/time formats when importing CSV.
•
You can use the API to create custom transformation functions. These transformation functions
will be available for business users to add to mappings in the user interface.
18.2 Changes in Functionality
This release contains no changes in functionality.
18.3 Changes to third-party libraries
This release contains no changes to third-party libraries.
18.4 Closed Issues
This release contains no closed issues.
Documentation > Release Notes > Version 4.4.0
TIBCO EBX® Data Exchange Add-on (New) 91
18.5 Known Issues
This release contains the following known issues:
•
Importing and exporting SQL: Read and write is not possible with the Timestamp data type with
MS SQL Server.
•
Configuring a schema using the JNDI configuration in your web server is not supported.
•
When creating a custom transformation function, you must use a predefined data type for its input
and output fields.
Documentation > Release Notes > Version 4.4.0
TIBCO EBX® Data Exchange Add-on (New) 92

Documentation > Release Notes > All release notes
TIBCO EBX® Data Exchange Add-on (New) 93
CHAPTER 19
All release notes
This chapter contains the following topics:
1.
Version 4.4.0
2.
Version 4.3.2
3.
Version 4.3.1
4.
Version 4.3.0
5.
Version 4.2.1
6.
Version 4.2.0
7.
Version 4.1.1
8.
Version 4.1.0
9.
Version 4.0.1
10.
Version 4.0.0
19.1 Version 4.4.0
Released: June 2022
New features
This release contains the following new features:
•
You can save templates for SQL import and export operations.
•
When importing SQL, you can import from configured database views.
•
When exporting to Excel or CSV at the table level, you can include data from related tables.
•
You can include Primary Key, Foreign Key and Enumeration labels when exporting to CSV, Excel
and SQL. Excel export also allows you to export Static Enumeration labels.
•
You can specify the Date and Date/time formats when importing CSV.
•
You can use the API to create custom transformation functions. These transformation functions
will be available for business users to add to mappings in the user interface.
Changes in Functionality
This release contains no changes in functionality.
Documentation > Release Notes > All release notes
TIBCO EBX® Data Exchange Add-on (New) 94
Changes to third-party libraries
This release contains no changes to third-party libraries.
Closed Issues
This release contains no closed issues.
Known Issues
This release contains the following known issues:
•
Importing and exporting SQL: Read and write is not possible with the Timestamp data type with
MS SQL Server.
•
Configuring a schema using the JNDI configuration in your web server is not supported.
•
When creating a custom transformation function, you must use a predefined data type for its input
and output fields.
19.2 Version 4.3.2
Released: April 2022
New features
This release contains the following new features:
•
The performance for SQL export was improved.
•
You can now use the API to:
•
Configure import, export, and transfer operations on any table or dataset that is based on the
same data model.
•
Execute the template API at the dataset level.
•
Configure the template API on any dataset based on the same data model.
Changes in Functionality
This release contains no changes in functionality.
Changes to third-party libraries
This release contains no changes to third-party libraries.
Closed Issues
This release contains no closed issues.
Known Issues
This release contains the following known issues:
•
Importing and exporting SQL: Read and write is not possible with the Timestamp data type with
MS SQL Server.
Documentation > Release Notes > All release notes
TIBCO EBX® Data Exchange Add-on (New) 95
•
Configuring a schema using the JNDI configuration in your web server is not supported.
19.3 Version 4.3.1
Released: March 2022
New features
You can now use import, export, and transfer functionality in workflow services and perspective
actions. The add-on specific services and actions begin with [ebx-addon-dint]. There are two options
for each import, export and transfer type—one to apply to tables and one for datasets.
Changes in Functionality
This release contains the following changes in functionality:
•
When saving a template, the position of tables, transformation functions, and links in the
Mapping screen are now stored. When the template is loaded, the components display according
to the state of the most recent save.
•
Template names must now be unique.
Changes to third-party libraries
This release contains no changes to third-party libraries.
Closed Issues
This release contains no closed issues.
Known Issues
This release contains the following known issues:
•
Importing and exporting SQL: Read and write is not possible with the Timestamp data type with
MS SQL Server.
•
Configuring a schema using the JNDI configuration in your web server is not supported.
19.4 Version 4.3.0
Released: February 2022
New features
This release contains the following new features:
•
You can now import from and export to SQL databases. An administrator must configure the
connection to the database and connection between the database and data model. See the User
Guide for more information.
•
The cross-reference transformation function contains the new Ignore lookup failure option.
When enabled, records are imported and exported even when the cross-reference lookup does not
find a corresponding value. If left disabled, records these records are not imported.
Documentation > Release Notes > All release notes
TIBCO EBX® Data Exchange Add-on (New) 96
Changes in Functionality
This release includes the following changes in functionality:
•
Behavior during import at the table level was updated to ensure consistency when importing an
empty file.
•
Templates are now available for use on tables from the same data model, regardless of their
location.
Changes to third-party libraries
This release contains no changes to third-party libraries.
Closed Issues
This release contains no closed issues.
Known Issues
This release contains the following known issues:
•
Importing and exporting SQL: Read and write is not possible with the Timestamp data type with
MS SQL Server.
•
Configuring a schema using the JNDI configuration in your web server is not supported.
19.5 Version 4.2.1
Released: December 2021
New features
This release includes no new features.
Changes in Functionality
This release includes no changes in functionality.
Changes to third-party libraries
This release contains no changes to third-party libraries.
Closed Issues
This release contains the following closed issue: [DINT-2853] Validate table name inputs.
Known Issues
This release contains no known issues.
19.6 Version 4.2.0
Released: November 2021
Documentation > Release Notes > All release notes
TIBCO EBX® Data Exchange Add-on (New) 97
New features
This release includes:
•
Support for multi-table import, export and transfer operations at the dataset level. Additionally,
when exporting from a dataset, you can now add target tables. This allows you to export data
from one table to multiple locations. See the User Guide for more information about this feature.
•
When importing or exporting with Excel, the new List separator option allows you to define a
separator for lists.
Changes in Functionality
This release contains no changes in functionality.
Changes to third-party libraries
This release contains no changes to third-party libraries.
Closed Issues
This release contains no closed issues.
Known Issues
This release contains no known issues.
19.7 Version 4.1.1
Released: September 2021
New features
This release includes no new features.
Changes in Functionality
This release contains no changes in functionality.
Changes to third-party libraries
The Apache Streaming Excel Reader library was upgraded to version 3.1.1.
Closed Issues
This release contains the following closed issue: [DINT-2589] An exception is thrown when multiple
cross reference transformations are used in a TableMapping.
Known Issues
This release contains no known issues.
Documentation > Release Notes > All release notes
TIBCO EBX® Data Exchange Add-on (New) 98
19.8 Version 4.1.0
Released: July 2021
New features
This release includes the following new features:
•
You can now transfer data between EBX® tables.
•
When exporting, you can now add, edit, and remove target fields in the Mapping screen.
•
When working with templates, you can now:
•
Set user permissions to view, modify and delete templates.
•
Save copies of templates.
•
The new Digital asset UUID lookup transformation function allows you to perform a bulk import
operation to attach digital assets to records. Note that instructions for this process are contained
in the TIBCO EBX® Digital Asset Manager Add-on documentation.
•
A public API has been provided that allows you to import, export and transfer data. See the Java
API documentation for more information.
•
Tables in the Mapping screen now display data type and cardinality next to each field.
Changes in Functionality
This release contains no changes in functionality.
Closed Issues
This release contains no closed issues.
Known Issues
This release contains no known issues.
19.9 Version 4.0.1
Updates
Released: June 2021
This release contains the following updates:
•
The First row contains header label was changed to Include column headers for Excel export
and Includes column headers for Excel import. When selecting Yes for this option during import,
you are now prompted to enter the starting location of table data.
•
When exporting Excel the two rows at the beginning of the file were removed.
•
The following library updates were made:
•
The Apache Commons BeanUtils library was upgraded to version 1.9.4.
•
The Apache CFX and HttpClient libraries were removed.
Documentation > Release Notes > All release notes
TIBCO EBX® Data Exchange Add-on (New) 99
Bug Fixes
[DINT-2261] A documentation issue was corrected.
19.10 Version 4.0.0
New features
Released: March 2021
The TIBCO EBX® Data Exchange Add-on (New) allows you to integrate data from a source location
into a target. Additionally, it can transform the data to meet business and technical requirements of
disparate applications and systems.
This release allows you to import and export using CSV and Excel formats at the TIBCO EBX® table
level. No configuration is required to initiate an import or export operation. The add-on provides the
following graphical elements and features to support import and export:
•
Automatic mappings are generated between source and target fields. Data mappings display as
lines between source and targets. Where possible, the add-on generates these automatically and
adds basic transformations if required. It will also alert you visually to possible errors or warnings.
•
Drag and drop functionality to create mappings and transformations when required.
•
Pop-up editors to define transformation functions. The add-on includes several built-in
transformation functions to cover common use cases.
•
Templates that save mappings and other configuration options for reuse.

Documentation > Release Notes > All release notes
TIBCO EBX® Data Exchange Add-on (New) 100
The following list provides links to additional topics and tasks:
Introduction to the add-on
For a more in-depth overview of the add-on and your
potential interaction with it, see About the TIBCO EBX®
Data Exchange Add-on (New) [p 8]
Importing
For an introduction to the import process, see Import
overview [p 16].
For instructions on importing, see Importing to a table [p 17].
Exporting
For an introduction to the export process, see Export
overview [p 36].
For instructions on exporting, see Exporting a table [p 37].
Mapping and transformations
Map and transform overview [p 76] provides a look at
how the add-on implements the concepts of mappings and
transformations.
Mapping interface reference [p 79] highlights the user
interface used for mapping and transformation tasks during
data integration. Additionally, it provides an example of
using a transformation function.
You can refer to Transformation function reference [p
87] to see a list and description of the add-on's built-in
transformation functions.
