
TIBCO EBX® Data Exchange Add-
on (New)
Version 6.1.4
June 2024

TIBCO EBX® Data Exchange Add-on (New) 3
Table of contents
Administrator Guide
1. Connecting to external data sources............................................................................................................... 8
2. Enabling data integration in workflows and perspectives............................................................................ 11
3. Creating custom date and date/time patterns................................................................................................13
4. Setting default options for services.............................................................................................................. 17
5. Setting permissions....................................................................................................................................... 19

TIBCO EBX® Data Exchange Add-on (New) 4
User Guide
6. About the add-on...........................................................................................................................................22
Importing data
7. Import overview....................................................................................................................................... 26
8. Importing to a table................................................................................................................................. 27
9. Importing to multiple tables.................................................................................................................... 37
Exporting data
10. Export overview..................................................................................................................................... 48
11. Exporting a table....................................................................................................................................49
12. Exporting multiple tables.......................................................................................................................55
13. Exporting labels and related data.......................................................................................................... 63
Transferring data
14. Transfer overview.................................................................................................................................. 70
15. Transferring to a table............................................................................................................................71
16. Transferring to multiple tables...............................................................................................................75
17. Using templates........................................................................................................................................... 81
18. Handling special characters........................................................................................................................ 83
Mapping and transforming data
19. Map and transform overview.................................................................................................................86
20. Mapping interface reference.................................................................................................................. 89
21. Transformation function reference.........................................................................................................97

TIBCO EBX® Data Exchange Add-on (New) 5
Notices
22. Documentation and Support......................................................................................................................102
23. Legal and Third-Party............................................................................................................................... 105

TIBCO EBX® Data Exchange Add-on (New) 6
Release Notes
24. Version 6.1.4..............................................................................................................................................108
25. All release notes........................................................................................................................................111

TIBCO EBX® Data Exchange Add-on (New) 7
Administrator
Guide

Documentation > Administrator Guide > Connecting to external data sources
TIBCO EBX® Data Exchange Add-on (New) 8
CHAPTER 1
Connecting to external data sources
This chapter contains the following topics:
1.
Overview
2.
Configuring a database connection
3.
Connecting a database and data model
1.1 Overview
An administrator can create connections that enable data integration with external data sources, such as
databases. The add-on can also connect to TIBCO Data Virtualization (TDV) where multiple databases
can be combined into views. In addition to the external data source connection, an administrator must
configure a connection between the database and data model. This ensures that end users can only
integrate data between a given data model and its approved data sources and targets.
To successfully complete these tasks, start with the database connection information configuration [p
8]. This is a prerequisite for connecting a database and data model [p 9].
1.2 Configuring a database connection
This section describes how to create a connection with a database, or TDV to enable data integration.
Attention
Prior to configuring a database connection, the correct JDBC driver must be deployed on your
TIBCO EBX® server.
To connect to a database or TDV:
1.
In the Administration panel, select TIBCO EBX® Data Exchange Add-on (New).
2.
From the Reference data group, select the Databases table and create a new record.
3.
Supply the required information:
•
Name: The name used to identify this connection.
•
URL: The URL used by the database for incoming connections. When using:
•
The External system authentication method, enter the URL for AWS.
•
The Direct authentication method, enter the URL specific to your database. For example:
Documentation > Administrator Guide > Connecting to external data sources
TIBCO EBX® Data Exchange Add-on (New) 9
•
MsSQL: jdbc:sqlserver://<server>:<port>;databaseName=<databaseName>
•
Oracle: jdbc:oracle:<drivertype>:@<server>:<port>:<databaseName>
•
Postgresql: jdbc:postgresql://<server>:<port>/<databaseName>
•
TDV: jdbc:compositesw:dbapi@<server name>:<port>?domain=<domain
name>&dataSource=<datasource name>
•
Authentication: Sets the authentication type for this connection. A direct connection uses a
username and password; external system requires an access key.
•
Username and Password: The login credentials for this database connection. If database
access is granted through Windows permissions, enter those credentials here.
•
Access key: The access key required to access the external database.
4.
Optionally, test the connection.
5.
Save and close.
This connection information is now available to use when connecting a database with a data
model.
1.3 Connecting a database and data model
The option to import or export SQL is not available to end users until an administrator configures a
connection between a database and a data model. To connect a database with a data model:
1.
In the Administration panel, select TIBCO EBX® Data Exchange Add-on (New).
2.
From the Reference data group, select Database to data model connections and create a new
record.
3.
Supply the following information:
•
Database: Select the database from the dropdown menu. This list populates with databases
that you provided connection information for using the Databases table.
•
Data model: Select the data model to enable import and export between it and the selected
database.
•
Optionally, provide a Table name pattern, Schema name pattern, and Description.
4.
Save and close.
Users that have access to data in the specified data model can use the SQL Import and SQL
Export services integrate data between the tables in the connected database and EBX®.
Documentation > Administrator Guide > Connecting to external data sources
TIBCO EBX® Data Exchange Add-on (New) 10

Documentation > Administrator Guide > Enabling data integration in workflows and perspectives
TIBCO EBX® Data Exchange Add-on (New) 11
CHAPTER 2
Enabling data integration in
workflows and perspectives
Administrators can enable add-on import, export, and transfer functionality in workflows and
perspectives. These actions are available as services and actions in workflows and perspectives,
respectively. See the EBX® product documentation for more information on working with
perspectives and workflows.
To enable data integration in a perspective or workflow:
1.
When configuring a:
•
Perspective: select the appropriate action from the drop-down menu.
The add-on specific actions begin with [ebx-addon-dint]. There are two options for each
import, export and transfer type. This allows you to specify whether the action applies to the
selected table, or dataset.
•
Workflow: select the appropriate service from the drop-down menu.
Documentation > Administrator Guide > Enabling data integration in workflows and perspectives
TIBCO EBX® Data Exchange Add-on (New) 12
The add-on specific actions begin with [ebx-addon-dint]. There are two options for each
import, export and transfer type. This allows you to specify whether the action applies to the
selected table, or dataset.
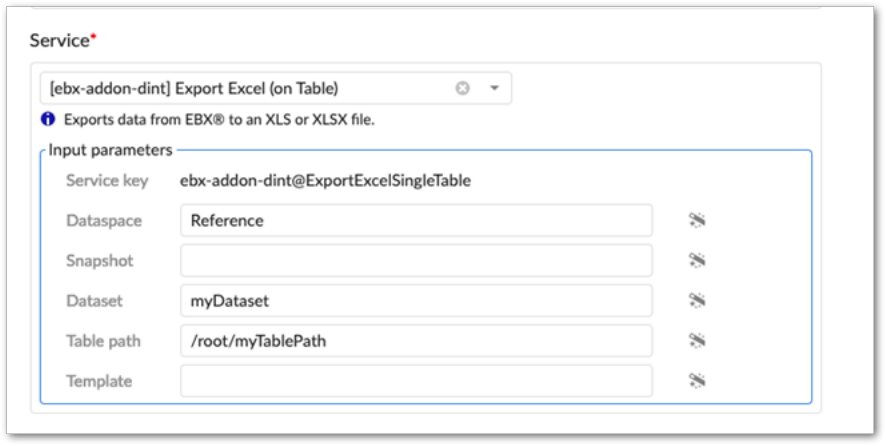
2.
Use the required Input parameters to specify the location where you want to service or action
to be active.
3.
Optionally, specify a Template parameter.
If you specify a template, users cannot change the template during import, export, or transfer.
Additionally, you might want to keep in mind that not all users can access each template.
4.
Complete remaining workflow or perspective configuration steps. See the EBX® product
documentation for more information on creating workflows and perspectives and how they work.

Documentation > Administrator Guide > Creating custom date and date/time patterns
TIBCO EBX® Data Exchange Add-on (New) 13
CHAPTER 3
Creating custom date and date/time
patterns
This chapter contains the following topics:
1.
Overview
3.1 Overview
In some cases when importing, the date or date/time format in the source is not compatible with
the target. The add-on allows administrators to create custom formats for CSV import and export to
overcome the compatibility issue.
Creating a custom pattern
To create a custom pattern:
1.
Navigate to Administration > TIBCO EBX® Data Exchange Add-on (New) > Reference data >
Date time pattern.
2.
Create a new record.
3.
Choose the application type.
4.
Enter the pattern.
See Date pattern reference [p 13] for date pattern definitions and output information. See Time
pattern reference [p 14] for time pattern definitions and output information.
Attention
The table will not accept duplicates.
5.
Select the pattern type.
6.
Save and close.
Date pattern reference
A date pattern must adhere to the following:
•
It can only include the following characters: G, y, M, w, W, D, d, F, E, u

Documentation > Administrator Guide > Creating custom date and date/time patterns
TIBCO EBX® Data Exchange Add-on (New) 14
•
It can only include the following special characters surrounded with double quotes: space, /, -, |, :,;
•
Any other characters must be surrounded with single quotes. For example: '#'
•
It cannot begin with the space character.
Note
A date/time pattern can utilize the allowed characters for both the date and time patterns.
The following table provides a description of the date pattern parameters:
Symbol Definition
Pattern/Output
G Era designator GG/AD
y Year yy/96
yyyy/1996
M Month in year MM/07
MMM/Jul
MMMM/July
W Week in year W/27
D Day number in year D/189
d Day number in month d/9
dd/09
F Day of week in month F/2 (2nd Wednesday in July)
E Day of week (name) E, EE, or EEE/Tue
EEEE/Tuesday
EEEEE/T
EEEEEE/Tu
u
Day number in week
1/Monday
2/Tuesday
Time pattern reference
A date pattern must adhere to the following:
•
It can only include the following characters: a, H, k, K, h, m, s, S, z, Z, X
•
It can only include the following special characters surrounded with double quotes: space, /, -, |, :,;
•
Any other characters must be surrounded with single quotes. For example: '#'

Documentation > Administrator Guide > Creating custom date and date/time patterns
TIBCO EBX® Data Exchange Add-on (New) 15
•
It cannot begin with the space character.
Note
A date/time pattern can utilize the allowed characters for both the date and time patterns.
The following table provides a description of the time pattern parameters:
Symbol Definition
Pattern/Output
a AM/PM designation a/PM
H Hour in the day Hour in the day
(0-23)
H/0
HH/00
k Hour in the day (1-24) k/24
kk/24
K Hour in am/pm for 12 hour format
(0-11)
K/0
KK/00
h Hour in am/pm for 12 hour format
(1-12)
h/7
hh/07
m Hour in am/pm for 12 hour format
(1-12)
m/4
mm/04
s Second in the minute s/3
ss/03
S Second in the minute S/2
SS/22
SSS/225
SSSS/2250
z Timezone z, zz, zzz/PST
zzzz/Pacific Standard Time
Z Timezone offset in hours (RFC
pattern)
-0800
X Timezone offset in ISO format -08; -0800; -08:00
Documentation > Administrator Guide > Creating custom date and date/time patterns
TIBCO EBX® Data Exchange Add-on (New) 16

Documentation > Administrator Guide > Setting default options for services
TIBCO EBX® Data Exchange Add-on (New) 17
CHAPTER 4
Setting default options for services
To set the default options for the add-on's import, export, and transfer services:
1.
Navigate to Administration > Integration > TIBCO EBX® Data Exchange Add-on (New) >
Additional configuration > Default option values and select either Import/Export, or Transfer.
2.
Open the table's record and use the tabs at the top to select the format to edit.
Note
The options that users can select during import, export, and transfer operations for
the Date format and Date/time format properties are created in the Date time
pattern table. Use the icon to access this table and edit the default pattern.
3.
After setting the new default options, save your changes.
To migrate default options between different environments:
1.
Select the desired table in the following location: Administration > Integration > TIBCO EBX®
Data Exchange Add-on (New) > Additional configuration > Default option values.
2.
Open the table's Actions menu and select Export XML.
3.
Adjust the export options to meet your requirements and select Export.
4.
In the target environment, open the table's Actions menu and select Import XML.
5.
After selecting the file to import from, make any needed adjustments to the import options and
select Import.
Note
Default options are not available to migrate using the TIBCO EBX® staging feature.
Documentation > Administrator Guide > Setting default options for services
TIBCO EBX® Data Exchange Add-on (New) 18

Documentation > Administrator Guide > Setting permissions
TIBCO EBX® Data Exchange Add-on (New) 19
CHAPTER 5
Setting permissions
Administrators can apply EBX® permissions to a profile, which is associated with either a user or a
role. Each user can have multiple roles, and each role can include multiple users. If more than one set
of permissions is associated with the same profile, the Restrictive policy setting determines whether
the least restrictive or most restrictive policy settings apply. The EBX Data Exchange Add-on (New)
allows you to leverage EBX® behavior related to permissions and apply it to the act of exchanging
data.
Permissions for users and roles determine:
•
access and interaction with import, export, and transfer screens. By default, all users can access
the Options, Mapping, and Simulation screens. Administrators can specify that these pages are
read-only accessible, or hidden from specific user profiles.
•
access to the modes users can choose when importing and transferring data. The modes determine
whether an import or transfer operation updates, inserts, or deletes data in the target location.
To set import and export permissions:
1.
Navigate to Administration > Integration > TIBCO EBX® Data Exchange Add-on (New) >
Additional configuration > Global permission and create a new record.
2.
On the Main tab you specify which profile these configuration settings will apply to and whether
this will be considered a restrictive policy. If the Restriction policy option is enabled, the settings
in this configuration are applied wherever they are more restrictive than others.
3.
Use the remaining tabs to set permissions for each data exchange import, export, and transfer
format. Note that if you choose the Write permission level for either Service options or Mapping,
you must also set the other to the same Write permission level.
Documentation > Administrator Guide > Setting permissions
TIBCO EBX® Data Exchange Add-on (New) 20

TIBCO EBX® Data Exchange Add-on (New) 21
User Guide

Documentation > User Guide > About the add-on
TIBCO EBX® Data Exchange Add-on (New) 22
CHAPTER 6
About the add-on
This chapter contains the following topics:
1.
Overview
2.
Data transformation overview
3.
Your role with the add-on
4.
What's next?
6.1 Overview
The TIBCO EBX® Data Exchange Add-on (New) enables integration and transformation of data from
one data store to another. The current version of the add-on can:
•
Import and export data between tables in your TIBCO EBX® repository and external files.
•
Transfer data between tables within your EBX® repository.
•
Import and export data between tables in your EBX® repository and SQL databases.
6.2 Data transformation overview
When requirements between your data source and target differ, you can use the add-on's transformation
functions to reconcile the differences. These transformations provide the flexibility to change data
values and convert data format between sources and targets. For example, a source might use the
following codes for states 1, 2, 3, etc. But, the target expects Alabama, Alaska, and Arizona. You can
use a transformation to populate the target with the expected value.

Documentation > User Guide > About the add-on
TIBCO EBX® Data Exchange Add-on (New) 23
6.3 Your role with the add-on
As a business user you interaction with the add-on likely includes the tasks outlined in the following
image:
Note
Where you access data integration services determines the source for exports and targets
for imports.

Documentation > User Guide > About the add-on
TIBCO EBX® Data Exchange Add-on (New) 24
6.4 What's next?
The following table outlines the topics covered in the documentation sections:
Importing
For an introduction to the import process, see Import
overview [p 26].
For instructions on importing, see Importing to a table [p
27].
Exporting
For an introduction to the export process, see Export
overview [p 48].
For instructions on exporting, see Exporting a table [p 49].
Data transfer
For an introduction to the transfer process, see Transfer
overview [p 70].
For instructions on transferring data, see Transferring to a
table [p 71].
Mapping and transformations
Map and transform overview [p 86] provides a look at
how the add-on implements the concepts of mappings and
transformations.
Mapping interface reference [p 89] highlights the user
interface used for mapping and transformation tasks during
data integration. Additionally, it provides an example of
using a transformation function.
You can refer to Transformation function reference [p
97] to see a list and description of the add-on's built-in
transformation functions.

Documentation > User Guide
TIBCO EBX® Data Exchange Add-on (New) 25
Importing data

Documentation > User Guide > Importing data > Import overview
TIBCO EBX® Data Exchange Add-on (New) 26
CHAPTER 7
Import overview
The services provided by the add-on allow you to import data from source locations outside of EBX®
to your repository. The location you initiate the import from determines the target for the import. For
instance, running the import service from a table's Actions menu, sets the table as the target. Running
the service from a dataset's Actions menu sets its tables as the targets. Overall, steps to complete these
procedures are the same, except some details such as mapping differ. As outlined below, the import
process includes:
•
Selecting the source data. Currently supported source formats include XLS, XLSX, CSV and
SQL. Importing from SQL is supported at the table level only and requires administrative
configuration [p 8].
•
Defining any required mappings or transformations. The add-on automatically maps source fields
with those in the target that have the same name. If required, you can use the add-on's drag-n-drop
functionality to create or update mappings. If you want to apply transformations to your data, you
can use built-in functions to modify data during import. For more information on the topics of
mapping and transformations, see Map and transform overview [p 86].
•
Optionally, running a simulation to preview the import result. This allows you to update or fix
your data before the import to prevent any potential errors.
•
Saving settings as a template for later reuse. When import operations require the use of
transformations or custom mappings, you can use templates to store these settings. This alleviates
you from having to redo the same tasks each time you perform a specific import.
See also
Importing to a table [p 27]
Map and transform overview [p 86]
Mapping interface reference [p 89]
Export overview [p 48]
Documentation > User Guide > Importing data > Importing to a table
TIBCO EBX® Data Exchange Add-on (New) 27
CHAPTER 8
Importing to a table
To import data from a CSV file, Excel file, or SQL data source to an individual table:
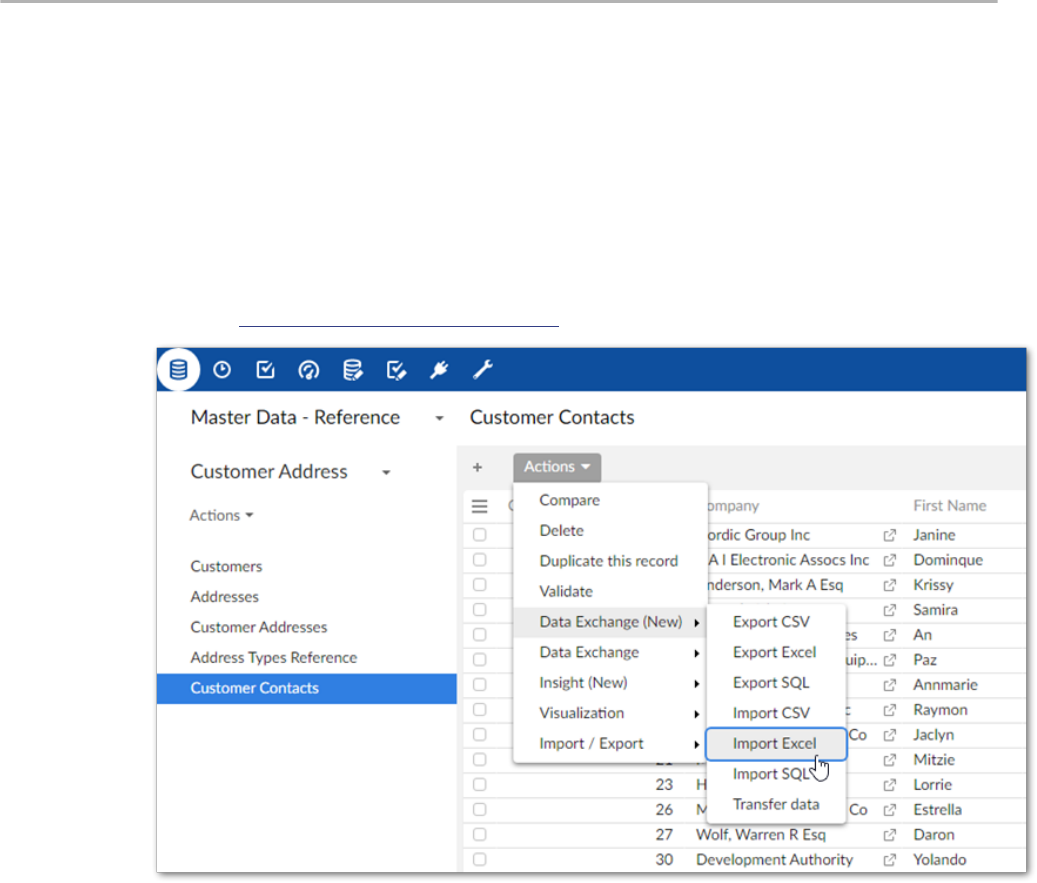
1.
Initiate the import process:
1.
Navigate to the table you want to use as the target.
2.
Initiate the import process from the table by selecting Actions > Data Exchange (New) and
one of the following options: Import CSV, Import Excel, or Import SQL. Administrators
must configure the available SQL sources [p 8] to enable the SQL import option.
2.
Choose the data source:
•
For CSV and Excel: Browse to select the file containing the source data for the import and
optionally the template to use.
•
For SQL: Use the SQL data source and SQL table dropdown menus to select the source
table or view for the import.
3.
Optionally, use the Load template option to select any previously saved template to load its
configuration and mapping options. After loading, you still have the ability to make changes
Documentation > User Guide > Importing data > Importing to a table
TIBCO EBX® Data Exchange Add-on (New) 28
to options. Note that changes to certain import options will impact the template's mappings.
Depending on the circumstances, the add-on can automatically create default mappings. In other
cases you might have to update mappings and transformations manually.
4.
Update format-specific options:

Documentation > User Guide > Importing data > Importing to a table
TIBCO EBX® Data Exchange Add-on (New) 29
1.
The following image and list highlight some of the options when importing from Excel:
1) Data table starts at and
Includes column headers:
Data table starts at: Specifies the location in the
spreadsheet where the data table begins.
Includes column headers: Use this option to
indicate whether the data table contains a header
row at the position specified by the Data table
starts at property. The add-on will match the text
in the first row of each source column with the field
labels in the target location. Automatic mappings
are generated when the values in the source and
target match. When this option is set to No, the add-
on maps columns sequentially. It begins by mapping
the first column in the source with the first column
in the target and so forth until one or both run out
of columns.
2) Advanced options:
Import mode: Specifies how target data is updated.
See the tooltip in the UI for descriptions of each
mode.
Note
Depending on your deployment
environment's resources, you might
have issues using the Insert only and
Delete only modes when importing
a large volume of data. If this issue
occurs, use any of the other import
modes.

Documentation > User Guide > Importing data > Importing to a table
TIBCO EBX® Data Exchange Add-on (New) 30
Case-sensitive label comparison: Determines
whether the add-on pays attention to letter case
when matching the labels in the source and target.
Ignore empty or null values: Determines whether
existing records are updated with empty or null
values from the imported file.
Check empty and null primary keys: Specifies
whether all primary keys are matched and validated
between source and target. This option is enabled
by default.

Documentation > User Guide > Importing data > Importing to a table
TIBCO EBX® Data Exchange Add-on (New) 31
2.
The following image and list highlight some of the options when importing from CSV:
1)
Basic options: The data source for this import
operation.
Includes column headers: Use this option to
indicate whether the data table contains a header
row at the position specified by the Data table
starts at property. The add-on will match the text
in the first row of each source column with the field
labels in the target location. Automatic mappings
are generated when the values in the source and
target match. When this option is set to No, the add-
on maps columns sequentially. It begins by mapping
the first column in the source with the first column
in the target and so forth until one or both run out
of columns.
Field separator: The value used by the source file
to denote a field.
List separator: The value used by the source file
to denote a list.
Cell delimiter: The value used by the source file to
denote the beginning and end of a cell in the source
file.
2)
Advanced options:
Import mode: Specifies how target data is updated.

Documentation > User Guide > Importing data > Importing to a table
TIBCO EBX® Data Exchange Add-on (New) 32
Case-sensitive label comparison: Determines
whether the add-on pays attention to letter case
when matching the labels in the source and target.
Decimal symbol: Specifies how the source file
represents the decimal symbol.
Ignore empty or null values: Specifies whether to
import values that are null or empty.
Check empty and null primary keys: Specifies
whether all primary keys are matched and validated
between source and target. This option is enabled
by default.
3.
The following image and list highlight some of the options when importing from SQL:
•
Import mode: Specifies how target data is updated. Use the property's tooltip for more
information about import modes.
•
Ignore empty or null values: Specifies whether to import values that are null or empty.
•
Check empty and null primary keys: Specifies whether all primary keys are matched and
validated between source and target. This option is enabled by default.
5.
Optionally, run an import simulation to preview the import result:
1.
Click Simulation at the bottom of the screen. Note, this option is also available from the
mapping screen.
2.
Configure the simulation options as desired. Select the '?' icon next to the configuration
options and message categories in the report to view their description.
3.
and click Run simulation to begin.
The report shows messages at the error, warning, and information levels. However, please
note that the simulation does not take table triggers into account.

Documentation > User Guide > Importing data > Importing to a table
TIBCO EBX® Data Exchange Add-on (New) 33
6.
Create mappings, or optionally update existing ones:
Note
The following steps provide only high-level mapping instructions. See Mapping
interface reference [p 89] for more detailed information on mapping and
transformations.
1.
Select Mapping to enter the mapping screen where you can update the default data mappings
or add data transformations. For Excel and CSV import, the add-on automatically creates
mappings where the source and target have the same labels. For SQL import, mappings are
automatically created when the label and data type match. A mapping identifies which data
is extracted from the source and where it is extracted to in the target.
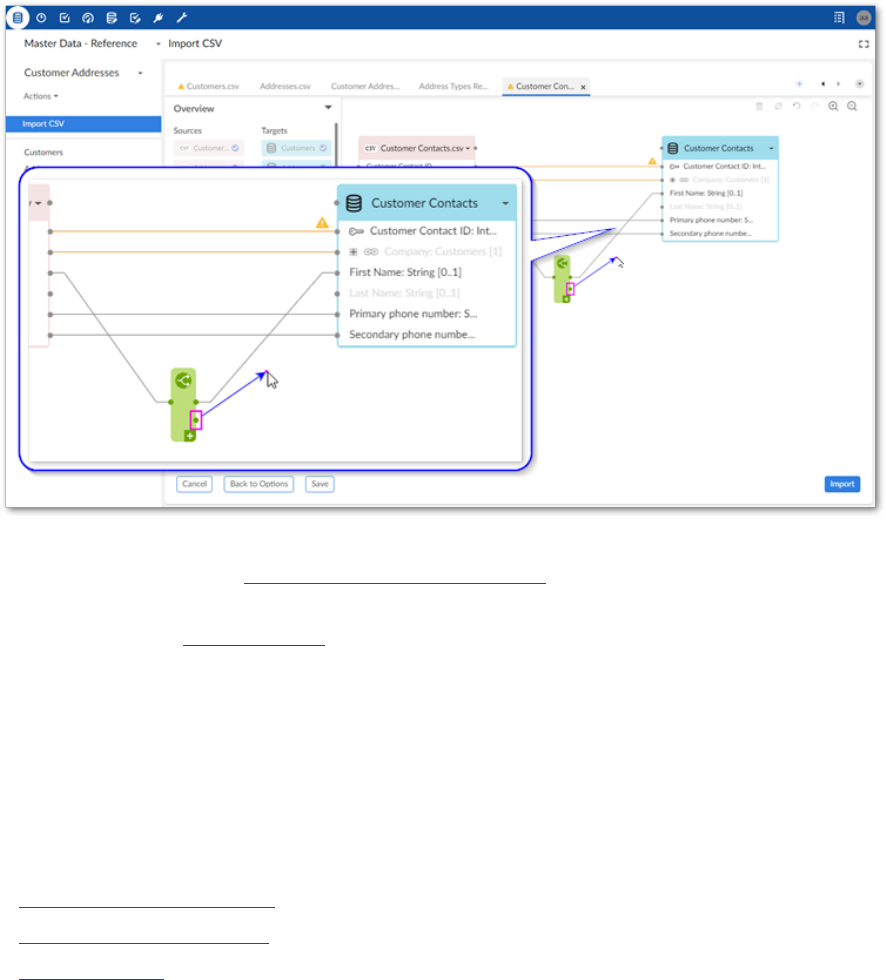
The following image and list describe some features of table and field mapping:
1)
Source (pink) and target (blue) tables: By default,
the data source displays on the left and the target
on the right. Each table header has a label and uses
an icon to show its type and selecting the small
arrow collapses and expands the table. The headers
also have connection points. Drag this top point to
automatically generate mappings between tables.
2)
Mappings: Each line is a mapping. An orange color
and icon indicates there is a warning for a mapping.
Select the icon to view the warning. Drag from
one field's connection point to another to create a
mapping.
3)
Delete selected: To delete a mapping, select it and
then the garbage icon.

Documentation > User Guide > Importing data > Importing to a table
TIBCO EBX® Data Exchange Add-on (New) 34
7.
Optionally, add transformation functions:
Transformation functions allow you change the source data to meet technical or business
requirements in the target. The add-on ships with several transformation functions that support
common business cases. The available API also allows you to implement custom transformation
functions. For more details on how to use transformation functions, see Mapping interface
reference [p 89]. For information on the available transformations and their descriptions, see
Transformation function reference [p 97].
1.
To add a transformation, select and drag the desired transformation function to the mapping
screen.
2.
Select and drag fields from the source to the function's input (left) and connect the function's
output (right) to target fields.
3.
Double-click the transformation function to edit its parameters. Each function is different,
for a complete list, see Transformation function reference [p 97].

Documentation > User Guide > Importing data > Importing to a table
TIBCO EBX® Data Exchange Add-on (New) 35
8.
Optionally, select Save to store your settings as a template for re-use. For more information on
using templates, see Using templates [p 81].
9.
Click Import to complete the process.
If errors prevent any of the records from importing correctly, the add-on presents you with
the option of downloading an Excel file containing the invalid data. Depending on your
circumstances, you can correct the data directly in the file and re-import it.
See also
Map and transform overview [p 86]
Mapping interface reference [p 89]
Export overview [p 48]
Documentation > User Guide > Importing data > Importing to a table
TIBCO EBX® Data Exchange Add-on (New) 36

Documentation > User Guide > Importing data > Importing to multiple tables
TIBCO EBX® Data Exchange Add-on (New) 37
CHAPTER 9
Importing to multiple tables
To import data from an archive of CSV files or an Excel file to multiple tables in a dataset:
1.
Initiate the import process:
1.
Navigate to the dataset that contains the target tables.
2.
Initiate the import process from the dataset by selecting: Actions > Data Exchange (New) >
Import CSV or Import Excel.
2.
Browse to select the file containing the source data for the import.
After selecting the file, additional options display.
3.
Optionally, select any previously saved template to load its configuration and mapping options.
After loading, you can still make changes to configuration options. Changes to some import
options impact the template's mappings. Depending on the circumstances, the add-on can
automatically create default mappings. In other cases you might have to update mappings and
transformations manually.
4.
Update format-specific options:

Documentation > User Guide > Importing data > Importing to multiple tables
TIBCO EBX® Data Exchange Add-on (New) 38
1.
The following image and list highlight some of the options when importing from Excel:
1) Includes column headers:
Use this option to indicate whether the data tables
contain a header row. The starting position of the
data is specified below in the Select source/target
tables option. The add-on will match the text in
the first (header) row of each source column with
the field labels in the target location. The add-on
automatically generates links between tables when
the values in the source and target match. When
this option is set to No, the add-on maps columns
sequentially. It begins by mapping the first column
in the source with the first column in the target and
so forth until one or both run out of columns.
2) Advanced options:
Import mode: Specifies how target data is updated.
See the tooltip in the UI for descriptions of each
mode.
Note
Depending on your deployment
environment's resources, you might
have issues using the Insert only and
Delete only modes when importing
a large volume of data. If this issue

Documentation > User Guide > Importing data > Importing to multiple tables
TIBCO EBX® Data Exchange Add-on (New) 39
occurs, use any of the other import
modes.
List separator: Specifies the character used in the
source file to separate lists.
Case-sensitive label comparison: Determines
whether the add-on pays attention to letter case
when matching the labels in the source and target.
Ignore empty or null values: By default, existing
records are not updated with empty or null values
from the imported file. Disable this option to update
the target with these values.
Check empty and null primary keys: Specifies
whether all primary keys are matched and validated
between source and target. This option is enabled
by default.
Ignore table failure: Ensures that when one or
more tables fails to import, the system still imports
valid tables from the dataset. When disabled, the
system rolls back all data when it fails to import a
single table.
3) Select source/target
tables
Determines the tables to import from the source,
specifies the data starting point for each source
table, and sets the target tables. Where possible,
the add-on automatically pairs source and target
tables. Deselect any sources that you want to
exclude. If a source table is included, it must have a
corresponding target table selection. Add multiple
targets to a source to import the same data to
multiple tables.
Note
You can add a maximum of 20 target
tables.

Documentation > User Guide > Importing data > Importing to multiple tables
TIBCO EBX® Data Exchange Add-on (New) 40
2.
The following image and list highlight some of the options when importing from CSV:
1) Basic options:
Includes column headers: Use this option to
indicate whether the data table contains a header
row at the position specified by the Data table
starts at property. The add-on will match the text
in the first row of each source column with the field
labels in the target location. Automatic mappings
are generated when the values in the source and
target match. When this option is set to No, the add-
on maps columns sequentially. It begins by mapping
the first column in the source with the first column
in the target and so forth until one or both run out
of columns.
Field separator: The value used by the source file
to denote a field.
List separator: The value used by the source file
to denote a list.
Cell delimiter: The value used by the source file to
denote the beginning and end of a cell in the source
file.
2) Advanced options:
Import mode: Specifies how target data is updated.

Documentation > User Guide > Importing data > Importing to multiple tables
TIBCO EBX® Data Exchange Add-on (New) 41
Case-sensitive label comparison: Determines
whether the add-on pays attention to letter case
when matching the labels in the source and target.
Decimal symbol: Specifies how the source file
represents the decimal symbol.
Ignore empty or null values: Specifies whether to
import values that are null or empty.
Check empty and null primary keys: Specifies
whether all primary keys are matched and validated
between source and target. This option is enabled
by default.
3) Select source/target
tables
Determines the tables to import from the source
and sets their targets. Where possible, the add-
on automatically pairs source and target tables.
Deselect any sources that you want to exclude.
If a source table is included, it must have a
corresponding target table selection. Add multiple
targets to a source to import the same data to
multiple tables.
Note
You can add a maximum of 20 target
tables.
If you do not select all source tables and later decide
to include one or more of the remaining tables,
you can accomplish this using the options in the
Mapping screen. See the next step for more details.
5.
Optionally, run an import simulation to preview the import result:
1.
Click Simulation at the bottom of the screen. Note, this option is also available from the
mapping screen.
2.
Configure the simulation options as desired. Select the '?' icon next to the configuration
options and message categories in the report to view their description.
3.
and click Run simulation to begin.
The report shows messages at the error, warning, and information levels. However, please
note that the simulation does not take table triggers into account.
6.
Optionally, update or create mappings:
Note
The following steps provide only high-level mapping instructions. See Mapping
interface reference [p 89] for more detailed information on mapping and
transformations.
Documentation > User Guide > Importing data > Importing to multiple tables
TIBCO EBX® Data Exchange Add-on (New) 42
1.
Select Mapping to enter the mapping screen where you can update the default data mappings
or add data transformations. The add-on automatically creates mappings where the source
and target have the same labels. A mapping identifies which data is extracted from the source
and specifies its target destination.

Documentation > User Guide > Importing data > Importing to multiple tables
TIBCO EBX® Data Exchange Add-on (New) 43
The following image and list describe some features of table and field mapping:
1) Table mapping tabs
Each tab contains the mappings between a different
pair of source and target tables. The icons to the
right allow you to locate and navigate between
tabs. Additionally, you can create new tabs, and add
any unmapped source and target tables by dragging
them from the Overview box to the mapping pane.
Note that the '+' icon is disabled when all sources
are already included in a mapping tab.
Please note that:
•
You can use the same source or target only
once in the mapping screen. In other words, you
cannot use a source or target in more than one
table mapping tab.
•
Sources can have multiple targets, but targets
can only have one source.
2) Source (pink) and target
(blue) tables
By default, the data source displays on the left and
the target on the right. Each table header has a label
and uses an icon to show its type and selecting the
small arrow collapses and expands the table. The
headers also have connection points. Drag this top
point to automatically generate mappings between
tables.

Documentation > User Guide > Importing data > Importing to multiple tables
TIBCO EBX® Data Exchange Add-on (New) 44
3) Mappings
Each line is a mapping. An orange color and icon
indicates there is a warning for a mapping. Select
the icon to view the warning. Drag from one field's
connection point to another to create a mapping. To
delete a mapping, select it and then select the trash
icon. To create a mapping, drag from a source field's
connection point to a connection point in the target.
7.
Optionally, add transformation functions:
Transformation functions allow you change the source data to meet technical or business
requirements in the target. The add-on ships with several transformation functions that support
common business cases. For more details on how to use transformation functions, see
Mapping interface reference [p 89]. For information on the available transformations and their
descriptions, see Transformation function reference [p 97].
1.
To add a transformation, select and drag the desired transformation function to the mapping
screen.
Documentation > User Guide > Importing data > Importing to multiple tables
TIBCO EBX® Data Exchange Add-on (New) 45
2.
Select and drag fields from the source to the function's input (left) and connect the function's
output (right) to target fields.
3.
Double-click the transformation function to edit its parameters. Each function is different,
for a complete list, see Transformation function reference [p 97].
8.
Optionally, select Save to store your settings as a template for re-use. For more information on
using templates, see Using templates [p 81].
9.
Click Import to complete the process.
If errors prevent any of the records from importing correctly, the add-on presents you with the
option of downloading an Excel file containing the invalid data. If you are importing CSV, the
files containing invalid data for each table are combined in a zip file. If you are importing Excel,
the invalid data for each table is added to a separate sheet in the downloadable file. Depending
on your circumstances, you can correct the data directly in the files and re-import it.
See also
Map and transform overview [p 86]
Mapping interface reference [p 89]
Export overview [p 48]
Documentation > User Guide > Importing data > Importing to multiple tables
TIBCO EBX® Data Exchange Add-on (New) 46

Documentation > User Guide
TIBCO EBX® Data Exchange Add-on (New) 47
Exporting data

Documentation > User Guide > Exporting data > Export overview
TIBCO EBX® Data Exchange Add-on (New) 48
CHAPTER 10
Export overview
The services provided by the add-on allow you to export data from your EBX® repository. The
location you initiate the export from determines the source for the export. For instance, running the
export service from a table's Actions menu, sets the table as the source. Running the service from a
dataset's Actions menu sets its tables as sources. Overall, steps to complete these procedures are the
same, except some details such as mapping differ. As outlined below, the export process includes:
•
Specifying the source file name and any format-specific options for CSV and Excel export, or
selecting the desired target location when exporting SQL. See Exporting a table [p 49] for
instructions. Exporting to SQL is supported at the table level only and requires administrative
configuration [p 8].
•
Defining any required mappings or transformations. The add-on automatically generates a map
of all source fields to target fields. If your circumstances require it, use the add-on's drag-n-drop
functionality to update the mappings. If you want to apply transformations to your data, you can
use built-in functions to modify data during export. For more information on the topics of mapping
and transformations, see Map and transform overview [p 86].
•
Saving settings as a template. When export operations require the use of transformations or
custom mappings, you can use templates to store these settings. This alleviates you from having
to redo the same tasks each time you perform a specific export.
See also
Exporting a table [p 49]
Map and transform overview [p 86]
Mapping interface reference [p 89]
Import overview [p 26]

Documentation > User Guide > Exporting data > Exporting a table
TIBCO EBX® Data Exchange Add-on (New) 49
CHAPTER 11
Exporting a table
To export data to a CSV file, Excel file, or SQL table:
1.
Initiate the export process:
1.
Navigate to the table you want to use as the source.
2.
Initiate the export process from the table by selecting Actions > Data Exchange (New)
and choosing one of the following options: Export CSV, Export Excel, or Export SQL.
Administrators must configure the available SQL sources [p 8] to enable the SQL export
option.
2.
Specify target information:
•
For CSV and Excel: Provide a file name and check the default options.
•
For SQL: Select the SQL data source, SQL target table, and check the default options.

Documentation > User Guide > Exporting data > Exporting a table
TIBCO EBX® Data Exchange Add-on (New) 50
If you have questions about the default options, hover your mouse over the label and select the
'?' icon to see a description:
3.
Optionally, update or create mappings:
Note
The following steps provide only high-level mapping instructions. See Mapping
interface reference [p 89] for more detailed information on mapping and
transformations.
1.
Select Mapping to enter the mapping screen where you can update the default data mappings
or add data transformations. For Excel and CSV export, the add-on automatically creates
mappings where the source and target have the same labels. For SQL export, mappings are
automatically created when the label and data type match. A mapping identifies which data
is extracted from the source and where it is extracted to in the target.

Documentation > User Guide > Exporting data > Exporting a table
TIBCO EBX® Data Exchange Add-on (New) 51
The following image and list describe some features of table and field mapping:
1)
Mappings: Each line is a mapping. Drag from
one field's connection point to another to create a
mapping. An orange color and icon indicates there
is a warning for a mapping. Select the icon to view
the warning. In these cases, where possible, the add-
on will perform a default transformation.
2)
Source (pink) and target (blue) tables: By default,
the data source displays on the left and includes data
type an cardinality for fields. The target table on
the right shows the field names that are included in
the exported file. Each table header has a label and
uses an icon to show its type and selecting the small
arrow collapses and expands the table. The headers
also have connection points. Drag this top point to
automatically generate mappings between tables.
3)
Adding, editing, and removing fields (not
available for SQL export): You can add additional
fields in the target file by selecting Add new. For
instance you might want to use a transformation
function to split a Full Name field into First Name
and Last Name in the target. Double-click to edit
field names. Hover your mouse over the field and
select the 'x' icon to remove them.
4.
Optionally, add transformation functions:

Documentation > User Guide > Exporting data > Exporting a table
TIBCO EBX® Data Exchange Add-on (New) 52
Transformation functions allow you change the source data to meet technical or business
requirements in the target. The add-on ships with several transformation functions that support
common business cases. For more details on how to use transformation functions, see
Mapping interface reference [p 89]. For information on the available transformations and their
descriptions, see Transformation function reference [p 97].
1.
To add a transformation, select and drag the desired transformation function to the mapping
screen.
2.
Select and drag fields from the source to the function's input (left) and connect the function's
output (right) to target fields. In the example shown below a constant value is output to the
target, so only the function's output is mapped.
3.
Double-click the transformation function to edit its parameters. Each function is different,
for a complete list, see Transformation function reference [p 97].
5.
Optionally, select Save to store your settings as a template for re-use. For more information on
using templates, see Using templates [p 81].

Documentation > User Guide > Exporting data > Exporting a table
TIBCO EBX® Data Exchange Add-on (New) 54

Documentation > User Guide > Exporting data > Exporting multiple tables
TIBCO EBX® Data Exchange Add-on (New) 55
CHAPTER 12
Exporting multiple tables
To export data to an Excel file or an archive (as CSV files):
1.
Initiate the export process:
1.
Navigate to the dataset containing the source tables.
2.
Initiate the export process by selecting: Actions > Data Exchange (New) > Export CSV or
Export Excel.

Documentation > User Guide > Exporting data > Exporting multiple tables
TIBCO EBX® Data Exchange Add-on (New) 56
2.
Supply a file name and check default options. If you have questions about individual settings,
hover your mouse over the label and select the '?' icon to see a description:
3.
Specify the tables you want to export with the Choose the tables to export property.
If you do not select all source tables and later decide to include one or more of the remaining
tables, you can accomplish this using the options in the Mapping screen. See the next step for
more details.
4.
Optionally, update or create mappings:
Note
The following steps provide only high-level mapping instructions. See Mapping
interface reference [p 89] for more detailed information on mapping and
transformations.
1.
Select Mapping to enter the mapping screen where you can update the default data mappings
or add data transformations. The add-on automatically creates mappings where the source
and target have the same labels. A mapping identifies which data is extracted from the source
and where it is extracted to in the target.

Documentation > User Guide > Exporting data > Exporting multiple tables
TIBCO EBX® Data Exchange Add-on (New) 57
The following image and list describe some features of table and field mapping:
1) Table mapping tabs
Each tab contains the mappings between a different
pair of source and target tables. The icons to the
right allow you to locate and navigate between
tabs. Additionally, you can create new tabs, and add
any unmapped source and target tables by dragging
them from the Overview box to the mapping pane.
Note that the '+' icon is disabled when all sources
are already included in a mapping tab.
2) Mappings
Each line is a mapping. Drag from one field's
connection point to another to create a mapping. An
orange color and icon indicates there is a warning
for a mapping. Select the icon to view the warning.
In these cases, where possible, the add-on will
perform a default transformation.
3) Source (pink) and target
(blue) tables
By default, the data source displays on the left
and includes data type an cardinality for fields.
The target table on the right shows the field names
that are included in the exported file. Each table
header has a label and uses an icon to show its
type and selecting the small arrow collapses and
expands the table. The headers also have connection
points. Drag this top point to automatically generate
mappings between tables.

Documentation > User Guide > Exporting data > Exporting multiple tables
TIBCO EBX® Data Exchange Add-on (New) 58
You can add, and map to additional target tables.
See Adding tables to the export [p 59] for more
information.
Please note that:
•
You can use the same source or target only
once in the mapping screen. In other words, you
cannot use a source or target in more than one
table mapping tab.
•
Sources can have multiple targets, but targets
can only have one source.
4) Adding, editing, and
removing fields
You can add additional fields in the target file by
selecting Add new. For instance you might want to
use a transformation function to split a Full Name
field into First Name and Last Name in the target.
Double-click to edit field names. Hover your mouse
over the field and select the 'x' icon to remove them.
5.
Optionally, add transformation functions:
Transformation functions allow you change the source data to meet technical or business
requirements in the target. The add-on ships with several transformation functions that support
common business cases. For more details on how to use transformation functions, see
Mapping interface reference [p 89]. For information on the available transformations and their
descriptions, see Transformation function reference [p 97].
1.
To add a transformation, select and drag the desired transformation function to the mapping
screen.

Documentation > User Guide > Exporting data > Exporting multiple tables
TIBCO EBX® Data Exchange Add-on (New) 59
2.
Select and drag fields from the source to the function's input (left) and connect the function's
output (right) to target fields. In the example shown below a constant value is output to the
target, so only the function's output is mapped.
3.
Double-click the transformation function to edit its parameters. Each function is different,
for a complete list, see Transformation function reference [p 97].
6.
Optionally, select Save to store your settings as a template for re-use. For more information on
using templates, see Using templates [p 81].
7.
Click Export to complete the process.
See also
Map and transform overview [p 86]
Mapping interface reference [p 89]
Export overview [p 48]
This chapter contains the following topics:
1.
Adding tables to the export
12.1 Adding tables to the export
You can include additional target tables in an export from the Mapping screen. One source table can
map to multiple targets. This allows you to split source data into multiple tables.
The following steps assume you have already initiated the export process and outline how to add target
tables to an export:
1.
Add a new target table:

Documentation > User Guide > Exporting data > Exporting multiple tables
TIBCO EBX® Data Exchange Add-on (New) 60
1.
From the Overview box in the Mapping screen, select New table.
2.
Drag the new table to the mapping screen.
2.
Add fields to the new table by selecting Add new.
After adding a field, you can double-click to edit its name, or select the 'x' icon to remove it.
3.
Drag from fields in the source table to fields in the new target to create mappings.

Documentation > User Guide > Exporting data > Exporting multiple tables
TIBCO EBX® Data Exchange Add-on (New) 61
As shown below, you can also include a transformation function to manipulate data if required.
4.
Repeat the previous steps until you have all required target tables.
Documentation > User Guide > Exporting data > Exporting multiple tables
TIBCO EBX® Data Exchange Add-on (New) 62

Documentation > User Guide > Exporting data > Exporting labels and related data
TIBCO EBX® Data Exchange Add-on (New) 63
CHAPTER 13
Exporting labels and related data
This chapter contains the following topics:
1.
Overview
2.
Exporting labels
3.
Exporting related data
13.1 Overview
Instructional details for some of the add-on's export options and example output are included in the
following sections:
•
Exporting labels [p 63]
•
Exporting related data [p 66]
13.2 Exporting labels
When exported data includes a primary key, foreign key, or enumeration, the resulting file might be
difficult to parse. The values contained in these fields are often numbers or other identifiers, and make
it challenging to extract meaningful information. To alleviate this, the add-on allows you to export the
labels for these fields. Note, that labels for these fields must be defined in the data model and can only
be set by someone with administrative access to edit the data model. See Setting labels [p 65] below
for high-level information on where to set the labels.
To include labels in an exported file:
1.
Initiate the export process.
Label export options are available at the dataset and table levels for CSV and Excel, but only the
table level for SQL. This example demonstrates exporting from one table to Excel and including
labels from a foreign key. With the exception of the following differences, the process and results
are similar for the other export formats and label options:
•
The option to export static enumerations is only available for Excel export.
•
When exporting at the dataset level: each sheet in an Excel file will contain data for one table
included in the export.
•
If you do not have permission to view a field it is not included in the export.
See Exporting a table [p 49] or Exporting multiple tables [p 55] for detailed instructions on exporting.

Documentation > User Guide > Exporting data > Exporting labels and related data
TIBCO EBX® Data Exchange Add-on (New) 64
2.
Choose the types of labels to export by selecting the corresponding options.
Note
You cannot use a transformation function on a field that is a static enumeration.
3.
Optionally, change mappings.

Documentation > User Guide > Exporting data > Exporting labels and related data
TIBCO EBX® Data Exchange Add-on (New) 65
As shown in the example below, you can find the label mappings in an expandable section in
the source table.
4.
Complete the export process.
The following image shows the file resulting from the export with the label column (Company
- Label) included:
Setting labels
If you have administrative access to edit a data model in the Data Model Assistant (DMA), you can
determine the exported labels for each field type by adding a label in the following locations:
•
Enumerations: select the field and navigate to Simple controls > Enumeration > Items > Label.
•
Primary keys: select the table and navigate to Advanced properties > Table > Presentation >
Record labeling.
•
Foreign keys: select the field and navigate to Advanced controls > Foreign key constraint >
Record labeling.

Documentation > User Guide > Exporting data > Exporting labels and related data
TIBCO EBX® Data Exchange Add-on (New) 66
13.3 Exporting related data
You can export data from related tables when exporting to Excel or CSV formats. You have the option
of including data from related tables up to 5 levels from the main source table (the table where you
run the export service). Only data related to records selected for export in the export's source table
are exported.
By default, data from dataspace snapshots is not included when exporting related data. This helps
to prevent excessively large exports. However, you can enable export of snapshots by selecting the
Export data from snapshots option.
When exporting to:
•
CSV: The add-on exports a ZIP file containing individual CSV files. Each file contains data from
one table and one of the files includes metadata about the related tables included in the export.
•
Excel: The add-on exports a single Excel file. The first sheet in the file contains the export's source
data. Each additional sheet—one for each table—contains the related data. The final sheet in the
file contains metadata about the related tables included in the export.
To export related data:
1.
Initiate the export process for CSV or Excel.
See Exporting a table [p 49] for detailed instructions on exporting.
Note
Related data export options are only available at the table level.
2.
Include data from related tables:
1.
Select the type related data to export using the following options:
•
Referred to by the source table
•
That references the source table
2.
Set the related data's scope using the following options:
•
Use the Select all tables up to and the Level menu to determine how much data to
include. See Table levels example [p 68] for more details on how level selection impacts
exported data.
•
Select the Export data from snapshots if you want to include all related data contained
in dataspace snapshots.

Documentation > User Guide > Exporting data > Exporting labels and related data
TIBCO EBX® Data Exchange Add-on (New) 67
•
If you only want to include data from specific tables, tic their corresponding boxes.
3.
Optionally, change or update mappings.
4.
Complete the export process.
See also
Exporting a table [p 49]
Map and transform overview [p 86]
Mapping interface reference [p 89]
Import overview [p 26]

Documentation > User Guide > Exporting data > Exporting labels and related data
TIBCO EBX® Data Exchange Add-on (New) 68
Table levels example
The following image and list include a data model diagram and export results to highlight the behavior
of exporting related data:
1) Source table
The export service was run from the Customer table.
2) Referenced by the source
table
The Customer table holds a FK to the Product table, but not
directly to Price, or Currency. The related data from Price
was included in the export because it was within the number
of levels specified (2), whereas Currency was not.
3) Tables that reference the
source table
Data from the Region table, which has a direct FK to
Customer, and Tax table was included in the export.
4) Results
The reference sheet includes metadata about all related
tables included in the export.

Documentation > User Guide
TIBCO EBX® Data Exchange Add-on (New) 69
Transferring data

Documentation > User Guide > Transferring data > Transfer overview
TIBCO EBX® Data Exchange Add-on (New) 70
CHAPTER 14
Transfer overview
The Transfer data service allows you to move data between tables within your EBX® repository.
The table or dataset you initiate the action from sets the data source. You can then choose the targets
and specify any required mappings or transformations.
Note
All EBX® permissions apply to data transfer operations. You cannot transfer to target
tables and fields unless you have permission to write data in these locations.
As outlined below, the transfer process includes:
•
Running the Transfer data service from a table or dataset's Actions menu.
•
Defining any required mappings or transformations. The add-on automatically maps source fields
with those in the target that have the same name. If required, you can use the add-on's drag-n-drop
functionality to create or update mappings. If you want to apply transformations to your data, you
can use built-in functions to modify data during transfer. For more information on the topics of
mapping and transformations, see Map and transform overview [p 86].
•
Saving settings as a template for later reuse. When import operations require the use of
transformations or custom mappings, you can use templates to store these settings. This alleviates
you from having to redo the same tasks each time you perform a specific import.
See also
Transferring to a table [p 71]
Map and transform overview [p 86]
Mapping interface reference [p 89]
Export overview [p 48]

Documentation > User Guide > Transferring data > Transferring to a table
TIBCO EBX® Data Exchange Add-on (New) 71
CHAPTER 15
Transferring to a table
To transfer data between two tables:
1.
Initiate the transfer process:
1.
Navigate to the table containing the source data you want to transfer.
2.
Initiate the import process from the table by selecting: Actions > Data Exchange (New) >
Transfer data.
2.
Set transfer options:

Documentation > User Guide > Transferring data > Transferring to a table
TIBCO EBX® Data Exchange Add-on (New) 72
1.
The following image and list highlight some of the options when transferring data:
1)
Load template: Optionally, select a template to
populate all data transfer settings and mappings.
Transfer mode: Select the desire transfer mode.
2)
Source: displays the source table information.
3)
Target: Use the menus to select the target table for
this transfer.
4)
Specify whether this transfer: includes computed
values, ignores null and empty values, and checks
empty and null primary keys.
3.
Optionally, update or create mappings:
Note
The following steps provide only high-level mapping instructions. See Mapping
interface reference [p 89] for more detailed information on mapping and
transformations.
1.
Select Mapping to enter the mapping screen where you can update the default data mappings
or add data transformations. The add-on automatically creates mappings where the source
and target have the same labels. A mapping identifies which data is extracted from the source
and where it is extracted to in the target.

Documentation > User Guide > Transferring data > Transferring to a table
TIBCO EBX® Data Exchange Add-on (New) 73
The following image and list describe some features of table and field mapping:
1)
Source (pink) and target (blue) tables: By default,
the data source displays on the left and the target
on the right. Each table header has a label and uses
an icon to show its type and selecting the small
arrow collapses and expands the table. The headers
also have connection points. Drag this top point to
automatically generate mappings between tables.
2)
Mappings: Each line is a mapping. An orange color
and icon indicates there is a warning for a mapping.
Select the icon to view the warning. Drag from
one field's connection point to another to create a
mapping.
3)
Delete selected: To delete a mapping, select it and
then the garbage icon.
4.
Optionally, add transformation functions:
Transformation functions allow you change the source data to meet technical or business
requirements in the target. The add-on ships with several transformation functions that support
common business cases. For more details on how to use transformation functions, see
Mapping interface reference [p 89]. For information on the available transformations and their
descriptions, see Transformation function reference [p 97].

Documentation > User Guide > Transferring data > Transferring to a table
TIBCO EBX® Data Exchange Add-on (New) 74
1.
To add a transformation, select and drag the desired transformation function to the mapping
screen.
2.
Select and drag fields from the source to the function's input (left) and connect the function's
output (right) to target fields.
3.
Double-click the transformation function to edit its parameters. Each function is different,
for a complete list, see Transformation function reference [p 97].
5.
Optionally, select Save to store your settings as a template for re-use. For more information on
using templates, see Using templates [p 81].
6.
Click Transfer data to complete the process.
See also
Map and transform overview [p 86]
Mapping interface reference [p 89]
Export overview [p 48]

Documentation > User Guide > Transferring data > Transferring to multiple tables
TIBCO EBX® Data Exchange Add-on (New) 75
CHAPTER 16
Transferring to multiple tables
To transfer data between multiple tables:
1.
Initiate the transfer process:
1.
Navigate to the dataset containing the source data you want to transfer.
2.
Initiate the import process from the table by selecting: Actions > Data Exchange (New)>
Transfer data.
2.
Set transfer options:

Documentation > User Guide > Transferring data > Transferring to multiple tables
TIBCO EBX® Data Exchange Add-on (New) 76
1.
The following image and list highlight some of the options when transferring data:
1)
Load template: Optionally, select a template to
populate all data transfer settings and mappings.
Transfer mode: Select the desire transfer mode.
2)
Target: Use the menus to select the target table
for this transfer. You can add additional targets by
selecting the '+' icon in the bottom-left corner of the
target group.
Note
You can add up to 7 target groups at
a time. To add more, you must first
select Save.
3)
Specify whether this transfer: includes computed
values, ignores null and empty values, and checks
empty and null primary keys.

Documentation > User Guide > Transferring data > Transferring to multiple tables
TIBCO EBX® Data Exchange Add-on (New) 77
3.
Optionally, update or create mappings:
Note
The following steps provide only high-level mapping instructions. See Mapping
interface reference [p 89] for more detailed information on mapping and
transformations.
1.
Select Mapping to enter the mapping screen where you can update the default data mappings
or add data transformations. The add-on automatically creates mappings where the source
and target have the same labels. A mapping identifies which data is extracted from the source
and where it is extracted to in the target.

Documentation > User Guide > Transferring data > Transferring to multiple tables
TIBCO EBX® Data Exchange Add-on (New) 78
The following image and list describe some features of table and field mapping:
1) Table mapping tabs
Each tab contains the mappings between a different
pair of source and target tables. The icons to the
right allow you to locate and navigate between
tabs. Additionally, you can create new tabs, and add
any unmapped source and target tables by dragging
them from the Overview box to the mapping pane.
Note that the '+' icon is disabled when all sources
are already included in a mapping tab.
2) Source (pink) and target
(blue) tables
By default, the data source displays on the left and
the target on the right. Each table header has a label
and uses an icon to show its type and selecting the
small arrow collapses and expands the table. The
headers also have connection points. Drag this top
point to automatically generate mappings between
tables.
Please note that:
•
You can use the same source or target only
once in the mapping screen. In other words, you
cannot use a source or target in more than one
table mapping tab.
•
Sources can have multiple targets, but targets
can only have one source.

Documentation > User Guide > Transferring data > Transferring to multiple tables
TIBCO EBX® Data Exchange Add-on (New) 79
3) Mappings
Each line is a mapping. An orange color and icon
indicates there is a warning for a mapping. Select
the icon to view the warning. Drag from one field's
connection point to another to create a mapping. To
delete a mapping, select it and then the trash icon.
4.
Optionally, add transformation functions:
Transformation functions allow you change the source data to meet technical or business
requirements in the target. The add-on ships with several transformation functions that support
common business cases. For more details on how to use transformation functions, see
Mapping interface reference [p 89]. For information on the available transformations and their
descriptions, see Transformation function reference [p 97].
1.
To add a transformation, select and drag the desired transformation function to the mapping
screen.
2.
Select and drag fields from the source to the function's input (left) and connect the function's
output (right) to target fields.
3.
Double-click the transformation function to edit its parameters. Each function is different,
for a complete list, see Transformation function reference [p 97].
5.
Optionally, select Save to store your settings as a template for re-use. For more information on
using templates, see Using templates [p 81].
6.
Click Transfer data to complete the process.
See also
Map and transform overview [p 86]
Mapping interface reference [p 89]
Export overview [p 48]
Documentation > User Guide > Transferring data > Transferring to multiple tables
TIBCO EBX® Data Exchange Add-on (New) 80

Documentation > User Guide > Using templates
TIBCO EBX® Data Exchange Add-on (New) 81
CHAPTER 17
Using templates
The add-on allows you to store configuration settings in templates. Each template holds an import,
export or data transfer operation's option settings and mapping details.
The option to save a template is available after entering the Mapping screen. At this point, you already
entered source/target information and specified any format specific options to apply. The add-on auto-
generated mappings where possible. You can save a template with the current configuration, or update
mappings and add transformations before saving. As shown below, to create a template, you specify
a unique name, optional description, owner, and template permissions:
This chapter contains the following topics:
1.
Working with existing templates

Documentation > User Guide > Using templates
TIBCO EBX® Data Exchange Add-on (New) 82
17.1 Working with existing templates
During an import, export, or data transfer operation you can select an existing template using the Load
template field on the Options page. After choosing a template, the add-on automatically populates
the option fields and mappings. You can:
•
Change configuration options.
•
View and update mappings.
•
Initiate the import, export, or transfer operation.
If you have sufficient permission when viewing a template, you can select Update to change template
settings. Additionally, you can create a copy of the current template by selecting Save as. After making
changes, you have the option of removing the original template via the Delete current template
option.
Some changes to configuration settings impact the mappings stored in a template. If you make changes
to settings that impact mappings, a warning displays to inform you of the impact. Additionally, if you
continue with the data transfer operation, a message prompt allows you to save or discard changes
to the template.

Documentation > User Guide > Handling special characters
TIBCO EBX® Data Exchange Add-on (New) 83
CHAPTER 18
Handling special characters
Characters such as quotes, backslashes, and certain symbols, can have special meaning. For example,
a ; used as a separator can denote the end of a field value in a CSV file. In this case, the add-on knows to
import the value after the ; into the next field. When data values include special characters, they should
be escaped so that they are treated as literal characters rather than having special meaning. During the
data integration process, you can specify the separators and delimiters used to ensure that data imports
correctly. However, please note that the add-on reserves use of the backslash (\) character in order to
support multi-valued fields. Due to this, you should avoid specifying a list separator character that
is also used in data values.
The following shows an example of how the \ character is handled by the add-on:
•
When data contains the \ character:
•
When exporting a value of 100\000, it becomes 100\ \000.
•
When importing a value of 100\,000, it becomes 100,000.
•
When data includes the selected list separator, for example, the space character as shown below:
•
When exporting a value of 100 000, it becomes 100\ 000.
•
When importing a value of 100\ 000, it becomes 100000.
Documentation > User Guide > Handling special characters
TIBCO EBX® Data Exchange Add-on (New) 84

Documentation > User Guide
TIBCO EBX® Data Exchange Add-on (New) 85
Mapping and
transforming data

Documentation > User Guide > Mapping and transforming data > Map and transform overview
TIBCO EBX® Data Exchange Add-on (New) 86
CHAPTER 19
Map and transform overview
This chapter contains the following topics:
1.
Mapping overview
2.
Transformation overview
19.1 Mapping overview
Data integration involves the movement of data from one data store to another. The process requires
data to be directed between a source and target. A goal, and sometimes requirement, is to make the
source data available in the format and structure required by the target. In the context of the add-on,
this goal is addressed using the concept of mapping.
Mapping refers to:
•
The process of specifying the following:
•
Which data is extracted from a data source.
•
The data's destination in the target location.
•
Any required changes, or transformations, to the data along the way.
•
The implementation results of the above process. For example, the mappings between fields in
a source and target table.
See also
Mapping interface reference [p 89]
Import overview [p 26]
Export overview [p 48]
19.2 Transformation overview
Data transformations are added to mappings when types, formatting, or other constraints prevent
successful movement of the data. A transformation makes the data compatible with the structure of
the target.
Transformation types can include:
•
Format changes: converting between technical formats, such as from String to Integer data types.

Documentation > User Guide > Mapping and transforming data > Map and transform overview
TIBCO EBX® Data Exchange Add-on (New) 87
•
Structure changes: changing the data's form. For example, splitting a Full name field into First
Name and Last Name fields.
•
Semantic conversion: converting the value to meet semantic requirements. For example, a source
might use the following codes for states 1, 2, 3, etc. But, the target expects Alabama, Alaska, and
Arizona. You can use a transformation to populate the expected value to the target.
See also
Mapping interface reference [p 89]
Transformation function reference [p 97]
Documentation > User Guide > Mapping and transforming data > Map and transform overview
TIBCO EBX® Data Exchange Add-on (New) 88

Documentation > User Guide > Mapping and transforming data > Mapping interface reference
TIBCO EBX® Data Exchange Add-on (New) 89
CHAPTER 20
Mapping interface reference
This chapter contains the following topics:
1.
Overview
2.
Mapping screen overview
3.
Anatomy of a transformation function
4.
Sample transformation use case
20.1 Overview
When moving data with the add-on, you use the Mapping screen to perform all mapping related tasks,
including those related to transforming data. The following sections describe the user interfaces for
mapping and transformations:
•
Mapping screen overview [p 90]
•
Anatomy of a transformation function [p 92]

Documentation > User Guide > Mapping and transforming data > Mapping interface reference
TIBCO EBX® Data Exchange Add-on (New) 90
20.2 Mapping screen overview
The image below and following list describe elements in the Mapping screen:
1) Overview box
This box shows you which tables are available to add to the
mapping pane and which are currently in the mapping pane.
To add an available table, select and drag it to the mapping
pane.
2) Transformation functions
palate
This palate contains all available transformation functions.
To add a function to the mapping pane, select and drag it
over.
3) Mapping pane
The mapping pane shows all tables included in this
operation. To create a mapping, select and drag one
connection point to another. For a mapping to be successful,
it can only be mapped to the same type of component. For
example, table to table and field to field.
4) Button bar
These icons allow you to:
•
Delete selected mappings.
•
Unlink a selected table's mappings.
•
Undo and redo actions in the mapping pane.
•
Zoom in and out.
5) Back to Options, Save as,
Save/Update
These buttons allow you to: return to the Options screen and
save your mapping configuration as a template for later use.

Documentation > User Guide > Mapping and transforming data > Mapping interface reference
TIBCO EBX® Data Exchange Add-on (New) 91
If you make changes to an existing template, select Update
to save the changes.
The image below and following list describe some of the Mapping screen features specific to data
integration with multiple tables:
1 & 3) Table mapping tabs and
navigation
Each tab contains a table mapping. If many tabs make it
difficult to locate the one you want, you can use the icons
to the right to page through the tabs. You can use the
downwards-facing arrow to open the list of all tabs and
select the one you want to view.
Use the '+' icon to add a blank tab. You can then drag
unmapped source and target tables to the Mapping pane to
create mappings. Note that if all sources are mapped, this
option is disabled.
2) Overview box
The paired tables on the selected mapping tab display
normally and the others are slightly obfuscated. Tables that
are not obfuscated can be added to a mapping.
Blue check marks indicate that a table is included in a
mapping.
Select New table to create a new target table. After you
drag it to the mapping pane, you can add fields, mappings,
transformations, etc. This option is only available when
exporting.
Documentation > User Guide > Mapping and transforming data > Mapping interface reference
TIBCO EBX® Data Exchange Add-on (New) 92
20.3 Anatomy of a transformation function
As implied by its name, transformation functions transform data. Their input accepts data from a
source, they operate on this data, and they output the changed data to a target location. One exception
to this behavior is the constant value function which only has an output. As UI components, they
have connection points that allow you to map incoming data from the source to the left-hand side and
outgoing data to the target from the right-hand side.

Documentation > User Guide > Mapping and transforming data > Mapping interface reference
TIBCO EBX® Data Exchange Add-on (New) 93
The image below and following descriptions highlights transformation function options and
components:
1) Input connection points
Each connection point accepts a mapping from one field in
the source. The '-' icon allows you to remove an incoming or
outgoing connection when there are more than the default
number of connections.
Note
Transformation function inputs are always
located on the left-hand side.
2) Output connection points
Each connection point can be mapped to one field in the
target. Note in the image shown above there is only one
point. However, some transformation functions can have
more than one output.
Note
Transformation function outputs are always
located on the right-hand side.
3) Add connection point
The '+' icon allows you to add additional connection points.
Selecting this icon will add points automatically to the
allowable side (input/output).
Available actions:
In addition to the functionality related to adding and
removing connection points, you can double-click to edit
the transformation function's configuration. The options
vary depending on the function. But generally you can
assign names and descriptions to the inputs and outputs.
Additionally, you can edit parameters that determine
certain aspects of the transformation function's behavior.


Documentation > User Guide > Mapping and transforming data > Mapping interface reference
TIBCO EBX® Data Exchange Add-on (New) 95
20.4 Sample transformation use case
The following provides an example of adding a transformation function during the import process to
split a string in the source into multiple target fields:
Action Description
Drag the function from
the Transformation
functions palate to the
mapping pane.
Connect the source
to the input and the
output to the target.
Drag from connection point to connection point. The order you map the connection points can matter.
Transformation functions that split values order the output values from top (first) to bottom (last). So in
this example the source Contact Name field contains names in the following order: 'John Smith'. When
the system splits this string, the first value will be 'John'. So the topmost connection point is mapped to
the First name field in the target. The same order of operations applies to concatenation.

Documentation > User Guide > Mapping and transforming data > Mapping interface reference
TIBCO EBX® Data Exchange Add-on (New) 96
Action Description
Edit the transformation
function.
Double-click to edit the function. Note that the input/output names and descriptions are optional.
Although, it does not display on the screen the important property to note here is the Parameter. A
space has been entered in the Value field.
See also
Mapping interface reference [p 89]
Import overview [p 26]
Export overview [p 48]

Documentation > User Guide > Mapping and transforming data > Transformation function reference
TIBCO EBX® Data Exchange Add-on (New) 97
CHAPTER 21
Transformation function reference
This chapter contains the following topics:
1.
Overview
2.
Format conversion
3.
Structure changing
4.
Semantic conversion
21.1 Overview
The add-on provides several built-in transformation functions. These are designed to cover common
business use cases: format conversion, structure changing, and semantic conversion.
21.2 Format conversion
The following convert the technical format:
Icon Description
The add-on includes the following transformation functions
that convert from one technical format to another:
•
Date and time --> String
•
Date --> String
•
String --> Date
•
String --> Date and time
•
String --> Time
•
Time --> String
Parameters: For each transformation function of this type
you can use the parameter to format the function's output
to meet business requirements. For example, specify that a
date value is output as yyyy-MM-dd or dd-MM-yyyy.

Documentation > User Guide > Mapping and transforming data > Transformation function reference
TIBCO EBX® Data Exchange Add-on (New) 98
21.3 Structure changing
Structure changing transformation functions can help change your data from denormalized to
normalized. This is generally accomplished by either combining or splitting data values.
Icon Description
The add-on includes the following:
Aggregate of integer numbers: takes as integers as input
and outputs the sum of those integers. Parameters: N/A
Concatenate string: takes multiple strings as input and
outputs them joined together as a single string. The output
string is in the same order as the input fields. Parameters:
the value to separate each input string.
Combine multiple fields: takes input from single and
multi-valued fields and outputs the values combined in a
single field, or into separate records. To enable separate
record output, double-click the function and under Options,
enable Output to multiple target records.
Direct split string: takes a string contained in a single field
and outputs parts of the string to other fields. A delimiter
is used to tell the system how to partition the string. For
example, a full name field might be split into first and last
fields using the space character as a separator. Parameters:
the separator used to determine where the string is split.
To enable separate record output, double-click the function
and under Options, enable Output to multiple target
records. After activating this option, the output side of the
function displays only a single output. You can drag this
output connection point to multiple target locations, such as
different tables.
Split single field to multi-valued field takes a string
contained in a single field and splits it into a single multi-
valued field. This transformation is useful when your source
data contains multiple list separators and you want to
specify an alternative separator from the one used in the
main options screen. Parameters: the separator used to
determine where the string is split.
To enable separate record output, double-click the function
and under Options, enable Output to multiple target
records. After activating this option, the output side of the
function displays only a single output. You can drag this
output connection point to multiple target locations, such as
different tables.
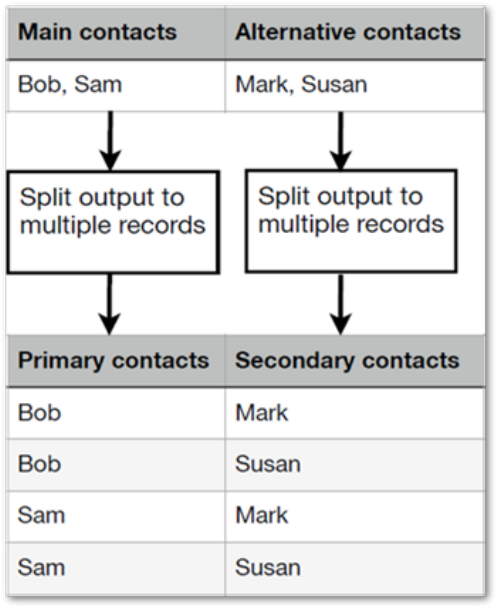
Documentation > User Guide > Mapping and transforming data > Transformation function reference
TIBCO EBX® Data Exchange Add-on (New) 99
Note, that when any of the above transformation functions are configured to output values to multiple
records, and more than one field from the same source table is used, the output includes each
combination of values as shown in the following image:

Documentation > User Guide > Mapping and transforming data > Transformation function reference
TIBCO EBX® Data Exchange Add-on (New) 100
21.4 Semantic conversion
The add-on includes:
Icon Description
Constant value: you supply a value which this function
outputs to the given field. Parameters: the data type and
value to output.
Cross reference: looks up the value and outputs a value
contained in a cross reference table. Parameters: the
location of the source and target fields.
Digital asset UUID lookup: takes file names in the
import source, looks up their UUIDs, and attaches the
corresponding digital assets to the target field. Instead of
having to manually open and attach assets to records, this
function allows you to perform a bulk import operation
to attach digital assets. The digital assets must already be
located in a Drive. For instructions on completing this
task, see the TIBCO EBX® Digital Asset Manager Add-on
documentation.

TIBCO EBX® Data Exchange Add-on (New) 101
Notices

Documentation > Notices > Documentation and Support
TIBCO EBX® Data Exchange Add-on (New) 102
CHAPTER 22
Documentation and Support
For information about this product, you can read the documentation, contact TIBCO Support, and
join TIBCO Community.
This chapter contains the following topics:
1.
How to Access TIBCO Documentation
2.
Product-Specific Documentation
3.
How to Contact TIBCO Support
4.
How to Join TIBCO Community
22.1 How to Access TIBCO Documentation
Documentation for TIBCO products is available on the TIBCO Product Documentation website,
mainly in HTML and PDF formats.
The TIBCO Product Documentation website is updated frequently and is more current than any other
documentation included with the product.
22.2 Product-Specific Documentation
The documentation for the TIBCO EBX® is available on the TIBCO EBX® Product Documentation
page. This page contains the latest version of each document.
The documentation for the TIBCO EBX® Add-ons is available on the TIBCO EBX® Add-ons
Product Documentation page. This page contains the latest version of each document.
To view the documents for Add-on Bundles that are compatible with other versions of TIBCO EBX®,
use the Bundle version menu to select the desired release.
22.3 How to Contact TIBCO Support
Get an overview of TIBCO Support. You can contact TIBCO Support in the following ways:
•
For accessing the Support Knowledge Base and getting personalized content about products you
are interested in, visit the TIBCO Support website.
•
For creating a Support case, you must have a valid maintenance or support contract with TIBCO.
You also need a user name and password to log in to TIBCO Support website. If you do not have
a user name, you can request one by clicking Register on the website.

Documentation > Notices > Documentation and Support
TIBCO EBX® Data Exchange Add-on (New) 103
22.4 How to Join TIBCO Community
TIBCO Community is the official channel for TIBCO customers, partners, and employee subject
matter experts to share and access their collective experience. TIBCO Community offers access to
Q&A forums, product wikis, and best practices. It also offers access to extensions, adapters, solution
accelerators, and tools that extend and enable customers to gain full value from TIBCO products. In
addition, users can submit and vote on feature requests from within the TIBCO Ideas Portal. For a
free registration, go to TIBCO Community.
Documentation > Notices > Documentation and Support
TIBCO EBX® Data Exchange Add-on (New) 104

Documentation > Notices > Legal and Third-Party
TIBCO EBX® Data Exchange Add-on (New) 105
CHAPTER 23
Legal and Third-Party
SOME TIBCO SOFTWARE EMBEDS OR BUNDLES OTHER TIBCO SOFTWARE. USE OF
SUCH EMBEDDED OR BUNDLED TIBCO SOFTWARE IS SOLELY TO ENABLE THE
FUNCTIONALITY (OR PROVIDE LIMITED ADD-ON FUNCTIONALITY) OF THE LICENSED
TIBCO SOFTWARE. THE EMBEDDED OR BUNDLED SOFTWARE IS NOT LICENSED TO BE
USED OR ACCESSED BY ANY OTHER TIBCO SOFTWARE OR FOR ANY OTHER PURPOSE.
USE OF TIBCO SOFTWARE AND THIS DOCUMENT IS SUBJECT TO THE TERMS AND
CONDITIONS OF A LICENSE AGREEMENT FOUND IN EITHER A SEPARATELY EXECUTED
SOFTWARE LICENSE AGREEMENT, OR, IF THERE IS NO SUCH SEPARATE AGREEMENT,
THE CLICKWRAP END USER LICENSE AGREEMENT WHICH IS DISPLAYED DURING
DOWNLOAD OR INSTALLATION OF THE SOFTWARE (AND WHICH IS DUPLICATED
IN THE LICENSE FILE) OR IF THERE IS NO SUCH SOFTWARE LICENSE AGREEMENT
OR CLICKWRAP END USER LICENSE AGREEMENT, THE LICENSE(S) LOCATED IN THE
“LICENSE” FILE(S) OF THE SOFTWARE. USE OF THIS DOCUMENT IS SUBJECT TO THOSE
TERMS AND CONDITIONS, AND YOUR USE HEREOF SHALL CONSTITUTE ACCEPTANCE
OF AND AN AGREEMENT TO BE BOUND BY THE SAME.
This document is subject to U.S. and international copyright laws and treaties. No part of this document
may be reproduced in any form without the written authorization of CloudSoftwareGroup,Inc.
TIBCO, the TIBCO logo, the TIBCO O logo, TIBCO EBX®, TIBCO EBX® Data Exchange Add-on,
TIBCO EBX® Add-on's Root Module, TIBCO EBX® Digital Asset Manager Add-on, TIBCO EBX®
Match and Merge Add-on, TIBCO EBX® Data Model and Data Visualization Add-on, TIBCO EBX®
Insight Add-on, TIBCO EBX® Graph View Add-on, TIBCO EBX® Add-on for Oracle Hyperion
EPM, TIBCO EBX® Information Governance Add-on, TIBCO EBX® GO Add-on, TIBCO EBX®
Activity Monitoring Add-on, TIBCO EBX® Rule Portfolio Add-on, and TIBCO EBX® Information
Search Add-on are either registered trademarks or trademarks of CloudSoftwareGroup,Inc. in the
United States and/or other countries.
Java and all Java based trademarks and logos are trademarks or registered trademarks of Oracle and/
or its affiliates.
This document includes fonts that are licensed under the SIL Open Font License, Version 1.1, which
is available at: https://scripts.sil.org/OFL.
Copyright (c) Paul D. Hunt, with Reserved Font Name Source Sans Pro and Source Code Pro.
All other product and company names and marks mentioned in this document are the property of their
respective owners and are mentioned for identification purposes only.

Documentation > Notices > Legal and Third-Party
TIBCO EBX® Data Exchange Add-on (New) 106
This software may be available on multiple operating systems. However, not all operating system
platforms for a specific software version are released at the same time. See the readme file for the
availability of this software version on a specific operating system platform.
THIS DOCUMENT IS PROVIDED “AS IS” WITHOUT WARRANTY OF ANY KIND,
EITHER EXPRESS OR IMPLIED, INCLUDING, BUT NOT LIMITED TO, THE IMPLIED
WARRANTIES OF MERCHANTABILITY, FITNESS FOR A PARTICULAR PURPOSE, OR NON-
INFRINGEMENT.
THIS DOCUMENT COULD INCLUDE TECHNICAL INACCURACIES OR TYPOGRAPHICAL
ERRORS. CHANGES ARE PERIODICALLY ADDED TO THE INFORMATION HEREIN;
THESE CHANGES WILL BE INCORPORATED IN NEW EDITIONS OF THIS DOCUMENT.
TIBCO SOFTWARE INC. MAY MAKE IMPROVEMENTS AND/OR CHANGES IN THE
PRODUCT(S) AND/OR THE PROGRAM(S) DESCRIBED IN THIS DOCUMENT AT ANY TIME.
THE CONTENTS OF THIS DOCUMENT MAY BE MODIFIED AND/OR QUALIFIED,
DIRECTLY OR INDIRECTLY, BY OTHER DOCUMENTATION WHICH ACCOMPANIES THIS
SOFTWARE, INCLUDING BUT NOT LIMITED TO ANY RELEASE NOTES AND "READ ME"
FILES.
This and other products of CloudSoftwareGroup,Inc. may be covered by registered patents. Please
refer to TIBCO's Virtual Patent Marking document (https://www.tibco.com/patents) for details.
Copyright© 2006-2024. CloudSoftwareGroup,Inc. All Rights Reserved

TIBCO EBX® Data Exchange Add-on (New) 107
Release Notes

Documentation > Release Notes > Version 6.1.4
TIBCO EBX® Data Exchange Add-on (New) 108
CHAPTER 24
Version 6.1.4
This chapter contains the following topics:
1.
New features
2.
Changes in Functionality
3.
Changes to third-party libraries
4.
Closed Issues
5.
Known Issues
24.1 New features
This release was updated to ensure compatibility with TIBCO EBX® version 6.1.4 and the Add-ons
Bundle version 6.1.4.
24.2 Changes in Functionality
This release contains no functionality changes.
24.3 Changes to third-party libraries
This release contains the following changes to third-party libraries:
•
The Apache Commons Compress library was updated to version 1.26.0.
•
The Apache Commons IO library was updated to version 2.12.0.
24.4 Closed Issues
This release contains no closed issues.
24.5 Known Issues
This release contains the following known issues:
•
[DINT-4339] A JNDI data source cannot be configured when EBX® is deployed on a WebLogic,
or JBoss server.
Documentation > Release Notes > Version 6.1.4
TIBCO EBX® Data Exchange Add-on (New) 109
•
Fonts are no longer shipped with the JDK 11. Font rendering in Java 11 JVMs now uses pre-
installed operating system fonts. This can cause issues in Linux environments when exporting
Excel files. As a workaround, you can install the fontconfig package.
•
When exporting to SQL with TDV, if any error occurs, the operation is cancelled.
•
Due to a limitation in Excel, long fields with the number data type display all numbers past the
16th place as a 0.
•
Importing and exporting SQL: Read and write is not possible with the Timestamp data type with
MS SQL Server.
•
Configuring a schema using the JNDI configuration in your web server is not supported.
•
When creating a custom transformation function, you must use a predefined data type for its input
and output fields.
Documentation > Release Notes > Version 6.1.4
TIBCO EBX® Data Exchange Add-on (New) 110

Documentation > Release Notes > All release notes
TIBCO EBX® Data Exchange Add-on (New) 111
CHAPTER 25
All release notes
This chapter contains the following topics:
1.
Version 6.1.4
2.
Version 6.1.3
3.
Version 6.1.2
4.
Version 6.1.1
5.
Version 6.1.0
6.
Version 4.5.2
7.
Version 4.5.1
8.
Version 4.5.0
9.
Version 4.4.1
10.
Version 4.4.0
11.
Version 4.3.2
12.
Version 4.3.1
13.
Version 4.3.0
14.
Version 4.2.1
15.
Version 4.2.0
16.
Version 4.1.1
17.
Version 4.1.0
18.
Version 4.0.1
19.
Version 4.0.0
25.1 Version 6.1.4
New features
This release was updated to ensure compatibility with TIBCO EBX® version 6.1.4 and the Add-ons
Bundle version 6.1.4.
Documentation > Release Notes > All release notes
TIBCO EBX® Data Exchange Add-on (New) 112
Changes in Functionality
This release contains no functionality changes.
Changes to third-party libraries
This release contains the following changes to third-party libraries:
•
The Apache Commons Compress library was updated to version 1.26.0.
•
The Apache Commons IO library was updated to version 2.12.0.
Closed Issues
This release contains no closed issues.
Known Issues
This release contains the following known issues:
•
[DINT-4339] A JNDI data source cannot be configured when EBX® is deployed on a WebLogic,
or JBoss server.
•
Fonts are no longer shipped with the JDK 11. Font rendering in Java 11 JVMs now uses pre-
installed operating system fonts. This can cause issues in Linux environments when exporting
Excel files. As a workaround, you can install the fontconfig package.
•
When exporting to SQL with TDV, if any error occurs, the operation is cancelled.
•
Due to a limitation in Excel, long fields with the number data type display all numbers past the
16th place as a 0.
•
Importing and exporting SQL: Read and write is not possible with the Timestamp data type with
MS SQL Server.
•
Configuring a schema using the JNDI configuration in your web server is not supported.
•
When creating a custom transformation function, you must use a predefined data type for its input
and output fields.
25.2 Version 6.1.3
New features
This release contains the following new features:
•
Permission settings for add-on import, export, and transfer services are now available to apply
in a global context.
•
When exporting data from related tables, the formatting and label options are now applied to the
related tables.
•
A new option was added to the following transformation functions to split the output into separate
records:
•
Direct split string
•
Split to a multi-valued field
•
Combine multiple fields (new)
Documentation > Release Notes > All release notes
TIBCO EBX® Data Exchange Add-on (New) 113
•
The new Combine multiple fields transformation function was added. This function takes input
from single and multi-valued fields and outputs the values combined in a single field, or into
separate records.
•
Performance was improved for the Options screen for instances where there a large number of
related tables.
Changes in Functionality
This release contains no changes in functionality.
Changes to third-party libraries
This release contains no changes to third-party libraries.
Closed Issues
This release contains no closed issues.
Known Issues
This release contains the following known issues:
•
[DINT-4339] A JNDI data source cannot be configured when EBX® is deployed on a WebLogic,
or JBoss server.
•
Fonts are no longer shipped with the JDK 11. Font rendering in Java 11 JVMs now uses pre-
installed operating system fonts. This can cause issues in Linux environments when exporting
Excel files. As a workaround, you can install the fontconfig package.
•
When exporting to SQL with TDV, if any error occurs, the operation is cancelled.
•
Due to a limitation in Excel, long fields with the number data type display all numbers past the
16th place as a 0.
•
Importing and exporting SQL: Read and write is not possible with the Timestamp data type with
MS SQL Server.
•
Configuring a schema using the JNDI configuration in your web server is not supported.
•
When creating a custom transformation function, you must use a predefined data type for its input
and output fields.
25.3 Version 6.1.2
New features
This release contains the following new features:
•
When creating a custom transformation using the add-on's API, the following information can
now be included on inputs and outputs: name, description, and data type. This input can be used
to help business users understand the transformation's purpose and its usage.
•
It is now possible to choose whether dataspace snapshots are included when exporting related
data using the new Export data from snapshots option.
•
When exporting related data, it is now possible to select the individual related tables to export.
Documentation > Release Notes > All release notes
TIBCO EBX® Data Exchange Add-on (New) 114
Changes in Functionality
The manner in which the add-on handles permissions was updated. The changes mainly impact
behavior related to records that are hidden due to permission settings. The add-on no longer blocks data
integration processes when encountering an exception related to permissions. Instead, only invalid
records are rejected and valid records are still processed. Additionally, the general behavior was made
more consistent between datasets and tables.
Changes to third-party libraries
Version 3.3.1 of the Apache Kafka client library was removed.
Closed Issues
This release contains the following closed issues:
•
[DINT-4251] Related data from a child dataspace is exported when it should not be.
•
[DINT-4657] An error displays when importing a CSV file using a template where the default
value of Concatenate String transformation is an empty string.
•
[DINT-4716] The dataspace is locked when transferring data to multiple target tables.
Known Issues
This release contains the following known issues:
•
[DINT-4339] A JNDI data source cannot be configured when EBX® is deployed on a WebLogic,
or JBoss server.
•
Fonts are no longer shipped with the JDK 11. Font rendering in Java 11 JVMs now uses pre-
installed operating system fonts. This can cause issues in Linux environments when exporting
Excel files. As a workaround, you can install the fontconfig package.
•
When exporting to SQL with TDV, if any error occurs, the operation is cancelled.
•
Due to a limitation in Excel, long fields with the number data type display all numbers past the
16th place as a 0.
•
Importing and exporting SQL: Read and write is not possible with the Timestamp data type with
MS SQL Server.
•
Configuring a schema using the JNDI configuration in your web server is not supported.
•
When creating a custom transformation function, you must use a predefined data type for its input
and output fields.
25.4 Version 6.1.1
New features
This release contains the following new features:
•
You can now import XLSM files.
•
An administrator can now define the default values used in import, export, and transfer operations.
Documentation > Release Notes > All release notes
TIBCO EBX® Data Exchange Add-on (New) 115
•
The number of updated and skipped records is now included in the import and transfer service
results summaries.
•
Statistics are now available when transferring data at the table level.
•
A new built-in transformation function is available that allows you to define different list
separators for different fields.
Changes in Functionality
Names, descriptions, and data types were added to the add-on's built-in transformation functions.
These values are now read-only.
Changes to third-party libraries
This release contains no updated to third-party libraries.
Closed Issues
This release contains the following closed issues:
•
[DINT-4226] The template cannot be saved after changing and publishing the data model.
•
[DINT-4246] The cell function instead of the cell value is imported when importing Excel.
•
[DINT-4271] File names that include Chinese characters do not display correctly in exported
CSV and Excel files.
•
[DINT-4307] A scheduled workflow job fails due to database connection issues.
•
[DINT-4417] The SQL template cannot be loaded when configuring the JNDI in the context.xml
file.
•
[DINT-4435] A large dataset cannot be imported from Excel.
Known Issues
This release contains the following known issues:
•
[DINT-4339] A JNDI data source cannot be configured when EBX® is deployed on a WebLogic,
or JBoss server.
•
Fonts are no longer shipped with the JDK 11. Font rendering in Java 11 JVMs now uses pre-
installed operating system fonts. This can cause issues in Linux environments when exporting
Excel files. As a workaround, you can install the fontconfig package.
•
When exporting to SQL with TDV, if any error occurs, the operation is cancelled.
•
Due to a limitation in Excel, long fields with the number data type display all numbers past the
16th place as a 0.
•
Importing and exporting SQL: Read and write is not possible with the Timestamp data type with
MS SQL Server.
•
Configuring a schema using the JNDI configuration in your web server is not supported.
•
When creating a custom transformation function, you must use a predefined data type for its input
and output fields.
Documentation > Release Notes > All release notes
TIBCO EBX® Data Exchange Add-on (New) 116
25.5 Version 6.1.0
Released: March 2023
New features
This release contains the following new features:
•
The add-on was updated to ensure compatibility with the new TIBCO EBX® staging feature. This
feature allows you to migrate configuration settings between environments. Settings available
to migrate from the add-on include database and data model connections and user-defined data
integration templates.
•
Add-on service memory usage was optimized to improve performance.
•
When importing data you can use the new simulation feature to preview import results. This
allows you to test the data and correct any potential errors prior to importing.
•
The add-on now maintains Options and Mapping screen states, eliminating the need to
reconfigure settings when switching between them.
•
The add-on's API was updated to support record filters on EBX® source tables.
•
When performing data integration tasks through a database connection, the following additional
data types are now supported:
•
BigInt Identity
•
DateTime 2
•
When connecting to a database, the add-on now supports the use of Windows credentials.
Changes in Functionality
This release contains no changes in functionality.
Changes to third-party libraries
This release contains no updated to third-party libraries.
Closed Issues
This release contains the following closed issues:
•
[DINT-3657] The Close button is duplicated in the Excel import result screen when using the
service in a perspective.
•
[DINT-4014] Unexpected errors are not handled in user services.
•
[DINT-4013] Misleading error logs can be generated when exporting files.
•
[DINT-1715] The warning message is missing when the Import mode is set to Replace all
content.
•
[DINT-3117] An Ajax error occurs when loading an SQL data source when its name was changed
in configuration settings.
Known Issues
This release contains the following known issues:
Documentation > Release Notes > All release notes
TIBCO EBX® Data Exchange Add-on (New) 117
•
Fonts are no longer shipped with the JDK 11. Font rendering in Java 11 JVMs now uses pre-
installed operating system fonts. This can cause issues in Linux environments when exporting
Excel files. As a workaround, you can install the fontconfig package.
•
When exporting to SQL with TDV, if any error occurs, the operation is cancelled.
•
Due to a limitation in Excel, long fields with the number data type display all numbers past the
16th place as a 0.
•
Importing and exporting SQL: Read and write is not possible with the Timestamp data type with
MS SQL Server.
•
Configuring a schema using the JNDI configuration in your web server is not supported.
•
When creating a custom transformation function, you must use a predefined data type for its input
and output fields.
25.6 Version 4.5.2
Released: February 2023
New features
This release was updated to ensure compatibility with TIBCO EBX® Add-ons Bundle version 5.6.1.
Changes in Functionality
This release contains no changes in functionality.
Changes to third-party libraries
This release contains no changes to third-party libraries.
Closed Issues
This release contains no closed issues.
Known Issues
This release contains the following known issues:
•
When exporting to SQL with TDV, if any error occurs, the operation is cancelled.
•
Due to a limitation in Excel, long fields with the number data type display all numbers past the
16th place as a 0.
•
Importing and exporting SQL: Read and write is not possible with the Timestamp data type with
MS SQL Server.
•
Configuring a schema using the JNDI configuration in your web server is not supported.
•
When creating a custom transformation function, you must use a predefined data type for its input
and output fields.
25.7 Version 4.5.1
Released: November 2022
Documentation > Release Notes > All release notes
TIBCO EBX® Data Exchange Add-on (New) 118
New features
This release contains no new features.
Changes in Functionality
This release contains no changes in functionality.
Changes to third-party libraries
The Excel-streaming-reader library was upgraded to version 4.0.4.
Closed Issues
This release contains no closed issues.
Known Issues
This release contains the following known issues:
•
When exporting to SQL with TDV, if any error occurs, the operation is cancelled.
•
Due to a limitation in Excel, long fields with the number data type display all numbers past the
16th place as a 0.
•
Importing and exporting SQL: Read and write is not possible with the Timestamp data type with
MS SQL Server.
•
Configuring a schema using the JNDI configuration in your web server is not supported.
•
When creating a custom transformation function, you must use a predefined data type for its input
and output fields.
25.8 Version 4.5.0
Released: September 2022
New features
This release contains the following new features:
•
API updates include:
•
The creation of custom services for SQL import and export. A custom script task can be
created and used in workflows.
•
All triggers and blocking constraints can be turned off when running add-on services.
•
During a data integration operation, valid records are persisted in EBX®, whereas invalid
records are skipped and listed in an error file after the operation. In the file, a column is added
that shows the relevant error message for each record.
•
If there is invalid data found during an import, a new option enables the download of a file
containing the invalid data. A column is added that shows the relevant error message for each
record.
•
A connection with TIBCO Data Virtualization can be created to integrate data between TDV
views and a TIBCO EBX® data model.
Documentation > Release Notes > All release notes
TIBCO EBX® Data Exchange Add-on (New) 119
•
Custom date and date/time patterns can now be created and used with CSV import and export
services.
•
Additional information about data integration services is now included in the add-on's logs.
•
Error log performance is improved.
•
When using a custom workflow script task:
•
The Template parameter now accepts the template's UUID or name as valid input.
•
When using a template with a custom workflow script task, transformation function
parameters can be overridden.
Changes in Functionality
This release contains no changes in functionality.
Changes to third-party libraries
This release contains no changes to third-party libraries.
Closed Issues
This release contains the following closed issues:
•
[DINT-3161] Excel file cells are incorrectly formatted when exporting numeric fields.
•
[DINT-3397] The database connection test does not work when the URL contains a special
character.
•
[DINT-3405] The Transform table shows all cross reference transformations as having an error.
•
[DINT-3427] Add-on services do not work if a connection is created with a TIBCO Data
Virtualization server view that has no schema.
•
[DINT-3431] When importing Excel at the dataset level, the execution order is not consistent
with the Excel sheet order.
•
[DINT-3441] A template created from a temporary dataspace cannot be used.
Known Issues
This release contains the following known issues:
•
When exporting to SQL with TDV, if any error occurs, the operation is cancelled.
•
Due to a limitation in Excel, long fields with the number data type display all numbers past the
16th place as a 0.
•
Importing and exporting SQL: Read and write is not possible with the Timestamp data type with
MS SQL Server.
•
Configuring a schema using the JNDI configuration in your web server is not supported.
•
When creating a custom transformation function, you must use a predefined data type for its input
and output fields.
25.9 Version 4.4.1
Released: July 2022
Documentation > Release Notes > All release notes
TIBCO EBX® Data Exchange Add-on (New) 120
New features
When defining a custom cross reference transformation via the API or script task, the Ignore lookup
failure parameter can be defined.
Changes in Functionality
This release contains no changes in functionality.
Changes to third-party libraries
This release contains no changes to third-party libraries.
Closed Issues
[DINT-3317] It is not possible to call an existing template via the API for workflow script task.
Known Issues
This release contains the following known issues:
•
Importing and exporting SQL: Read and write is not possible with the Timestamp data type with
MS SQL Server.
•
Configuring a schema using the JNDI configuration in your web server is not supported.
•
When creating a custom transformation function, you must use a predefined data type for its input
and output fields.
25.10 Version 4.4.0
Released: June 2022
New features
This release contains the following new features:
•
You can save templates for SQL import and export operations.
•
When importing SQL, you can import from configured database views.
•
When exporting to Excel or CSV at the table level, you can include data from related tables.
•
You can include Primary Key, Foreign Key and Enumeration labels when exporting to CSV, Excel
and SQL. Excel export also allows you to export Static Enumeration labels.
•
You can specify the Date and Date/time formats when importing CSV.
•
You can use the API to create custom transformation functions. These transformation functions
will be available for business users to add to mappings in the user interface.
•
Support is now included for data model variants for the TIBCO EBX® Match and Merge Add-
on in the Export SQL service.
Changes in Functionality
This release contains no changes in functionality.
Documentation > Release Notes > All release notes
TIBCO EBX® Data Exchange Add-on (New) 121
Changes to third-party libraries
This release contains no changes to third-party libraries.
Closed Issues
This release contains the following closed issues:
•
[DINT-3100] An error occurs when using the Export CSV service with the Export Label from
Foreign Key options selected.
•
[DINT-3186] An error occurs when exporting data.
Known Issues
This release contains the following known issues:
•
Importing and exporting SQL: Read and write is not possible with the Timestamp data type with
MS SQL Server.
•
Configuring a schema using the JNDI configuration in your web server is not supported.
•
When creating a custom transformation function, you must use a predefined data type for its input
and output fields.
25.11 Version 4.3.2
Released: April 2022
New features
This release contains the following new features:
•
The performance for SQL export was improved.
•
You can now use the API to:
•
Configure import, export, and transfer operations on any table or dataset that is based on the
same data model.
•
Execute the template API at the dataset level.
•
Configure the template API on any dataset based on the same data model.
Changes in Functionality
This release contains no changes in functionality.
Changes to third-party libraries
This release contains no changes to third-party libraries.
Closed Issues
This release contains no closed issues.
Documentation > Release Notes > All release notes
TIBCO EBX® Data Exchange Add-on (New) 122
Known Issues
This release contains the following known issues:
•
Importing and exporting SQL: Read and write is not possible with the Timestamp data type with
MS SQL Server.
•
Configuring a schema using the JNDI configuration in your web server is not supported.
25.12 Version 4.3.1
Released: March 2022
New features
You can now use import, export, and transfer functionality in workflow services and perspective
actions. The add-on specific services and actions begin with [ebx-addon-dint]. There are two options
for each import, export and transfer type—one to apply to tables and one for datasets.
Changes in Functionality
This release contains the following changes in functionality:
•
When saving a template, the position of tables, transformation functions, and links in the
Mapping screen are now stored. When the template is loaded, the components display according
to the state of the most recent save.
•
Template names must now be unique.
Changes to third-party libraries
This release contains no changes to third-party libraries.
Closed Issues
This release contains no closed issues.
Known Issues
This release contains the following known issues:
•
Importing and exporting SQL: Read and write is not possible with the Timestamp data type with
MS SQL Server.
•
Configuring a schema using the JNDI configuration in your web server is not supported.
25.13 Version 4.3.0
Released: February 2022
New features
This release contains the following new features:
Documentation > Release Notes > All release notes
TIBCO EBX® Data Exchange Add-on (New) 123
•
You can now import from and export to SQL databases. An administrator must configure the
connection to the database and connection between the database and data model. See the User
Guide for more information.
•
The cross-reference transformation function contains the new Ignore lookup failure option.
When enabled, records are imported and exported even when the cross-reference lookup does not
find a corresponding value. If left disabled, records these records are not imported.
Changes in Functionality
This release includes the following changes in functionality:
•
Behavior during import at the table level was updated to ensure consistency when importing an
empty file.
•
Templates are now available for use on tables from the same data model, regardless of their
location.
Changes to third-party libraries
This release contains no changes to third-party libraries.
Closed Issues
This release contains no closed issues.
Known Issues
This release contains the following known issues:
•
Importing and exporting SQL: Read and write is not possible with the Timestamp data type with
MS SQL Server.
•
Configuring a schema using the JNDI configuration in your web server is not supported.
25.14 Version 4.2.1
Released: December 2021
New features
This release includes no new features.
Changes in Functionality
This release includes no changes in functionality.
Changes to third-party libraries
This release contains no changes to third-party libraries.
Closed Issues
This release contains the following closed issue: [DINT-2853] Validate table name inputs.
Documentation > Release Notes > All release notes
TIBCO EBX® Data Exchange Add-on (New) 124
Known Issues
This release contains no known issues.
25.15 Version 4.2.0
Released: November 2021
New features
This release includes:
•
Support for multi-table import, export and transfer operations at the dataset level. Additionally,
when exporting from a dataset, you can now add target tables. This allows you to export data
from one table to multiple locations. See the User Guide for more information about this feature.
•
When importing or exporting with Excel, the new List separator option allows you to define a
separator for lists.
Changes in Functionality
This release contains no changes in functionality.
Changes to third-party libraries
This release contains no changes to third-party libraries.
Closed Issues
This release contains no closed issues.
Known Issues
This release contains no known issues.
25.16 Version 4.1.1
Released: September 2021
New features
This release includes no new features.
Changes in Functionality
This release contains no changes in functionality.
Changes to third-party libraries
The Apache Streaming Excel Reader library was upgraded to version 3.1.1.
Documentation > Release Notes > All release notes
TIBCO EBX® Data Exchange Add-on (New) 125
Closed Issues
This release contains the following closed issue: [DINT-2589] An exception is thrown when multiple
cross reference transformations are used in a TableMapping.
Known Issues
This release contains no known issues.
25.17 Version 4.1.0
Released: July 2021
New features
This release includes the following new features:
•
You can now transfer data between EBX® tables.
•
When exporting, you can now add, edit, and remove target fields in the Mapping screen.
•
When working with templates, you can now:
•
Set user permissions to view, modify and delete templates.
•
Save copies of templates.
•
The new Digital asset UUID lookup transformation function allows you to perform a bulk import
operation to attach digital assets to records. Note that instructions for this process are contained
in the TIBCO EBX® Digital Asset Manager Add-on documentation.
•
A public API has been provided that allows you to import, export and transfer data. See the Java
API documentation for more information.
•
Tables in the Mapping screen now display data type and cardinality next to each field.
Changes in Functionality
This release contains no changes in functionality.
Closed Issues
This release contains no closed issues.
Known Issues
This release contains no known issues.
25.18 Version 4.0.1
Updates
Released: June 2021
This release contains the following updates:
Documentation > Release Notes > All release notes
TIBCO EBX® Data Exchange Add-on (New) 126
•
The First row contains header label was changed to Include column headers for Excel export
and Includes column headers for Excel import. When selecting Yes for this option during import,
you are now prompted to enter the starting location of table data.
•
When exporting Excel the two rows at the beginning of the file were removed.
•
The following library updates were made:
•
The Apache Commons BeanUtils library was upgraded to version 1.9.4.
•
The Apache CFX and HttpClient libraries were removed.
Bug Fixes
[DINT-2261] A documentation issue was corrected.
25.19 Version 4.0.0
New features
Released: March 2021
The TIBCO EBX® Data Exchange Add-on (New) allows you to integrate data from a source location
into a target. Additionally, it can transform the data to meet business and technical requirements of
disparate applications and systems.
This release allows you to import and export using CSV and Excel formats at the TIBCO EBX® table
level. No configuration is required to initiate an import or export operation. The add-on provides the
following graphical elements and features to support import and export:
•
Automatic mappings are generated between source and target fields. Data mappings display as
lines between source and targets. Where possible, the add-on generates these automatically and
adds basic transformations if required. It will also alert you visually to possible errors or warnings.
•
Drag and drop functionality to create mappings and transformations when required.
•
Pop-up editors to define transformation functions. The add-on includes several built-in
transformation functions to cover common use cases.
•
Templates that save mappings and other configuration options for reuse.

Documentation > Release Notes > All release notes
TIBCO EBX® Data Exchange Add-on (New) 127
The following list provides links to additional topics and tasks:
Introduction to the add-on
For a more in-depth overview of the add-on and your
potential interaction with it, see About the add-on [p 22]
Importing
For an introduction to the import process, see Import
overview [p 26].
For instructions on importing, see Importing to a table [p 27].
Exporting
For an introduction to the export process, see Export
overview [p 48].
For instructions on exporting, see Exporting a table [p 49].
Mapping and transformations
Map and transform overview [p 86] provides a look at
how the add-on implements the concepts of mappings and
transformations.
Mapping interface reference [p 89] highlights the user
interface used for mapping and transformation tasks during
data integration. Additionally, it provides an example of
using a transformation function.
You can refer to Transformation function reference [p
97] to see a list and description of the add-on's built-in
transformation functions.
Documentation > Release Notes > All release notes
TIBCO EBX® Data Exchange Add-on (New) 128
