
Writer Guide
Chapter 12
Tables of Contents, Indexes,
and Bibliographies

Copyright
This document is Copyright © 2011–2012 by its contributors as listed below. You may distribute it
and/or modify it under the terms of either the GNU General Public License
(http://www.gnu.org/licenses/gpl.html), version 3 or later, or the Creative Commons Attribution
License (http://creativecommons.org/licenses/by/3.0/), version 3.0 or later.
All trademarks within this guide belong to their legitimate owners.
Contributors
Ron Faile Jr.
Jean Hollis Weber
J A Smith
Feedback
Please direct any comments or suggestions about this document to:
Acknowledgments
This chapter is based on Chapter 12 of the OpenOffice.org 3.3 Writer Guide. The contributors to
that chapter are:
Martin Fox John Kane Rachel Kartch
Sigrid Kronenberger Peter Kupfer Paul Miller
Iain Roberts Gary Schnabl Rob Scott
Janet Swisher Catherine Waterman Jean Hollis Weber
Claire Wood Michele Zarri
Publication date and software version
Published 18 March 2012. Based on LibreOffice 3.4.5.
Note for Mac users
Some keystrokes and menu items are different on a Mac from those used in Windows and Linux.
The table below gives some common substitutions for the instructions in this chapter. For a more
detailed list, see the application Help.
Windows or Linux Mac equivalent Effect
Tools > Options menu
selection
LibreOffice > Preferences Access setup options
Right-click Control+click Opens a context menuccC
Ctrl (Control) z (Command) Used with other keys
F5 Shift+z+F5 Opens the Navigator
F11 z+T Opens the Styles and Formatting window
Documentation for LibreOffice is available at www.libreoffice.org

Contents
Copyright......................................................................................................................................... 2
Note for Mac users........................................................................................................................... 2
Introduction...................................................................................................................................... 5
Tables of contents............................................................................................................................ 5
Creating a table of contents quickly............................................................................................. 5
Customizing a table of contents................................................................................................... 6
Index/Table page.................................................................................................................... 7
Changing the title.............................................................................................................. 7
Setting the type of index/table.......................................................................................... 7
Protecting against manual changes.................................................................................. 7
Changing the number of levels included........................................................................... 7
Choosing the scope of the table of contents..................................................................... 7
Creating a table of contents from an outline..................................................................... 8
Creating from additional styles......................................................................................... 8
Creating from index marks................................................................................................ 8
Entries page............................................................................................................................ 8
Adding elements............................................................................................................. 10
Changing elements......................................................................................................... 10
Applying changes to all outline levels............................................................................. 10
Deleting elements........................................................................................................... 10
Hyperlinking an entry...................................................................................................... 10
Applying character styles................................................................................................ 11
Tab parameters............................................................................................................... 11
Tab position relative to Paragraph Style indent............................................................... 11
Styles page........................................................................................................................... 11
Columns page....................................................................................................................... 12
Background page.................................................................................................................. 12
Adding color................................................................................................................... 13
Adding a graphic............................................................................................................. 13
Deleting a color or graphic.............................................................................................. 13
Maintaining a table of contents.................................................................................................. 14
Editing a table of contents..................................................................................................... 14
Updating a table of contents................................................................................................. 15
Deleting a table of contents...................................................................................................15
Alphabetic indexes......................................................................................................................... 15
Adding index entries.................................................................................................................. 15
Creating an alphabetic index quickly......................................................................................... 16
Customizing index entries......................................................................................................... 17
Example of using an index key............................................................................................. 17
Customizing the appearance of an index...................................................................................18
Index/Table page.................................................................................................................. 18
Entries page.......................................................................................................................... 19
Adding elements............................................................................................................. 20
Changing elements......................................................................................................... 20
Deleting elements........................................................................................................... 20
Chapter Info.................................................................................................................... 20
Applying character styles................................................................................................ 20
Formatting entries........................................................................................................... 21
Styles, Columns and Background pages.............................................................................. 21
Creating Tables of Contents, Indexes and Bibliographies 3

Columns page....................................................................................................................... 21
Adding multiple columns................................................................................................. 21
Maintaining an index.................................................................................................................. 22
Viewing and editing existing index entries................................................................................. 22
Other types of indexes................................................................................................................... 23
Example: Creating an index of figures....................................................................................... 23
Bibliographies................................................................................................................................ 25
Creating a bibliographic database............................................................................................. 25
Filtering records.................................................................................................................... 26
Changing column details....................................................................................................... 26
Changing the data source..................................................................................................... 26
Changing field details............................................................................................................ 27
Adding entries to the database.................................................................................................. 28
Maintaining entries in the database........................................................................................... 29
Adding references (citations) into a document........................................................................... 29
Entering references from a database.................................................................................... 29
Entering references from documents.................................................................................... 30
Editing a reference.................................................................................................................... 30
Creating the bibliography........................................................................................................... 31
Index/Table page.................................................................................................................. 31
Entries page.......................................................................................................................... 32
Styles, Columns and Background pages.............................................................................. 33
Generating the bibliography.................................................................................................. 33
Defining the paragraph style for the bibliography.......................................................................34
Updating, editing and deleting an existing bibliography............................................................. 35
Tools for working with bibliographies......................................................................................... 35
4 Creating Tables of Contents, Indexes and Bibliographies

Introduction
This chapter describes how to create and maintain a table of contents (TOC), an index, and a
bibliography for a text document using LibreOffice Writer. To understand the instructions, you need
to have a basic familiarity with Writer and styles (see Chapters 6 and 7).
This chapter does not cover all the possible ways to use the features available through the
TOC/Index dialog in Writer. Some common usage examples are given.
Tables of contents
Writer’s table of contents feature lets you build an automated table of contents from the headings
in your document. Whenever changes are made to the text of a heading in the body of the
document or the page on which the heading appears, those changes automatically appear in the
table of contents when it is next updated.
Before you start, make sure that the headings are styled consistently. For example, you can use
the Heading 1 style for chapter titles and the Heading 2 and Heading 3 styles for chapter
subheadings.
This section shows you how to:
• Create a table of contents quickly, using the defaults.
• Customize a table of contents.
Note
You can use any style you want for the different levels to appear in the table of
contents; however, for simplicity, most of this chapter uses the default Heading [x]
styles.
Creating a table of contents quickly
Most of the time you will probably find the default table of contents to be what you need. Inserting a
default TOC is simple:
1) When you create your document, use the following paragraph styles for different heading
levels (such as chapter and section headings): Heading 1, Heading 2, and Heading 3.
These are what will appear in your TOC. Writer can evaluate up to ten levels of headings.
2) Click in the document where you want the TOC to appear.
3) Choose Insert > Indexes and Tables > Indexes and Tables.
4) Click OK. The result will be a typical table of contents.
Some tips you may find useful:
• If some of your headings do not show up in the table of contents, check that the headings
have been tagged with the correct paragraph style. If a whole level of headings does not
show up, check the settings in Tools > Outline Numbering. See “Defining a hierarchy of
headings” in Chapter 6, Introduction to Styles, for more information.
• The TOC appears with a gray background. This background is there to remind you that the
text is generated automatically. It is not printed and does not appear if the document is
converted to a PDF. To turn off this gray background, go to Tools > Options > LibreOffice
> Appearance, then scroll down to the Text Document section and deselect the option for
Index and table shadings.
This change may leave a gray background showing behind the dots between the headings
and the page numbers, because the dots are part of a tab. To turn that shading off, go to
Tables of contents 5

Tools > Options > LibreOffice Writer > Formatting Aids and deselect the option for
Tabs.
• If you cannot place the cursor in the TOC, choose Tools > Options > LibreOffice Writer >
Formatting Aids, and then select Enable in the Cursor in protected areas section.
If you add or delete text (so that headings move to different pages) or you add, delete, or change
headings, you need to update the table of contents. To do this: Right-click anywhere in the TOC
and select Update Index/Table from the pop-up menu.
Customizing a table of contents
Almost every aspect of the table of contents can be customized to suit the style and requirements
of your document. However, with this flexibility also comes some complexity and it is good to have
in mind the desired end result.
Start by clicking in the document where you want the table of contents to appear and choose
Insert > Indexes and Tables > Indexes and Tables to open the Insert Index/Table dialog shown
in Figure 1.
Figure 1. Index/Table page of Insert Index/Table dialog
You can also access this dialog at any time by right-clicking anywhere in an existing table of
contents and choosing Edit Index/Table from the pop-up menu.
The Insert Index/Table dialog has five pages. Each of them covers a different aspect of the TOC
structure and appearance:
• Use the Index/Table page to set the attributes of the TOC.
• Use the Entries and Styles pages to format the entries in the TOC.
6 Creating Tables of Contents, Indexes and Bibliographies

• Use the Columns page to put the TOC into more than one column.
• Use the Background page to add color or a graphic to the background of the TOC.
You can display a preview box, located on the left-hand side of each page, to show as you work
how the TOC will look. (If you do not see the preview box, select the Preview option in the lower
right-hand corner of the dialog.) The illustrations in this chapter show the dialog as it appears with
the preview box hidden.
Note
The preview box only shows the appearance from settings made on the Index/Table,
Entries and Styles pages. The Columns and Background pages each have their own
preview panes.
After making all your changes, click OK to apply them. Before clicking OK, If you choose to revert
to the default settings for the Columns and Background pages, select each page in turn and click
the Reset button. The settings on the Entries and Styles pages must be reset manually, the Reset
button has no effect.
Index/Table page
Use the Index/Table page, pictured in Figure 1, to set the attributes of the TOC.
Changing the title
To give the table of contents a different title, type it in the Title field. To delete the title, clear the
Title field.
Setting the type of index/table
Be sure the Type is set to Table of Contents. See “Alphabetic indexes” on page 15 and “Other
types of indexes” on page 23 for more about creating other types of indexes.
Note
You can only change the type of index when you first create it. Once you define an
index type (for example, make a table of contents) you cannot change the type.
Protecting against manual changes
To prevent the TOC from being changed accidentally, select Protected against manual changes.
If this option is selected, the TOC can only be changed by using the right-click menu or the Insert
Table/Index dialog. If the option is not selected, the TOC can be changed directly on the document
page, just like other text. However, any manual changes will be lost when you update it.
Changing the number of levels included
Writer uses 10 levels of headings when it builds the table of contents (or the number of levels used
in the document, whichever is smaller). To change the number of levels included, enter the
required number in the Evaluate up to level box. For example, the TOC in this book includes only
the first four heading levels.
Choosing the scope of the table of contents
The for drop-down list in the Create index/table area, allows you to select whether the TOC will
cover all the document's headings (Entire document) or just the headings of the chapter where it
is inserted. Writer identifies a “chapter” as all the headings between two first level outline headings
(normally Heading 1).
Tables of contents 7

Creating a table of contents from an outline
The third section of the Index/Table page is used to determine what Writer should use to create the
TOC. The available choices (not mutually exclusive) are:
• Outline
• Additional styles
• Index marks
By default Writer uses the outline levels; that is, paragraphs formatted with the paragraph styles
associated with outline levels in Tools > Outline Numbering. In the default document, Heading 1
has outline level 1, Heading 2 outline level 2 and so on up to Heading 10.
You can change the paragraph styles included in the outline as described in “Defining a hierarchy
of headings” in Chapter 6, Introduction to Styles. You can include other paragraph styles in the
TOC by assigning an outline level to those styles. To do this, modify the paragraph style definition:
go to the Outline & Numbering page for the style, and select the required outline level. Click OK to
save the change.
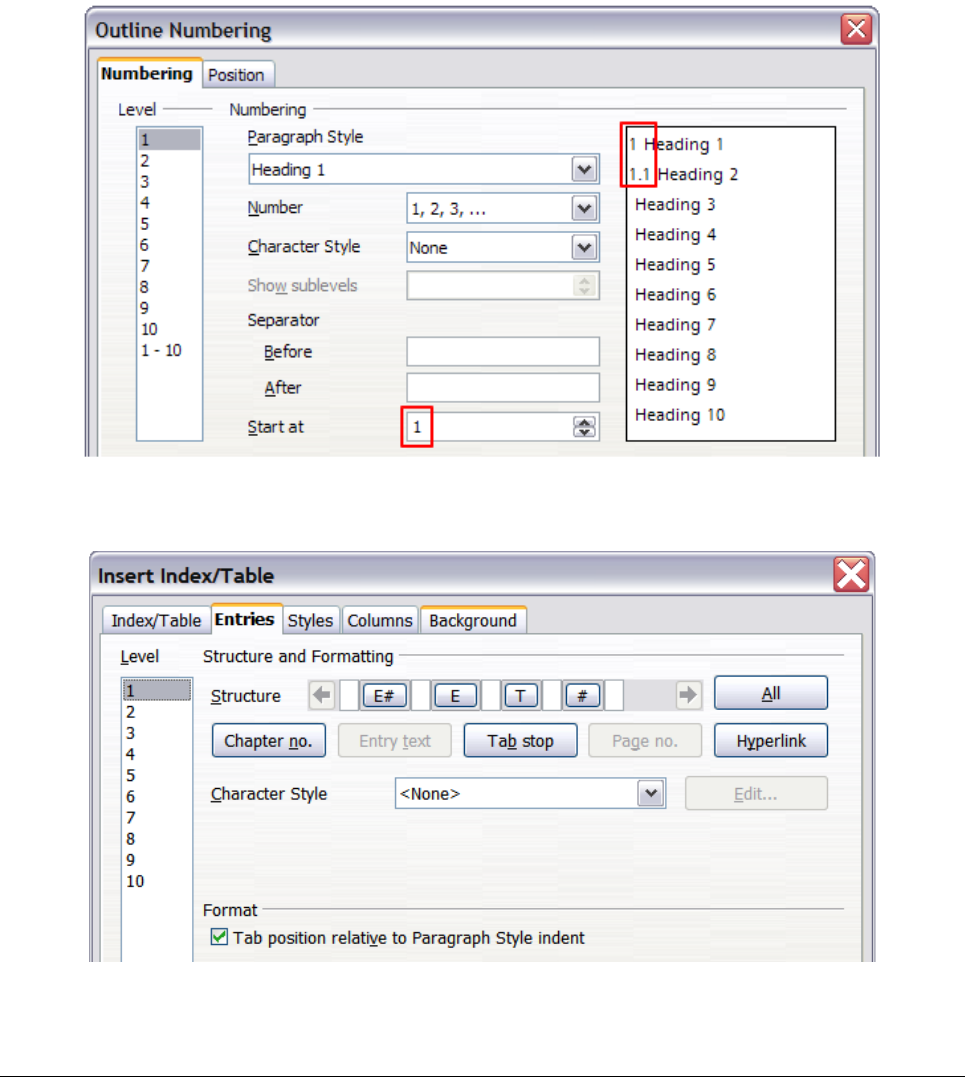
Figure 2: Specifying an outline level on the Outline & Numbering page for a paragraph style
Creating from additional styles
By selecting the Additional Styles option on the Index/Table page, you can add more paragraph
styles to the TOC. This can be useful when you want to include in the TOC an annex (appendix). If
the Outline option is also selected, the additional styles will be included in the table of contents
together with the ones defined in the outline numbering. However, headings included in the TOC
using this feature are not hyperlinked to the headings in the document body as are headings
assigned to outline levels.
Creating from index marks
This selection adds any index entries that you have inserted into the document by using Insert >
Indexes and Tables > Entry. Normally you would not use this selection for a table of contents.
However, if you do wish to use it, be sure to select Table of Contents from the drop-down list in
the Insert Index Entry dialog (see Figure 10) when you are entering the index entries for use in a
TOC, so that Writer can distinguish between them and any index entries intended for inclusion in
an alphabetic index.
Entries page
Use the Entries page (see Figure 4) to define and format the text of entries in the TOC. The text of
each outline level can be styled independently from the other levels by adding and deleting
elements.
Click on a number in the Level column to select the outline level whose elements you want to
format. This will display the Structure line which contains the elements included in the entries for
that level. Elements that can be added to the structure line are displayed just below the structure
line, and are grayed out if they cannot be included:
• The E# button represents the “chapter number”, which means the heading number value
assigned in Tools > Outline Numbering to a heading style, not just for chapters but also
for other levels of headings (Chapter level and level 2 values are illustrated in Figure 3).
8 Creating Tables of Contents, Indexes and Bibliographies
• The E button represents the chapter (or sub-chapter) text: That is the text formatted with
the paragraph style used for each level. In Figure 3, Heading 1 is used for Level 1, Heading
2 for Level 2.
• The T button represents a tab stop.
• The # button represents the page number.
• The LS button represents the start of a hyperlink. (This button does not appear on the
default Structure line.)
• The LE button represents the end of a hyperlink. (This button does not appear on the
default Structure line.)
The LS and LE buttons are part of the Hyperlink button set-up (See Hyperlinking an entry, below).
Each white field on the Structure line represents a blank space where you can add custom text.
Figure 3: Assigning a chapter number value (the E# value). The assigned Level 2
value also shows in the preview pane.
Figure 4. Entries page of Insert Index/Table dialog
Tables of contents 9

Note
In the Outline Numbering dialog, if you have included any text in the Separator text
input boxes for any given level, then that text will be part of the E# field for that
level. You should take care when building the structure line not to create any
unwanted effects in the appearance of your TOC.
Adding elements
To add an element to the Structure line:
1) Click in the white field where you want to insert the element.
2) Click one of the active buttons just below the Structure line. For example, to add a tab, click
the Tab stop button. A button representing the new element appears on the Structure line.
3) To add custom text, such as the word Chapter, type the text in the white field. Don't forget a
trailing space.
Changing elements
To change an element in the Structure line, click the button representing that element and then
click a non-grayed out element that you want to substitute it for, in the row of buttons just below the
Structure line. For example, to change a chapter number to a tab stop, click the E# button on the
Structure line (it shows then as being pressed) and then click the Tab stop button in the row of
available elements. To cancel before swapping an element, click in one of the white spaces.
Applying changes to all outline levels
To apply the displayed structure and formatting to all outline levels, click the All button.
Deleting elements
To delete an element from the Structure line, click the button representing that element and then
press the Delete key on your keyboard. For example, to delete a tab stop, click the T button and
then press the Delete key (Function+Delete on a Mac).
Hyperlinking an entry
To change the default Structure line so that the chapter number and the entry text form a hyperlink,
follow these steps:
1) On the Structure line, place the cursor in the white field to the left of the E# button.
2) Click the Hyperlink button. An LS button, representing the start of the hyperlink, appears
on the Structure line.
3) On the Structure line, place the cursor in the white field to the right of the E button.
4) Click the Hyperlink button again. An LE button, representing the end of the hyperlink,
appears on the Structure line.
Figure 5 represents the completion of the above steps. The number and the text of the entries on
that level will now be hyperlinks.
Figure 5: Hyperlink in table of contents
10 Creating Tables of Contents, Indexes and Bibliographies

Applying character styles
You might want an element to be a bit different from the rest of the line. For example, you might
want the page number to be bold. To apply a character style to an element:
1) Be sure you have defined a suitable character style.
2) On the Structure line, click the button representing the element to which you want to apply
a style.
3) From the Character Style drop-down list, select the desired style.
To view or edit the attributes of a character style, select the style from the Character Style drop-
down list and then click the Edit button.
Tip
The default character style for hyperlinks is Internet Link, which by default is
underlined and shown in blue. If you want the TOC entries to work as hyperlinks,
but not appear underlined and blue, you can change the attributes of the Internet
Link character style. However, this changes the attributes of all hyperlinks in the
document.
If you want other hyperlinks (for example, website addresses) to remain in the
default style, select the LS button on the Structure line and change the character
style selection for TOC entries to Index Link. If necessary, change the attributes for
Index Link to what you want.
Tab parameters
Clicking on the Tab stop button on the structure line brings up two controls: Fill character and Tab
stop position:
• Fill character: select from the three options the tab leader you wish to use.
• Tab stop position: Enter the distance to leave between the left page margin and the tab
stop.
Tab position relative to Paragraph Style indent
When this option is selected, entries are indented according to the settings of their individual
formats. Where a paragraph style specifies an indent on the left, tab stops are relative to this
indent. If this option is not selected, tab stops are relative to the left margin position.
Styles page
Use the Styles page (Figure 6) to change which paragraph style is assigned to display the text of
each level in the table of contents. In most cases, the best strategy is to keep the assigned styles
but change their settings as needed to make the TOC appear the way you want.
To apply a custom paragraph style to an outline level:
1) In the Levels list box, select the outline level.
2) In the Paragraph Styles list box, click the desired paragraph style.
3) Click the < button to apply the selected paragraph style to the selected outline level.
The style assigned to each level appears in square brackets in the Levels list.
To remove paragraph styling from an outline level, select the outline level in the Levels list box, and
then click the Default button.
To view or edit the attributes of a paragraph style, click the style in the Paragraph Styles list box,
and then click the Edit button.
Note
Changes to a paragraph style will affect any text in the document that is formatted
using this style, not just the format of the table of contents.
Tables of contents 11

Figure 6. Styles page of Insert Index/Table dialog
Columns page
Use the Columns page to change the number of columns for the TOC. Multiple columns are more
likely to be used in indexes than in TOCs, so this page is described in the section on indexes. See
Figure 14.
Background page
Use the Background page to add color or a graphic to the background of the TOC.
Figure 7: Background page, showing Color choices.
12 Creating Tables of Contents, Indexes and Bibliographies

Adding color
To add color to the background of the table of contents, select from the color grid.
Note
By default, the background to the TOC is shaded gray. This setting is in Tools >
Options > LibreOffice > Appearance, then, in the Text Document area, Index and
table shadings is selected.
Deselect this option to remove the gray background. Note that by adding a
background color, you overwrite this setting anyway.
Adding a graphic
To add a graphic to the background of the table of contents:
1) From the As drop-down list, select Graphic. The Background tab now displays the graphics
options, as shown below.
2) Click the Browse button. The Find graphics dialog opens.
3) Find the graphic file you want and then click the Open button. The Find graphics dialog
closes and the selected graphic appears in the graphic preview box on the right-hand side
of the Background tab. (If you do not see the graphic, select the Preview checkbox.)
4) To embed the graphic in your document, clear the Link checkbox. To link the graphic to the
document but not embed it, select the Link checkbox.
5) In the Type area of the Background tab, choose how you want the background graphic to
appear:
a) To position the graphic in a specific location, select Position and then click the
desired location in the position grid.
b) To stretch the graphic to fill the entire background area, select Area.
c) To repeat the graphic across the entire background area, select Tile.
Figure 8: Graphic options on the Background page of the Insert Index/Table dialog
Deleting a color or graphic
To delete color or a graphic from the table background:
1) From the As drop-down list, select Color.
2) Click No Fill on the color grid.
Tables of contents 13

Maintaining a table of contents
This section shows you how to:
• Edit an existing TOC
• Update a TOC when changes are made to the document
• Delete a TOC
Editing a table of contents
To edit an existing TOC:
1) Right-click anywhere in the TOC.
2) From the context menu, choose Edit Index/Table. The Insert Index/Table dialog (Figure 1
on page 6) opens and you can edit and save the table as described in the previous section.
Tip
If you cannot click in the TOC, it is probably because it is protected. To disable this
protection, choose Tools > Options > LibreOffice Writer > Formatting Aids, and
then select Enable in the Cursor in protected areas section. If you wish to edit the
TOC without enabling the cursor, you can access it from the Navigator.
You can also access the Index/Table dialog from the Navigator (Figure 9 ).
Figure 9: Access an index from the Navigator
1) Open the Navigator (press F5).
2) Click the expansion symbol (+ sign or triangle) next to Indexes.
3) Right-click on Table of Contents1 and choose Index > Edit.
14 Creating Tables of Contents, Indexes and Bibliographies

Updating a table of contents
Writer does not update the TOC automatically, so after any changes to the headings, you must
update it manually. To update a TOC when changes are made to the document:
1) Right-click anywhere in the TOC.
2) From the pop-up menu, choose Update Index/Table. Writer updates the TOC to reflect the
changes in the document.
You can also update the index from the Navigator by right-clicking on Indexes > Table of
Contents1 and choosing Index > Update.
Deleting a table of contents
To delete the TOC from a document:
1) Right-click anywhere in the TOC.
2) From the pop-up menu, choose Delete Index/Table. Writer deletes the TOC.
Note
Writer will not prompt you to confirm the delete! Use caution when deleting a TOC.
You can also delete the index from the Navigator by selecting Index > Delete from the menu
shown in Figure 9.
Alphabetic indexes
An alphabetical index (referred to as an index) is a list of keywords or phrases used throughout a
document that, if listed in order with page numbers, may help the reader find information quickly.
Generally an index is found in the back of a book or document.
This section describes how to:
• Add index entries.
• Create an alphabetic index quickly.
• Customize the display of index entries.
• Customize the appearance of the index.
• View and edit existing index entries.
Adding index entries
Before you can create an index, you must create some index entries.
1) To add a word to the index, place the cursor anywhere in that word. If you want to add
multiple words as one entry, select the entire phrase.
2) Choose Insert > Indexes and Tables > Entry to display a dialog similar to that shown in
Figure 10. When the dialog opens, the selected text appears in the Entry text input box.
You can accept the word or phrase shown, or change it to whatever you want.
3) Click Insert to create the entry.
You may of course open the dialog before selecting text, and then select the text required. After
selecting the text, click on the dialog to enter the text into the Entry text input box.
Note
A cursor placed immediately before the first character of a word, or immediately after
the last character of a word if it's followed by a space, counts as being in that word.
Alphabetic indexes 15

Figure 10. Inserting an index entry
See “Customizing index entries” on page 17 for an explanation of the fields on this dialog.
You can create multiple entries without closing the dialog. For each one:
1) Click at the location in the document that you want to index.
2) Click again on the dialog.
3) Change the entry if needed, and click Insert.
4) Repeat steps 1–3 until you have finished with the entries, then click Close.
Note
If field shading is active (see Tools > Options > LibreOffice > Appearance >
Text Document > Field shadings), when a selected word or phrase has been
added to the index, it is shown in the text with a gray background. If the text of an
index entry has been changed from the text of the word selected, the index entry is
marked by a small gray rectangle at the start of that word.
Tip
You can also open the Insert Index Entry dialog by clicking the Entry icon on the
Insert toolbar, as shown in Figure 11.
Figure 11. Entry icon on Insert toolbar
Creating an alphabetic index quickly
Now that you have some index entries, you can create the index.
Although indexes can be customized extensively in Writer, most of the time you need to make only
a few choices.
To create an index quickly:
1) Click in the document where you want to add the index and click Insert > Indexes and
Tables > Indexes and Tables.
2) In the Type box on the Index/Table page (Figure 12), select Alphabetical Index.
16 Creating Tables of Contents, Indexes and Bibliographies

3) In the Options section, you may want to uncheck Case sensitive (so that capitalized and
lower-case words are treated as the same word) and uncheck Combine identical entries
with p or pp.
4) Click OK. The result will be a typical index.
Writer does not update an index automatically. If you add, delete, or change the text of index
entries, you need to update the index. To do this, follow the steps outlined in “Updating a table of
contents” on page 15.
Customizing index entries
Below is a brief explanation of the fields in the Insert Index Entry dialog (Insert > Indexes and
Tables > Entry) and how to use them.
Index
The type of index this entry is for. The default is Alphabetical Index, but you can use this field
to create extra entries for a table of contents or user-defined indexes or lists of almost anything.
For example, you might want an index containing only the scientific names of species
mentioned in the text, and a separate index containing only the common names of species.
See “Other types of indexes” on page 23.
Entry
The word or phrase to be added to the selected index. This word or phrase does not need to
be in the document itself; you can add synonyms and other terms that you want to appear in
the index.
1st key
An index key is an entry that has no associated page number and has several subentries that
do have page numbers. Using keys is a useful way of grouping related topics. (See “Example
of using an index key” on page 17.)
2nd key
You can have a three-level index, where some of the first-level keys have level-2 entries that
are also keys (without page numbers). This degree of index complexity is not often necessary.
Main entry
When the same term is indexed on several pages, often one of those pages has more
important or detailed information on that topic, so you want it to be the main entry. To make the
page number for the main, or most important, entry stand out, select this option and then define
the character style for the page number of a main index entry to be bold, for example.
Apply to all similar texts
Select this option to have Writer automatically identify and mark any other word or phrase that
matches the current selection. The Match case and Whole words only options become
available if this option is selected. Use this option with care, as it may result in many unwanted
page numbers (for minor uses of a word) being listed in the index.
Example of using an index key
An index key is a primary entry under which subentries are grouped. For example, you might want
to create a grouping similar to this:
LibreOffice
Calc...........10
Impress......15
Writer...........5
Alphabetic indexes 17

In this example, LibreOffice is the 1st key. The subentries (with the page numbers showing) are the
indexed entries. To insert an index entry for the topic Writer, on the Insert Index Entry dialog
(Figure 10 on page 16), type Writer in the Entry box and LibreOffice in the 1st key box.
Customizing the appearance of an index
To customize an existing index, right-click anywhere in the index and choose Edit Index/Entry
from the context menu.
The Insert Index/Table dialog (Figure 12) has five pages. Any or all of them can be used to
customize the appearance of an index.
• Use the Index/Table page to set the attributes of the index.
• Use the Entries and Styles pages to format the entries in the index.
• Use the Columns tab to put the index into more than one column.
• Use the Background tab to add color or a graphic to the background of the index.
The preview box, located on the left-hand side of the dialog, shows as you work how the index will
look. (If you do not see the preview box, select Preview in the lower right-hand corner of the
dialog.)
After making your changes, click OK to save the index so it appears in your document.
Note
The preview box only shows the appearance from settings made on the Index/Table,
Entries and Styles pages. The Columns and Background pages each have their own
preview panes.
Index/Table page
Use the Index/Table page to set the basic attributes of the index.
Figure 12. Index/Table page of Insert Index/Table dialog
18 Creating Tables of Contents, Indexes and Bibliographies

1) To give the Index a different title, type it in the Title field. To delete the title, clear the Title
field.
2) Be sure the type of index is set to Alphabetical Index.
3) To prevent the index from being changed accidentally, select Protected against manual
changes. If this option is selected, the index can only be changed using the right-click
menu, or the Insert Index/Table dialog. If the option is not selected, the index can be
changed directly on the document page, just like other text, but any manual changes to an
index are lost when you update it.
4) From the drop-down list in the Create index/table section, select Entire document. You
can also choose to create an index for just the current chapter.
5) Various other options determine how the index handles entries:
• Combine identical entries. Defines how identical entries are dealt with. Normally
each page number of an indexed word or phrase will be shown in the index; however
these can be combined using the Combine identical entries with p or pp. If you
want a page range displayed, select Combine with – (which will produce something
similar to 23–31). If you want different entries based on what letters are capitalized,
select Case sensitive.
• AutoCapitalize entries. Automatically capitalizes the first letter of each entry
regardless of how they show within the document itself.
• Keys as separate entries. For the keys to have their own page numbers, select this
option.
• Concordance file. Enables a list of words in an external file to be imported (select
using the File button) and then used within the index. The concordance file has a
special file format; for further information, refer to concordance file in Help >
LibreOffice Help. Using a concordance file can speed up production of an index, but
unless the words are very carefully selected and you edit the index afterwards, the
resulting index can be full of entries for minor mentions of a term, making it less useful
than a more selective index.
• Sort. Defines how the entries are sorted when displayed. The only option is
alphanumeric, but you can define which language alphabet will be used.
Entries page
Use the Entries page to set exactly how and what will be displayed for each of the entries. The
page is similar to Figure 13.
To begin, in the Level column select the index level whose elements you want to format. Level “S”
refers to the single letter headings that divide the index entries alphabetically when the
Alphabetical delimiter option is selected in the Format section. (You will be able to apply your
changes to all index levels later.) The Structure line displays the elements for entries in that level.
Each button on the Structure line represents one element:
• The E button represents the entry text.
• The T button represents a tab stop.
• The # button represents the page number.
• The CI button represents chapter information. This is not present by default, but can be
added by selecting the Chapter info button.
Each white field on the Structure line represents a blank space. You can add custom text if you
desire.
Alphabetic indexes 19

Figure 13. Entries page for creating an alphabetical index
Adding elements
To add an element to the Structure line:
1) Place the cursor in the white field to the left of where you want to insert the element.
2) Click one of the active buttons below the Structure line. (For example, to add a tab stop,
click the Tab stop button.) A button representing the new element appears on the Structure
line.
3) To add custom text, click in the white space at the position you want to insert it, and type
the text. Don't forget a trailing space.
Changing elements
To change an element in the Structure line, click the button representing that element and then
click the element that you want to substitute it for in the row of buttons just below the Structure line.
For example, to change entry text to a tab stop, click the E button on the Structure line (it shows
then as being pressed) and then click the Tab stop button in the row of available elements.
Deleting elements
To delete an element from the Structure line, click the button that represents that element and then
press the Delete key on your keyboard. For example, to delete a tab stop, click the T button and
then press the Delete key (Function+Delete on a Mac).
Chapter Info
This button inserts chapter information, such as the chapter heading and number. The information
to be displayed is selected from the Chapter entry box menu. This data is determined in the
Outline Numbering dialog (Tools > Outline Numbering).
Applying character styles
Each of the items that can be added to the Structure line may be given additional formatting. For
example, you may want the page number to be a different size from the rest of the index text. To
do this, apply a character style to one of the elements in the Structure line.
20 Creating Tables of Contents, Indexes and Bibliographies

To apply a character style to an element:
1) On the Structure line, click the button representing the element to which you want to apply
a style.
2) Select the desired style from the Character Style drop-down list. Writer applies the style to
the selected element.
To view or edit the attributes of a character style, select the style from the Character Style drop-
down list and then click the Edit button.
Formatting entries
Apply additional formatting using the options in the Format section.
• Alphabetical delimiter. This separates the index entries into blocks that start with the
same first letter, using that letter as a header. For example, if your index begins:
apple, 4
author, 10
break, 2
bus, 4
then selecting this option will give you:
A
apple, 4
author, 10
B
break, 2
bus, 4
• Key separated by commas. Arranges the entries in the index on the same line but
separated by commas.
• Tab position relative to Paragraph Style indent. When checked, entries are indented
according to the settings of their individual formats. Where a paragraph style with an indent
on the left is in use, tab stops will be relative to this indent. If this option is not selected, tab
stops will be relative to the left margin position.
Styles, Columns and Background pages
Refer to “Styles page” on page 11 and “Background page” on page 12 for detailed information on
these pages.
Columns page
Use the Columns page (Figure 14) to change the number of columns for the index.
Adding multiple columns
To display the index in more than one column:
1) Either enter the number of columns desired in the box labeled Columns or select the icon
representing the number of columns.
2) To evenly distribute the columns according to the page width, check the AutoWidth box. If
it is unchecked, you can manually set each of the following:
• Width of each of the columns
• Spacing between each of the columns
Alphabetic indexes 21

Figure 14. Columns page of the Insert Index/Table dialog
3) You can choose to have a separator line between the columns:
• Style: The default is None, or select from three choices of line style.
• Width: The width (thickness) of the line. The default is 0.25pt.
• Height: The height of the line, as a percentage of the full column height. The default is
100%
• Position: Position of the line relative to the columns (top, centered, or bottom) if the
height is less than 100%.
• Color: Allows the color of the separator line to be set.
Maintaining an index
To modify the appearance of an index:
1) Right-click anywhere in the index.
2) From the context menu, choose Edit Index/Table. The Insert Index/Table dialog opens and
you can edit and save the index using the five tabs described in the previous section.
To update or delete an index, right-click anywhere in the index and select Update Index/Table or
Delete Index/Table as required.
Viewing and editing existing index entries
Once you have added the initial entries, you can make some amendments. You can view and edit
these using the following steps:
1) Ensure that field shading is active (Tools > Options > LibreOffice > Appearance > Text
Document > Field shadings), so you can locate index entries more easily.
22 Creating Tables of Contents, Indexes and Bibliographies

2) Place the cursor in the field shading of an existing index entry in the body of your document
and select Edit > Index Entry. In the case of a changed-text entry, the field shading is
immediately before the word. Placing the cursor immediately before a word marked as a
text entry will satisfy both selection criteria. Alternatively, right-click at those positions and
from the context menu select Index Entry.
3) A dialog similar to Figure 15 appears. You can move through the various index entries
using the forward and back arrow buttons. If there is more than one entry for a single word
or phrase, a second row of buttons with a vertical bar at the point of the arrow head is
displayed allowing you to scroll through each of these entries.
4) Make the necessary modifications or additions to the index entries, and then click OK.
Figure 15. Viewing and editing index entries
Other types of indexes
An alphabetical index is not the only type of index that you can build with Writer. Other types of
indexes supplied with Writer include those for illustrations, tables, and objects, and you can even
create a user-defined index. This chapter does not give examples of all the possibilities.
To create other indexes:
1) Place the cursor where you want the index created.
2) Select Insert > Indexes and tables > Indexes and tables from the menu bar.
3) On the Insert Index/Table dialog, in the Type drop-down list, select the index wanted.
4) Modify the various pages, which are very similar to those discussed in previous sections.
5) Select OK when everything has been set.
Example: Creating an index of figures
Creating an index (list) of figures or tables is easy if the figure captions were created using Insert >
Caption or manually using a number range variable as described in Chapter 14, Working with
Fields.
1) On the Insert Index/Table dialog, in the Type drop-down list, choose Illustration Index.
You can change the title of the index to something else; we have used Table of
Figures as our title.
2) Be sure Captions is selected in the Create from section, and choose the category of
caption. The default for Category is Illustration; in our example we have used Figure for the
figure captions.
Other types of indexes 23
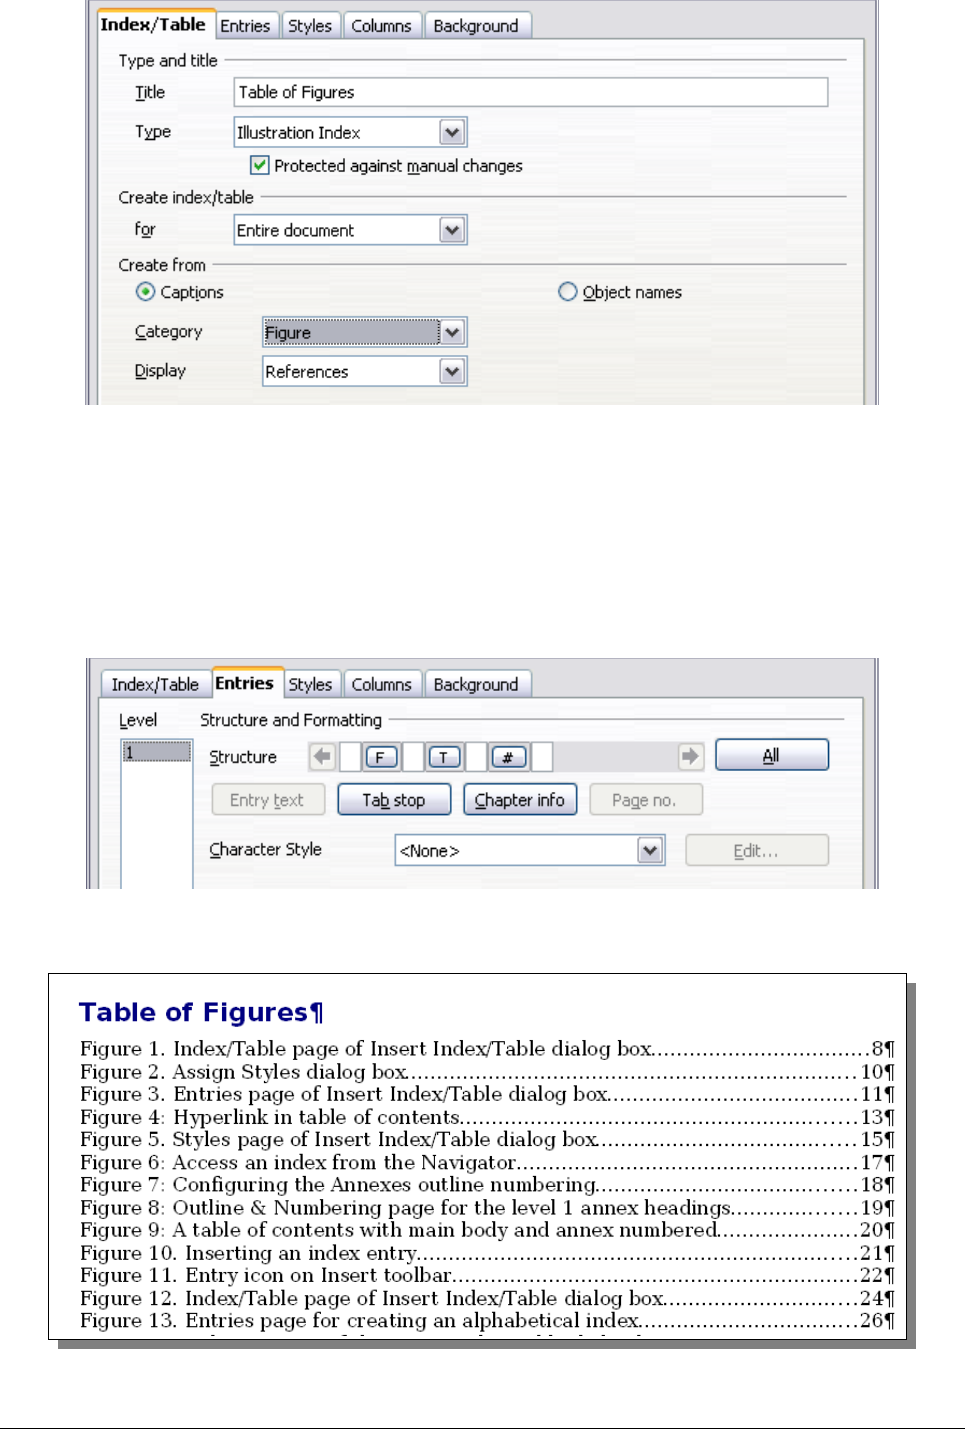
Figure 16. Creating other types of indexes
(The category Figure is not supplied with LibreOffice; however, if you have defined it when
creating a caption in your document, it will appear on this list. See Chapter 8, Working with
Graphics, for more about creating captions.)
3) Under Display, you can choose References (to include the category, number, and caption
text), Category and Number, or Caption Text. We have chosen References.
4) On the Entries page, notice that hyperlinking from the index to the body of the document is
not available, but you can make some other selections.
Figure 17: Entries tab for Illustration Index
5) Click OK. The result is shown below.
Figure 18: Resulting index of illustrations
24 Creating Tables of Contents, Indexes and Bibliographies

Bibliographies
A bibliography is a list for displaying references used throughout a document. These references
are either stored in a bibliographic database or within the document itself.
This section shows you how to:
• Create a bibliographic database; add and maintain entries.
• Add a reference into a document.
• Format the bibliography.
• Update and edit an existing bibliography.
Creating a bibliographic database
For most of this section, the database table used is the sample one that comes with Writer. For
information on creating a new table in the bibliographic database, see Chapter 8, Getting Started
with Base, in the Getting Started guide.
Although you can create references within the document itself, creating a bibliographic database
allows reuse in other documents and saves a lot of time.
Select Tools > Bibliography Database. The Bibliography Database window similar to that in
Figure 19 opens. The upper part of the page shows all of the records, in a table layout similar to
that of a spreadsheet. The lower part of the page shows all the fields of the selected record.
Figure 19. Bibliography Database main window
Bibliographies 25

Filtering records
To set up a filter for specific records within the bibliographic database, select Tools > Filter from
the Bibliographic Database menu bar. On the Standard Filter dialog (Figure 20), choose the fields,
conditions and values for the filter and click OK.
Figure 20. Setting up a filter for the bibliographic database
Changing column details
To change the details of columns in the bibliographic database, select Edit > Column
Arrangement from the menu bar, or click the Column Arrangement button near the top of the
window (see Figure 19). The Column Layout for Table biblio dialog (Figure 21) is displayed. This
allows you to change which fields are allocated to which columns. As an example, you can select
to have Author data go into the Identifier column, by changing the destination in the drop-down list.
The Short name data column destination sets to None automatically, as you can't set duplicate
destinations for data.
Figure 21. Changing column layout for bibliographic database
Changing the data source
To change the data source in use (for example, if you have more than one bibliographic database
for different purposes), select Edit > Choose Data Source from the menu bar, or click the Data
Source button near the top of the window. The Choose Data Source dialog (Figure 22) is
displayed.
26 Creating Tables of Contents, Indexes and Bibliographies
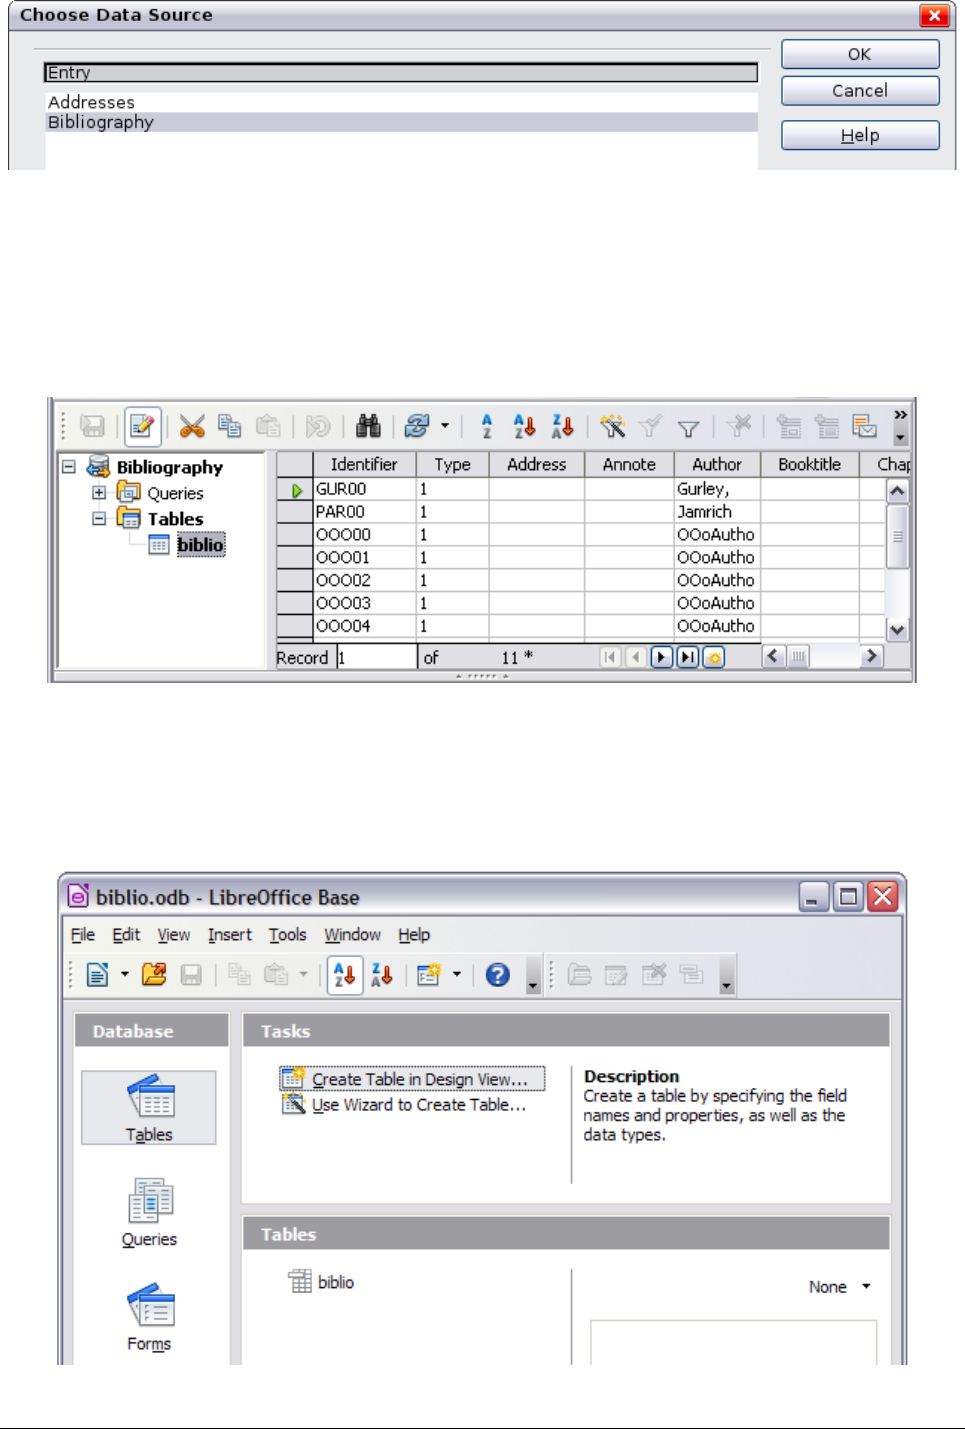
Figure 22: Choosing a different data source for the bibliographic database
Changing field details
You can make changes to the bibliography database (for example, rename fields or change the
length of fields) by doing the following:
1) In the main document (not the Bibliography Database window), press F4 or click View >
Data Sources to open the data source window, similar to Figure 23.
Figure 23. Data Source view of Bibliography database
2) Make sure that the Bibliography database is selected as well as the correct table. You may
have to expand some levels to be able to select the correct ones.
3) Right-click on the table entry (biblio in the example) and select Edit Database File from
the context menu. This opens a window similar to Figure 24, which is the main menu for
Base, the database component of LibreOffice.
Figure 24. Main window for working with databases
Bibliographies 27

4) If Tables (in the Database section) is not selected, select it now.
5) Right-click on the biblio table name in the Tables section and select Edit from the context
menu to display the Table Design window similar to that shown in Figure 25.
6) You can now select each of the fields. You can select the text in the Field Name cell and
change the entry as required. Clicking in the Field Type cell, allows you to open a selection
menu to change the data type in that cell. In the Field Properties section, the data
properties can be modified . For each data field selected, an explanation of that field
appears in a window to the right of the section.
7) When finished, you will be asked to confirm that you want the changes saved.
Note
For more information on how to use LibreOffice’s database features, see Chapter 8,
Getting Started with Base, in the Getting Started guide.
Figure 25: Modify table properties window
Adding entries to the database
Use the Bibliography Database dialog (Tools > Bibliography Database) to add entries to the
database:
1) You can add records directly into the database using the fields in the lower section of the
dialog shown in Figure 19 on page 25.
2) Select Insert > Record from the menu bar of the Bibliography Database dialog, or click the
Insert Record icon to the left of the horizontal scroll bar.
3) Enter a name for the entry in the Short Name box. Complete other fields as required. Use
the Tab key to move between fields.
4) It is best to use a unique name in the Short name field. This field is used when inserting
entries into documents.
28 Creating Tables of Contents, Indexes and Bibliographies

5) To complete the entry, move to the last field and press Tab once more.
If your document requires [Author, date] style citations, use the Short name field of the database to
record the information in the required format.
Maintaining entries in the database
To maintain entries in the database, use the Bibliography Database dialog (Tools > Bibliography
Database). Click on the appropriate record and modify the fields as appropriate.
Modified entries are saved automatically to the database when the cursor moves off the record.
Adding references (citations) into a document
Writer supports two methods of adding references to your document:
• From a bibliography database, such as the one built in to Writer.
• Directly from the keyboard when you may have documents in front of you.
Entering references from a database
To add references from the bibliographic database into a document:
1) Place the cursor where you want the reference to appear.
2) From the main menu, choose Insert > Indexes and Tables > Bibliographic Entry.
3) In the Insert Bibliographic Entry dialog, choose From bibliography database at the top of
the dialog.
Figure 26. Inserting bibliographic entries into a document
4) Select the reference from the Short name drop-down list near the bottom of the dialog. The
Author and Title of the selected reference are shown in the middle of the dialog, to help you
verify that it is the reference you want.
5) To insert the reference into the document, click Insert.
6) You can keep the dialog open and insert another reference into the document; you don’t
need to close and reopen it.
7) When you have finished inserting all the references, select Close.
Bibliographies 29

Entering references from documents
You may choose to enter your bibliographic entries directly into the document, instead of from an
external database. For example, you may not be working on your own computer.
Click in the document where you want to add the entry.
Select Insert > Indexes and Tables > Bibliography Entry.
1) In the dialog which opens, select the From document content option.
a) Select New.
b) In the Define Bibliography Entry dialog, complete all the fields which are relevant to
your entry. Type a unique name in the Short name text entry box, because the Insert
Bibliography Entry dialog uses this entry for the citation.
c) An entry must be selected from the menu in the Type input box in order to enable the
OK button.
d) Click OK when all the fields wanted are completed.
e) Click Insert to add the Short name field to the document
f) Click in each location you wish to add an entry and repeat this sequence
2) Click Close.
You may of course re-use an entry in your document, by restarting the sequence above, and then
selecting the Short name required, from the current list of entries, instead of selecting to add a new
entry
Editing a reference
You can edit a reference in the following manner:
1) Right-click on the entry (the cursor then displays to the left of the entry).
2) From the context menu which opens, select Bibliography Entry.
The Edit Bibliography Entry dialog opens, similar to below.
Figure 27: Edit the citation entry
3) To quickly edit only the Short name, click on the text box, alter the entry and then click
Modify. The dialog saves the change and closes.
4) To edit more of the entry, click on Edit to open the Define Bibliography Entry dialog similar
to the graphic shown below (Figure 28).
5) Make any changes required and then click OK to return to the dialog of Figure 27.
6) If you are satisfied with your changes, click Modify to accept the changes and exit the
dialog.
30 Creating Tables of Contents, Indexes and Bibliographies

Caution
When you open the Define Bibliography Entry dialog to edit an entry, do NOT use
the selection menu in the Short name box to change the entry you wish to edit.
Changing this setting will randomly distribute the data amongst the fields, from the
fields in which the data should reside.
Whatever the source of the citation, the modified references are stored in the document. If the
source was a bibliography database, that database remains unmodified.
Figure 28: The editable fields
Creating the bibliography
To create the bibliography:
1) Place the cursor at the point where you wish to insert the bibliography.
2) Select Insert > Indexes and Tables > Indexes and Tables and change the Type to
Bibliography, to display a dialog similar to that shown in Figure 29.
The Insert Index/Table dialog has five pages.
Index/Table page
Writer supports two ways of displaying references (citations) in the text of a document:
• Using the text recorded in the Short name field of each bibliographic entry, for example
[GUR00].
• By numbering the referenced documents in the sequence they occur in the text, for
example [1].
Tip
To specify which citation style is used in the document, use the Index/Table page
on the Insert Index/Table dialog, described on page 32.
Formatting the bibliography involves choices made in two places:
• Insert Index/table dialog (covered in this section)
• Bibliography 1 paragraph style (see page 34)
Bibliographies 31

The basic settings are selected on this page.
1) To give the bibliography a title, enter it in the Title field. (A title is not required.)
2) You can protect the bibliography from being changed accidentally, by checking Protected
against manual changes. If this option is selected, the bibliography can only be changed
using the right-click menu or the Insert Table/Index dialog. If the option is not selected, the
bibliography can be changed directly on the document page, just like other text, but any
manual changes will be lost when you update the bibliography.
Figure 29: Inserting a bibliography
3) To have the bibliographic entries (citations) numbered within the body of the document (for
example, [1], [2], ...), select Number entries. If, however, you wish to have the Short name
field contents (from the database) appear in the document, deselect this option.
4) Select the type of brackets that you want for the referenced entries shown within the body
of the document.
5) Define the sorting you require. Currently only alphanumeric sorting is supported. Sorting by
the the sequence that entries appear in the text is done on the Entries page.
Entries page
The structure of this page (see Figure 30), is similar to that for tables of contents and for indexes.
You can define how the entry will appear based on the Type of the entry, or simply apply the same
format to all entries by selecting the All button.
Each entry in the Type list has a default structure format.
The Structure of the entry is based on the fields available in the bibliographic database. The ones
shown by default for Article in the Type list are:
Sh – Short name
Au – Author
Ti – Title
Ye - Year
32 Creating Tables of Contents, Indexes and Bibliographies

Note
In this release of LibreOffice the Right scroll arrow on the structure line does not
work. If you have more than three entries, and you wish to check what elements are
on the line, click in the structure line and use the keyboard right navigation arrow.
The Left scroll arrow works correctly.
To remove elements from the Structure line, click the element then click the Remove button.
To add an element, click in the Stucture line where it is to be inserted. Select either the Tab stop,
or an element in the drop-down list to the left of the Insert button, and then click Insert. The
elements in the drop-down list are those fields found in the Bibliography Database.
All the elements on the Structure line can be formatted using the Character Style selection list.
To determine how entries are sorted, modify the Sort by options. To sort by the sequence that
entries appear in the text, choose Document position. To sort alphanumerically, choose Content.
Use Sort keys to group similar references.
Figure 30: Entries page for bibliographies
Styles, Columns and Background pages
Refer to “Styles page” on page 11, “Columns page” on page 21 and “Background page” on page
12 for detailed information on these pages.
Generating the bibliography
To generate the bibliography so that it appears in your document, click OK. The Insert Index/Table
dialog closes and the bibliography appears in your document.
Bibliographies 33

Defining the paragraph style for the bibliography
You can modify the Bibliography 1 paragraph style to suit your requirements. For example, to
number the entries in the bibliography list, you need to define a numbering style and link that
numbering style to the Bibliography 1 paragraph style. To do this:
1) On the Styles and Formatting window, click on the List Styles icon. You can either define a
new list style or modify one of those supplied. In this example, we will modify the
Numbering 1 style. Right-click on Numbering 1 and choose Modify from the context menu.
2) On the Numbering Style dialog, go to the Options page. In our example we want to have
the numbers enclosed in square brackets. To do this, type [ in the Before box and ] in the
After box, as shown in Figure 31.
Figure 31: Specifying square brackets before and after the number in a list
3) Now go to the Position page of the Numbering style dialog. In the Spacing to text box,
specify how much indentation you want for the second and following lines of any item in the
bibliography list of your document. Often you will need to experiment a bit to see what is
the best setting. In our example (Figure 32), we have chosen 1 cm.
Figure 32: Setting the spacing between the margin and the text
34 Creating Tables of Contents, Indexes and Bibliographies

4) Click OK to save these settings and close the Numbering Style dialog. Return to the Styles
and Formatting window, click on the Paragraph Styles icon, choose All Styles from the
list at the bottom of that window, then right-click on Bibliography 1 and choose Modify.
5) On the Paragraph Style dialog, go to the Outline & Numbering tab and select Numbering
1 from the drop-down list. (See Figure 33.) Click OK to save this change to the
Bibliography 1 paragraph style.
Figure 33: Applying a numbering style to a paragraph style
Now when you generate the bibliography, the list will look something like the one shown below
after removing elements from the structure line (the Short name and colon, for example).
Figure 34: Result of changing settings for Bibliography 1 paragraph style
Updating, editing and deleting an existing bibliography
Right-click anywhere in the bibliography. Then, in the context menu which opens:
• Select Update Index/Table to update the bibliography.
• Select Edit Index/Table to open the Insert Index/Table dialog so you can edit and save the
table.
• Select Delete Index/Table to delete the table without a confirmation request.
Tools for working with bibliographies
If you find Writer’s bibliography feature too limited, try Bibus (http://bibus-biblio.sourceforge.net/
wiki/index.php/Main_Page) or Zotero (http://www.zotero.org/). Both programs are free and open
source and are reported to work well with Writer.
Bibliographies 35
