
Let’s Cook: A Recipe for Creating Accessible
Word Documents
July 21, 2014
General Electric Foundation
Computer Center

Alternative Format Statement
This publication is available in alternative media upon request.
Statement of Non-Discrimination
The Pennsylvania State University is committed to the policy that all persons shall have equal access to
programs, facilities, admission, and employment without regard to personal characteristics not related
to ability, performance, or qualifications as determined by University policy or by state or federal
authorities. It is the policy of the University to maintain an academic and work environment free of
discrimination, including harassment. The Pennsylvania State University prohibits discrimination and
harassment against any person because of age, ancestry, color, disability or handicap, national origin,
race, religious creed, sex, sexual orientation, or veteran status. Discrimination or harassment against
faculty, staff, or students will not be tolerated at The Pennsylvania State University. Direct all inquiries
regarding the nondiscrimination policy to the Affirmative Action Director, The Pennsylvania State
University, 328 Boucke Building, University Park, PA 16802-5901; Tel 814-865-4700/V, 814-863-
1150/TTY.
Permission to copy all or part of this document is granted provided that the copies are not made or
distributed for direct commercial advantage. In addition, any duplicated materials must be attributed to
the Penn State Behrend Computer Center and include this credit notice. Direct any questions or
requests to:
Carolyn Dudas
Penn State Behrend
Computer Center
4205 College Drive
Erie, PA 16563-1201
814-898-6458

Table of Contents
Overview ....................................................................................................................................................... 1
Headings........................................................................................................................................................ 2
To apply a style to a paragraph heading: .................................................................................................. 2
To modify a style: ...................................................................................................................................... 3
To view the navigation pane: .................................................................................................................... 4
Images ........................................................................................................................................................... 5
To add alt text to an image: ...................................................................................................................... 5
To set the text wrapping for an object: .................................................................................................... 6
Tables ............................................................................................................................................................ 7
To add alt text to a table: .......................................................................................................................... 7
To add a header row: ................................................................................................................................ 7
Charts and Graphs ......................................................................................................................................... 8
To add alt text to a chart:.......................................................................................................................... 8
To add a caption to a chart: ...................................................................................................................... 9
Hyperlinks ................................................................................................................................................... 10
To create a hyperlink: ............................................................................................................................. 10
List Items ..................................................................................................................................................... 11
To create a list: ........................................................................................................................................ 11
Accessibility Checker ................................................................................................................................... 12
To use the Accessibility Checker: ............................................................................................................ 12
Save a Word Document as a PDF ................................................................................................................ 13
To save a document as a PDF (if you have the Acrobat tab in the ribbon): ........................................... 14
To save a document as a PDF (if you DO NOT have the Acrobat tab in the ribbon): ............................. 15
Best Practices .............................................................................................................................................. 16
Resources .................................................................................................................................................... 16
Training Exercise ......................................................................................................................................... 16

Overview
Everyone knows how to create a Word document, but do you know how to create an accessible Word
document? This document will guide you through a “recipe” to show you how to create an accessible Word
document (and by extension, an accessible PDF document). For example, we’ll learn how to properly add
ingredients (e.g. headings, images, tables, charts and graphs, hyperlinks, and list items), use a helpful Word
accessibility tool, and learn the preferred method of saving a Word document as a PDF.
Why is this important? Information needs to be accessible to everyone, including those with disabilities. For
instance, an individual who is blind may use a screen reader which “reads” the document to the person using
synthesized speech.
Think of it in this way… Two innovations, curb cuts and automatic door openers, were originally intended to
help people who use wheelchairs. They provided wheelchair users with the ability to easily cross streets and
the ability to enter buildings independently. But in reality, these two innovations became a benefit to
everyone --- we all use these innovations and they have become so commonplace that we don’t even think
twice about them. Document content needs to be provided in such a way so that it is accessible to people
with disabilities, which like curb cuts and door openers, can provide benefits to everyone.
So let’s get cookin’!
Note: The instructions in this document pertain to Office 2010 and 2013 for Windows.
CDudas\OfficeDocs\Seminars\How-To-Guides\Accessibility-OfficeDocs\AccessibleWordDocs-WithChartImages.docx\03.05.12\Revised 07.23.14\Page 1

Headings
Paragraph headings (such as those you find in this document), provide not only visual cues to major topics, but
they also provide a means for navigating the document by a screen reader. However, the paragraph headings
are not individually formatted (e.g. larger font size, bolded, and underlined), but are formatted by using styles.
Headings should be applied to paragraph headings based upon their hierarchy within a document. For
example, the following headings should be applied as follows:
• Heading 1 – Title of document
• Heading 2 – Major headings
• Heading 3 – Subheadings
Note: JAWS (the most popular screen reader) does not recognize custom named styles. Therefore, only use
headings with a name of Heading 1, Heading 2, etc.
Example:
In this document, Heading 1 is applied to the title (on the cover page). Heading 2 is applied to the major
topic headings, such as Images (the topic on the next page). Heading 3 is applied to the sentence that
precedes the numbered instructions, i.e. To apply…. (Heading 3 is not really necessary, but it makes it
easier for someone to quickly find the instructions if using a screen reader.)
To apply a style to a paragraph heading:
1. Click the Home tab.
2. Click on the paragraph that you want to style as a heading.
3. From the Styles section of the ribbon, click on the desired style.
CDudas\OfficeDocs\Seminars\How-To-Guides\Accessibility-OfficeDocs\AccessibleWordDocs-WithChartImages.docx\03.05.12\Revised 07.23.14\Page 2

To modify a style:
1. Click the Home tab.
2. In the Styles section of the ribbon, right click on the style name.
3. From the shortcut menu, select: Modify.
4. Make the desired formatting changes.
To add a style that can be used with other documents, select the option: New Documents
Based on this Template.
5. Click OK.
CDudas\OfficeDocs\Seminars\How-To-Guides\Accessibility-OfficeDocs\AccessibleWordDocs-WithChartImages.docx\03.05.12\Revised 07.23.14\Page 3

You can view the heading structure of your document by using Word’s navigation pane. Also, the navigation
pane allows you to navigate to specific locations within your document based upon your heading levels.
To view the navigation pane:
1. Click the View tab.
2. In the Show section of the ribbon, place a checkmark in the box next to Navigation Pane.
3. To navigate to a specific section within the document, click on any item in this pane.
CDudas\OfficeDocs\Seminars\How-To-Guides\Accessibility-OfficeDocs\AccessibleWordDocs-WithChartImages.docx\03.05.12\Revised 07.23.14\Page 4

Images
Images must have a description that explains the purpose or the content of that image. This description,
referred to as alt text (or alternate text), is read by a screen reader.
Example:
To add alt text to an image:
1. Right click on an image.
2. From the menu, select: Format Picture.
Additionally, in Word 2013: Click on the Layout & Properties button.
The button looks like this:
3. From the category list, click: Alt Text.
4. In the Description box, type a brief description.
Do not type the alt text in the Title box.
For alternative text, do not use the phrases: “Image of…”, “Picture of…”, or “Pic of …”. They
are redundant.
Alternative text should communicate the message being conveyed by the image.
5. Click the Close button.
CDudas\OfficeDocs\Seminars\How-To-Guides\Accessibility-OfficeDocs\AccessibleWordDocs-WithChartImages.docx\03.05.12\Revised 07.23.14\Page 5

It is also helpful if the images are not floating objects. For example, an image is considered a floating object if
it isn’t “in line” with the text. This makes it challenging for a screen reader user to navigate the document.
However, an image that is formatted in line is treated as if it was a single, large character with text flowing
above and below the image.
Another advantage of formatting an object in line is that you eliminate the extra blank lines that are often
inserted to position a floating image.
And, although images must be in line, you can format the images to better control the placement of the image.
To do so, use indents. (You can also create a style for images that will provide consistent indentation of all
images. Generally, you’ll want to set the left indent and the spacing before and after the image.)
To set the text wrapping for an object:
1. Right click on the object.
2. From the shortcut menu, select: Wrap Text.
3. Click on the following: In Line with Text.
4. If needed, indent the line to place the image in the desired location.
CDudas\OfficeDocs\Seminars\How-To-Guides\Accessibility-OfficeDocs\AccessibleWordDocs-WithChartImages.docx\03.05.12\Revised 07.23.14\Page 6

Tables
Tables should include alt text as well as column headings.
Example of a table with column headings:
Class List
Name
Major
Semester Standing
Nancy Johnson
Engineering
06
Mark Smith
History
01
Rita Brown
Biology
04
Ted Belle
Business
08
To add alt text to a table:
1. Right click on the table.
2. From the shortcut menu, select: Table Properties.
3. Click on the Alt Text tab.
4. In the Description box, type a brief description.
Do not type the alt text in the Title box.
5. Click OK.
Another feature that helps to make your tables more accessible to screen readers is the header row option.
(Also, this option is useful for another purpose: If you have a table that splits across more than one page, it
will repeat the column headings for every page on which the table appears.)
To add a header row:
1. Type column headings in the first row of the table.
2. Select the first row containing the column headings.
3. From the Table Tools tab on the ribbon, click: Layout.
4. Click the Repeat Header Rows button.
CDudas\OfficeDocs\Seminars\How-To-Guides\Accessibility-OfficeDocs\AccessibleWordDocs-WithChartImages.docx\03.05.12\Revised 07.23.14\Page 7

Charts and Graphs
Charts and graphs also require alt text as well as a short caption.
Example of a chart with a caption:
To add alt text to a chart:
1. Right click on the chart’s border.
2. From the menu, select: Format Chart Area.
Additionally, in Word 2013: Click on the Layout & Properties button.
The button looks like this:
3. From the category list, click: Alt Text.
4. In the Description box, type a brief summary that explains the chart.
Do not type the alt text in the Title box.
5. Click the Close button.
CDudas\OfficeDocs\Seminars\How-To-Guides\Accessibility-OfficeDocs\AccessibleWordDocs-WithChartImages.docx\03.05.12\Revised 07.23.14\Page 8

To add a caption to a chart:
1. Right click on the chart’s border.
2. From the shortcut menu, select: Insert Caption.
3. In the Caption box, type the desired text for the caption.
4. Click OK.
5. Format and position the caption as desired.
CDudas\OfficeDocs\Seminars\How-To-Guides\Accessibility-OfficeDocs\AccessibleWordDocs-WithChartImages.docx\03.05.12\Revised 07.23.14\Page 9

Hyperlinks
Another guideline for web accessibility concerns the use of non-descriptive links. A non-descriptive link, such
as "click here" or “read more”, is not helpful to screen reader users --- especially if there is more than one non-
descriptive link within a page or document. (That’s because a screen reader can scan a document for links and
then read those list of links to a user; so it is imperative that the links make sense without the surrounding
text.) A descriptive link, on the other hand, is just that --- it describes the link.
Another recommendation: Do not use the hyperlink address in the document (such as
http://psbehrend.psu.edu
). If you do, a screen reader will read each individual character/word which can be
quite tedious to listen to --- especially for a lengthy hyperlink address. Instead, use a descriptive link (e.g. Penn
State Behrend).
Example of a non-descriptive link:
Penn State Behrend is now selling Berkey Creamery ice cream. The college community, as well as the
public, can buy ice cream cones, dishes, sundaes and milk shakes. Read more…
Example of descriptive link:
Penn State Behrend is now selling Berkey Creamery ice cream
. The college community, as well as the
public, can buy ice cream cones, dishes, sundaes and milk shakes.
To create a hyperlink:
1. Use your web browser and go to the page that you want to link to.
2. Copy the web address.
3. In the Word document, select the text that you want to use for the hyperlink.
4. Right click and from the shortcut menu, select: Hyperlink.
5. Paste the web address into the Address box.
6. Click OK.
CDudas\OfficeDocs\Seminars\How-To-Guides\Accessibility-OfficeDocs\AccessibleWordDocs-WithChartImages.docx\03.05.12\Revised 07.23.14\Page 10

List Items
Lists of related items should be formatted as bullets. This is important since a screen reader will announce that
there is a bulleted list and then read those items.
Example of a list:
My favorite pizza toppings are:
• Pineapple
• Ham
• Bacon
Often a list can be used as an alternative to a table when presenting information.
Example of a table:
Shuttle Bus Service
Times
Location
7:40 am
University Gate Apartments
7:43 am
Burke Center (south)
7:46 am
Ohio Hall
7:49 am
Burke Center (north)
Example of using a list rather than a table for the above information:
Shuttle Bus Service: Times and Location
• 7:40 am – University Gate Apartments
• 7:43 am – Burke Center (south)
• 7:46 am – Ohio Hall
• 7:49 am – Burke Center (north)
To create a list:
1. Type each item on a single line.
2. Select the group of items.
3. Click the bullet or numeric bullet button.
CDudas\OfficeDocs\Seminars\How-To-Guides\Accessibility-OfficeDocs\AccessibleWordDocs-WithChartImages.docx\03.05.12\Revised 07.23.14\Page 11

Accessibility Checker
The Accessibility Checker is a great tool to check for problems in your Word document. It points out things
such as missing alt text, missing table row headers, unclear hyperlink text, and more. Not only that, but it
provides instructions on how to fix any items that have been flagged as inaccessible.
To use the Accessibility Checker:
1. Click on the File tab.
2. Click on Info.
3. Click on the Check for Issues button.
4. From the menu, select: Check Accessibility.
An Inspection Results pane will appear. It provides a list of errors and warnings that it found in
the document.
5. Under the errors section, click on an item.
Word navigates to the item in error.
In the Additional Information section of the Inspection Results pane, information is given
explaining why the item needs fixed and how to remedy the error.
6. Under the warnings section, click on an item.
In the Additional Information section of the Inspection Results pane, information is given
explaining why the item needs fixed and how to remedy the error.
7. Fix the errors and warnings as appropriate.
CDudas\OfficeDocs\Seminars\How-To-Guides\Accessibility-OfficeDocs\AccessibleWordDocs-WithChartImages.docx\03.05.12\Revised 07.23.14\Page 12
Save a Word Document as a PDF
There is more than one way to save a Word document as a PDF. You can save a document as a PDF by using
Adobe’s Acrobat add-in or Word’s add-in.
Adobe’s add-in produces a better tagged and accessible PDF (especially for more complex documents). If you
have the full version of Adobe Acrobat installed on your PC, you will have an Acrobat tab on the ribbon.
However, even if you don’t have Adobe Acrobat, Word’s add-in does a good job for a typical document which
has headings, lists, images, etc.
Important: In either case, it is essential that you create an accessible Word document before you convert it to
a PDF.
Accessibility Alert
Note that even a PDF that has been created from an accessible Word document will almost always have
accessibility issues. As a result, the PDF will require further remediation so that it is accessible. Remediation
of a PDF can be a time-intensive and costly process depending upon the complexity of the document.
Web site content editors: Keep in mind that PDF documents cannot be the sole source of presenting online
information unless they have been remediated for accessibility issues. Therefore, it is recommended that PDF
content be provided in an alternative format. (A link to an inaccessible PDF is acceptable as long as you
provide the content in an alternative, accessible format.) Acceptable alternative formats include web pages
and accessible Word documents. For more details, visit the PDFs and Alternative Formats web site
(http://behrend.psu.edu/pdfalternatives).
CDudas\OfficeDocs\Seminars\How-To-Guides\Accessibility-OfficeDocs\AccessibleWordDocs-WithChartImages.docx\03.05.12\Revised 07.23.14\Page 13

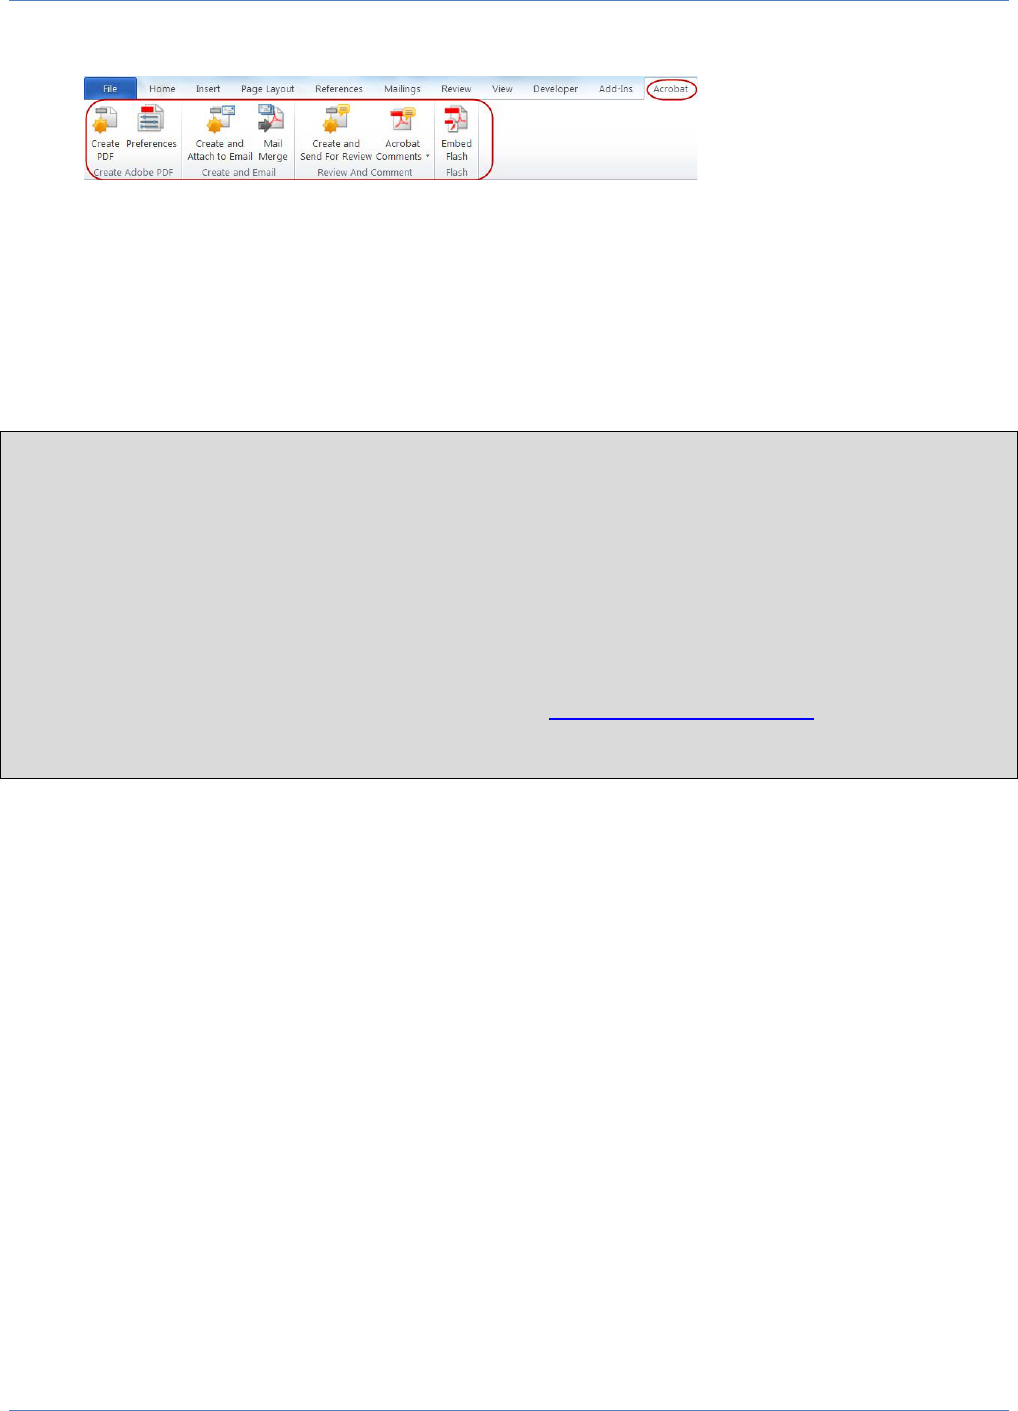
To save a document as a PDF (if you have the Acrobat tab in the ribbon):
1. Open a Word document.
2. Prepare the document so that it is accessible.
3. Click the Acrobat tab.
4. Click the Preferences button.
a. In the Application Settings section, make sure that there is a checkmark in the box for this
option: Enable Accessibility and Reflow with Tagged Adobe PDF.
b. Click OK.
5. Click the Create PDF button.
6. Click the Save button.
CDudas\OfficeDocs\Seminars\How-To-Guides\Accessibility-OfficeDocs\AccessibleWordDocs-WithChartImages.docx\03.05.12\Revised 07.23.14\Page 14

To save a document as a PDF (if you DO NOT have the Acrobat tab in the ribbon):
1. Open a Word document.
2. Prepare the document so that it is accessible.
3. Click the File tab.
4. From the menu, select: Save as.
Additionally, in Word 2013: Select the location where you want to save the file (i.e. Current Folder,
Recent Folders, or Browse options).
5. Click the drop-down arrow for the Save as Type box and select: PDF.
6. Click the Options button.
7. Click to place a checkmark in the box for this option: Create Bookmarks Using.
8. Underneath the option, Create Bookmarks Using, click: Headings.
9. Click to place a checkmark in the box for this option: Document Structure Tags for Accessibility.
10. Click OK.
11. Click the Save button.
CDudas\OfficeDocs\Seminars\How-To-Guides\Accessibility-OfficeDocs\AccessibleWordDocs-WithChartImages.docx\03.05.12\Revised 07.23.14\Page 15

Best Practices
Keep this in mind if you plan to convert a document to a PDF:
• Prep the Word document first so that it is accessible.
• Then, if needed, convert it to a PDF.
Here are some tips to guide you in the creation of an accessible Word document.
• Use headings to structure and organize your document. Ensure that all heading styles are applied in a
hierarchal manner. Note: JAWS (the most popular screen reader) does not recognize custom named
styles. Therefore, only use headings with a name of Heading 1, Heading 2, etc.
• Include alt text for images, tables, and charts and graphs. Also, include captions for charts and graphs.
• Do not format objects as floating. Format objects as “In Line with Text”.
• Keep tables simple --- do not use nested tables. Include column headings for tables and specify a
header row for tables. Do not split or merge cells, rows, or columns.
• Do not use tabs or spaces to create columns. Instead, use the Page Layout/Columns command.
• Use descriptive hypertext links.
• Use bulleted and numeric lists for related items.
• Keep titles short. (Less than 20 words are recommended, but shorter is even better if it still
adequately conveys the intended meaning).
• Include a table of contents (which Word can generate if you use styles).
• Avoid watermarks. If you must use one, make sure that the information it contains is also included
elsewhere in the document.
• Be cautious as to the colors you choose. Some colors and color combinations can be difficult to read,
especially for someone who has color blindness. Also, do not use color to solely convey meaning.
• Include closed captions or transcripts for any audio or video elements.
• FYI… Information contained in headers, footers, and footnotes is accessible to screen readers (if the
document is read in Outline view).
Resources
Here are some additional resources for learning how to make your document accessible.
• Microsoft Word Tips
- http://accessibility.psu.edu/microsoftword
• Guide for Creating Accessible Microsoft Word 2010 Documents - http://teachingcommons.cdl.edu/
access/docs_multi/documents/StandardsandTechniquesGuideforCreatingAccessibleMSWord2010Docs
v1.0.pdf
• Creating Accessible Word Documents - http://webaccess.msu.edu/tutorials/accessible-word-
documents.html
• Microsoft Accessibility Checker Rules - http://webaccess.msu.edu/tutorials/accessible-word-
documents.html
• Ten Tips for Accessible Documents - http://office.microsoft.com/en-us/help/ten-tips-for-accessible-
documents-HA010337552.aspx
• Creating Accessible Word Documents - http://office.microsoft.com/en-us/word-help/creating-
accessible-word-documents-HA101999993.aspx
Training Exercise
You can download a Word exercise file so that you can practice what you have learned in this document. For
those reading the printed version of this document, the exercise can be downloaded from:
http://psbehrend.psu.edu/intranet/computer-center/exercise-files/exercise-files-for-training.
CDudas\OfficeDocs\Seminars\How-To-Guides\Accessibility-OfficeDocs\AccessibleWordDocs-WithChartImages.docx\03.05.12\Revised 07.23.14\Page 16
