
ALON Dictaphone ........................................................................................................................................ 1
User's manual (v. 2.4.4) ........................................................................................................................... 1
1. Introduction ...................................................................................................................................... 1
2. Interface survey ................................................................................................................................ 4
3. Recording.......................................................................................................................................... 8
4. Edit mode ........................................................................................................................................ 21
5. Categories ....................................................................................................................................... 27
6. Tools ................................................................................................................................................ 28
7. Play state ........................................................................................................................................ 38
8. Bookmarks ...................................................................................................................................... 41
9. iCloud .............................................................................................................................................. 47
10. Extended mode (Advanced settings) ......................................................................................... 49
11. Lock Screen .................................................................................................................................. 50
12. Apple Watch ................................................................................................................................. 51
13. Pro and Free versions ................................................................................................................. 54
14. Additional features and tips. ....................................................................................................... 55
15. Show history list. ......................................................................................................................... 58
16. Voice monitoring. ......................................................................................................................... 62
17. VoiceOver ..................................................................................................................................... 63
ALON Dictaphone
User's manual (v. 2.4.4)
Thank you for choosing the ALON Dictaphone! We hope that you will like our product and will find
it useful for you. We welcome any feedback from you for improving the ALON Dictaphone. Please,
contact our support at [email protected]
1. Introduction
Note: The description corresponds to the Pro version of ALON Dictaphone or to the Free
version which includes all of the built-in extensions. The following extensions can be purchased:
• Share Audio Memos
This option allows you to share the audio files via E-mail, FTP servers, Dropbox, SoundCloud,
GoogleDrive, OneDrive, Box, Evernote, WebDAV, SharePoint, YouTube and iCloud. The
additional option which you will get is the opportunity to open the audio records in other
applications.
• Advanced Audio Pack
Adjusting the microphone sensitivity, sound activation (the option allows you to filter a "silence"
and activates recording by a "real sound") and adjusting volume and balance during playback.
1
• Multiple Selection
This option gives you an opportunity to delete/share (FTP/E-mail/Wi-Fi)/move (between
categories) at once on the set of tracks. As a result, it improves the management of a large
quantity of recorded tracks.
• Bookmarks
This option allows you to make the time markers the same during playback as during recording.
You can also create a play route from these bookmarks in order to play back parts of the track
in the needed sequence.
• Categories
With this option you can easily structure your recorded tracks. For example, you can create
categories like "Lectures", "Interview", "Private", "Studies" and so on. You can move the
tracks between categories, if needed.
• Adjustable Playback Speed
This is a convenient option for fast playback of the recorded track in order to find a desired
location or to slowly playback to a certain place in order to distinguish the sounds of the track.
There is the ability to choose the playback speed (x0.5, x0.8, x1, x1.5, x2, x4).
• Edit Options: Append, Overwrite, Trim, Cut, Insert, Conjunction
With this option, you can edit the audio recordings.
• Without Advertisement
It is free from any advertisements.
You can get the desired extension for the Free version via In-App Purchases in the Settings (left
top button in the navigation bar) > Extensions tab:
2

Please note that all of these extensions are included in the Pro version.
ALON Dictaphone allows you to record in mp3 and wav audio formats. You can easily turn your
iPhone/iPad/iPod into an advanced digital Dictaphone and start to record lectures, conversations and
interviews and then send the recordings to SoundCloud, Dropbox, Google Drive, OneDrive, Box,
Evernote, WebDAV, SharePoint, YouTube, Ftp server or use iTunes or Wi-Fi to copy them to your
laptop directly. You can also send recordings via E-mail.
The iCloud option allows you to synchronize recordings between iOS devices. You can also find your
recordings in the iCloud Drive. The Auto Dropbox Synchronization option allows you to synchronize
recordings between Dropbox and your iOS devices automatically.
All of your recordings can be easily structured by groups. You can add a new group at any time, move
3

recordings into a corresponding group or delete a group.
For any recorded track, you can resume recording using the functionality of an appending record or
you can also easily overwrite any part of the recorded track in order to trim or cut needed parts of the
audio file.
To improve your speech dictation, you can use the “Voice Monitoring” option, which allows you to
hear yourself through the headphones during the recording process. This can be useful for correcting
pronunciation when learning a foreign language and speaker skills.
You can filter “silence” during the recording process (voice activation).
You can easily add bookmarks (time, images, text notes) during recording as well as during playback.
2. Interface survey
The main window consists of a top navigation bar, track list (list of recordings) and media buttons.
The buttons from the top navigation bar can be used for (from left to right):
1. Open “Settings” (Settings button)
2. Open Tool bar (Tools button)
3. Set the Edit mode (Edit button)
4. Shows the current category and provides an opportunity to pass to a Category window and to
choose the other category.
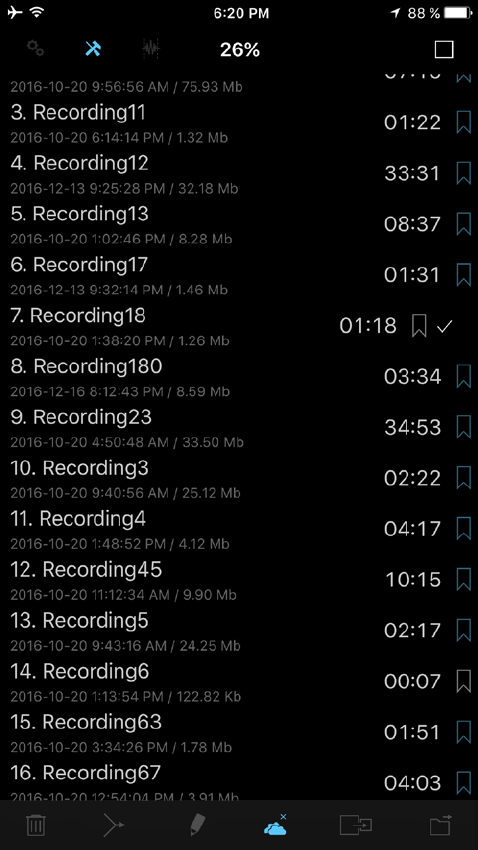
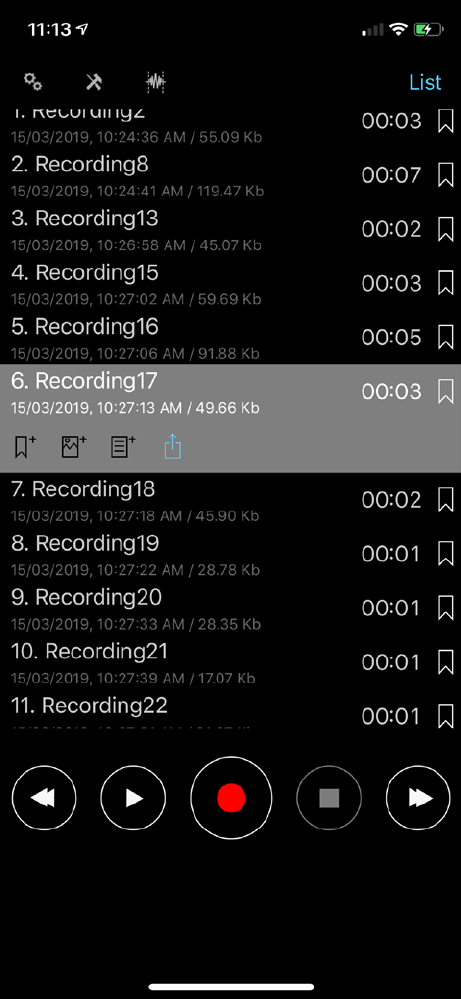
The track list represents each track by a track name, duration, date of creation, extension and size.
For each of these parameters, you can sort a track list via “Settings > List tab > Sorting list”:
4

There's also a search bar that you can open by swiping down the list of recordings with two fingers.
When the search starts, you will get four tabs to search. The fourth tab is different for entries in the
Deleted Items window. The File Extension tab is for the main list of recordings, and the Category tab
is for deleted recordings:
5

To close the search bar, you need to swipe up the list of recordings with two fingers.
Media buttons allow navigating on the track list, playing back of a chosen track and making the
recordings. The buttons rewind/previous or forward/next have several options in the app:
1. In the “Stop” state (no Playback/Recording), you can scroll by page with these buttons.
2. In the “Playback” state, you can press and hold the previous/next button in order to rewind/forward.
A long press on the previous/next button will increase the rewind speed according to the recording
size.
3. In the “Playback/Pause Recording” state you can forward/rewind a few seconds in a single click of
a button if the corresponding option is set in the Settings:
6

You can also use the playback slider at the bottom of window for rewind/forward.
Each track has a bookmark-button at the end of a recording. The bookmark-button allows the opening
of the Bookmark window in order to work with bookmarks. In order to add a bookmark you can use
one of the three buttons which are placed below of the recording.
You can change the view of the app choosing the Dark or Light skin from the Settings:
7

3. Recording
The recording process has three states. The first state is used for starting a new recording. It creates a
new track every time that you press down on this button. The recording starts after a short beep. The
beep can be disabled in the “Extended mode” (pictures below):
1. Settings(left top button) > Extended tab(“Main > Extended” for the free version) > Advanced
settings > Extended mode > On > Done
2. Settings(left top button) > Main tab > Sound recording tone > OFF
8

The main window of the app (without any actions like Recording/Playback) looks like:
9

The first state of the recording is shown below:
10

In this state, you will be able to re-write the last part of the recording quickly, using the slider at the
bottom of the window or Next/Pervious buttons during the stop state. The duration for re-writing
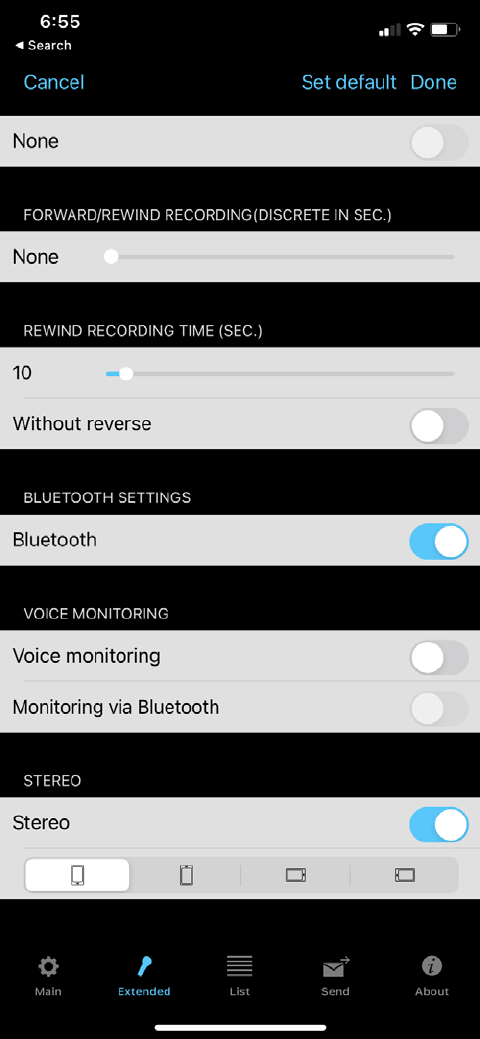
(Rewind Recording Time) is set in the Settings > Extended (“Main > Extended” for the free version):
11

Rewind Recording Time can be adjusted between 5 and 30 seconds. While paused, you can also play
back the last part of the recording to know exactly from what position you want to re-write the
recording. The slider will return to the original place automatically as the playback is finished (an
automatic return can be switched off in the settings of the app: Settings > Extended (“Main >
Extended” for the free version) > Rewind Recording Time > Without reverse > ON)
You can rewind back a few seconds in a single click by the previous button if the “Forward/Rewind
Recording” option is set in the Settings:
12

The second state is used for filtering silence during recording. In order to turn it “On”, you should go
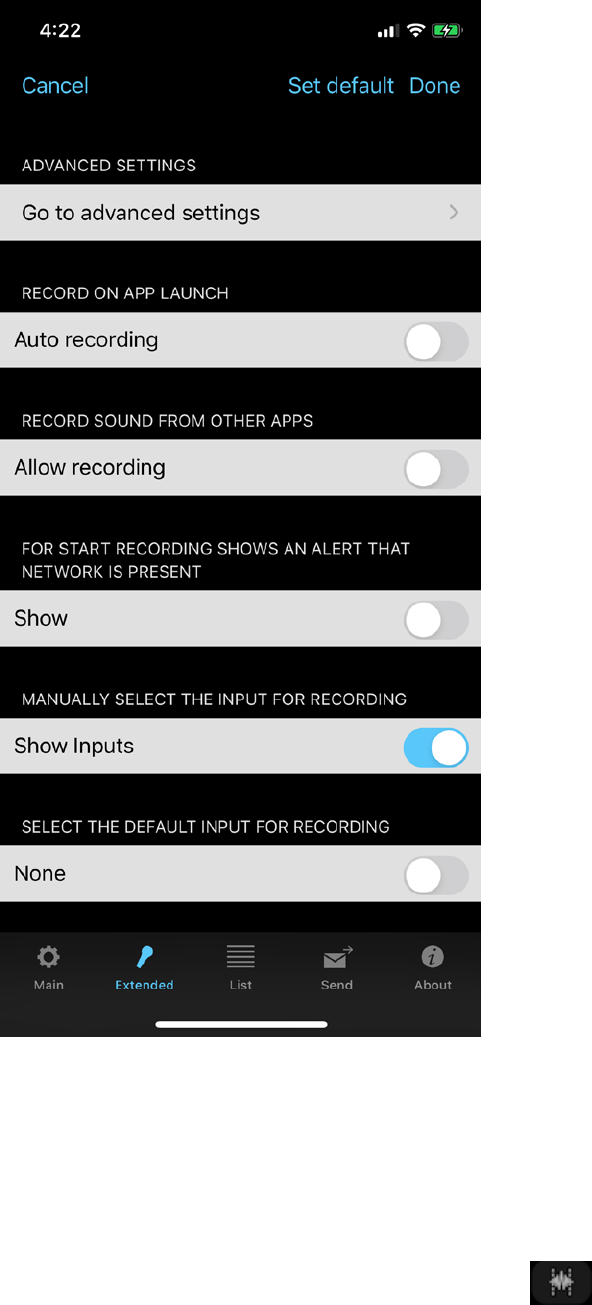
to “Settings > Extended (“Main > Extended” for the free version) > Go to advanced settings >
Threshold recording activation” and set the switch to “On”. In this state, you can also adjust
“Threshold recording activation” by using the slider. It provides an opportunity to filter the more quiet
sounds which will be considered as “silence” and recording will be paused. The leftmost position of
the slider corresponds to the state where the silence is almost absent (it’s similar to the first recording
state).
The window looks like:
13

The app has the option called the “Bookmark waiting time” which is used to specify how long the app
will wait until it creates a bookmark during the Threshold Record Mode. These bookmarks allow you
to determine the periods of silence. The “Bookmark waiting time” can be specified in the Advanced
Settings (Settings > Extended (“Main > Extended” for the free version) > Go to advanced settings >
Bookmark waiting time):
14

The third state (Edit mode) is used to edit the audio tracks. The following operations are available:
Overwrite Append, Insert, Trim and Cut. A more detailed description of these operations can be found
in the Edit mode section below.
For all of these recording states you can set recording gain via “Settings > Extended (“Main >
Extended” for the free version) > Go to advanced settings > Record gain level”. This option allows
you to record silent sounds more loudly. However, on the opposite side, the sound of the noise will
also be increasing in your recording. The leftmost position of the slider corresponds to an auto gain
level.
Note: “Threshold record activation” depends on “Record gain level”. It means that if you are
using the “Threshold record activation” and change a “Record gain level”, you should adjust the
“Threshold record activation” value again.
15

You can choose the additional recording formats from “Settings > Recording Quality > More…:
You can change the recording template from “Settings > Extended (“Main > Extended” for the free
version) > Recording template”.
The stereo recording is possible with the external microphones suitable for your device. You can also
try to turn off the "Processing" option (Settings > Extended (“Main > Extended” for the free version) >
Go to advanced settings > Processing > off) for some external microphones.
It is also possible to use stereo recording for the built-in microphones (requires iOS/iPadOS 14 and
later, not all iOS/iPadOS devices support this option).
To check if your device supports stereo recording please open "Settings(of the app)
16
> Extended". At the bottom of the window you should find the “Stereo" field:
You should turn on the Stereo option.
If this field is missing, your device does not support stereo recording with the built-in microphones.
Note: The sample rate can be decreased (resample) for some mp3 stereo formats by application
in order to save the current bitrate.
You can make the recordings with 32 bit depth for wav audio formats:
17

If you need to enter a new name of the recorded track by yourself, you should set the option “Show
save dialog” to ON as shown in the image below:
18

The save window looks like this:
19

You also can set the timer in order to stop the recording process after a certain amount of time. This
option is available from the Settings > Main > Stop Timer Recording.
If the app uses several audio inputs at the same time (Air Pods and built-in microphone of your iOS
device, for example) you can select the required microphone manually when you press the Record
button. This functionality can be switched on in the settings of the app:
20
The app can remember your choice of the preferred microphone if you select the option "Select the
default input for recording".
4. Edit mode
To enable this mode, you should press the Edit button on the top navigation bar. This edit state
offers these opportunities:
1. Append a new recording to the end of the current one.
2. Overwrite a part of the current recording.
3. Insert a new recording in the current recording.
21

4. Trim operation
5. Cut operation
The edit mode state is shown below:
In order to append a new recording, you should press the Record button.
The video can be seen here: Append recording
If you need to overwrite some part of the audio track, you should select the required time positions as
shown in the picture below.
22

You should then press the Record button. The video can be seen here: Overwrite operation
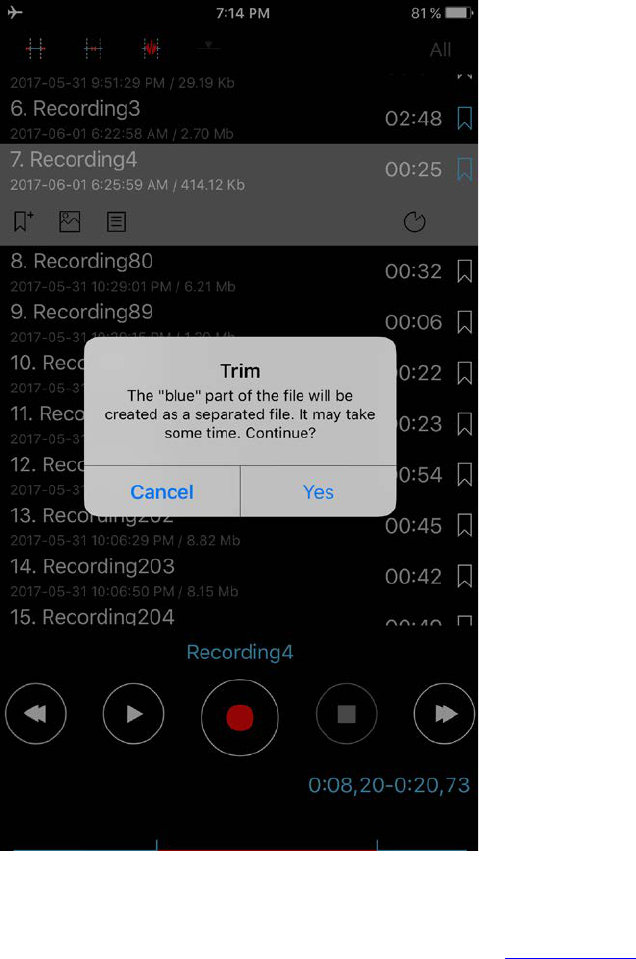
In order to trim a part of the track in a new file, you should adjust the desired interval (red part of the
track) for the trim operation on the track. You should then press down the top left button on the
navigation bar (see the picture below). The video can be seen here: Trim operation
23

The Insert operation is available when you set the time to insert a new recording like on the window
below:
25

Note: When you press the Insert button the existing file will be modified due to the new
recording that will be inserted into the file. The initial recording remains in your list. It will be named
with an additional suffix “_initial” . The video can be seen here: Insert operation
In order to precisely adjust the interval time for the trim, cut, and insert operation, you can tap on the
clock time (Edit time button for iPad) to get the following window:
26
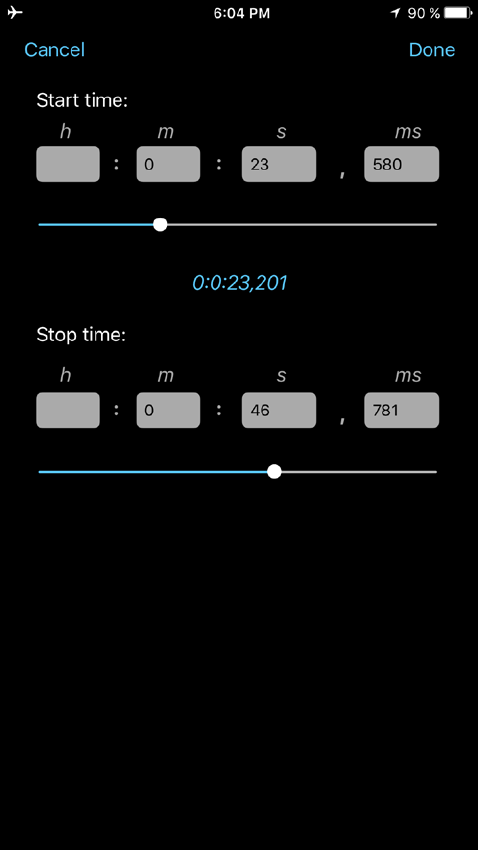
In this window, you can also choose bookmarks (if any) in order to quickly select the required edit
times.
5. Categories
In order to pass Category window you need to press down the right top navigation button. The
Categories window looks like:
27
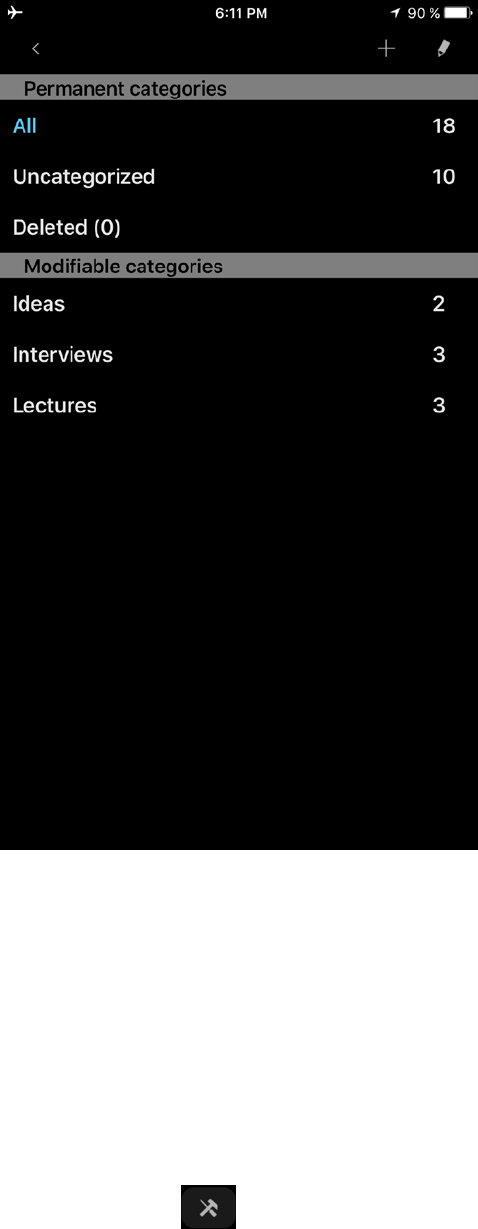
In this window, you can add a new category or edit or delete the already existing one. Each category
shows how many tracks belong to it. There are 3 unchangeable categories “All”, “Uncategorized” and
“Deleted”. One tap on the category allows you to pass to the needed category. The way to use the
“Deleted” category is described below (in the Tools). Please note that the “Deleted” category is
available only for the Pro version or free version + “Categories” extension.
6. Tools
The Tools button ( ) shows the tool bar. In this state, you can work with tracks in order to delete,
rename, share/send, concatenate and move them. You can also open any track from within another
application. The tool window looks like:
28

The tool bar has 6 buttons (from left to right):
1. Delete track(s).
The deleted tracks can be managed from the Categories > Deleted. Here you can return the deleted
track to the list of recordings or completely remove it from the device:
29

2. Conjunction of recordings
Select the desired track > press the Conjunction button in the toolbar (second button from left to
right) > select the track which will be added to the end of the previous one > Ok. The video can be
seen here: Conjunction operation
3. Rename track
4. A. (Share/Export audio recordings)
Send track(s) via E-mail; to Ftp server; SoundCloud/Dropbox/Google
Drive/OneDrive/Box/Evernote/WebDAV/SharePoint/YouTube server or HTTP server using Wi-
Fi for local storage (laptop for example).
B. (Export recording)
Open a recording in another application (Open In…).
30

The preferred method can be chosen from “Settings > Send tab”. In this case, the program will not
ask you what method you will choose for sending tracks.
Note1: Before you start sending tracks, you should set up the needed information for the
corresponding send method. It can be done from “Settings > Send tab”.
Note2: The audio recording can be sent together with its bookmark data (text notes, photos)
as a zip file. This option is available for the E-mail and Google Drive methods. To use it turn
on a zip option in the settings of these methods.
You can point to up to 3 recipients' email addresses.
If the size of the sending track exceeds the “split size”, the track will be sent by parts. The “split
size” can be set from “Settings > Send tab”.
Note: You can choose “No split” in the Settings. In this case, you can attach any track with
an e-mail. You will also be able to send several letters at one time. However, in this case, an
error may occur if the total size of all the letters or the size of one letter will be more than
31

what is allowed by the server.
Uploading to the Ftp server:
You should complete the appropriate fields with the:
1. Server name
2. User name
3. Password
4. Directory(optional)
32

If you choose the “Sync categories” option, all of the tracks will be saved in the appropriate
category on your Ftp server in the same way as on your device.
Getting recordings via iTunes (for Windows and Mac up to Catalina macOS):
The recordings are saved in the ALON Dictaphone (Dictaphone) directory named "Documents".
You can easily get access to this directory via iTunes (Getting recordings via iTunes). You need to
do the following:
1. Open iTunes on your Mac or PC.
2. Connect your iPhone, iPad, or iPod touch to your computer using the USB cable that came with
your device.
3. Click your device in iTunes. Get help if you can't find it.
4. In the left sidebar, click File Sharing.
5. Select ALON Dictaphone (Dictaphone)
6. Drag and drop files from the Documents list to a folder or window on your computer to copy
them to your computer. You can also select the file or files that you want to copy to your computer
from the Documents list and click "Save to," then find the folder on your computer to which you
33

want to copy the files and click “Save To”.
For the latest macOS you can use the Finder app directly.
https://support.apple.com/en-us/HT210598
NOTE The recordings can be obtained via iTunes or Finder app but only if you don’t use the
iCloud option “Settings > Send tab > iCloud”
Getting recordings via HTTP (Wi-Fi):
In this case, you should have a Wi-Fi connection in the same network where your laptop is. When
you choose HTTP sync, just enter an URL in your browser. The URL will be shown in a sync
window:
Uploading to SoundCloud:
34
You should make an authorization in the “SoundCloud settings” (“Send tab”) in order to upload
the tracks. Therefore, it assumes that you already have a SoundCloud account.
You can upload the tracks as public or private using the “Public” switch in the “SoundCloud
settings”.
Uploading to Dropbox/Google
Drive/OneDrive/Box/Evernote/WebDAV/SharePoint/YouTube:
You should make an authorization in the “Dropbox/Google drive/OneDrive/Box/Evernote/
Evernote/WebDAV/SharePoint/YouTube settings” “Send tab”) in order to upload the tracks. It,
therefore, assumes that you already have a Dropbox/Google
Drive/OneDrive/Box/Evernote/WebDAV/SharePoint/YouTube account.
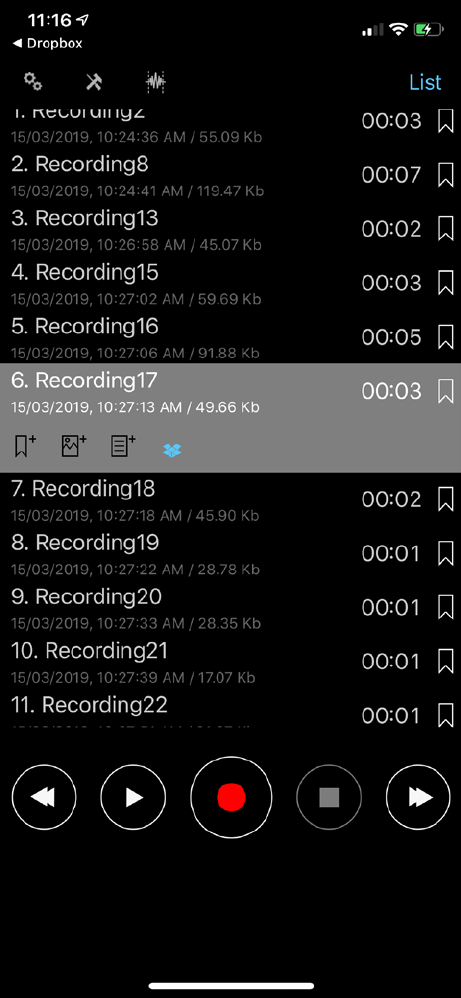
The Dropbox settings has “Auto synchronization” option (Settings > Send tab). This option allows
you to send recorded tracks to your Dropbox automatically. It’s also possible to create any folder
with tracks under root folder “ALON Dictaphone” on the Dropbox side and get them into your
device.
Another Dropbox option is “Auto Upload & Delete”. It allows you to automatically delete
recordings from the app as they are uploaded to your Dropbox storage.
To create an app root folder anywhere in your Dropbox storage, you need to select the “Full
access” option and reload the app. Then re-authenticate.
To use the SharePoint send method requires that you make the registration of the app (ALON
Dictaphone) on your Azure portal (you will get the Client ID, and create your Redirect URL) and
grant the permissions to read the groups of your SharePoint account. The Client ID and Redirect
URL need to write down to the correspondent fields in the SharePoint settings of the app. Then
you can start using the SharePoint send method with your account password and login:
35

Saving into Photo Album:
The audio recording will be presented as a video file.
In order to stop the sending operation, you can choose the “Tools” button in the navigation bar and
then press the “Stop sending” button in the tool bar:
36
5. Open track with other application.
6. Move track(s) from one category to another
Note: You cannot move tracks from the “All” category because some recordings may already
belong to some categories. Therefore, in order to organize your recordings, you should
choose the “Uncategorized” category.
All of these operations can also be accessed from the main window. You can press and hold the
desired track in order to get a context menu:
37

7. Play state
To fast rewind, you can press and hold the previous/next button in order to rewind/forward. A long
press on the previous/next button will automatically increase the rewind speed according to the
recording size.
You can also use the playback slider at the bottom of window for rewind/forward.
One click on the previous/next button, starts to playback a previous/next track in the list.
You can forward/rewind a few seconds in a single click of a button if the “Forward/Rewind Playback”
option is set in the Settings:
38

You can specify how to play a track list from “Settings > List tab > How to play list”. There are five
positions:
39
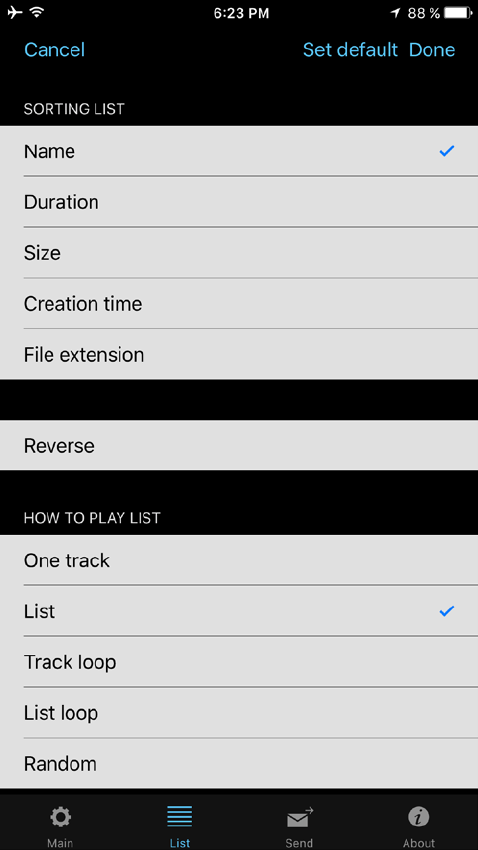
1. One track – plays one track and stops
2. List – plays the list and stops
3. Track loop – plays one track to the end and starts again
4. List loop - plays the list to the end and starts again
5. Random - randomly selects tracks to play
You also can set the timer in order to stop a playback after some time. This option is available from
the Settings > Stop Timer Playback.
During playback you can change the playback speed using the Playback Speed button:
40

8. Bookmarks
You can set a bookmark for a track from the “Stop/Record/Play” states. The “Add bookmark” window
looks like:
41

The track which has a bookmark is marked in the main list. If you choose a bookmark at the end of a
row of the track, you will see a window that looks like this:
42
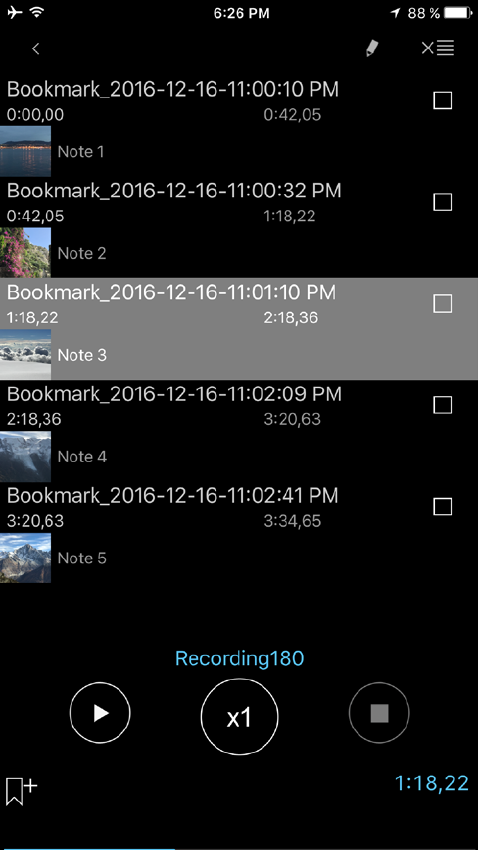
You can start playback from any bookmark or you can arrange a playback route from the bookmarks
in this window.
The playback route consists of the selected checkboxes. The order of the bookmarks can be changed in
the way that you want:
43

Note: In order to repeat a part of the recording, you should put the bookmark in the desired place then
pass to the bookmark window and set a check box for this bookmark. You should then press the
"Play" button.
If there are several chosen bookmarks, the whole route will be playing in a circle.
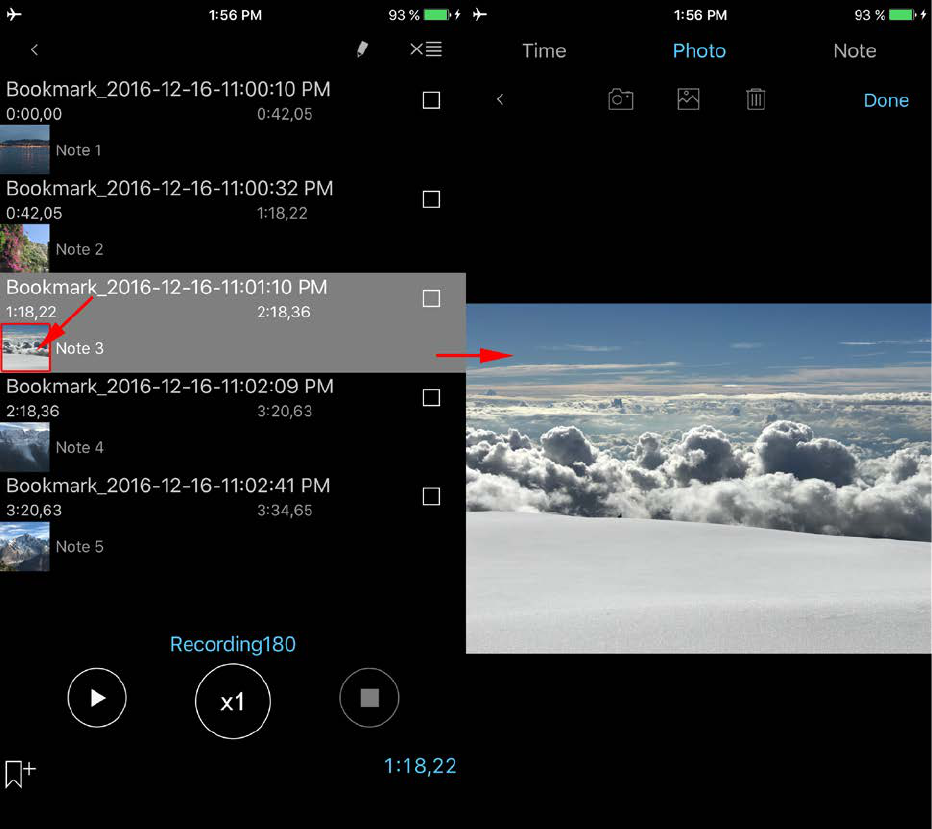
Besides that you can add text notes and photos to the bookmark using the corresponding buttons of the
recording or from within the Bookmark window:
44

You can pass into the text note or photo of the bookmark by typing on the corresponding fields in the
row of the bookmark as it is shown on the screenshots below:
45

46
9. iCloud
You can synchronize recordings, bookmarks, main preferences and categories with iCloud for iOS
devices. On your Mac, you can access the recordings in iCloud Drive through the Finder app:
Finder > iCloud Drive > ALON Dictaphone (Dictaphone)
47

If this option is “ON”, then the settings like "List tab" and "Send tab" will be synchronized via iCloud
as well as by categories.
Note 1 If you already have had some settings in your "Send tab" and the option iCloud was OFF, then
when you switch this option to ON, you'll get the question about replacing the current settings (if the
iCloud has the "Send tab" settings unlike on your device).
.
Note 2 If some categories from iCloud are missing from your device and the “iCloud” option is
switched ON, these categories will be added to your device. If there are some categories on your
device that are not present in the iCloud and the “iCloud” option is switched ON, these categories will
not be deleted from your device.
Note 3 The “Advanced settings” are not synchronized via iCloud.
Note 4 Please be aware that if you do not use your recordings for a long time, they can be
removed from your device in order to clear the memory (the same also applies for large
recordings). However, the metadata will remain (name of file, audio format) so when you load
48

the app again, the recordings will be downloading from the iCloud server (the Internet must be
present) again. It may require some time, depending on the size and number of your recordings.
To be sure that the downloading process has begun, try to restart the app:
a. Double press the Home button
b. To close app, simply swipe up.
c. Start the app again.
10. Extended mode (Advanced settings)
This allows you to exactly set the needed audio format and adjust the record gain level or threshold
record activation level. If you turn on "Extended mode", switch the record gain level and the threshold
level will be accessible during recording process as well as "Volume" and Balance" for the playback
state. The main window is shown below (for recording and playback states accordingly):
49

To turn on this option, you should open the Main pane (Settings > Extended (“Main > Extended” for
the free version)> Go to advanced settings > Extended mode > On)
11. Lock Screen
The Lock Screen option is available from Settings (Settings > Main > Lock screen). With this option,
you can set a password to access the application. The password can be simple (4 digits) or arbitrary
(any length and combination of letters and digits). If you use the Touch ID with your device, you can
disable it by using the Touch ID to unlock the app.
50

12. Apple Watch
You can use the Apple Watch as an audio recorder or use it as a remote control for the iPhone. A
description of using the ALON Dictaphone on the Apple Watch is shown below for each state. On the
screen of the app you can see Send button and Settings button:
The Send button initiates the transfer of audio recordings from Apple Watch to your iPhone.
51

1. Using Apple Watch directly for recording/playback.
In order to record directly on Apple Watch, you should select the watch icon in the main window of
the app or set it in the settings: “Settings button > Storage > Apple Watch > ON”
(This option is selected by default) and then press the Record button. The recording window looks
like:
By default, the recordings are transferred automatically to the iPhone from the Apple Watch. In order
to switch OFF this option, you can choose:
Settings button > Auto sending > Auto > OFF
In this case, all of your recordings will remain in the Apple Watch. In order to transfer them later to
the iPhone, you can choose:
Send button
Play in background > Background mode (for watchOS 5.0 and newer)
The option “Background mode” allows using a Bluetooth headset (Air Pods for example).
During playback, in this mode (Background mode), it is possible to adjust the volume and rewinding
for 15 seconds with the arrows:
52

Recording by launch option is available in the settings. You can use it in order to start the recording
process only by launch the app (without pressing the Record button):
An audio recording can be deleted on the Apple Watch by swiping left on it when the app in the stop
states (no recording/playback).
Note: The recording process must be resumed manually after incoming calls if the application
was in the background (for iOS 12.4 and higher).
2. Apple Watch as a remote control for the iPhone.
In this state, the Apple Watch is working like a remote control for the ALON Dictaphone which is
placed on the iPhone. You can Record/Play/Stop the recordings on the iPhone side via the Apple
Watch. In order to start to record, you should select the phone icon in the main window of the app (or
set it in the settings: Settings button > Storage > Apple Watch > OFF) and then press the Record
button. The recording window looks like:
Note: The recording process can only be started if the application on the iPhone is in the
foreground (for iOS 12.4 and higher).
In this state you can get access to the categories in the app on the iPhone.
You can also change the current category from the Settings button > Right window (swipe to the left):
53

To use a complication on iPhone:
1. On your iPhone, open the Apple Watch app.
2. Tap the My Watch tab, and then tap Complications.
To manage your complications, tap Edit. When you're finished, tap Done.
•Remove a complication by tapping Minus icon. Then tap Remove.
•Add a complication by tapping Plus icon.
After you choose complications, you can add them to your watch face.
Note: Please be aware that the direct audio recording via Apple Watch is not intended to be used or a
long recording process. The best duration for one recording should be no more than 20 minutes. The
large recordings may be cause of a significant delay for getting them from the Apple Watch.
13. Pro and Free versions
When the Pro version is installed, the free version will be working as the Pro version. In other words,
all options from the Pro version will be available on the free version. All recordings will initially
remain in the free version so you can share and edit your recordings with the free version in the same
way as with the Pro version. However, if you want to transfer your recordings from the free version to
the Pro one, you can use one of four methods:
1. Open the free version > Tools button( ) > Share/Send button( ) > Open In… >
ALON Dictaphone
2. Via iTunes(watch the video ) for Windows and Mac up to Catalina macOS:
Open iTunes on your Mac or PC.
Connect your iPhone, iPad, or iPod touch to your computer using the USB cable that
came with your device.
Click your device in iTunes. Get help if you can't find it.
In the left sidebar, click File Sharing.
Select ALON Dictaphone (Dictaphone)
Drag and drop files from the Documents list to a folder or window on your computer to
copy them to your computer. You can also select the file or files that you want to copy to
your computer from the Documents list and click "Save to," then find the folder on your
computer to which you want to copy the files and click Save To.
54

To add recordings into the app:
Drag and drop files from a folder or window onto the Documents list to copy them to
your device. You can also click Add in the Documents list in iTunes, find the file or files
you want to copy from your computer, and then click Add. Choose only files that will
work with the app.
For the latest macOS you can use the Finder app directly.
https://support.apple.com/en-us/HT210598
3. Via iCloud:
Open the free version > Settings button ( ) > Send pane > iCloud > On
Open the Pro version > Settings button ( ) > Send pane > iCloud > On
4. Via Dropbox:
Open the free version > Settings button ( ) > Send pane > Dropbox settings > Auto
synchronization > On
Wait for the synchronization complete
Open the Pro version > Settings button ( ) > Send pane > Dropbox settings > Auto
synchronization > On
If you purchased any extension as an In-App Purchase and it did not appear or you are going to use it
on another device, try the following:
1. Make sure that you have the Internet on your device.
2. Make sure that you have the same Apple ID account when you made the purchase.
3. Open "Settings" on your app again. Tap the 'Extensions' tab, then tap the “Restore" button.
14. Additional features and tips.
Show In Control Center – allows pausing and resuming a process of the playback/recording from the
Control Center.
Recording On App Launch – start recording when the app becomes the foreground without pressing
the Record button.
Record Sound From Other Apps – allows you to record sound from the other apps. In the usual case
(without an intention to record audio from another application), this option is better if turned off.
Note: Not all applications can allow recording.
Clicking on the current active recording (during playback/recording) allows returning to the actual
recording of the track list. It’s useful for a long track list if some recording is selected and you need to
return quickly to the actual recording.
In order to repeat the whole recording you should choose Settings (left top button) > List tab >
55

How to play list > Track loop.
In order to repeat some part of the recording you should put the bookmark in the desired place then
pass to the bookmark loop window and set a check box for this bookmark. Then press the "Play"
button.
Send the recording to WhatsApp:
In order to send the recording into WhatsApp you can do the following:
1. Select desired recording.
2. In the row of the recording click the Share button.
3. Choose Open in…
4. Choose WhatsApp
or
1. Select desired recording.
2. Choose the Tools button in the left top corner of the window (second button from left to right)
3. In the tools bar select the Share button.
4. Choose Open in…
5. Choose WhatsApp
Moving audio recordings from an old iOS device to a new one:
All the same as described in Сhapter 13 except for the first item.
Import an audio recording from another application:
1. Select a command “Share”/”Open in …” for a recording in another app.
2. Choose ALON Dictaphone(Dictaphone) from the list of the apps
In order to get your recordings you can use the following methods:
Recordings from the free version of the app can be obtained through iTunes(for Windows and Mac up
to Catalina macOS). (Getting recordings via iTunes):
The recordings are saved in the “ALON Dictaphone (Dictaphone)” directory. You need to make the
following:
1. Open iTunes on your Mac or PC.
2. Connect your iPhone, iPad, or iPod touch to your computer using the USB cable that came with
your device.
3. Click your device in iTunes. Get help if you can't find it.
4. In the left sidebar, click File Sharing.
5. Select ALON Dictaphone (Dictaphone)
6. Drag and drop files from the Documents list to a folder or window on your computer to copy them
to your computer. You can also select the file or files that you want to copy to your computer from the
Documents list and click "Save to," then find the folder on your computer to which you want to copy
the files and click Save To.
For the latest macOS you can use the Finder app directly.
https://support.apple.com/en-us/HT210598
The recordings from the Pro version (or free + In-App Purchase “Share Audio Memos”) you can get
through:
56

1. Email
Normally, email providers allow around 10 MB of data for attachments. If you significantly exceed
that, your recording will be split into multiple emails. If that is the case, you will need to use an
archiving tool like MacHacha for Mac or HJSplit for PC to combine the files to convert it back to a
MP3 or WAV file. The chunk size for sending can be set in the Settings (left top button) > Send tab >
E-mail settings. You can choose “No split” in the Settings in this case. This allows you to attach any
track with an e-mail letter you will also be able to send several letters at one time. However, in this
case, an error may occur if the total size of all letters or the size of one letter is more than allowed by
the server.
2. iTunes (Finder app for the latest macOS):
See above
3. via FTP:
You should fill in the appropriate fields in the Settings > Send (tab) with:
1. Server name
2. User name
3. Password
4. Directory (optional)
4. via HTTP
In this case, you should have a Wi-Fi connection in the same network where your laptop is.
5. via Dropbox
6. via Google Drive
7. via OneDrive
8. via SoundCloud
9. via Box
10. via Evernote
11. via WebDAV
12. via SharePoint
13. iCloud
On your Mac, you can access the recordings in iCloud Drive through the Finder app:
Finder > iCloud Drive > ALON Dictaphone (Dictaphone).
For Windows, you can install the iCloud Drive on your PC:
https://support.apple.com/en-us/HT204283
14. AirDrop
15. For transferring between apps, you should choose the "Open In..." option in the Dictaphone app
and choose "ALON Dictaphone" in order to transfer the needed recording in the ALON Dictaphone
app.
57

Note: If you are going to use "Dropbox/Google
Drive/OneDrive/SoundCloud/Box/Evernote/WebDAV/SharePoint", it assumes that the appropriate
account already exists.
To pass to the Pro version you should choose "Settings ( ) > Extensions". The cost of the paid (Pro)
version is approximately $5.00. You can also only get the share option via In-App Purchases in the
same tab "Settings ( ) > Extensions > Share Audio Memos"
The cost of the "Share Audio Memos" is approximately $2.00. The button Settings ( ) will be
available in a stop state (no recording and playback)
When the Pro version is installed, the free one will work as the Pro version. In other words, all options
from the Pro version will be available in the free version.
15. Show history list.
Show history list option can be used for showing a list of the new recordings which have not been
played back yet. It is available in the settings of the app:
58
This option allows you to check whether the current audio has already been sent.
a. All sent audio recordings will be marked with a colored send button in their lines:
b. If you select the “Tools” button (the second button from left to right) in the navigation pane, you
can see all the sent audio recordings in highlighted blue:
59

c. Which the sending methods were used for a particular audio recording, you can see in the "Send"
window by clicking the "Send" button in the audio recording line or in the tools window(must not be
used any preferred option for the send methods):
60

d. If the preferred option is set for a certain send method you can see if the audio recording was sent
by colored send button which icon shows the particular send method(for example Dropbox):
61
16. Voice monitoring.
With this option, you can hear in real time through the headset what is being recorded.
In order to turn on this option you should choose “Voice monitoring” option in the settings:
62

Voice monitoring and recording via Bluetooth headphones such as AirPods require the Bluetooth
option to be enabled.
For voice monitoring via Bluetooth headphones and recording via another microphone (for example,
built-in), should enable the option “Monitoring via Bluetooth”.
Note: If you have several recording inputs, and you need to use Bluetooth headphones for voice
monitoring, make sure that the Bluetooth headphones are connected last.
17. VoiceOver
How to use the VoiceOver rotor to rewind.
Playback state:
63
1. The rewind option for playback will be available only if you set the rewind time (3, 5, 10 ...) in the
settings: Application Settings (upper left button on the navigation bar) > Forward/Rewind (discrete in
sec.)
2. In the rotor, choose the rewind option during playback.
3. Rewind the audio with your finger upwards or downwards.
Recording state:
1. The rewind option for recording pause will be available only if you set the rewind time (1, 3, 5 ...)
in the settings: Application Settings (upper left button on the navigation bar) > Forward/Rewind
recording (discrete in sec.)
2. In the rotor, choose the rewind option during Recording pause.
3. Rewind the audio with your finger upwards or downwards.
Magic Tap(A two-finger double-tap)
You can use Magic Tap for playback/pause(it’s a default state) or for recording/pause if set this option
in the settings: Application Settings (upper left button on the navigation bar) > Magic Tap(VoiceOver)
> Start recording > ON
64
