
Accessibility Handbook
for Online Courses
Provided by
North Carolina Virtual Learning Community (VLC)
Revised September 2018
© NCCCS Virtual Learning Community ™ 2018
2
Table of Contents
How to Use this Handbook .......................................................................................................... 3
Online Course Accessibility Checklist .......................................................................................... 4
Accessible Course Design Guidelines .......................................................................................... 6
Color Contrast .......................................................................................................................... 6
Consistency .............................................................................................................................. 8
Color......................................................................................................................................... 8
Font Styles ............................................................................................................................... 9
Real Text ................................................................................................................................ 10
Formattable Text ................................................................................................................... 10
Blinking and Moving Elements .............................................................................................. 11
Structure ................................................................................................................................ 12
Tables ..................................................................................................................................... 13
Alternative Text (alt text) ...................................................................................................... 14
Hyperlinks .............................................................................................................................. 21
Keyboard Access .................................................................................................................... 21
Tab Key Test ........................................................................................................................... 21
Navigation .............................................................................................................................. 22
File Names ............................................................................................................................. 22
Accessibility in Documents (.doc, .docx, .pdf) ........................................................................... 23
Accessibility in Presentations (.ppt, .pptx) ................................................................................ 29
Accessibility in Multimedia (Audio/Video) ................................................................................ 43
Accessible Web Resources ........................................................................................................ 49
Resources .................................................................................................................................. 50
Appendix .................................................................................................................................... 51
Accessible Math using MathType ............................................................................................. 52
Creating Accessible Word 2013 Documents ............................................................................. 64
Creating Accessible PowerPoint 2013 Presentations ............................................................... 74
Creating an Accessible PDF File from a Word 2013 Document ............................................... 82

How to Use this Handbook
This guide has been designed to provide you with an overview of accessible design concepts. Its
content is based on the most recent version (2.1) of the World Wide Web Consortium’s Web
Content Accessibility Guidelines, as they pertain to online course design.
This guide’s simple DO THIS / NOT THIS format is intended to provide you with a quick
reference of what to do and what not to do as you design online courses. Topics include:
general accessibility concepts, accessible Word documents, accessible PowerPoint
presentations, accessible multimedia, and accessible math.
The Online Course Accessibility Checklist can be used to evaluate the accessibility of your
courses; however, the Checklist may also be useful in helping you become more aware of which
accessible design skills you may need to learn. Please contact the VLC if you are interested in
receiving professional development.
The Appendix has been divided into guides that can be printed independently of the handbook.
It is the hope of the VLC that you will find this handbook and the information therein useful.
Acknowledgement
Thank you to Wake Technical Community College for providing
many of the accessibility examples contained in this guide and
to Durham Technical Community College for updating the content.
4
Online Course Accessibility Checklist
This checklist follows WCAG 2.1 AA guidelines and is intended to serve as a guide in evaluating online
courses for ADA accessibility compliance. It contains 35 items divided into six categories: Color,
Contrast, and Text/Font Style; Structure; Images; Hyperlinks; Multimedia; and File Names.
Color, Contrast, Text/Font Style
Strong color contrast is present between the foreground (text or graphics) and the background.
The content is readable.
Color used to emphasize or convey information is supplemented with secondary formatting.
Choice of text size, font style, and foreground and background colors enhance readability.
Images required to understand content have sufficient color contrast
Basic, simple, easy-to-read fonts are used.
Content is NOT locked; student can customize paragraph spacing, letter spacing, word spacing,
and line height.
Blinking or moving text is avoided.
Real text, not text in a graphic, is used whenever possible.
Structure
Word Documents
The document is organized with Heading styles.
Lists are structured with Word’s bulleted or numbered list options.
PowerPoint Presentations
The presentation is created with built-in slide layouts.
Lists are structured with PowerPoint’s bulleted or numbered list options.
Information appearing in the Outline View is in the same order as it appears on the slides.
All text content on the slides appears in Outline View. (Note: content in tables will not appear in
the Outline View pane).
Each slide has a unique title.
Tables
Tables have a designated header row and include a title/caption. Verify the reading order using
the Tab key.
In Word, the table’s alternative text indicates how many rows and columns the table contains.
In PowerPoint, NO alternative text is added.
When the table contains information that is more complex or abbreviations, more explanation
in the form of a long description, is provided near the table.
(continued on next page)

5
Images
Alternative Text
Alternative text is provided for all images, charts, graphs, and diagrams.
The alternative text is meaningful and sufficiently “replaces” the images, charts, graphs, and
diagrams. It is succinct, generally between 5 and 15 words or about 125 characters.
In PowerPoint, all word art has been replaced with real text, or an alternative text is provided.
Long Description
A long description is included near more complex images, charts, graphs, and diagrams. (Note:
In PowerPoint, compose the long description in the slide’s Notes area.)
OR
A link to the long description is provided before or after the complex image.
An indication of where to find the longer description is provided in the image’s alternative text.
Hyperlinks
All hyperlinks should be readable, descriptive, and convey: Where is the link going? Why is the
link provided? What else happens when the link is clicked?
Hyperlinks that open in a new window are clearly marked as such.
Hyperlinks to documents and other uploaded files/types of content indicate the type of file or
content in the clickable text (e.g., DOC, PDF, PPT, etc.).
Multimedia
Embedded (or linked) videos are captioned. Audio description (narrative description of on-
screen visuals) is provided when needed.
A transcript is provided for each video and audio recording (e.g., Films On Demand, YouTube, a
podcast).
Audio and/or video files are NOT set to Auto-start and do not loop.
When necessary, a link to the multimedia plugin is provided.
Internet resources, including videos, can be navigated or operated with the keyboard alone.
Accessible File Names
File name uses alphanumeric (abc, ABC, 123) characters. You may use the hyphen (-).
File name does NOT include spaces.
File name does NOT include special characters, such as: &, ( ) % # $ ¢ / \ { } [ ] < > : ; @
END OF CHECKLIST
6
Accessible Course Design Guidelines
Color Contrast
Course theme or template provides strong color contrast between background and text.
Blackboard Example
Moodle Example

7
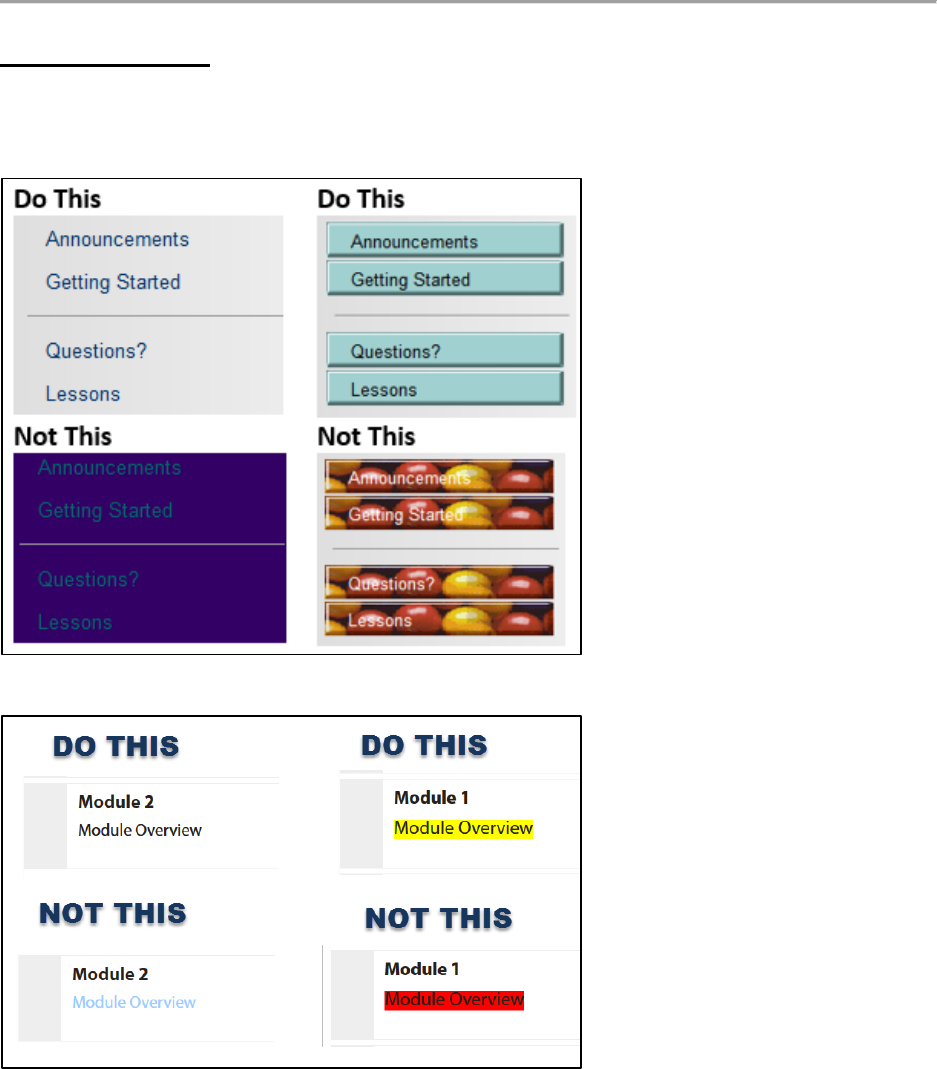
Images required to understand content have sufficient color contrast
DO THIS
Graphic with sufficient color contrast utilizing dark text on light backgrounds.
NOT THIS
Graphic with insufficient color contrast utilizing dark text on dark backgrounds.

8
Consistency
No more than 3 different text fonts or colors are used throughout the course.
DO THIS
NOT THIS
Color
Color is not used as the only means of conveying information.
Color blindness is the inability to perceive differences between some colors that others can
distinguish.
DO THIS
Lines that must be memorized for the next quiz appear in bold and red print below.

9
NOT THIS
Lines that must be memorized for the next quiz are colored red in the excerpt below.
Font Styles
Text is easy to read.
Sans Serif fonts are suggested (fonts without “feet” or ornamentations):
This is Arial. This is Verdana. This is Tahoma.
Verdana is considered the easiest to read of the basic Sans Serif fonts. It is larger, has more
spacing between letters, and its characters are not easily confused.
DO THIS
Verdana example in Blackboard

10
NOT THIS
Georgia example in Blackboard (font size was set the same as the Verdana example)
Real Text
Real, typed text, NOT text in a graphic is used whenever possible.
DO THIS
Type the text directly onto the document or presentation, such as:
Thank you!
NOT THIS
Avoid using a graphic of text.
Formattable Text
Content is not locked.
Paragraph spacing, letter spacing, word spacing, and line height can be customized by the
student to enhance readability. An example of locked content is a PDF document. If you wish to

11
use a PDF, upload a companion Word document containing ALL of the same information to
allow students to select the document format that is more suitable for each student’s situation.
Blinking and Moving Elements
No moving or blinking animations or text should be present in course content.
Blinking/flashing elements can trigger an event in individuals who are prone to seizures.
Blinking and animated elements are known to be distracting to all students regardless of
cognitive or attention challenges.

12
Structure
Content is logically structured.
Headings (Heading, Sub Heading 1, Sub Heading 2…) and lists are used appropriately to
establish content hierarchy.
DO THIS
Always implement headings to establish content structure and hierarchy; nest headings
properly. Don’t apply headings out of order.
The structure that headings and lists create is visible and available to Assistive Technology in a
HIERARCHICAL reading order.
NOT THIS
Adjusting the color and size or applying bold and italics to text just changes the visual
components of the page; it does not address structure or establish an accessible content
hierarchy.

13
Tables
Tables are simple, used for data only, have logical left-to-right top-to-bottom reading order.
Table headers are implemented when available.
DO THIS
Never embed a table within a table. Screen readers always read embedded content first. Never
use tables for visual layout purposes. Tables should be used to convey meaningful data.
NOT THIS
This table has been used to visually layout content.

14
Alternative Text (alt text)
Non-text elements have meaningful alternative text and when necessary, a long description.
All images require alternative text. Alternative text replaces the image for screen reader users,
allowing the users to visualize the graphic.
Generally, the length of alternative text is less than 125 characters (about 10-15 words).
Consider your purpose for using the image:
• Is it purely decorative?
• Is it an example of something you mention in surrounding text/lecture?
• Is it a more complex graphic containing important information?
Decorative Images
Example:
An architecture instructor might use the following image, as decoration, on a title slide of a
PowerPoint presentation about Greek architecture.
DO THIS
Alt Text: North face of White House mansion (Washington DC, USA)
The alt text provides a brief overview of the content that appears in the image.
NOT THIS
Alt Text: Washington DC
The alt text does not provide a brief overview of the content appearing in the image.

15
Example Images
Example:
An architecture instructor might use the following image, in a text lecture, as an example of a
type of Greek column.
DO THIS
Alt Text: North face of White House mansion (Washington DC, USA) featuring square portico
surrounded by Ionic columns
The alt text identifies the type of columns and the White House as an example of them.
NOT THIS
Alt Text: White House
Even though the image depicts the White House, the instructor is using the image as an
example of a type of Greek column.
NOR THIS
Alt text: whiteHouse.jpg
Note that this is the name of the image file. This should be replaced with alt text sufficient
enough to replace the visual.
16
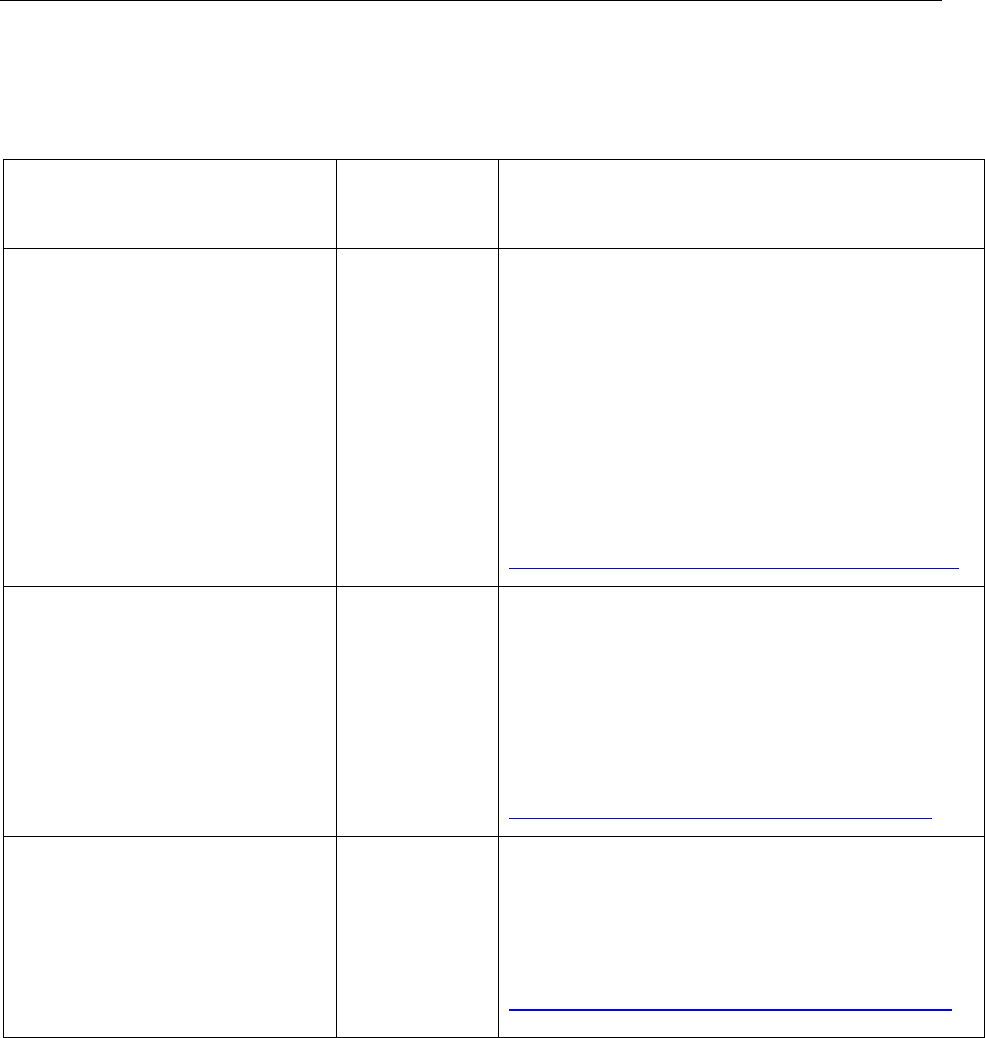
Complex (STEM) Images
Alternative text AND a long description are required for more complex educational images,
such Science, Technology, Engineering, and Math (STEM) images. Depending on the type of
STEM image, use one of three long description strategies: Linear Description, List Description,
or Table Description.
Type of STEM Image
Long
Description
Strategy
Description of Strategy
• Venn diagrams
• Illustrations
• Comparison illustrations
Linear
Description
A linear description is a traditional description
of an image. It organizes the content in the
graphic by describing it from left to right (or
top to bottom). To provide a linear description,
begin by selecting a spot, providing a
description for it, and then moving in a
sequential, logical narrative from that first
point to the next spot and beyond. Try to be
brief and specific.
Linear Description Example (in-document link)
• Image of a process
• Image of a cycle (i.e., a life
cycle)
• Flow chart
List
Description
A list description is a numbered (or otherwise
ordered, such as alphabetized) list. Start at the
beginning of a process (or in the case of a cycle,
pick a point within the cycle in which to
begin), and type a list of all of the steps
involved in the process.
List Description Example (in-document link)
• Bar charts
• Line graphs
• Pie charts
• An illustration that has an
embedded graph or chart
• Complex diagram
Table
Description
A table organizes data from images of charts
and graphs. In Word, create an accessible
table of the data appearing in the chart or
graph.
Table Description example (in-document link)

17
Linear Description Example
The long description (linear description) of the Venn diagram is provided below the image:
Long description of Venn diagram comparing and contrasting Scientific Revolution and
Technological Revolution: This Venn diagram has two overlapping circles. One is labeled
Scientific Revolution and the other is labeled Technological Revolution. Scientific Revolution
includes: 16
th
Century, Completely new inventions, and Physical science. Technological
Revolution includes: 21
st
Century, Mostly enhanced previous inventions, and Technological
science. The circles overlap in the middle and include: New technology, Encourages new way of
thinking, Reinvents concept of education, Develops global communication, and New
perspective.
The Venn diagram image’s alt text is: Venn diagram comparing and contrasting Scientific
Revolution and Technological Revolution. Long description provided below image.

18
List Description Example
The long description (list description) of the lunar cycle is provided below the image:
Long description of lunar phases cycle: 15 photographs of the moon documenting its lunar
phases. The list below provides a description of the photographs:
1. The Moon's unilluminated side is facing the Earth. The Moon is not visible.
2. The Moon appears to be partly but less than one-half illuminated by direct sunlight. The
fraction of the Moon's disk that is illuminated is increasing.
3. One-half of the Moon appears to be illuminated by direct sunlight. The fraction of the
Moon's disk that is illuminated is increasing.
4. The Moon appears to be more than one-half but not fully illuminated by direct sunlight.
The fraction of the Moon's disk that is illuminated is increasing.
5. The Moon's illuminated side is facing the Earth. The Moon appears to be completely
illuminated by direct sunlight.
6. The Moon appears to be more than one-half but not fully illuminated by direct sunlight.
The fraction of the Moon's disk that is illuminated is decreasing.
7. One-half of the Moon appears to be illuminated by direct sunlight. The fraction of the
Moon's disk that is illuminated is decreasing.
8. The Moon appears to be partly but less than one-half illuminated by direct sunlight. The
fraction of the Moon's disk that is illuminated is decreasing.
(Continued on next page)

19
The lunar phases cycle’s alt text is: Lunar phases cycle. Long description provided below image.
Table Description Example
The long description (table description) of the pie chart is provided below the image:
Long description of pie chart depicting percentage of professionals who were awarded
Medicare EHR Incentive payments, by amount in 2012. The table below provides a description
of the data depicted in the pie chart:

20
Table 1: Data depicted in pie chart
Amount (in dollars)
Percentage
18,000
63%
12,000
10%
Greater than or equal to
$12,000, but less than $18,000
27%
The caption below the image provides attribution information:
Figure 2: Percentage of Professionals Who Were Awarded Medicare by U.S. GAO (2013)
https://www.flickr.com/photos/58220939@N03/10691813934/ United States Government
Work (http://www.usa.gov/copyright.shtml) Photo Attribution by PhotosForClass.com
The pie chart’s alt text is: Pie chart depicting percentage of professionals who were awarded
Medicare EHR Incentive payments, by amount in 2012. Long description provided below image.
21
Hyperlinks
Hyperlink text clearly states the purpose of the link. Web addresses are also provided in text-
only format.
Hyperlinks convey where the link is going, why, and what happens.
EXAMPLE: A science instructor is sending students to WRAL TV online to observe current local
weather radar reports.
DO THIS
WRAL Online Local Radar (opens in a new window)
http://www.wral.com/weather/radar/
NOT THIS
http://www.wral.com/weather/radar/
NOR THIS
Click Here
Keyboard Access
Course components and multimedia elements are controlled by the user.
Controls can be manipulated with the keyboard. This means pressing the Tab key should move
the “focus” logically through the content appearing on screen. Pressing Enter (or Spacebar)
should confirm a selection (you can test this by using only your keyboard – not your mouse – to
navigate areas of your course, such as downloading an assignment or opening a hyperlink).
A multimedia element should not start when the page in which it is located is opened.
Tab Key Test
Anyone should be able to use the tab key to navigate through all elements of the course and all
multimedia controls in the course. All components and controls can be manipulated without
the use of a mouse. For examples, please refer to Keyboard Access and Player Controls in this
handbook.

22
Navigation
Course navigation is simple and consistent.
Keeping content within three clicks of the main course page will allow students to more easily
locate course material. The example below illustrates course navigation in Blackboard. In
Moodle, all content is linked from the course home page.
DO THIS
NOT THIS
File Names
Appropriate file naming conventions are implemented.
• File name uses alphanumeric (abc, ABC, 123) characters.
• A hyphen (-) may be used to separate words.
• No spaces.
• No special characters, such as: &, ( ) % # $ ¢ / \ { } [ ] < > : ; @
DO THIS
NOT THIS

23
Accessibility in Documents (.doc, .docx, .pdf)
File Names
Appropriate Web file-naming conventions are implemented when documents will be
accessed on the Web.
Screen Reader Access
Documents are NOT Read-Only. Screen readers cannot access the Read-Only format.
In Microsoft Office, marking a document or project as final and/or encrypting or restricting
editing and permissions also blocks access to assistive technology.
A restricted document will display (Read-Only) status in the title bar at the top of the screen.
The document portrayed in the image below is not accessible to a screen reader.

24
PDFs created in newer versions of Adobe Acrobat can be locked as long as screen reader access
is enabled. Adobe Acrobat displays a warning as in the example below when screen reader
access is disabled.
Contrast
Confirm adequate color contrast.
DO THIS
The lower portion of the following image provides an example of what a red/green color blind
person would see.

25
NOT THIS
The lower portion of the following image provides an example of what a red/green color blind
person would see.
Structure
Documents are logically structured using styles.
DO THIS
Structure the document using the Styles pane in Word.
NOT THIS
Changing font sizes, formatting text by applying bold or italic, changing colors by using the Font
pane changes the visual hierarchy of the page, but it does not create structure that is available
to assistive technology.

26
Both documents below are visually similar. The document on the left (created using the Styles
pane) has a well-established hierarchy, making the content easy to access even by those who
cannot visually discern the structure.
Fonts
Text is easy to read. Sans Serif fonts are suggested for documents accessed online—12 pt.
font size minimum.
Consistency
No more than 3 different text fonts or colors should be used. Please refer to 6A on page 4 for
examples.

27
Color
Do not use color as the only means of representation. A good rule-of-thumb is to consider how
a chart that uses color to convey information might look in grey-scale.
If color is used to convey information, be sure to provide an alternate means of conveying the
same information. In the example below, a data table has been included under the image of the
chart.
Class Enrollment by Environment
Type of Enrollment
Math
English
History
Art
Online Enrollment
66
66
55
88
Hybrid Enrollment
88
77
66
66
Seated Enrollment
77
66
88
77

28
Alternative Text (Alt Text)
Non-text elements have meaningful alternative text and when necessary, a long description.
All images require alternative text. Refer to Alternative Text (alt text) in the Accessible Course
Design section of this handbook for information on composing alternative text.
Provide long description (if needed) below the image so all students can benefit.
Tables
Tables are simple, used for data only, have logical left-to-right top-to-bottom reading order,
table headers are implemented. Headers should repeat when a table falls in a page break.
DO THIS
This simple table has descriptive column headers and was created considering left-to-right, top-
to-bottom reading order.
STUDENT
COURSE
TUTOR
DAY
TIME
Sally
Math
Mrs. Jones
Monday
12 pm -1 pm
Walter
English
Mr. Jones
Monday
12 pm -1 pm
Tommy
Math
Mr. Smith
Tuesday
1 pm -2 pm
Helen
Reading
Ms. French
Tuesday
2 pm -3 pm

29
NOT THIS
This image depicts a table that has embedded table elements. They would be read out of logical
order by assistive technology. This table was not created considering left-to-right, top-to-
bottom reading order.
Hyperlinks
All hyperlinks are well formed.
Please refer to hyperlinks in the Accessible Course Design section of this handbook for basic
information.
Accessibility in Presentations (.ppt, .pptx)
File Names
Appropriate file-naming conventions are implemented.
Please refer to the Accessible Course Design section of this handbook section for basic
information.
Screen Reader Access
Presentations are not “Read Only.”
See Screen Reader Access in the Documents section of this handbook.
Auto Layout
Slides are created using Auto Layout.

30
DO THIS
Use the Auto Layout feature to add appropriate slides. Consider the type of content you plan to
enter when selecting an Auto Layout slide. Add content by clicking the appropriate icon in the
Auto Layout slide.

31
NOT THIS
Insert text in the Auto Layout text areas, DO NOT add text using a Text Box. Slide content in a
Text Box is not available to assistive technology.
Contrast
Slides provide adequate color contrast.
DO THIS
NOT THIS

32
Outline View
Open Outline View. Click the View tab and then select Outline View.
Each slide has a title, all text content is visible and in logical reading order.
With the exception of alternative text and long descriptions, content not visible in Outline View
is not available to assistive technology.
DO THIS
NOT THIS
Two slides, in the image below, have content that does not appear in Outline View.

33
Unique Titles
Each slide has a unique title.
DO THIS
If the same slide title is necessary for several slides, note in parentheses how
many slides appear in the series and the numeric order of the slides within the
series. For example, (1 of 2) and (2 of 2).

34
NOT THIS
Slide titles are duplicated.
Fonts
Select fonts that are clear and easy to read.
DO THIS
Select Sans Serif fonts

35
NOT THIS
Consistency
No more than 3 text fonts or colors are used.
DO THIS

36
NOT THIS
Color
Color alone is not used to convey information.
Please refer to the Accessible Course Design section of this handbook section for basic
information.
DO THIS
Contents in Bold Red and Blue Italics will be on exam.

37
NOT THIS
Contents in Red and Blue will be on the exam.
Alternative Text (alt text)
Non-text elements have meaningful alternative text and when necessary, a long description.
All images require alternative text. Refer to Alternative Text (alt text) in the Accessible Course
Design section of this handbook for information on composing alternative text.

38
DO THIS
Charts that have not been created within PowerPoint are simply displayed as images in
PowerPoint. Alt text should be applied to the images to make them accessible.
If color is used in the chart to convey information, be sure to provide an alternative means of
conveying the same information without relying on color. An example would be to include a
link to the same information in excel format. Excel spreadsheets can be very accessible if
created with accessibility in mind.
It is also critical to provide an explanation of the available data and its relevance using a
detailed description adjacent to the graph on the page or in the description alt text box.

39
NOT THIS
Slide note content cannot be read by assistive technology. Slide note content should also be
placed on the slide itself or in the Alt Text/Description text boxes.
Transitions and Animations
Avoid slide transitions and animations, or provide an alternate version without transitions
and animations.
Rarely do animations or transitions actually add to the teaching value of a presentation, and
both often conflict with screen reader access. Avoid animations and transitions, or provide an
additional version of the presentation that does not include transitions or animations

40
DON’T DO THIS
Dissolve transition in process.
NOR THIS
Wave animation in process.

41
Tables
Tables are simple, used for data only, have logical left-to-right top-to-bottom reading order;
table headers are implemented when available.
Accessible tables created in the PowerPoint environment should have a title (use the slide’s
Title placeholder) and a logical structure with labeled headers for columns and/or rows. When a
table is properly formatted, people with visual disabilities can scan content more quickly using
screen readers.
Careful! Is the Table Actually an Image?
It is important to confirm that the data in a table is available to screen readers.
DO THIS
The best way to discern if a table is text-based (potentially accessible) or an image (a non-text
element) is to attempt to select some of the text.
The table in the image below is an example of a text-based table. The rows and cells of text are
easily selected.
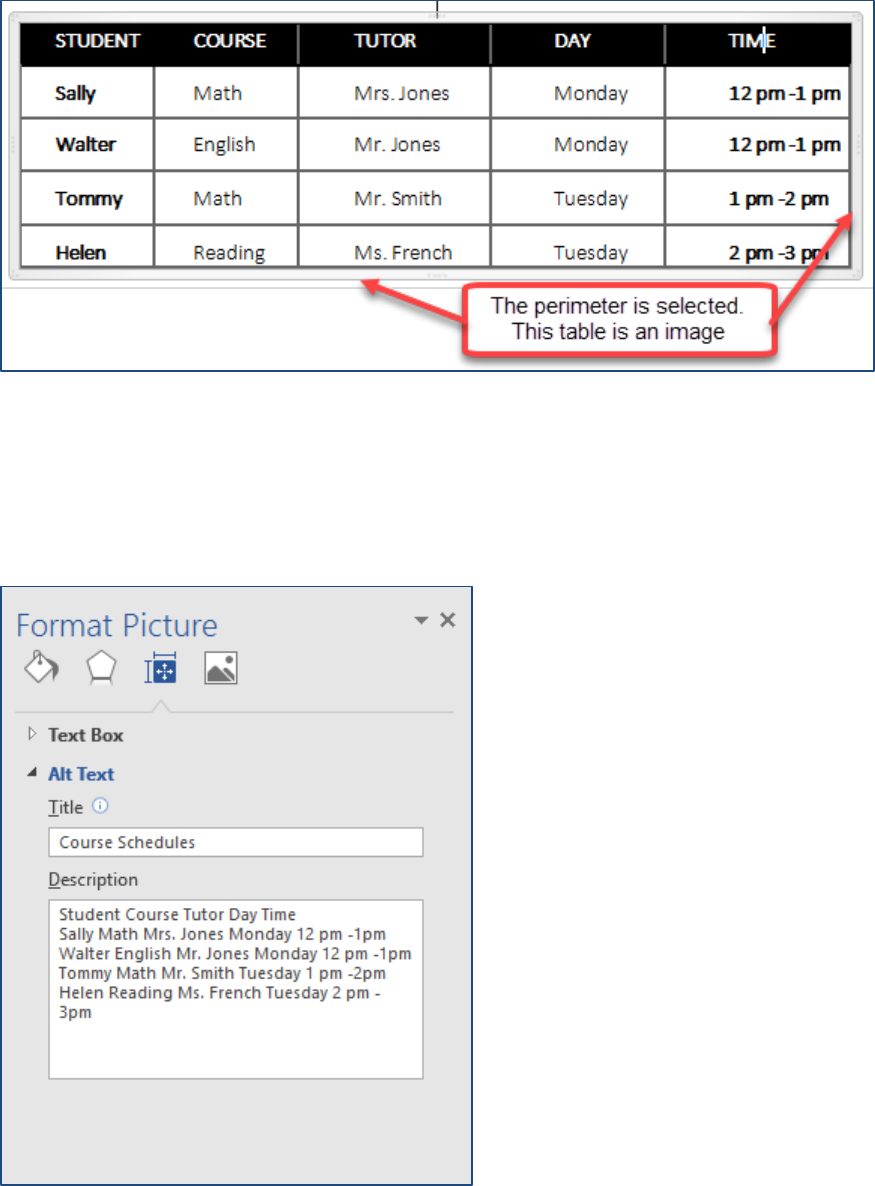
42
The table in the image below is an image. The perimeter is selected, but the rows, columns, and
cells of data cannot be selected individually.
When a Table is Actually an Image
If it the table is an image, it will require the same concise description as a complex image,
graph, or chart. Convey all of the information appearing in the data table and its purpose in the
Description text box.

43
Accessibility in Multimedia (Audio/Video)
Audio
All audio files should have an adjacent transcript and appropriate user controls.
Don’t enable AutoPlay or allow the multimedia to loop (play over and over).
DO THIS
• Enable user controls
• Add a link to the transcript
• Add link to download to the audio file, if possible
Transcript of Food Bites Back (TXT)
Download audio file: vitalSigns-FoodBitesBack.mp3
NOT THIS
Click here for podcasts
Multimedia Videos
All videos are synchronously captioned and a transcript is provided.
All video and multimedia content that contain speech or other necessary audio information
should be open or closed captioned.
Captions are a synchronous text- based representation of multimedia audio content. Open
captioning cannot be turned on and off. Closed captioning, which is the preferred method, can
be turned on and off.
44
Transcript of Sharing Creative Videos (TXT)
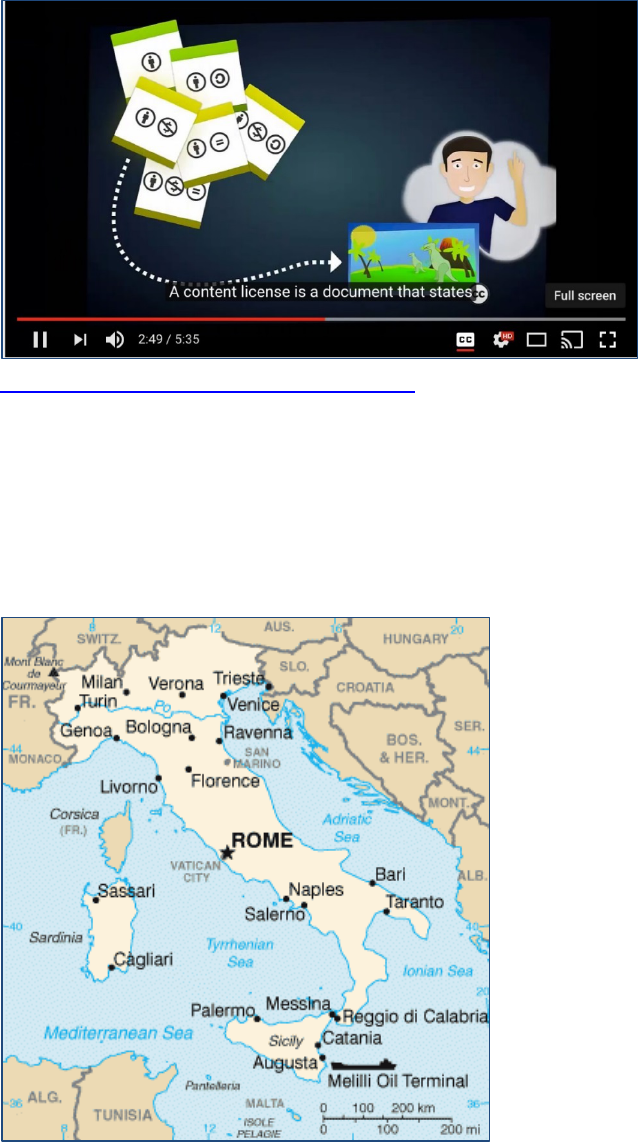
Audio Descriptions
Video narratives are created incorporating visual descriptions.
When adding multimedia content, use a script to provide an audio narrative of what the learner
is being shown. EXAMPLE: When providing information about a geographic location on a map,
describe it visually.

45
DO THIS
Italy’s boundaries are shaped like a boot with the city of Rome at the knee and with the toe of
the boot pointed towards the island of Sicily. Italy is surrounded by water on three sides.
NOT THIS
Rome is here, Sicily is here…
Detailed audio descriptions enhance learning for all students, including the visually challenged.
Keyboard Access and Player Controls
Multimedia elements can be controlled by the user. Controls can be manipulated with the
keyboard (Tab Key test).
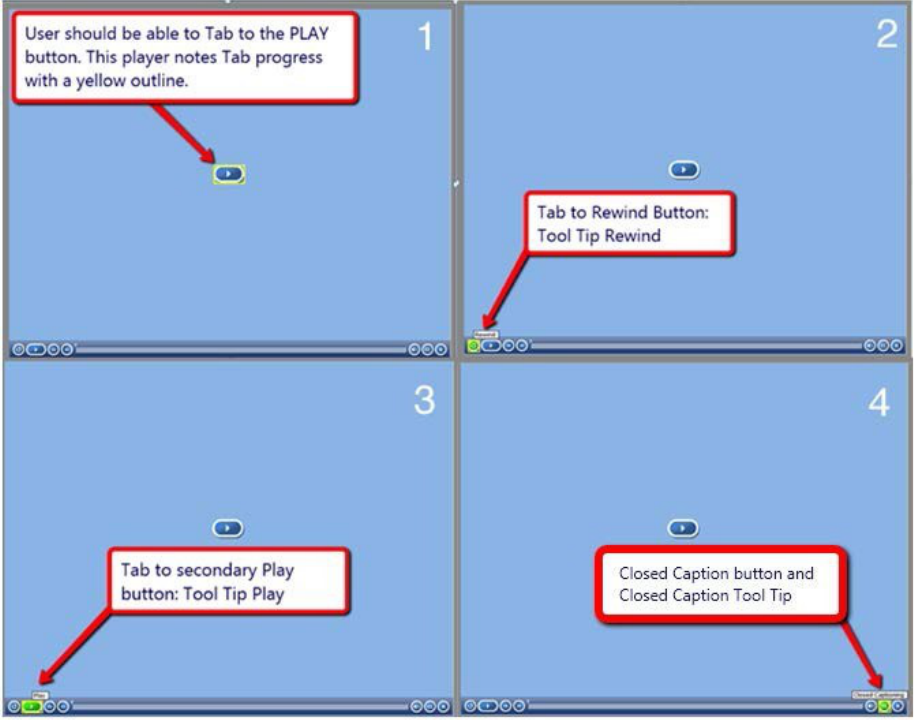
Tab Key Test
To perform the Tab Key test, press the tab key repeatedly to navigate through all multimedia
elements and controls.
The four images below demonstrate the Tab key test:
1. The main PLAY button has focus.
2. Tab again to focus on Rewind.
3. Tab again to focus on the secondary Play button.
4. Tab-tab-tab-tab to focus on Closed Captioning.
46
Instructions should always be provided within the course for downloading and installing plug-
ins (including links to the specific plug-ins), enabling captions, navigating players, or for
accessing accessible alternatives specific to the multimedia types used within the course.
The YouTube site is accessible; but often a player embedded in a lesson is not. Alternative
options with captions should be provided for all embedded media. Windows Media player may
require the user to enable the caption feature. The new QuickTime player is the only plug-in
player at this time that enables captions by default. Please see examples that follow.

47
YouTube Player
Captions are enabled in the YouTube player.
Windows Media Player
Captions must be enabled in the user’s Windows Media player.

48
Quicktime Player
Captions are enabled by default

49
Accessible Web Resources
Hyperlinks
Hyperlink text clearly states the purpose of the link. Web addresses are also provided in text-
only format.
Please refer to the Accessible Course Design section of this handbook section for basic
information.
DO THIS
W3C: Web Accessibility Initiative (opens in a new window)
[URL: http://www.w3.org/WAI/]
NOT THIS
Multimedia
Multimedia components and controls are accessible with keyboard (Tab Key test).
Please refer to the Accessible Course Design section of this handbook section for basic
information.
Accessibility Compliance
External resources meet accessibility guidelines, including the availability of captions and
transcripts.
Navigation
External resources open in a new window.
When hyperlinking to an external resource, (opens in a new window) or the abridged (opens
new window) is appended to the hyperlink.
W3C: Web Accessibility Initiative (opens in a new window)

50
Resources
The following sites provide additional online course accessibility resources.
Access eLearning - Access E-Learning is a tutorial of the Georgia Tech Research on Accessible
Distance Education (GRADE) project at Georgia Tech.
http://www.accesselearning.net/
Access for All’s Free PDF Accessibility Checkers (PAC 2)
http://www.access-for-all.ch/en/pdf-lab/pdf-accessibility-checker-pac.html
NCDAE – The National Center on Disability and Access to Education offers online resources on
creating accessibility instructional materials.
http://www.ncdae.org/resources/
UDL-Universe: A Comprehensive Universal Design for Learning Faculty Development Guide
http://enact.sonoma.edu/content.php?pid=218878&sid=2032869
WebAIM – provides accessibility resources and compliance guidance http://webaim.org/
W3C: Web Accessibility Initiative - Strategies, guidelines, resources to make the Web accessible
to people with disabilities
http://www.w3.org/WAI/
51
Appendix

52
MathType
Introduction
MathType is an equation editor that allows for the rich display of mathematical numbers,
symbols, and equations on the Microsoft Windows and Apple Macintosh platforms. MathType
expands on the basic equation editor symbol set and provides additional equation and notation
options for the display of mathematical content. MathType is commonly used within Microsoft
Office applications (e.g., MS Word and PowerPoint) or the Apple iWork suite (e.g., Pages and
Keynote), to author mathematical symbols and other science notation. MathType is also a
major component in supporting the conversion of documents into accessible alternate formats
that include mathematical content.
Adding Equations in Microsoft Word
Once MathType has been installed, an additional tab called the MathType ribbon will appear in
the Microsoft Word interface. To add an equation to a document, switch to the MathType
ribbon and select either the Inline Equation or Display Equation option. An Inline Equation will
add a MathType object within the same line as the cursor focus. A Display Equation will add a
MathType object centered and on a new line.
MathType will automatically open the MathType interface. For entering numbers or letters, use
the keyboard to enter the relevant characters. MathType automatically adjusts the spacing and
formatting for "math" specific content; as a result, the space bar is disabled to prevent
unintended spacing in the equations.

53
To save the equation back into the Microsoft Word document, choose File > Close and Return
to Document (Ctrl+F4). This will save the current MathType object and return you back to the
original document.
For entering symbols, such as the radical symbol or fraction symbol, use the templates provided
just above the MathType editing window. These symbol templates provide a mechanism to
control the placement of numbers or other characters in order to properly display the equation.

54

55
Example: Equations with Fractions
To enter an equation with a fraction, use the fraction template to establish the
numerator and denominator template regions (hotkey command Ctrl+F).
Enter the appropriate value for either the numerator or denominator.
Switch between the numerator and denominator regions by using the up or down arrow
keys.
To exit the numerator or denominator regions, press the right arrow key to move the
cursor focus outside of the fraction.
Return to the document by choosing File > Save and Close (Ctrl+F4).

56
MathType Keyboard Commands
MathType provides a large number of keyboard commands to simplify the authoring or editing
of mathematical symbols and equations. For instance, Ctrl+F will automatically include the
fraction template whereas Ctrl+R will embed the square root symbol into the editing region.
To review all the keyboard commands or change the current keyboard mapping, in MathType
go to Preferences > Customize Keyboard. Expand open the menu list of keyboard commands to
review the currently established options or to set new keyboard commands.

57
The current shortcut keys will be displayed in the "Current Keys" region. If you wish to return all
the keyboard commands to the original settings, press the "Reset All" button. This will reset all
the keyboard commands to the default settings when MathType was first installed.
Appearance of Math Content
One challenge when working with MathType is that it can be difficult to discern which parts of
the document are text-based and which parts of the document are MathType objects. There
are two methods one can use to differentiate between the text content and MathType objects.
Color
You can set MathType objects so that they may be a different color than the surrounding text-
based information.
To change the color of an equation, double-click on the equation to open the MathType
window.
Select the entire equation (Ctrl-A).

58
Choose Format > Color, and then select the color you wish to use to represent the
equations. The color you choose will be represented in the final version of the
document, so ensure appropriate color contrast.
To change all future equations to be of the same color, choose Format > Color > Edit
Color Menu.
Choose your desired color and press the Set as Default button. This will set the color for
future MathType equations.
Browse by Equation
In addition to setting the color for a MathType equation, it is also possible to navigate through
the document from equation to equation skipping the text-based content. To move from
equation to equation, press the Previous or Next button (in the Browse region) to move by
MathType objects through the document.

59
Browsing by equation will allow you to quickly jump from one equation to the next and provide
a visual indicator of the equation in the document. This can be useful if you do not wish to
change the color of equation as described in the previous section. This can also be a useful
method to evaluate if there are any "empty" MathType objects in the document.
Export to the Web
MathType offers numerous export options for equations authored within the MathType
interface. To ensure a version of the document is compatible with assistive technology, it is
necessary to use the Publish to MathPage export option. Please note - this is different than
using the Save As Web page option from within the Microsoft Office
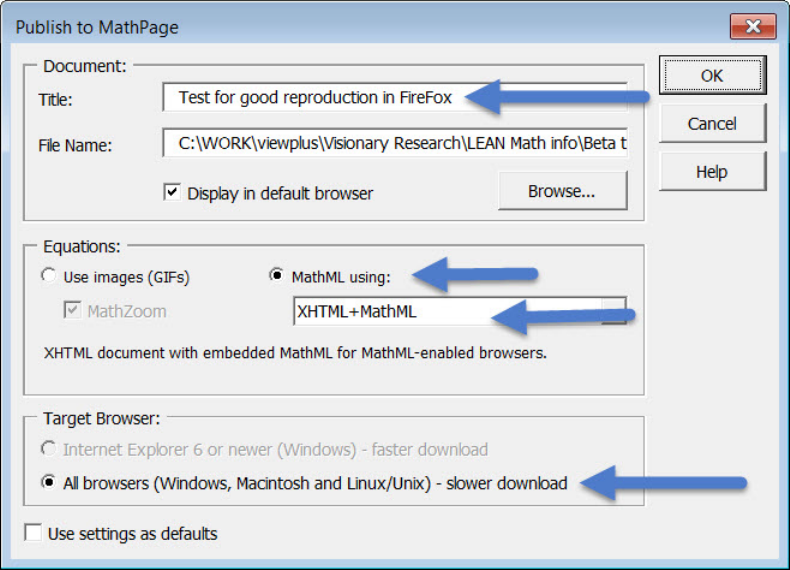
Example: Exporting as a Web Page
Create your document and add the relevant MathType objects.
Save the document.
Choose Publish to MathPage in the MathType ribbon.
60
In the Publish to MathPage window, provide a title for the document. This will become the title
of the Web page that is displayed at the top of the browser (this creates the <title> tag).
Check the location of where the file will be stored in the File Name region. To change the file
save location, press the Browse button and select a new file location.
In the Equations section, click the radio button MathML using: and select the option
"XHTML+MathML". This will create a Web page with MathML content compatible with the
most Web browsers.
Open the resulting file using a MathML compatible Web browser (e.g. Safari, Firefox, Opera). At
this time Google Chrome is not fully compatible with MathML
61
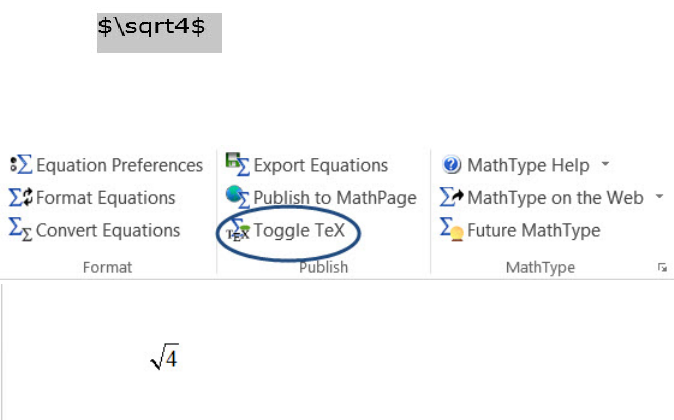
Using LaTeX with MathType
You can type LaTeX directly into your Microsoft Word document. Type the TeX, highlight and
click on the Toggle/TeX command. The Toggle/TeX command converts TeX code into MathType
objects that can be saved and rendered into MathML. It is also possible to copy LaTeX code
directly into MathType.
In MathType in the main equation editor copy a piece of LaTeX code such as:
m &= \frac{m_0}{\sqrt{1-\frac{v^2}{c^2}}} or
x = \frac{ { - b \pm \sqrt {b^2 - 4ac} } } { {2a} }

62
The LaTex code will be converted into a MathType equation. Notice the red & sign, in fact
anytime you see the & sign in an equation you will need to delete it. This is due to the
translation process from LaTeX to MathType and will need to be deleted. Below is the original
equation with corrections necessary and the corrected equation.

63

64
Creating Accessible Word 2013 Documents
Basic Concepts
Sans-Serif fonts, such as Verdana, Tahoma, and Arial are recommended for easy reading on
computers.
• Serif fonts, such as Times New Roman, and Georgia are recommended for easy reading
in print.
• Minimum font size of 12 pt. is suggested in most situations.
• Do not use color alone to convey information.
• Consider text to background color contrast when creating content.
• File names should be alphanumeric, avoid spaces, avoid symbols other than underscore
or dash, and contain less than 32 characters.
Headings – Lists – Styles
Headings
Headings add structure and improve the readability of a document. Apply the appropriate
heading using the Styles group; do not make adjustments using the Font group. Incorporating
the Styles gallery enables easy navigation of documents for all.
1. Select the heading text.
2. Select the Home tab.
3. In the Styles group, choose appropriate headings from the Styles gallery.
Heading 1 is the title of a short document. It should be brief and concise. Generally, there is just
one Heading 1 per page. Headings should continue in logical order based on their hierarchy or
order of importance. Do not skip heading levels. It can be helpful to view the Navigation Pane
while applying structure to a document.
65
Lists
Utilize built-in lists. Use numbers if a sequential order is important to the list, and bullet lists if
all items are of equal value.
1. Select the Home tab.
2. In the Paragraph menu, select the number or bullet option.

66
Styles
You can change the look of a document without disturbing the hierarchy.
Change Document Style
1. Select the Home tab.
2. Click the small down arrow in the Styles Gallery menu on the far right beside Change
Styles.
3. Click Style Set.
4. Choose any of the default styles to change the look of your entire document.
Change Individual Styles
1. Select the Home tab.
2. Right click on the individual applied style in the Styles Gallery.
3. Select Modify.
4. Edit the individual style item elements that you would like to modify. All like style items
will automatically update to reflect those changes.
Alternative Text
All non-text elements must have a text- based alternative that concisely presents (in context)
the information to be conveyed.
• Average 8-80 characters
• Avoid typing image of or graphic of (it’s redundant for screen reader users)
• Replace, don’t describe…
Add Alternative Text
1. Right click on the image.
2. Select Format Picture.
3. Select Layout & Properties.
4. Select Alt Text.
5. Add alternative text in the Description text box. Be aware that screen readers may not
access the Title text box.
6. Click the Close button.

67

68
Long Descriptions
If 8-80 characters will not convey the message, a Long Description is needed. Long descriptions
are usually necessary for:
• Complex images
• Graphs
• Charts
• Diagrams
• Images of Tables
Add alternative text to the image (see instructions above), but include a longer description in
the document (as a caption or in the content of the document,) so it is available to all students.
Hyperlinks
A properly formed hyperlink answers three important questions:
• Where am I going? (What is the name of the site?)
• Why am I going? (What should I focus on when I get to the site?)
• What is going to happen when I get there? (does a new window open?)
A properly formed hyperlink makes sense independently.
It is not required, but it is a good idea to also provide the URL address as plain text (not an
active hyperlink).
Barriers/Challenges
Potential Word document accessibility barriers include:
• Header/Footer content may not be available to a screen reader.
• SmartArt accessibility is not consistent at this time.
• WordArt is an image and requires alternative text.
• Images should always be inline, never wrapped.

69
Document Language
Document Language identification is critical for accessible PDF conversion.
1. Select the File tab
2. Select Options.
3. Select the Language.
4. Select or confirm English (US) as the Default, or the main language of the document.
(You may also add other languages if the content requires it.)
5. Click the OK button.
Tables
• Merged, nested, and split cells change the reading order of table content.
• Tables are for data, not page layout.
• Content must be presented in a logical order. Screen Readers read from top to bottom,
left to right.
• Readability should be considered when selecting fonts and when formatting text.
• Screen readers have difficulty accessing tables created with the Draw Table tool.

70
Build an Accessible Table
Always create a table using the Table tool.
1. Choose the Insert tab.
2. Click the Table command.
3. Click Insert Table.
4. Indicate the number of rows and columns.
5. Click OK.
You may also select the appropriate configuration of row and column cells from the graph.
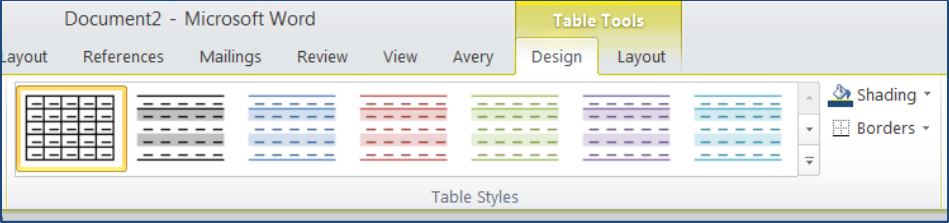
Add a Table Style
Choose a Table Style to visually distinguish the header row. Table styles help header text stand
out.
1. Click the selection handle outside the top left corner of the table. The entire table
should turn blue when selected.
2. The Table Tools tab appears above the Word ribbon.
3. Below Table Tools, Choose the Design tab.
4. Choose a simple Table Style for header row focus.
5. Click the Borders arrow to the right of the Table Styles menu to add visible table column
and row borders as needed.
71

72
Add Table Headers
Accessible tables need a designated header row. In Word, header rows are limited to horizontal
rows. Identify a row as the header, it is necessary to set the header row to repeat.
1. Click the selection handle outside the top left corner of the table. The table should turn
blue to indicate that it has been selected.
2. Right click on the selected table.
3. Choose Table Properties from the context menu.
4. Choose Row.
5. Click the Next Row button until the first row is blue and visible at the top of the page.
6. Click the check box to choose Repeat as header row at the top of each page.

73
Add a Table Caption
A table caption summarizes and identifies a table. A table caption also prepares a screen reader
to access a different type of content.
1. Select the table by scrolling over and clicking the + outside the top left corner.
2. Right click on the selected table.
3. Choose Insert Caption.
4. In the Caption format menu, add a brief table summary.
5. Confirm Label-Table and Position: Above selected item.
6. Click OK.

74
Creating Accessible PowerPoint 2013 Presentations
Basic Concepts
Sans-Serif fonts, such as Verdana, Tahoma, and Arial are recommended for easy reading on
computers.
• Serif fonts, such as Times New Roman, and Georgia are recommended for easy reading
in print.
• Minimum font size of 14 pt. is suggested in most situations. If the presentation will be
projected on a screen, a larger font size may be needed.
• Do not use color alone to convey information.
• Consider text to background color contrast when creating content.
• Check the reading order of slides to ensure that items are read in the correct order.
• File names should be alphanumeric, avoid spaces, avoid symbols other than underscore
or dash, and contain less than 32 characters.
Slide Layouts
Creating a New Slide
PowerPoint has a variety of slide layouts created. These layouts have been correctly structured
to include all the elements needed to help the slide accessible – slide title, structured headings,
and proper reading order.
1. Select the Home tab.
2. Select the New Slide button or press Ctrl + M.

75
3. Select the Layout button. Then select the layout you wish to use.
You can create your own slide layouts using the Slide Master. The Slide Master is located on the
View tab. When creating a custom Slide Master, be sure to include the slide title, text and
content boxes, and set reading order.
Alternative Text
All non-text elements must have a text- based alternative that concisely presents (in context)
the information to be conveyed.
• Average 8-80 characters
• Avoid typing image of or graphic of (it’s redundant for screen reader users)
• Replace, don’t describe…
Add Alternative Text
1. Right click on the image.

76
2. Select Format Picture.

77
3. Select the Size and Position button.
4. Select Alt Text.

78
5. Add alternative text in the Description text box. Be aware that screen readers may not
access the Title text box.
Long Descriptions
If 8-80 characters will not convey the message, a Long Description is needed. Long descriptions
are usually necessary for:
• Complex images
• Graphs
• Charts
• Diagrams
• Images of Tables
Add alternative text to the image (see instructions above), but include a longer description in
the presentation (as a caption or in the content of the presentation,) so it is available to all
students. Do not use the Notes panel to add the description. Screen readers may not have
access to the Notes panel.
Hyperlinks
A properly formed hyperlink answers three important questions:
• Where am I going? (What is the name of the site?)
• Why am I going? (What should I focus on when I get to the site?)
• What is going to happen when I get there? (does a new window open?)
A properly formed hyperlink makes sense independently.

79
It is not required, but it is a good idea to also provide the URL address as plain text (not an
active hyperlink).
Running the Accessibility Checker
PowerPoint 2010 and later contains an accessibility checker that can help identify and correct
accessibility errors. This tool is only available in the Windows version of PowerPoint.
1. Select the File tab.
2. Select Info and then select the Check for Issues button next to Inspect Presentation.
3. From the list, select Check Accessibility.

80
4. The Accessibility Checker will run and a pane will open providing a list of errors and
warnings that are present in the presentation.

81
5. To correct an error, click to select the error from the list. You will jump to it in the
presentation. If you are unsure on how to correct the error, instructions are provided in
the Additional Information section at the bottom of the pane.
Barriers/Challenges
Potential PowerPoint presentation accessibility barriers include:
• Content added to the Notes panel may not be accessed by a screen reader. Do not
include important information about the presentation in the notes.
• Avoid automatic transitions in your presentation. Allowing user control of slides will
provide more accessibility to the presentation.
• SmartArt accessibility is not consistent at this time.
• WordArt is an image and requires alternative text.
• Images should always be inline, never wrapped.

82
Creating an Accessible PDF File
from a Word 2013 Document
Preparing the Word Document
Use Word’s Built-in Features
• Paragraphs and styles
• Numbered or Bulleted Lists
• Headers/footers
• Tables
• A Table of Contents – for longer documents
• Headings – nest properly (like an outline)
• Alt-text (and a long description, if needed)
• Set the document’s language
Create Accessible Tables
• Keep tables simple
o Avoid merging or splitting cells
o Avoid nesting tables
• Denote the Header Row
• Provide a title (in Word, this is called a caption)
• Are there any abbreviations that should be explained? Is there anything that someone
who cannot see it will miss if it’s not in the summary? Add those to the Alt-text. A long
description may be necessary if the table must be complex
• Make sure there are no blank or merged cells
Check for Accessibility
• Were Styles used to create the headings/subheadings?
o To test a document for the proper use of headings, open the Navigation Pane -
are the headings descriptive?
• If a table has been used, make sure each of the column headings are descriptive and
that there are no merged or split cells.
• To test whether a table is actually an image, place the cursor in the first cell and press
Tab to make sure the cursor moves to the right and automatically down to the next row.
• Use the Accessibility Checker (File tab > Info > Check for Issues > Check for Accessibility)

83
A Note about Saving the Document
It is suggested that you save your document prior to creating a PDF file.
• .doc – This file type does a better job of properly ordering all of the document tags,
including the placement of images in the correct location. Note: The Accessibility
Checker will be unavailable.
• .docx – This file type will allow you to use the Accessibility Checker; however, creating a
PDF from a .docx causes images to become out of order (behind the scenes) for a screen
reader user.
To Create a PDF File:
1. Save the document as a .doc file extension. Keep the document open on your computer.
2. Then save the document as PDF.
3. Click the Options button.

84
4. A dialog box appears. Place a check next to the following options:
Create bookmarks using – Headings
Document properties
Document structure tags for accessibility
5. Click OK and then click Save. The PDF file will be created.
