RUBY
®
HD
Handheld Video Magnifier
User’s Guide
440648-001 Rev. B
ii
Copyright © 2019 Freedom Scientific, Inc. All Rights Reserved. RUBY
®
is a trademark of Freedom
Scientific, Inc., in the United States and other countries. Information in this document is subject to
change without notice. No part of this publication may be reproduced or transmitted in any form or
any means electronic or mechanical, for any purpose, without the express written permission of
Freedom Scientific.
Technical Support
To contact Technical Support by telephone, U.S. customers can call (727) 803-8600, Monday
through Friday, 8:30 AM to 7:00 PM (Eastern Time).
To contact by e-mail, send questions to Support@FreedomScientific.com.
To search the knowledge base, visit www.FreedomScientific.com and choose the Support link.
iii
Table of Contents
Read Me First ......................................................................................................... 1
Overview ................................................................................................................ 3
Hardware Description ............................................................................................. 5
Quick Start .............................................................................................................. 8
Battery LED Descriptions ..................................................................................... 11
Inserting Batteries ................................................................................................ 12
Charging NiMH Batteries ..................................................................................... 13
Turning On RUBY HD .......................................................................................... 14
Button Descriptions .............................................................................................. 15
Magnifying Live Images ....................................................................................... 16
Magnifying Frozen or Saved Images ................................................................... 16
Changing Color Modes ........................................................................................ 17
iv
Switching Between the Last Used Color Mode and Full Color ............................ 18
Displaying More Color Modes .............................................................................. 19
Resetting Default Color Modes ............................................................................ 21
Color Modes ......................................................................................................... 21
Default Color Modes ...................................................................................... 21
Additional Color Modes ................................................................................. 22
Freezing an Image ............................................................................................... 23
Turning LED Lights Off ......................................................................................... 24
Using Reading Line or Reading Masks ................................................................ 25
Displaying Reading Line ................................................................................ 25
Displaying Reading Masks ............................................................................ 26
Storage Mode ....................................................................................................... 28
Saving and Deleting an Image ............................................................................. 28
v
Viewing Saved Images ......................................................................................... 29
Saving an Image When Memory is Full ............................................................... 31
Storage Mode Icons ............................................................................................. 32
Transferring Images to a Computer Using the USB Cable .................................. 33
Transferring Images to RUBY HD Using the USB Cable .................................... 36
Displaying a Slide Show ....................................................................................... 37
Troubleshooting ................................................................................................... 39
Technical Specifications ....................................................................................... 45

1
Read Me First
Before using RUBY
®
HD for the first time, you must charge the four AAA
NiMH (1000 mAh) batteries. These batteries are included. A full charge
takes approximately 2 hours. Refer to Battery LED Descriptions on page
11 for battery status explanations. You can also use four AAA disposable
alkaline batteries to operate the unit.
Note: Do not mix NiMH batteries with alkaline batteries. Replace all
batteries of the same chemistry at the same time. Do not mix new
batteries with old batteries. Replace NiMH batteries with 1000 mAh
NiMH batteries. Failure to follow this precaution can lead to battery
failure or leakage. The risk of explosion is possible if batteries are
replaced with an incorrect type. Do not use batteries that specify a
MAX Charging Current below 250 mA.
2
Refer to Charging NiMH Batteries on page 13 for battery charging
procedures.
Refer to Battery LED Descriptions on page 11 for battery status
descriptions.
For the basics to help you get started using RUBY HD, read Quick Start on
page 8.
For an overview of RUBY HD and its operation, review the information in
this guide first.
3
Overview
Thank you for purchasing RUBY HD.
RUBY HD is a portable, handheld video magnifier that can magnify an object
from two to 13 times its size. It has an, auto-focus HD camera that provides
sharp HD quality images that are easily viewed on its full color, 4.3-inch LCD
screen. RUBY HD supports five default color modes, and 15 additional
contrasting color modes that can easily be enabled.
The unit has a fold-away handle that allows you to hold the magnifier close to an
object, press the magnification buttons for continuous zoom (2x to 13x with the
handle open or 4x to 10x with the handle closed), and then freeze the image on
the screen. If you like, you can then make any necessary magnification
adjustments. This is ideal for viewing clothing labels, prescription labels, price
tags, receipts, business cards, and more.
4
RUBY HD can save and store approximately 80 images that can easily be copied
to a computer through a simple USB connection.
The unit also has a reading line and reading mask feature that you can turn on
and use to quickly locate and maintain your place while viewing an image or
reading text on the LCD screen.
5
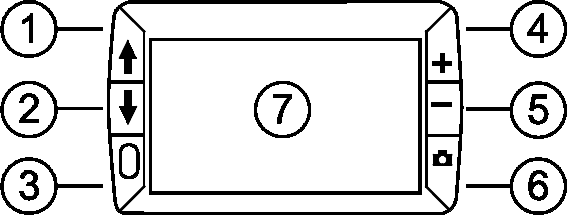
Hardware Description
1. Color Mode Scroll Up (Blue)
2. Color Mode Scroll Down
(Blue)
3. Power (Green/Yellow)
4. Magnification Increase (Yellow)
5. Magnification Decrease (Yellow)
6. Freeze Frame (Red)
7. LCD screen

6
8. Power connector
9. Battery LED
10. USB port
11. Handle and battery compartment in closed position

7
12. HD camera sensor
13. LED lights
14. Handle and battery compartment in open position

8
Quick Start
Below are steps to quickly set up and use RUBY HD for the first time.
1. Make sure the unit is fully charged. Refer to page 11.
2. Turn the unit on by pressing the green/yellow button . Refer to page
15.
3. Do one of the following.
Unfold the handle to hold and use the unit like a magnifying glass.
This is useful when it’s necessary to magnify and read objects such
as labels or details on cans, packages, pill bottles, and more.
With the handle folded closed, place the unit on a flat document
such as a newspaper or magazine, a bill or receipt, a letter, and so
on.

9
4. Adjust the magnification using the yellow buttons ( or ). Refer to
page 16.
5. Select a color mode ( or ) for contrasting colors that best suit your
vision needs. Refer to page 17.
6. Freeze the image on the LCD screen so that you may take your
time reading details in the image. Refer to page 23.
7. Save the image or return to live view . Refer to page 28.
10
Once you become comfortable using RUBY HD, try the following advanced
features.
Turn the LED reading lights on or off to adjust for glare and reflections
when viewing photographs or glossy magazine pages. Refer to page 24.
Use the reading line or reading masks to help you maintain your place
while reading text. Refer to page 25.
Save, view, and delete images stored on the unit as described on pages
28 through 31.
For additional storage, transfer images from the unit to your computer as
described on page 33.
11
Battery LED Descriptions
Green – Solid: Battery charged – power adapter connected.
Green – Flashing: Battery charging – power adapter connected.
Red – Flashing: Battery low.
Red – Solid: Error – unplug power adapter, wait a few seconds, and plug
in again. If this condition persists, change the batteries.
No LED: Battery charge ok, power adapter not connected; or RUBY is off.

12
Inserting Batteries
1. Fully extend the handle, and remove the battery cover by sliding it in the
direction of the imprinted arrow.
2. Insert the batteries, replace the battery cover, and close the handle.
Make sure that batteries are inserted using the correct polarity.

13
Charging NiMH Batteries
1. Plug one end of the power adapter into the unit and the other end into a
wall outlet.
2. The battery indicator LED blinks green to show that the batteries are
charging. For more, see Battery LED Descriptions on page 11.
3. The LED stops blinking and glows a steady green once the batteries are
charged. Unplug the power adapter from the unit. The battery indicator
LED turns off.

14
4. You can now use your RUBY HD for approximately two hours of
continuous use. When the batteries are low, the battery indicator LED
flashes red. Connect the power adapter and plug it in to recharge the
NiMH batteries.
Note: If you decide to replace the supplied NiMH batteries, replace all
four at the same time with 1000 mAh NiMH batteries with a MAX
Charging Current above 250 mA.
Turning On RUBY HD
1. Press the green/yellow button to turn on the unit. After a few seconds,
the battery status icon displays on the screen.
2. Press the button again to turn off the unit.
Note: If it is left on and no buttons are pressed, it automatically turns off
after 30 minutes to avoid draining the batteries.

15
Button Descriptions
Power (Green/Yellow): Press to turn power on. Press it again to
turn power off.
Magnification (Yellow): Press and HOLD for continuous zoom
magnification with live images. When viewing frozen images, press
and release to incrementally increase or decrease magnification.
Color Mode (Blue): Press to cycle through five default color
modes and 15 additional color modes. For a complete list, refer to
Color Modes on page 21.
Freeze Frame (Red): Press to freeze the current image. Press it
again to turn off Freeze Frame mode and return to live view.

16
Magnifying Live Images
When viewing a live image, you can use continuous zoom magnification between
2x to 13x with the handle open, or 4x to 10x with the handle closed.
Press and HOLD the yellow PLUS button to zoom in.
Press and HOLD the yellow MINUS button to zoom out.
Magnifying Frozen or Saved Images
You can freeze and then save an image that displays on the LCD screen. When
viewing a frozen or saved image, you can zoom in or out in incremental steps by
pressing the yellow buttons (
or ).
For steps to freeze an image, refer to Freezing an Image on page 23.
To access saved images, refer to Saving and Deleting an Image on page 28.

17
Changing Color Modes
A color mode is a pre-defined color combination (for example, yellow text on a
blue background) that you can select when reading items with RUBY HD.
The unit has five default color modes: Full Color; Black on White (high-contrast
positive); White on Black (high-contrast negative); Yellow on Blue; Yellow on
Black; and 15 additional color modes. For a complete list, refer to Color Modes
on page 21.
Press the blue arrow buttons ( or ) to change the current color
combination on the LCD screen.
The blue UP arrow button cycles in one direction through the color
combination list while the blue DOWN arrow button
cycles in the other
direction.

18
Switching Between the Last Used Color Mode and Full Color
RUBY HD provides the convenience of quickly switching between the last color
mode used and full color, or vice versa.
This shortcut is useful when looking at a live image (for example, while holding
and reading a document) and using a color mode that provides the best contrast
for you. If you need to move the unit to a different part of the document, it may be
easier to switch to full color, move to the new location, and then return to your
color mode selection and continue reading.
To do this,
Press and HOLD the green/yellow button , and then press the blue
DOWN arrow button
. The screen changes from one mode to the other.
To switch back, repeat the same button sequence again.

19
Displaying More Color Modes
RUBY HD has five default color modes. You can also activate and choose from a
variety of 15 other color modes. Once a color mode is available, you can easily
switch to it using the blue arrow buttons (
or ).
To add or remove other color modes,
1. Press and HOLD the green/yellow button and then press the blue UP
arrow button
to enter Color Selection mode.
The Enable check box
displays indicating that the current color mode
is active.
2. To disable the current color mode, press the blue DOWN arrow while
STILL holding the green/yellow button
. This button sequence clears
the check box.
.

20
3. To scroll to the next color mode, press the blue UP arrow while STILL
holding the green/yellow button.
If the check box is selected ( ), the color mode is enabled.
If the check box is cleared ( ), the color mode is disabled.
4. To enable or disable a color mode, press the blue DOWN arrow while
STILL holding the green/yellow button to select or clear its check box.
5. Repeat steps 3 and 4 to continue adding or removing color modes.
6. When you are finished loading color modes, release all buttons. Any
color mode changes made will be saved, and the unit will return to
normal operating mode.

21
Resetting Default Color Modes
If you have added or removed color modes that display on the screen, you can
always restore RUBY HD to its five default color modes.
Press and HOLD the green/yellow button and the blue UP arrow button
simultaneously for 15 seconds.
Color Modes
There are five factory default color modes and 15 additional color modes that you
can make active.
Default Color Modes
1. Full Color (always available, cannot be disabled)
2. Black on White – high-contrast positive
22
3. White on Black – high-contrast negative
4. Yellow on Blue
5. Yellow on Black
Additional Color Modes
Black on Yellow
Blue on Black
Black on Amber
Green on Black
Blue on Yellow
Violet on Black
Black on Green
Red on Black
Black on Violet
White on Blue
Black on Red
Red on White
Black on Blue
Amber on Black
Black on Light Blue

23
Freezing an Image
Freezing an image on the LCD screen can be useful for reading labels on items
on a store shelf. By holding the unit close to the item and freezing the image, you
can then hold it close enough for you to read.
1. Press the red button to freeze the image.
If you like, press the yellow PLUS button
to increase magnification, or
the yellow MINUS button
to decrease magnification.
2. Press the red button again to turn off Freeze Frame mode and
return to the live view.
Note: To save a frozen image, press and HOLD the red button
for
three seconds. Refer to Saving and Deleting an Image on page 28 for
more information.

24
Turning LED Lights Off
When you turn on RUBY HD, the LED lights also turn on. To avoid glare when
viewing reflective surfaces, you can turn off the LED lights.
1. Press and HOLD the green/yellow button , and then press the red
button
. The LED lights turn off.
2. To turn the lights on again, press and HOLD the green/yellow button ,
and then press the red button
.

25
Using Reading Line or Reading Masks
The reading line is a horizontal line that displays on the screen. Reading masks
block part of the screen to show a horizontal slice of the screen. Use these items
to help you locate and maintain your place while viewing an image. When using
the button sequence as described below, the unit cycles through displaying the
reading line, the reading masks, and then no reading line or masks.
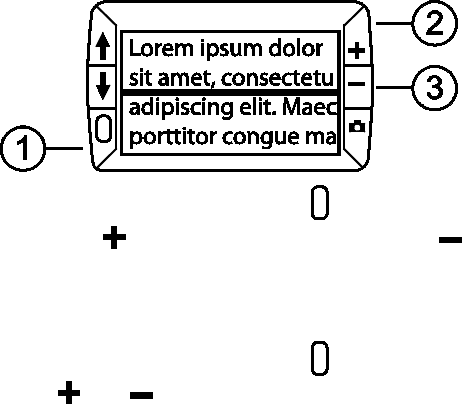
Displaying Reading Line
1. Press and HOLD the green/yellow button (1) and then press both
yellow buttons (
and (2 and 3)). The reading line displays on the
screen as shown in the next figure.
26
2. Press and HOLD the green/yellow button (1) and then press the
yellow PLUS button
(2) or the yellow MINUS button (3) to move
the reading line up or down on the screen.
Displaying Reading Masks
1. Press and HOLD the green/yellow button (1) and then press both
yellow buttons (
and (2 and 3)) again to remove the reading line
and display the reading masks on the screen as shown in the next
figure.

27
2. Press and HOLD the green/yellow button (1) and then press the
yellow PLUS button
(2) or the yellow MINUS button (3) to increase
or decrease the distance between the masks.
3. To remove reading masks from the screen, press and HOLD the
green/yellow button
(1) and then press and HOLD both yellow buttons
(
and (2 and 3)).

28
Storage Mode
Storage mode can save approximately 80 images. When you first store an
image, it is saved with the current magnification and color settings just as
displayed on the screen. When viewing a saved image, you can change the
magnification level.
Saving and Deleting an Image
After freezing an image on the screen, you can save it by doing the following.
1. Press and HOLD the red button for three seconds to enter Storage
mode.
2. The Save Image check box is automatically selected and displays for
three seconds. This indicates that the image will be saved after exiting
Storage mode and returning to live view.

29
To delete an image while in Storage mode,
1. Press and HOLD both yellow buttons ( and ) to clear the check box
. When you exit Storage mode, the image is deleted.
2. Press and HOLD the red button for three seconds to exit and return
to live view.
Viewing Saved Images
RUBY HD can store approximately 80 images. You can easily scroll through the
images using the blue arrow buttons (
and ).
1. Press and HOLD the red button for approximately six seconds to
enter Review mode.
To scroll forward through the saved images, press the blue UP
arrow (
).

30
To scroll backward through the saved images, press the blue DOWN
arrow (
).
2. Press and HOLD the red button for approximately three seconds to
exit and return to live view.

31
Saving an Image When Memory is Full
RUBY HD can store approximately 80 images. If you try to save another image
when the unit’s memory is full, the Memory Full icon
displays on the screen.
To add another image, you must first remove one or more saved images from
memory.
1. Press the blue UP arrow ( ) or the blue DOWN arrow ( ) to step to an
image that you want to delete.
2. Press both yellow buttons ( and ) to clear the check box .
3. Press and HOLD the red button for three seconds to exit Storage
mode. The new image is saved, and all unchecked images are deleted.
Note: To free space on the unit, you can also move images to a
computer. For more information, refer to Transferring Images to a
Computer Using the USB Cable on page 33.

32
Storage Mode Icons
Save: Press the two yellow buttons (
and ) at the same
time to select the check box. The image is saved when you exit
Storage mode.
Delete: Press the two yellow buttons (
and ) at the same
time to clear the check box. The image is deleted when you exit
Storage mode.
Memory Full: Indicates that memory is full, and no more
images can be saved on the unit. You must mark one or more
images for deletion
before you can save the current image.

33
Transferring Images to a Computer Using the USB Cable
Images stored on RUBY HD can be transferred to your computer using the
supplied USB cable. To do this,
1. Connect the supplied USB cable to the unit (1) and the computer.
2. When connected,
The USB symbol and battery icon briefly display on the LCD screen.
34
The battery icon indicates the current battery status. Images do not
display on the screen while the unit is connected to a
computer’s USB port.
Note: A USB port does not provide enough power to charge the NiMH
batteries. Use the power adapter to recharge low batteries.
RUBY HD displays as an external device in Windows Explorer or
Finder (Mac).
3. Open RUBY HD’s DCIM folder and use the drag and drop method to
move or copy one or more images to a folder or the desktop on your
computer. Images are named and are numbered in the order saved, for
example, IMG_0001.bmp, IMG_0002.bmp, and so on as shown in the
next figure.
4. When you are finished transferring files, make sure that you safely eject
(remove) the unit from your computer.

35
Note: To safely disconnect the unit and protect your data, always follow
your operating system’s procedures for removing a USB device.
36
Transferring Images to RUBY HD Using the USB Cable
Any image moved from RUBY HD to your computer can easily be moved back to
the unit.
Note: Only images saved by RUBY HD can be copied back to the unit.
1. Make sure the unit is connected to your computer using the supplied
USB cable.
2. Locate the image on your computer using Windows Explorer or Finder
(Mac).
3. Select the image and drag it to RUBY HD’s DCIM folder.
4. When you are finished transferring files, make sure that you safely eject
(remove) the unit from your computer.
Note: To safely disconnect the unit and protect your data, always follow
your operating system’s procedures for removing a USB device.
37
Displaying a Slide Show
You can create a slide show that loops continuously using the images saved on
the unit. Each image displays for approximately five seconds. The order that
images display is based on their file names, for example, IMG_0001.bmp,
IMG_0002.bmp, and so on.
To rearrange the order that images display, you can transfer them to your
computer, rename the files in the order that you like, and then transfer them back
to the unit. (The file names should not be longer than eight characters followed
by the BMP file extension.) To move files between the unit and computer, refer to
the transfer procedures as described on pages 33 and 36.
Note that when in Slide Show mode, the 30-minute power-off timer is disabled.

38
To start the slide show, do the following:
1. Press and HOLD the red button for approximately six seconds to
enter Review mode.
2. Press and HOLD the green/yellow button , and then press the blue UP
arrow
.
The first image stored on the unit, based on its file name, displays on the
LCD screen for approximately five seconds followed by the second
image, the third, and so on.
3. Press and HOLD the red button for approximately three seconds to
exit Slide Show mode and return to live view.
39
Troubleshooting
The unit does not turn on.
Press the green/yellow Power button. If the unit does not turn on,
charge the batteries.
Make sure the batteries are inserted correctly. See page 12.
Note: A USB port does not provide enough power to charge the NiMH
batteries. Use the power adapter to recharge low batteries.
The screen is blank.
When the unit is connected to a computer via USB, the screen is blank.
Turn on the LED lights.
Turn the unit off and then on again.
40
Verify that the item you want to magnify is positioned correctly under the
camera window.
Press the yellow Magnification buttons to step through the
magnification levels.
Press the blue Color Mode buttons to step through the color modes.
The battery indicator LED is flashing red.
Charge the NiMH batteries, or replace the AAA alkaline batteries. (Do
not mix battery chemistries.)
If you replace the rechargeable batteries, be sure to use 1000 mAh
NiMH batteries.
41
The battery LED is solid red while the power adapter is connected to the
unit.
A battery error has occurred. Unplug the power adapter from the unit
and plug it in again.
Charge the NiMH batteries for at least 2 hours, or replace with AAA
alkaline batteries. Do not charge alkaline batteries.
If the problem continues, disconnect the power adapter and call
Freedom Scientific Technical Support as mentioned earlier in this
document.
The battery indicator LED does not flash green, even though the power
adapter is connected and plugged into a wall socket.
Ensure that the small end of the power adapter is firmly plugged into the
unit’s power port.
42
Ensure that the outlet has power and is not malfunctioning. If the outlet
is connected to a wall switch, make sure the switch is on.
The NiMH batteries are not charging.
Make sure the batteries are inserted correctly. See page 12. (Do not
replace batteries while the power adapter is connected.)
Use the supplied power adapter to charge the unit. Note that a USB
port does not provide enough power to charge the batteries.
Make sure the small end of the power adapter is firmly plugged into the
unit’s power port.
Ensure that the outlet has power and is not malfunctioning. If the outlet
is connected to a wall switch, make sure the switch is on.
Some batteries have low charge rates and specify a “MAX Charging
Current.” DO NOT USE batteries that specify their MAX Charging
Current as being below 250 mA.
43
There are smudges or blemishes on the screen.
Clean the LCD screen as described in Cleaning Procedures on page
50.
Text is too small or too large to read.
Press the yellow Magnification buttons to increase or decrease
magnification. For live images, press and HOLD a magnification button
for continuous zoom magnification. For frozen or saved images, press a
magnification button to zoom in or out one step at a time.
LED lights produce glare against a reflective surface.
Press and HOLD the green/yellow Power button, and then press the red
Freeze Frame button to turn off the LED lights.
44
The unit turns off after reading for 30 minutes.
This is expected behavior. The unit turns off after 30 minutes if no
buttons are pressed. This extends battery life.
45
Technical Specifications
LCD widescreen: 4.3 inches (109 mm)
Body size:
4.9 inches high (125 mm)
2.9 inches wide (74 mm)
1.4 inches deep (36 mm)
Weight: 8.0 oz. (227 grams)
Color modes: Five factory default color modes (Full Color; Black on White
(high-contrast positive); White on Black (high-contrast negative); Yellow on
Blue; Yellow on Black), and 15 additional color modes
Magnification range:
4x to 10x zoom (handle closed)
2x to 13x zoom (handle open)
Maximum saved images: Approximately 80 bitmap (BMP) images
46
Camera: HD auto-focus camera module
Image resolution: 800 x 450 pixels
Color: 24-bit
Battery:
Four AAA NiMH rechargeable (1000 mAh) batteries; approximately 2 hours
of continuous use; charges in approximately 2 hours, or
Four AAA disposable alkaline batteries
Note: Only use the supplied power adapter to charge the unit’s battery. Do
not use batteries that specify a MAX Charging Current below 250 mA.
47
Federal Communications Commission Notice
This equipment has been tested and found to comply with the limits for a Class B digital device,
pursuant to Part 15 of the FCC Rules. These limits are designed to provide reasonable protection
against harmful interference in a residential installation. This equipment generates, uses, and can
radiate radio frequency energy and, if not installed and used in accordance with the instructions,
may cause harmful interference to radio communications. However, there is no guarantee that
interference will not occur in a particular installation. If this equipment does cause harmful
interference to radio or television reception, which can be determined by turning the equipment
off and on, the user is encouraged to try to correct the interference by one or more of the
following measures:
Increase the separation between the equipment and receiver.
Connect the equipment into an outlet on a circuit different from that to which the receiver is
connected.
Reorient or relocate the receiving antenna.
Consult the dealer or an experienced radio or television technician for help.

48
Industry Canada Notice
This Class B digital apparatus complies with Canadian ICES-003.
Cet appareil numérique de la classe B est conforme à la norme NMB-003 du Canada.
Regulatory Compliance
Safety: IEC 60950-1 ed2.0, UL 60950-1:2007, CSA C22.2.60950-1:2007, EN 60950-1:
2006 + A11:2009 + A1:2010 + A12:20122
EMC: FCC (CFR-47, part 15) Class B; ICES-003; EN 55022 Class B; EN 55024
49
Safety and Maintenance
Do not attempt to repair the unit or open its case. This product contains no user serviceable
parts. Any unauthorized attempt to service or replace internal components will void the
product warranty.
Keep the unit away from wet areas, rain, and other sources of liquids. Do not submerge the
unit.
Always operate the unit in a place where the temperature is between 10° and 35° C (50° and
95° F).
Do not store in places subject to temperature extremes such as a parked car.
Do not force any connector into the unit’s power port. The power connector fits easily into the
port.
50
Cleaning the LCD Screen
Turn off and unplug the unit before cleaning the LCD screen.
Always use a clean microfiber cloth.
Very gently wipe the cloth across the screen. Do not press hard on the cloth or screen.
If you use a cleaning liquid, use an appropriate LCD cleaning liquid. You can also use
distilled water, isopropyl alcohol, or vinegar mixed with water at a concentration of no more
than 10 percent vinegar. Note that tap or mineral water may cause spotting on the screen.
Do not leave any liquid on the screen. Repeat this procedure for hard to remove smudges.
Do not spray any cleaning solutions directly on the LCD screen.
Do not use a cleanser that contains acetone, ethyl alcohol, ethyl acid, ammonia, or methyl
chloride.
Do not use a paper towel to clean the LCD screen.
Cleaning the RUBY HD Body
Make sure the unit is unplugged. Use a lightly dampened, soft, clean cloth with water or mild
detergent. Do not use alcohol, solvents, abrasives, or aerosol sprays.
