
Hotel Booking Plugin for WordPress Documentation
Updated on Dec 4, 2020
Overview
Quick Start Guide
Installation
Add Seasons
Add Services
Add Accommodation Types
Add Amenities
Add Attributes
Create Advanced Search
Create Custom Property Details
Add Categories
Add Rates
Enable Variable Pricing
Weekly/Monthly rates
Generate Accommodations
Create System Pages
Apply Plugin Settings
Select system pages
Skip Search Results
Set parameters for displaying accommodation types
Booking confirmation and cancellation settings
Set up search parameters
Set Display options
Edit Admin and Customer email templates
Apply email settings
Configure payment gateways
Test payments
Enable PayPal

Enable 2Checkout
Accept bookings with Stripe
Benefits of using Stripe
How to enable Stripe
Enable Braintree
Direct bank transfer
More payment gateways
Language settings and edits
Shortcodes
Customize Hotel Booking styles
Manage Bookings
All Bookings
Add booking manually
Add payment manually
Modify existing bookings
OTAs sync for updated bookings
Bookings Calendar
Create discount coupons
Set Booking rules
Check-in rules
Check-out rules
Minimum stay rules
Maximum stay rules
Block accommodation rules
Minimum & Maximum advance reservation rules
Booking buffer rules
Taxes And Fees
Fees
Taxes
Reports (CSV)
Synchronize your hotel website with OTAs via iCal
How to configure automatic synchronization
For Developers

Overview
MotoPress Hotel booking plugin for WordPress is a universal solution to help you manage your
hospitality business online. Plugin’s functionality allows you to add accommodation types to
display on the site, apply different seasonal pricing, set room rates, add photo galleries, manage
online bookings and perform much more functions in order to easily take care of your hotel
establishment. The listing design of your accommodations will depend on the WordPress theme
you use.
Quick Start Guide
It’s easy to start working with the plugin! Follow this quick guide:
1. Install and activate the plugin from your WordPress dashboard. Two menus should
appear: Accommodation and Bookings.
2. Start with adding Seasons - specific time periods that can come with different pricing for
rooms.
3. Add a full list of available hotel Services.
4. Add Accommodation types specifying their descriptions, amenities and additional
services available. Here you can also add Amenities (in-room facilities, generally free),
bed types and Categories of an accommodation type.

5. Add Rates to present the same accommodations with different conditions (e.g. triple
refundable vs triple non-refundable).
6. Go to Generate accommodations menu to generate a needed number of real rooms of
the same accommodation types available in your hotel establishment.
7. Create all needed pages (you should be offered to install these pages automatically) -
Search Results, Search Availability, Complete Booking, Booking Confirmation, Booking
Cancellation pages with appropriate shortcodes and messages.
8. Navigate to configure general plugin Settings and Payments.
9. Configure Language settings .
10. Go to Shortcodes to get the needed ones and add to the needed pages and posts.
11. To view, add or delete your real booking requests, go to Bookings menu. In the same
menu, you can also Add discount coupons, synchronize your bookings across OTAs
(Online Travel Agencies) like Booking.com via iCal, and add taxes and fees.
Installation
After downloading the plugin you should have motopress-hotel-booking-xxx.zip file on your
computer. This is a compressed file with all the plugin data. Here are the steps to install it:
1. Log into your WordPress dashboard and go to Plugins → Add New.
2. Click the Upload Plugin button.
3. Click the Choose File button → find the plugin archive on your computer.
4. Click Install Now.
5. Click Activate.

Add Seasons
To set a new season go to Accommodation → Seasons → Add New.
Season is a specific period of time that helps differentiate hotel prices depending on a time of
the year. “Season” is a general term and you can label your seasons any way you want. Apply
only real dates to all added seasons.
1. Type the season’s title ( e.g. 2018, Christmas period, August ).
2. Define start and end date of this season ( real dates ).
3. If this “season” is limited to some specific days during a period you set, go to “Applied for
days” list and select the days when parameters of this season are active.
4. Publish your changes.
Note: as for prices for seasons, you’ll be able to set them later in Rates menu.

Add Services
Before adding Accommodation types of your hotel establishment, add all available hotel
services to be able to further tie them to an accommodation type. Go to Accommodation →
Services → Add new.
1. Add title and description of a service ( e.g. airport-to-hotel delivery, massage, childcare ).
2. Specify details on how your guests will be charged:
● set service price or zero for free service;

● periodicity (is it a one-time price for all stay-in period or the guest will be charged this
price per night);
● Charge for 1 accommodation or 1 adult.
3. You may also set a featured image of your service.
4. Publish the service.
Example:
Add Accommodation Types
In this menu you add accommodation types available in your hotel establishment. Note:
“Accommodations” are real accommodations, and “Accommodation types” are only their types
(e.g. you can have a double room “Accommodation type” and 10 real “Accommodations” of this
type).

Go to Accommodation → Accommodation types → Add Accommodation Type.
1. Add title, description and a short description (excerpt).
2. Add total accommodation capacity (size, maximum number of adults and children).
Do you need to turn on the “Capacity” option?
The “Capacity” option prioritizes the total number of sleeps rather than strictly differentiates the
number of adults and children. For example:
“Capacity” disabled (empty) : 6 adults, 3 children means a property can accommodate strictly up
to 6 adults and up to 3 children.

“Capacity” enabled (value set) : For example, “Capacity” - 6, “Adults” - 6, “Children” - 5. In this
case, 6 adults, 5 children means a property can accommodate any variation up to 6 guests: 1
adult and 5 children, or 2 adults and 4 children, etc.
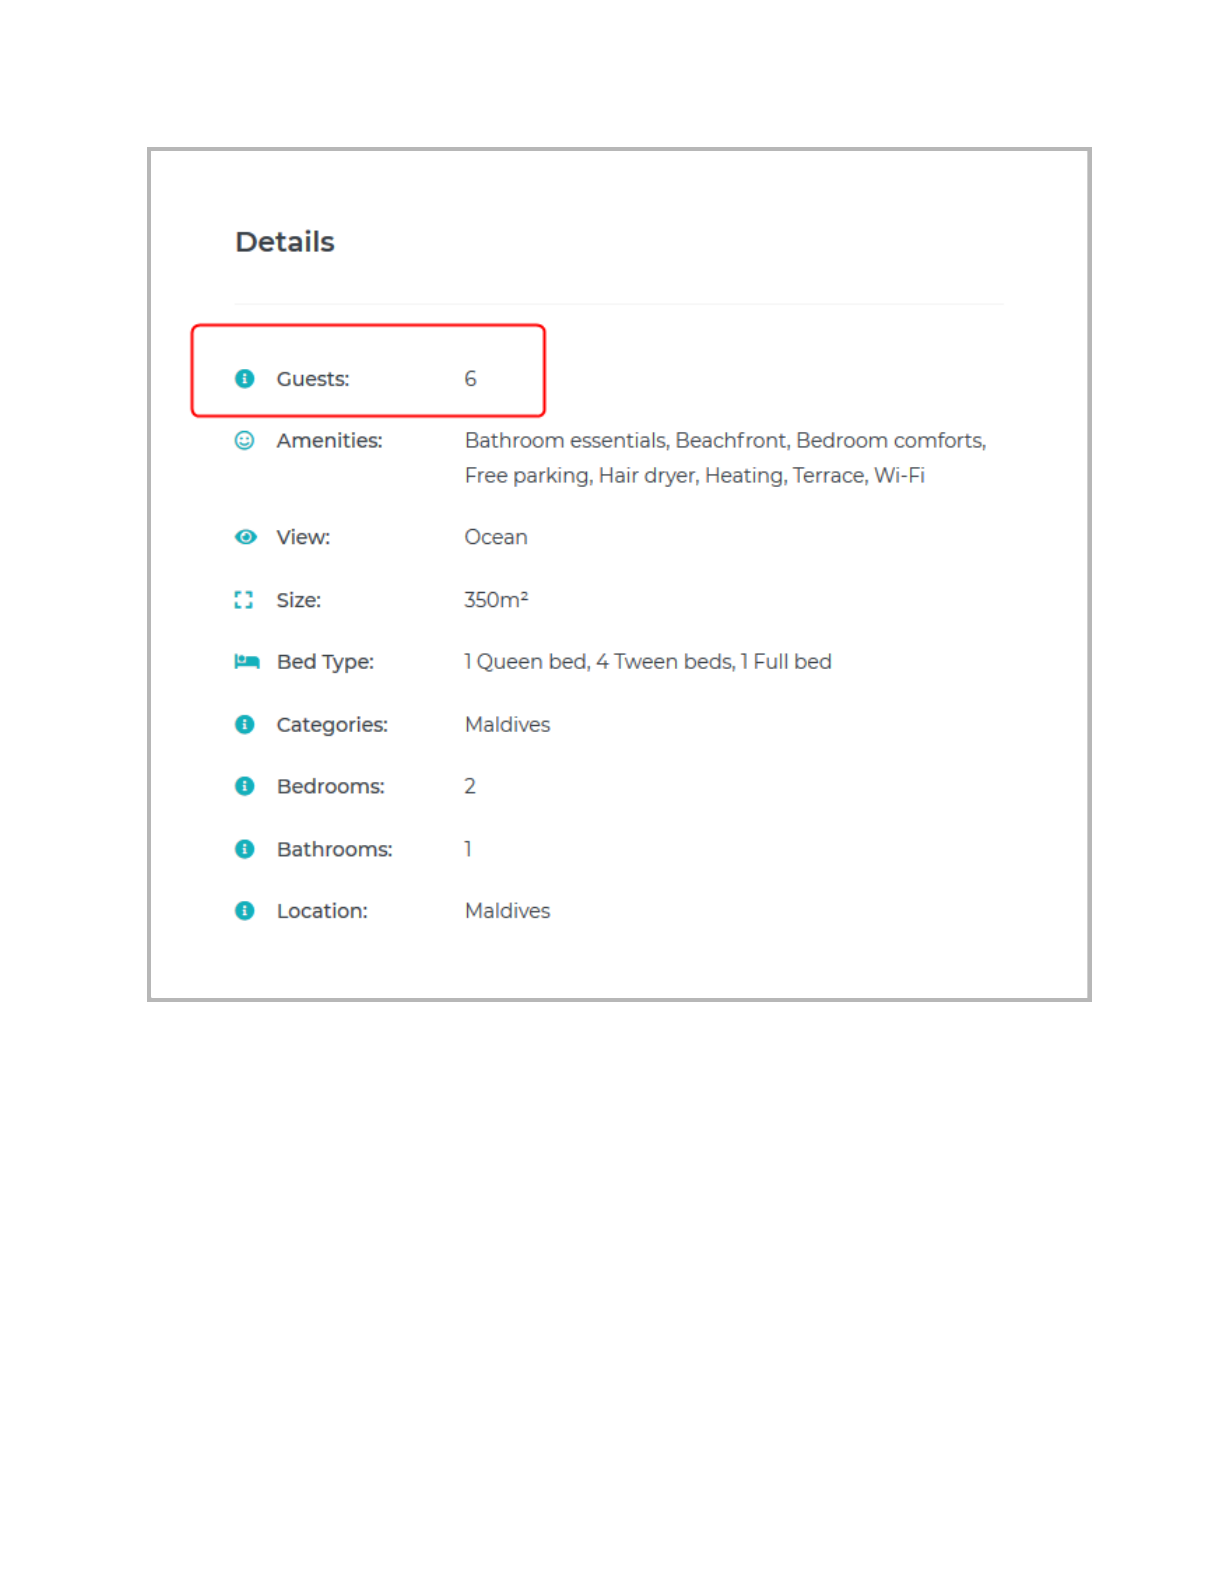
Important: A minimum parameter of 1 “Adult” is required. A property can’t be booked for
“Children” alone.
If you don’t need the number of adults and children to be flexible, don’t configure this option.
Use it to allow dynamic change of the number of adults or children based on the guest’s
preferences. At checkout, the number of children changes dynamically based on the chosen
number of adults and vice versa so that in result the choice meets the “Capacity” requirement.
3. Add view ( e.g. seaside, city view ) and bed types in this accommodation type.

4. Add bed types - you’ll be redirected to the Settings menu , where you’ll need to specify
your bed types > click Add Bed Type button > scroll down and save changes.
5. Tick “allow comments” if you want to enable comments under the accommodation types.
6. Select services that your hotel can provide for this accommodation type.
7. Add accommodation Amenities and categories right from this menu or go to add new
ones (from Accommodation → Categories / Amenities).
8. Add photo gallery and featured image if needed.
9. Publish the changes.
If you have many real rooms of this accommodation type, you can simply generate the needed
number of them while staying in this menu: click Generate accommodation under description
field.

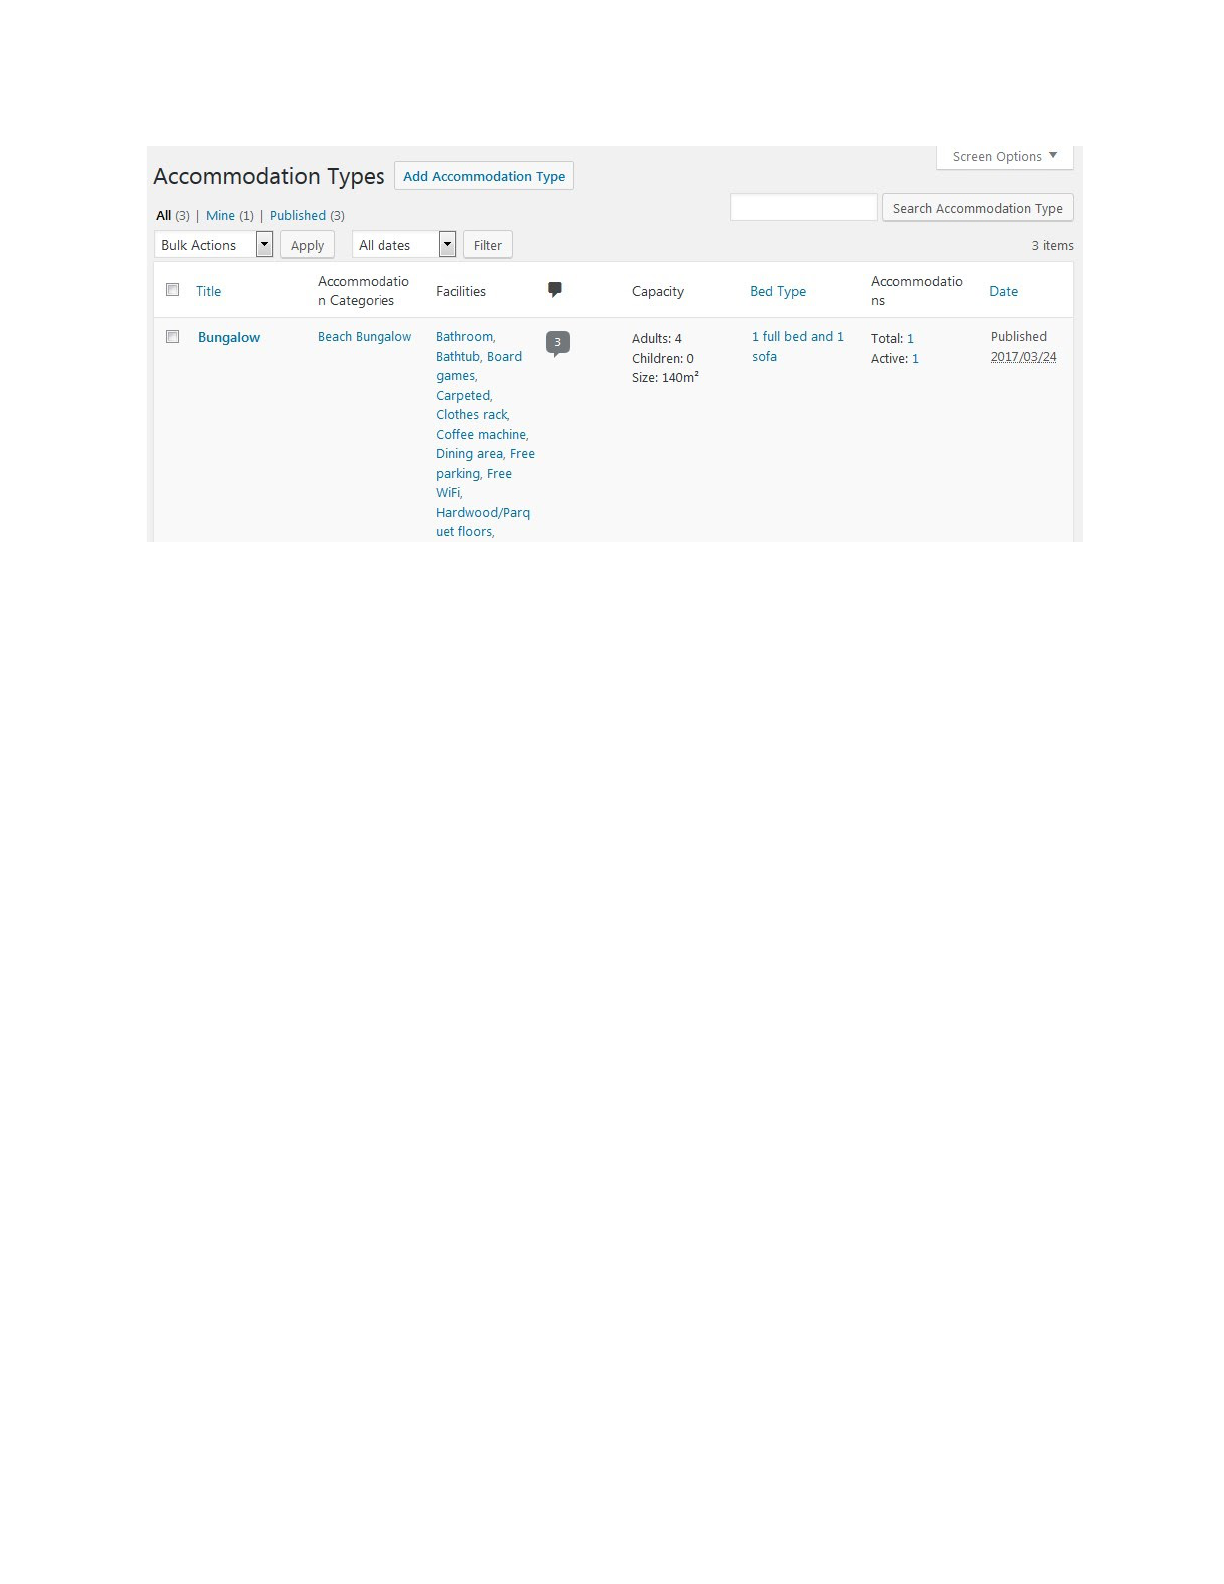
Here is an example of accommodation types listed on the dashboard:
Add Amenities
To add the full list of amenities for different types of accommodations, go to Accommodation →
Amenities → Add new.
There are standard WordPress fields for this type of content: add a name, slug, description and
probably choose a parent of the amenity.
When editing or adding an accommodation type, you’ll be able to see all these Amenities in the
right sidebar and tie the needed ones to the appropriate accommodation types.

Add Attributes
( video tutorial )
Attributes can be later used for advanced search (by location, price range, type, etc.) or for
adding custom details to your properties. The default details are Capacity, Amenities, View,
Size, Bed Types, Category, Tags.
To add attributes go to the Accommodation tab → Attributes → Add New. There, specify the
Title of your custom attribute, for example, Location. This title will be visible on the front-end.
Then click Configure Terms and add all the possible terms for this attribute, e.g. London, Paris,
New York. While adding the terms, you need to fill in at least the Name field and click Add New.
There is no limitation to the number of attributes or terms that can be created.

You can influence the order in which the terms appear on the website in the Accommodation tab
→ Attributes. Open an attribute and select an order in the Order field. The default order is
Custom. The terms can also be sorted by Term ID, Name and Numeric Name.
These attributes need to be assigned to your accommodation types in the Accommodation tab
→ Accommodation Types. Hover over an accommodation type and click Edit. Tick the terms
related to this accommodation type in the Attributes Section in the right hand column.
Create Advanced Search
All the attributes that were created can be used in the search forms to allow advanced search.
For this, you will need to use the slugs of your attributes. The slugs are displayed in the
Accommodation tab → Attributes (the Slug column). In order to add the custom attributes in a
search form:
1) added with a shortcode, specify the attributes parameter in its shortcode with comma
separated slugs like: [mphb_availability_search attributes=”comma separated slugs
of your attributes” ]
Ex. [mphb_availability_search attributes=”location,price-range”].
2) added with a widget, go to the widget settings and specify the comma-separated slugs of
your attributes in the Attributes field.
Each attribute will be displayed as an additional search field in the search availability form. The
fields are displayed in the order of attribute slugs in the shortcode/widget. These search fields

are not required and some of them can be left empty for broader search. If a term is not
assigned to any accommodation type, it will not appear in the search availability form.
Create Custom Property Details
To add custom details to your properties, go to the Accommodation tab → Attributes. Open an
attribute and tick Visible in Details. This will display the attribute and its term(s) in the Details
section of your properties. Tick Enable Archives and the terms will become linked. Each term
link leads to an archive page with all accommodation types that have this term.
Add Categories
To add a full list of accommodation categories ( e.g. single, triple ), go to Accommodation →
Categories → Add new.
There are standard WordPress fields for this type of content: add a name, slug, description and
probably choose a parent of the category.
When editing or adding an accommodation type, you’ll be able to see all these categories in the
right sidebar and tie the needed ones to the appropriate accommodations.
Add Rates
Rates are very important for your entire hotel management process. They are directly
connected with prices for accommodation types depending on whether or not a particular

accommodation type is supplied with extra benefits. The choice of rates (a list of rates) will be
visible for a site visitor under a selected accommodation type.
This is how you should set up the rate for a particular accommodation type (go to
Accommodation → Rates → Add New):
1. Specify a rate title ( e.g. triple standard non-refundable, triple standard with breakfast
included, etc. ).
2. Choose an accommodation type from the drop-down menu.
3. Set season prices of this accommodation type: choose an earlier added season and
specify its price. You can add as many seasons with different prices as you want.
4. Write a description of this rate specifying the most important information for your guests
( e.g. refundable, non-refundable ).

Example:
Enable Variable Pricing
Since version 2.6.0 you are able to add variable pricing for each season rate. This option allows
to set the price variation according to a number of guests indicated in the search availability
form. In other words, you can set different prices for the same accommodation depending on a
number of guests. Follow the steps below to learn how it works:
- Go to edit any rate and check Enable variable pricing option. In our case it is a
standard rate of Superior Double Room with a following capacity 2 Adults 1 Child

- Once it’s checked, you can add the first variation - a number of Adults and Children and
a price of this variation.
- Add 1 Adult and and 0 Children and set a price for this variation. Note: it can be lower or
higher price than a base rate.
- Add a new variation and type 2 Adults and 0 Children and set a price for this variation.
- Add another variation for 1 Adult and 1 Child and set the price.
- Now you can add one more Variation (2 Adults and 1 Child, i.e. max capacity for this
accommodation) or leave it as it is as a Base Rate should be applied if search parameter
is not found among price variations.

When your site visitors perform a search, they will see prices of accommodations depending on
available variations you set.
Weekly/Monthly rates
Since version 2.7.5, you can set up different per night rates if a booking is placed for certain
number of night or more. To add these variations, go to Accommodation > Rates > Select a rate
you want to edit or add new. To add variations based on the number of booked dates click +.
Make sure to start from the lowest variation, e.g. 3, 4, 7, 14 nights:
And define the number of nights needed in a booking for the new rate to apply. For example, the
following set up means that if a booking is placed for 7 or more nights, the total price will be
counted as 40 per night:

There is no limitation to the number of days or variations that you can add here. These rules can
be also combined with the per person rates if you tick Enable Variable Pricing:

Generate Accommodations
This is an optional tool to reduce repetitive work if you have a lot of real accommodations of
the same type. After all available accommodation types are added, you can simply generate the
needed number of real rooms: go to Accommodation → Generate Accommodations:
1. Set the number of accommodations that should be generated (these are real rooms of
your hotel establishment).
2. Choose an accommodation type.
3. Optionally put a title - it will be visible on the dashboard only.
4. Hit “Generate”.
Create System Pages
When configuring plugin settings, you’ll need to set all appropriate pages for the plugin to work
properly. You should be asked to install these pages automatically.
If for some reason you should add them manually, go add the following pages:
● Search Results page with [mphb_search_results] shortcode
● Search Availability page with [mphb_availability_search] shortcode
● Complete Booking page with [mphb_checkout] shortcode
● Booking Confirmation with your message
● Booking Cancellation with your message

Apply Plugin Settings
Time to set general settings to make your plugin work properly. Go to Accommodation →
Settings.
In the first General tab you can configure the following settings:
Select system pages
- Select Search Results page (a page where your guests will see the search results
listing)
- Select Complete Booking page (where guests will complete their booking requests).
These pages should be added earlier in order to appear in the drop-down menu.
- Select Terms and Conditions page - by adding a page here you enable a checkbox on
the checkout page with text linked to this page. So your guest will be asked if they
accept your terms before making a reservation.
Skip Search Results
This option allows to skip search results page and enable direct booking if search is performed
from accommodation pages. It is mostly useful for small rental establishments with several
accommodation types.
Set parameters for displaying accommodation types

● Specify square units
● Currency
● Currency position
● General check-in and check-out time
● Date format
● Bed types available in the hotel
● Specify the period of time to show the lowest price. If guests don’t set check-in and
check-out dates, the’ll see the cheapest accommodation for the period of time you set
(for example, if you set 20 days - they’ll see the cheapest price during 20 days).

● Enable/disable the search form to recommend the best set of accommodations
according to a number of guests. This feature is great to support multiple
accommodations booking at a time (perfect for hotels). That is, if a guest is looking for
rooms for 10 people, for example, the system will recommend several rooms to
accommodate 10 people. So, the guest can either go ahead and add all recommended

rooms into one reservation or skip the recommendation and choose rooms manually. For
example (frontend):
Quick tips regarding “ To recommend the best set of accommodations according to a number
of guests ”:
1) This option is perfect for hotels.

2) If you use the plugin for a vacation rental, BnB or a guest house, which are generally
rent out as one item, you’ll most likely need to turn off this option, because travellers
might not find it useful to be advised several, say, villas, in different locations.
● Enable/Disable the use of coupons (Add new discount coupons via Bookings →
Coupons → Add new)
● Put the text of your Terms and Conditions.
If you plan to disable a booking option, simply tick “Disable Booking” button and include any
notification for your guests while booking is disabled.
Booking confirmation and cancellation settings
At first, set a confirmation mode - who should confirm a booking after the booking request is
placed by the customer:
● you (pick By admin manually)
● your guest (pick by Customer via email)
● automatically after payment (pick Confirmation upon payment)
In the same section select which page the users will be redirected to once their booking request
is confirmed.
If you prefer the user to confirm their booking, specify an approval time given for this procedure
in Approval Time for User section ( e.g. 25 minutes ).

In the same section set what address information is required from the guest in order to place a
booking: either it’s only a country or residence or full address.
Now, set booking cancellation option.
If you want to allow users cancel booking by clicking on cancellation link in the email, tick the
appropriate field and specify the page where users will be redirected to after cancellation is
made.

Set up search parameters
This is maximum accommodation occupancy available in the Search Form.
Set the maximum adults and children accommodation occupancy for the Search form (the
values are unlimited).
To support multiple accommodations booking at a time, set the maximum limit of guests. For
example, there are 20 rooms with a total capacity 60 people; you may set the maximum adults
to 40, for example, because one guest can make a reservation for 20,30, etc. people at a time.
Don’t forget to hit Save Changes button after all settings are defined.
Set Display options
There are 2 options so far:
1. Enable/disable displaying gallery images of accommodation page in lightbox. This option
was integrated to improve compatibility with Jetpack plugin that supports a great gallery
and lightbox modules to display the images of your properties in a beautiful way.

2. Choose the theme for your Search Availability calendar to fit design of your WordPress
theme.
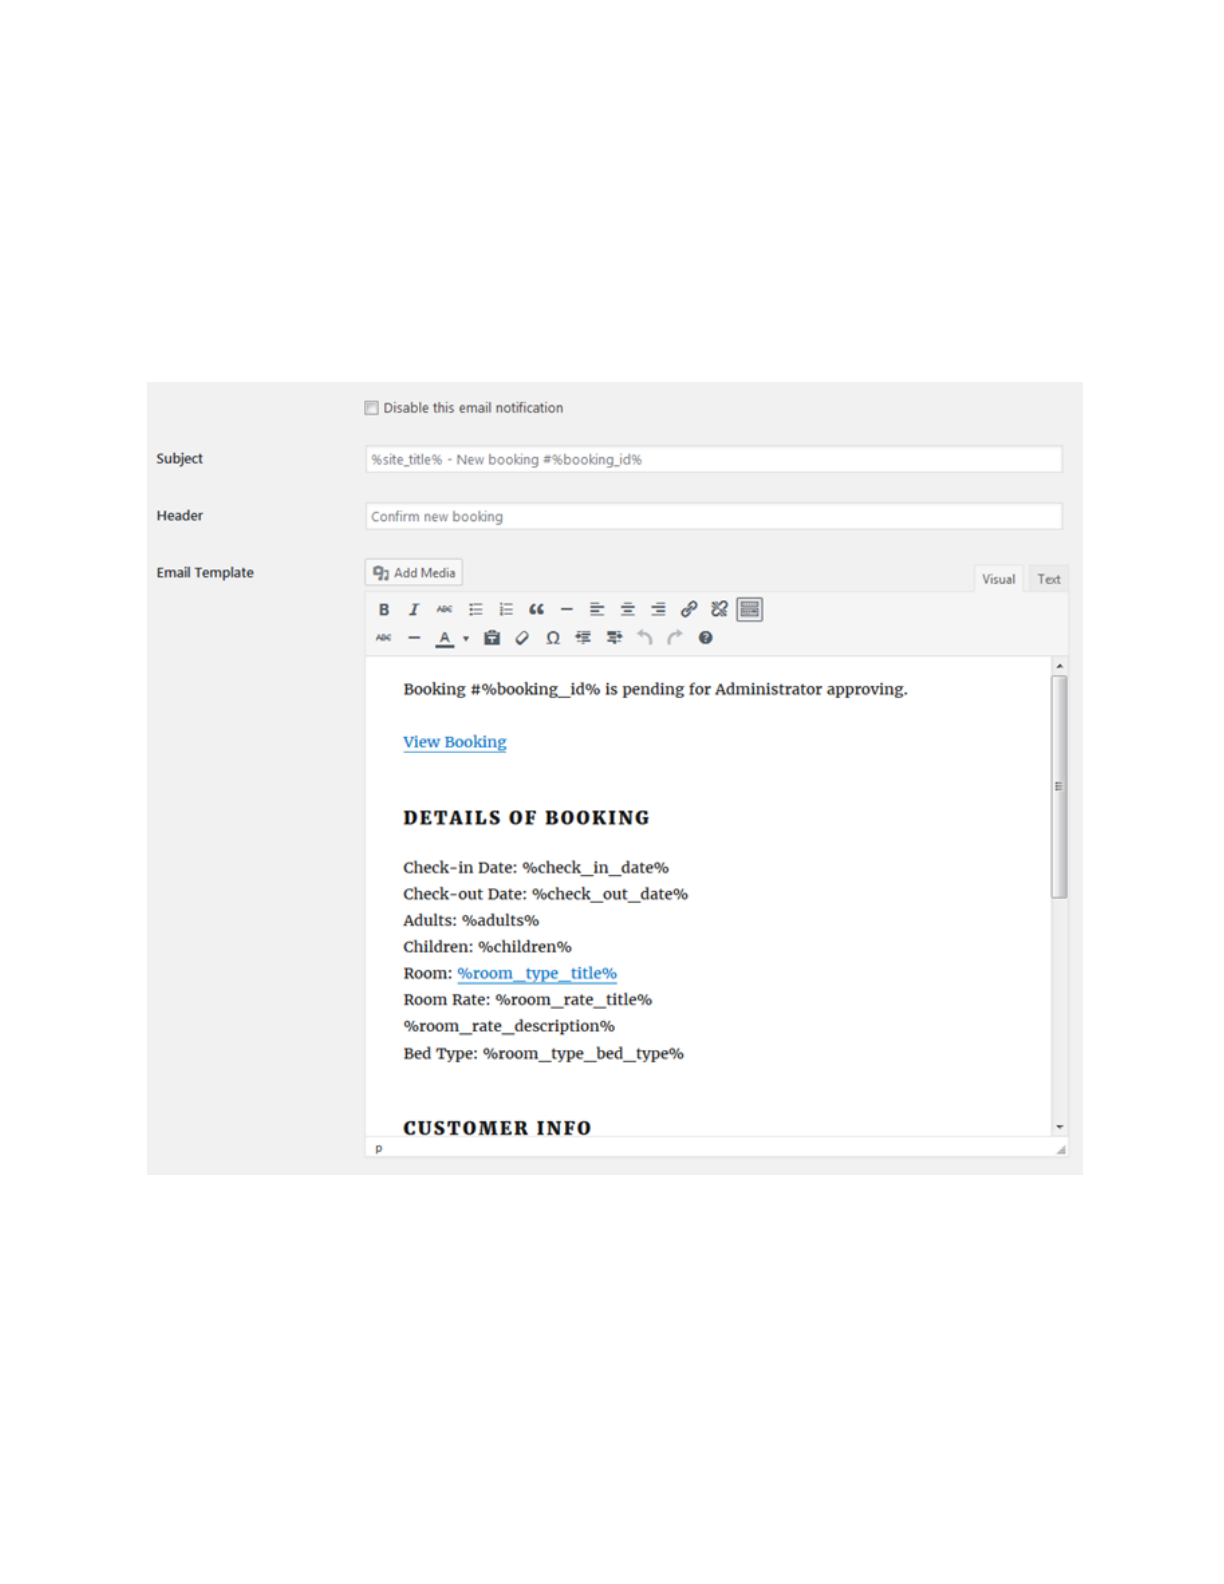
Edit Admin and Customer email templates
Please note : If you update the plugin to Version 2.0.0, make sure to update your email
templates to support multiple accommodations booking.
Go to Admin Emails tab to configure your email settings and templates.
You have a list of tags (to put the needed info automatically into email) to customize your
admins emails:
● pending booking email - notifies you that new booking is placed by a guest;
● approved booking email - notifies you that a customer confirmed their booking via email;
● cancelled booking email - notifies you that a customer cancelled a booking;
● approved booking email (via payment) - notifies that the a booking is confirmed by
payment.
You are free to change a header, subject and body of email templates or completely disable
chosen email notifications.
Go to Customer Emails tab to configure email templates of your customers:

You have a list of tags (to put the needed info automatically into email) to customize email
notifications of your guests:
● new booking email (by admin) - notifies your guest that a booking waits to be approved
by admin (sent on admin confirmation mode set in General Settings );
● new booking email (by user) - notifies your guest that a booking is placed and they
(guest) should proceed with email confirmation (sent on user confirmation mode set in
General Settings );
● approved booking email - notifies your guest that their booking is confirmed;
● cancelled booking email - notifies your guest that their booking is cancelled.
You are free to change a header, subject and body of email templates or completely disable
chosen email notifications.

Apply email settings
Go to Email Settings tab to apply general email settings:
1. In the Email Sender section specify email and name you’ll be sending email notifications
from.
2. Customize appearance of your email - add logo URL, footer text, set colors.


Configure payment gateways
At first, install Success and Failed Transaction pages for future payments.
To set up payment methods, go to Payment Gateways tab .
At first, set General Settings:
● Specify whether the customer pays a full price or a deposit ;
● If the deposit, choose whether it’ll be f ixed price or percent ;
● Enable SSL for secure payments ( HTTPS is required by most payment gateways );
● Select Success and Failed Transactio n pages you installed beforehand;
● Select a default payment gateway : PayPal, Stripe, 2Checkout, Braintree, Pay on arrival
or a direct bank transfer. The one you choose will be displayed by default; all others, if
enabled, will be displayed as alternative for users;
● Set Pending payment time - period of time in minutes the user is given to complete
payment. Unpaid bookings become Abandoned and accommodation status changes to
Available.
Test payments
Enable Sandbox Mode of the payment gateway for test payments, specify your testing
credentials, save changes.
On the frontend, you’ll be able to test the payments in the following way:

Enable PayPal
To turn on and set up PayPal, go to the appropriate tab:
● Enable PayPal;
● Enable test mode if needed;
● Specify title and description for it;
● Specify PayPal business email (or Sandbox email for testing);
● Disable IPN (instant payment verifications) if needed.

Enable 2Checkout
● Enable 2Checkout;
● Enable test mode if needed;
● Write title and description for it;
● Specify your account number and secret word.

Accept bookings with Stripe
Stripe is one of the top chosen payment gateways to accept online payments globally: it’s so far
available for businesses in 34 countries , which allows you to meet widely varying customer
preferences.
The Stripe payment gateway is by default built into the MotoPress Hotel Booking plugin; you
may optionally turn it on at checkout in case you opt to confirm bookings upon payment. Since
guests will be able to stay on the same website page during checkout, the booking and payment
process should be more convenient and quick for them.
Benefits of using Stripe
● In addition to Stripe card payments, in Hotel Booking, you can optionally enable such
local payment methods as iDEAL, SOFORT, Bancontact, Giropay and SEPA Direct
Debit. This option will definitely help you serve international travelers better.
● Stripe works with all major debit and credit cards.

● Stripe operates according to the EU’s second payment services directive (PSD2) and
supports Strong Customer Authentication (SCA) to give you an extra fraud protection
layer. This is required for safe transactions within the European Economic Area (EEA).
Stipe made sure that the SCA mechanisms will require your customers to authenticate
purchases when there’s a real need for it.
● Stripe is optimized for fast mobile checkout.
● Take advantage of free new innovative features as Stripe launches new updates.
● Stripe provides in-depth analytics on how and what payment methods are used across
the world so you can better set up and optimize payment methods for different regions.
● Since you’ll have access to a centralized Stripe dashboard, you can perform easy
payment monitoring and reporting.
How to enable Stripe
To start using Stripe for accepting online bookings, log into your WordPress dashboard >
Accommodation > Settings > Payment gateways > Stripe tab. Before you set up Stripe, make
sure that the booking confirmation mode is set to “Upon payment” (Accommodation > Settings >
General).
You can use Stripe with either deposit or full payments (Accommodation > Settings > Payment
Settings >General Settings). Then go through the following configuration:
1. Customize the title and description of the payment method at checkout to state any
specific details.
2. Obtain your Stripe Secret and Public keys via your Stripe dashboard and insert them into
the appropriate fields.
3. Optionally configure Stripe Webhook settings.
4. Enable the preferable payment methods (credit cards or other available local payment
methods).
5. Set up language preferences for the checkout.


Please note:
● A valid SSL certificate (you can ask your hosting provider about this) is required to
ensure that the payment process is secure for your guests.
● You can process test payments by enabling the Sandbox mode in the plugin.
Enable Braintree
● Enable Braintree;
● Enable sandbox for test payment if needed;
● Set title and description;
● Set merchant ID;
● Set public and private key;
● Set Merchant Account ID.

Direct bank transfer
● Enable direct bank transfer
● Designate instructions explaining how guests must pay.

More payment gateways
If you need more payment gateways, use Hotel Booking WooCommerce Payments extension -
it will help you integrate dozens of WooCommerce payment gateways with your hotel / vacation
rental website.
Language settings and edits
The plugin is translated into multiple languages. So you can benefit from it even without
additional translation efforts.

All default plugin content like labels, buttons, system messages will be displayed in the main site
language which you set in General → Settings → Site Language.
If you want to customize anything, simply follow the guide right inside Accommodation →
Language . You can translate plugin texts using any free program like Poedit, Loco, Pootle etc.
If you run a multilingual website, all your added content should be also translated.
Shortcodes
Go to Accommodation → Shortcodes to get all needed shortcodes to place to the needed pages
and output all hotel booking info.
Here are the shortcodes you can use:

Availability Search Form
[mphb_availability_search] - use this shortcode to display a search form.
● adults - the number of adults preset in the search form. (values: 1...10/ default: 1)
● children - the number of children preset in the search form (values: 0...10/ default: 0)
● check_in_date - check-in date preset in the search form. (values: date in format d/m/Y /
default: empty string)
● check_out_date check-out date preset in the search form (values: date in format d/m/Y
/ default: empty string)
● attributes custom attributes for advanced search (values: comma-separated slugs of
attributes / default: empty string)
● class - custom CSS class for shortcode wrapper (values: whitespace separated css
classes / default: empty string)
Example: [mphb_availability_search adults="2" children="1"
check_in_date="25/06/2018" check_out_date="30/06/2018"
attributes="city,price-range"]
Availability Calendar
[mphb_availability_calendar] - use this shortcode to show the individual availability
calendar of a particular accommodation type.
● id - indicate the ID of a certain accommodation type whose availability calendar you
want to show. (values: integer number / this parameter is Required )

● monthstoshow - how many months to show (values: set the number of columns or the
number of rows and columns separated by comma, example: "3" or "2,3" / default: 2)
● class - custom CSS class for shortcode wrapper (values: whitespace separated css
classes / default: empty string)
Example: [mphb_availability_calendar id="123" monthstoshow="2,3"].
Note: you can find ID of Accommodation Type at URL while editing it - in the address bar of your
browser e.g. https://your-site.com/wp-admin/post.php?post= 777 &action=edit
Availability Search Results
[mphb_search_results] - use this shortcode to show search results listing according to
user’s search criteria.
● title - whether to display title of the accommodation type (values: true, yes,1, on | false,
no,0,off / default: true)
● featured_image - whether to display featured image of the accommodation type
(values: true | false (yes,1,on | no,0,off / default: true)
● gallery - whether to display gallery of the accommodation type (values: true | false
(yes,1,on | no,0,off / default: true)
● excerpt - whether to display excerpt (short description) of the accommodation type
(values: true, yes,1, on | false, no,0,off / default: true)
● details - whether to display details of the accommodation type (values: true, yes,1, on |
false, no,0,off / default: true)

● price - whether to display price of the accommodation type (values: true, yes,1, on |
false, no,0,off / default: true)
● view_button - whether to display ‘View Details’ button with the link to accommodation
type (values: true, yes,1, on | false, no,0,off / default: true)
● orderby - sort by (values: price, order, ID, title, date, menu_order. See the full list . /
default: menu_order)
● order - designates the ascending or descending order of sorting. ASC - from lowest to
highest values (1, 2, 3). DESC - from highest to lowest values (3, 2, 1) (values: ASC,
DESC / default: DESC)
● meta_key - custom field name. Required if "orderby" is one of the "meta_value",
"meta_value_num" or "meta_value_*" (values: custom field name / default: empty string)
● meta_type - specified type of the custom field. Can be used in conjunction with
orderby="meta_value" (values: NUMERIC, CHAR, DATETIME. See the full list . / default:
empty string)
● class - custom CSS class for shortcode wrapper (values: whitespace separated css
classes / default: empty string)
Example: [mphb_search_results title="true" featured_image="true"
gallery="false" excerpt="false" details="true" price="true"
view_button="false" default_sorting="price"]
Accommodation Types Listing
[mphb_rooms]- listing of available room types.

● title - whether to display title of the accommodation type (values: true, yes,1, on | false,
no,0,off / default: true)
● featured_image - whether to display featured image of the accommodation type
(values: true | false (yes,1,on | no,0,off / default: true)
● gallery - whether to display gallery of the accommodation type (values: true | false
(yes,1,on | no,0,off / default: true)
● excerpt - whether to display excerpt (short description) of the accommodation type
(values: true, yes,1, on | false, no,0,off / default: true)
● details - whether to display details of the accommodation type (values: true, yes,1, on |
false, no,0,off / default: true)
● price - whether to display price of the accommodation type (values: true, yes,1, on |
false, no,0,off / default: true)
● view_button - whether to display ‘View Details’ button with the link to accommodation
type (values: true, yes,1, on | false, no,0,off / default: true)
● book_button - whether to display Book button (values: true, yes,1, on | false, no,0,off /
default: true)
● posts_per_page - amount of accommodations to show per page of pagination (values:
number /default: empty string) e.g. posts_per_page=”6”
● class - custom CSS class for shortcode wrapper (values: whitespace separated css
classes / default: empty string)
● category - indicate IDs of categories you want to list accommodations from (values:
Comma-separated IDs. / default: empty string)

● tags - indicate IDs of tags you want to list accommodations by (values:
Comma-separated IDs. / default: empty string)
● ids - indicate IDs of certain accommodation types that you want to list. (values:
Comma-separated IDs. / default: empty string)
● relation - this parameter can be applied for category and tags terms. Its allows you to
define whether to meet all or any of the conditions specified in tags and categories.
Values:
AND - is used to list accommodations that meet ALL tags and categories values.
OR - is used to list accommodations that meet at least one of tags or categories values
(default value: OR)
● orderby - sort by (values: price, order, ID, title, date, menu_order. See the full list . /
default: menu_order)
● order - designates the ascending or descending order of sorting. ASC - from lowest to
highest values (1, 2, 3). DESC - from highest to lowest values (3, 2, 1) (values: ASC,
DESC / default: DESC)
● meta_key - custom field name. Required if "orderby" is one of the "meta_value",
"meta_value_num" or "meta_value_*" (values: custom field name / default: empty string)
● meta_type - specified type of the custom field. Can be used in conjunction with
orderby="meta_value" (values: NUMERIC, CHAR, DATETIME. See the full list . / default:
empty string)
Example: [mphb_rooms title="true" featured_image="true" gallery="false"
excerpt="false" details="true" price="true" view_button="true"

book_button="false" posts_per_page="6" category="25,33" tags="112,287"
relation="OR"]
Note: you can find ID of tag or category at URL while editing it - in the address bar of your
browser e.g.
https://your-site.com/wp-admin/term.php?taxonomy=mphb_room_type_tag&tag_ID= 50 &post_ty
pe=...
Services Listing
[mphb_services] this shortcode allows to list all services of your rental establishment.
● ids - indicate IDs of certain services that you want to list. (values: Comma-separated
IDs. / default: empty string)
● posts_per_page - amount of services to show per page of pagination (values: number
/default: empty string) e.g. posts_per_page=”3”
● orderby - sort by (values: price, order, ID, title, date, menu_order. See the full list . /
default: menu_order)
● order - designates the ascending or descending order of sorting. ASC - from lowest to
highest values (1, 2, 3). DESC - from highest to lowest values (3, 2, 1) (values: ASC,
DESC / default: DESC)
● meta_key - custom field name. Required if "orderby" is one of the "meta_value",
"meta_value_num" or "meta_value_*" (values: custom field name / default: empty string)

● meta_type - specified type of the custom field. Can be used in conjunction with
orderby="meta_value" (values: NUMERIC, CHAR, DATETIME. See the full list . / default:
empty string)
● class - custom CSS class for shortcode wrapper (values: whitespace separated css
classes / default: empty string)
Example: [mphb_services ids="138,78,79" posts_per_page="2"]
Note: you can find ID of Service at URL while editing it - in the address bar of your browser e.g.
https://your-site.com/wp-admin/post.php?post= 138 &action=edit
Display Single Accommodation Type
[mphb_room] - this shortcode is used to display certain accommodation type
● id - indicate ID of certain accommodation type that you want to show. (values: integer
number / this parameter is Required )
● title - whether to display title of the accommodation type (values: true, yes,1, on | false,
no,0,off / default: true)
● featured_image - whether to display featured image of the accommodation type
(values: true | false (yes,1,on | no,0,off / default: true)
● gallery - whether to display gallery of the accommodation type (values: true | false
(yes,1,on | no,0,off / default: true)
● excerpt - whether to display excerpt (short description) of the accommodation type
(values: true, yes,1, on | false, no,0,off / default: true)

● details - whether to display details of the accommodation type (values: true, yes,1, on |
false, no,0,off / default: true)
● price - whether to display price of the accommodation type (values: true, yes,1, on |
false, no,0,off / default: true)
● view_button - whether to display ‘View Details’ button with the link to accommodation
type (values: true, yes,1, on | false, no,0,off / default: true)
● book_button - whether to display Book button (values: true, yes,1, on | false, no,0,off /
default: true)
● class - custom CSS class for shortcode wrapper (values: whitespace separated css
classes / default: empty string)
Example: [mphb_room id="777" title="true" featured_image="true"]
Note: you can find ID of Accommodation Type at URL while editing it - in the address bar of your
browser e.g. https://your-site.com/wp-admin/post.php?post= 777 &action=edit
Checkout Form
[mphb_checkout] - this shortcode shows checkout form while making a reservation.
Note: Use only on page that you set as Checkout Page in Settings
Specific Accommodation Booking Form
[mphb_availability] - a booking form to check availability of a particular accommodation
type.

● id - indicate ID of certain accommodation type to check availability for (values: integer
number / default: empty string)
● class - custom CSS class for shortcode wrapper (values: whitespace separated css
classes / default: empty string)
Example: [mphb_availability id="777"]
Note: you can find ID of Accommodation Type at URL while editing it - in the address bar of your
browser e.g. https://your-site.com/wp-admin/post.php?post= 777 &action=edit
Accommodation Rates List
[mphb_rates] - to show all rates for a particular room.
● id - indicate ID of certain accommodation type to list its available rates (values: integer
number / default: empty string)
● class - custom CSS class for shortcode wrapper (values: whitespace separated css
classes / default: empty string)
Example: [mphb_rates id="777"]
Note: you can find ID of Accommodation Type at URL while editing it - in the address bar of your
browser e.g. https://your-site.com/wp-admin/post.php?post= 777 &action=edit
Booking Confirmation
[mphb_booking_confirmation] - a page with a confirmed booking notification.

● class - custom CSS class for shortcode wrapper (values: whitespace separated css
classes / default: empty string)
Note: Use this shortcode on Booking Confirmation Page
You can add the needed shortcode in the following way: go to add new Post, Page or Custom
Post Type → paste your shortcode in the content area → publish the changes.
Customize Hotel Booking styles
If you want to customize the look (styling) of the property search form, booking forms, widgets
and more, you can use extra Hotel Booking classes accessible via the Hotel Booking Styles
addon. It allows you to copy/paste the needed class to the Hotel Booking shortcodes or
Gutenberg blocks in order to make such adjustments as to make the search form horizontal,
delete field labels, etc.
For example:
This form is created thanks to the “is-style-horizontal-form” class:

Manage Bookings
All Bookings
If you enabled users to submit online bookings through your site, you can manage all received
bookings with all statuses under Bookings → All bookings menu .
You can check or change the status of the booking: it can be Pending User Confirmation,
Pending Payment, Pending Admin, Abandoned, Confirmed, Cancelled.
Add booking manually

Since version 2.7.0 it is possible to add new bookings at the back-end. Follow the steps below
to learn how to add new bookings:
- navigate to Bookings>All Bookings
- click ‘ New Booking ’ button at the top
- select Check in/out dates, certain accommodation type if needed, and capacity and click
‘ Search ’ button
- system will show available accommodations types and its accommodations Select
needed accommodations and click Reserve button

- After that fill the forms like on the front-end checkout page. So here you can select the
amount of guests, add extras/services, guest name, apply coupon code (optional), fill
required fields like name, email and phone number.
- Fill all the information and click the Book Now button.
Add payment manually
If the guest has already paid the needed amount of money and should pay the rest after arrival
to the hotel, you can add the payment manually to the appropriate booking.
To do this, simply go to a needed booking, scroll down to Additional info and click Add payment
manually.
The history of all payments you can view under Accommodation → Payments History.

Modify existing bookings
You can edit booking information collected at checkout or added by your staff manually.
To edit a booking, go to Booking → select a booking and click “Edit”.
● In the “Booking Information” section, you can edit check-in and check-out dates.
● In the “Reserved accommodations” section, you can manage accommodations and
other booking information, such as booked services or a property rate (all information
you can see in this section is editable).
To edit arrival/departure dates , follow the next steps:
1. Click “Edit Dates” and select new dates to check the availability of the already booked
properties in this reservation. Pick dates and click “Check Availability” .
It a property is available, you’ll see the “Available” status:

If not, it won’t let you proceed with an unavailable one:
2. Continue if a property is available. You’ll see the source and target accommodation. The
source accommodation is used to transfer already available client data to a new updated
booking. If you just change dates, most likely the source accommodation will be the
same as the target one.

3. On the final step, you can compare the new booking details with those in the original
booking.

The dates are changed. But when you also want to update any other information (e.g. to add a
service), you can do it on this step - the details are customizable.
Click “Save” when you are ready to change new details.
To edit, remove or replace accommodation , follow these steps:
1. Click “Edit Accommodations” - here you can add new accommodations for the same or
other dates. Also, you can edit rates, services, the number of guests, etc.

2. Click “Add”, “Remove” or “Replace” accommodation to make the required changes.
When you add or replace accommodation, you’ll be offered to select an accommodation type
and a physical accommodation of its type:
You can add as many properties as needed.

3. Choose the source accommodation for each new one (to automatically transfer client
data) and click “Continue”.
4. Customize the editable details of bookings if needed and click “Save”.


You can see the history of changes in the Logs panel.
When you add new accommodations, update rates or services, the final booking cost may
change. If it was already paid, you can do the following to charge the balance:
● Record a cash payment manually via dashboard after the arrival of your guest:
● Integrate the Payment Request add-on to send a payment link with the balance in a click
(guests will be able to pay online before arrival and the payment will be recorded
automatically).

OTAs sync for updated bookings
If you list your properties on external OTAs via iCal , the changes you make to bookings on the
site will also be synchronized with those on OTAs.
Each accommodation in a booking (in “Reserved accommodations” - there can be several ones
in a booking) has its unique ID (UID) that is used in iCal calendars.
If you change booking dates for properties in a reservation, the calendar UID stays the same.
If you change accommodation or its type in a booking (add, remove or replace properties), its
UID in a calendar is also changed.
The updated booking data should be synced with external calendars during the next scheduled
automatic sync.
During the export, the UIDs of the events in calendars are compared, so if there is new
information, it should be also automatically updated on the external platforms.
Note : you cannot edit the bookings imported from external sources/platforms . To modify
bookings sourced from external platforms, you need to update the source booking (the listing on
the OTA) and resync your calendars to export new data to the Hotel Booking plugin on your
WordPress website.
Bookings Calendar
To preview all bookings in a user-friendly calendar view, go to Bookings → Calendar. Here you
may find the bookings by an accommodation type, by period or status.

Create discount coupons
Please note: the use of coupons should be enabled via Accommodation → Settings → General
tab → Misc → tick “Enable the use of coupons” (the option was released in Version 2.1.0).
If you want to provide guests with discount coupon codes, which they can apply on the checkout
page, you should go to Bookings → Coupons → Add new.
All the settings of this menu will let you customize the coupon:
- Create the coupon name

- Add coupon description
- Set the discount amount of the coupon in % (required)
- Optionally set the expiration date
- Optionally choose accommodation types the discount coupon is valid for
- Optionally set check-in and check-out dates “frame” when the discount coupon is valid
- Optionally set minimum and maximum days to stay required for the coupon to be valid
- Optionally set the number of times the coupon can be used

The guests can apply the coupon on the checkout page when confirming and booking an
accommodation:

So, when the coupon is applied, the guests pay a discounted price:

Set Booking rules
Note! New booking rules were released in Version 2.3.0. Make sure that your old booking rules
are successfully transformed into new ones.
Go to Bookings → Booking Rules menu to set your booking rules.
These rules allow you to set minimum and maximum check-in and check-out dates, minimum
and maximum stay-in days for all or individual accommodations. Also, using this menu you’ll be
able to block the booking option for chosen accommodations at specific periods of time.
Check-in rules
You may add as many rules as you want.
Select all available check-in days for chosen accommodation types and seasons.
For example, if guests can check in at any day and to any accommodation, just select All.

If you want to add a custom booking rule for any particular accommodation type, just add a new
rule. For example, check-in is not available on Monday for Classic Double room:

To make sure that it doesn’t conflict with the rules for all other accommodation types, uncheck
Classic Double room in the first rule applied for all other accommodations. Drag and drop the
rules to set the needed priority:

On the frontend, if a guest wants to check in on Monday, there won’t be Classic Double room in
the search results list, because we made check-in on Mondays unavailable for this
accommodation type.

Check-out rules
You can do the same for the check-out days. Just set when guests can check out (can be
applied to all accommodation types or to any individually). Make sure that rules don’t conflict
with each other.
Minimum stay rules
You may set a minimum stay-in period for all accommodations or each one individually.
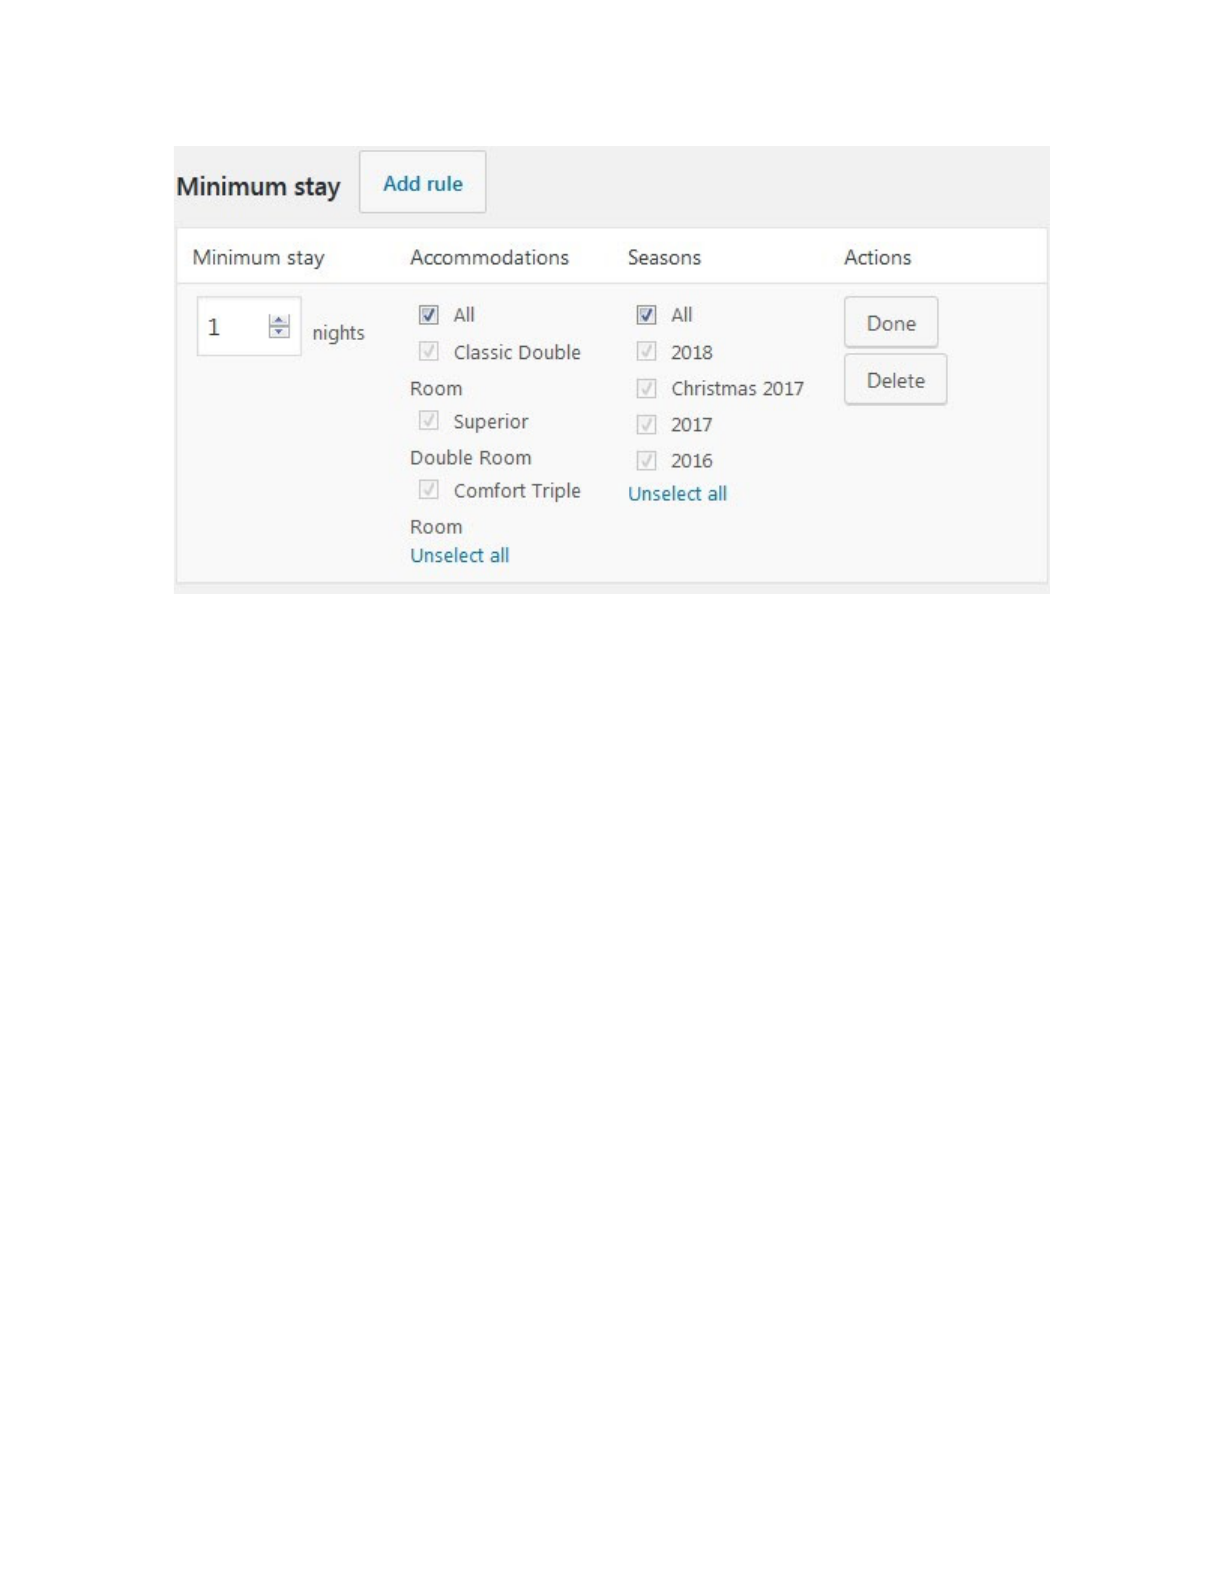
For example, if you want to set 2 days as a minim stay-in period for all accommodations, this
will be shown in the search availability calendar as well (guest will be able to choose a
check-out date only in 2 days after the check-in date):

Maximum stay rules
Set the maximum stay-in period for all accommodations or each one individually. For example,
you may set maximum 15 days for all rooms:

In this case, a guest won’t be able to choose more than 15 days for stay-in (and unavailable
days will be crossed out in the search availability calendar).

Block accommodation rules
If you need to make all accommodations or any specific accommodation type/actual
accommodation unavailable during a specific period of time, use “Block accommodation rules”.

Among the restriction rules are: not check-in, not check-out and not stay-in (when you want to
totally block accommodations/a specific accommodation at a chosen period of time).
You may add as many rules as you want for each accommodation separately.
For example, if you rent out 2 apartments and want to totally block all for 8 days, simply choose
needed dates and ‘All’. Then, in the search availability form, all the blocked dates will be
crossed out (the dates are blocked from December, 20 till December, 28):

Minimum & Maximum advance reservation rules
In the Minimum Advance reservation menu , you can set the minimum number of days before a
booking can be made depending on the current date. In other words, in how many days before
the chosen check-in date a guest can make a booking.
In the Maximum Advance reservation menu , you can set the maximum number of days allowed
for future reservations.
If a guest wants to check in earlier or later than allowed by the rules you set, they won't be able
to do that.

You can apply either rule to all or individual properties/seasons.
For example, let’s designate in our Minimum advanced reservation booking rules that a booking
can be made in minimum 15 nights before arrival:
The frontend availability calendar will show unavailable days with the only 16th day as available:
If we set the maximum Advance reservation rule to, for example, 40 nights, the property will
become unavailable for booking starting from the 41st night from the current date.

Guests will see the reason why the property is unavailable by hovering over unavailable days in
a calendar.
Booking buffer rules
The booking buffer is an extra time (in nights) added to the already booked dates - before and
after the check-out and check-in dates. This might be helpful when you need to perform any
extra cleaning or sanitizing procedures before your client arrives and after they depart. You can
apply it to all or individual properties / seasons.
For example, you set a booking buffer to 1 night:

If a guest booked the accommodation for Dec, 5 - Dec, 6, the plugin will automatically block out
one extra day before and after these dates according to your booking buffer rule, so potential
guests will see the property as unavailable for Dec, 4 - Dec, 7.

So this is visible for your potential guests on the frontend availability calendar. In your admin
calendar, however, you’ll see the normal booked dates:
You can also notice the buffer times are colored in grey around the booked dates (visible on
hover)

Don’t forget to save your changes!
Please note, if there are too many different rules, the frontend search availability calendar won’t
be able to show all of them instantly, but all the rules will work delivering results according to all
your rules.
As you see, the system of booking rules is very flexible - you can customize the rules for any
accommodation type / actual accommodation / season with ease.
Taxes And Fees
Fees
Fee is a separate mandatory charge in addition to base accommodation rate. Follow the steps
below to add a new fee:

1. Go to Bookings>Taxes & Fees> push Add New button (next to Fees)
2. Give a name to your fee e.g. ‘Cleaning fee’. This label will be shown at Checkout page
under price breakdown.
3. Select whether to charge the fee per guest or per accommodation:
a. ‘Per guest / per day’
b. ‘Per accommodation / per day’
4. Define the price (Amount) of fee for Adult and Child. (when you set to ‘charge per
accommodation’, there is single box for price)
5. Next you can set a limit of days the fee is charged. If you put ‘0’ days the fee is charged
each day of stay period. If you want to charge once only, set 1 day.
6. Check the accommodation types you want to tie the fee with. You should uncheck All to
select certain accommodation types.
7. Click ‘Done’ and ‘Save Changes’
Here is an example of Cleaning Fee with price $10 and that is charged once (1 day limit) for whole
accommodation (not per guest) and is tied to Classic Double Room and Comfort Triple Room
You can add unlimited amount of fees in the same way.
Your guests can see all applied Fees at checkout page by breaking down the price table

Taxes
You can add Taxes for Accommodations, Services and Fees separately.
Taxes for Accommodations
In order to make Accommodation types taxable you should navigate to your Dashboard →
Bookings → Taxes & Fees and follow the next steps:
1. Click Add new button next to Accommodation Taxes
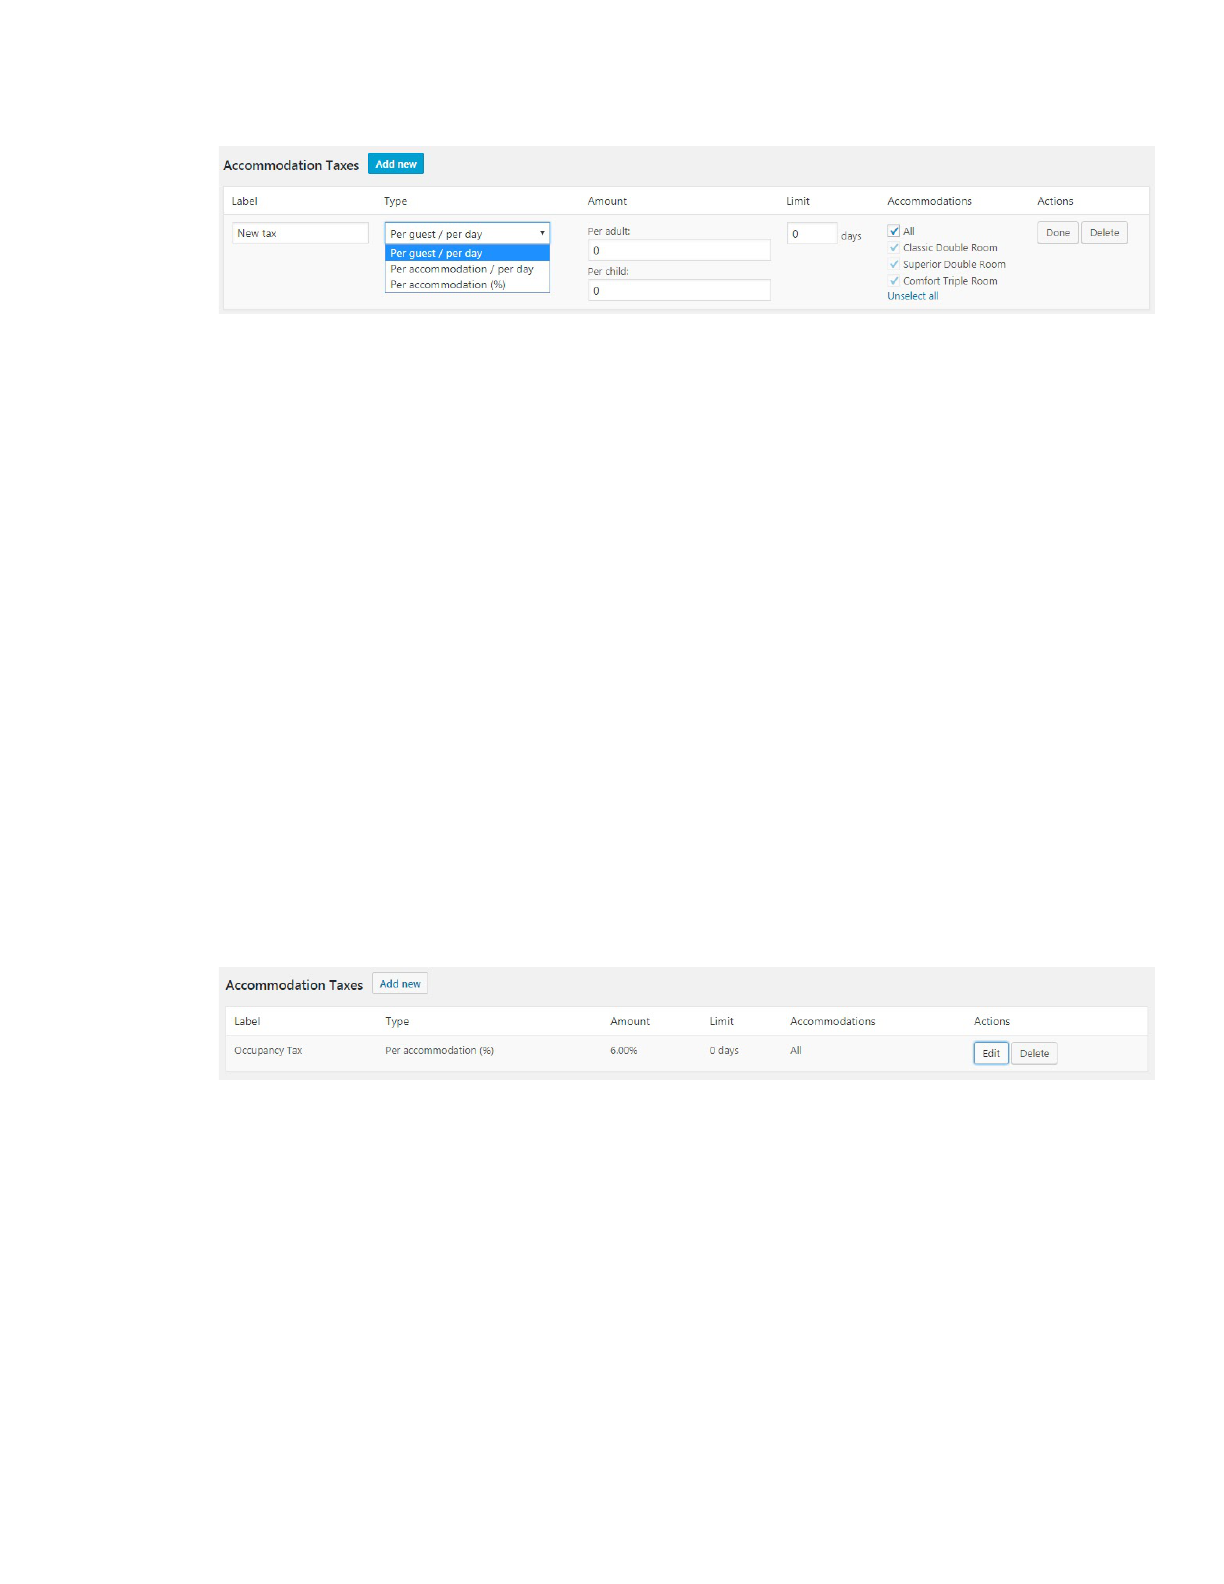
2. Name the Tax. The label will appear in a price breakdown on the frontend (your guests
will see it).
3. Select a type of the tax among:
a. Per guest / Per day - allows to add different tax for adult and child.
b. Per accommodation / Per day - add fixed tax for accommodation per day - not
depending on guests quantity.
c. Per accommodation in percents (%) - add tax in percents for accommodation
without days count.
4. Define ‘Amount’ of Tax - this will depend on type of the Tax - percentage or price.
5. Add limit of days if needed. When there is ‘0’ the tax will be applied to all days of stay-in
period. You can put ‘1’ to charge the tax once only.
6. Check the accommodation types you want to apply this tax for. You should uncheck All
to select certain accommodation types.
7. Click ‘Done’ and ‘Save Changes’
Here is an example of 6 % Occupancy Tax for whole accommodation and is applied for all Accommodation
Types
You can add more Taxes in the same way.
Your guests will see all applied taxes at checkout page by breaking down the price table.
Taxes for Services and Fees
In addition to Accommodation taxes, you can also add taxes for Services and Fees separately.
There are the same properties for both types of taxes available:

These percentage taxes are for total fees and services amount.
Tip: If you need to apply Tax for total sum of reservation, you should create a tax for
each type (accommodation, service (if there are any) and fee(if there are any)) with the
same percent amount.
Your guests will see all applied taxes at checkout page by breaking down the price table (before
they pay).
Reports (CSV)
Since the Hotel Booking 3.5.0 version it is possible to export Bookings in CSV format. This
allows to import the bookings and related information to excel or spreadsheet document. In
order to export Bookings you should navigate to Dashboard > Bookings > Reports. There you
may use available options to filter the Bookings you want to export by the following parameters:
- Accommodation Type - bookings of certain accommodation type
- Status of Bookings - bookings with certain status applied
- The periods/time frames to select the booking for export between start and end dates
Once you configured these parameters you may select the columns of reservation to export. In
other words what information of the booking you would need exporting CSV file:
● ID
● Status
● Check-in

● Check-out
● Accommodation Type
● Accommodation Type ID
● Accommodation
● Rate
● Adults/Guests
● Children
● Services
● First Name
● Last Name
● Email
● Phone
● Country
● Address
● City
● State / County
● Postcode
● Customer Note
● Full Guest Name
● Coupon
● Total
● Paid
● Payment Details
● Date
The final selection is saved for further export so you would not need to unselect the
unnecessary columns again with each next export of bookings.


Synchronize your hotel website with OTAs via iCal
If you list your property on multiple online channels and also offer online website bookings via
MotoPress Hotel Booking plugin, you can easily avoid overbooking by synchronizing all those
channels with your site and with each other. To make this synchronization possible, the online
channels you use should support iCalendar file format.
To configure synchronization of your bookings across all channels, go to your WordPress
Dashboard → Bookings → Sync Calendars . You’ll see a list of all your real accommodations
with their unique URLs (the link under Export).
In short, setting up synchronization is a 2-phase process : you’ll need to export a calendar URL
to an external channel/channels (to notify them about the bookings made through your site) and
import the link from them to your site (to notify your site about the bookings made through the

channels). In this way, your availability across channels and a website will always be up to date.
During synchronization, the plugin will download the bookings from external booking platforms
by the imported links. The external channels will download the bookings from our plugin by the
exported links according to their internal schedules.
How to export your website calendars to online channels
Use Export Calendar link to export your calendars to any external online travel channel. So, just
copy the URL and paste it into the appropriate field in the OTA backend.
Note : each accommodation comes with its unique calendar URL.
How to import calendars from external online channels to your website

Go to the external online channel, find the iCal file URL and copy it (each real accommodation
should have its unique iCal URL). Then go to your WordPress dashboard → Bookings → Sync
Calendars → choose a needed accommodation and click Edit → click Add New Calendar →
paste the URL → Update . Here you may add as many URLs from different channels as needed:
Quick links: how to import/export calendars across most popular online channels:
How to import and export Calendars on Booking.com
How to import and export Airbnb calendars
How to import and export HomeAway calendars
How to import and export TripAdvisor calendars
If you list your property on any other online travel agency, make sure that it supports iCal file
format for synchronization.
Once all your calendars are crosslinked, you can synchronize the bookings manually or enable
the automatic sync. To manually sync only a specific accommodation across the channels, click

‘Sync external calendars’ only under this particular accommodation. To synchronize all
calendars for all accommodations, click on the ‘Sync all external calendars’ button:
And wait for the process to start and finish:

When the process is complete, you can click on any chosen accommodation and see how many
bookings were received. Moreover, you’ll be able to see all bookings in the “ All Bookings ”
menu and “ Calendar ” menu. So far, you may check the source of the booking (whether it’s your
website or any external online travel channel via All Bookings → choose booking → click Edit →
view Logs).
You may also manually download calendars from your site to your PC or upload external
calendars by clicking Import Calendar or Download calendar buttons:

How to configure automatic synchronization
In the Accommodation tab → Settings (scroll down) you can enable and configure the automatic
sync:
Choose the time when the synchronisation should start in the Clock field and the time period of
the synchronisation in the Interval field. The available intervals are:
a. daily
b. twice daily
c. once hourly.

Note : to prevent unnecessary requests to the server, the automatic sync is executed in the set
time interval only if there is a visitor on your website within that time interval. This means that
the plugin will download bookings from external calendars as soon as someone visits your
website.
You can also automatically delete synchronization logs by choosing a suitable period of time:
every day, week, month, quarter, half a year (or never).
For Developers
This plugin contains hooks that allow you to edit, add and move content without needing to edit
template files. This method protects against upgrade issues.
Alternatively, you can copy template files from '/wp-content/motopress-hotel-booking/templates/'
folder to '/wp-content/your-theme/hotel-booking/' to override them.
