
Compensation Cable
Installation Guide
FOR WHISPER-FLEX® AND WIDE-LOOP STEADI-FLEX® CABLES
VERSION 1114

WHISPER-FLEX® compensating
cables are designed to be used in
free-hanging applications in traction
elevators.
STEADI-FLEX® compensating cables
are designed to be used in free-hang-
ing applications in traction elevators
when a wider loop is desired.
With proper dampening devices, they
may be operated at speeds of up to
700 ft/min • 3.56 m/sec (speeds up
to 350 ft/min • 1.8 m/sec without
them). Recommended operating
temperatures from 5°F to 140°F •
-15°C to +60°C.
Important! Please read!
WARRANTY AND SAFETY INFORMATION
This guide has been prepared
to instruct installers in the safe
and efficient installation of
Whisper-Flex and Steadi-Flex
compensating cables. Failure
to follow these procedures will
not only invalidate product war-
ranty, but could endanger public
safety. If you have any ques-
tions regarding installation pro-
cedures, please do not hesitate
to call Draka Elevator Products
at 877.372.5237 or 252.972.6000.
1
Whisper-Flex® and Steadi-Flex® - the differences 2
Hardware required for installation 3
Visual inspection and moving the reel 4
Position the cable for unreeling 5
Install the counterweight support bracket 6
Prepare the cable end for termination 7
Attach the cable to the counterweight bracket 8
Whisper-Flex® cable loop diameters and installation diagram 9 - 10
Steadi-Flex® cable loop diameters and installation diagram 11 - 12
Attach the car support bracket 13
Secure U-bolt and place the S-hook 14
Determining which installation kit to use (JCC vs JCC-CHN) 15
Installing Whisper-Flex with the JCC kit 16 - 17
Installing Steadi-Flex / shallow pit installations with the JCC-CHN kit 18
Attach the cable to car support bracket 19
Multiple compensating cables installation 20
High speed installations 21
Using damping devices 22 - 25
Final inspection 26
Using the Whisper-Flex Strip Kit 27 - 32
Table of contents

2
Whisper-Flex cable provides smooth
operation at temperatures of -15° C
to +60° C and, in the US, can be used
for elevators with rated speeds of no
greater than 3.56 m/sec • 700 ft/min.
Support brackets, U-bolts, S-hooks,
and heavy duty stainless steel grips
specifically designed for Whisper-Flex
cable must be used to ensure safe
installations.
Draka Elevator damping devices are
recommended to minimize cable
sway for car speeds above 1.8 m/sec •
350 ft/min.
Steadi-Flex cable is a wide-loop
version of our standard Whisper-Flex
compensating cable.
Because of its wider natural loop,
Steadi-Flex cable can be positioned
closer to the car’s centerline. This
improves car balance and ride quality
for installations with side counter-
weights and long hang lengths (over
122 m • 400 ft).
When choosing Steadi-Flex, give
special consideration to the dynamic
loop width. The dynamic loop width
is the width of the loop when the
cable is in motion and will vary with
car speed, distance between support
points and other factors.
Whisper-Flex® and Steadi-Flex® - the differences
TAILORED FOR YOUR PARTICULAR APPLICATION
Steadi-Flex is NOT a
one-for-one replacement
for Whisper-Flex.
Pit dimension and possible
obstructions should be
considered when specifying
Steadi-Flex.
Counterweight and car
attachment points should be
spaced to match the dynamic
loop width.

3
Draka installation kits contain all
hardware needed for the safe
installation of Whisper-Flex and
Steadi-Flex compensating cable.
JCC kits are for Whisper-Flex
installations. They include a stainless
steel double eye/double weave/closed
mesh grip and one roll of electrical
tape.
JCC-CHN kits are for Steadi-Flex or
Whisper-Flex in shallow pits. They
include a 1.2 m • 4 ft chain and one or
two couplings.
BOTH kits contain
one steel S-hook,
one steel U-bolt with nuts
and washers, and
two support brackets with nuts, bolts,
flat washers and lock washers.
Hardware required for installation
USE DRAKA ELEVATOR INSTALLATION KITS
JCC kit JCC-CHN kit
Using hardware other than
Draka’s could seriously
jeopardize the safety of your
installation and void any
warranty.
4
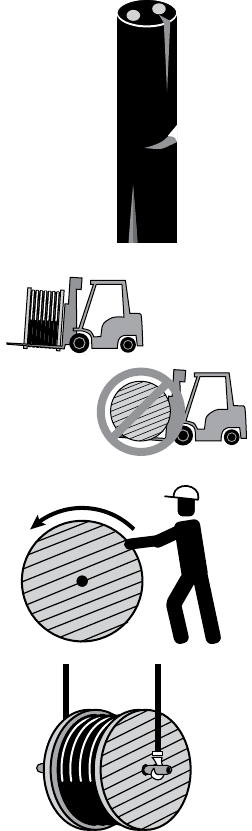
Immediately inspect the cable for
physical damage. A cut or gash could
mean a weakened and unsafe cable.
Examine the reel as well. A damaged
reel may be a sign of rough handling
in transit and may also indicate cable
damage.
Whisper-Flex and Steadi-Flex cable
may be moved by forklift.
Lift the reel by the wood, not by the
cable.
It may also be rolled on its reel on a
firm surface. If a hoist is being used,
place a strong rod through the reel for
lifting purposes. Store the cable in a
safe place.
Do not install potentially damaged
cable. Call Draka if you have any ques-
tions regarding damaged cable.
Visual inspection and moving the reel
LOOK FOR OBVIOUS DAMAGE / MOVE CABLE SAFELY
YES
NO

5
Place the cable reel in a convenient
location near the elevator (usually the
first landing or the pit floor). Reel roll-
ers are the preferred means of
supporting the reel.
Another method is to run a strong rod
or pipe through the hole in the center
of the reel. Support the pipe ends so
that the reel is off the floor enough to
rotate freely.
Pay the cable off the bottom of the
reel.
NEVER pay cable off the side of a reel
as it causes the cable to twist.
Position the cable for unreeling
WORK FROM THE PIT OR THE LOWEST LANDING
YES
NO

6
Lock washer
Flat washer
Bring the counterweight down to a com-
fortable working level. Use the counter-
weight support bracket as a template
to mark and drill correctly-sized holes
centered on the counterweight frame.
Attach the counterweight support
bracket to the frame by placing the flat
washer over the 13 mm • 1/2 in bolt and
running the bolt up through the bracket
and the frame. Then place the lock
washer on the bolt. Secure the bolt with
two nuts. Repeat with the other bolt.
Install the counterweight support bracket
DRILL THE COUNTERWEIGHT FRAME
Exploded view of
bolt/nuts/washers
7
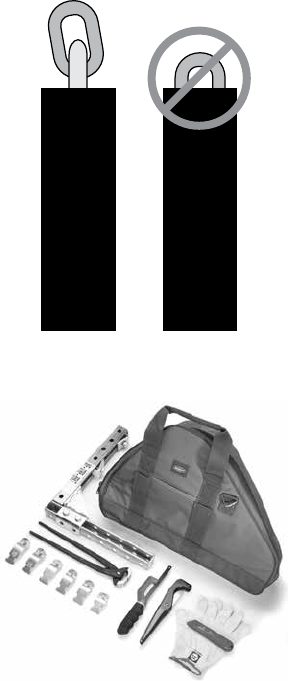
Expose one-and-one-half links of
undamaged chain.
Both Whisper-Flex and Steadi-Flex
may be ordered with the ends prepared
as shown. Call Draka Elevator for
details.
You may also use the Whisper-Flex
Strip Kit (part number WF-STRP) to
prepare the cable end. See pages 27 -
32 for cable preparation instructions.
Prepare the cable end for termination
LEAVE ONE-AND-ONE-HALF EXPOSED LINKS
YES NO

8
Place the flat washer over the chain
attachment bolt. Run the bolt through
the chain link and the bracket. Place
the lock washer on the bolt. Secure the
bolt with two nuts.
Chain attachment bolt sizes
WF075 & 10 10 mm • 3/8 in.
WF/SFC15 to 30 12 mm • 7/16 in.
WF/SFC35 & 40 13 mm • 1/2 in.
Once the cable is attached, run the
counterweight up and bring the car
down to a comfortable working level at
the bottom of the hoistway.
Attach the cable to the counterweight bracket
USE THE ATTACHMENT BOLT SUPPLIED BY DRAKA ELEVATOR
Lock washer Flat washer
Using hardware other than
Draka’s could seriously
jeopardize the safety of your
installation and void any
warranty.

9
For optimum performance, there is a
specific distance between the cable
counterweight and car attachment
points - the cable loop diameter of a
hanging cable. As shown on the table
below, the loop diameter varies with
the size/weight of the cable.
Measured from the hanging point
of the counterweight, the cable loop
diameter provides the location of the
U-bolt.
The car support bracket is located 60 to
90 cm • 24 to 36 in. beyond the U-bolt.
Please note the JCC-CHN distances can
be reduced.
Whisper-Flex® cable loop diameters
DETERMINING LOOP DIAMETER
Product Cable Weight Loop Diameter Max. Hanging Length*
Code lb/ft • kg/m in • cm ft • m
WF075 0.75 • 1.12 22 • 54 600 • 183
WF10 1.0 • 1.49 24 • 61 600 • 183
WF15 1.5 • 2.23 24 • 61 600 • 183
WF20 2.0 • 2.98 26 • 66 520 • 159
WF25 2.5 • 3.72 26 • 66 600 • 183
WF30 3.0 • 4.46 26 • 66 505 • 154
WF35 3.5 • 5.21 27 • 69 600 • 183
WF40 4.0 • 5.95 27 • 69 530 • 162
*Max. hanging lengths are based on a 5:1 safety factor per ASME A17.1-2013
Do NOT exceed the maximum
hanging lengths shown on the
table above. Contact Draka for
longer hanging lengths.

10
Typical Whisper-Flex installation diagram
MEASURING THE HANGING POINTS
Damping
devices
Car frame center
S-hook
Mesh
grip
Cable tie
Cable Loop
Diameter
(see p. 9)
Car
Support Bracke
t
U-bolt
Counterweight
Support Bracket
Pullout switch
Safety Loop
0.6 to 0.9 meters
24 to 36 in.
Allow a
minimum of
1 m • 3 ft
Loop Diameter
(see p. 9)
This is a typical Whisper-Flex cable
installation (not to scale). The brack-
ets and U-bolt should all be in the
same plane.
Measure and mark the locations of
the car support bracket and U-bolt on
the car frame.
Two damping devices are recom-
mended for speeds above 1.8 m/sec
• 350 ft/min. See pages 22 - 25 for
details on these devices.

11
For optimum performance, there is a
specific distance between the cable
counterweight and car attachment
points - the dynamic loop width. As
shown on the table below, the dynam-
ic loop width varies with the size/
weight of the cable.
Note: at rest, Steadi-Flex cable will
bow inward slightly. If you are using
Super SwayLess devices (pages 24 -
25) to control movement, the cable
will touch the rollers at rest but will
assume the dynamic loop width in
motion.
Steadi-Flex® cable loop diameters
DETERMINING DYNAMIC LOOP WIDTH
Product Cable Weight Dynamic Loop Width Max. Hanging Length*
Code kg/m • lb/ft cm • in m • ft
SFC15 2.23 • 1.5 117 • 46 183 • 600
SFC20 2.98 • 2.0 120 • 47 159 • 520
SFC25 3.72 • 2.5 122 • 48 183 • 600
SFC30 4.46 • 3.0 125 • 49 154 • 505
SFC35 5.21 • 3.5 127 • 50 183 • 600
SFC40 5.95 • 4.0 127 • 50 162 • 530
*Max. hanging lengths are based on a 5:1 safety factor per ASME A17.1-2013
Using hardware other than
Draka’s could seriously
jeopardize the safety of your
installation and void any
warranty.

12
Typical Steadi-Flex installation diagram
MEASURING THE HANGING POINTS
Car frame
center
S-hook
Counterweight
Support Bracket
Car
Support Bracket
U-bolt
Pullout
switch
Safety Loop
0.6 to 0.9 meters
24 to 36 in.
Dynamic
Loop Width
(see p. 11)
Allow
1 m • 3 ft
At rest,
Steadi-Flex
cable will bow
inward
Super
SwayLess
damping
devices
Dynamic Loop Width
(see p. 11)
This is a typical Steadi-Flex cable
installation (not to scale - cable
bowing is also exaggerated). The
brackets and U-bolt should all be
in the same plane.
Measure and mark the locations of
the car support bracket and U-bolt on
the car frame.
Super Swayless damping devices
(pages 24-25) are recommended for
speeds above 1.8 m/sec • 350 ft/min.
Locate damping devices directly
below the counterweight support and
the car attachment points.

13
Drill properly spaced mounting holes
for the car support bracket and the
U-bolt on either side of your marks.
If using a JCC kit, the location for the
car support bracket and the U-bolt
should be 60 to 90 cm • 24 to 36 in
apart. This distance will be shorter if
using a JCC-CHN kit.
Attach the car support bracket to the
bottom of the car frame as shown.
Attach the car support bracket
DETERMINE HOLE LOCATIONS AND DRILL THEM
Car Frame
Exploded view
of bolt/nuts/
washers
U-bolt location
(less for JCC-CHN kits)
Car support
bracket location
60 to 90 cm
24 to 36 in.
13 mm • 1/2 in bolt
s
Lock
washer
Flat
washer

14
Install the U-bolt through the holes
in the car frame. Make sure that the
U-bolt is tightly held at a 90° angle to
the car frame.
Place the S-hook through the U-bolt.
The Pullout Switch should be installed
near the U-bolt. If the S-hook is acti-
vated, the cable will pull the key down-
ward and trigger the switch.
NOTE: The pullout switch kit
(WF-POSK) is sold separately.
Secure U-bolt and place the S-hook
U-BOLT SHOULD BE VERTICAL
90°
90°
Using hardware other than
Draka’s could seriously
jeopardize the safety of your
installation and void any
warranty.

15
Whisper-Flex requires the use of JCC
installation kits (or JCC-CHN kits for
shallow pits - see below). Cable termi-
nation location is determined by which
style of installation kit is being used.
JCC kits need enough cable to form
an S-shaped safety/adjustment loop
which then connects to the car support
bracket.
Once the cable has been installed and
the loop has been formed (see pages
16 and 17), cut the cable at the point
where it reaches the support bracket.
Steadi-Flex and shallow pits require
the use of JCC-CHN installation kits.
These kits use chain and couplings to
form the safety loop. Once the cable
has been installed and the loop has
been formed (see page 18), cut the
cable four links short of the S-hook.
If the cable was not ordered with
prepared ends, see pages 27 - 32 for
instructions on using the Whisper-Flex
Strip Kit.
Determine which installation kit to use
USING THE JCC OR JCC-CHN INSTALLATION KITS
Whisper-Flex uses JCC kits
Steadi-Flex and shallow pits
use JCC-CHN kit

16
For JCC installations, place the mesh
grip over the end of the Whisper-Flex
cable that will be attached to the car.
Position the grip so that the top of the
weave is between 1.5 to 2 meters • 5 to
6.5 ft from the free end of the cable.
Hang the grip from the S-hook. Adjust
the cable within the grip as needed so
that the cable hangs freely at least 15
cm • 6 in above the pit floor and forms
a ‘relaxed’ and semi-circular loop.
The cable should not bell out or hang
in a misshapen loop.
Attach Whisper-Flex to the car
USING JCC KITS WITH A MESH GRIP
1.5 - 2 m
5 - 6.5 ft
Excess
cable
Allow
at least
15 cm • 6 in.
clearance

17
For JCC installations, hang the mesh
grip from the S-hook. Compress the
mesh grip and adjust the cable so
that it forms a reverse curve (two half-
circles of equal size). Attach a cable tie
to help the cable exit the grip vertically.
Make sure the grip is hanging vertically.
The connecting cable tie for the pullout
switch should pass through the key’s
ring and the mesh grip eye loops.
Once positioned, secure the bottom
of the mesh grip to the cable with at
least 4 wraps of electrical tape. Make
sure that the safety loop does not
get caught on any pit equipment
(ex: car buffer).
Form the safety/adjustment loop - JCC kits
ADJUST AND SECURE WITH ELECTRICAL TAPE
Cable tie
Failure to make the safety
adjustment loop could
seriously jeopardize the safety
of your installation.

18
For JCC-CHN kits for Steadi-Flex and
shallow pit applications, attach the
chain provided in the kit to the cable
with the coupling (instructions are in
the coupling package).
Use the S-hook to connect the chain to
the U-bolt. If the chain link is too small
to permit this, use the second (smaller)
supplied coupling to make the connec-
tion to the S-hook.
The connecting cable tie for the pullout
switch should pass through the key’s
ring and a chain link.
The cable should not bell out or hang
in a misshapen loop.
Form the safety/adjustment loop - JCC-CHN kits
ATTACH THE CABLE WITH THE SUPPLIED COUPLINGS
Loop
diameter
Use coupling with
JCC-30-CHN and
JCC-40-CHN kits
Attach chain directly
to S-hook with
JCC-10-CHN and
JCC-20-CHN kits
0.6 to 0.9 meters
24 to 36 in.
Allow
at least
15 cm • 6 in.
Failure to make the safety
adjustment loop could
seriously jeopardize the safety
of your installation.

19
Attach the exposed link from either
the cable (JCC kit) or the chain (JCC-
CHN kit) to the bracket as shown.
Place the flat washer over the chain
attachment bolt. Run the bolt through
the chain link and the bracket. Place
the lock washer on the bolt. Secure the
bolt with two nuts.
Chain attachment bolt sizes
WF075 & 10 10 mm • 3/8 in
WF/SFC15 to 30 12 mm • 7/16 in
WF/SFC35 & 40 13 mm • 1/2 in
Attach the cable to car support bracket
TERMINATE THE CHAIN AT THE SUPPORT BRACKET
Lock washer Flat washer

20
To optimize car balance, most instal-
lations call for two equally-sized
Whisper-Flex or Steadi-Flex cables.
If so, position the brackets and the
U-bolt equidistant from the center of
the car, the same distance apart as
on the counterweight.
The cables should hang parallel to
each other and perpendicular to the
wall with the counterweight.
Multiple compensating cables installation
FOR BALANCED LOADS
Center
of car
Hanging
points are
equidistant
from center
of car
Cables
should be
of equal
weight
Steadi-Flex
installation

21
Two damping devices are recom-
mended for high-speed applications
(1.78 to 3.56 m/sec • 350 to 700 ft/
min).
Position the devices a ‘loop diameter’
apart (see page 9 for Whisper-Flex or
11 for Steadi-Flex) and directly below
the counterweight support bracket
and the Safety U-bolt/S-hook.
High speed installations
INSTALLING THE DAMPING DEVICES
YES
NO
YES
NO
All cable and support devices
should be on the same plane
within the hoistway.
The devices should not guide
the cable out of its natural
plane.

22
Two SwayLess damping devices are
normally required for installation and
are mounted 1 meter • 3 ft from the
base of the loop.
SwayLess dampeners open when
unbolted. Close the SwayLess device
around the cable and bolt it back
together. The internal brass ring can be
easily replaced as it wears over time.
Rail-mounted (SL-RMB-2) and floor-
mounting (SL-FMB-48) brackets are
available.
Using SwayLess® damping devices
FOR WHISPER-FLEX SIZES UP TO WF30 < 2.5 M/SEC • 500 FT/MIN
Damping
devices
with
mounting
brackets
Allow
1 m • 3 ft.
Damping
devices
with
mounting
brackets
Allow
1 m • 3 ft.
When properly installed,
damping devices will keep
the cable inside its vertical
traveling plane.
It is critical that the cable travel
vertically as it passes through
the dampeners.

23
Two Super SwayLess damping devices
are normally required for installation
and are mounted 1 meter • 3 ft from
the base of the loop.
Use a wrench to detach one roller with
two brackets and place the dampener
around the cable. Reattach the roller
and brackets after inserting the cable.
Rail-mounted (SSL-RMB-2) and floor-
mounted (SSL-FMB-48) brackets are
available.
Using Super SwayLess® damping devices
FOR INSTALLATIONS 2.5 TO 3.56 M/SEC • 500 TO 700 FT/MIN
Allow
1 m • 3 ft.
NO
Damping
devices
with mounting
brackets
Allow
1 m • 3 ft
YES
NO
Cable should
barely touch
inner rollers
Allow
1 m • 3 ft.
NO
Damping
devices
with mounting
brackets
Allow
1 m • 3 ft
YES
NO
Cable should
barely touch
inner rollers
When properly installed,
damping devices will keep
the cable inside its vertical
traveling plane.
It is critical that the cable travel
vertically as it passes through
the dampeners.

24
It is important to note that Steadi-
Flex cable will actually touch the roll-
ers of a Super SwayLess device when
at rest. This is due to the natural
tendency of Steadi-Flex cable to bow
inward when not in motion.
When the car moves, the cable will
assume its dynamic loop width and
touch the Super SwayLess device
as part of its normal sway damping
function.
Using Super SwayLess devices with Steadi-Flex
THE CABLE WILL TOUCH THE DEVICES AT REST
Dynamic loop
width
Car frame
center
S-hook
Counterweight
Support Bracket
Car
Support Bracket
U-bolt
Cable should
be vertical
when in
motion
Inward curve of
static loop
exaggerated for
clarity
Pullout
switch
Cable may touch
rollers at rest,
but expand to
dynamic loop
width when in
motion

25
The ShallowSwayless is ONLY for shal-
low pit applications.
The ShallowSwayless is a sway reduc-
tion device for shallow pit applications
where there is insufficient pit depth for
SwayLess or SuperSwayless devices.
It reduces compensating cable sway
and oscillation in installations up to
3.56 m/sec • 700 ft/min. Two sizes
are available; the 27L version is for
Whisper-Flex and the 50L version is for
Steadi-Flex.
The kit includes all components
shown, including mounting bolts and
washers.
Using ShallowSwayless damping devices
RECOMMENDED ONLY FOR SHALLOW PIT INSTALLATIONS

26
Give your installation a final
inspection. Make sure that:
• the cable has no cuts, gashes,
deep abrasions or damaged links
• all Support Brackets are tightly
fastened
• both end links of the cable are
securely attached to the support
brackets
• all U-bolts are vertical and tightly
fastened
• the cable hangs vertically and
does not touch walls, floor
or hoistway/pit equipment
• if damping devices are used,
make sure that they are installed
at the recommended height
above the bottom of the cable
loop
• the damping devices, if used,
do not guide the cable out of its
natural loop or interfere with
buffer operations.
• the pullout switch key is securely
attached to the mesh grip eye
loop (JCC kit) or a chain link
(JCC-CHN kit) and that it will freely
and vertically pull out should the
S-hook activate.
Final inspection
CHECK ALL POINTS PRIOR TO OPERATION
A routine inspection program should be implemented to maximize
product safety and performance.

27
The Whisper-Flex Strip Kit (WF-STRP
- ordered separately) contains all of
the tools and accessories required to
prepare both Whisper-Flex and Steadi-
Flex cable ends for installation.
The kit contains
• an angle bracket,
• clamps to fit all sizes of cable,
• nippers,
• a utility knife,
• cable jacket cutter, a hacksaw,
• protective gloves and
• a carrying case.
Replacement tools can be ordered
individually.
Prestripped cable is available.
Call Draka Elevator for details.
Cable stripping instructions
USING THE WHISPER-FLEX FIELD STRIP KIT

28
Attach the angle bracket to the car
guide rail by tightening the beam
clamps using a 3/4 inch wrench.
Position the angle bracket as shown at
a comfortable working height.
Insert the proper-sized cable clamp
into the channel.
Use a screwdriver to loosen the cable
clamp.
Attach the angle bracket to the car guide rail
SELECT THE PROPER-SIZED CLAMP
Cable goes
through clamp
Guide rail
Cable clamp
Beam clamp
Beam
clamp

29
Run the cable through the clamp so
that 7.5 to 10 cm • 3 to 4 in of cable is
exposed above the clamp. Tighten the
clamp with a screwdriver.
Position the cable jacket cutter about
7.5 cm • 3 in from the cable end.
Rotate the jacket cutter to score and
make a ring cut through the cable.
Score the jacket with the cable jacket cutter
ESTABLISH A GUIDE CUT
Extend cable
7.5 - 10 cm • 3 - 4 in.
above clamp
Score jacket
7.5 cm • 3 in.
from the end

30
Once the cable is scored,
1) grab the end of the cable and bend it
as you...
2) deepen the ring cut all the way to
the chain with the utility knife. This
may require several passes with the
knife.
3) Use the utility knife to make
a vertical cut from the ring cut to the
cable end. Make sure the jacket is cut
deeply enough to reach the chain.
Cut and slit the cable jacket
CUT ALL THE WAY TO THE CHAIN
1) pull cable away
from utility knife
2) cut until you
reach the chain
3) cut until
you reach
the chain

31
Once the ring and vertical cuts are
made, use the nippers to grab an edge
of the vertical cut and rip the jacket
from the chain. If necessary, repeat
this step for the other edge of the cut.
Repeat the stripping process as need-
ed until one-and-one-half undamaged
chain links are exposed. Discard any
cut links.
Use the nippers to remove the jacket
EXPOSE ONE-AND-ONE-HALF LINKS OF UNDAMAGED CHAIN

32
Unbolt the arm of the angle bracket
that was used to prepare the coun-
terweight end of the cable. Reattach
it so that the side with the channel/
clamp is facing up.
Tighten the clamp to hold the cable.
Use the hacksaw provided in the strip
kit to cut off the excess cable.
Clamping the cable to the angle
bracket helps prevent injury caused
by blade slippage.
Return the angle bracket arm to its
original position.
Prepare the cable end as before
(pages 7 to 12).
If you are using a JCC kit with mesh
grip, go to page 17 for safety loop
instructions.
If you are using a JCC-CHN kit with
chain, go to page 18 for safety loop
instructions.
Cut the cable to the correct length
USE THE ANGLE BRACKET AS A SUPPORT
Whisper-Flex, Steadi-Flex, SwayLess,
SuperSwayLess, ShallowSwayLess, the
Draka globe design and Draka Elevator
are trademarks of Prysmian.
Unauthorized reproduction, disclo-
sure or distribution of copies by any
person of any portion of this work
may be a violation of Copyright Law
of the United States of America and
other countries, could result in the
awarding of statutory damages of up
to $100,000 (17 USC 504) for infringe-
ment and may result in further civil
and criminal penalties.
Draka Elevator reserves the right to
improve, enhance, or modify the fea-
tures and specifications of Draka prod-
ucts without prior notification.
©2014 Draka Elevator.
All rights reserved. Printed in USA.
FOR TECHNICAL ASSISTANCE,
CALL TOLL FREE (US AND CANADA)
877.408.HELP (877.408.4357)
TO ORDER KITS/PARTS,
CALL TOLL FREE
877.DRAKA EP (877.372.5237)
Comp Install Guide 1114
Draka Elevator
2151 N. Church Street | Rocky Mount, NC 27804
1-877-DRAKA EP (877-372-5237) | +1-252-984-5100 | Fax +1-252-972-6001
Technical information 1-877-408-4357 | www.drakaelevator.com
