
Hydraulic Residential Elevator
INSTALLATION MANUAL

Thank you for your purchase of a Federal Elevator
Hydraulic Residential Elevator. We appreciate and value
your continued afliation with us and we are proud to
list your company as one of our recommended Dealers.
This manual will provide you with instructions on how
to properly install one of our Panorama or Renaissance
models in a home. Upon your job going to contract, we
will issue a special number which begins with F-. Please
refer to this number when communicating with us so
that we can collect the project’s corresponding les.
Federal Elevator will provide you with an Installation
Package with your shipment which will include General
Layout and Electrical Schematics that are specic to
your job. Those materials along with this Manual will be
of help during your installation.
Please pay close attention to any safety messages
and notes in sections following. These are indicated
with symbols (
) and bold text and contain important
information that will ensure your safety and will ease the
installation process.
Should you have any questions during the installation,
please contact us at (905) 458-4015 or at
1-888-785-5438 ext. 228 for Technical Support.
September 2015

PAGE 1 of 48
Table Of Contents
SECTION 1 – SAFETY AND MATERIALS REQUIRED
2 Safety
2 Recommended P.P.E.
2 Mechanical Safety
2 Electrical Safety
3 Recommended Tools and Materials Required
SECTION 2 – INSTALLATION
4 Pre-Installation Site Check
4 Installation Procedure
4 Rail Bracket Installation
5 Rail Installation
7 Installation of Cylinder, Sling Assembly and
Related Equipment
7 Cable Installation
8 Pum p Unit and Controller Installation
8 Cab Installation
10 Accordion Door Installation
10 Bifold Gate Installation
10 2-Speed Door Installation
10 Cab Electrical
10 Travel Cable Installation
11 Switch Mounting
11 Hoistway and Hall Station Wiring
11 Tapehead Mounting/Magnet Installation
11 Tapehead Magnet and Valve Adjustment
12 Interlock Installation
12 Uninterrupted Power Supply (UPS) Installation
13 Finalizing The Installation
SECTION 3 – ADJUSTMENTS AND TROUBLESHOOTING
14 Tapehead Magnet and Valve Adjustment Quick Guide
15 Troubleshooting Procedures
15 Quick Guide
15 Quick Fix Guide For Typical Problems
16 Residential Controller PLC Inputs & Outputs
21 Maintenance Guideline
APPENDICES
23 Appendix 1 – Residential 3" X 5" Rule
24 Appendix 2 – Temporary Operation Start
Up Procedure
25 Appendix 3 – Main and Auxiliary Disconnect
and Motor Connection
26 Appendix 4 – Residential Exploded View –
Accordion Doors
27 Appendix 4A – Residential Exploded View –
Bifold Doors
28 Appendix 5 – Infrared Curtain Assembly
29 Appendix 6 – Two Speed Door Installation
30 Appendix 7 – Tapehead Mounting
31 Appendix 7A – Four Stop Magnet Placement
32 Appendix 7B – Three Stop Magnet Placement
33 Appendix 7C – Two Stop Magnet Placement
34 Appendix 8 – Hoistway Prewiring Drawing
35 Appendix 9 – Blain Valve Adjustment Sheet
47 Notes
PAGE 2 of 48
SECTION 1 –
Safety and Materials
Required
SAFETY
WARNING: Always pay very close attention
to this symbol. It indicates important safety
information for preventing serious injury/
bodily harm or equipment damage.
Always use proper safety procedures when working on
any installation lift. Ensure that your Personal Protective
Equipment (P.P.E.) is appropriate for the type of job that you
are doing and that it ts correctly.
It is very important for you to keep in mind
the 3"x 5" rule during the initial stages of
design. ASME A17.1 Rule 5.3.1.4.2 States: The
clearance between the hoistway doors or
gates and the hoistway edge of the landing
sill shall not exceed 3 inches (76mm). The
distance between the hoistway face of the
landing door or gate and the car door or gate
shall not exceed 5 inches. This rule must be
strictly adhered to as it will prevent having
an area between the hall door and elevator
door that could potentially be an area that a
small child, person, or animal could t and
be subject to injury or death. Please refer to
Appendix 1 – Residential 3" x 5" Rule.
NOTE: Some door hinges and door handles may
interfere with this rule due to size. Ensure that
they will not impede with this rule before you begin
installation of the elevator.
NOTE: Please refer to Detail A on Page 2 of the
General Layout which indicates interlock mounting
and running clearance dimensions.
RECOMMENDED P.P.E.:
■ Steel toe boots – CSA/UL approved – Soles resistant
to shock
■ Hard hat – Class A
■ Eye/face protection – CSA/UL approved
■ Work gloves
■ Hearing protection
■ Personal fall arrest equipment – with at least basic training
■ Respiratory protection
MECHANICAL SAFETY
ALWAYS ADHERE TO THE FOLLOWING
RECOMMENDATIONS DURING
INSTALLATIONS:
■ Watch out for any moving parts
■ Do not wear shorts or tank tops, long sleeve shirts and
pants are recommended
■ Jewelry and loose clothing shall not to be worn
when working
■ Always shore the lift before working in the pit
■ There should always be two people present to complete
the installation
■ Never try to lift a cylinder or any other heavy object alone
■ Tie off your personal fall arrest equipment when over 6 ft.
■ Make sure to provide proper barricades as per local
building jurisdictions at every hall entry prior to the
installation of doors with working interlocks
ELECTRICAL SAFETY
ALWAYS ADHERE TO THE FOLLOWING
RECOMMENDATIONS DURING
INSTALLATION:
■ Before working on any electrical circuits remove all metal
object and electrical components you are carrying, i.e. cell
phones, jewelry, tools, keys, etc.
■ Use a proper circuit tester in good working condition
■ Always take the time to check each circuit before
performing any work
■ Assume that all electrical circuits are LIVE unless tested to
prove otherwise
■ Make sure that you are not standing or kneeling on metal
or wet surfaces
■ Use fuse pullers to install and remove fuses
■ When exiting the site, ensure that you use proper lock-out
and tag out procedures so that the elevator is inoperable
when the mechanic is not on-site.
Always work in a safe manner and be aware
of your surroundings.
YOU ARE RESPONSIBLE FOR
YOUR OWN SAFETY!

PAGE 3 of 48
RECOMMENDED TOOLS AND
MATERIALS REQUIRED
Federal Elevator recommends that you have the following
tools and materials available for use during every installation:
STANDARD MECHANICS TOOL KIT:
■ Screwdrivers:
■ Phillips - #1, #2, #3
■ Slotted – ¹⁄₈" (for wiring controller), ³⁄₁₆", ¼"
■ Robertson - #1, #2
■ Set of open wrenches – ⁵⁄₁₆" to ¾"
■ Set of socket wrenches (deep and shallow) – ⁵⁄₁ ₆" to ¾"
■ Exactor knife
■ Locking pliers – small, medium
■ Set of allen keys – Metric and SAE
■ 10" Files - (File Rail joints)
■ Center Punch
■ Hammers
■ Tape measure – Metric / SAE
■ Pry bars – Small, Large
■ Flashlight
■ Carpenters pencils
■ Permanent markers
■ 2 Plumb bobs and lines
■ Chalk line
■ Levels – 4', 2'
■ Extension cords – 50' to 100'
■ Chain hoist or come along – min. ½ ton capacity
■ ½" reversible hand drill
■ Hammer drill
■ Electric grinder
■ Drill bits – Carbide, masonry
■ Hacksaw with ne and coarse blades
■ Chisels
■ Temporary light for shaft
■ Funnel for Oil reservoir
■ Digital multimeter
■ Alligator clips
■ Emery paper- Fine
■ Fuse puller
■ Wire Strippers
■ Wire Ties
■ Rags c/w cleaning solvents
■ Temporary Up + Down Buttons
■ Scaffolding and/or Ladders
■ Safety harness equipment (Fall Arrest)
■ Safety Boots, Safety helmet, safety glasses and gloves
MATERIALS REQUIRED:
■ Wall Anchors to suit project construction
■ 32 Grade Hydraulic Oil - Min. 20 gal.
■ Electrical Tape
■ ½" Aluminum Flex
■ ¹⁄₈" Aluminum ex
■ Marr Connectors
■ Butt Connectors
■ ½" + ¹⁄₈" electrical connectors
■ TEW stranded wire 10 ga. + 18 ga. – This is dependent
on electrical codes
■ Multi-wire cable (wiring for call buttons and interlocks)
■ Wire Ties

PAGE 4 of 48
SECTION 2 – Installation
DELIVERY OF MATERIAL
ACCEPTING THE LIFT
Federal Elevator has taken every care to ensure that the
equipment leaves the factory in excellent condition. Upon
receipt of the material, inspect all components in the
presence of the shipping company. Ensure that there is no
damage to the equipment, wrapping or the crating.
NOTE: Any damages to the equipment, wrapping or
crating should be reported to the carrier immediately
and an email sent to us as soon as possible listing all
of the damages. It is your responsibility to le freight
claims against the carrier for damages to equipment
during shipping.
UNPACKING THE LIFT
Once the lift has been inspected and accepted, an inventory
of all parts must be completed. We recommend that you
compare all components in the shipment against the shipping
list, which can be found in the Installation Package that states
the F number. Should there be any discrepancies between the
shipping list and the shipment, please call 1-905-458-4015
and let us know immediately.
WARNING: Ensure that two (2) people are
available to unpack the lift. Failure to do so
may result is serious bodily harm and/or
damage to equipment.
PRE-INSTALLATION SITE CHECK
Below are a list of site checks and dimensions that shall
be done prior to beginning any installation. If any of these
requirements are not met, notify the site super immediately.
If any dimensions on site are different from those on the
drawings, contact Federal Elevator to conrm whether
alterations need to be made.
SITE CHECK
Prior to installation, the site must be inspected to ensure that it is
ready for you to begin the process. Please check the following:
SHAFT
■ Check that the shaft is square and plumb
■ Conrm the nished shaft length and width with
original dimensions given by customer and Federal
Elevator drawings
■ Conrm the number of oors served
■ Ensure rail bracket supports are exposed (if the supports
are covered by dry wall, the drywall must be cut out so as
to allow the bracket to sit against the supports)
■ Make sure support dimensions are the same as bracket
spacing on drawings
■ Pit oor must be smooth and level where the pit steel sits
■ Check: pit dimension, oor to oor dimension and total
travel dimension
■ Check overhead
■ Ensure no other equipment, or piping are in the shaft,
unless they pertain to the elevator
MACHINE ROOM
■ Conrm that the machine room is in the right location and
on the right oor
■ Ensure that there is a min. clearance of 3'3" in front of any
live circuits, as well as a min. clear height of 7'0" – Or as
per any Local Codes
■ Make sure that main disconnect switch (fused, 3 pole with
auxiliary contact) is live with fuses in place
■ Usually 220 V - single phase, or as per drawing
■ Check that 120VAC – 15 Amp fused disconnect is live
■ Ensure G.F.I. receptacle is installed and working
■ Verify that the light switch and light are working
INSTALLATION PROCEDURE
WARNING: Because of the close tolerances
required with this equipment, the placement
of the guide rail brackets is CRITICAL as
there is no adjustment once the rails are
attached. Therefore you should plumb the rail
brackets as accurately as possible before the
installation of the guide rails.
WARNING: It is advisable to have more than
one person on site during the start-up stage.
RAIL BRACKET INSTALLATION
1. It is very seldom that you come across a plumb and square
shaft so the mechanic must rst establish the “tightest
point” in the shaft. The tightest point is found by dropping
a plumb line from the top landing (from the top landing sill
on the rail wall side) to the pit and taking measurements
from the landing sill to the plumb line at each landing.
The smallest distance to this plumb line will be your
tightest point.
NOTE: Ensure the plumb bob is perfectly still and not
touching the pit oor.
2. Once the tightest point is found, it is time to mark the
center line of the rails. Refer to the plan view of the General
Layout (page 1 of 4) for this dimension.

PAGE 5 of 48
NOTE: This dimension is not a constant and will vary
from job to job depending on the size of the lift.
3. Drop a chalk line from the top of the shaft to the pit oor.
Ensure that your chalk line intersects the center line
marking made from the tightest point. Check that your
measurement at the top and bottom is not smaller than the
tightest point measurement. Once the weight of the chalk
line stops moving, “snap” the chalk line and conrm you
have a clear mark all the way up the shaft.
4. Using this center line mark, make your way up the
scaffolding/ladder and mark the vertical rail support
locations as shown in the General Layout (page 3 of 4).
NOTE: These vertical dimensions do not have to be
exact, they can be moved up or down in case of an
obstruction to a maximum of 80" (2032 mm).
5. Using a 4' carpenters level, mark the hole locations as
seen in Figures 1 or 2 (see page 1 of 4 of the General
Layout drawings to determine what size Distance Between
Guide rails (D.B.G.) your installation requires).
NOTE: Ensure that the marks are level by using the
bubble indicators on the level.
Figure 1 – 30" D.B.G. rail bracket fastening dimensions
Figure 2 – 27" D.B.G. rail bracket fastening dimensions
6. Once your holes are marked, begin to drill holes for
anchors, through bolts, or lag bolts (depending on the
construction of the elevator support wall).
7. ALWAYS begin the installation of the brackets with the top
bracket. Center the bracket with the chalk line mark and
level it off. Tighten the four (4) Through bolts or anchors
and drop a plumb line to the pit on each of the rail bracket
legs, 5 ½" from the wall, see Figure 3
NOTE: for extended rail brackets refer to General
Layout (page 3 of 4) for centerline dimensions. These
centerline dimensions are very critical).
With the two (2) plumb lines hanging, continue to install
the remaining rail brackets. Ensure that you keep the rail
bracket leg centerline dimension constant or within ¼".
Use the plumb lines to as a guide to keep the rail brackets
in line.
Figure 3 - Rail Bracket Leg Centerline
NOTE: Make sure that your rail brackets are perfectly
level and all bolts are tightened. Shimming may be
needed in order to keep your leg centerlines constant.
RAIL INSTALLATION
1. You must install the pit steel before the installation of the
rails can begin.
2. Ensure that the oor is clean and level before installing the
pit steel. If not, use the rails shims provided and shim level
underneath pit steel.
3. The pit steel must be inline with the rail bracket legs. This
is done by using the plumb lines, see Figure 4. The pit
steel is to be secured to the oor after the installation of
the car frame and xing of the guide rails.
Figure 4 - Pit Steel
4. Once the pit steel is set into place, you may begin to stack
the rails.
NOTE: conrm that the faces of the rails are clean
prior to installation.
5. The rst set of rails that should be stacked will have a ½"
hole in at approx. 60" high from pit oor. These holes are
for the bottom dead stops.
NOTE: Rails ends are “tongue and groove”, please
verify that one of the rails is “male” end down and the
other is “female” end down.

PAGE 6 of 48
6. Place the rails in the center of the rail bracket legs and pit
steel brackets and tighten rail clips by hand, center the
rail with the plumb line by eye. Begin by making sure that
you have the proper D.B.G. between the rail faces (see
General Layout for this dimension), shims may be needed
to achieve this dimension.
7. Using a level, level out the front and side faces of the rail.
Always remember to keep your rail centerline (5 ½" or as
per drawing, see Figure 3). Once everything is level and
at the required dimension, tighten the rails to the brackets
using the rail clips.
8. With the rst rails stack in place, the sh plates can be
installed. Always remember to keep the machined face of
the sh plate against the rail. Tighten the eight (8), four (4)
per sh plate, bolts by hand. With the sh plate in place,
the next set of rails can be stacked.
9. Gently bring the next rail down onto the stacked rail until
the tongue and groove match up. Insert the remaining
eight (8), four (4) per sh plate, bolts (M12 x 2") into each
sh plate and tighten by hand.
10. Follow steps 1 to 9 until the rails are completely stacked.
NOTE: Ensure that all sh plate bolts, rail clips and
rail bracket bolts are tight. Check that all rail joints
are mated properly. If necessary, le the rail joints to
ensure a smooth transition.
NOTE: Do NOT use a grinder to le the rail joins.
INSTALLATION OF CYLINDER, SLING ASSEMBLY
AND RELATED EQUIPMENT
1. After the installation of the rails it is time to move onto the
cylinder assembly.
2. The vertical drawings in the General Layout will indicate
the dimension for both the pillar (3" x 3" Steel tubing) and
the cylinder to wall bracket. Anchor the pillar bracket onto
the wall with the appropriate fastening hardware. On top of
the pit steel you will see welded square angles where the
pedestal sits into place.
3. Place the pillar bracket onto the pillar and tighten bolts
(see Figures 5 and 6).
4. Sit the cylinder pillar cup into place. Federal Elevator has
installed a decal which indicates the direction of the cup to
avoid any confusion. The plate of the cup has a diagonal
cut which faces towards the back wall and to the right.
(see Figure 5).
Figure 5 - Cylinder and Pedestal Assembly
Figure 6 - Pit Steel Assembly
5. Prior to lifting the cylinder, and for ease of installation, we
suggest installing the ow control valve, bleeder and
drain elbow ahead of time on the oor. Use high grade
Teon tape to ensure a secure and leak free tting.
NOTE: Refer to Figures 7, 8 and 9 to determine the
correct direction of the valve restricted ow. Please
ensure attention has been paid to this detail.
Figure 7 - Flow Control Valve A
Figure 8 - Flow Control Valve B Figure 9 - Flow Control Valve C

PAGE 7 of 48
6. Lift cylinder using a chain hoist or come along (min.½ ton)
and place into cylinder cup.
7. Install the cylinder bracket provided ensuring that the clamp
is approximately 12" (305mm) below the cylinder head and
pushed as far as you can to the right (see Figure 10).
Figure 10 - Cylinder Bracket Set-Up
8. The sheave assembly can now be mounted to the top
of the cylinder. The cylinder top plate is attached to
the underside of the sheave and must be removed and
fastened to the cylinder head with the ¾" bolt provided
in cylinder. The cylinder top plate is also marked with a
decal which points towards the back of wall. Slide the
sheave between the rails and drop it onto the top cylinder.
There are four ½" hex bolts holding the plate to the sheave.
Fasten them together and tighten all bolts.
NOTE: That this assembly is installed so that the
cylinder is offset towards the back wall and to
the right.
9. The next step is to plumb the cylinder. The sheave has
been designed with slots at each end of the plates that
allow it to be moved ½" in either direction. If necessary,
loosen bolts and shift the top of cylinder over to achieve
your level. Adjust the pillar bracket as necessary to plumb
the shaft. Once this is complete and you are satised the
cylinder is level tighten up the cylinder wall bracket and the
sheave plate.
10. With your scaffolding or ladder still in place, slide the two
³⁄₈" wire ropes through the sheave so both loose ends are
at the bottom of shaft. The sling assembly can now be
installed onto the rails. For shipping purposes these slings
were fastened together.
11. Disassemble sling uprights by removing the four ½" x ¼"
bolts in the top horizontal and bottom safety channel.
Remove the two ¼" bolts from the plank cross braces. Lay
a couple of cinder blocks or pieces of wood on the pit oor
to be used as temporary sling supports inside the shaft.
12. The nished sling will have to be located at the under travel
distance below the lowest landing. The top of the platform
should be approximately 1"- 1 ½" (25-38mm) below the
nished oor of the lowest landing (see Figure 11).
Figure 11 - Sling Set-Up
13. Insert both sling uprights onto the rail with the sling planks
resting on the wood/blocks. Tighten the top horizontal
sling channel to sling uprights by hand and proceed to do
the same for the bottom with the bottom safety assembly.
14. Place a level across the sling planks and ensure that they
are level to one another. Shim if necessary. Once this
is done tighten all eight ½" bolts and attach sling cross
braces together to ensure that the distance between the
legs is constant.
NOTE: The guide shoes should have a clearance of ¹⁄₃₂"
between each guide and rail face.
CABLE INSTALL ATION
1. During the installation of the sheave, your ropes had been
passed through the sheave while the scaffolding or ladder
was in place. It is now time to fasten both ends of the ³⁄₈"
steel cable into the wedge sockets.
NOTE: Federal Elevator pistons are not required to be
raised out of the cylinder prior to roping.
2. We suggest roping the wedge sockets on the dead
end hitch side (Pit Steel) rst. Ideally, manually thread
yours bolts on the shackle rod halfway up so it provides
maximum adjustment in either direction once the ropes
become taunt should adjustment be required.
3. Remove cotter pin from wedge and remove from wedge
socket. Pass your rst rope down through the long side of
the socket and loop the cable back up towards the short
side of the socket. At the same time, insert the wedge
back up through the socket pulling an excess of 18"–24"
(457-610mm) cable past the top of the socket.
4. With the rope clips provided, fasten the excess rope to the
stationary rope together. Ensure the cotter pins are placed
into the shackles and that your rope clips are fastened
properly (Refer to Figure 12).
NOTE: Remember, ‘you never saddle a dead horse’.

PAGE 8 of 48
Figure 12 – Wedge Socket
5. Review your wedge sockets position so that they are not
twisted and running parallel to one another to avoid any
further twisting. You will later need to trim down the excess
length but this is done once you are satised of the nal
adjustments after running the lift is complete.
6. Proceed with the next rope following the same steps
(See General Layout).
7. Now it is time to fasten the rope to the wedge sockets on
the car sling assembly. Make sure that the rst rope you
fastened is aligned correctly with the opposing end.
8. Follow the same steps as earlier and pull the ropes as taut
as possible. This will lessen the platform from dropping
down too far into the pit once tension is applied.
9. Fasten your clips onto the rope and provide same excess
of rope as you did at the pit steel.
10. Roping is now complete and you can proceed in the
machine room to install the pump unit and controller.
PUMP UNIT AND CONTROLLER INSTALLATION
1. Install the hydraulic power unit and x the controller to the
machine room wall (Please refer to the General Layout).
2. Verify that the electrical supply is as required by the
specications and is compatible with the supplied
equipment meeting all local requirements.
3. Read the electrical schematics provided before connecting
motor and other equipment to the power supply (Electrical
Schematics are included in your Installation package).
(Refer to Appendix 3 – Main and Auxiliary Disconnect
and Motor Conection)
4. Once all connections are made and ready electrically,
review the Appendix 2 Temporary Operation Start up
Procedure for up and down direction.
5. Connect the hydraulic hose line or piping (to suit local
code requirements) to the tank unit. It is recommended
with all our hydraulic ttings that Teon tape be used or
an equivalent caliber of pipe dope (hard piping). Be careful
not to block passage of oil with excess Teon tape.
6. Fill the tank with Grade 32 hydraulic oil making sure the oil
will cover the pump/motor unit completely.
7. Dry any excess spillage and inspect tank for any potential
leaks. Check oil level again after the oil is pumped to the
hydraulic cylinder.
Note: The typical amount of oil required is 15 gallons,
this will however, depend upon travel and the size of
the tank.
Completed Machine Room
CAB INSTALLATION
With the slings and cables installed and elevator running, it is
now time to begin installing the cab.
NOTE: It is essential to follow the steps given to
ensure proper installation.
Appendix 4 – Residential Exploded View – Accordion
Doors and Appendix 4A – Residential Exploded View
– Bifold Doors are good points of reference to help you
understand the way the cab and parts of the residential
elevator will t together.
1. Begin by raising the lift approx. 6" to get some tension on
the cables.
2. Remove the tape off of the bottom sling channel to expose
the pivot plate. Unscrew the ¼" nuts on the ¼"-20 x 6" eye
bolt and bring the bottom ¼" nut all the way to the bottom
of the eye bolt and bring the top ¼" nut down so that all of
your thread is up in the air, and tighten by hand.

PAGE 9 of 48
3. Pass the ½" threaded rod through the large slot on the
pivot plate. On the front face of the safety block, there are
a total of 3 bolts. There are two ¼" bolts and one ⁵⁄₁₆" bolt.
Unscrew the ⁵⁄₁₆" x 1" bolt and pass it through the hole in
the pivot plate. With the bolt through the pivot plate hole,
re-screw it back into its original place. Screw the bolt in
half way and then place the smaller pivot plate slot onto
the knurled roller. Tighten the 5/16" bolt all the way and
then loosen it off a couple of turns so that the pivot plate
pivots freely but is not too loose that it may slide off.
4. With the springs compressed and the plate in the normal
position there should be a gap of around ¹⁄₁₆" between the
knurled roller and the face of the guide rail, this should
be the same for both sides. See Figures 13 and 14 for
clarication and nal assembly views.
Figure 13 – Safety Block Attachment
Figure 14 - Safety Block Assembly
5. With the safeties in working order, you must install the
platform onto the slings. Place the platform in the center
of the two slings and 1 ¼" from the oor landing, or as
per drawing sheet 1 of 4 of General Layout. The platform
must be placed at a distance of 10" from the oor to the
platform, or as per drawing ¾ of the General Layout. This
dimension can be larger, but can not be smaller.
NOTE: This dimension is critical to ensure that the lift
will not hit the rail brackets on the way up or down.
6. Make sure platform is level in both directions, if needed,
use shims provided to make level. With the platform in
place and level, insert the four ⅜" x 1 ½" bolts and tighten
them by hand.
Platform Installed
7. Ride the elevator to each landing and check the
dimensions from the landing to the platform edge.
If the tightest point was found at the beginning of the
installation, this will be the landing where your running
clearance will be set. With the clearances all set and the
platform level, the bolts can be tightened.
8. Take the lift for another ride up and down the shaft to
check clearances at every bracket and landing.
9. With the platform set, the cab installation can begin.
NOTE: Do not remove (if provided) cab wall shims
around perimeter of platform. These are designed to
suit oor to sill allowance.
10. The control wall must be mounted onto the platform rst.
Before placing the control wall onto the platform, a few
things need to be done. Firstly, all of the switches and cab
wiring must be uncoiled from around the car station box
and passed over the top of the control wall so that it lies
on the front face.
11. The Safety Switch (the side of the switch will be marked
‘Safety Switch’) which is attached to the bottom of the car
station box must be passed behind the slings along with
the travel cable.
12. You must then uncoil the travel cable and make sure there
are no kinks in it. Pass the end in between the cylinder and
the left guide rail (when facing the slings). As you pass the
travel cable through, walk the control wall into place. There
are two holes at the bottom of the walls for ¼" bolts to
pass through. In your hardware package we have provided
two ½" x 6" threaded rods. These are passed through the
vertical tabs which are welded onto the top of the control
wall, and they attach to the horizontal tabs welded to the
slings. Use ½" locks, ats and nuts to x these together.
13. Using your level, make sure that the control wall is
completely plumb before continuing to the next wall.
14. After control wall is secured and leveled, mount back walls
and fasten to control wall using the ¼" bolts provided.
Position side wall in place and fasten to back wall using ¼"
hardware. The ceiling can now be placed on cab walls. Pre
drilled holes have already been provided in the ceiling. Use
¼" bolts to fasten into place. Once the ceiling is secured,
the car door can be installed.
PAGE 10 of 48
ACCORDION DOOR INSTALLATION
1. Accordion gate can be slid through the accordion car gate
track (previously mounted on the cab ceiling).
2. Bolt the car gate shroud onto control wall face where holes
have been provided. Once secure, fasten accordion gate to
car gate shroud.
NOTE: A car gate shroud is not provided for platforms
over 36", the gate is fastened directly to the back of
the return wall. On all return walls Federal Elevator has
provided ¼" x 3" Lag Bolts for fastening.
3. If applicable, mount automatic car gate operator to ceiling.
You will nd holes predrilled in ceiling where operator was
mounted in our plant.
4. Locate into position and secure with wood screws.
5. Attach arm from accordion gate leading edge to gate
operator. There will be two countersunk machine screws
that attach to operator when cover has been removed.
NOTE: All elevators with accordion gates MUST have
an Infrared Light Curtain installed running along the
entrance of the cab. Refer to Appendix 5 for Infrared
Curtain Assembly.
BIFOLD GATE INSTALLATION
Similar to the Accordion door, the bifold door has been
predrilled into the track and prepared for nal installation.
Refer to `Appendix 4A – Residential Exploded View –
Bifold Doors.
2-SPEED DOOR INSTALLATION
Refer to Appendix 6 for 2-Speed Door Installation which
has instructions and diagram which will help you with
installation of the 2 speed doors.
Note: You must ensure that the cab is square and
plumb and that all bolts are tight before moving onto
the cab electrical part of the installation.
CAB ELECTRICAL
Before any other components are installed, make sure to
install the ‘Safety Switch’. This switch should have been
passed back behind the bottom.
TRAVEL CABLE INSTALLATION
1. With the cab built and plumb, run the lift up on temporary
controls so that you can get underneath the lift and Install
the travel cable and hanger.
2. The travel cable hanger is usually placed on the wall
opposite the rail wall (if it cannot be placed on this
wall, place it on any other wall where there is no risk of
interference).
3. The height of the travel cable hanger is based on your
travel and is installed using the following calculation:
Equation 1 - Travel cable hanger location
4. Once height is determined, mount the travel cable hanger
using the 4 holes provided.
5. After travel cable hanger has been attached, pass the
travel cable through the slings onto the sling cross braces,
(See Figure 15).
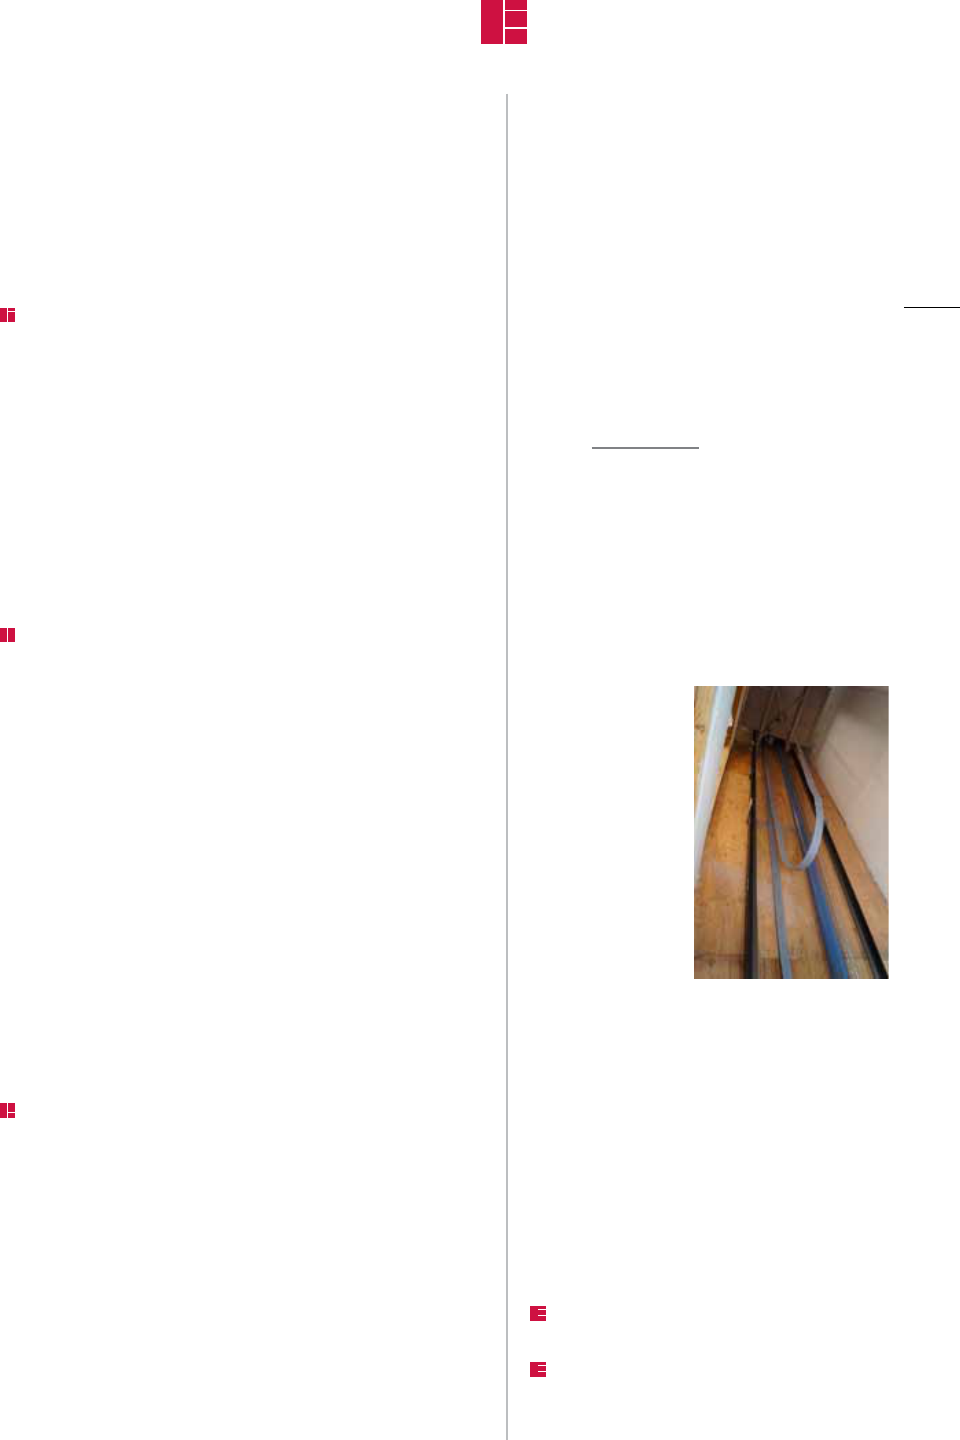
Figure 15 – View from under the cab, notice the way the travel
cable hangs from cab.
6. Pass the travel cable into the slots of the hanger and
replace the cover.
7. To get a proper hang, bring the elevator to the bottom oor
and make sure the cable does not hit the oor and is not
pulled. Once this has been conrmed, take the lift to the
top oor and make sure that the travel cable is not pulling.
8. Ensure that when you are traveling up the shaft, the cable
has a nice loop with no kinks.
NOTE: Your elevator may be equipped with a at or
round travel cable.
NOTE: The travel cable hanging could be done as
the next step after installing the control wall on
the platform.
TRAVEL
2
+ 1 FOOT (305MM)

PAGE 11 of 48
SWITCH MOUNTING
1. Switch mounting brackets are already placed in the proper
location for you. All switches and switch brackets are
marked with stickers for easy installation. Straighten out all
switch cables (switches should be on ceiling) and separate
each switch. The switch brackets are located either on the
cab wall or on the top inside of the slings.
2. Simply match the switch to the marking on the bracket and
tighten the switch onto the bracket. Make sure to secure
the loose switch cable so that it does not get caught
on anything.
HOISTWAY AND HALL STATION WIRING
Please refer to Appendix 8 Hoistway Prewiring Drawing or
Electrical Schematics for all hoistway and Hall Station wiring
connections.
TAPEHEAD MOUNTING/MAGNET INSTALLATION
1. Locate an area as close to the rail as possible that can
accommodate the footprint of the unit for the entire length
of the shaft. Refer to Appendix 7 Tapehead Mounting.
2. Mount the top clamp retainer so the center of the tube
correspond to where you want the center of the tape to be
located. Mount it high so that the sensor unit will not hit
the top clamp at the furthest extent of up overtravel.
3. Mount the bottom clamp retainer so the center of the tube
is plumb with the top retainer tube. Mount it low enough so
the sensor unit will not hit the bottom clamp at the furthest
extent of down overtravel.
4. Drill a ⅜" clearance hole in the center of the tape about 2"
from the end. Install the top clamp on this end of the tape
with 3 at ⅜" bolts. There will be about 1" of extra tape;
bend it slightly to clear the threaded rod.
5. Install the top clamp into the top clamp retainer tube with
a washer and two hex nuts as shown. For now, have the
hex nuts at the end of the threaded rod. Carefully unroll the
tape and let it hang.
NOTE: You can save some time by sliding the sensor
up the tape and tying it off at the top of this point.
6. Install the bottom clamp into the bottom clamp retainer
tube with washers, spring and hex nuts as shown. For now,
have the hex nuts about 1" from the end of the threaded
rod. Put a wedge of scrap material between the clamp and
the clamp retainer to compress the spring about ½". Refer
to Appendixes 7 Tapehead Mounting, 7A Four Stop
Magnet Placement, 7B Three Stop Magnet Placement,
and 7C Two Stop Magnet Placement.
7. Pull the tape tight. Mark the tape to correspond to the
center hole of the clamp, and drill a ⅜" clearance hole.
Cut the tape at least 2" beyond the hole.
8. Remove the wedge and adjust the top clamp so the spring
is compressed about ¾". Tape should be hanging straight.
Tighten all nuts and bolts.
TAPEHEAD MAGNET AND VALVE ADJUSTMENT
NOTE: The valve should be adjusted completely before
applying the magnets to the steel tape.
1. Before loading the car, make sure that it moves smoothly in
the down direction by using the emergency lowering valve.
2. Start by adjusting the relief valve and make sure that you
have the correct operation pressure and that the car can
move up in the rated load speed.
3. Adjust the bypass following the Appendix 9 Blain Valve
Adjustment Sheet provided with your Installation Package.
4. Adjust the high speed for both directions, before adjusting
the slow speed.
5. Federal Elevator has mounted 4 LED’s (marked A,B,C,D) to
show the situation of the coils (A,B,C,D). The proper LED
energizes when the related coil energizes. For example,
if the elevator is moving ion the high speed in the up
direction, both LED’s A & B are energized, the same for
coils A & B. If the elevator is moving high speed in the
down direction, both LED’s C & D are energized, the same
for coils C & D.
6. Please refer to Appendix 9 Blain Valve Adjustment Sheet
for more details about the valve and the coil function.
7. It is best to perform the speed adjustment before
operating the automatic however, by removing the jumper
between terminals (A & B) and the jumper between
terminal (C & D) the elevator can travel up and down
(temporarily) in slow speed.
8. If a top of the car inspection station provided, you can use
it instead of temporary operation to mount the magnets.
Please note that another adjustment is required after
turning the operation into automatic. This adjustment
includes the acceleration and deceleration in both
directions (up and down). The up levelling speed also
needs to be adjusted.
9. After the high and slow speed are adjusted properly in
both directions, you can start applying the magnets. Refer
to the tapehead magnet drawings for their placement
(Refer to Appendixes 7 Tapehead Mounting, 7A Four
Stop Magnet Placement, 7B Three Stop Magnet
Placement, and 7C Two Stop Magnet Placement).

PAGE 12 of 48
10. After magnets have been mounted, level the car at each
oor and ensure that all of the sensors (LD/LDZ, HDZ
and LU) are energized while the elevator is level.
11. Refer to Appendixes 7 Tapehead Mounting, 7A Four
Stop Magnet Placement, 7B Three Stop Magnet
Placement, and 7C Two Stop Magnet Placement
to conrm proper magnet location.
12. When the elevator is ready to be turned onto automatic,
it is time to do the second valve adjustment for the
acceleration, deceleration and the nal leveling speed
if applicable.
13. To check the valve and tapehead magnet adjustment, start
by sending the elevator to the intermediate oor.
INTERLOCK INSTALLATION
1. Remove cover plate, from the lock.
2. Mark a line 72" (1823mm) from the oor (
NOTE: this
dimension could change depending on door height),
this is to the center of the lock. Mark another line at
approximately ⅜" (9.5mm) from the door in its closed
position to the front face of the lock base.
3. The door keeper is to be installed ¹⁄₈" (3mm) from the
bottom of the locking mechanism in the energized position
(at its maximum vertical height).
4. Mount the lock cover plate.
Figure 16 – Locked position Figure 17 – Unlocked position
Figure 18 – Cover plate Figure 19 – Door keeper
Once all shaft and hall station cables are run into the
controller, refer to the Electrical Schematics for all
wiring information.
UNINTERRUPTED POWER SUPPLY (UPS) INSTALLATION
To install the UPS in your controller, please ensure that
all power is turned off. Refer to Figures 20 and 21 and the
important notes following.
Figure 20 – Close up of the back of UPS Figure 21 – Top of UPS
NOTE: The UPS is to be connected only AFTER the
elevator is in working order and in automatic operation
with all of the wiring complete.
NOTE: Be sure to test the UPS before connecting
it to the controller to ensure that it gives the
required voltage.
NOTE: Never use the Bypass plugs in the UPS. We
have placed a large red X in Figure 20 to help you
understand which are the bypass plugs.
NOTE: Keep plug and receptacle connected unless an
external mounted UPS back-up is available.
NOTE: Never plug the UPS into the wall, only plug it
into the controller.

PAGE 13 of 48
FINALIZING THE INSTALLATION
Once installation has been completed, we recommend going
through the following steps to ensure that the elevator is in
safe working order:
1. Ensure all temporary operation buttons and jumpers have
been removed from the controller.
NOTE: This step is crucial, please complete rst.
2. Run the elevator to ensure smooth operation.
3. Test all safety features to be certain that they are in good
working operation: Door switches, hall door interlocks,
slack rope switch, pit switch, top of car stop switch, in
car stop switch and any other safety device applicable to
the elevator.
4. Double check all safety circuits and switches to ensure
safe operation.
5. Ensure that the home owner is provided with a
demonstration on how to run the elevator and given any
keys required.
6. Provide the home owner with the Owner’s Manual and ll
in your contact information

PAGE 14 of 48
SECTION 3 – Adjustments
and Troubleshooting
TAPEHEAD MAGNET AND VALVE ADJUSTMENT
QUICK GUIDE
The LCD is an optional part that can be added to the PLC,
enabling the user to change a memory location value or to
monitor and troubleshoot a problem. The screen will display
a message specically describing the nature of the fault.
(See Figure 22).
Values which could be controlled by the elevator user include
the following:
1. Changing the door opening time (A minimum of 1 second
and maximum of 20 seconds).
2. Changing the power door (slide or swing), same for the car
gate operator. Or turning the power door off at a selected
oor without changing the wiring.
3. Changing the maximum tripping time for the low oil
timer; a minimum of 30 seconds, and a maximum of
180 seconds.
Figure 22 - LCD
Apply and adjust the magnets as shown in the Appendices 6,
6A, 6B and 6C.
To check the level and tapehead magnet adjustment, begin
by sending the elevator to the intermediate oor, below are
some possible problems and their source of the problem.
1. If you experience the elevator stopping above the level in
both directions – Try moving the door zone magnet down.
2. If you experience the elevator stopping below the level in
both directions. – Try moving the door zone magnet up.
3. If you experience the elevator stopping above the level
when it goes in the up direction, but below the level when
it goes in the down direction. Try the following:
■ Decrease the slow speed in both directions.
■ Ensure that all of the sensors (LD, LU, DZH, & DZL) are
energized when the elevator is level with the oor.
If the above does not work, refer to the Appendices 6, 6A, 6B
and 6C.
4. If the elevator stops above the oor in the up direction and
stops level with the oor in the down direction. Try the
following:
■ Decrease the leveling speed in the up direction.
■ Decrease the low speed in the up direction.
■ Decrease the setting of the pump delay timer if LCD
screen provided.
5. If the elevator stops level in the up direction and below
level in the down direction. Try the following:
■ Move the door zone magnet up, the elevator will stop
level in the down direction but above the oor in the up
direction. Go back to step 4 and also make sure that
the down direction slow speed is not high.
6. If the elevator is stopping below the oor in the
up direction and stops level in the down direction.
Try the following:
■ Increase the leveling speed in the up direction.
■ Increase the low speed in the up direction.
■ Increase the setting of the pump delay timer if LCD
screen provided.
7. If the elevator will stop level in the up direction and above
the level in the down direction. Try the following:
■ By moving the door zone magnet down the elevator will
stop level in the down direction but below the oor in
the up direction. Go back and do step 6.
8. If the elevator stops below the oor in the up direction &
above the oor in the down direction, try the following:
■ The door zone magnet is too long.
■ The slow speed is too low in both directions.
9. For nal adjustment, you may need to adjust the
acceleration & the deceleration. This may affect the
leveling (within ¹/8"), but by readjusting the slow speed you
can get the elevator to stop level.
For the top and the bottom oor, use the same procedure
which was used for the intermediate oor.
NOTE: The PLC will not allow the elevator to move in
the slow speed more than 10 sec, within this time the
elevator should reach the oor level.

PAGE 15 of 48
TROUBLESHOOTING PROCEDURES
QUICK GUIDE
1. Access machine room.
2. Locate the elevator and inspect for any damages to
the equipment.
3. Inspect each call station for damage and they are in the off
position (if key required).
4. Test the elevator hall doors and ensure that they are all
closed and locked
5. With the proper meter, determine that the main line voltage
is correct and check the main fuses.
6. Check the position of the motor overload device if in the
off position; look for poor connections at control or motor,
or a failure in any of the main contactors.
7. Test all fuses in the controller with the proper meter. If any
fuses are open, check the wiring print to determine the
cause and location of the circuit and switches.
8. Test the hoistway circuit to determine if any switches
are open with the proper meter (do not under any
circumstances jump out any part of these circuits with a
jumper wire or by any other tool).
9. If the elevator will go down but not up check the ‘UP’
terminal switch.
10. If the elevator will go up but not down check the ‘DN’
terminal switch and down coil.
11. Call Federal Elevator Systems Inc. (1-905-458-4015)
if none of the above recties the problem.
QUICK FIX GUIDE FOR TYPICAL PROBLEMS
The elevator moves in the down direction but will not
move or accept calls in the up direction
■ Check if the power relay has de-energized
■ Check if the overload has tripped
■ Check if the phase protection relay has tripped
(if applicable)
■ Check if the low oil timer has tripped
Motor turning but no pressure:
■ Conrm the up coils are energized. If yes, check the
voltage and compare it with the rated voltage on the coils.
■ Conrm that the motor is turning freely in the right
direction (clockwise).
■ Adjust the Bypass and the relief as per the Appendix 9
Blain Valve Adjustment Sheet.
■ Conrm the valve up adjustments are correct.
Down coils energizes but elevator not moving:
■ Conrm that the shut-off valve is open.
■ Check the setting of the ow control valve.
■ Conrm that the valve down adjustments are correct.
■ Conrm that the safety block is not engaged.
■ Conrm that the adjustment of the low pressure switch
is correct.
■ Check the voltage and compare it with the rated voltage
on the coils.
Elevator is missing the bottom oor (sitting in the pit):
■ The slow speed may be set too high.
■ It may be missing some or all of the door zone signals
(Possible reasons: short magnet, wrong location or
polarity of the magnet, wrong location of the switches
or the cams which may be causing the switch to not
engage mechanically).
■ It could be that it is missing the oor limit signals.
■ It may be missing the slowdown limit signals.
■ The nal limit switch may be located in the wrong place.
Elevator is missing a oor:
■ It could be missing one or more of the door zone signals.
■ It could be missing the oor limit (position) signals.
■ It could be missing the slowdown limit signals.
Elevator is missing the top oor:
■ The pump delay adjustment could be too high. While
Federal Elevator will pre-set the pump delay in the factory
before shipping, the setting could have changed. Conrm
that it is set to 0.2 seconds, this could be adjusted from the
LCD screen.
■ The valve leveling speed could be set too high during the
pump delay timing, lower the levelling speed.
■ The elevator could be missing some or all of the door
zone signals, go back and check that they are in the
right location.
■ Could be missing the oor limit (position) signals.
■ Could be missing the slowdown limit signals.
■ Final limit cam could be installed in the wrong area.

PAGE 16 of 48
Elevator is bouncing in the up direction:
■ There could be mechanical resistance due to a
mechanical issue.
■ Valve may require pressure adjustment.
■ Ensure that the motor data plate and the power supply
match and that they pump mechanical specication
is suitable.
■ The up acceleration could be set too low.
■ There may not be enough oil in the tank.
■ Rails may need to be lubricated with oil.
Elevator is bouncing in the down direction:
■ There could be mechanical resistance due to a
mechanical issue.
■ Valve may require better adjustment in the down direction.
■ Low pressure switch may need adjustment.
■ There could be air in the cylinder, bleed the cylinder to see
if this xes the problem.
■ Rails may need to be lubricated with oil.
Elevator is stuck between oors:
■ One or more of the electromechanical safety contact is
open (for example: door contact, gate contact, safety
switch contact or low pressure switch contact).
■ A fuse could be blown.
NOTE: the monitoring from the PLC software may
cause the elevator to stop at any position for example:
the low oil timer or the overload is enabled however,
after a few seconds, the controller will register an
automatic call to the bottom oor to allow exit from
the elevator. Elevator may shutdown at the bottom
oor level and needs to reset the PCL to re-operate.
If the problem comes back, then some parts are not
functioning will and may require replacement.
Door interlock unlocking Solenoid not energizing:
■ No power to the Solenoid – It may be missing some or all
of the door zone or the position signals. There may be no
power from the 24V feeding fuse (F24) or the fuse could be
blown. The software may not be permitting the Solenoid
to energize due to illegal signals (For example: a jumper
detected or 2 position signals at the same time).
■ The door interlock unlocking the Solenoid has power but
it is buzzing – Possible voltage drop in the wiring: Federal
Elevator supplies permanent duty 24VDC Solenoid with
momentarily operation of 12 seconds (this is adjustable).
Check your shaft connection.
RESIDENTIAL CONTROLLER PLC
INPUTS & OUTPUTS
This section explains the basic function of the inputs and
outputs for the Federal Elevator Residential Controller.
GENERAL INFORMATION
The Federal Elevator Residential Controller (GR) is a controller
system designed by Federal Elevator to operate both
hydraulic units (1 to 4 coil valve) and electric drum units.
The operation of the elevator can be either automatic or
constant pressure.
The controller has been designed to operate up to 4 stops
with 2 automatic car gate operators, 4 automatic hall door
operators as well as electric strikes. However, it is possible to
provide customized controller options beyond our standard.
Federal Elevator always saves the required default setting data
on the PLC during the testing stage in our factory. Changing
this data on site is possible by using the LCD screen tool which
is provided initially to the dealer on their rst order (See Figure
22). This tool is removable and can be used on any Federal
Elevator PLC controller. Care must be taken when changing
the data parameters using this tool as any mistake will result
in an elevator shutdown situation. For example, if the job is
installed with a 4 coil valve but the data parameters have been
accidently set up for a 2 coil valve, then the PLC will receive
signals from the B and C coils causing the redundancy to trip in
less than 1 second. The same is true if the job is installed with
a 2 coil valve but the data parameters have been accidently set
up for a 4 coil valve.
INPUT SUMMARY
X0
This input energizes when the elevator is at the 3
rd
Floor Limit
(position) area. It activates the 3
rd
oor reading and setting
even when the elevator is moving. This signal is monitored by
the General Sensor Monitoring Timer in the PLC.
When the elevator is moving and passing this oor, this signal
should not energize for more than 7 seconds or the PLC will
stop the elevator. If the elevator is slowing down at this oor,
it should arrive at the oor level within 5 seconds or the PLC
will stop it automatically from the slowdown monitoring timer.
If the elevator starts moving from this oor, the position signal
should de-energize within 10 seconds (this includes the pump
bypass time) otherwise the start monitoring timer in the PLC
will stop the elevator.
X1
This input energizes when the elevator is at the 2
nd
oor Limit
(position) area. It activates the 2
nd
oor reading and setting
even when the elevator is moving. This signal is monitored by
the General Sensor Monitoring Timer in the PLC. When the
elevator is moving and passing this oor, this signal should

PAGE 17 of 48
not energize for more than 7 seconds or the PLC will stop
the elevator. If the elevator is slowing down at this oor, it
should arrive at the oor level within 5 seconds or the PLC will
stop it automatically from the slowdown monitoring timer. If
the elevator starts moving from this oor, the position signal
should de-energize within 10 seconds (this includes the pump
bypass time) otherwise the start monitoring timer in the PLC
will stop the elevator.
X6
This input energizes when the elevator is at the 1
st
Floor Limit
(position) area. It activates the 1
st
oor reading and setting
even when the elevator is moving. This signal is monitored by
the General Sensor Monitoring Timer in the PLC.
If the elevator is slowing down at this oor, it should arrive
at the oor level within 5 seconds or the PLC will stop it
automatically from the slowdown monitoring timer. If the
elevator starts moving from this oor, the position signal
should de-energize within 10 seconds (this includes the pump
bypass time) otherwise the start monitoring timer in the PLC
will stop the elevator.
X7
This input energizes when the elevator is at the Top Floor
Limit (position) area. It activates the 4
th
oor reading and
setting even when the elevator is moving. This signal is
monitored by the General Sensor Monitoring Timer in the
PLC.
If the elevator is slowing down at this oor, it should arrive
at the oor level within 5 seconds or the PLC will stop it
automatically from the slowdown monitoring timer. If the
elevator starts moving from this oor, the position signal
should de-energize within 10 seconds (this includes the pump
bypass time) otherwise the start monitoring timer in the PLC
will stop the elevator.
X2 & X3
Main Door Zone Signals operated from the related door
zone relays.
X4 & X5:
Auxiliary Door Zone Signals and Level Correction Signals.
The main door zone signals and the auxiliary door zone
signals have multi-functions. In order to activate any opening
command after the elevator has performed a complete stop
you need a oor signal and at least one of the auxiliary door
zone signals.
The opening command controls the opening of any car or hall
door in addition to the electrical strike and electrical interlock.
The LEVEL CORRECTION could be performed after the
elevator makes a complete stop and the oor signal is active.
Both of the main door zone signals and at least one of the
auxiliary door zone signals are required.
When the elevator enters the designated oor area, it uses
the position magnet to slow down. If that position signal is not
working for any reason, the elevator will slowdown from the
auxiliary door zone signals (UL or DL). Then it will stops when
both (UL & DL) ENERGIZE at the same time.
Once the elevator stops, missing any of the main door zone
signals or the position signal will cause the elevator to:
■ Deactivate any opening command
■ Deactivate any re-leveling or level correction command
■ Register an automatic call to the bottom oor
Sequence for Inputs X4 and X5:
A. When the elevator arrives at the required oor level it
slows down in order to perform the complete stop. The
slowdown could be either from the oor position or the
Door Zone magnet when one of the Auxiliary Door Zone
signal (X4 or X5) are energized. The maximum slow down
time is from 5 to 10 seconds. If the elevator does not reach
the oor level within this time, it will stop automatically.
In this case:
1. If the elevator is more than 2" away from the oor level,
it will travel to the bottom oor to reset.
2. If the elevator is less than 2" away from the oor level,
it will re-level as mentioned in section C below.
NOTE: the up maximum slow down timer is different
from the down maximum slow down timer and both
are adjustable by using the LCD screen. Federal
Elevator has saved the default settings at 10 seconds
for both directions.
IMPORTANT EXAMPLE:
Question: What would happen if you register a call to all
available oors with the following conditions?
■ Elevator is at the bottom level
■ Door Zone magnets are mounted on all oors
■ Position magnet is mounted only at the bottom oor
Answer: The elevator will travel, slow down and stop at each
oor with the Door Zone magnets working as a counter. The
power doors (hall or car) will not open. The EMI interlock
solenoid or the electric strike will not energize and the
elevator will not perform the re-leveling even though it is
stopped at the oor level. This explains the oor counter
operation from the Door Zone magnet signal.
PAGE 18 of 48
IMPORTANT EXAMPLE:
Question: What would happen if you register a call to all
available oors with the following conditions?
■ Elevator is at the bottom level
■ Door Zone magnet is only mounted at the bottom oor
■ Position magnets are mounted on all oors
Answer: The elevator will travel and slow down when the proper
position magnet energizes. Since the maximum slow speed time
is limited, the elevator will stop level by adjusting the maximum
slow down timers (T55 for the Up direction and T54 for the Down
direction in the PLC software). This should be done at 50-60%
of the full cab load and only after nishing all valve adjustments.
Note that no power doors (car of hall) will open. The EMI
interlock solenoid or the electric strike will not energize and the
elevator will not perform the re-leveling function.
NOTE: It is recommended to have all magnet mounted
as shown in the related drawing. Refer to Appendixes
7 Tapehead Mounting, 7A Four Stop Magnet
Placement, 7B Three Stop Magnet Placement, and
7C Two Stop Magnet Placement.
B. Inputs X2, X3, X4, X5 and only one of the position signals
should be energized when the elevator is at the oor level.
C. If only X4(or X5) is de-energized but X3, X4 and only one
of the position signals still on, the elevator will perform
the re-leveling and it will stop when X2, X3, X4 and X5 are
all energized.
Additional Information:
1. The re-leveling starts only after the elevator stops.
2. When the safety circuit is made, the re-leveling will start
and continue up to a maximum of 20 attempts. If the
elevator level cannot be corrected, it will travel to the
bottom oor to reset.
3. If any of the door contacts are opened or if the stop push
button in the car station is turned to the off position, the
number of the re-leveling is unlimited
4. For a Hydraulic elevator: the maximum re-leveling time
is 10 sec followed by 1 second interval to check if any
contacts are welded. If so, the elevator will shut down.
5. For the Drum Unit: the maximum re-leveling time is 1
second followed by 5 second interval to allow the drive to
reset to zero and to check if any contacts are welded.
X10, X11, X16 & X17:
During the automatic operation, all the above inputs are to be
energized in order for the elevator to start. Jumping the safety
in the controller may cause the software to trip the operation
for 1 hour from the time the jumper is removed. Re-cycle the
power to reset.
X16
Signal from the nal limit switch.
This signal energizes when all the safety contacts before the
terminal (FINAL) are energized.
X17
Signal from the hall door contact switch.
This signal energizes when all the hall door contacts are made
in addition to all the safety contact before the terminal (FINAL)
are energized.
If some contacts of the safety circuit are open (e.g. pit switch
and or the 1
st
oor hall door contact) jumping the safety
between terminal LOW AND E-CT will cause input X17 to
energize without input X16. This will stop the elevator from the
PLC. Reset to re operate.
X10 AND X11
These signals may be either from the 2
nd
set of the hall door
contact switches or the signal from the car gate operator
contact. This signal energizes when all the safety contacts are
made up.
If some contacts of the safety circuit are open (e.g. pit switch
and/or the 1
st
oor hall door contact), jumping the safety
between terminal + and terminal E-L will cause inputs X10 &
X11 to energize without inputs X16 & X17. This will stop the
elevator from the PLC. Reset to re operate.
Inputs X10 & X11 should always have the same state (either
both on or both off) otherwise the PLC will stop the operation
The inputs X10 & X11 have 4 possibilities as shown:
SIGNALS G GX Redundancy
INPUTS X10 X11
POSSIBILITIES 1 ON ON OK
2 ON OFF Will Trip
3 OFF ON OK
4 OFF OFF Will Trip
X12 & X13:
A – Hydraulic controller
In hydraulic controller, signals X12 & X13 are operated from
the up contactors. Both U & UX contactors should be in the
same position. Therefore, both inputs X12 & X13 are to be
energized or de-energized at the same time. Please note if
both contactors U & UX fail in the energized or de-energized
position at the same time the PLC will detect this failure.
B – Drum controller
This is the exact same operation as the hydraulic controller
but the names of the contactors (relays) are UD and UDX. The
contactors UD and UDX energize in both directions of travel.

PAGE 19 of 48
NOTE: If both of the contactors U & UX (or UD & UDX)
are energized manually, the PLC will detect the wrong
signals and shut the elevator down.
X14
Power Supply Signal
Input X14 is required to be energized in order for the
elevator to move up but it is not required for the elevator
to move down.
X15
Call Common Signal
Input X15 is required to be energized in order to operate
in automatic mode. It is activated from the temporary/
automatic key switch (Located on the PC board, see electrical
schematic) when this key switch is turned to automatic.
X20, X21, X22 & X23
Floor Call Signals (1
st
oor, 2
nd
oor, 3
rd
oor and 4
th
oor
respectively).
They are usually operated from the car or the hall
push buttons.
NOTE: If the temporary/automatic key switch not in the
automatic position, call will not be registered even if a
jumper had been used directly to the above mentioned
terminals.
X100, X101, X102 & X103:
A – Hydraulic
The inputs X100, X101, X102 and X103 are operated from the
valve terminals A, B, C and D in order to monitor the valve.
Inputs X100, X101, X102 and X103 should have the same state
as the outputs Y100, Y101, Y102 and Y103.
NOTE: If the up coil valve signals are operated from
the PLC without the contactors U & UX, the PLC will
stop the operation after 1 sec even if the inputs X100 &
X101 match the signals from the outputs Y100 & Y101.
B – Drum
X101: Drive is running
X102: Signal from the drive (failure)
X104, X105, X106 & X107:
They energize when terminals W1, W2, W3 & W4 are
energized. If any electrical strikes are powered by use of a
jumper, the elevator will stop the operation
X110:
Door open push button signal.
X111:
Signal from the temporary operation.
If it is on, the elevator will not accept to register an automatic
call even if a jumper used from terminal PLC directly to the
call inputs X20 thru X23
OUTPUTS SUMMARY
Y0 and Y1:
Hydraulic Drum
Y0 Up moving command Up – Down moving
command
Y1 AUX Up moving command AUX Up – Down
moving command
Both outputs should have the same state causing the
2 related contactors or relays to energize otherwise the
elevator will stop after 1 second. the related monitoring
inputs should energize within 1 second. Also, the other
related outputs and inputs should energize within 1 second
(see inputs X100 thru X103 and outputs Y100 thru Y103).
Y2
High Speed: Not used in the standard application
Y3
Slow Speed: Not used in the standard application
Y4, Y5, Y6 & Y7
Call Register Light.
Energizes when a call is permitted to be registered. If the
power is turned off and the UPS is still turned on, a call can
be registered in the down direction to a lower level only.
Y10, Y11, Y12 & Y13
Position Indicator outputs that illustrates the elevators
position in the hoistway.
The digital position indicator is ashing when the elevator is
travelling and solid when the elevator is at the oor level.
Y14
1
st
Car Gate Operator Open Relay Command
Y15
2
nd
Car Gate Operator Open Relay Command
When the elevator stops at a oor level and the signal is sent
to the automatic car gate operator to open, the GR1 relay
(operated from Y14) and the GR2 relay (operated from Y15)
will energize according to PLC pre-setting. The relays GR1 &
GR2 are used in the related car power door operator to open
the door.

PAGE 20 of 48
Example: You purchase an elevator with 2 openings having
sliding doors. The rst opening is for oors 1, 2 & 4 while the
second opening is for oor 1, 3 & 4.
When the elevator arrives to a oor and stops at the oor
level, the open command is initiated depending on the
designated oor.
■ The relays will be in the following states:
■ At the 1
st
oor both of the relays GR1 & GR2 will energize.
■ At the 2
nd
oor only the GR1 relay will energize.
■ At the 3
rd
oor only the GR2 relay will energize.
■ At the 4
th
oor both of the relays GR1 & GR2 will energize.
Y16
Automatic Car Light.
When it energizes, the related AL relay in the car station
energizes to TURN OFF the light. In order for the Y16 to
energize and turn off the light: the elevator should time up
to 5 min (300 sec) in normal operation and all the safety
contacts are made. No software monitoring or software
safety is activated, the elevator is at the door zone with all the
required door zone signals are on, no call registered.
Y17
Level correction, Re-leveling Enabled.
If the elevator stops within 2" (50mm) above or below the
designated oor level, the elevator will automatically correct
itself. Y17 energizes to activate the RLVL & RLVLX relays to
operate the level correction. This requires the elevator to be
in automatic operation and it is designed to allow for the car
and hall door contacts to be open. The same applies for the
car stop push button or switch.
Y100, Y101, Y102 & Y103
Hydraulic: Valve terminals A, B, C & D.
A: Up slow speed coil
B: Up high speed coil
C: Down high speed coil
D: Down slow speed coil
Drum: Up & Down command.
Y104, Y105, Y106 & Y107
EMI Interlock or Electric Strike Terminals.
Energizes at the designated oor with only one output
energized at each time. These will activate the door open
command. The PLC is designed so that placing jumpers on
any of the above terminals will cause the opening command
and the elevator to shut down.
COMMON INPUTS AND OUTPUTS DURING AUTOMATIC
OPERATION (2 STOP)
1. When the elevator is at the rst oor level with all doors
closed, the inputs X2, X3, X4, X5, X6, X10, X11, X14, X15,
X16, X17 are illuminated.
The output Y10 is also illuminated.
2. Pushing the 1
st
oor hall call push button will energize X20
momentarily and energize the 1
st
oor hall door Interlock
solenoid (input X104 energizes and outputs Y104, Y14 &
Y4 energize). This will also cause the hall door contacts
to open (Inputs X17 will drop) and the automatic car gate
contact, if applicable, will open (Inputs X10 & X11 will drop).
3. Close the hall door and wait for the car door to close fully.
All the inputs and the outputs will go back to normal. See
item 1 above.
4. Pushing the second oor call will cause the input X21
to energize momentarily and the output Y5 to latch. The
outputs Y0 & Y1 energize to operate the up contactors.
The outputs Y100 & Y101 will also energize to operate the
A & B coils.
5. Inputs X12 & X13 will energize right away or within 1 sec.
If not, the elevator call will be cancelled.
6. Inputs X100 & X101 will energize right away or within
1 sec. If not, the elevator call will be cancelled.
7. The elevator starts moving (or it will shut down within 5 sec)
8. The DL signal will de-energize (input X5)
9. The DZL signal will de-energize (input X3)
10. The DZH signal will de-energize (input X2)
11. The UL signal will de-energize (input X4)
12. The P1 signal will de-energize (input X6)
13. If any of the above signals remain energized within 5 sec
from the time the elevator starts moving, the elevator
will shut down and the LCD screen will indicate a tape
head failure.
14. Between oors the output Y10 will be turned off and the
output Y11 will start ashing
15. The elevator will start to enter the 2
nd
oor area, input X1
will energize causing the elevator to slow down. Output
Y11 will latch and output Y101 and input X101 will de-
energize. This will be followed by inputs X5, X3, X2 & X4
energizing. The elevator now is at the 2
nd
oor level. The
output Y100 and the input X100 will de-energize after
a 0.4 second pump delay. The outputs Y0 & Y1 will de-
energize causing the elevator to stop level

PAGE 21 of 48
16. The output Y105 and input X105 will energize while the
inputs X10, X11, X17 and output Y5 will de-energize. If an
automatic car gate operator is installed then output Y14
and/or Y15 will energize.
17. After few seconds, outputs Y14, Y15 and Y105 as well as
input X106 will de-energize. The car door will start to close
and the interlock will engage.
18. At this point, your inputs will be: X1, X2, X3, X4, X5 in
addition to X10, X11, X14, X15, X16 and X17.
COMMON INPUTS AND OUTPUTS DURING AUTOMATIC
OPERATION (3 STOPS)
1. When the elevator is at the rst oor level with all doors
closed, the inputs X2, X3, X4, X5, X6, X10, X11, X14,
X15, X16, X17 are illuminated. The output Y10 is also
illuminated.
2. Pushing the 3
rd
oor hall call push button will energize X22
momentarily and output Y6 will energize. The elevator will
start moving up with Y11 ashing.
3. As the elevator enters the 2
nd
oor area, the input X1 and
output Y11 will energize. Because a 3
rd
oor call was
placed, the elevator will continue passed the 2
nd
oor call.
When passing the 2
nd
oor, the inputs X2, X3, X4 and X5
will energize. When the elevator is passed the 2
nd
oor the
inputs will de-energize in the owing order: X5, X3, X2, X4
and X1.
4. As the elevator approaches the 3
rd
oor area, the input
X0 energizes causing the elevator to slow down. Output
Y12 energizes, output Y101 de-energizes and input X101
de-energizes initiating the slowdown speed.
5. X5, X3, X2 and X4 will energize when the elevator has
reached the oor.
6. The output Y100 and Input X100 will de-energize after
a 0.4 second pump delay. The output Y0 and Y1 will
de-energize causing the elevator to stop.
MAINTENANCE GUIDELINE
The schedule for maintenance on this unit is to be arranged
by the local service company; however, it is recommended
that the following inspections and adjustments (if required)
be carried out at regular intervals not exceeding 90 days.
NOTE: Please check all local codes or authorities to
ensure that you are following the correct guidelines,
regulations and codes while performing your
elevator maintenance.
CHECK THE MACHINE ROOM FOR THE FOLLOWING:
Check the tank unit for the following:
1. That there is no oil leakage around the control valve
2. That there is no oil leakage around the hydraulic
hose joints
3. Check the minimum oil level when elevator is at the
top oor
4. That the oil tank is clean and dry
5. Check expiry date of hose line
Check the controller for the following:
1. Loose terminal connections
2. Burnt or frayed wiring
3. Excessive dust buildup
4. Loose relays and bases
5. Ensure that the controller is clean of any debris
6. Ensure that the emergency battery has not exceeded
its expiry date
INSPECT THE SHAFT FOR THE FOLLOWING:
Check the shaft for the following:
1. That the guide rail brackets, rails and clips are secure
2. That the guide rail sh plates are secure
3. Ensure that all limit switches are secure
4. Check lights and outlets to ensure that they are functioning
5. That all piping and ttings are secure
6. That the pit is clean and dry
7. That the hoisting ropes are undamaged
8. That rope attachments and rope clips are secure

PAGE 22 of 48
9. That the guide rails are sufciently lubricated
Inspect the hydraulic cylinder for the following:
1. Ensure that there are no scratches to piston
2. That the wiper seal is not leaking excessive oil
3. If applicable, ensure that the oil return hose is connected
4. Check that the cylinder and pillar brackets are secure
Inspect the piston follower for the following
(if applicable):
1. That the piston sheave guide shoes are secured
2. That there is sufcient lubrication to the guide shoes
3. That the piston sheave is level
TESTING THE SAFETY DEVICES – THIS SHOULD BE
COMPLETED ON EACH SERVICE CALL
Inspect the top of car for the following:
1. That all attachments are secure
2. That travel cables are hanging properly
3. That conduits and piping are not damaged
4. That the car top is clean and dry
5. If applicable, check top of car inspection station to
ensure that the light works and you can run on top of
car inspection
Inspect the door frames for the following:
1. That all frames are secure and not damaged
2. That door interlocks are attached rmly
3. That door hinges are lubricated
4. That the door view panel is intact
5. That door gibs are secured
6. That the spring door closer is attached rmly to slow door
Inspect each landing entrance for the following:
1. That the button face plate is secure
2. That call buttons are operating as normal
Inspect the inside of the car for the following:
1. That lights are working
2. That the face plate secure
3. That all indicator lights and buttons are functioning
4. That all walls and handrails are secured
5. If applicable, that the telephone is working
6. Disconnect power to test that the emergency light works
7. Check oor level stops for accuracy

PAGE 23 of 48
APPENDIX 1 – RESIDENTIAL 3" X 5" RULE
APPENDICES

PAGE 24 of 48
APPENDIX 2 - TEMPORARY OPERATION START UP PROCEDURE
During temporary operation: some fuses may be not mounted to the sockets by Federal before shipping!! Only after completing all
the connections to the controller, the above fuses should be mounted with the power OFF (including the POWER PACK) in order to
start the automatic operation.
The PLC protection cover is to be removed before placing the elevator in service in order to allow the air to ventilate the PLC.
During installation: the TEMPORARY – AUTOMATIC switch (where applicable) should be in the temporary position and is not to
be turned into automatic until all of the temporary jumpers are removed.
■ Before making any connections, make sure that:
a. There is enough starting power for the motor and the controller.
b. And that the 110V (+ or - 5%) AC volts from a separate disconnect switch.
■ Connect the ground wire from the main switch to the ground of the proper terminal in the controller (10 AWG).
■ Both the main disconnect switch and the 110V disconnect switch are OFF:
a. Connect the wires from the main switch to the terminals of the proper contactor (see sticker in the controller).
b. Connect the wires from the 110V disconnect switch to the proper terminals in the controller; making sure that AC2 (or N)
is the neutral (use the white wire), and that AC1 (or H) is the (HOT-LIVE) line (use the black wire).
c. Connect the wires from the proper terminals in the controller into the auxiliary contact in the main disconnect switch
(and remove the jumper).
d. Turn the 110V power on to ensure that you have the correct voltage between AC1 and AC2 (or H and N).
e. Turn the main power on to ensure that you have the correct voltage between (L1 & L2), (L1 & L3), and (L2 & L3).

PAGE 25 of 48
APPENDIX 3 – MAIN AND AUXILIARY DISCONNECTS AND MOTOR CONNECTION

PAGE 26 of 48
APPENDIX 4 – RESIDENTIAL EXPLODED VIEW – ACCORDION DOORS

PAGE 27 of 48
APPENDIX 4A – RESIDENTIAL EXPLODED VIEW – BIFOLD DOORS

PAGE 28 of 48
APPENDIX 5 – INFRARED CURTAIN ASSEMBLY

PAGE 29 of 48
APPENDIX 6 – TWO SPEED DOOR INSTALLATION
INSTALLATION ILLUSTRATION
500297
( FOR TWO SPEED HALL ENTRANCE )
AVT Beckett Elevator Ltd.
Beckett Elevator Ltd.

PAGE 30 of 48
APPENDIX 7 TAPEHEAD MOUNTING

PAGE 31 of 48
APPENDIX 7A FOUR STOP MAGNET PLACEMENT

PAGE 32 of 48
APPENDIX 7B THREE STOP MAGNET PLACEMENT
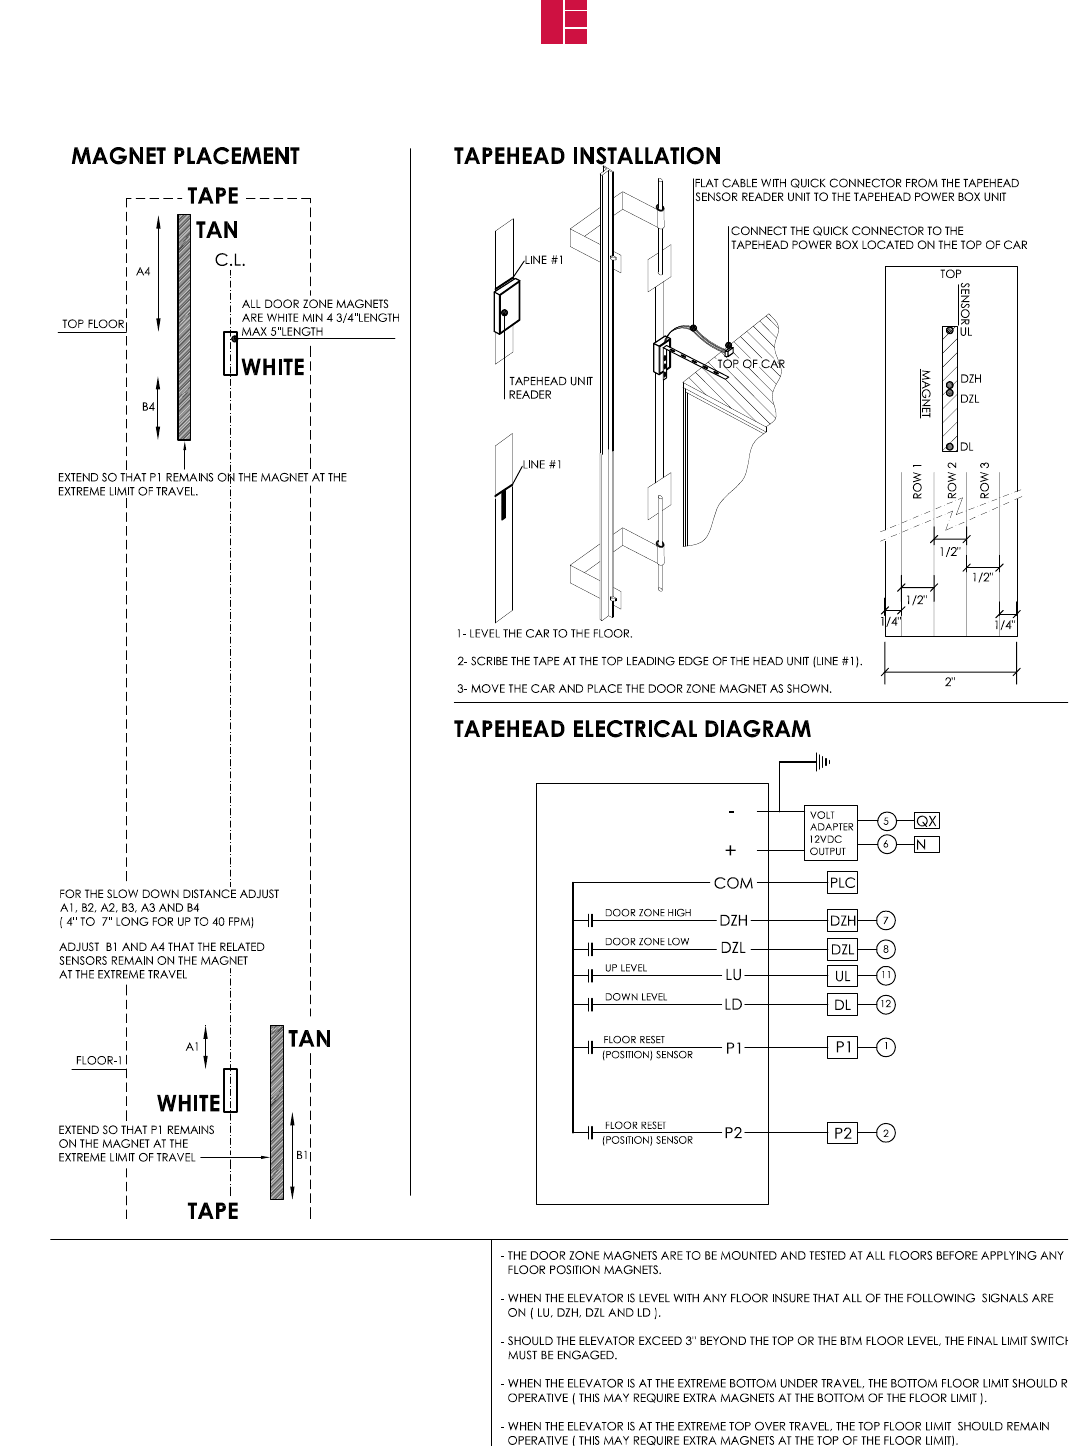
PAGE 33 of 48
APPENDIX 7C TWO STOP MAGNET PLACEMENT

PAGE 34 of 48
APPENDIX 8 HOISTWAY PREWIRING DRAWING

PAGE 35 of 48
APPENDIX 9 BLAIN VALVE ADJUSTMENT SHEET
34 268
10
Z1
139
37
22
103
37,5
54
EV 100
¾“ EV 1 ½“ & 2“ EV 2 ½“ EV
EN ISO 9001
2 ½“ EV
¾“ EV 1 ½“ EV
EV 100 EV 100
GmbH
Pfaffenstrasse 1 Tel. 07131 2821-0
Boellinger Hoefe Fax 07131 485216
74078 Heilbronn http://www.blain.de
Germany e-mail:[email protected]
B44
EN 81-2
Z1
120
55 9
54
90
TP
Z1
20 55
13
3 x M6
10 100
15
21,5
63,5
99
29
118,5
Z
26 216
Z1
29
78
54110
26
55
70
89
43,5
29
180
85
50
53,5
41
18938
3 x M10
Z
101
P
T
Z1
EV 100
PT
Z
63
210
110
130
62
Z1
3 x M10
34
151
65
75
29
198
Simple Responsive Adjustment Self Cleaning Pilot Line Filters
Temperature and Pressure Compensation Self Cleaning Main Line Filter (Z-T)
Solenoid with Connecting Cables Built-in Turbulence Suppressors
Pressure Gauge and Shut Off Cock 70 HRc Rockwell Hardened Bore Surfaces
Self Closing Manual Lowering 100% Continuous Duty Solenoids
Technical Data: ¾“ EV 1 ½“ & 2“ EV 2 ½“ EV
Flow Range: l/min 10-125 (2-33 USgpm) 30-800 (8-208 USgpm) 500-1530 (130-400 USgpm)
Pressure Range: bar 5-100 (74-1500 psi) 3-100 (44-1500 psi) 3-68 (44-1000 psi)
Press. Range CSA: bar 5-100 (74-1500 psi) 3-70 (44-1030 psi) 3-47 (44-690 psi)
Burst Pressure Z: bar 575 (8450 psi) 505 (7420 psi) 340 (5000 psi)
Pressure Drop P–Z: bar 6 (88 psi) at 125 lpm 4 (58 psi) at 800 lpm 4 (58 psi) at 1530 lpm
Weight: kg 5 (11 lbs) 10 (22 lbs) 14 (31 lbs)
Oil Viscosity: 25-60 cSt. at 40°C (104°F). Max. Oil Temperature: 70°C (158°F)
Solenoids AC: 24 V/1.8 A, 42 V/1.0 A, 110 V/0.43 A, 230 V/0.18 A, 50/60 Hz. Insulation Class, AC and DC: IP 68
Solenoids DC: 12 V/2.0 A, 24 V/1.1 A, 42 V/0.5 A, 48 V/0.6 A, 80 V/0.3 A, 110 V/0.25 A, 196 V/0.14 A.
Description
Available port sizes are ¾“, 1 ½“, 2“ and 2 ½“ pipe threads, depending on ow. EV 100‘s start on less than minimum load and
can be used for across the line or wye-delta starting. According to customers‘ information, valves are factory adjusted ready for
operation and very simple to readjust if so desired. The patented up levelling system combined with compensated pilot control
ensure stability of elevator operation and accuracy of stopping independent of wide temperature variations.
EV 100 valves include the following features essential to efcient installation and trouble free service:
The BLAIN EV 100 program includes the widest range of options offered to the elevator industry for high performance
passenger service. Easy to install, EV 100‘s are smooth, reliable and precise in operation throughout extreme load and
temperature variations.
Elevator Control Valves
Manufacturer of the Highest Quality:
Control Valves for Elevators
Tank Heaters - Hand Pumps
Pipe Rupture Valves - Ball Valves

PAGE 36 of 48
APPENDIX 9 BLAIN VALVE ADJUSTMENT SHEET
BLAIN HYDRAULICS
2
B44
EV 100
EV 10
EV 1
EV 0
EN 81-2
Optional Equipment
EN Emergency Power Solenoid
CSA CSA Solenoids
KS Slack Rope Valve
BV Main Shut-Off Valve
HP Hand Pump
DH High Pressure Switch
DL Low Pressure Switch
CX Pressure Compensated Down
MX Auxiliary Down
Up Up to 0.16 m/s (32 fpm). 1 Up Speed.
Up Start is smooth and adjustable.
Up Stop is by de-energising the pump-motor.
Down Up to 1.0 m/s (200 fpm). 1 Full Speed and 1 Levelling Speed.
All down functions are smooth and adjustable.
¾" 1 ½" and 2" EV 2 ½"
Up Up to 0.16 m/s (32 fpm). 1 Up Speed.
Up to 0.4 m/s (80 fpm) by overtravelling and levelling back down.
Up Start is smooth and adjustable.
Up Stop is smooth and exact through valve operation whereby
the pump must run approx. ½ sec. longer through a time relay.
Down Up to 1.0 m/s (200 fpm). 1 Full Speed and 1 Levelling Speed.
All down functions are smooth and adjustable.
EV Control Valve
Types
USA Patent No. 4,637,495
Pats & Pats Pend: France, Germany,
Italy, Japan, Switzerland & U.K.
USA Patent No. 4,637,495
Pats & Pats Pend: France, Germany,
Italy, Japan, Switzerland & U.K.
Up Up to 1.0 m/s (200 fpm). 1 Full Speed and 1 Levelling Speed.
Up Start and Slow Down are smooth and adjustable.
Up Levelling speed is adjustable.
Up Stop is by de-energising the pump-motor.
Down Up to 1.0 m/s (200 fpm). 1 Full Speed and 1 Levelling Speed.
All down functions are smooth and adjustable.
Up
Up to 1.0 m/s (200 fpm). 1 Full Speed and 1 Levelling Speed.
All 'up' functions are smooth and adjustable.
Up Levelling speed is adjustable.
Up Stop is smooth and exact through valve operation whereby
the pump must run approx. ½ sec. longer through a time relay.
Down Up to 1.0 m/s (200 fpm). 1 Full Speed and 1 Levelling Speed.
All down functions are smooth and adjustable.
USA Patent No. 4,601,366
Pats & Pats Pend: France, Germany,
Italy, Japan, Switzerland & U.K.
USA Patent No. 4,601,366
Pats & Pats Pend: France, Germany,
Italy, Japan, Switzerland & U.K.

PAGE 37 of 48
APPENDIX 9 BLAIN VALVE ADJUSTMENT SHEET
BLAIN HYDRAULICS
3
EV 1
EV 10
EV 100
EV 0
Adjustments UP
1. By Pass: When the pump is started, the unloaded car should remain stationary at the oor for a period of 1 to 2 seconds
before starting upwards. The length of this delay is determined by the setting of adjustment 1. 'In' (clockwise) shortens
the delay, 'out' (c-clockwise) lengthens the delay.
2. Up Acceleration: With the pump running, the car will accelerate according to the setting of adjustment 2. 'In' (clockwise)
provides a softer acceleration, 'out' (c-clockwise) a quicker acceleration.
Up Stop: The pump-motor is de-energised. There is no adjustment.
Alternative Up Stop with Over-travel: The motor is de-energised at oor level. Through the ywheelaction of the pump-
motor drive the car will travel to just above oor level. In overtravelling the oor, down levelling solenoid D is energised,
lowering the car smoothly back down to oor level where D is de-energised.
S Relief Valve: 'In' (clockwise) produces a higher, 'out' (c-clockwise) a lower maximum pressure setting. After turning 'out',
open manual lowering H for an instant.
Important: When testing relief valve, do not close ball valve sharply.
1. By Pass: When the pump is started and solenoid A energised, the unloaded car should remain stationary at the oor for
a period of 1 to 2 seconds before starting upwards. The length of this delay is determined by the setting of adjustment
1. 'In' (clockwise) shortens the delay, 'out' (c-clockwise) lengthens the delay.
2. Up Acceleration: With the pump running and solenoid A energised as in 1, the car will accelerate according to the setting
of adjustment 2. 'In' (clockwise) provides a softer acceleration, 'out' (c-clockwise) a quicker acceleration.
5. Up Stop: At oor level, solenoid A is de-energised. Through a time relay the pump should run approx. ½ second longer
to allow the car to stop smoothly by valve operation according to the setting of adjustment 5. 'In' (clockwise) provides a
softer stop, 'out' (c-clockwise) a quicker stop.
Alternative Up Stop: At relatively higher speeds, the car will travel to just above oor level. In overtravelling the oor,
down levelling solenoid D is energised, lowering the car smoothly back down to oor level where D is de-energised.
S Relief Valve: 'In' (clockwise) produces a higher, 'out' (c-clockwise) a lower maximum pressure setting. After turning 'out',
open manual lowering H for an instant.
Important: When testing relief valve, do not close ball valve sharply.
1. By Pass: When the pump is started and solenoid B energised, the unloaded car should remain stationary at the oor for
a period of 1 to 2 seconds before starting upwards. The length of this delay is determined by the setting of adjustment
1. 'In' (clockwise) shortens the delay, 'out' (c-clockwise) lengthens the delay.
2. Up Acceleration: With the pump running and solenoid B energised as in 1, the car will accelerate according to the setting
of adjustment 2. 'In' (clockwise) provides a softer acceleration, 'out' (c-clockwise) a quicker acceleration.
3. Up Deceleration: When solenoid B is de-energised, the car will decelerate according to the setting of adjustment 3. 'In'
(clockwise) provides a softer deceleration, 'out' (c-clockwise) a quicker deceleration.
4. Up Levelling: With solenoid B de-energised as in 3, the car will proceed at its levelling speed according to the setting
of adjustment 4. 'In' (clockwise) provides a slower, 'out' (c-clockwise) a faster up levelling.
Up stop: The pump-motor is de-energised. There is no adjustment.
S Relief Valve: 'In' (clockwise) produces a higher, 'out' (c-clockwise) a lower maximum pressure setting. After turning 'out',
open manual lowering H for an instant.
Important: When testing relief valve, do not close ball valve sharply.
1. By Pass: When the pump is started, and solenoids A and B energised, the unloaded car should remain stationary at
the oor for a period of 1 to 2 seconds before starting upwards. The length of this delay is determined by the setting of
adjustment 1. 'In' (clockwise) shortens the delay, 'out' (c-clockwise) lengthens the delay.
2. Up Acceleration: With the pump running and solenoids A and B energised as in 1, the car will accelerate according to
the setting of adjustment 2. 'In' (clockwise) provides a softer acceleration, 'out' (c-clockwise) a quicker acceleration.
3. Up Deceleration: When solenoid B is de-energised, whilst solenoid A remains energised, the car will decelerate according
to the setting of adjustment 3. 'In' (clockwise) provides a softer deceleration, 'out' (c-clockwise) a quicker deceleration.
4. Up Levelling: With solenoid A energised and solenoid B de-energised as in 3., the car will proceed at its levelling speed
according to the setting of adjustment 4. 'In' (clockwise) provides a slower, 'out' (c-clockwise) a faster up levelling.
5. Up Stop: At oor level, solenoid A is de-energised with solenoid B remaining de-energised. Through a time relay the
pump should run approx. ½ second longer to allow the car to stop smoothly by valve operation according to the setting
of adjustment 5. 'In' (clockwise) provides a softer stop, 'out' (c-clockwise) a quicker stop.
S Relief Valve: 'In' (clockwise) produces a higher, 'out' (c-clockwise) a lower maximum pressure setting. After turning 'out',
open manual lowering H for an instant.
Important: When testing relief valve, do not close ball valve sharply.
Valves are already adjusted and tested. Check electrical operation before changing valve settings.
Test that the correct solenoid is energised, by removing nut and raising solenoid slighty to feel pull.
Nominal Settings: Adjustments 1 & 4 approx. level with ange faces. Up to two turns in either direction may then be necessary.
Adjustments 2, 3 & 5 all the way 'in' (clockwise) then two turns 'out' (c-clockwise). A small nal adjustment may be necessary.
Warning: Only qualified personell should adjust or service valves. Unauthorised manipulation may result in injury,
loss of life or damage to equipment. Prior to servicing internal parts, ensure that the electrical power is switched off and residual
pressure in the valve is reduced to zero.

PAGE 38 of 48
APPENDIX 9 BLAIN VALVE ADJUSTMENT SHEET
5
D C B A
4
BLAIN HYDRAULICS
V
X
Y
W
U
8 97
4
1
2
TP
Z1
Z
Z1
Z1
6
H
3
S
M1
M1
D C A B
S
5
2
1
34
9
6
8
D C B A
6
8
9 7 4
3
5
2
S
1
KS
Positions of Adjustments EV 100 1½", 2", 2½"
Adjustments UP
1 By Pass
2 Up Acceleration
3 Up Deceleration
4 Up Levelling Speed
5 Up Stop
Adjustments DOWN
6 Down Acceleration
7 Down Full Speed
8 Down Deceleration
9 Down Levelling Speed
Adjustments DOWN
Valve Types Elements Omitted
EV 0 A, B, W, 3, 4 & 5
EV 1 B, W, 3 & 4
EV 10 A & 5
EV 100 as shown
Control Elements
A Solenoid (Up Stop)
B Solenoid (Up Deceleration)
C Solenoid (Down Deceleration)
D Solenoid (Down Stop)
H Manual Lowering
S Relief Valve
U By Pass Valve
V Check Valve
W Levelling Valve (Up)
X Full Speed Valve (Down)
Y Levelling Valve (Down)
KS Option
Valves are already adjusted and tested. Check electrical operation before changing valve settings.
Test that the correct solenoid is energised, by removing nut and raising solenoid slightly to feel pull.
Nominal Settings: Adjustments 7 & 9
approx. level with ange face. Two turns in either direction may then be necessary.
Adjustments 6 & 8
turn all the way 'in' (clockwise), then 1.5 turns 'out' (c-clockwise). One nal turn in either direction may be necessary.
Horizontal Sections
6. Down Acceleration: When solenoids C and D are energised, the car will accelerate downwards according to the setting of
adjustment 6. 'In' (clockwise) provides a softer down acceleration, 'out' (c-clockwise) a quicker acceleration.
7. Down Speed: With solenoids C and D energised as in 6 above, the full down speed of the car is according to the setting of
adjustment 7. 'In' (clockwise) provides a slower down speed, 'out' (c-clockwise) a faster down speed.
8. Down Deceleration: When solenoid C is de-energised whilst solenoid D remains energised, the car will decelerate according to
the setting of adjustment 8. 'In' (clockwise) provides a softer deceleration, 'out' (c-clockwise) a quicker deceleration. Attention:
Do not close all the way in! Closing adjustment 8 completely (clockwise) may cause the car to fall on the buffers.
9.
Down Levelling: With solenoid C de-energised and solenoid D energised as in 8 above, the car will proceed at its down levelling
speed according to the setting of adjustment 9. 'In' (clockwise) provides a slower, 'out' (c-clockwise) a faster down levelling speed.
Down Stop: When solenoid D is de-energised with solenoid C remaining de-energised, the car will stop according to the setting
of adjustment 8 and no further adjustment will be required.
KS Slack Rope Valve: Solenoids C and D must be de-energised! The KS is adjusted with a 3 mm Allan Key by turning the screw
K 'in' for higher pressure and 'out' for lower pressure. With K turned all the way 'in', then half a turn back out, the unloaded car
should descend when Manual Lowering H is opened. Should the car not descend, K must be backed off until the car just begins
to descend, then backed off a further half turn to ensure that with cold oil, the car can be lowered as required.
Warning: Only qualied personnel should adjust or service valves. Unauthorised manipulation may result in injury,
loss of life or damage to equipment. Prior to servicing internal parts, ensure that the electrical controller is switched
off and residual pressure in the valve is reduced to zero.
Vertical Section
M1 Second pressure gauge connection, ½"
Z1 Pressure switch connection, ¼"
Important: Length of ¾“ thread on pump
connections should not be longer than 17 mm!

PAGE 39 of 48
APPENDIX 9 BLAIN VALVE ADJUSTMENT SHEET
5
BLAIN HYDRAULICS
EV 0
EV 1
EV 10
7
DH
DL
RS
ES
8
X
F
HP
V
1
U
9
H
Y
KS
DC
6
M
S
2
EV 100
B
3
A
5
BV
W
4
EN
6
8
9
8
7
2
1
5
5
A
C
D
CD
6
8
9
8
7
2
1
CD
6
8
9
8
7
2
1
3
B
4
5
A
CD
6
8
9
8
7
2
1
4
3
B
7
DH
DL
RS
ES
8
X
F
HP
V
1
U
9
H
Y
KS
DC
6
M
S
2
B
3
BV
W
4
EN
7
DH
DL
RS
ES
8
X
F
HP
V
1
U
9
H
Y
KS
DC
6
M
S
2
A
5
BV
EN
7
DH
DL
RS
ES
8
X
F
HP
V
1
U
9
H
Y
KS
DC
6
M
S
2
BV
EN
EV
Z1
Z1
Z1
Z1
Elevator Valves
Control Elements
A Solenoid (Up Stop) U By Pass Valve
B Solenoid (Up Deceleration) V Check Valve
C Solenoid (Down Deceleration) W Levelling Valve (Up)
D Solenoid (Down Stop) X Full Speed Valve (Down)
H Manual Lowering Y Levelling Valve (Down)
S Relief Valve F Filter
Hydraulic Circuit Electrical Sequence
Adjustments UP
1 By Pass
2 Up Acceleration
3 Up Deceleration
4 Up Levelling Speed
5 Up Stop
Adjustments DOWN
6 Down Acceleration
7 Down Full Speed
8 Down Deceleration
9 Down Levelling Speed
MOTOR
MOTOR
MOTOR
MOTOR

PAGE 40 of 48
APPENDIX 9 BLAIN VALVE ADJUSTMENT SHEET
US gpm.
US gpm.
5 10 15 20 25 30 35
20 40 60 80 100 120 140
50 100 150 200 250 300 350 400 20 40 60 80 100 120 140 160 180 200
200 400 600 800 1000 1200 1400 1600 100 200 300 400 500 600 700
1
1
7
S
01
02
03 04
06
05
0
12 3
45
6
8 9
10
UF
MM
M
DR
MO
DF
DN
DK
DG
DS
MM
AD
AR
M
MO
AN
AS
AH
AF
3+5+6
2
S
H
8
FS
FS
Y
XX D
SMMS
SESF SZ SO
EV
HO
UD UOU 1E EO FO1F
W6 VF FO 4F FS 4E EO
FO 7F
9F
7O7EF UOXO
4
5
6
3
8
9
H
A+B
C+D
6 mar 11 BLAIN HYDRAULICS Designers and Builders of High Quality Valves for Hydraulic Elevators Printed in Germany
EO9E
KS
1 ½" & 2" 2 ½"
¾"
US gpm.
l/min.
l/min.
l/min.
SK
9
7
4
C+D A+B
¾" 1 ½" 2 ½"
FO 26x2P 47x2.5P 58x3P *
EO 9x2P 9x2P 9x2P
UO 26x2V
39.34x2.62V
58x3V
WO 5.28x1.78V 5.28x1.78V 5.28x1.78V
VO 23x2,5V 42x3V 60x3V **
7O 5.28x1.78P 9x2P 9x2P
XO 13x2V 30x3V 47x3V
HO 5.28x1.78V 5.28x1.78V 5.28x1.78V
SO 5.28x1.78P 5.28x1.78P 5.28x1.78P
MO 26x2P 26x2P 26x2P
O-Ring: V - Viton
P - Perbunan
50
40
30
20
10
0
700
600
500
400
300
200
100
50
40
30
20
10
0
700
600
500
400
300
200
100
50
40
30
20
10
0
700
600
500
400
300
200
100
FD
2
VO
WO
W
bar
psi psi
barbar psi
V
DC
AB
5
1
2
6
8
3 97
DC
AB
H
S
H
S
5
1
2
4
97
4
6
8
3
DC
AB
5
1
2
4
3
H
S
97
6
8
{
Pos. No. Item
FS Lock Screw - Flange
FO O-Ring - Flange
1F Flange - By Pass
EO 0-Ring - Adjustment
1E Adjustment - By Pass
UO 0-Ring - By Pass Valve
U By Pass Valve
UD Noise Suppressor
UF Spring - By Pass
2 Adjustment - Up Acceleration
3 Adjustment - Up Deceleration
EO 0-Ring - Adjustment
4E Adjustment - Up Levelling
4F Flange - Check Valve
FO 0-Ring - Flange
VF Spring - Check Valve
W Up-Levelling Valve
WO 0-Ring - Up Levelling Valve
VO Seal - Check Valve
V Check Valve
W6 Screw - Check Valve
3 Adjustment - Up Stop
3 Adjustment - Down Acceleration
7F Flange - Down Valve
FO 0-Ring - Flange
7O 0-Ring - Adjustment
7E Adjustment - Down Valve
UO 0-Ring - Down Valve
XO Seal - Down Valve
X Down Valve
XD Noise Suppressor
F Main Filter
8 Adjustment - Down Deceleration
EO 0-Ring - Adjustment
9E Adjustment - Down Levelling
9F Spring - Down Valve
Y Down Levelling Valve
H Manual Lowering - Self Closing
HO Seal - Manual Lowering
SE Adjustment - Screw
SM Hexagonal
MS Grub Screw
SO 0-Ring - Nipple
SZ Nipple
SF Spring
SK Piston
MM Nut - Solenoid
AD Collar - Solenoid
M Coil - Solenoid (indicate voltage)
AR Tube - Solenoid 'Up'
MO 0-Ring - Solenoid
AN Needle - 'Up'
AF Spring - Solenoid 'Up'
AH Seat Housing - 'Up'
AS Seat - Solenoid Up'
MM Nut - Solenoid
M Coil - Solenoid (indicate voltage)
DR Tube - Solenoid 'Down'
MO 0-Ring - Solenoid
DF Spring - Solenoid 'Down'
DN Needle - 'Down'
DK Core - Solenoid
DG Seat Housing with Screen-'Down'
FD Filter Solenoid
DS Seat - Solenoid 'Down'
Some parts occur more than once in different
positions of the valve.
EV Spare Parts List
Static pressure with empty car.
Static pressure with empty car.
Static pressure with empty car.
Static pressure with empty car.
Adjustments
In case of down leakage, replace and test in the following order:
DS & DN , XO , VO , WO , FO + HO .
Flow Valves
F Do not remove!
Solenoid Valves
0-Ring-Size
No.
* FO by 4F 2½" is 67x2.5P
** 90 Shore
Flow Guide Selection Charts
To order EV 100, state pump ow, empty car pressure (or ow guide size) and solenoid voltage.
Example order: EV 100, 380lpm, 18 bar (empty), 110 AC ≡ EV 100/4/110AC
Taper threads: Do not exceed 8 turns of piping
into the valve connections.

PAGE 41 of 48
APPENDIX 9 BLAIN VALVE ADJUSTMENT SHEET
KV
EN ISO 9001
GmbH
Pfaffenstrasse 1 Tel. 07131 2821-0
Boellinger Hoefe Fax 07131 485216
74078 Heilbronn http://www.blain.de
Germany e-mail:[email protected]
EN 81-2
KV2S
P
Z
T
3.2 kg
KV2P
P
Z
T
2.5 kg
KV1S
P
Z
T
2.3 kg
P
Z
T
1.8 kg
B44
KV1P
KV 1/2" solenoid valves are designed for small hydraulic lifts operating at speeds up to 0.16 m/s (32 fpm) depending on the
valve selected. The smooth and accurate ride characteristics of the KV2S valve which includes 'soft stop' in both directions,
render it highly suitable for quality home lifts and lifts for the handicapped.
Flow Range: 5-80 l/min. (1.3-20 gpm) - see fl ow pressure charts on page 6 Pressure Range: 3-100 bar (45-1500 psi)
Oil Viscosity: 25-60 mm²/sec. at 40°C (15-35 cSt. at 120°F) Burst Pressure: 500 bar (7500 psi)
Solenoids AC: 24 V/1.8 A, 42 V/1.0 A, 110 V/0.5 A, 230 V/0.18 A, 50/60 Hz Max. Oil Temperature: 70°C (158°F)
Solenoids DC: 12 V/2.1 A, 24 V/1.1 A, 42 V/0.6 A, 80 V/0.3 A, 125 V/0.25 A, 196 V/0.14 A.
Ports: P Pump, Z Cylinder and T Tank all G1/2"
Insulation Class, AC and DC: IP 68
Control Valves for Small Lifts
Speeds max. (EN code)
Up One up speed, 0.16 m/s (32 fpm) max.
Up start has built-in damping.
Up stop has no damping (pump stops).
Down One down speed, 0.16 m/s (32 fpm) max.
Down start has adjustable damping.
Down speed is adjustable.
Down stop has built-in damping.
Up One up speed 0.16 m/s (32 fpm) max. with soft stop,
or 0.4 m/s (80 fpm) max. with overtravel and releveling.
Up start has built-in damping.
Up stop has adjustable damping (delayed pump stop required).
Down One down speed, 0.16 (32 fpm) max.
Down start has adjustable damping.
Down speed is adjustable.
Down stop has built-in damping.
Up One up speed, 0.16 m/s (32 fpm) max.
Up start has built-in damping.
Up stop has no damping (pump stops).
Down Two down speeds, 1 m/s (200 fpm) max.
Down start has adjustable damping.
Fast down speed and leveling speeds are adjustable.
Slow down and stop have built-in damping.
Up One up speed, 0.16 m/s (32 fpm) max. with soft stop,
or 0.4 m/s (80 fpm) max. with overtravel and releveling.
Up start has built-in damping.
Up stop has adjustable damping (delayed pump stop required).
Down Two down speeds, 1 m/s (200 fpm) max.
Down start has adjustable damping.
Fast down speed and leveling speeds are adjustable.
Slow down and stop have built-in damping.
Manufacturers of the Highest Quality:
Control Valves for Elevators
Tank Heaters - Hand Pumps
Pipe Rupture Valves - Ball Valves

PAGE 42 of 48
APPENDIX 9 BLAIN VALVE ADJUSTMENT SHEET
BLAIN HYDRAULICS
2
EN ISO 9001
B44
EN 81-2
9
7 9S 1
C
6
D
KV2P
5
KV1P
D
6
S 1
1S
KV1S
AD
6
9
5
A
C
6
D
7 9S
1
KV2S
H
H
H
H
DL
V
DH
HP
BV
ES
RS
F
EN
D
6
H
KS
Y
9
U
1
S
M
H
DL
V
DH
HP
BV
ES
RS
F
EN
D
6
H
KS
Y
9
U
1
S
M
A
5
DL
V
DH
HP
BV
ES
RS
F
EN
D
6
H
KS
Y
9
U
1
S
M
C
X
7
DL
V
DH
HP
BV
ES
RS
F
EN
D
6
H
KS
Y
9
U
1
S
M
A
5
C
X
7
D
6
9
1
A
D
5
5
6
9
1
C
D
6
7
9
1
1
A
CD
6
7
9
1
5
5
1
Electrical SequenceHydraulic Circuit
Alternative Overtravel
Motor
Motor Motor
Alternative Overtravel
Motor
For Options:
BV, EN, HP, KS,
DH, DL and HA
see page 4.
Control Elements
A Solenoid ‘Up Stopʼ
C Solenoid ‘Down Decelerationʼ
D Solenoid ‘Down Stopʼ
U Bypass Valve
H Manual Lowering
HA Manual Down Speed Adjuster
Adjustments DOWN
6 Down Acceleration
7 Down Full Speed
9 Down Leveling Speed
Down Deceleration built-in
Adjustments UP
1 Bypass
5 Up Soft Stop
Up Acceleration built-in
V Check Valve
X Down Valve
Y Down Level Valve
F Main Filter
S Relief Valve
3 mm socket key
3 mm socket key
3 mm socket key
3 mm socket key

PAGE 43 of 48
APPENDIX 9 BLAIN VALVE ADJUSTMENT SHEET
KV1P
KV1S
KV2P
KV2S
3
BLAIN HYDRAULICS
Adjustments UP
1. Up Bypass: When the pump is started, the unloaded car should remain stationary at the fl oor for a period of about 1 second
before starting upwards. The length of this delay is according to the setting of adjustment 1.'In' (clockwise) shortens the delay,
'out' (c-clockwise) lengthens the delay.
Up Stop: At fl oor level, the pump-motor is de-energized. The stop may be abrupt depending on load and speed of approach.
No adjustment possible.
S Relief Valve: 'In' (clockwise) produces a higher, 'out' (c-clockwise) a lower maximum pressure setting. After turning 'out', open
manual lowering H for an instant.
Important: When testing relief valve, do not close ball valve sharply.
1. Up Bypass: When the pump is started, the unloaded car should remain stationary at the fl oor for a period of about 1 second
before starting upwards. The length of this delay is according to the setting of adjustment 1.'In' (clockwise) shortens the delay,
'out' (c-clockwise) lengthens the delay.
5. Up Stop: At fl oor level solenoid A is de-energized. Through a time relay the pump must run approx. 1/2 seconds longer to allow
the car to stop smoothly by valve operation according to the setting of adjustment 5. 'In' (clockwise) provides a softer stop, 'out'
(c-clockwise) a quicker stop. Pre-adjustment: With solenoid A disconnected and the pump running, 5 should be turned in until
the car starts to move up, then slowly backed off again until the car stops.
Alternative Up Stop: At relatively higher speeds and with the time relay arrangements as with 'up stop' above, the car may
travel to just above fl oor level. In overtravelling the fl oor, down leveling solenoid D is energized, lowering the car smoothly back
down to fl oor level where D is de-energized.
S Relief Valve: 'In' (clockwise) produces a higher, 'out' (c-clockwise) a lower maximum pressure setting. After turning 'out', open
manual lowering H for an instant.
Important: When testing relief valve, do not close ball valve sharply.
1. Up Bypass: When the pump is started, the unloaded car should remain stationary at the fl oor for a period of about 1 second
before starting upwards. The length of this delay is according to the setting of adjustment 1.'In' (clockwise) shortens the delay,
'out' (c-clockwise) lengthens the delay.
Up Stop: At fl oor level, the pump-motor is de-energized. The stop may be abrupt depending on load and speed of approach.
No adjustment possible.
S Relief Valve: 'In' (clockwise) produces a higher, 'out' (c-clockwise) a lower maximum pressure setting. After turning 'out', open
manual lowering H for an instant.
Important: When testing relief valve, do not close ball valve sharply.
1. Up Bypass: When the pump is started, the unloaded car should remain stationary at the fl oor for a period of about 1 second
before starting upwards. The length of this delay is according to the setting of adjustment 1.'In' (clockwise) shortens the delay,
'out' (c-clockwise) lengthens the delay.
5. Up Stop: At fl oor level solenoid A is de-energized. Through a time relay the pump must run approx. 1/2 seconds longer to allow
the car to stop smoothly by valve operation according to the setting of adjustment 5. 'In'' (clockwise) provides a softer stop, 'out'
(c-clockwise) a quicker stop. Pre-adjustment: With solenoid A disconnected and the pump running, 5 should be turned in until
the car starts to move up, then slowly backed off again until the car stops.
Alternative Up Stop: At relatively higher speeds and with the time relay arrangements as with 'up stop' above, the car may
travel to just above fl oor level. In overtravelling the fl oor, down leveling solenoid D is energized, lowering the car smoothly back
down to fl oor level where D is de-energized.
S Relief Valve: 'In' (clockwise) produces a higher, 'out' (c-clockwise) a lower maximum pressure setting. After turning 'out', open
manual lowering H for an instant.
Important: When testing relief valve, do not close ball valve sharply.
Nominal Settings: Adjustment 1 level with fl ange faces. Adjustment 5 (KV1S & KV2S) level with fl ange faces.
Valves are already tested and adjusted. Check electrical operation before changing valve settings. Test that the correct solenoid is en-
ergized by removing nut and raising solenoid slightly to feel pull.
Warning: Only qualifi ed personell should adjust or service valves. Unauthorised manipulation may result in injury, loss of life or
damage to equipment. Prior to servicing internal parts, ensure that the electrical power is switched off and residual pressure in
the valve is reduced to zero.

PAGE 44 of 48
APPENDIX 9 BLAIN VALVE ADJUSTMENT SHEET
BV
HP (H13)
EN
90
60
30
44
90
°
65
65
DH/DL KS
4
BLAIN HYDRAULICS
DH/DL KS
BV
HP (H13)
EN
HA
Options are shown with KV1P Valve. The same Options
can be applied to all other KV Valve types .
KV Example with Options
KV Optional Equipment
BV Ball Valve built in
EN Emergency Power Solenoid
HP Hand Pump H 13
KS Slack Rope Valve
DH Pressure Switch 10-100 bar
DL Pressure Switch 1-10 bar
CSA CSA Solenoids
HA Manual Down Speed Adj.
KV1P / KV1S
6. Down Acceleration: When solenoid D is energized, the car will accelerate downwards according to the setting of adjustment 6.
'In' (clockwise) provides a softer down acceleration, 'out' (c-clockwise) a quicker acceleration. Pre-adjustment: 6 should be turned
all the way in and then solenoid D energized. Turn 6 slowly back out until the car accelerates downwards.
9. Down Speed: With solenoid D energized as above, the down speed of the car is according to the setting of adjustment 9. 'In'
(clockwise) provides a slower down speed, 'out' (c-clockwise) a faster down speed.
Down Stop: At fl oor level, solenoid D is de-energized causing the car to stop. No adjustment necessary.
H Manual Lowering: 'out' (c-clockwise) allows the car to be lowered by hand. Closes automatically on release.
KV2P / KV2S
6. Down Acceleration: When solenoids C and D are energized, the car will accelerate downwards according to the setting of
adjustment 6. 'In' (clockwise) provides a softer down acceleration, 'out' (c-clockwise) a quicker acceleration. Pre-adjustment: 6 should
be turned all the way in and then solenoid C and D energized. Turn 6 slowly back out until the car accelerates downwards.
7. Down Speed: With solenoids C and D energized as above, the down speed of the car is according to the setting of adjustment
7. 'In' (clockwise) provides a slower down speed, 'out' (c-clockwise) a faster down speed.
Down deceleration: When solenoid C is de-energized whilst solenoid D remains energized, the car will decelerate according to the
built-in damping. No further adjustment will be required.
9. Down Leveling: With solenoid C de-energized and solenoid D remaining energized, the car will travel at its down leveling speed
according to the setting of adjustment 9. 'In' (clockwise) provides a slower, 'out' (c-clockwise) a faster down leveling speed.
Down Stop: At fl oor level, solenoid D is de-energized causing the car to stop. No adjustment necessary.
H Manual Lowering: 'out' (c-clockwise) allows the car to be lowered by hand. Closes automatically on release.
KS Slack Rope Valve: Solenoid D must be de-energised! The KS, is adjusted with a 3 mm Allan Key by turning the screw K 'in' for
higher pressure and 'out' for lower pressure. With K turned all the way 'in', then half a turn back out, the unloaded car should descend
when Manual Lowering H is opened. Should the car not descend, K must be backed off until the car just begins to descend, then
backed off a further half turn to ensure that with cold oil, the car can be lowered as required.
Valves are already tested and adjusted. Check electrical operation before changing valves settings. Test that the correct solenoid
is energized by removing nut and raising solenoid slightly to feel pull.
KV Nominal Settings: Adjustments 7 & 9, screwheads level with the hexagon heads.
Adjustments DOWN
Optional
Separate Equipment
RS Pipe Rupture Valve
ES Pipe Rupture Valve End Switch

PAGE 45 of 48
APPENDIX 9 BLAIN VALVE ADJUSTMENT SHEET
BLAIN HYDRAULICS
5
A
D
6
Z
T
YU
P
1
9
5
KV1P
KV1S
FV
Z
L
KS
H
S
KV2P
KV2S
6
D
C A
Z
T
P
U
1
5
F
VX
Y
Z
L
KS
H
7
9
S
KV1P
KV1S
7
34,5
50
111
40
125
110
65
43
Z
T
P
M6
44
15,5
G /4"
DH - DL
1
36,5
M6
Z
T
P
M6
25
65
20
50
8
14
36
M6
KV2P
KV2S
7
34,5
50
40
125
110
65
43
Z
T
P
M6
M6
G /4"
DH - DL
1
40,6
140
48,5
Z
T
P
M6
25
65
20
50 7,5
10,5
15,5
34
M6
Measurements
Assembly
Adjustments
1 Bypass
5 Soft Stop ‚Up‘
6 Start ‚Down‘
7 Speed ‚Down‘
9 Levelling ‚Down‘
S Relief Valve
Connections
P Pump
T Tank - return
Z Cylinder
KV1P and
KV1S
KV2P and
KV2S
Control Elements
A Solenoid ‚Up Stop‘
C Solenoid ‚Down Deceleration‘
D Solenoid ‚Down Stop‘
U Bypass Valve
V Check Valve
X Down Valve
Y Down Levelling Valve
H Manual Lowering
L Gauge Shut Off Cock
F Main Filter
Important: Length of ½“ thread on pipe connections
should not be longer than 14 mm!
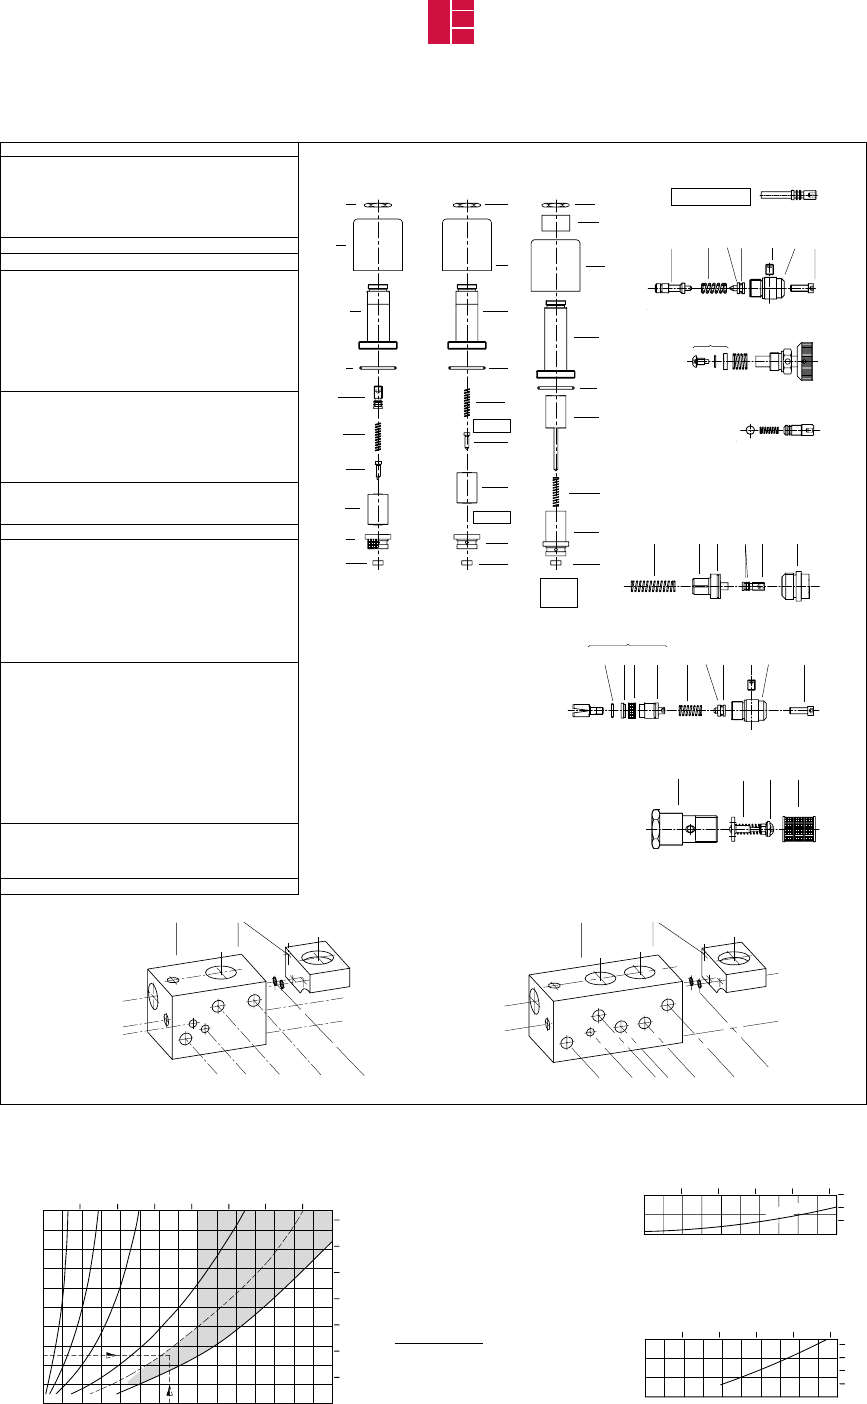
PAGE 46 of 48
APPENDIX 9 BLAIN VALVE ADJUSTMENT SHEET
KV
6 Jan 11 BLAIN HYDRAULICS Designers and Builders of High Quality Valves for Hydraulic Elevators Printed in Germany
MM
M
DR6
MO
6
DF
N6
DK
DG
S6
AS
AH
AF
AN
MO
AR
M
AD
KV1S
KV2S
MM
D
DR
MO
DF
DN
DK
DG
S6
M
MM
C A
KV2
KV2
5
KV1S, KV2S
S
SESMMSSOSZSFSK
H
HO
KS
1
1F1EUF UOU EO
7+9
7ESM9F MSSZ SOYOFIXTXO
Z
FZA V VO
S
L KS
H7
D/6
C
A
1
5
KV2S
KV2P
9
0-Ringe: 9x2 P
Z
DH/DL
0-Ringe: 9x2 P
Z
DH/DL
L KS H S
D/6
A
KV1P KV1S
5
9
1
X / Y
h
bar
l/min
US gpm
psi
5 10
15 20
25 30 35
100
90
80
70
60
50
40
30
20
10
200
400
600
800
1000
1200
1400
KV1
KV2
10 20 40
80
10 20
30
40
50
60
70
80 90
100 110
120
130 140
150
bar
l/min
psi
5
10
15 20
25
20
10
200
10 20
30
40
50
60
70
80 90
100
100
300
KV1&KV2
US gpm
bar
l/min
US gpm
psi
5
10
15 20
25
30
20
10
200
400
10 20
30
40
50
60
70
80 90
100
100
300
For pressure-fl ow conditions with-
in shaded area, use 3/4" piping to
avoid unnecessary power loss.
Pump fl ows above 80 l/min. not
recommended
Example order
KV2S, 65 l/min, 25 bar (empty),
220WS
or: KV2S/80/220WS
Pressure Drop P - Z
Insert Selection and Down Flow Chart
Solenoid Valves Adjustments
Parts List
Flow Valves
Static pressure with empty car.
Lowest Relief Pressure
0-Rings: V - Viton - FKM
P - Perbunan - NBR
In case of down leakage, replace and test
in the following order:
S6, N6, HO, V complete, XO, (2x XO with
KV2).
0-Rings: 9x2 P
0-Rings: 9x2 P
Pos. No. Item
1 1F Flange - Bypass
1E Adjustment - Bypass
EO 0-Ring - Adjustment (3,5x1,5 - P)
U Flow Guide - Bypass
UO 0-Ring - Bypass (17x1 - V)
UF Spring - Bypass
5 5 Adjustment - Up Stop
6 6 Adjustment - Down Acceleration
7+9 7E Adjustment - Down Valve
9F Spring - Down Valve
YO 0-Ring - Flow Guide (10x1 - V)
XO Seal - Flow Guide (5.28x1.78 - V)
XT 0-Ring Disc
FI Filter - Down Valve
X Down Flow Guide (Brass)
Y Down Levelling Flow Guide (Steel) - KV2
Y Down Flow Guide (Steel) - KV1
S SE Adjustment Screw - Relief Valve
SM Hexagonal - Relief Valve
MS Locking Screw
SO 0-Ring - Nipple
SZ Nipple - Relief Valve
SF Spring - Relief Valve
SK Piston - Relief Valve
H H Manual Lowering - Self Closing
HO Seal - Man. Lowering (0-Ring 5.28x1.78 - V)
HA HA Adjustable Manual Lowering
KS KS Slack Rope Valve
A MM Nut Solenoid
AD Collar Solenoid
M Coil Solenoid (indicate voltage)
AR Tube Solenoid 'Up'
MO 0-Ring Solenoid
AN Needle Solenoid 'Up'
AF Spring Solenoid 'Up'
AH Seat Housing 'Up'
AS Seat Solenoid 'Up'
C+D M Coil Solenoid (indicate voltage)
C DR Tube - Solenoid 'Down', w/o adj. 6
D DR6 Tube Solenoid 'Down', with adj. 6
MO 0-Ring Solenoid
DF Spring Solenoid 'Down'
C DN Needle Solenoid 'Down'
D N6 Needle Solenoid 'Down' (Nipple)
C HN Needle Solenoid 'Down'
DK Core Solenoid 'Down'
DG Seat Housing 'Down'(Solen.D with screen)
C S6 Seat Solenoid 'Down'
C CO 0-Ring Seat Housing
Z ZA Cylinder Thread Connection
V Check Valve
VO 0-Ring Check Valve (5,28x1,78 - V)
F Main Filter
L L Gauge Shut Off Cock

PAGE 47 of 48
NOTES

PAGE 48 of 48
NOTES


1090 Lorimar Drive
Mississauga, ON L5S 2A1
Tel 905.458.4015
Toll 1.888.785.5438
Fax 905.458.0680
www.federalelevator.com
