
RAM
CRYSTAL ELEVATOR
INSTALLATION MANUAL
CRYSTAL ELEVATOR
INSTALLATION MANUAL
Copyright 1996
Revision B – June 2013

UNI-VERS ELEVATOR INSTALL MANUAL - TABLE OF CONTENTS
TOC-1
Rev 1A – Oct. 2003
• SECTION 1 - SIT E PREPARATION AND SET UP.
• SECTION 2 - GUIDE RAILS AND CROSS BRACES.
• SECTION 3 - MOTORS AND RUNNING GEAR.
• SECTION 4 - CARRIAGE.
• SECTION 5 - SAFETIES.
• SECTION 6 - DOORS.
• SECTION 7 – DOORS LOCK OPERATOR CAMS.
• SECTION 8 – OVER SPEED GOVERNOR.
• APPENDIX A – INSTRUCT IONAL DRAWINGS
• UG089 – LIMIT SWITCH OPERATOR BRACKET LOCATIONS
• CONTROLLAYOUT (1-5) – ON-BOARD CONTROLLER LOCATION AND LAYOUT
• CLEARANCES – CARRIAGE AND MOT OR CLEARANCES
• APPENDIX B - MISCELLANEOUS SHOP DRAWINGS.
• UG135 - COUNTER WEIGHT ASSEMBLY
• AFCUG035 - GEAR BOX AND UPPER HORIZONTAL SUPPORT
• AFCUD101 - DOOR FRAME ASSEMBLY
• APPENDIX C - REQUIRED TOOLS FOR INSTALLATION.

SECTION 1 - SITE PREPARATION AND SET UP.
Page 1-1
Rev 1A – Oct. 2003
1.1
a. Make sure the area where you are working is clean. Sweep out the pit if necessary, and clean the area where
your parts are going to be placed.
b. Check installation drawing for shaft dimensions and guide rail locations.
c. Measure the shaftway along its full length at 24” intervals making sure that all four walls are parallel, square
and plumb, and that the dimensions match the installation drawings.
d. Measure the distance to each landing from the bottom of the pit to the top of the finished floor, the distance
from the pit floor to the finished top floor is the most critical.
e. Measure clearance from the finished top floor to the shaft ceiling, a minimum of 96” is required. If the shaft
ceiling is less than 97” you will have to modify the motor position to the lowest position on the gear reducer if it
is not already done.
f. Ensure that you have 83" (for standard Bi-fold door only) door height clearance from the top of the FINISHED
floor to the door header. If floors are not finished, determine thickness of finished flooring and add to required
door height clearance.
g. Ensure that the 2” x 3” slots are cut out at the base of each door opening for the Bi-fold door tracks.
h. Make sure that the floors at each landing are level, especially where the guide rails are going to be
assembled. Guide rails may have to be shimmed with steel shims if floor is not level.

SECTION 2 - GUIDE RAILS AND CROSS BRACES.
Page 2-1
Rev 1A – Oct. 2003
2.1
Determine which wall will support the guide rails and locate
the center of the wall. Place a mark on the floor at 14 ¾” on
either side if the centerline. This will be the position that you
start setting up your guide rails.
Figure 1. Marking the guiderail location.
MATERIAL LIST PART #
NOTE:

SECTION 2 - GUIDE RAILS AND CROSS BRACES.
Page 2-2
Rev 1A – Oct. 2003
2.2
Assemble lower guide rails, guide rail base frame, lower
cross brace, lower counter weight guides, and 2 wall
mounting brackets (FIG. 2). Leave all bolts loose.
NOTE: Do not use washers for the bolt heads on the
outside of the guide rails.
Figure 2. Lower guide rail assembly, looking from
behind the guide rails.
MATERIAL LIST PART #
1. Lower guide rails *NOTE
2. Crossbrace support (4 hole) FFBUG003
3. Wall mounting bracket FFBUG008
4. Lower guide rail base frame FFBUG001
5. 7/16 N.C. x 5 bolt PGAGF014
6. 7/16 N.C. x 1 3/4 bolt PGAGF042
7. 7/16 N.C. nylon lock nut PGAGF030
8. Lower counter weight guides *NOTE
NOTE:
Refer to the shop drawings for each job for details on
these items.

SECTION 2 - GUIDE RAILS AND CROSS BRACES.
Page 2-3
Rev 1A – Oct. 2003
2.3
Stand lower guide rail assembly against supporting wall.
Measure from each guide rail to the nearest wall, the
distance should be equal. If you are unable to keep the
guide rails an equal distance from both walls for the entire
travel distance then pick a wall (the one with the doors) and
make sure the guide rails run parallel to that wall for the
entire travel distance. Install ONE lag bolt into the top wall
mounting bracket to stabilize the assembly (FIG. 3), leave
all of the other bolts loose.
Figure 3. Lower guide rail installation, looking from
in front of the guide rails.
NOTE:
MATERIAL LIST PART #
1. Lag bolt 1/4 x 3 long (wood wall), or
concrete block lag bolt 1/4 X 2 1/4
(concrete block wall).
PGAGF082
or
PGAGF083
2. Guide rail connector section (double)
Change required Conn. Section with
welded lock nuts
FFBUG013
3. Guide rail connector section (single) FFGUG015
SECTION 2 - GUIDE RAILS AND CROSS BRACES.
Page 2-4
Rev 1A – Oct. 2003
2.4
a.) Slide the next (upper or mid) guide rail sections in
place. Insert all of the outside bolts. Remove the
uppermost inner guide rail bolt (do not remove all
the inner guide rail bolts or the connector tube will
fall inside the guide rail).
b.) Put the 6 hole cross brace in place at an angle
(Fig. 4) and insert one bolt on each side as shown.
Remove the lower inside bolt, swing the cross
brace into position and install the remaining bolts.
Leave all bolts loose.
NOTE: Do not use washers for the bolt heads on the
outside of the guide rails.
Figure 4. Installing the middle cross brace, looking
from in front of the guide rails.
NOTE:
MATERIAL LIST PART #
1. 7/16 x 2 bolt
2. 7/16 x 2 ¼ bolt
3. 7/16 Flat washer
4. 6 hole crossbrace FFBUG006

SECTION 2 - GUIDE RAILS AND CROSS BRACES.
Page 2-5
Rev 1A – Oct. 2003
2.5
Install the remaining guide rails, cross brace, upper
counter weight guides, and wall mounting brackets (FIG.
5). Leave all bolts loose.
NOTE: Do not use washers for the bolt heads on the
outside of the guide rails.
Figure 5. Installation of the upper guide rails, cross
brace, upper counter weight guides, and wall
mounting brackets. Looking from in front of the
guide rails.
NOTE:
MATERIAL LIST PART #
1. Upper guide rails FFBUG011
2. Crossbrace support (4 hole) FFBUG003
3. Wall mounting bracket FFBUG008
4. 7/16 N.C. x 5 bolt PGAGF014
5. 7/16 N.C. x 2 1/4 PGAGF020
6. Upper counter weight guides FFBUG012

SECTION 2 - GUIDE RAILS AND CROSS BRACES.
Page 2-6
Rev 1A – Oct. 2003
2.6
Install counter weight guide connecting angle (FIG. 6).
Leave all bolts loose.
2.7
Install battery base frame (FIG. 7).
Figure 6. Installation detail of the counter weight
guide connecting angle. Looking from in front of the
guide rails, with part of the guide rail and cross
brace cut away for clarity.
NOTE:
Refer to shop drawings for each job for details of this
item.
MATERIAL LIST PART #
1 Gear Drive base frame FFCUG017
2. Upper counter weight guides FFBUG012
3. Wall mounting bracket FFBUG008
4. 7/16 N.C. x 1 bolt PGAGF006
5. 7/16 nylon lock nut PGAGF030
6. Lower counter weight guide *NOTE
7. Counter weight guide connecting
angle
FFBUG016
Figure 7. Gear Drive base frame and counter weight
guides installation, looking from behind the guide
rails.

SECTION 2 - GUIDE RAILS AND CROSS BRACES.
Page 2-7
Rev 1A – Oct. 2003
2.8
Tighten all bolts on the guide rails, cross braces, and counter weight guide angles starting from the bottom to top in the
following sequence:
a) Tighten the base frame first followed by the lower cross brace (FIG. 8) Ensure cross brace is flush with back of rail.
(do not tighten the wall mounting brackets or the counter weight guides at this time).
b) Tighten the guide rail connector sections and mid-cross brace ensuring that the rails make a straight line where they
connect. Tighten to about 80 ft-lbs, do NOT over tighten. IMPORTANT: Using a 4’ level or a set square ensure that
the guide rails are in line and square in all directions (FIG. 9) (do not tighten the wall mounting brackets or the counter
weight guides at this time).
c) Tighten the bolts on the upper cross brace and motor base frame.
d) Tighten the counterweight guide connecting angles (Figure 6) Ensure counterweight guide angles edges are lined
up and are tight together. Grind connection smooth if necessary.
e) Move guide frame assembly back to supporting wall and anchor the wall mounting brackets to the supporting wall.
Center guide rails in shaft by measuring from 4” x 4” rail to shaft walls adjacent to the support wall.
f) Tighten all of the counter weight guide angle bolts except for the ones on the lower cross brace (FIG. 8).
Figure 8. Tightening the base frame and lower cross
brace, looking from in front of the guide rails.
Figure 9. checking that the guide rails are straight
and square, looking from in front of the guide rails.

SECTION 2 - GUIDE RAILS AND CROSS BRACES.
Page 2-8
Rev 1A – Oct. 2003
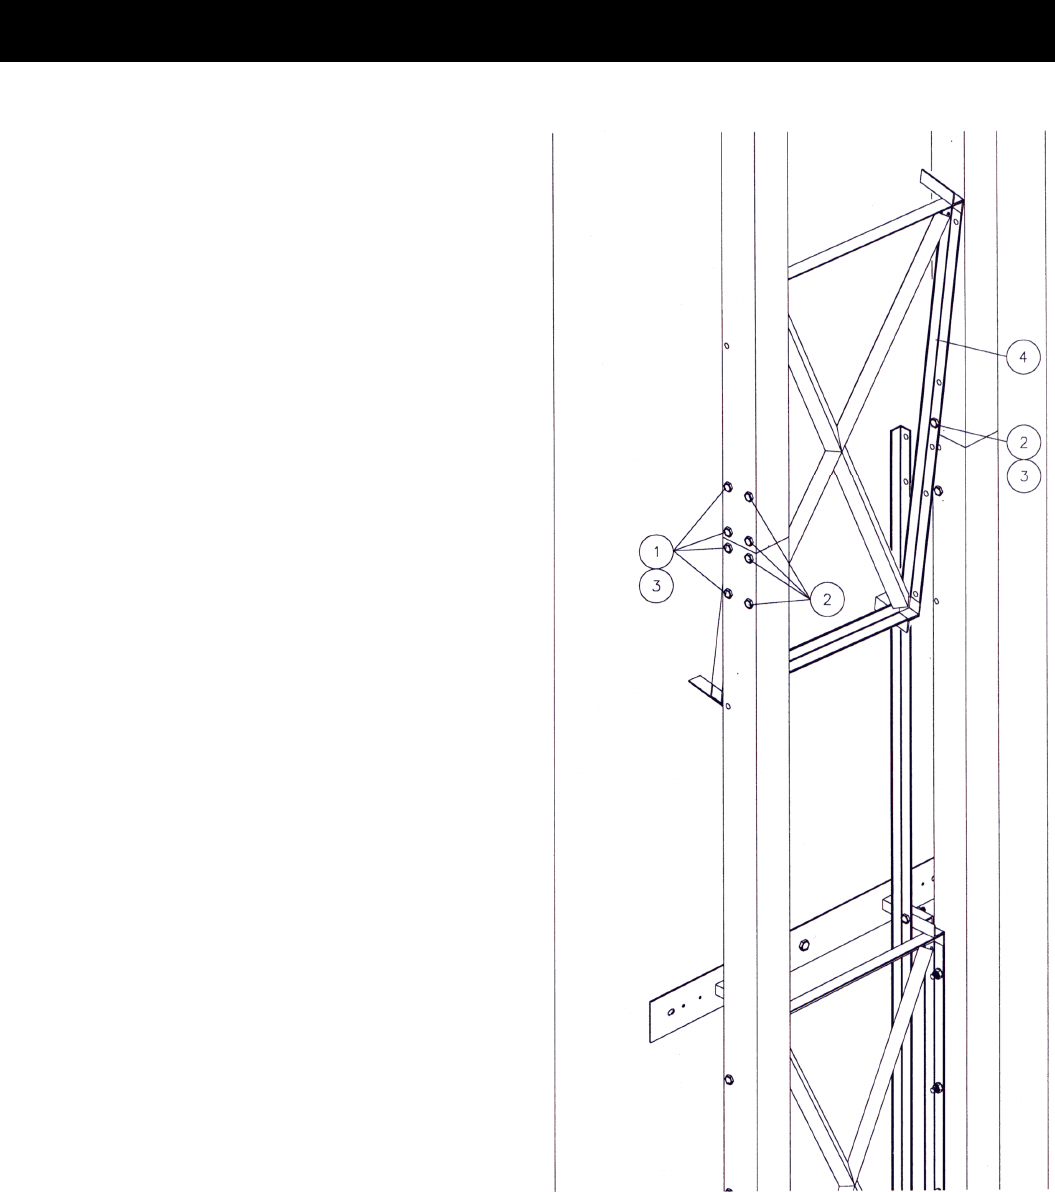
2.9
Install and tighten the upper horizontal supports and wall
mounting bracket (FIG. 10).
Figure 10. Installing the upper horizontal supports
looking from in front of the guide rails.
NOTE:
Refer to shop drawings for each job for details of this
item.
MATERIAL LIST PART #
1. Upper horizontal supports *NOTE
2. Wall mounting bracket FFBUG008
3. 7/16 N.C. x 1 3/4 bolt PGAGF042
4. 7/16 N.C. nylon lock nut PGAGF030
5. 7/16 N.C. x 1 bolt PGAGF006
6. Lag bolt 1/4 x 2 1/2 long (wood wall),
or concrete block lag bolt 1/4 x 2 1/2
(concrete block wall).
PGAGF082
or
PGAGF083

SECTION 3 - MOTORS AND RUNNING GEAR
Page 3-1
Rev 1B – May 2013
3.1
Hang the working platform on the bottom of the upper
cross brace (FIG. 1) to install the gear reducers and
motor(s).
Figure 1. Hanging the working platform on the upper
cross brace.
NOTE:
MATERIAL LIST PART #

SECTION 3 - MOTORS AND RUNNING GEAR
Page 3-2
Rev 1B – May 2013
3.2
Mount the gear reducer on to the mounting base at the top
of the guide rail assembly (FIG. 2). The sheaves should
have been installed at the shop, and should be secured
with a roll pin through the boss.
3.3
Ensure that the sheaves are 9 1/2” centre to centre
(FIG. 3).
Figure 2. Installation of gear reducer assembly.
Looking from in front of the guide rails.
NOTE:
MATERIAL LIST PART #
1. Gear reducer assembly
2. Traction sheave MMBUG080
3. 7/16 N.C. x 5 1/2 bolt PGAGF015
Figure 3. Sheave spacing.

SECTION 3 - MOTORS AND RUNNING GEAR
Page 3-3
Rev 1B – May 2013
3.4
Install motor. (FIG. 4).
3.5
Move the working platform to the top of the second cross
brace to begin installation of the counter weights.
Figure 4. Motor installation. Looking from in front of
the guide rails.
MATERIAL LIST PART #
1. AC motor
2. Gearbox

SECTION 3 - MOTORS AND RUNNING GEAR
Page 3-4
Rev 1B – May 2013
3.6
Hang the temporary counter weight hangers on the top of
the second cross brace (FIG. 5).
Refer to counterweight assembly drawing UG135 in
appendix B for all counterweight assembly images.
3.7
Assemble the counterweight side channels (UG136)to the
upper and lower cross plates (UG140 & UG141) as per
DWG UG135 in Appendix B using the 5/16 x 1 Hex bolts.
Finger tight only at this stage
3.8
Install the specified number of counterweight plates
(UG142) onto the lower cross plate ensuring that the
weight stack is tight to the back of the side channel.
3.9
Install the lower & upper keeper plates using the low profile
10-32 Pan Head screws.
Figure 5. Installation of the counter weight hangers,
looking from the front of the guide rails.
MATERIAL LIST PART #
1. Counter weight hanger AMBUG023
2. Crossbrace support (6 hole) FFBUG006
3. Counterweight Assembly UG135
NOTE: The counterweight sling will be shipped
assembled-it must be disassembled prior to being
installed on the counterweight hangars.

SECTION 4 - CARRIAGE
Page 4-1
Rev B – June 2013
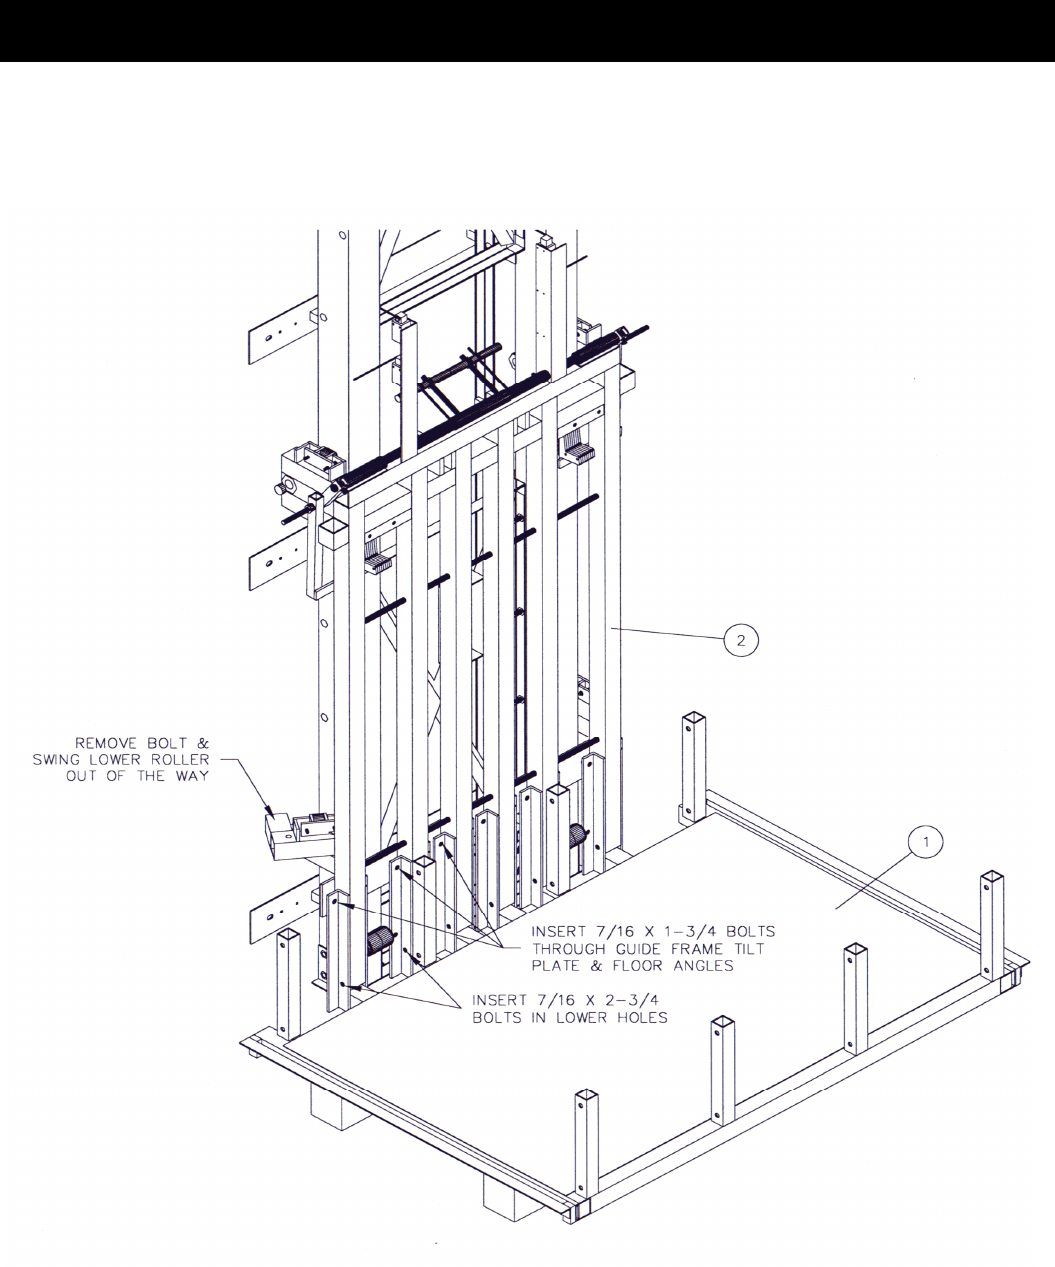
4.1
Remove the four bolts that connect the lower two wall
mounting brackets to the counter weight guides (FIG. 1).
4.2
Place carriage floor inside shaftway on 4 x 4 temporary
support tubes (2-2x4 studs on edge screwed together will
also work) (FIG. 2). Centre the carriage floor with the guide
rails.
Figure 1. Removing the lower counter weight guide
bolts. Looking from behind the guide rails.
NOTE:
Refer to job specific shop drawings for details of these
items.
MATERIAL LIST PART #
1. 7/16 nylon lock nut PGAGF030
2. Lower counter weight guides *NOTE
3. Wall mounting bracket FFBUG008
4. 7/16 x 1 3/4 bolt PGAGF042
5. Carriage floor *NOTE
6. Temporary 4 x 4 support tubes
Figure 2. Placing the carriage floor inside the
shaftway.
SECTION 4 - CARRIAGE
Page 4-2
Rev B – June 2013
4.3
Remove the lower side guide roller bracket assemblies and the upper rollers from the guide frame. Slide the guide
frame into place and insert the lower nuts & bolts. Insert the tilt plate bolts through the back of the guide frame tilt plate
and the carriage floor vertical angles. Tighten the tilt plate bolts until they just make contact but can still turn freely.
Figure 3. Setting the guide frame in place.
MATERIAL LIST PART #
1. Carriage floor AFBUC050
2. Carriage guide frame AFCUC001

SECTION 4 - CARRIAGE
Page 4-3
Rev B – June 2013
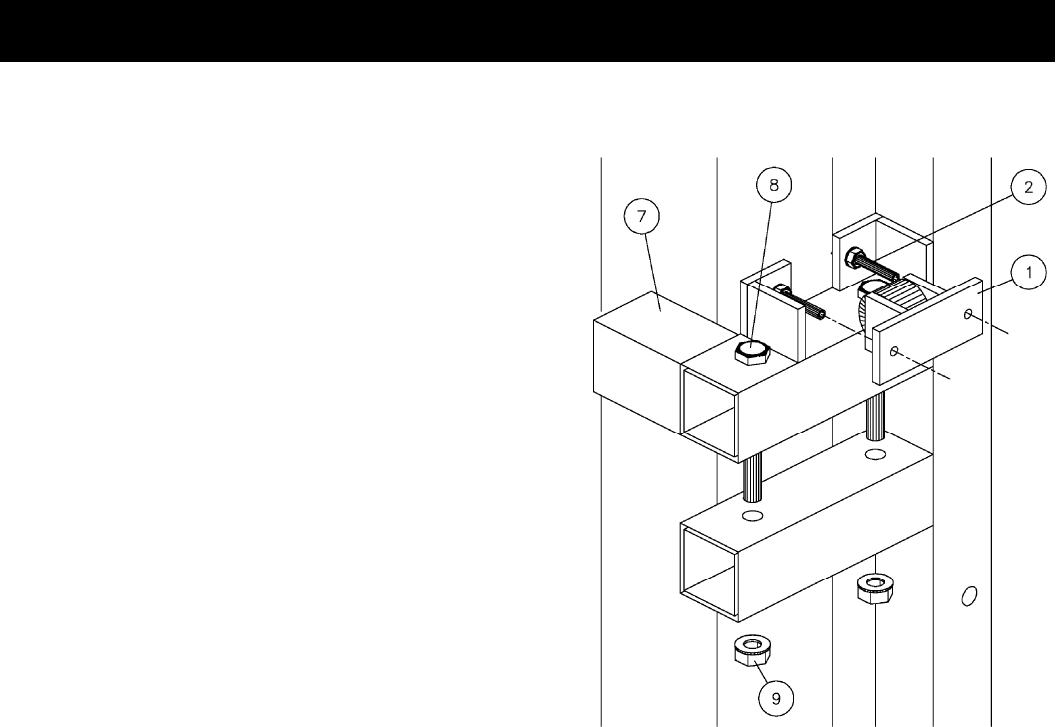
4.4
Install the upper rollers as shown in (FIG. 4). Note the 1”NC jamb nut is placed in between the two ½” thick steel plates
of the guide frame. Thread the jamb nut onto the 1”x7” bolt until it has reached the end of the threads. Thread the
1”NC lock nut onto the bolt and tighten so that the jamb nut and lock nut are tight and rigid against the outside ½” steel
guide frame plate. Note the upper roller should have approximately 1/4” movement along the bolt shaft when tight.
NOTE:
Refer to shop drawings for each job for details of this
item. Parts are not exactly as shown.
MATERIAL LIST PART #
1. Carriage guide frame AFCUC001
2. Lower guide rails *NOTE
3. 1 N.C. x 7 bolt PGAGF019
4. Upper roller MMBUC040
5. 1 N.C. jamb nut PGAGF026
6. 1 N.C. lock nut PGAGF033
7. 5/8 N.C. x 3 bolt PGAGF017
8. Cable thimble
9. 5/8 N.C. nylon lock nut PGAGF032
Figure 4. Installing the carriage guide frame on to the guide rails. Looking from behind the guide rails.
SECTION 4 - CARRIAGE
Page 4-4
Rev B – June 2013
4.5
Install the bottom side rollers on the carriage guide frame
(FIG. 5) (not exactly as illustrated).
Figure 5. Installation of the bottom side rollers.
Looking from behind the guide rails.
NOTE:
Parts may not be exactly as shown
MATERIAL LIST PART #
1. Side roller and bracket – No longer
required
FMBUC014
2. 1/4 N.C. x 2 Allen head bolt PGAGF002
3. 1 N.C. lock nut PGAGF033
4. 1 N.C. jamb nut PGAGF026
5. 1 N.C. x 7 bolt PGAGF019
6. Upper roller MMBUC040
7. Lower side roller frame bracket FFBUC018
8. 7/16 N.C. x 5 bolt PGAGF014
9. 7/16 N.C. nylon lock nut PGAGF030

SECTION 4 - CARRIAGE
Page 4-5
Rev B – June 2013
Figure 6. Carriage Lifting Cable Attachment.
NOTE:
Slack cable operated safeties shown.
4.6
Install the lifting cables. Note the attachment to the carriage is
assembled in the factory-inspect to ensure cable attachment
bolts are fully threaded onto the locknuts.(Figure 6.)
Refer to counterweight assembly drawing UG135 in
appendix B for all counterweight assembly images.
4.7
Thread the counterweight end of the lifting cable through the
gear drive base frame and over each traction sheave ensuring
that each cable is set into the sheave groove. Note: you will need
to loosen the cable keeper angle bolts to get the cables into the
sheave groove. Tighten bolts once cables are in-place.
4.8
Connect the rope wedge socket to the counterweight as shown
in drawing UG135. Adjust the thread length after the bottom nut
so that it is even on both sides and remove as much slack from
the cable as possible. Jamb the nuts to secure the wedge
socket in place as per UG135 and install the cotter pin in the hole
below the bottom nut.
4.9
Remove the temporary 4x4 support tubes underneath the carriage by lifting the carriage floor from the pit using a
plank lever and blocks. The carriage should now be suspended by the lifting cables.
DO NOT REMOVE COUNTERWEIGHT HANGARS UNTIL CARRIAGE IS FULLY ASSEM BLED

SECTION 4 - CARRIAGE.
Rev B – June 2013
Page 4-10
4.10
The right side rollers will have been set in the factory to
achieve clearance of approximately 3/4” (FIG 7&8) spacing
between the carriage guide frame and the outside of the
guide rails. The left side rollers are spring loaded and you
must back off the 5/16 square headed bolt to allow the
spring to apply roller pressure on the guide rail.
(not exactly as illustrated).
Figure 7. Upper side roller spacing. Looking from
behind the guide rails.
Figure 8. Lower side roller spacing. Looking from
behind the guide rails.
MATERIAL LIST PART #
1. Carriage guide frame AFCUC001
2. Side roller and bracket FMBUC014
3. Lower guide rails *NOTE
4. Lower side roller frame bracket FFBUC018
5. 1/4 N.C. x 2 Allen head bolt PGAGF002

SECTION 4 - CARRIAGE.
Rev B – June 2013
Page 4-11
4.11
Install the carriage walls and ceiling, leave the bolts loose.
MATERIAL LIST PART #
1. Carriage wall studs FFBUC060
2. Carriage ceiling
3. 7/16 N.C. x 2 1/4 bolt PGAGF008
4. 7/16 Nylon lock nut PGAGF030
5. Carriage Corner Cam Stud FFBUC100
Figure 9. Installing the carriage walls and ceiling.
NOTE:
Refer to shop drawings for each job for details of these
items.

SECTION 4 - CARRIAGE.
Rev B – June 2013
Page 4-12
4.11
To level the carriage, adjust each tilt plate bolt in sequence until the deck is level or tilted slightly up(approx. ¼”) on the
side opposite the guide frame and all of the bolts have the same amount of tension. Do not adjust the bolts more than
a ½ turn at a time.
4.12
Once the carriage floor is level proceed to tightening all of the carriage studs making sure that the factory set markings
line up on each stud as this will make installing the trim panels easier.
4.13
Once the carriage studs are tight proceed to installing the carriage trim pieces using the 1/8 pop rivets provided.
Figure 10. Tightening the carriage bolts.

SECTION 4 - CARRIAGE.
Rev B – June 2013
Page 4-13
4.14
Turn gear reducer manually to raise the counter weight
from the hangers (FIG. 11), make sure that the counter
weight is not resting on the hangers before continuing with
the next step.
Figure 11. Removing the counter weight hangers and
bottom counter weight plate, and installation of a
lock nut on the threaded shaft. Looking from behind
the guide rails.
NOTE:
Parts may not be exactly as shown

SECTION 4 - CARRIAGE.
Rev B – June 2013
Page 4-14
4.15
Remove the counter weight
hangers and bottom counter
weight plate. (FIG. 12).
4.16
Install the four bolts that connect the lower two wall mounting brackets to the counter weight guides (FIG. 1). These
bolts were removed in step 4.1.
4.17
Tighten the 5/16 x 1 Hex bolts on the counterweight side channels and the counterweight lower & upper keeper plates
(see section 3.7 and 3.9) by manually cranking the weights to a position where the bolts and screws can be accessed.
Figure 12. Removing the counterweight hangars.
NOTE:
Parts may not be exactly as shown.

SECTION 5 - SAFETIES
Page 5-1
Rev B – June 2013
5.1
The Wedge type safeties require onsite adjustment.
Adjust the brake adjustment bolts (see figure two) so that the brakes move 1-1/4” off the lifting bar when manually
lifted and jammed between the roller and guide rail. Ensure that each brake set are tight across the face of the brake.
This may need to be repeated a few times to get both brakes set equally.
Next block the counterweights and jack up the carriage 12” to cause the cables to go slack. Without moving the brake
shoes make a final adjustment to ensure that both sets of brakes are engaged equally.
Release the jack quickly, both brake sets should engage equally. Repeat drop test with 125% of the rated carriage
load.
Note: The above procedure is for slack cable activated safeties. When using an overspeed governor, activate the
safeties by moving the linkage up by hand when moving in the down direction at contract speed with 125% of the
rated load instead of jacking up the carriage to slacken the cables.
Figure 2. Location of brake adjustment bolts.

SECTION 5 - SAFETIES
Page 5-2
Rev B – June 2013
5.2
Figure 3 shows the location of the slack cable brake safety circuit switch. Adjust this switch by rotating the spline
switch head and/or bending the copper tube so that the switch activates when the safeties are engaged and so the
switch disengages just prior to coming to rest in the normal position when the brake linkage is fully disengaged.
Figure 3. Location of the slack cable brake safety circuit switch.
NOTE:
Parts may not be exactly as shown

SECTION 6 - DOORS
Page 6-1
Rev 1A – Oct. 2003
Bi-fold Doors
6.1
Install the doors and jambs so that they are flush with the inside of the shaftway. The carriage corner studs should
clear the inside of the shaft by 1 1/2 inches at the end of the carriage, the side of the carriage should clear the inside of
the shaft by 3 inches (FIG. 1). See Appendix A for more door details.
6.2
Install the carriage door trim as shown (FIG. 1).
NOTE:
See shop drawings for details of these items.
MATERIAL LIST PART #
1. Complete door frame assembly AFCUD101
2. Bi-fold door AFBUD001
3. Carriage floor *NOTE
4. Carriage corner stud (L section) FFBUC060
5. Floor finishing plate *NOTE
6. Entrance trim - guide rail side FEBUC071
7. Entrance trim - opp. guide rail side FEBUC072
Figure 1. Installing the door, jamb, and carriage door trim.

SECTION 7 – DOOR LOCK OPERATOR CAMS
Page 7-1
Rev 1A – Oct. 2003
Bi-fold Doors
7.1
Figures 1 to 3 show the cam configurations for various shaft widths when the cam is on the guide rail side.
Figure 2. Standard Shaft (58” to 65”)
Figure 1. Narrow Shaft (54” to 57”)

SECTION 7 – DOOR LOCK OPERATOR CAMS
Page 7-2
Rev 1A – Oct. 2003
Bi-fold Doors
7.1 Continued
7.2
Figure 4 shows the cam configurations for an adjacent access Bi-fold door.
Figure 3. Wide Shaft (66” to 67”)
Figure 4. Adjacent Access Carriage.

SECTION 7 – DOOR LOCK OPERATOR CAMS
Page 7-3
Rev 1A – Oct. 2003
GAL Interlocks (Swing Doors)
7.3
Figure 5 shows a typical GAL cam configuration for a shaft up to 59” wide. The extension bracket may or may not be
required.
7.4
Figure 6 shows a typical GAL cam configuration for shaft 60” wide or larger.
Figure 5. GAL cam configuration (carriage up to 59”
wide).
Figure 6. GAL cam configuration (carriage 60” or
wider).

SECTION 7 – DOOR LOCK OPERATOR CAMS
Page 7-4
Rev 1A – Oct. 2003
GAL Interlocks (Swing Doors)
7.5
Figure 7 shows a typical GAL cam configuration for an adjacent shaft.
Figure 7. GAL cam configuration (adjacent
carriage).

SECTION 8 – OVER SPEED GOVERNOR
Page 8-1
Rev 1A – Oct. 2003
8.1
Figure 1 shows the basic configuration of the over speed governor. The over speed governor is always on the left side
of the guide rails.
NOTE:
Not all installations require an over speed governor.
MATERIAL LIST PART #
1. Over speed governor bracket FMBUG050
2. Over speed governor
3. OSG counter weight assembly AMBUG057
4. OSG counter weight guide FMBUG055
5. ¼” dia. OSG pulley cable
Figure 1. Typical over speed governor
configuration

SECTION 8 – OVER SPEED GOVERNOR
Page 8-2
Rev 1A – Oct. 2003
8.2
Figure 2 shows how to connect the over speed governor cable to the brake system.
8.3
Figure 3 shows the location of the over speed governor safety circuit switch.
Figure 2. Connecting the over speed governor
cables to the slack cable brake linkage.
Figure 3. Location of the over speed governor
safety circuit switch.

APPENDIX A – INSTRUCTIONAL DRAWINGS
APPENDIX A-1
Rev 2 – May. 2008
• APPENDIX A – INSTRUCT IONAL DRAWINGS
• UG089 – LIMIT SWITCH OPERATOR BRACKET LOCATIONS
• LimSwLocation – LIMIT SWITCH LOCATION
• CONTROLLAYOUT (1-5) – ON-BOARD CONTROLLER LOCATION AND LAYOUT
• CLEARANCES – CARRIAGE AND MOT OR CLEARANCES


APPENDIX B – MISCELLANEOUS SHOP DRAWINGS
APPENDIX B-1
Rev B – June 2013
• APPENDIX B - MISCELLANEOUS SHOP DRAWINGS
• AMBUG101 – MANUAL CRANK ASSEMBLY
• AMBUG135 - COUNTER WEIGHT ASSEMBLY
• AFCUG035 - GEAR BOX AND UPPER HORIZONTAL SUPPORT
• AFCUD101 - DOOR FRAME ASSEMBLY


APPENDIX C – TOOLS AND EQUIPMENT
APPENDIX C-1
Rev 1C – July 2008
REQUIRED TOOLS FOR INSTALLATION
• ½” Drive Electric Drill
• 1" AUGER Bit LONG 12 – 18”
• 1 1/2" & 1 7/16" Combination Wrench
• 24" Combination Punch-Pry Bar
• Concrete Chisel
• 48" Level
• Broom & Dustpan
• 90 Ft. 12Ga. extension Cord w/tri-plug adapter
• Extension Ladder
• 72" Step Ladder
• Working Platform - shipping with elevator (1
st
install only)
• 24" Hydraulic Bottle Jack
• Counterweight Hangars - shipping with elevator (1
st
install only)
• Trouble Light
• Concrete Drill with 3/8 concrete bit

APPENDIX C – TOOLS AND EQUIPMENT
APPENDIX C-2
Rev 1C – July 2008
LIST OF STANDARD TOOLS THAT SHOULD BE INCLUDED
IN THE INSTALLERS TOOL BOX
• 3/8" Drive Electric Drill • 3/8" Drive Ratchet w/6" Extension
• 4-1/2" Electric Grinder • 3/8" Drive. Bit Driver
• 10-12" Hacksaw • Combination Screwdriver
• Torpedo Magnetic Level • #2 Stubby Robertson Screwdriver
• Utility Knife • #2 Stubby Phillips Screwdriver
• 25'x1" Measuring Tape • Terminal Block Screw Driver (1/8"
Tipped Flathead)
• 12" Combination Square • Combination Wire Stripper/Crimper
• Drywall Saw • 7" Wire Cutters
• Multi-meter • 8" Linesman Pliers
• Pop Rivet Gun • Needle Nose Pliers
• 16 oz. Ball Peen Hammer • 10" Channel Lock Pliers
• Tapered Hole Punch • 7/8", 1 1/8", 1 1/16", 1 1/4" Hole Saws
w/arbor
• Center Punch • Drill Bits (1/8,5/32,13/64,1/4) X2 & 1/2"
w/3/8 shaft
• Cold Chisel • Taps (10-24 & 1/4-20 NC.) X2
• 1/2" Wood Chisel • Large Flat Head Screw Driver
• 10" Vise Grip (x2) • Needle Nose Vise Grips
• 7" Quick Clamp
• Round & Flat File
• 1/16"-3/8" Allen Wrenches
• 3/8,7/16,1/2,9/16,5/8,11/16,3/4
Combination Wrenches
• 5/16,3/8,7/16,1/2,9/16,5/8,11/16,3/4&5/8
Deep 3/8" Dr. Sockets
