
Database Concepts
7th Edition
David M. Kroenke • David J. Auer
Online Appendix E
SQL Views, SQL/PSM and Importing Data

Database Concepts SQL Views, SQL/PSM and Importing Data Appendix E
All rights reserved. No part of this publication may be reproduced, stored in a retrieval system, or transmitted,
in any form or by any means, electronic, mechanical, photocopying, recording, or otherwise, without the prior
written permission of the publisher. Printed in the United States of America.
Appendix E — 10 9 8 7 6 5 4 3 2 1
E-2

Database Concepts SQL Views, SQL/PSM and Importing Data Appendix E
Appendix Objectives
• To understand the reasons for using SQL views
• To use SQL statements to create and query SQL views
• To understand SQL/Persistent Stored Modules (SQL/PSM)
• To create and use SQL user-defined functions
• To import Microsoft Excel worksheet data into a database
What is the Purpose of this Appendix?
In Chapter 3, we discussed SQL in depth. We discussed two basic categories of SQL statements: data
definition language (DDL) statements, which are used for creating tables, relationships, and other
structures, and data manipulation language (DML) statements, which are used for querying and
modifying data.
In this appendix, which should be studied immediately after Chapter 3, we:
• Describe and illustrate SQL views, which extend the DML capabilities of SQL.
• Describe and illustrate SQL Persistent Stored Modules (SQL/PSM), and create user-defined
functions.
• Describe and use DBMS data import techniques to import Microsoft Excel worksheet data into a
database.
E-3

Database Concepts SQL Views, SQL/PSM and Importing Data Appendix E
Creating SQL Views
An SQL view is a virtual table that is constructed from other tables or views. A view has no data of its
own but uses data stored in tables or other views. Views are created using SQL SELECT statements and
then used in other SELECT statements as just another table. The only limitation on the SQL SELECT
statements that create the views is that they cannot contain ORDER BY clauses.
1
If the results of a query
using a view need to be sorted, the sort order must be provided by the SELECT statement that processes
the view.
Does Not Work with Microsoft Access ANSI-89 SQL
Unfortunately, Microsoft Access does not support views. However, Access allows you to create a query,
name it, and then save it, which is not supported in a standard SQL implementation. You can then
process Access queries in the same ways that you process views in the following discussion.
Solution: Create Microsoft Access view–equivalent queries, as discussed in the "The Access Workbench"
section at the end of this appendix.
We'll use the WPC database that we created in Chapter 3 as the example database for this discussion of
views. You use the SQL CREATE VIEW statement to create view structures. The essential format of this
statement is:
CREATE VIEW ViewName AS
{SQL SELECT statement};
The following statement defines a view named EmployeePhoneView based on the EMPLOYEE table:
/* *** SQL-CREATE-VIEW-AppE-01 *** */
CREATE VIEW EmployeePhoneView AS
SELECT FirstName, LastName, Phone AS EmployeePhone
FROM EMPLOYEE;
Figure E-1 shows the view being created in the SQL Server Management Studio Express Edition, Figure E-
2 shows the view being created in the Oracle SQL Developer, and Figure E-3 shows the view being
created in the MySQL Workbench.
1
This limitation appears in the SQL-92 standard. Some DBMSs modify this limitation in their
implementation of SQL. For example, Oracle Database allows views to include ORDER BY, and SQL Server
allows ORDER BY in very limited circumstances.
E-4

Database Concepts SQL Views, SQL/PSM and Importing Data Appendix E
Figure E-1 — Creating a View in the Microsoft SQL Server Management Studio
Figure E-2 — Creating a View in the Oracle SQL Developer
Click the New
Query button,
enter the SQL for
the view just as you
would enter the
SQL for a query,
and then click the
Execute button to
create the view
The new view
appears in the
expanded Views
folder after it is
created
The “Command(s)
completed
successfully”
message in the
Messages window
indicates that the
view has been
created
Click the New SQL
Worksheet button,
enter the SQL for
the view just as you
would enter the
SQL for a query,
and then click the
Run Statement
button to create the
query
The new view
appears in the
expanded Views
folder after it is
created (refresh if
necessary)
The “view
EMPLOYEEPHONEVIEW
created.” message in the
Script Output window
indicates that the view has
been created
E-5

Database Concepts SQL Views, SQL/PSM and Importing Data Appendix E
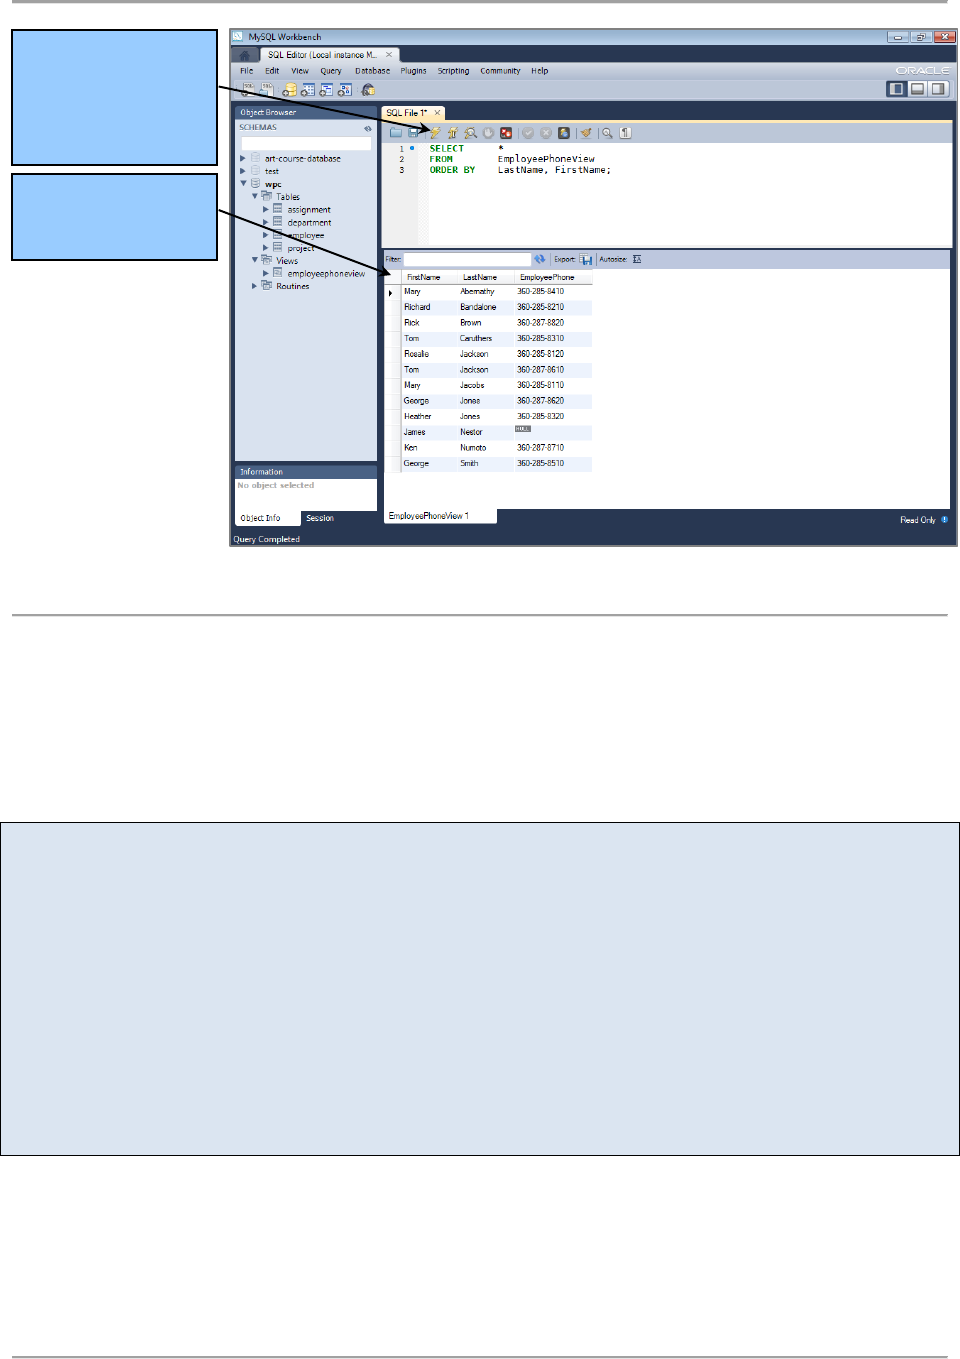
Figure E-3 — Creating a View in the MySQL Workbench
By The Way
SQL Server 2005, SQL Server 2008, SQL Server 2008 R2, SQL Server 2012, and most other DBMSs process
the CREATE VIEW statements as written here without difficulty. However, SQL Server 2000 will not run
such statements unless you remove the semicolon at the end of the CREATE VIEW statement. We have
no idea why SQL Server 2000 works this way, but be aware of this peculiarity if you are using SQL Server
2000.
After we create the view, we can use it in the FROM clause of SELECT statements just as we would use a
table. The following obtains a list of employee names and phone numbers, sorted first by employee last
name and then by employee first name:
/* *** SQL-QUERY-AppE-01 *** */
SELECT *
FROM EmployeePhoneView
ORDER BY LastName, FirstName;
Figure E-4 shows this SQL statement run in the SQL Server Management Studio, Figure E-5 shows it run
in the Oracle SQL Developer, and Figure E-6 shows it run in the MySQL Workbench.
Enter the SQL for
the view just as you
would enter the
SQL for a query,
and then click this
button to create the
view
The new view
appears in the
expanded wpc
schema after it is
created (you may
have to refresh the
schema for it to
appear)
The Action Output
CREATE VIEW
message indicates
that the view has
been created
E-6

Database Concepts SQL Views, SQL/PSM and Importing Data Appendix E
Figure E-4 — Using EmployeePhoneView in the Microsoft SQL Server Management Studio
Figure E-5 — Using EmployeePhoneView in the Oracle SQL Developer
Click the New
Query button,
enter the SQL for
the query that uses
the view, and then
click the Execute
button to create the
query
The query results
appear in the
Results window
Enter the SQL for
the query that uses
the view, and then
click the Run
Statement button
to execute the
query
The query results
appear in the
Query Result
window
E-7
Database Concepts SQL Views, SQL/PSM and Importing Data Appendix E
Figure E-6 — Using EmployeePhoneView in the MySQL Workbench
Note that the number of columns returned depends on the number of columns in the view, not on the
number of columns in the underlying table. In this example, SELECT * produces just three columns
because the view has just three columns. Also notice that the column Name in the EMPLOYEE table has
been renamed EmployeePhone in the view, so the DBMS uses the label EmployeePhone when
producing results.
By The Way
If you ever need to modify an SQL view you have created, use the ALTER VIEW {ViewName} statement.
This works exactly the same as the CREATE VIEW {ViewName} AS statement except that it replaces the
existing view definition with the new one. This statement is very useful when you are trying to fine-tune
your view definitions.
If you ever want to delete a view, simply use the SQL DROP VIEW {ViewName} statement.
Enter the SQL for
the query that uses
the view, and then
click this button to
execute the query
The query results
appear in a tabbed
results window
E-8

Database Concepts SQL Views, SQL/PSM and Importing Data Appendix E
Using SQL Views
In general, SQL views are used to prepare data for use in an information system application, which may
or may not be a Web-based application. While applications commonly use a Web interface (via a Web
browser such as Microsoft Internet Explorer (IE), Google Chrome, or Mozilla Firefox), there are still many
applications that run in their own application window.
In Appendix F — Getting Started with Systems Analysis and Development, we define data as recorded
facts and numbers. Based on this definition, we can now define
2
information as:
• Knowledge derived from data.
• Data presented in a meaningful context.
• Data processed by summing, ordering, averaging, grouping, comparing or other similar
operations.
In general, application programmers prefer that the work of transforming database data into the
information that will be used in and presented by the application be done by the DBMS itself. SQL views
are the main DBMS tool for this work. The basic principle is that all summing, averaging, grouping,
comparing and similar operations should be done in SQL views, and that it is the final result as it appears
in the SQL view that is passed to the application program for use. This is illustrated in Figure E-7.
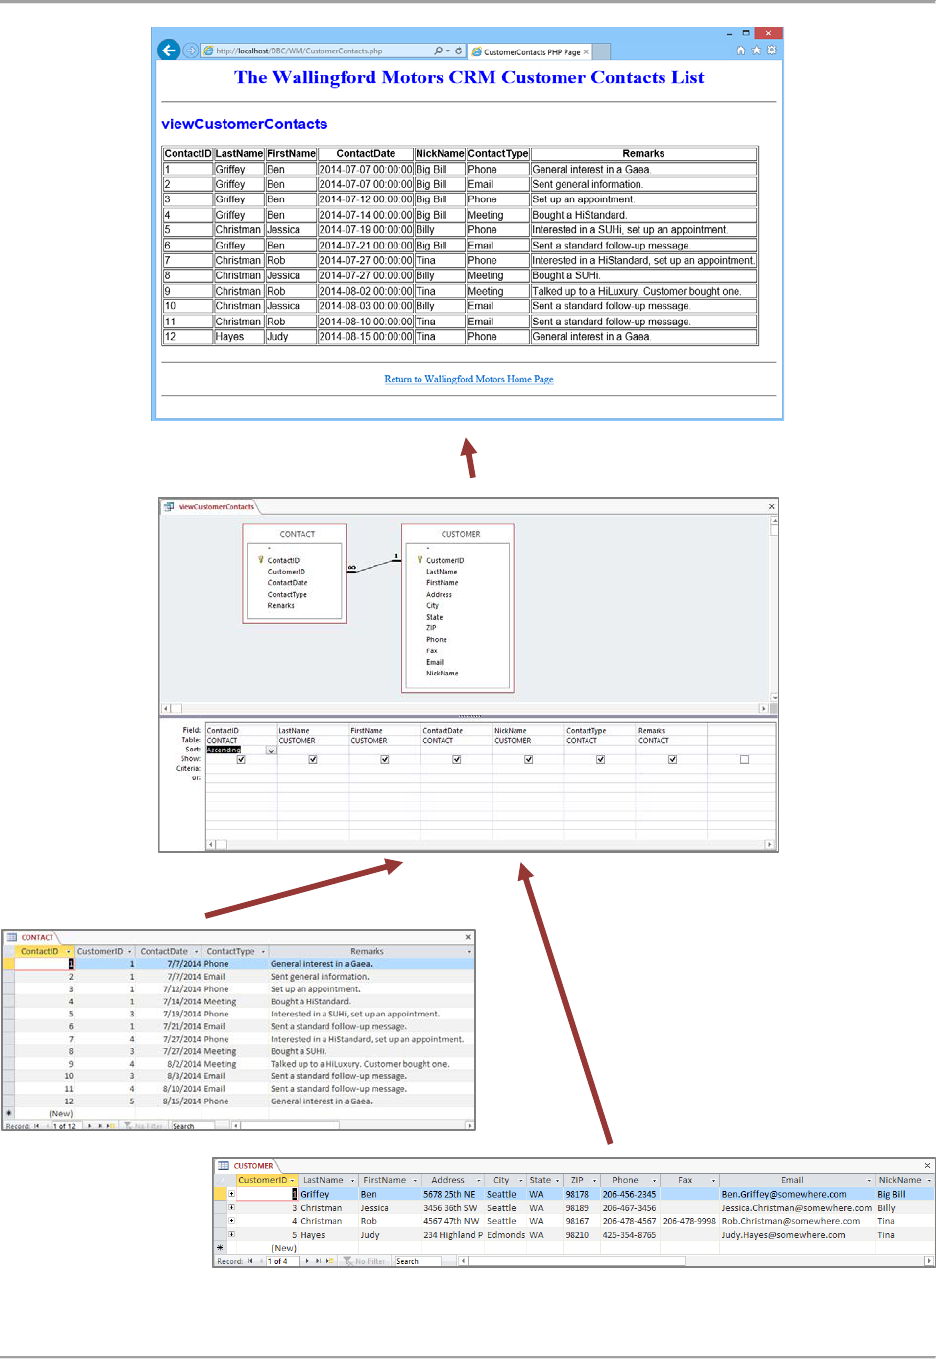
For a specific example, let’s consider a Web page that we’ll build in Chapter 7’s section of “The Access
Workbench.” We are building a Customer Relations Management (CRM) Web application for
Wallingford Motors (WM). As shown in Figure E-8, one part of the Web CRM application displays a
report named The Wallingford Motors CRM Customer Contacts List, which shows all contacts between
WM salespeople (identified by NickName) and customers (identified by LastName and FirstName). This
report is based on a view named viewCustomerContacts, which combines data from the both the
CUSTOMER table and the CONTACT table in the WM database. This example clearly illustrates the
principle of combining and processing data into a view that becomes the basis of the data sent to the
Web application for display in a Web page.
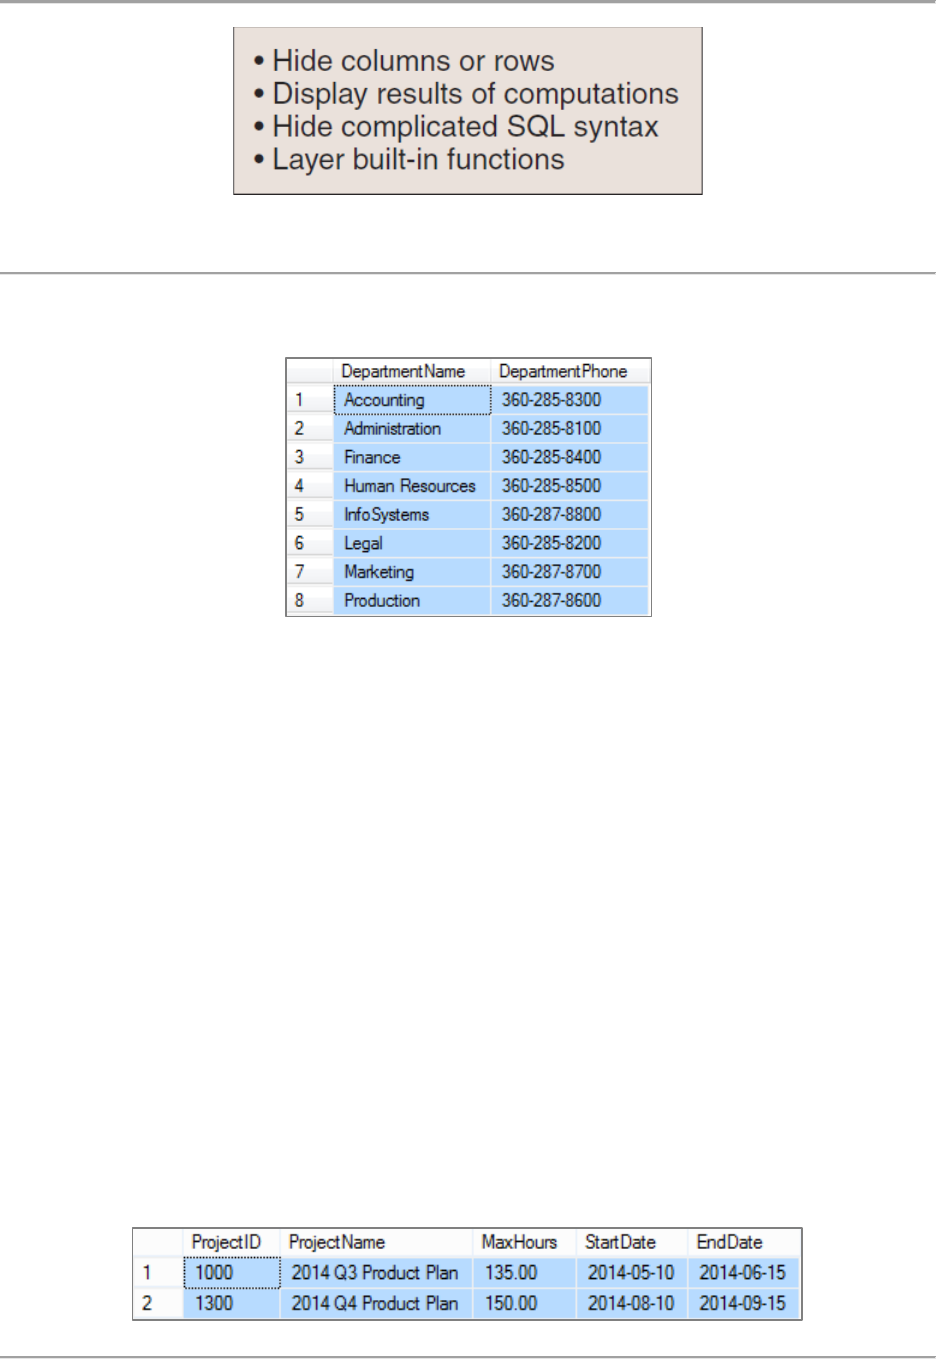
Figure E-9 lists some of the specific uses for views.
3
They can hide columns or rows. They also can be
used to display the results of computed columns, to hide complicated SQL syntax, and to layer the use of
built-in functions to create results that are not possible with a single SQL statement. We will give
examples of each of these uses.
2
These definitions are from David M. Kroenke's books Using MIS (6th
Ed.) (Upper Saddle River, NJ: Prentice-Hall,
2014) and Experiencing MIS (4th
Ed.) (Upper Saddle River: Prentice-Hall, 2012). See these books for a full discussion
of these definitions, as well as a discussion of a fourth definition, "a difference that makes a difference."
3
Additional uses of SQL views are discussed in David M. Kroenke and David J. Auer, Database Processing:
Fundamentals, Design, and Implementation, 13th edition (Upper Saddle River, NJ: Prentice Hall, 2014), Chapter 7.
E-9

Database Concepts SQL Views, SQL/PSM and Importing Data Appendix E
Figure E-7 — SQL Views as the Basis For Application Reports
Using Views to Hide Columns or Rows
Views can be used to hide columns to simplify results or to prevent the display of sensitive data. For
example, suppose the users at WPC want a simplified list of departments that has just the department
names and phone numbers. One use for such a view would be to populate a Web page. The following
statement defines a view, BasicDepartmentDataView, that will produce that list:
/* *** SQL-CREATE-VIEW-AppE-02 *** */
CREATE VIEW BasicDepartmentDataView AS
SELECT DepartmentName, Phone AS DepartmentPhone
FROM DEPARTMENT;
The following SELECT statement obtains a list of department names and phone numbers sorted by the
DepartmentName:
/* *** SQL-QUERY-AppE-02 *** */
SELECT *
FROM BasicDepartmentDataView
ORDER BY DepartmentName;
E-10
Database Concepts SQL Views, SQL/PSM and Importing Data Appendix E
Figure E-8 — The Wallingford Motors CRM Web Application Customer Contacts List
E-11
Database Concepts SQL Views, SQL/PSM and Importing Data Appendix E
Figure E-9 — Some Uses for SQL Views
The results of a SELECT sorted by DepartmentName on this view are:
Views can also hide rows by providing a WHERE clause in the view definition. The next SQL statement
defines a view of WPC projects in the marketing department:
/* *** SQL-CREATE-VIEW-AppE-03 *** */
CREATE VIEW MarketingDepartmentProjectView AS
SELECT ProjectID, ProjectName, MaxHours,
StartDate, EndDate
FROM PROJECT
WHERE Department = 'Marketing';
The following SELECT statement obtains a list of projects managed by the marketing department, sorted
by the ProjectID number:
/* *** SQL-QUERY-AppE-03 *** */
SELECT *
FROM MarketingDepartmentProjectView
ORDER BY ProjectID;
The results of a SELECT sorted by ProjectID on this view are:
E-12

Database Concepts SQL Views, SQL/PSM and Importing Data Appendix E
As desired, only the marketing department projects are shown in this view. This limitation is not obvious
from the results because Department is not included in the view. This characteristic can be good or bad,
depending on the use of the view. It is good if this view is used in a setting in which only marketing
department projects matter; it is bad if the view indicates that these projects are the only WPC projects
currently underway.
Using Views to Display Results of Computed Columns
Another use of views is to show the results of computed columns without requiring the user to enter the
computation expression. For example, the following view allows the user to compare the maximum
hours allocated for each WPC project to the total hours worked to date on the project:
/* *** SQL-CREATE-VIEW-AppE-04 *** */
CREATE VIEW ProjectHoursToDateView AS
SELECT PROJECT.ProjectID,
ProjectName,
MaxHours AS ProjectMaxHours,
SUM(HoursWorked) AS ProjectHoursWorkedToDate
FROM PROJECT, ASSIGNMENT
WHERE PROJECT.ProjectID = ASSIGNMENT.ProjectID
GROUP BY PROJECT.ProjectID;
By The Way
Both SQL Server and Oracle Database require that any column specified in the SELECT phrase be used in
either an SQL built-in function or the GROUP BY phrase. The previous SQL statement is correct SQL-92
syntax and will run in MySQL as written. However, SQL Server and Oracle Database require you to write:
/* *** SQL-CREATE-VIEW-AppE-04-MSSQL *** */
CREATE VIEW ProjectHoursToDateView AS
SELECT PROJECT.ProjectID,
ProjectName,
MaxHours AS ProjectMaxHours,
SUM(HoursWorked) AS ProjectHoursWorkedToDate
FROM PROJECT, ASSIGNMENT
WHERE PROJECT.ProjectID = ASSIGNMENT.ProjectID
GROUP BY PROJECT.ProjectID, ProjectName, MaxHours;
Note the use of the extra column names in the GROUP BY clause. These are necessary to create the view
but have no practical effect on the results.
E-13

Database Concepts SQL Views, SQL/PSM and Importing Data Appendix E
When the view user enters:
/* *** SQL-QUERY-AppE-04 *** */
SELECT *
FROM ProjectHoursToDateView
ORDER BY ProjectID;
these results are displayed:
Placing computations in views has two major advantages. First, it saves users from having to know or
remember how to write an expression to get the results they want. Second, it ensures consistent results.
If developers who use a computation write their own SQL expressions, they may write the expression
differently and obtain inconsistent results.
Using Views to Hide Complicated SQL Syntax
Another use of views is to hide complicated SQL syntax. By using views, developers do not need to enter
complex SQL statements when they want particular results. Also, such views allow developers who do
not know how to write complicated SQL statements to enjoy the benefits of such statements. This use of
views also ensures consistency.
Suppose that WPC users need to know which employees are assigned to which projects and how many
hours each employee has worked on each project. To display these interests, two joins are necessary:
one to join EMPLOYEE to ASSIGNMENT and another to join that result to PROJECT. You saw the SQL
statement to do this in Chapter 3:
/* *** SQL-QUERY-CH03-49 *** */
SELECT ProjectName, FirstName, LastName, HoursWorked
FROM EMPLOYEE AS E JOIN ASSIGNMENT AS A
ON E.EmployeeNumber = A.EmployeeNumber
JOIN PROJECT AS P
ON A.ProjectID = P.ProjectID
ORDER BY P.ProjectID, A.EmployeeNumber;
E-14

Database Concepts SQL Views, SQL/PSM and Importing Data Appendix E
Now we need to make it into a view named EmployeeProjectHoursWorkedView. Remember that we
cannot include the ORDER BY clause in the view. If we want to sort the output, we'll need to do this
when we use the view:
/* *** SQL-CREATE-VIEW-AppE-05 *** */
CREATE VIEW EmployeeProjectHoursWorkedView AS
SELECT ProjectName, FirstName, LastName, HoursWorked
FROM EMPLOYEE AS E JOIN ASSIGNMENT AS A
ON E.EmployeeNumber = A.EmployeeNumber
JOIN PROJECT AS P
ON A.ProjectID = P.ProjectID;
This is a complicated SQL statement to write, but after the view is created the results of this statement
can be obtained with a simple SELECT statement. When the user uses:
/* *** SQL-QUERY-AppE-05 *** */
SELECT *
FROM EmployeeProjectHoursWorkedView;
these results will be displayed:
Clearly, using the view is much simpler than constructing the join syntax. Even developers who know
SQL well will appreciate having a simpler view with which to work.
E-15

Database Concepts SQL Views, SQL/PSM and Importing Data Appendix E
Layering Computations and Built-in Functions
Recall from Chapter 3 that you cannot use a computation or a built-in function as part of a WHERE
clause. You can, however, construct a view that computes a variable and then write an SQL statement
on that view that uses the computed variable in a WHERE clause. To understand this, consider the
ProjectHoursToDateView definition created previously as SQL-CREATE-VIEW-AppE-04 (and remember
that it needs to be modified for SQL Server and Oracle Database as noted in the By The Way on
page E-13):
/* *** SQL-CREATE-VIEW-AppE-04 *** */
CREATE VIEW ProjectHoursToDateView AS
SELECT PROJECT.ProjectID,
ProjectName,
MaxHours AS ProjectMaxHours,
SUM(HoursWorked) AS ProjectHoursWorkedToDate
FROM PROJECT, ASSIGNMENT
WHERE PROJECT.ProjectID = ASSIGNMENT.ProjectID
GROUP BY PROJECT.ProjectID;
The view definition contains the maximum allocated hours for each project and the total hours actually
worked on the project to date as ProjectHoursWorkedToDate. Now we can use
ProjectHoursWorkedToDate in both an additional calculation and the WHERE clause, as follows:
/* *** SQL-QUERY-AppE-06 *** */
SELECT ProjectID, ProjectName, ProjectMaxHours,
ProjectHoursWorkedToDate
FROM ProjectHoursToDateView
WHERE ProjectHoursWorkedToDate > ProjectMaxHours
ORDER BY ProjectID;
Here, we are using the result of a computation in a WHERE clause, something that is not allowed in a
single SQL statement. This allows users to determine which projects have exceeded the number of hours
allocated to them by producing the result:
Such layering can be continued over many levels. We can turn this SELECT statement into another view
named ProjectsOverAllocatedMaxHoursView (again without the ORDER BY clause):
E-16

Database Concepts SQL Views, SQL/PSM and Importing Data Appendix E
/* *** SQL-CREATE-VIEW-AppE-06 *** */
CREATE VIEW ProjectsOverAllocatedMaxHoursView AS
SELECT ProjectID, ProjectName, ProjectMaxHours,
ProjectHoursWorkedToDate
FROM ProjectHoursToDateView
WHERE ProjectHoursWorkedToDate > ProjectMaxHours;
Now we can use ProjectsOverAllocatedMaxHoursView in a further calculation—this time to find the
number of hours by which each project has overrun its allocated hours:
/* *** SQL-QUERY-AppE-07 *** */
SELECT ProjectID, ProjectName, ProjectMaxHours,
ProjectHoursWorkedToDate,
(ProjectHoursWorkedToDate - ProjectMaxHours)
AS HoursOverMaxAllocated
FROM ProjectsOverAllocatedMaxHoursView
ORDER BY ProjectID;
Here are the results:
SQL views are very useful tools for database developers (who will define the views) and application
programmers (who will use the views in applications).
SQL/Persistent Stored Modules (SQL/PSM)
E
ach
DBMS
product has its own variant or extension
of SQL,
including
f
e
a
t
ur
e
s that allow SQL to
f
un
c
t
i
o
n similarly to a procedural programming language. The
ANSI/ISO
standard r
e
f
e
rs to
t
h
e
s
e
as
SQL/Persistent Stored Modules
(SQL/PSM)
.
M
i
c
r
o
s
o
f
t
SQL
Server calls its version
of SQL Transact-SQL
(T
-
S
Q
L)
,
and Oracle Database calls its version
of
SQL
Procedural Language/SQL (P
L/S
Q
L)
.
The
MySQL
variant
also includes
SQL/PSM
components, but it has no special name and is just called
SQL
in the
MySQL
docum
e
n
t
ation
.
SQL/PSM provides
the program
variables
and cursor
f
un
c
t
i
o
na
l
i
t
y
.
It also includes control-of-flow
language such as
B
EGIN
.
.
.
END blocks, IF
.
.
.
THEN
.
.
.
ELSE logic
structures, and
LOOPs,
as
well
as the
ability
to
provide usable output to users.
The most important
f
e
a
t
ur
e
of SQL/PSM,
h
owe
v
e
r
,
is that it allows the code that implements these
f
e
a
t
ur
e
s in a database to be contained in that database. Thus the name:
Persistent—the
code remains
available for
use over
time—Stored—the
code is stored
for
reuse in the
database—Modules—the
code is
E-17

Database Concepts SQL Views, SQL/PSM and Importing Data Appendix E
Figure E-10 — User-Defined Functions Logical Process Flow
written as a collection of us
e
r
-de
f
i
n
e
d units or modules
.
The
SQL
code can be written as one
of
three
module types: us
e
r
-de
f
i
n
e
d
f
un
c
t
i
o
n
s,
triggers,
and stored procedures.
SQL/PSM User-Defined Functions
A
user-defined
function (also known as a stored function) is a stored set
of SQL
statements
th
a
t
:
●
is
called
by name from another
SQL s
t
a
t
ement (or another module),
●
may have input
parameters
passed to it by the
calling SQL
statement (or module), and
●
returns
an output
value
to the
SQL
statement that
called
the
f
un
c
t
i
o
n (or module)
.
The
logical
process
flow of
a us
e
r
-de
f
i
n
e
d
f
un
c
t
i
o
n is illustrated in
Figure E-10. SQL/PSM
user-d
e
f
i
n
e
d
f
un
c
t
i
o
ns are very similar to the
SQL
built-in
f
un
c
t
i
o
ns (COUNT, SUM, AVE, MAX, and MIN)
that we
discussed and used in Chapter 3
,
except that, as the name implies, we
c
r
e
a
t
e
them
ourselves
to
p
e
r
f
o
rm
specific
tasks that we need to do.
A
common problem is needing a name in the
f
o
rma
t
FirstName LastName
(including the space!) in a
report when
t
h
e
database stores the basic data in two
fields
named
FirstName
and
L
a
s
tN
am
e
.
Using
the data in the WPC database,
we
co
u
l
d
,
of
course, simply include the code to do this in an
SQL
statement using a concatenation operator:
/* *** SQL-Query-AppE-08 *** */
SELECT RTRIM(FirstName)+' '+RTRIM(LastName) AS EmployeeName,
Department, Phone, Email
FROM EMPLOYEE
ORDER BY EmployeeName;
E-18

Database Concepts SQL Views, SQL/PSM and Importing Data Appendix E
This produces the desired results, but at the expense
of
working out some
c
umb
e
rs
o
m
e c
od
i
ng
:
By The Way
SQL-Query-AppE-08 is written for SQL Server 2014 using SQL Server T-SQL. As usual, SQL syntax varies
from DBMS to DBMS. Oracle Database Express Edition 11g Release 2 uses a double vertical bar [ || ] as
the concatenation operator, and SQL-Query-AppE-08 is written for Oracle Database as:
/* *** SQL-Query-AppE-08-Oracle-Database *** */
SELECT RTRIM(FirstName)||' '||RTRIM(LastName) AS EmployeeName,
Department, Phone, Email
FROM EMPLOYEE
ORDER BY EmployeeName;
MySQL 5.6 uses the concatenation string function CONCAT() as the concatenation operator, and SQL-
Query-AppE-08 is written for MySQL 5.6 as:
/* *** SQL-Query-AppE-08-MySQL *** */
SELECT CONCAT(RTRIM(FirstName),' ',RTRIM(LastName))
AS EmployeeName,
Department, Phone, Email
FROM EMPLOYEE
ORDER BY EmployeeName;
The alternative is to create a us
e
r
-de
f
i
n
e
d
f
un
c
t
i
o
n to store this code. Not only does
t
h
i
s make it easier
to use, but it also makes it
available for
use in other
SQL
statements.
Figure E-12
shows a us
e
r
-de
f
i
n
e
d
f
un
c
t
i
o
n written in
T
-S
Q
L
for
use with
M
i
c
r
o
s
o
f
t
SQL Server 2014,
and the
SQL
code
for
the
f
un
c
t
i
o
n uses, as
we would
expect, specific
syntax requirements
for M
i
c
r
o
s
o
f
t
SQL S
e
r
v
e
r
’
s
T-SQL
2014:
E-19

Database Concepts SQL Views, SQL/PSM and Importing Data Appendix E
Figure E-12 — User-Defined Function Code to Concatenate FirstName and LastName
●
The
f
un
c
t
i
o
n is created and stored in the database by using the
T-SQL CREATE FUNCTION
statement
.
●
The
f
un
c
t
i
o
n name starts with
db
o
,
which is a
M
i
c
r
o
s
o
f
t
SQL Server schema
nam
e
This use
of
a schema name preended to a database object nampe is
co
mm
o
n in
M
i
c
r
o
s
o
f
t
SQL S
e
r
v
e
r
.
●
The
variable
names
of
both the input parameters and the returned output
value s
t
ar
t
with
@.
●
The concatenation syntax is
T-SQL
syntax.
Now that we have created and stored the us
e
r
-de
f
i
n
e
d
f
un
c
t
i
o
n
,
we can use it in SQL-Query-AppE-09:
/* *** SQL-Query-AppE-09 *** */
SELECT dbo.FirstNameFirst(FirstName, LastName) AS EmployeeName,
Department, Phone, Email
FROM EMPLOYEE
ORDER BY EmployeeName;
E-20

Database Concepts SQL Views, SQL/PSM and Importing Data Appendix E
Note that we supply the parameters to the function in the order it expects them: first name, then last
name. The advantage of having a user-defined function is that we can now use it whenever we need to
without having to re-create the code. Now we have a query using our function that produces the results
we want, which
of
course are identical to the results
for SQL-Query-AppE-08
above:
By The Way
The user-defined function FirstNameFirst is written for SQL Server 2014 using SQL Server T-SQL. As
usual, SQL syntax varies from DBMS to DBMS. The Oracle Database Express Edition 11g Release 2
version is written as:
E-21

Database Concepts SQL Views, SQL/PSM and Importing Data Appendix E
The MySQL 5.6 version is written as:
SQL/PSM Triggers
A trigger is a stored program that is executed by the
DBMS
whenever a
specified
event occurs.
Triggers
for
Oracle Database are written in
J
a
v
a or in
O
ra
c
l
e
’
s
PL/SQL. SQL Server
triggers are written in
M
i
c
r
o
s
o
f
t
.NET
Common Language Runtime
(CLR)
languages, such as
Visual Basic .NET,
or
M
i
c
r
o
s
o
f
t
’
s
T-
SQL. MySQL
triggers are written in
M
yS
Q
L
’
s variant
o
f
SQL.
In this
c
hap
t
e
r
,
we
will
discuss
triggers
in a
generic
manner without considering the particulars
of
those
languages.
A trigger is attached to a table or a
vi
ew
.
A table or a view may have many
triggers,
but a trigger is
associated
w
i
t
h just one table or
vi
ew
.
A trigger is automatically invoked by an
SQL DML INSERT, UPDATE,
or
DELETE
request on the table or
view
t
o
which it is a
tt
a
c
h
e
d
.
Figure E-13
summarizes the triggers
available
for
SQL Server 2014, Oracle Database Express Edition 11g Release 2, and MySQL 5.6.
Oracle Database Express Edition 11g Release 2 supports three kinds of triggers: BEFORE, INSTEAD OF,
and AFTER.
As you would expect,
BEFORE
triggers are executed b
e
f
o
r
e
the
DBMS
processes the insert,
update, or delete request.
INSTEAD
OF triggers are executed in place
of
any
DBMS
processing
of
the insert,
update, or delete request.
AFTER
triggers are executed a
f
t
e
r
t
h
e
insert, update, or delete request has
been pr
oce
ss
e
d
.
All
t
oge
t
h
e
r
,
nine trigger types are possible:
BEFORE (INSERT, UPDATE, DELETE); INSTEAD OF
(INSERT, UPDATE, DELETE);
and AFTER
(INSERT, UPDATE,
DELETE).
E-22

Database Concepts SQL Views, SQL/PSM and Importing Data Appendix E
Figure E-13 — Summary of SQL Triggers by DBMS Product
Since
SQL
Server
2005, SQL
Server supports DDL triggers (triggers on such
SQL
DDL statements as
CREATE, ALTER, and DROP) as well as DML triggers. We will only deal with the DML triggers here, which
for SQL Server 2014 are INSTEAD OF and AFTER triggers on INSERT, UPDATE, and DELETE. (Microsoft
includes the FOR keyword, but this is a synonym for AFTER in Microsoft syntax.) Thus, we have six
possible trigger types for use in SQL Server 2014.
MySQL
5.6 supports only
BEFORE
and
AFTER
triggers, thus it supports only six trigger
types.
Other
DBMS
pr
o
du
c
t
s support triggers d
i
ff
e
r
e
n
t
ly
.
See
the documentation
of
your product to determine which trigger
types it supp
o
r
t
s.
When a trigger is
i
n
v
oke
d
,
the
DBMS
makes the data involved in the requested action
available
to the
trigger
code.
For an insert, the
DBMS will
supply the
values of
columns
for
the row that is being
i
ns
e
r
t
e
d
.
For deletions, the
DBMS will
supply the values
of
columns
for
the row that is being d
e
l
e
t
e
d
.
For updates,
it
will
supply both the old and the new values. The way in which this is done depends on the
DBMS
product.
While a full discussion of triggers is beyond the scope of this book, we will note that triggers have many
uses, and four common uses for triggers are
●
Providing
d
e
f
ault values
●
Enforcing
data
co
ns
t
r
ai
nt
s
●
Updating
SQL
views
●
Performing
referential integrity a
c
t
i
o
ns
For more information about SQL triggers and how to use them, see David M. Kroenke and David J. Auer,
Database Processing: Fundamentals, Design, and Implementation, 13
th
Edition (Upper Saddle River, NJ:
Pearson, 2014).
E-23

Database Concepts SQL Views, SQL/PSM and Importing Data Appendix E
Figure E-14 — Triggers Versus Stored Procedures
SQL/PSM Stored Procedures
A stored
procedure
is, like a function or trigger, a program that is stored within the database
.
In
Oracle Database, stored procedures can be written in PL/SQL or in Java. With SQL Server 2014, stored
procedures are written in T-SQL or a .NET CLR language, such as Visual Basic.NET, C#.NET, or C++.NET.
With MySQL, stored procedures are written in MySQL’s variant of SQL.
Stored procedures can
receive
input parameters and return results. They differ from functions in that
they are not required to return a result. And unlike triggers, which are attached to a given
t
ab
l
e
or
vi
ew
,
stored procedures are attached to the database.
They
can be executed by any process using the
database that has permission to use the procedure.
Differences
between triggers and stored procedures
are summarized in
Figure E
-14.
Stored procedures are used for many purposes. Although database administrators use them to p
e
r
f
o
rm
common administration tasks, their primary use is within database applications. They can be invoked
from application programs written in languages such as COBOL, C, Java, C#, or C++. They also can be
invoked from Web pages using VBScript, JavaScript, or PHP. Ad hoc users can run them from DBMS
management products such as SQL*Plus or SQL Developer in Oracle Database, SQL Server Management
Studio in SQL Server, or the MySQL Workbench in MySQL.
E-24

Database Concepts SQL Views, SQL/PSM and Importing Data Appendix E
Advantages of Stored Procedures
While a full discussion of stored procedures is beyond the scope of this book, we will note that there are
many advantages of using stored procedures. These are listed in Figure E-15.
Unlike application code, stored procedures are never d
i
s
t
ri
bu
t
e
d to client computers.
They always
reside
in the database and are processed
by
the
DBMS
on the database s
e
r
v
e
r
.
Thus,
they are m
o
r
e
secure than
distributed application
code,
and they
also
reduce network
t
ra
ff
ic.
I
n
c
r
e
as
i
n
g
ly
,
stored procedures are the
pr
e
f
e
rr
e
d mode
of
processing application
logic over
the Internet or corporate intranets. Another advantage
of
stored procedures
is
that
t
h
ei
r
SQL
statements can be optimized
by
the
DBMS
co
mp
i
l
e
r
.
When application
logic
is placed in a stored procedure, many d
i
ff
e
r
e
n
t
application programmers can use
that code. This sharing results not
only
in less
work,
but also in standardized pro
ce
ssin
g
.
F
ur
t
her
,
the
developers best suited for database work can create the stored procedures
while
other
developers,
sa
y
,
those who
specialize
in Web-tier programming, can do other work.
Because of
these
advantages,
it
is likely
that stored procedures
will
see increased use in the
f
u
t
ur
e.
For more information about SQL stored procedures and how to use them, see David M. Kroenke and
David J. Auer, Database Processing: Fundamentals, Design, and Implementation, 13
th
Edition (Upper
Saddle River, NJ: Pearson, 2014).
Figure E-15 — Advantages of Stored Procedures
E-25

Database Concepts SQL Views, SQL/PSM and Importing Data Appendix E
Importing Microsoft Excel Data into a Database Table
When developing a database to support an application, it is very common to find that some (if not all) of
the data needed in the database exists as data in user worksheets (also called spreadsheets). A typical
example of this is a Microsoft Excel 2013 worksheet that a user has been maintaining, and which must
now be converted to data stored in the database.
If we are really lucky, the worksheet will already be organized like a database table, with appropriate
column labels and unique data in each row. And if we are really, really lucky, there will be one or more
columns that can be used as the primary key in the new database table. In that case, we can easily
import the data into the database. More likely, we will have to modify the worksheet, and organize and
clean up the data in it before we can import the data. In essence, we are following a procedure that we
will encounter again in Chapter 8 in our discussion of data warehouses known as extract, transform and
load (ETL).
As an example, let’s consider the problem of computers owned by WPC. WPC needs to track these
computers (asset inventory) and who they are currently and have been assigned to for use. The properly
designed tables (COMPUTER and COMPUTER_ASSIGNMENT) to handle this problem are shown in the
Chapter 03 Access Workbench Exercises as Figures 3-23 and 3-25. The data for the tables is shown in
Figures 3-24 and 3-26.
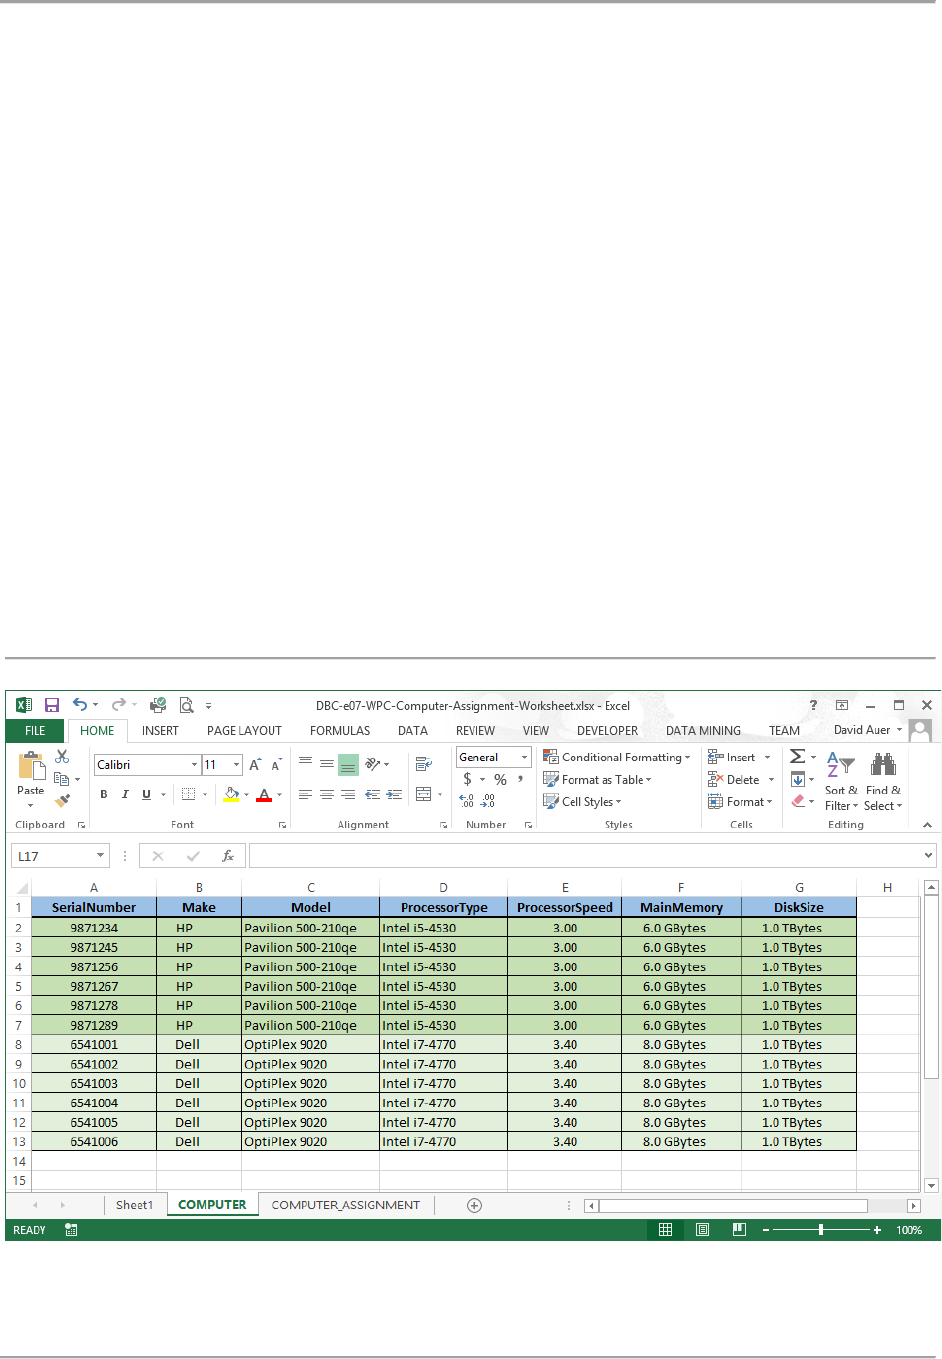
Unfortunately, that is not the way we will probably encounter the data. More likely we’ll find it stored in
a worksheet such as the Microsoft Excel 2013 worksheet shown in Figure E-16.
This worksheet breaks our basic rule of one theme per table—it combines computer inventory and
computer assignment data into the same worksheet. Worse, the computer assignments are handled by
using multiple assignment and date columns.
This is an example of what is called the multivalue, multicolumn problem, which occurs when multiple
columns are used in a spreadsheet or database table to record repetitions of the same data. A good
example is EMPLOYEE phone number data, where we might find a columns for HomePhone, CellPhone,
and BusinessPhone. This may seem reasonable until we have to add yet another phone number,
perhaps DepartmentPhone or SpousesPhone.
What we are dealing with here is a multivalued dependency, where the determinant determines
multiple values instead of just one:
EmployeeID
→→
PhoneNumber
A detailed solution to this problem is beyond the scope of this book, but the basic answer to is to put
the EmployeeID and PhoneNumber data into their own table (Note that as stated in Chapter 2, this
is 4NF).
4
4
For more information about multivalued dependencies and the multivalue, multicolumn problem, see David
Kroenke and David Auer, Database Processing: Fundamentals, Design, and Implementation, 13
th
Edition. (Upper
Saddle River, NJ, 2014: Pearson Higher Education.
E-26

Database Concepts SQL Views, SQL/PSM and Importing Data Appendix E
E-27
Database Concepts SQL Views, SQL/PSM and Importing Data Appendix E
In our current situation, it is obvious that we must extract the data we need from the worksheet for two
database tables – COMPUTER and COMPUTER_ASSIGNMENT, transform each set of data into a correctly
structured and formatted worksheet, and then load (import) the data from the worksheet into the
database.
We can do this by:
• Creating two new worksheets named COMPUTER and COMPUTER_ASSIGNMENT, and copying
the data into them, then
• Modifying the structure and data in each worksheet so that it is correct for importing into the
database,
• Importing the data from each worksheet into the database
After the data is imported into two database tables, we will then have to use SQL ALTER TABLE
statements to create primary keys, foreign keys and any other needed constraints.
Preparing the Microsoft Excel Data for Import into a Database Table
Figure E-17 shows the COMPUTER worksheet after it has been cleaned up. All extraneous rows and
columns have been deleted, and only the computer data (with appropriate column headers) remains.
This worksheet now looks like a database table, which is a good indication that the data import should
work properly.
Figure E-17 — The WPC COMPUTER Worksheet
E-28

Database Concepts SQL Views, SQL/PSM and Importing Data Appendix E
Figure E-18 — The WPC COMPUTER_ASSIGNMENT Worksheet – First Attempt
Figure E-18 shows the COMPUTER_ASSIGNMENT worksheet after our first attempt at restricting it.
There are still some obvious problems here. First of all, in the WPC database we identify employees by
their EmployeeNumber, not by their name. Second, we still have multiple Assigned To and Date
columns. Therefore, we need to (1) substitute EmployeeNumber for Assigned To, and (2) combine the
Assigned to and Date columns. We can determine EmployeeNumber (a surrogate key) by using an SQL
query in the WPC database:
/* *** SQL-Query-AppE-10 *** */
SELECT *
FROM EMPLOYEE
This query gives us:
E-29

Database Concepts SQL Views, SQL/PSM and Importing Data Appendix E
Figure E-19 — The WPC COMPUTER_ASSIGNMENT Worksheet – Second Attempt
Using this data, we can rework the COMPUTER_ASSIGNMENT worksheet as shown in Figure E-19, which
also includes a renamed Date column which is now DateAssigned. We have also renamed the
AssignedTo column to EmployeeNumber and transformed each row, which represented a single
computer, into multiple rows, one per assignment of that computer—that effectively combines the
AssignedTo and Date columns; it also transforms the data into first normal form.
Admittedly this is a small example, and given a larger data set a different strategy would be needed. For
our purposes here, however, this method will work.
We will now look at how to import a table into SQL Server 2014, Oracle Database Express Edition 11g
Release 2, and MySQL 5.6. We will use the COMPUTER table. The COMPUTER table column
characteristics as stated in Figure 3-23 are shown below in Figure E-20. Note that we will need two
CHECK constraints on this table, and that neither of these can be done in the data import—we will have
to use SQL ALTER TABLE statements to implement these constraints after the table is created and the
data is imported.
E-30

Database Concepts SQL Views, SQL/PSM and Importing Data Appendix E
Figure E-20 — Database Column Characteristics for the COMPUTER Table
Importing the Microsoft Excel Data into an SQL Server 2014 Database Table
Because Microsoft creates both Microsoft Excel 2013 and Microsoft SQL Server 2014, we would expect
that importing data from Microsoft Excel into SQL Server would be simple and problem free.
Unfortunately, in our experience, the SQL Server Import and Export Wizard, which is the tool we use for
data import, has some glitches.
First, apparently the SQL Server Import and Export Wizard is only programmed to work with Microsoft
Excel workbooks thorough Microsoft Excel 2007. Since we are using Microsoft Excel 2013, we have to
download and install the Microsoft Access Database Engine 2010 Redistributable from
http://www.microsoft.com/en-us/download/confirmation.aspx?id=13255
. There are both 32-bit and
64-bit versions—install both if you are running a 64-bit version of Office. If you don’t install this
software, you will get an error message during the Wizard, and it will not complete its tasks.
5
Second, the Wizard does not handle data types or NULL/NOT NULL constraints smoothly. We cannot
modify the Wizard-detected data types or NULL/NOT NULL setting into the data types we want in the
database—if we try, the Wizard generates an error message and will not complete its tasks.
Third, the Wizard does not allow a primary key to be set on the imported table, and it imports a set of
blank rows (all NULL values) in addition to the actual data (this is only possible because no primary key
has been set.
5
This statement is true on Windows 8.1 Update 1 running Microsoft Office 2013 and Microsoft SQL Server 2014
Express Edition with all updates and patches installed as of July 7
th
, 2014. Hopefully Microsoft will update the SQL
Server Import and Export Wizard and its supporting software in the near future.
E-31

Database Concepts SQL Views, SQL/PSM and Importing Data Appendix E
Our solution to this is to:
• Use the SQL Server Import and Export Wizard to import the data into a temporary table as
created by the Wizard, then
• Use an SQL CREATE TABLE statement to create the actual table we want in the database, then
• Use an SQL INSERT statement to copy the data from the temporary table to the actual table,
then
• Delete the temporary table from the database.
Note that in these steps we will use a new variant of the SQL INSERT statement, a bulk INSERT
statement. We use this form of the SQL INSERT statement when we want to copy a lot of data from one
table to another, and copying from a temporary table to a final table is a great place to use this
statement. In this case, given the name of the temporary table will be COMPUTER$, the SQL Statement
will be:
/* *** SQL-INSERT-AppE-01 *** */
INSERT INTO dbo.COMPUTER
(SerialNumber, Make, Model, ProcessorType,
ProcessorSpeed, MainMemory, DiskSize)
SELECT SerialNumber, Make, Model, ProcessorType,
ProcessorSpeed, MainMemory, DiskSize
FROM COMPUTER$
WHERE SerialNumber IS NOT NULL;
Note the use of the embedded SQL SELECT statement where we would expect to find a VALUES clause.
Here are the actual steps:
1. In the Microsoft SQL Server Management Studio, expand the WPC database.
2. Right-click on the WPC database object to display a short-cut menu, and in the short-cut menu
click on the Tasks command to display the Tasks menu, as shown in Figure E-21.
3. In the Task menu, click the Import Data command shown in Figure E-21 to launch the SQL Server
Import and Export Wizard as shown in Figure E-22.
4. On the Welcome to SQL Server Import and Export Wizard page shown in Figure E-22, click the
Next button to display the Choose a Data Source page as shown in Figure E-23.
5. On the Choose a Data Source page shown in Figure E-23, select Microsoft Excel as the data
source.
6. On the Choose a Data Source page shown in Figure E-23, browse to the location of the Microsoft
Excel file, select the most current version of Microsoft Excel listed in the Excel version drop-
down list (currently Microsoft Excel 2007), and make sure the check box for First row has column
names is checked, as shown in Figure E-23.
7. Click the Next button to display the Choose a Destination page as shown in Figure E-24, and
select SQL Server Native Client 11 as the destination. The WPC database values are
automatically supplied and there is nothing to change.
8. Click the Next button to display the Specify Table Copy or Query page as shown in Figure E-25.
E-32

Database Concepts SQL Views, SQL/PSM and Importing Data Appendix E
Figure E-21 — Launching the Microsoft SQL Server Import and Export Wizard
Figure E-22 — The Microsoft SQL Server Import and Export Wizard
Right-click the
WPC database
object to display
the shortcut menu
The Import Data
command
The Tasks
command
The Next button
E-33

Database Concepts SQL Views, SQL/PSM and Importing Data Appendix E
Figure E-23 — The Choose a Data Source Page
9. Click the Next button to display the Select Source Tables and Views page as shown in Figure E-
26, and check the ‘COMPUTER$’ check box in the Source column. The table name
[dbo].[COMPUTER$] is generated and displayed in the Destination column. This is the name we
will use for the temporary table in the WPC database.
10. Click the Edit Mappings button to display the Column Mappings dialog box shown in Figure E-27.
This dialog box shows the column names, data types and NULL/NOT NULL settings that will be
used to create the COMPUTER$ table during the import.
Note: We should be able to edit these values, but if we do we are likely to generate
errors during the import process. Therefore, we leave them alone, and leave the
temporary COMPUTER$ table as created by the Wizard.
Note: You may want to try some other imports where you do edit these values, in order
to understand what you can and cannot successfully edit. When in doubt, leave it alone!
11. Click the OK button to return to the Select Source Tables and Views page, and then click the
Next button.
12. The Run Package page is displayed as shown in Figure E-28. Click the Next button to display the
Complete the Wizard page as shown in Figure E-29, and then click the Finish button.
13. The SQL Server Import and Export Wizard runs the actual import, and then displays the The
Execution was successful page as shown in Figure E-30. Note that there are no errors in the
process. Click the Close button to close the Wizard.
The Next button
The Choose a
Data Source page
Select Microsoft
Excel 2007
Browse to the
Excel file
Select Microsoft
Excel
Check the First
row has column
names check box
E-34

Database Concepts SQL Views, SQL/PSM and Importing Data Appendix E
Figure E-24 — The Choose a Destination Page
Figure E-25 — The Specify Table Copy or Query Page
The Next button
The Choose a
Destination page
Select SQL Server
Native Client
11.0—the other
setting will appear
The Next button
Select Copy data
from one or more
tables or views
The Specify Table
Copy or Query
page
E-35

Database Concepts SQL Views, SQL/PSM and Importing Data Appendix E
Figure E-26 — The Select Source Tables and Views Page
Figure E-27 — The Column Mappings Dialog Box
The Next button
The OK button
The Select Source
Tables and Views
page
Check the
‘COMPUTER$’
check box
The Column
Mappings dialog
box
The Edit
Mappings button
E-36

Database Concepts SQL Views, SQL/PSM and Importing Data Appendix E
Figure E-28 — The Run Package Page
Figure E-29 — The Complete the Wizard Page
Figure E-30 — The Execution was Successful Page
The Next button
The Finish button
The Close button
The Run Package
page
The Complete the
Wizard page
The The execution
was successful
page
E-37

Database Concepts SQL Views, SQL/PSM and Importing Data Appendix E
14. In SQL Server Management Studio, refresh the WPC database. In Object Explorer, expand the
WPC database, then expand the Tables object, then expand the dbo.COMPUTER$ object, and
finally expand the Columns object.
15. Open a New Query window, and run SQL-Query-AppE-11:
/* *** SQL-Query-AppE-11 *** */
SELECT *
FROM COMPUTER$;
16. The results of SQL-Query-AppE-11 are shown in Figure E-31. Note that the SQL Server Import
and Export Wizard inserted an additional ten rows of blank data. This was only possible because
no primary key was set, and SerialNumber was allowed to be NULL during the import process.
Figure E-31 — The SQL-Query-AppE-11 Query and Results
E-38

Database Concepts SQL Views, SQL/PSM and Importing Data Appendix E
17. Now we have to create the final COMPUTER table in the WPC database. In the Microsoft SQL
Server Management Studio, write the SQL CREATE TABLE statement for the COMPUTER table
based on the data in Figure E-20. Note that in this case we can use the necessary CHECK
CONSTRAINT statements as part of the CREATE TABLE statement, and will not need to add them
later. This will be the SQL-CREATE-TABLE-AppE-01:
/* *** SQL-CREATE-TABLE-AppE-01 *** */
CREATE TABLE COMPUTER(
SerialNumber Int NOT NULL,
Make Char(12) NOT NULL,
Model Char(24) NOT NULL,
ProcessorType Char(24) NULL,
ProcessorSpeed Numeric(3,2) NOT NULL,
MainMemory Char(15) NOT NULL,
DiskSize Char(15) NOT NULL,
CONSTRAINT COMPUTER_PK PRIMARY KEY(SerialNumber),
CONSTRAINT MAKE_CHECK CHECK
(Make IN ('Dell', 'Gateway', 'HP', 'Other')),
CONSTRAINT SPEED_CHECK CHECK
(ProcessorSpeed BETWEEN 1.0 AND 4.0)
);
18. Run the SQL-CREATE-TABLE-AppE-01 statement. The results are shown in Figure E-32.
Figure E-32 — The SQL-CREATE-TABLE-AppE-01 Statement and Results
The SQL CREATE
TABLE statement
The COMPUTER
table
The COMPUTER$
table
E-39

Database Concepts SQL Views, SQL/PSM and Importing Data Appendix E
19. To copy the imported data from the temporary COMPUTER$ table to the final COMPUTER table,
use the SQL bulk INSERT statement SQL-INSERT-AppE-1:
/* *** SQL-INSERT-AppE-01 *** */
INSERT INTO dbo.COMPUTER
(SerialNumber, Make, Model, ProcessorType,
ProcessorSpeed, MainMemory, DiskSize)
SELECT SerialNumber, Make, Model, ProcessorType,
ProcessorSpeed, MainMemory, DiskSize
FROM COMPUTER$
WHERE SerialNumber IS NOT NULL;
20. After running the SQL-INSERT-AppE-01 statement, run SQL-Query-AppE-12:
/* *** SQL-Query-AppE-12 *** */
SELECT *
FROM COMPUTER;
21. The results for SQL-Query-AppE-12 are shown in Figure E-33. Note that we now have the correct
twelve rows of data.
22. Drop the temporary COMPUTER$ table (be sure you drop the right table!) using SQL-DROP-
TABLE-AppE-01:
/* *** SQL-DROP-TABLE-AppE-01 *** */
DROP TABLE COMPUTER$;
Because we were able to put all needed constraints, including PRIMARY KEY and the CHECK constraints,
into the SQL CREATE TABLE statement, the COMPUTER table does not require any modifications and is
ready to use.
Figure E-33 — The Final COMPUTER Table and Data
The SQL bulk
INSERT statement
Data in the
COMPUTER table
E-40
Database Concepts SQL Views, SQL/PSM and Importing Data Appendix E
Importing the Microsoft Excel Data into an Oracle Database Express Edition 11g Release 2
Database Table
Oracle Database Express Edition 11g Release 2 provides two ways of importing Microsoft Excel data via
SQL Developer:
• Create the table first using an SQL CREATE TABLE statement, and then import the data.
• Create the table while importing the data.
We will use the second method.
1. In Oracle SQL Developer, expand the WPC database.
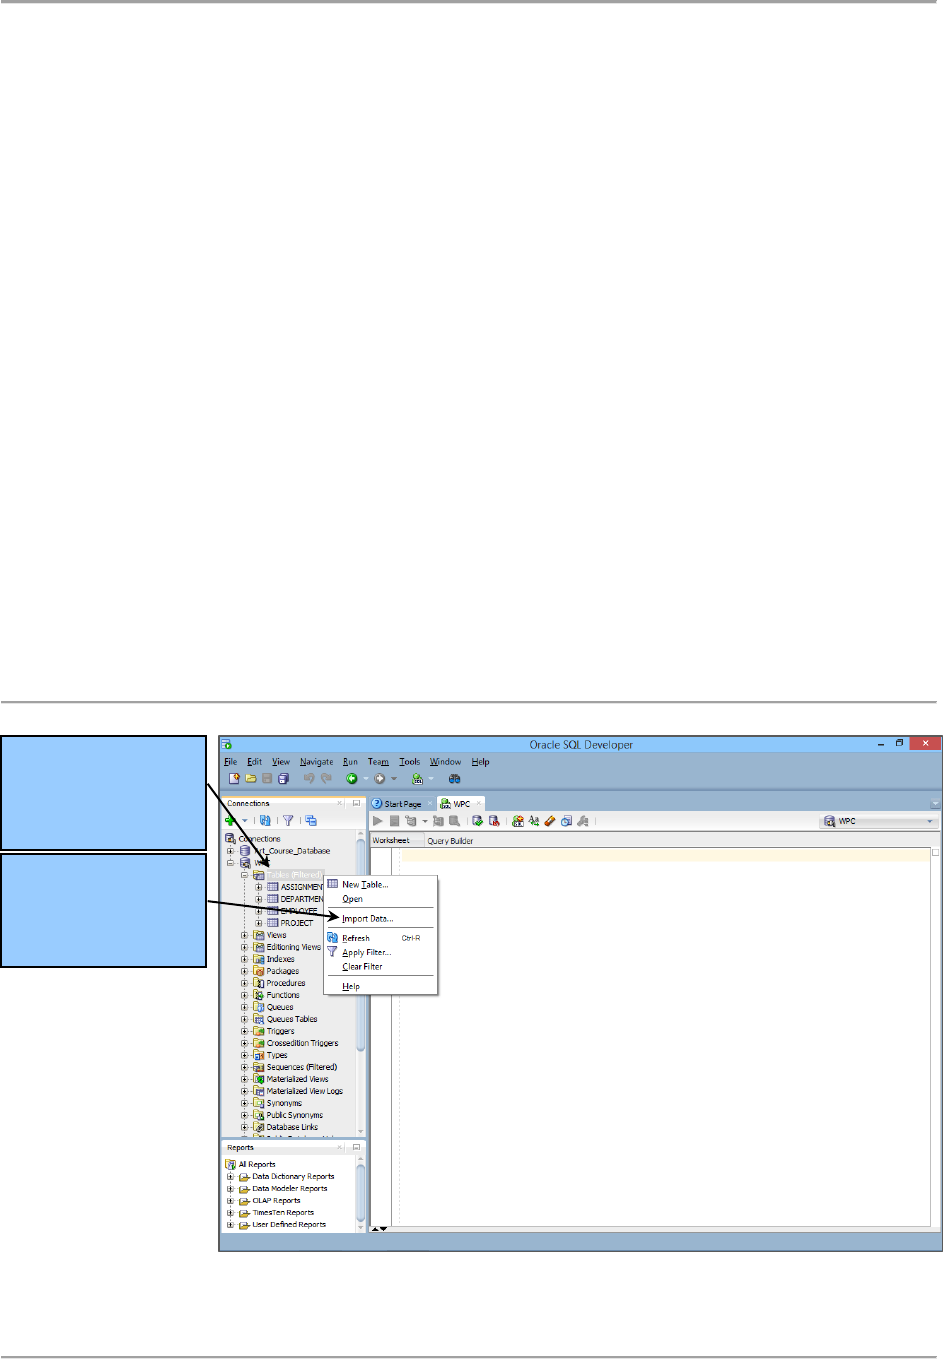
2. Right-click on the Tables (Filtered) WPC database object to display a short-cut menu, and in the
short-cut menu click on the Import Data command, as shown in Figure E-34.
3. Click the Import Data command shown in Figure E-34. The Open dialog box is displayed, as
shown in Figure E-35. Browser to the Excel workbook as shown in Figure E-35, and then click the
Open button.
4. The Data Import Wizard – Step 1 of 5 dialog box is displayed, initially looking as shown in Figure
E-36.
5. In the Data Import Wizard – Step 1 of 5 dialog box, check the Header checkbox, select the excel
2003+ (xlsx) format and the COMPUTER worksheet, so that the dialog box appears as shown in
Figure E-37.
Figure E-34 — The Import Data Command
Right-click Tables
(Filtered) to
display the shortcut
menu
In the shortcut
menu, click Import
Data…
E-41

Database Concepts SQL Views, SQL/PSM and Importing Data Appendix E
Figure E-35 — The Open Dialog Box
Figure E-36 — The Data Import Wizard – Step 1 of 5 Dialog Box – Original Settings
The Open dialog
box
Browse to the
Microsoft Excel file
and select it
Data Import
Wizard – Step 1 of
5 dialog box
These are the
original settings,
and need to be
edited.
The Open button
E-42

Database Concepts SQL Views, SQL/PSM and Importing Data Appendix E
Figure E-37 — The Data Import Wizard – Step 1 of 5 Dialog Box – Edited Settings
6. Click the Next button. The Data Import Wizard – Step 2 of 5 dialog box is displayed. Type in the
Table Name COMPUTER, so that the dialog box appears as shown in Figure E-38.
7. Click the Next button. The Data Import Wizard – Step 3 of 5 dialog box is displayed. This step
allows us to choose which worksheet columns to import. Note that all are currently selected,
and that is what we want, so no changes are necessary.
8. Click the Next button. The Data Import Wizard – Step 4 of 5 dialog box is displayed, as shown in
Figure E-39. This step allows us to define column characteristics for the COMPUTER table. Note
that in Figure E-39, the SerialNumber column characteristics do not match the ones specified in
Figure E-20.
9. Figure E-40 shows the SerialNumber column characteristics edited to match Figure E-20 as much
as possible. Note that we cannot designate this column as the primary key.
10. Edit the rest of the column characteristics to match Figure E-20 (Use CHAR instead of
VARCHAR2). Figure E-41 shows the edits for the ProcessorSpeed column.
11. When you have completed editing the column characteristics, click the Next button to display
the Data Import Wizard – Step 5 of 5 dialog box. This dialog box does not require us to take any
action.
12. Click the Finish button. The Import Data dialog box is displayed to shown that the import is
complete, as shown in Figure E-42.
13. Click the Import Data dialog box OK button to close the dialog box and end the import process.
Data Import
Wizard – Step 1 0f
5 dialog box
These are the
correct, edited
settings
The Next button
E-43

Database Concepts SQL Views, SQL/PSM and Importing Data Appendix E
Figure E-38 — The Data Import Wizard – Step 2 of 5 Dialog Box – Edited Settings
Figure E-39 — The Data Import Wizard – Step 4 of 5 Dialog Box – SerialNumber Initial Settings
Data Import
Wizard – Step 2 of
5 (not 4 as stated)
dialog box
Type in the Table
Name COMPUTER
The Next button
Data Import
Wizard – Step 4 of
5 dialog box
These are initial
settings, and need
to be edited
The Next button
E-44

Database Concepts SQL Views, SQL/PSM and Importing Data Appendix E
Figure E-40 — The Data Import Wizard – Step 4 of 5 Dialog Box – SerialNumber Edited Settings
Figure E-41 — The Data Import Wizard – Step 4 of 5 Dialog Box – ProcessorSpeed Edited Settings
Data Import
Wizard – Step 4 of
5 dialog box
These are the
correct, edited
settings
The Next button
Data Import
Wizard – Step 4 of
5 dialog box
These are the
correct, edited
settings
The Next button
E-45

Database Concepts SQL Views, SQL/PSM and Importing Data Appendix E
Figure E-42 — The Import Data Dialog Box
Figure E-43 — The Filter Dialog Box – Adding the COMPUTER Table
14. Right-Click the Tables (Filtered) WPC database object, and click the Apply Filter… command. In
the Filter dialog box, add in the COMPUTER table by NAME and equals (=) to add the COMPUTER
table to the list of visible database tables, as shown in Figure E-43.
15. Click the OK button on the Filter dialog box. The COMPUTER table now appears in the Tables
(filtered) objects, as shown in Figure E-44 (where the COMPUTER table object itself has been
expanded to shown the columns).
Import Data dialog
box
The OK button
Edit this new filter
line to match
The OK button
Right-click Tables
(Filtered) to
display the shortcut
menu—then click
the Apply Filter…
command
The Filter dialog
box
The Add button
E-46

Database Concepts SQL Views, SQL/PSM and Importing Data Appendix E
Figure E-44 — The COMPUTER Table in the Tables (Filtered) Object
Figure E-45 — SQL-Query-AppE-13 Results
The Tables
(Filtered) object
The COMPUTER
table
The columns in the
COMPUTER table
The SQL-Query-
AppE-13 query
The SQL-Query-
AppE-13 query
results
E-47

Database Concepts SQL Views, SQL/PSM and Importing Data Appendix E
16. In the WPC SQL query window, and run SQL-Query-AppE-13:
/* *** SQL-Query-AppE-13 *** */
SELECT *
FROM COMPUTER;
17. The results of SQL-Query-AppE-13 are shown in Figure E-45. Note that the all columns and data
are correct.
18. To set the COMPUTER table primary key, in the WPC SQL query window write the SQL-ALTER-
TABLE-AppE-01 statement:
/* *** SQL-ALTER-TABLE-AppE-01 *** */
ALTER TABLE COMPUTER
ADD CONSTRAINT COMPUTER_PK PRIMARY KEY(SerialNumber);
19. To set the CHECK CONSTRAINT for the computer make, in the WPC SQL query window write the
SQL-ALTER-TABLE-AppE-02 statement:
/* *** SQL-ALTER-TABLE-AppE-02 *** */
ALTER TABLE COMPUTER
Add CONSTRAINT MAKE_CHECK CHECK
(Make IN ('Dell', 'Gateway', 'HP', 'Other'));
20. To set the CHECK CONSTRAINT for the computer processor speed, in the WPC SQL query
window write the SQL-ALTER-TABLE-AppE-03 statement:
/* *** SQL-ALTER-TABLE-AppE-03 *** */
ALTER TABLE COMPUTER
Add CONSTRAINT SPEED_CHECK CHECK
(ProcessorSpeed BETWEEN 1.0 AND 4.0);
21. The combined results for SQL-ALTER-TABLE-AppE-01, SQL-ALTER-TABLE-AppE-02, and SQL-
ALTER-TABLE-AppE-03 are shown in Figure E-46.
22. The COMPUTER table has now been added to the WPC database.
E-48

Database Concepts SQL Views, SQL/PSM and Importing Data Appendix E
Figure E-46 — SQL-ALTER-TABLE Statement Results
Importing the Microsoft Excel Data into a MySQL 5.6 Database Table
For MySQL, we will create the COMPTUER Table using the MySQL for Excel Add-In. Install this utility
using the MySQL Installer, and when Microsoft Excel is launched, it will then appear on the DATA tab in
the Microsoft Excel 2013 ribbon. The MySQL for Excel Add-In does a good job of letting use create a new
table, set a primary key and specify most column characteristics. It does not, however, let us set CHECK
constraints as specified in Figure E-20, so we will have to use SQL ALTER TABLE statements to add those.
However, MySQL does not support some common SQL ALTER TABLE features, so we will have to use
MySQL specific syntax (see: http://dev.mysql.com/doc/refman/5.6/en/alter-table.html
).
1. Open the COMPUTER worksheet in Microsoft Excel 2013, and click the DATA tab in the Ribbon.
The MySQL for Excel button is displayed, as shown in Figure E-47. Click the MySQL for Excel
button to launch the MySQL for Excel pane, as shown in Figure E-48.
2. Open a MySQL connection by double-clicking Local instance MySQL56, and logging into the
MySQL 5.6 server.
The SQL-ALTER-
TABLE-AppE-01
statement
The SQL-ALTER-
TABLE-AppE-02
statement
The SQL-ALTER-
TABLE-AppE-03
statement
The SQL-ALTER-
TABLE statement
results
E-49

Database Concepts SQL Views, SQL/PSM and Importing Data Appendix E
3. As shown in Figure E-49, filter the database schemas shown to find the wpc schema, then click
the wpc schema name to select it, and then click the Next button.
4. In Microsoft Excel, select (highlight) the entire COMPUTER table range!
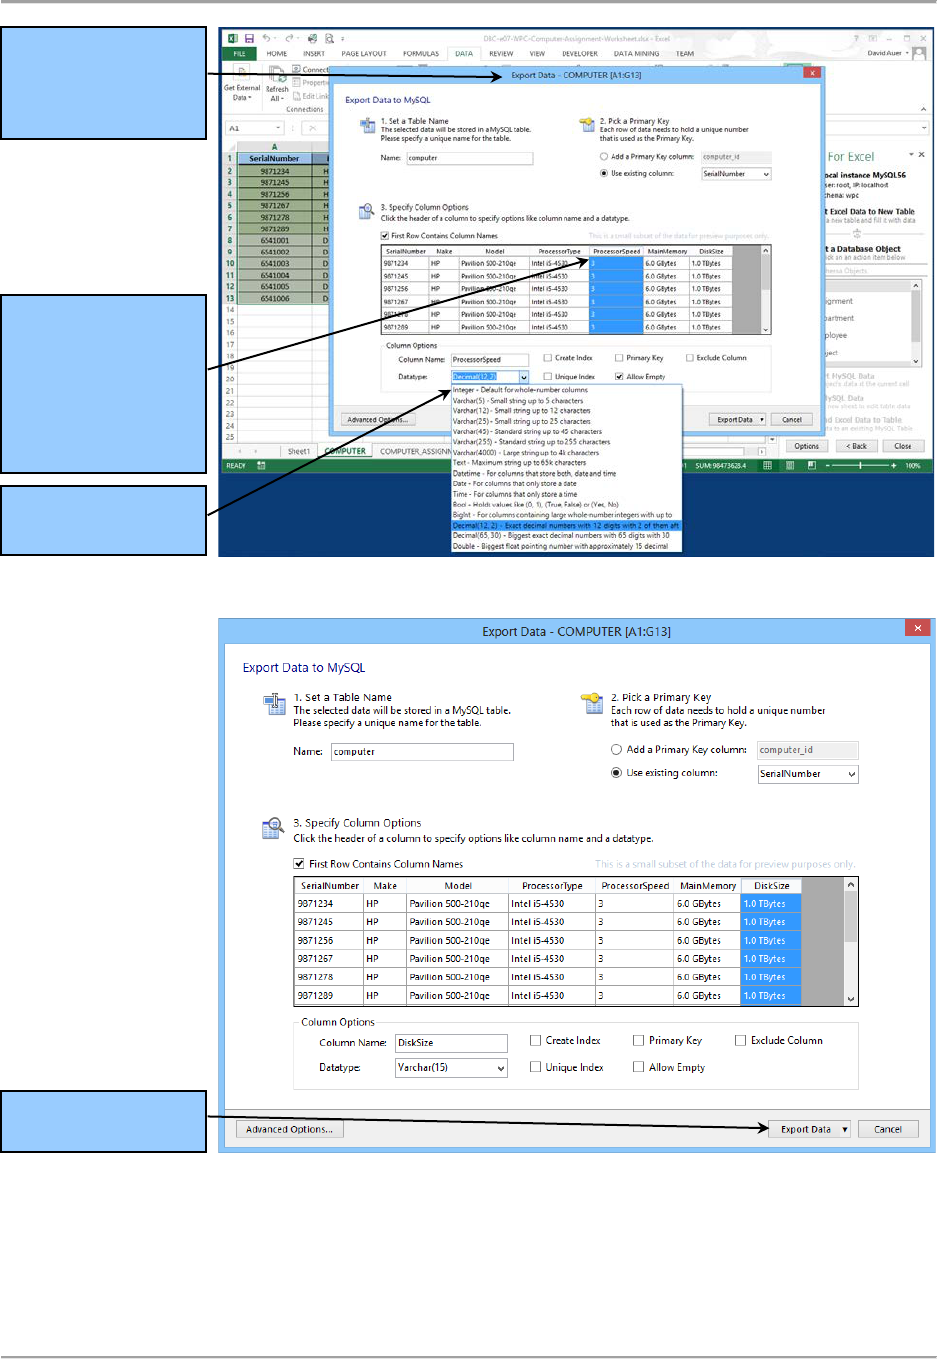
5. As shown in Figure E-50, click the Export Excel Data to New Table command. The Export Data
dialog box is displayed, as shown in figure E-51, labeled with the name of the selected Microsoft
Excel sheet and the selected range (COMPUTER [A1:G13]).
6. Complete the new COMPUTER table specifications to match Figure E-20 – note that you can
adjust data types and NULL/NOT NULL (shown as “Allow Empty”) for each column as shown in
Figure E-52. Although Figure E-20 shows Text data types which would normally be CHAR data
types, we will use the selected MySQL VARCHAR data type for text columns, but adjust the
number of characters to match Figure E-20.
7. The complete Export Data – COMPUTER [A1:G13] dialog box is shown in Figure E-53.
8. Click the Export Data button. The new table is created and populated, as shown in the Success
dialog box seen in Figure E-54.
Figure E-47 — The MySQL for Excel button
The MySQL for
Excel button
The COMPUTER
worksheet
E-50

Database Concepts SQL Views, SQL/PSM and Importing Data Appendix E
Figure E-48 — The MySQL for Excel Pane
Figure E-49 — Selecting the wpc Database Schema
9. In the Success dialog box, click the OK button.
10. In the Microsoft Excel MySQL For Excel pane, click the Close button to close MySQL for Excel.
11. Save the Microsoft Excel workbook. If a dialog box appears warning about macro features that
cannot be saved, ignore it and click the Yes button.
12. Close the Microsoft Excel workbook.
The MySQL for
Excel
button
The COMPUTER
worksheet
The MySQL for
Excel pane
The Next button
Filter for the wpc
database schema
Click the wpc
database schema
to select it
E-51

Database Concepts SQL Views, SQL/PSM and Importing Data Appendix E
Figure E-50 — The MySQL for Excel Pane
Figure E-51 — The Export Data – COMPUTER [A1:G13] Dialog Box
Select (highlight)
the entire range of
the COMPUTER
table in Microsoft
Excel
The Export Data –
COMPUTER
[A1:G13] dialog
box
Click the Export
Excel Data to New
Table command
E-52
Database Concepts SQL Views, SQL/PSM and Importing Data Appendix E
Figure E-52 — Editing the COMPUTER Table Specifications
Figure E-53 — Final COMPUTER Table Specifications
The Export Data –
COMPUTER
[A1:G13] dialog
box
Edit each set of
column
characteristics to
match Figure
E-20—Use
VARCHAR for text
data
Datatype drop-
down list
The Export Data
button
E-53

Database Concepts SQL Views, SQL/PSM and Importing Data Appendix E
Figure E-54 — the Success Dialog Box
13. Open MySQL Workbench, and refresh the wpc schema. Expand the Tables object and the
computer table object Columns.
14. We need to inspect the structure of the new computer table. Right-click the computer table
object, click Table Inspector, and then click the Columns tab. The column characteristics for the
computer table are displayed as shown in Figure E-55. The only problem with the table as
created in MySQL 5.6 is that the DiskSize column should be NOT NULL. We can run an SQL ALTER
TABLE command to fix that—otherwise everything is correct.
15. We need to check the data in the new computer table. Right-click the computer table object,
and then click the Select Rows – Limit 1000 command. The data in the computer table is
displayed, as shown in Figure E-56. All the data is correct.
Figure E-55 — The computer Table Characteristics
This should be
“NO”—we will need
to use an SQL
ALTER TABLE
statement to fix it
The OK button
E-54

Database Concepts SQL Views, SQL/PSM and Importing Data Appendix E
Figure E-56 — The computer Table Data
16. Now we need to modify the computer table to match the COMPUTER column characteristics in
Figure E-20. Specifically, we need to fix the NULL/NOT NULL setting of DiskSize, and we need to
add the two CHECK CONSTRAINTS.
17. To set the NULL/NOT NULL status of DiskSize requires the use of a syntax particular to MYSQL. In
the WPC SQL query window write the SQL-ALTER-TABLE-AppE-04 statement:
/* *** SQL-ALTER-TABLE-AppE-04 *** */
ALTER TABLE COMPUTER
CHANGE COLUMN DiskSize DiskSize VARCHAR(15) NOT NULL;
18. To set the CHECK CONSTRAINT for the computer make, in the WPC SQL query window write the
SQL-ALTER-TABLE-AppE-05 statement:
/* *** SQL-ALTER-TABLE-AppE-05 *** */
ALTER TABLE COMPUTER
ADD CONSTRAINT MAKE_CHECK CHECK
(Make IN ('Dell', 'Gateway', 'HP', 'Other'));
19. To set the CHECK CONSTRAINT for the computer processor speed, in the WPC SQL query
window write the SQL-ALTER-TABLE-AppE-06 statement:
/* *** SQL-ALTER-TABLE-AppE-06 *** */
ALTER TABLE COMPUTER
ADD CONSTRAINT SPEED_CHECK CHECK
(ProcessorSpeed BETWEEN 1.0 AND 4.0);
The data is
correct—no
adjustments
needed.
E-55

Database Concepts SQL Views, SQL/PSM and Importing Data Appendix E
Figure E-57 — The SQL ALTER TABLE Statements in MySQL Workbench
20. The combined results for SQL-ALTER-TABLE-AppE-04, SQL-ALTER-TABLE-AppE-05, and SQL-
ALTER-TABLE-AppE-06 are shown in Figure E-57.
21. The COMPUTER table has now been added to the WPC database.
22. Close MySQL Workbench.
Section E
Working with Views and Microsoft Excel Data in Microsoft Access
In Chapter 3's section of "The Access Workbench," you learned to work with Microsoft Access SQL and
QBE. In this section, you'll learn how to create the Access equivalent of SQL views.
We'll continue to use the WMCRM database we have been using. At this point, we have created and
populated (which means we've inserted the data into) the CUSTOMER, CONTACT, and SALESPERSON
tables and have set the referential integrity constraints between them.
The SQL-ALTER-
TABLE-AppE-04
statement
The SQL-ALTER-
TABLE-AppE-05
statement
The SQL-ALTER-
TABLE-AppE-06
statement
The SQL-ALTER-
TABLE statement
results
E-56

Database Concepts SQL Views, SQL/PSM and Importing Data Appendix E
Working with SQL Views in Microsoft Access
Although a view is a virtual table, it can also be represented as a stored query. Although most DBMSs do
not allow queries to be saved in a database, Access does. Access allows us to run queries against tables
or against saved queries. This gives us a way to implement a Microsoft Access equivalent of an SQL
view: We simply save the SELECT query that would be used to create the SQL view and use it as we
would an SQL view in other queries.
Here is an SQL CREATE VIEW statement that would be used to list customer data from the WMCRM
database if we were creating a standard SQL view:
/* *** SQL-CREATE-VIEW-AWAppE-01 *** */
CREATE VIEW CustomerPhoneView AS
SELECT FirstName, LastName, Phone AS CustomerPhone
FROM CUSTOMER;
Since we cannot create SQL Views directly as SQL Views in Access, we instead create a query—using
either Access SQL or QBE—based on the SELECT portion of this statement:
/* *** SQL-QUERY-AWAppE-01 *** */
SELECT FirstName, LastName, Phone AS CustomerPhone
FROM CUSTOMER
After we create the query, we save it using a query name that indicates that this query is intended to be
used as an SQL view. We can use the naming convention of putting the word view at the beginning of
any such query name. Thus, we can name this query viewCustomerPhone.
Creating an Access Query as a View Equivalent
1. Start Microsoft Access 2013.
2. Click the File command tab to display the File menu and then click the WMCRM.accdb database
filename in the quick access list to open the database.
3. Click the Create command tab to display the Create command groups.
4. Click the Query Design button.
5. The Query1 tabbed document window is displayed in Design view, along with the Show Table
dialog box.
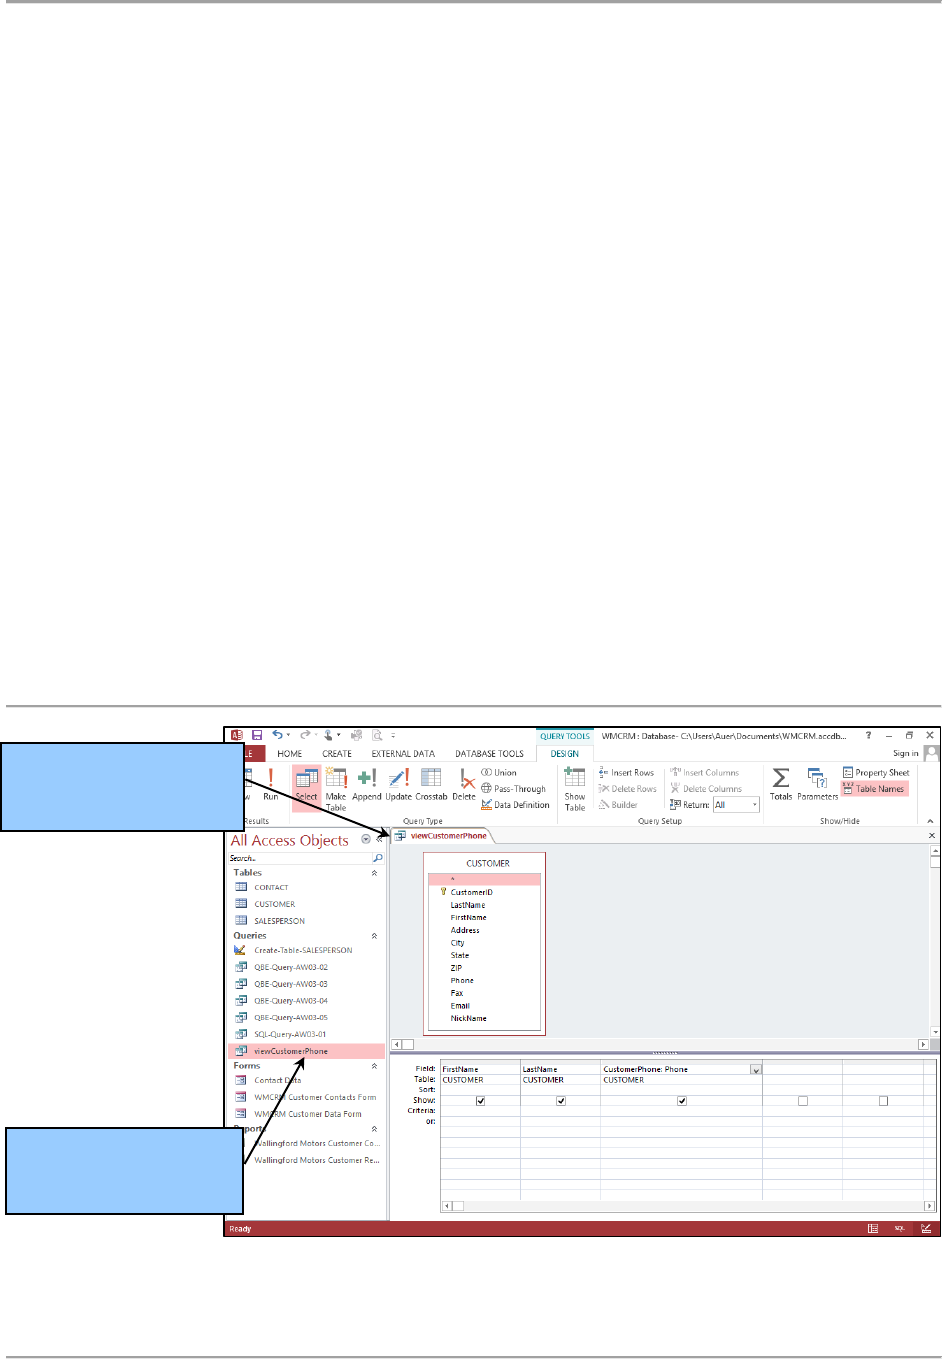
6. Using either the SQL or QBE technique of creating queries, as described in Chapter 3's section of
"The Access Workbench," create the query:
SELECT FirstName, LastName, Phone AS CustomerPhone
FROM CUSTOMER;
E-57
Database Concepts SQL Views, SQL/PSM and Importing Data Appendix E
NOTE: As shown in Figure AW-E-1, to create the equivalent of Phone AS
CustomerPhone , enter the alias name followed by a colon [ : ], and followed by the
column name that is being aliased.
7. To save the query, click the Save button on the Quick Access Toolbar. The Save As dialog box
appears.
8. Type in the query name viewCustomerPhone and then click the OK button. The query is saved,
the document window is renamed with the query name, and a newly created
viewCustomerPhone query object appears in the Queries section of the Navigation Pane, as
shown in Figure AW-E-1. Note that Figure AW-E-1 shows the query created in Access QBE.
9. Close the viewCustomerPhone window by clicking the document window's Close button.
10. If Access displays a dialog box that asks whether you want to save changes to the design of
query viewCustomerPhone, click the Yes button.
Now we can use the viewCustomerPhone query just as we would any other SQL view (or Access saved
query). For example, we can implement the following SQL statement:
/* *** SQL-QUERY-AWAppE-01 *** */
SELECT FirstName, LastName, CustomerPhone
FROM viewCustomerPhone
ORDER BY LastName;
Figure AW-E-1 — The viewCustomerPhone Query in the Queries Pane
The query window is
now named
viewCustomerPhone
The
viewCustomerPhone
query object
E-58

Database Concepts SQL Views, SQL/PSM and Importing Data Appendix E
We'll use Access QBE in this example.
Using an Access Query in Another Access Query
1. Click the Create command tab to display the Create command groups.
2. Click the Query Design button.
3. The Query1 tabbed document window is displayed in Design view, along with the Show Table
dialog box.
4. In the Show Table dialog box, click the Queries tab to select it. The list of all saved queries
appears, as shown in Figure AW-E-2.
5. Click viewCustomerPhone to select the viewCustomerPhone query. Click the Add button to add
the viewCustomerPhone query to the new query.
6. Click the Close button to close the Show Table dialog box.
7. From the viewCustomerPhone query, click and drag the LastName, FirstName, and
EmployeePhone column names to the first three field columns in the lower pane.
8. In the field column for LastName, set the Sort setting to Ascending. The completed QBE query
looks as shown in Figure AW-E-3. If necessary, resize the table object and the Field columns so
that complete labels are displayed.
Figure AW-E-2 — Queries Displayed in the Show Table Dialog Box
The Queries tab in
the Show Table
dialog box
The
viewCustomerPhone
query object
E-59
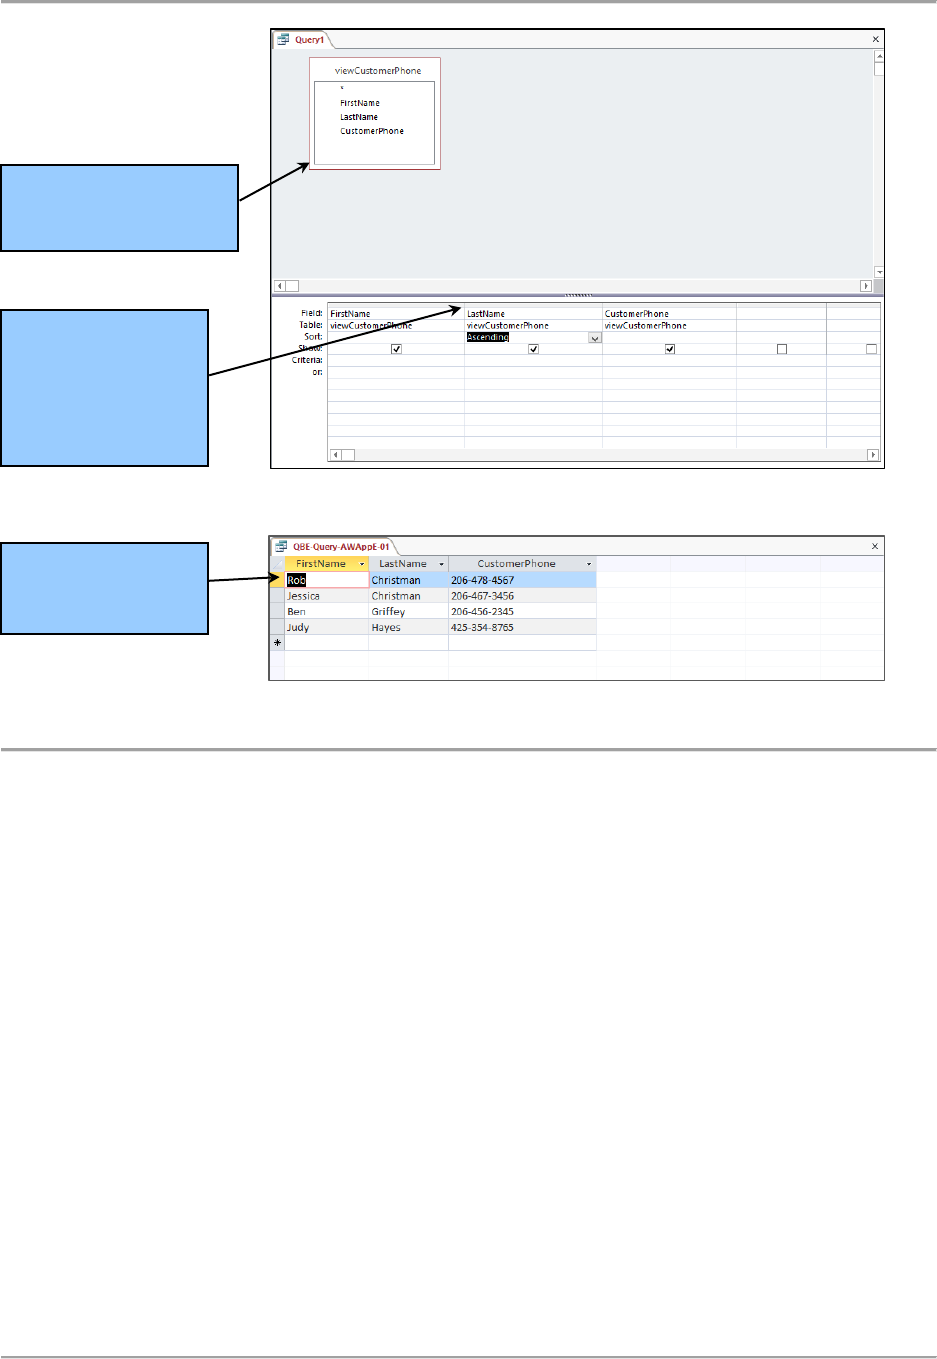
Database Concepts SQL Views, SQL/PSM and Importing Data Appendix E
Figure AW-E-3 — The Completed Query
Figure AW-E-4 — The Query Results
9. Save the query as QBEQuery-AWAppE-01.
10. Click the Run button on the Design command tab. The query results appear as shown in Figure
AW-E-4.
11. Close the QBEQuery-AWAppE-01 query window.
Now we can use the equivalent of SQL views in Access by using one query as the source for additional
queries. That completes the work we'll do in this section of "The Access Workbench," so we can close
the database and Access.
Working with SQL/PSM in Microsoft Access
Microsoft Access 2013 does not implement SQL/PSM as such. Corresponding capabilities can be found in
Microsoft Access Visual Basic for Applications (VBA), but that topic is beyond the scope of this book.
Object and Field
column boundaries
can be adjusted as
necessary to
display complete
titles and names
The
viewCustomerPhone
query object
The data are sorted
by LastName, but
not by FirstName
E-60

Database Concepts SQL Views, SQL/PSM and Importing Data Appendix E
Figure AW-E-5 — The Wallingford Motors Gaea Specifications Workbook
Importing Microsoft Excel Data into in Microsoft Access
To illustrate importing Microsoft Excel data into Microsoft Access, we’ll need a Microsoft Excel
worksheet. Fortunately, the sales force at Wallingford Motors have been keeping details about Gaea
model specifications in just such a worksheet, as shown in Figure AW-E-5.
As discussed in the text, this worksheet is problematic because it contains more that just the column
names and data we will want to import. Therefoer, we create an edited version as shown in
Figure AW-E-6. Now we need to import this data into Microsoft Access 2013.
Importing a Microsoft Excel Worksheet into Microsoft Access
1. Click the EXTERNAL DATA command tab to display the EXTERNAL DATA command groups.
2. As shown in Figure AW-E-7, click the Excel button to display the Get External Data – Excel
Worksheet dialog box.
3. Browse to the DBC-e07-WMCRM-2015-Specificiations.xlsx Microsoft Excel 2013 workbook, as
shown in Figure AW-E-8. Leave the Import the source data into a new table in the current
database radio button selected.
4. Click the OK button.
5. The Import Spreadsheet Wizard is launched. On the first page, select the SPECIFICATIONS_2015
worksheet as shown in Figure AW-E-9.
6. Click the Next button.
E-61

Database Concepts SQL Views, SQL/PSM and Importing Data Appendix E
Figure AW-E-6 — The Revised Wallingford Motors Gaea Specifications Worksheet
Figure AW-E-7 — The Get External Data – Excel Spreadsheet Dialog Box
The Excel button
The EXTERNAL
DATA command
tab
The Get External
Data – Excel
Spreadsheet
dialog box
E-62

Database Concepts SQL Views, SQL/PSM and Importing Data Appendix E
Figure AW-E-8 — The Get External Data – Excel Spreadsheet Dialog Box Completed
Figure AW-E-9 — The Import Spreadsheet Wizard Dialog Box
7. On the next page of the Import Spreadsheet Wizard, make sure the First Row Contains Column
Headings checkbox is checked, as shown in Figure AW-E-10.
8. Click the Next button.
Browse to the
Excel spreadsheet
with the data to be
imported
Select the Import
the source data
into a new table in
the current
database radio
button
The Excel
spreadsheet path
and name
The OK button
The Import
Spreadsheet
Wizard
Select the
SPECIFICATIONS
_2015 worksheet
The Next button
E-63

Database Concepts SQL Views, SQL/PSM and Importing Data Appendix E
Figure AW-E-10— The First Row Contains Column Headings Check Box
Figure AW-E-11— The Field Options for the EstMPG Column (Field)
9. On the next page of the Import Spreadsheet Wizard, we are given a chance to review column
(called field here) characteristics. For each field, we can set Field Name, DataType and whether
to index each column. We do not need to index. ModelNumber, ModelName and
ModelDescription will be Short Text, EstElectricToGasRatio will be Single, and EstMPG will be
Integer. Figure AW-E-11 shows the settings for the EstMPG field.
10. Click the Next button.
The Import
Spreadsheet
Wizard
Check the First
Row Contains
Column Headings
check box
The Next button
The Import
Spreadsheet
Wizard
The Field Options
for the EstMPG
column (field)
The Next button
E-64
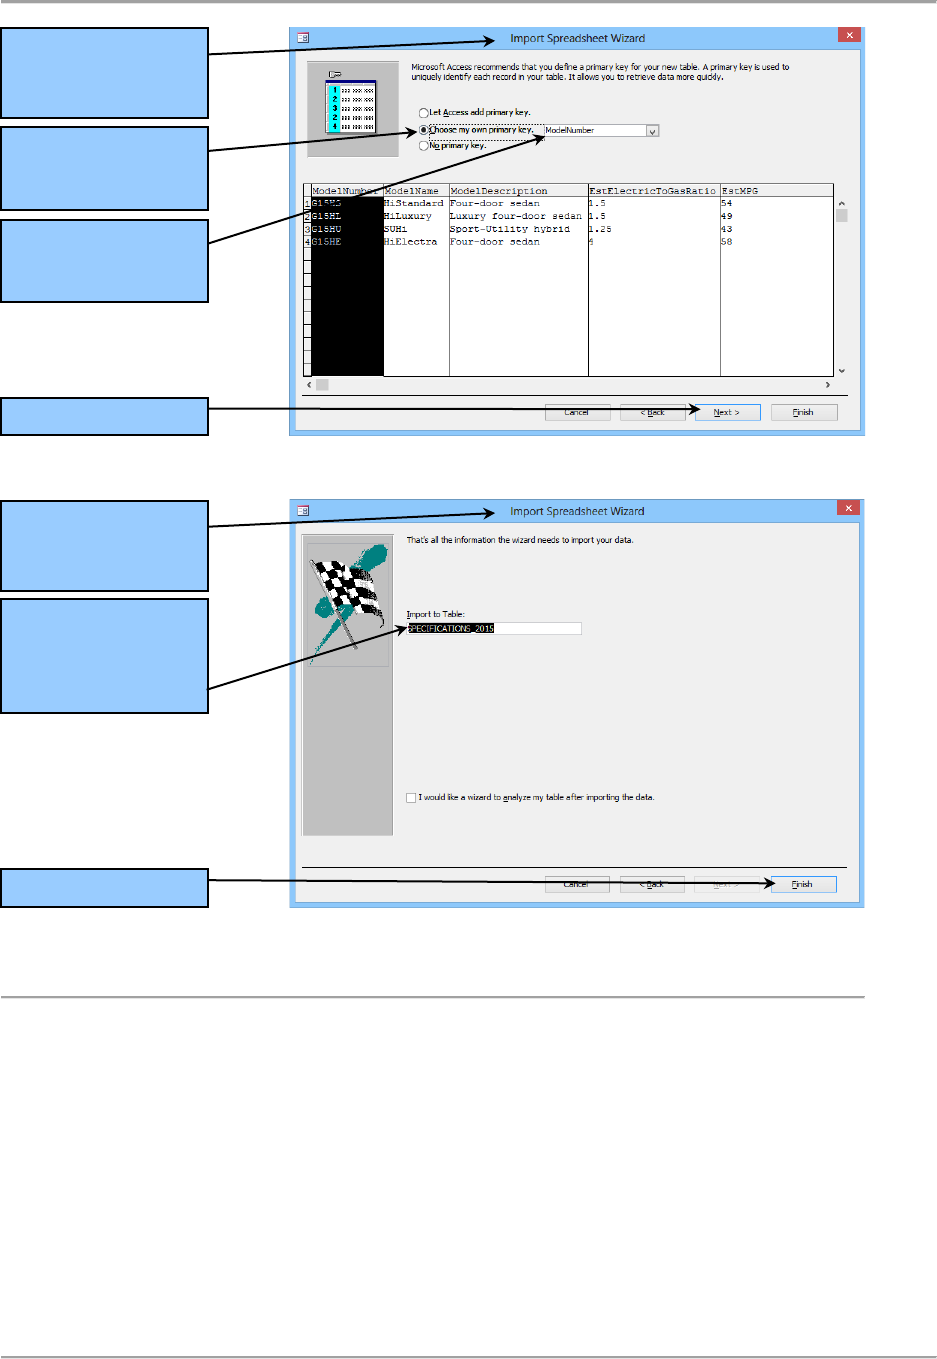
Database Concepts SQL Views, SQL/PSM and Importing Data Appendix E
Figure AW-E-12— The Choose Primary Key Window
Figure AW-E-13— Entering the New Table Name
11. On the next page we are given a chance to set a primary key. We will choose our own, and it will
be ModelNumber, as shown in Figure AW-E-12.
12. Click the Next button.
13. On the next page we are given a chance to set a table name. The default is the Worksheet name,
and, as shown if Figure AW-E-13, here it is SPECIFICATIONS_2015, which is what we want the
table to be named. No changes are required here.
14. Click the Finish button.
The Import
Spreadsheet
Wizard
The Choose my
own primary key
radio button
The Next button
Select
ModelNumber as
the primary key
The Import
Spreadsheet
Wizard
Type in the new
table name
SPECIFICATIONS
_2015 here
The Finish button
E-65
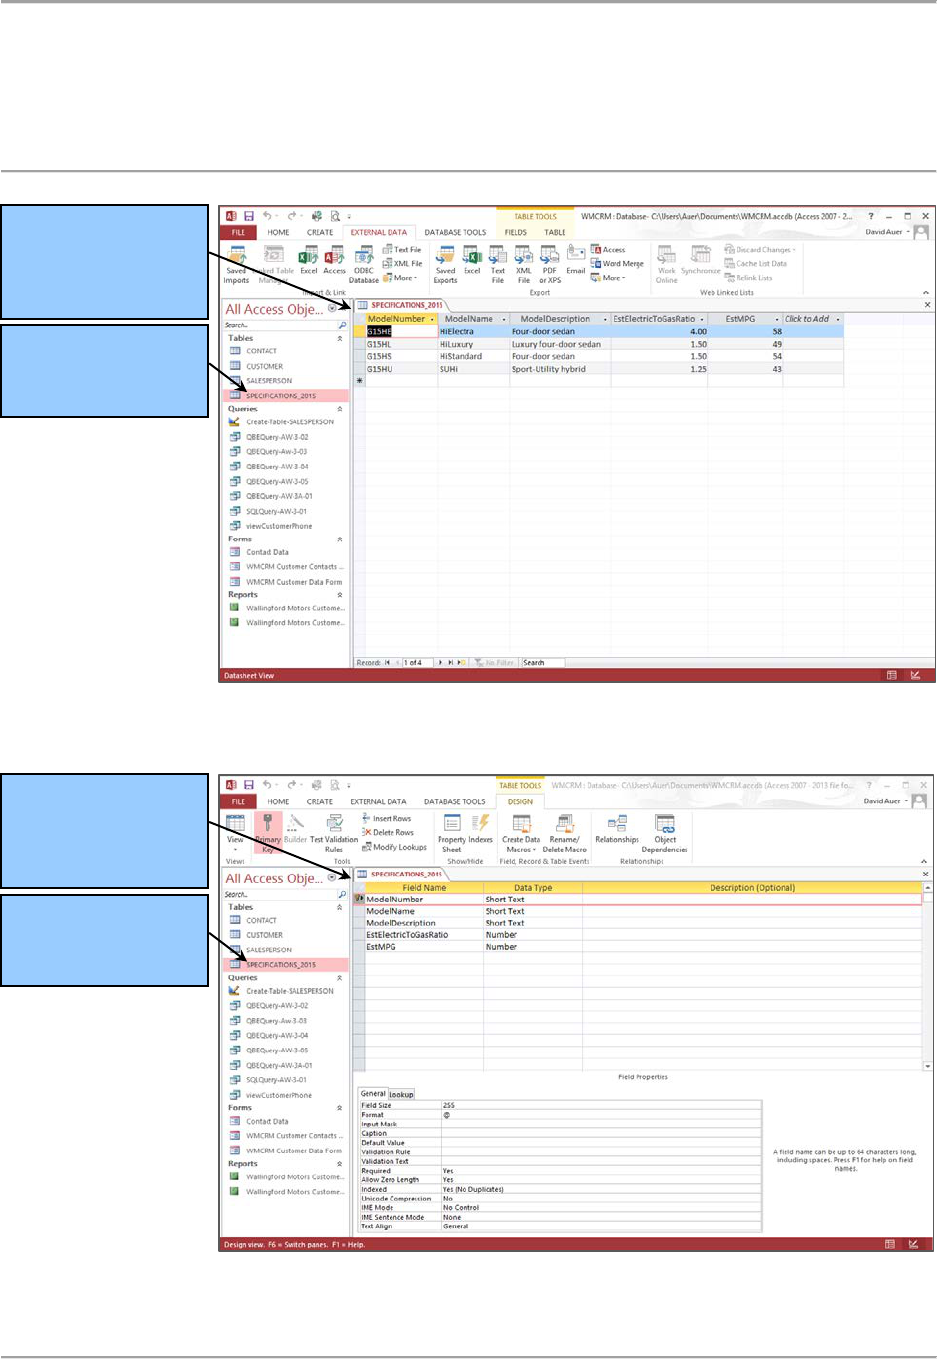
Database Concepts SQL Views, SQL/PSM and Importing Data Appendix E
15. The table and data are imported, and we are given a chance to save the import steps. There is
no need to do this so click the Close button to end the Wizard.
16. The imported SPECIFICATIONS_2015 table is shown in Datasheet View in Figure AW-E-14.
Figure AW-E-14 — The SPECIFICATIONS_2015 Table – Datasheet View
Figure AW-E-15 — The SPECIFICATIONS_2015 Table – Design View
The new
SPECIFICATIONS
_2015 table in
Datasheet view
The new
SPECIFICATIONS
_2015 table object
The new
SPECIFICATIONS
_2015 table in
Design view
The new
SPECIFICATIONS
_2015 table object
E-66

Database Concepts SQL Views, SQL/PSM and Importing Data Appendix E
17. Figure AW-E-15 shows the table in Design View. Note that the ModelNumber Short text Field
size is 255. We may want to edit that and other field characteristics. For example, we need to
set NULL/NOT NULL setting on all fields—this was not done during the import.
Although there is still some editing to do, we have successfully imported a Microsoft Excel 2013
worksheet in Microsoft Access 2013.
Closing the WMCRM Database and Exiting Access
1. To close the WMCRM database and exit Access, click the Close button in the upper-right corner
of the Microsoft Access window.
Summary
An SQL view is a virtual table that is constructed from other tables and views. An SQL SELECT statement
is used as part of a CREATE VIEW ViewName statement to define a view. However, view definitions
cannot include ORDER BY clauses. Once defined, view names are used in SELECT statements the same
way table names are used.
There are several uses for views. Views are used (a) to hide columns or rows, (b) to show the results of
computed columns, (c) to hide complicated SQL syntax, and (d) to layer computations and built-in
functions.
SQL/PSM is the portion of the SQL standard that provides for storing reusable modules of program code
within a database. SQL/PSM specifies that SQL statements will be embedded in user-defined functions,
triggers, and stored procedures in a database. It also specifies SQL variables, cursors, control-of flow
statements, and output procedures.
A trigger is a stored program that is executed by the DBMS whenever a specified event occurs on a
specified table or view. In Oracle Database, triggers can be written in Java or in a proprietary Oracle
language called PL/SQL. In SQL Server, triggers can be written in a propriety SQL Server language called
TRANSACT-SQL, or T-SQL. With MySQL, triggers can be written in MySQL’s variant of SQL.
Possible triggers are BEFORE, INSTEAD OF, and AFTER. Each type of trigger can be declared for insert,
update, and delete actions, so nine types of triggers are possible. Oracle Database supports all nine
trigger types, SQL Server supports only INSTEAD OF and AFTER triggers, and MySQL supports the
BEFORE and AFTER triggers.
A stored procedure is a program that is stored within the database and compiled when used. Stored
procedures can receive input parameters and return results. Unlike triggers, their scope is database-
wide; they can be used by any process that has permission to run the stored procedure. Stored
procedures can be called from programs written in the same languages used for triggers. They also can
be called from DBMS SQL utilities. The advantages of using stored procedures are summarized in
Figure E-15.
SQL Server, Oracle Database, MySQL and Microsoft Access have tools for importing spreadsheet data.
E-67

Database Concepts SQL Views, SQL/PSM and Importing Data Appendix E
Key Terms
bulk INSERT statement
SQL ALTER VIEW {ViewName} statement
Data
SQL CREATE VIEW {ViewName} statement
extract, transform and load (ETL)
SQL DROP VIEW {ViewName} statement
Information
SQL/Persistent Stored Modules (SQL/PSM)
Microsoft Access Database Engine 2010
Redistributable
SQL Server Import and Export Wizard
multivalue, multicolumn problem
SQL view
multivalued dependency
Stored procedure
MySQL for Excel Add-In
trigger
Spreadsheet
user-defined function
worksheet
Review Questions
E.1 What is an SQL view? What purposes do views serve?
E.2 What SQL statements are used to create SQL views?
E.3 What is the limitation on SELECT statements used in SQL views?
E.4 How are views handled in Microsoft Access?
Use the following tables for your answers to questions E.5 through E.21:
PET_OWNER (OwnerID, OwnerLastName, OwnerFirstName, Phone, Email)
PET_3 (PetID, PetName, PetType, PetBreed, PetDOB, PetWeight, OwnerID)
These are the same tables that are used in the review questions for Chapter 3, and data for these tables
are shown in below in Figures 3-18 and 3-20. For each SQL statement you write, show the results based
on these data. If possible, run the statements you write in the questions that follow in an actual DBMS,
as appropriate, to obtain your results.
E-68

Database Concepts SQL Views, SQL/PSM and Importing Data Appendix E
E.5
Code an SQL statement to create a view named OwnerPhoneView that shows OwnerLastName,
OwnerFirstName, and OwnerPhone.
E.6 Code an SQL statement that displays the data in OwnerPhoneView, sorted alphabetically by
OwnerLastName.
E.7 Code an SQL statement to create a view named DogBreedView that shows PetID, PetName,
PetBreed, and PetDOB for dogs.
E.8 Code an SQL statement that displays the data in DogBreedView, sorted alphabetically by
PetName.
E.9 Code an SQL statement to create a view named CatBreedView that shows PetID, PetName,
PetBreed, and DOB for cats.
E.10 Code an SQL statement that displays the data in CatBreedView, sorted alphabetically by
PetName.
E.11 Code an SQL statement to create a view named PetOwnerView that shows PetID, PetName,
PetType, OwnerID, OwnerLastName, OwnerFirstName, OwnerPhone, and OwnerEmail.
E.12 Code an SQL statement that displays the data in PetOwnerView, sorted alphabetically by
OwnerLastName and PetName.
E-69

Database Concepts SQL Views, SQL/PSM and Importing Data Appendix E
E.13 Code an SQL statement to create a view named OwnerPetView that shows OwnerID,
OwnerLastName, OwnerFirstName, PetID, PetName, PetType, PetBreed, and PetDOB.
E.14 Code an SQL statement that displays the data in OwnerPetView, sorted alphabetically by
OwnerLastName and PetName.
E.15 Code an SQL statement to create a view named PetCountView that shows each type (that is, dog
or cat) and the number of each type (that is, how many dogs and how many cats) in the
database.
E.16 Code an SQL statement that displays the data in PetCountView, sorted alphabetically by
PetType.
E.17 Code an SQL statement to create a view named DogBreedCountView that shows each breed of
dog and the number of each breed in the database.
E.18 Code an SQL statement that displays the data in DogBreedCountView, sorted alphabetically by
PetBreed.
E.19 Write a user-defined function named LastNameFirst that concatenates the OwnerLastName and
OwnerFirstName into a single value named OwnerName, and displays, in order, the
OwnerFirstName and OwnerLastName with a single space between them (hint: Downs and
Marsha would be combined to read Marsha Downs).
E.20 Code an SQL statement to create a view named PetOwnerLastNameFirstView that shows PetID,
Name, Type, OwnerID, LastName and FirstName concatenated using the LastNameFirst user-
defined function and displayed as PetOwnerName, Phone, and Email.
E.21 Code an SQL statement that displays the data in PetOwnerLastNameFirstView, sorted
alphabetically by OwnerName and PetName.
Exercises
If you haven't created the Art Course database described in Chapter 3, create it now (by completing
exercises 3.52 and 3.53). Use the Art Course database to answer exercises E.22 through E.32.
E.22 Code an SQL statement to create a view named CourseView that shows unique course names
and fees.
E.23 Code an SQL statement that displays the data in CourseView, sorted alphabetically by Course.
E.24 Code an SQL statement to create a view named CourseEnrollmentView that shows
CourseNumber, Course, CourseDate, CustomerNumber, CustomerLastName,
CustomerFirstName, and Phone.
E.25 Code an SQL statement that displays the data in CourseEnrollmentView for the Advanced
Pastels course starting 10/01/15. Sort the data alphabetically by CustomerLastName.
E-70

Database Concepts SQL Views, SQL/PSM and Importing Data Appendix E
E.26 Code an SQL statement that displays the data in CourseEnrollmentView for the Beginning Oils
course starting 10/15/15. Sort the data alphabetically by CustomerLastName.
E.27 Code an SQL statement to create a view named CourseFeeOwedView that shows
CourseNumber, Course, CourseDate, CustomerNumber, CustomerLastName,
CustomerFirstName, Phone, Fee, AmountPaid, and the calculated column (Fee – AmountPaid),
renamed as AmountOwed.
E.28 Code an SQL statement that displays the data in CourseFeeOwedView, sorted alphabetically by
CustomerLastName.
E.29 Code an SQL statement that displays the data in CourseFeeOwedView, sorted alphabetically by
CustomerLastName for any customer who still owes money for a course fee.
E.30 Write a user-defined function named LastNameFirst that concatenates the CustomerLastName
and CustomerFirstName into a single value named CustomerName, and displays, in order, the
CustomerLastName, a comma, a space, and the CustomerOwnerFirstName (hint: Johnson and
Ariel would be combined to read Johnson, Ariel).
E.31 Code an SQL statement to create a view named CourseEnrollmentLastNameFirstView that
shows CourseNumber, Course, CourseDate, CustomerNumber, CustomerLastName and
CustomerFirstName concatenated using the LastNameFirst user-defined function and displayed
as CustomerName, and Phone.
E.32 Code an SQL statement that displays the data in CourseEnrollmentLastNameFirstView, sorted
alphabetically by CustomerName and CourseNumber.
Access Workbench Key Terms
Microsoft Access equivalent of an SQL view
Access Workbench Exercises
In the "Access Workbench Exercises" sections for Chapters 1, 2, and 3, you created a database for
Wedgewood Pacific Corporation (WPC) of Seattle, Washington. In this set of exercises, you will use that
database, as completed in Chapter 3's section of "The Access Workbench Exercises," to create and use
Microsoft Access queries as SQL view equivalents, and to practice importing data from an Excel
spreadsheet..
AW.E.1 Using Access QBE or SQL, create and run view-equivalent queries to complete the questions
that follow. Save each query using the query name format viewViewQueryName, where
ViewQueryName is the name specified in the question.
A. Create an Access view–equivalent query named Computer that shows Make, Model,
SerialNumber, ProcessorType, ProcessorSpeed, MainMemory, and DiskSize.
E-71

Database Concepts SQL Views, SQL/PSM and Importing Data Appendix E
B. Create an Access view–equivalent query named EmployeeComputer that uses
viewComputer for part A to show EMPLOYEE.EmployeeNumber, LastName,
FirstName, and the data about the computer assigned to that employee, including
Make, Model, SerialNumber, ProcessorType, ProcessorSpeed, MainMemory, and
DiskSize.
AW.E.2 Use Access QBE to create and run the queries that follow. Save each query using the query
name format QBEQuery-AW-E-1-##, where ## is replaced by the letter designator of the
question. For example, the first query will be saved as QBEQuery-AW-E-1-A.
A. Create an Access QBE query to display the data in viewComputer, sorted
alphabetically by Make and Model and then numerically by SerialNumber.
B. Create an Access QBE query to display the data in viewEmployeeComputer. Sort the
results alphabetically by LastName, FirstName, Make, and Model and then numerically
by SerialNumber.
AW.E.3 The COMPUTER and COMPUTER_ASSIGNMENT table have already been created in the
Microsoft Access version of the WPC database as part of the Chapter 3 exercises, so we must
use alternate names.
A. Using the table names COMPUTER_2 and COMPUTER_ASSIGNMENT_2, import the
data from the DBC-e07-WPC-Computer-Assignment-Worksheet.xlsx file into the WPC
database.
B. Modify the COMPUTER_2 and COMPUTER_ASSIGNMENT_2 table structures as needed
to match the table column characteristics shown in Figures 3-23 and 3-25.
C. Create the needed relationships between COMPUTER_2, COMPUTER_ASSIGNMENT_2
and EMPLOYEE.
D. Complete exercises AW.E.1 and AW.E.2 using COMPUTER_2 and
COMPUTER_ASSIGNMENT_2.
Heather Sweeney Designs Case Questions
These questions are based on Chapter 3's Heather Sweeney Designs case questions. Base your answers
to the questions that follow on the HSD database, as described there. If possible, run your SQL
statements in an actual DBMS to validate your work.
A Write a user-defined function named LastNameFirst that concatenates the customer’s LastName
and FirstName into a single value named CustomerName, and displays, in order, the
CustomerLastName, a comma, a space, and the CustomerOwnerFirstName (hint: Jacobs and
Nancy would be combined to read Jacobs, Nancy).
E-72

Database Concepts SQL Views, SQL/PSM and Importing Data Appendix E
B. Create the following SQL views:
1. Create an SQL view named CustomerSeminarView that shows CUSTOMER.CustomerID,
LastName, FirstName, EmailAddress, City, State, ZIP, SeminarDate, Location, and
SeminarTitle.
2. Create an SQL view named CustomerLastNameFirstSeminarView that shows
CUSTOMER.CustomerID, then LastName and FirstName concatenated using the
LastNameFirst user-defined function and displayed as CustomerName, EmailAddress,
City, State, ZIP, SeminarDate, Location, and SeminarTitle.
3. Create an SQL view named CustomerProductView that shows CustomerID, LastName,
FirstName, EmailAddress, INVOICE.InvoiceNumber, InvoiceDate,
PRODUCT.ProductNumber, and Description.
4. Create an SQL view named CustomerLastNameFirstProductView that shows
CustomerID, then LastName and FirstName concatenated using the LastNameFirst user-
defined function and displayed as CustomerName, EmailAddress,
INVOICE.InvoiceNumber, InvoiceDate, PRODUCT.ProductNumber, and Description.
C. Create and run the following SQL queries:
1. Create an SQL statement to run CustomerSeminarView, with the results sorted
alphabetically by State, City, and ZIP (in that order) in descending order.
2. Create an SQL statement to run CustomerLastNameFirstSeminarView, with the results
sorted alphabetically by State, City, and ZIP (in that order) in descending order.
3. Create an SQL statement to run CustomerSeminarView, with the results sorted
alphabetically by Location, SeminarDate, and SeminarTitle (in that order) in ascending
order.
4. Create an SQL statement to run CustomerLastNameFirstSeminarView, with the results
sorted alphabetically by Location, SeminarDate, and SeminarTitle (in that order) in
ascending order.
5. Create an SQL statement to run CustomerProductView, with the results sorted
alphabetically by LastName, FirstName, InvoiceNumber, and ProductNumber in
ascending order.
6. Create an SQL statement to run CustomerLastNameFirstProductView, with the results
sorted alphabetically by CustomerName, InvoiceNumber, and ProductNumber in
ascending order.
E-73

Database Concepts SQL Views, SQL/PSM and Importing Data Appendix E
Garden Glory Project Questions
These questions are based on Chapter 3's Garden Glory project questions. Base your answers to the
questions that follow on the Garden Glory database, as described there. If possible, run your SQL
statements in an actual DBMS to validate your work.
A Write a user-defined function named LastNameFirst that concatenates the employee’s
LastName and FirstName into a single value named FullName, and displays, in order, the
LastName, a comma, a space, and the FirstName (hint: Smith and Steve would be combined to
read Steve, Smith).
B. Create the following SQL views:
1. Create an SQL view named OwnerPropertyView that shows OWNER.OwnerID,
OwnerName, Type, PropertyID, PropertyName, Street, City, State, and Zip.
2. Create an SQL view named PropertyServiceView that shows PROPERTY.PropertyID,
PropertyName, Street, City, State, Zip, Date, FirstName, LastName, and HoursWorked.
3. Create an SQL view named PropertyServiceLastNameFirstView that shows
PROPERTY.PropertyID, PropertyName, Street, City, State, Zip, Date, then LastName and
FirstName concatenated using the LastNameFirst user-defined function and displayed as
EmployeeName, and HoursWorked.
C. Create (and run) the following SQL queries:
1. Create an SQL statement to run OwnerPropertyView, with the results sorted
alphabetically by OwnerName.
2. Create an SQL statement to run PropertyServiceView, with the results sorted
alphabetically by Zip, State, and City.
3. Create an SQL statement to run PropertyServiceLastNamefirstView, with the results
sorted alphabetically by Zip, State, and City.
D. Garden Glory staff keep a record of tool inventory and who uses those tools in a Microsoft Excel
worksheet, as shown in Figure E-58.
1. Duplicate Figure E-58 in a worksheet (or spreadsheet) in an appropriate tool (such as
Microsoft Excel or Apache OpenOffice Calc).
2. Import the data into one or more new tables in the GG database. You must determine
all tables characteristics needed (primary key, foreign keys, data types, etc.)
3. Link this (these) new table (tables) as appropriate to the GG_SERVICE table in the GG
database.
E-74

Database Concepts SQL Views, SQL/PSM and Importing Data Appendix E
Figure E-58 — The Garden Glory Tool Inventory Worksheet
James River Jewelry Project Questions
The James River Jewelry project question are available in online Appendix D, which can be
downloaded from the textbook’s Web site: www.pearsonhighered.com/kroenke.
The Queen Anne Curiosity Shop Project Questions
These questions are based on Chapter 3's Queen Anne Curiosity Shop project questions. Base your
answers to the questions that follow on the Queen Anne Curiosity Shop project database, as described
there. If possible, run your SQL statements in an actual DBMS to validate your work.
A Write a user-defined function named LastNameFirst that concatenates the employee’s
LastName and FirstName into a single value named FullName, and displays, in order, the
LastName, a comma, a space, and the FirstName (hint: Smith and Steve would be combined to
read Smith, Steve).
E-75

Database Concepts SQL Views, SQL/PSM and Importing Data Appendix E
B. Create the following SQL view statements:
1. Create an SQL view named BasicCustomerView that shows each customer's CustomerID,
LastName, FirstName, Phone, and Email.
2. Create an SQL view named BasicCustomerLastNameFirstView that shows each
customer's CustomerID, then LastName and FirstName concatenated using the
LastNameFirst user-defined function and displayed as CutomerName, Phone, and Email.
3. Create an SQL view named SaleItemItemView that shows SaleID, SaleItemID,
SALE_ITEM.ItemID, SaleDate, ItemDescription, ItemCost, ITEM.ItemPrice as
ListItemPrice, and SALE_ITEM.ItemPrice as ActualItemPrice.
C. Create (and run) the following SQL queries:
1. Create an SQL statement to run BasicCustomerView, with the results sorted
alphabetically by LastName and FirstName.
2. Create an SQL statement to run BasicCustomerFirstNameFirstView, with the results
sorted alphabetically by CustomerName.
3. Create an SQL statement to run SaleItemItemView, with the results sorted by SaleID and
SaleItemID.
4. Create an SQL query that uses SaleItemItemView to calculate and display the sum of
SALE_ITEM.ItemPrice (which is relabeled as ActualItemPrice) as TotalPretaxRetailSales.
D. The Queen Anne Curiosity Shop owners and staff have decided to sell standardized items that
can be stocked and reordered as necessary. So far, they have kept their records for these items
in a Microsoft Excel worksheet, as shown in Figure E-59. They have decided to integrate this
data into the QACS database
1. Duplicate Figure E-59 in a worksheet (or spreadsheet) in an appropriate tool (such as
Microsoft Excel or Apache OpenOffice Calc).
2. Import the data into one or more new tables in the QACS database. You must determine
all table characteristics needed (primary key, foreign keys, data types, etc.)
3. Link this (these) new table (tables) to the VENDOR table only in the QACS database.
E-76

Database Concepts SQL Views, SQL/PSM and Importing Data Appendix E
Figure E-59 — The Queen Anne Curiosity Shop Standard Merchandise Inventory Worksheet
E-77
