
©2002-2024 Millet Software Page 1
DataLink Viewer 2011
View, Print, Export, Inspect, Schedule, and Auto-Refresh Crystal Reports
www.MilletSoftware.com
Version 6.9
August 2024
By
Millet Software
5275 Rome Ct.
Erie, PA 16509-3951
ido@MilletSoftware.com
(814) 825-6009
Disclaimer: This software is provided "as-is" by Millet Software without assuming any
responsibility for harm to computer systems, software, or data with which these files are used.
©2002-2024 Millet Software Page 2
INTRODUCTION ................................................................................................................................................................................... 7
MAIN BENEFITS: .................................................................................................................................................................................... 7
INSTALL / REMOVE ................................................................................................................................................................................ 9
Speeding Up via Native Image ......................................................................................................................................................... 9
TYPICAL USE SCENARIOS............................................................................................................................................................... 10
SELECT REPORT WINDOW ................................................................................................................................................................... 10
Right-Click Report Row Menu ...................................................................................................................................................... 11
PREVIEW REPORT WINDOW: ................................................................................................................................................................ 12
After Export Action ........................................................................................................................................................................ 12
Email Exported File ....................................................................................................................................................................... 13
3 Print Buttons ................................................................................................................................................................................ 14
Refresh (auto-refresh) Button ......................................................................................................................................................... 14
Report Grid Help ............................................................................................................................................................................ 15
Report Preview Help ...................................................................................................................................................................... 15
Selecting a Report to View ............................................................................................................................................................. 16
COPYING OBJECT/TEXT FROM THE REPORT ........................................................................................................................................ 16
Object Copy (Ctrl-C) ...................................................................................................................................................................... 16
Text Copy (Alt-C) .......................................................................................................................................................................... 16
Tooltip Copy (Ctrl-Shift-C) ............................................................................................................................................................ 16
PARAMETER FUNCTIONALITY ..................................................................................................................................................... 17
REMEMBER PARAMETER VALUES FROM A PREVIOUS SESSION (VIDEO DEMO) ..................................................................................... 17
SELECTIVE PARAMETER REFRESH (VIDEO DEMO) ................................................................................................................................ 17
INITIALIZING PARAMETER VALUES WITH DATE EXPRESSIONS (VIDEO DEMO) ..................................................................................... 18
SAVE AND REUSE NAMED PARAMETER SETS (VIDEO DEMO) ............................................................................................................... 19
CLICK TO CHANGE A PARAMETER VALUE (VIDEO DEMO) .................................................................................................................... 21
Toggling Between 2 Parameter Values .......................................................................................................................................... 21
Special Date and DateTime Parameter Dialogs ............................................................................................................................. 21
Input Box Dialog ............................................................................................................................................................................ 22
ListBox Dialog ............................................................................................................................................................................... 22
Changing a Parameter by Clicking on a Related Formula.............................................................................................................. 22
LOAD INI VALUES INTO PARAMETERS ................................................................................................................................................. 23
SECURING REPORTS AGAINST UNAUTHORIZED USE ............................................................................................................................ 23
LOAD MACHINE/COMPANY/REPORT INFORMATION INTO PARAMETERS .............................................................................................. 24
DLV_Machine_Name .................................................................................................................................................................... 24
DLV_Registered_Company ........................................................................................................................................................... 24
DLV_HD_Serial_N ........................................................................................................................................................................ 24
DLV_Rpt_Path ............................................................................................................................................................................... 24
CONTROL DATA ACCESS ACCORDING TO PC LOGIN ............................................................................................................................ 25
DYNAMIC & CASCADING PARAMETERS (VIDEO DEMO) ....................................................................................................................... 26
Respond to Single-Value Live Prompts ......................................................................................................................................... 26
Link back in a Hierarchy of Live Prompts ..................................................................................................................................... 27
Respond to Multi-Value Live Prompts ........................................................................................................................................... 28
Manage Display & Data Values for Live Parameters .................................................................................................................... 29
View the Report ............................................................................................................................................................................. 30
DYNAMIC AND CASCADING PARAMETERS (DEVELOPER NOTES) ......................................................................................................... 31
Naming Parameters ........................................................................................................................................................................ 31
Designing Live Prompt Reports ..................................................................................................................................................... 31
©2002-2024 Millet Software Page 3
Implementing a "Select All" Option ............................................................................................................................................... 32
Sharing Values Across Cascading Parameters ............................................................................................................................... 33
Requiring a Value for a Dynamic Parameter .................................................................................................................................. 34
Forcing Users to Select from the List of Values (No Direct Edit) ................................................................................................. 34
AUTO-REFRESH REPORTS .............................................................................................................................................................. 35
AUTO_REFRESH COMMAND LINE ARGUMENT .................................................................................................................................... 36
SAVED DATA AUTO REFRESH .............................................................................................................................................................. 36
SPECIFYING PARAMETERS WHEN USING SAVED DATA AUTO REFRESH .............................................................................................. 36
AUTO_PAGE_AND_REFRESH ............................................................................................................................................................... 37
VIEWMODE (REMOVE TOOLBAR/STATUS BAR/TITLEBAR) ................................................................................................................. 37
CYCLING THROUGH SEVERAL AUTO-REFRESHED REPORTS ................................................................................................................ 38
CLICK TO SET FORMULA VALUE (VIDEO DEMO) ................................................................................................................... 39
CLICK TO SET ANOTHER FORMULA TO CLICKED FORMULA VALUE .................................................................................................... 39
CLICK TO SET ANOTHER FORMULA TO CLICKED FORMULA NAME ...................................................................................................... 39
CLICK COLUMN HEADERS TO RE-SORT THE REPORT .......................................................................................................................... 40
CLICK TO SHOW HTML TOOLTIP (VIDEO DEMO) .................................................................................................................. 40
IN-PLACE DRILL-DOWN (VIDEO DEMO) .................................................................................................................................... 41
CONVERTING SECTION DOUBLE-CLICK TO IN-PLACE DRILL-DOWN ................................................................................................... 43
DYNAMIC GROUPING (GROUP SWAP EXPERT) (VIDEO DEMO) ......................................................................................... 44
OPTIONAL TECHNIQUE FOR GAINING FORMULA ACCESS TO THE DYNAMIC GROUPING: ..................................................................... 46
CHANGE LAYOUT & CONTENT WHEN PRINTING THE REPORT ........................................................................................ 47
DATA GRID ........................................................................................................................................................................................... 48
EXAMPLE ............................................................................................................................................................................................. 48
WHAT DATA IS INCLUDED? ................................................................................................................................................................. 50
DISABLING THE DATA GRID FUNCTIONALITY ...................................................................................................................................... 50
EXPORTING/COPYING THE DATA ......................................................................................................................................................... 50
SAVING/RESTORING GRID LAYOUTS ................................................................................................................................................... 50
DATA VISUALIZER ............................................................................................................................................................................ 51
ADDING HIERARCHIES ......................................................................................................................................................................... 54
AUTOMATED EXPORTING .................................................................................................................................................................... 55
REPORT INSPECTION & DOCUMENTATION TOOLS .............................................................................................................. 56
REPORT INSPECTOR ............................................................................................................................................................................. 56
REPORT DOCUMENTATION .................................................................................................................................................................. 57
LAUNCHING REPORTS & COMMAND LINE API ....................................................................................................................... 58
LAUNCH REPORTS FROM FILE EXPLORER ............................................................................................................................................ 58
GENERATE DESKTOP SHORTCUTS TO LAUNCH REPORTS ..................................................................................................................... 59
LAUNCH REPORTS FROM COMMAND LINES ......................................................................................................................................... 60
Examples: ....................................................................................................................................................................................... 60
Handling Saved Data ...................................................................................................................................................................... 60
CALL DATALINK VIEWER FROM ANOTHER APPLICATION ................................................................................................................... 61
VIEWMODE (REMOVE TOOLBAR/STATUS BAR/TITLEBAR) ................................................................................................................. 62
©2002-2024 Millet Software Page 4
REFERRING TO SAVED ENCRYPTED PASSWORDS ................................................................................................................................. 63
COMMAND LINE ARGUMENTS FOR PARAMETER VALUES (OLD APPROACH) ........................................................................................ 64
Range and Multi-Value Parameters ................................................................................................................................................ 64
COMMAND LINE ARGUMENTS FOR PARAMETER VALUES (NEW APPROACH) ...................................................................................... 65
Specifying Subreport Parameter Values ......................................................................................................................................... 65
generating a command line with parameters .................................................................................................................................. 65
Optional Parameters with No Value ............................................................................................................................................... 66
Null Values ..................................................................................................................................................................................... 66
Ignoring Saved Parameter Values .................................................................................................................................................. 66
Date Constants................................................................................................................................................................................ 67
Custom Calendars .......................................................................................................................................................................... 69
Adjusting Data Constants for Day of Week ................................................................................................................................... 70
Number Constants .......................................................................................................................................................................... 71
ARGUMENT FOR USING SAVED DATA .................................................................................................................................................. 72
SPECIFYING PARAMETERS WHEN USING SAVED DATA ....................................................................................................................... 72
ARGUMENT FOR SETTING FORMULA EXPRESSIONS ............................................................................................................................. 72
ARGUMENT TO SET EXTRA RECORD SELECTION LOGIC ...................................................................................................................... 73
COMMAND LINE ARGUMENTS FOR TRIGGERING/SCHEDULING EXPORTING......................................................................................... 74
Interactive Use................................................................................................................................................................................ 74
Fully-Automated Exporting ........................................................................................................................................................... 74
Scheduling Exporting ..................................................................................................................................................................... 74
FULLY-AUTOMATED EXPORTING OF DATA VISUALIZATIONS .............................................................................................................. 75
To an Image File ............................................................................................................................................................................ 75
To Excel File .................................................................................................................................................................................. 76
Follow-Up Processing in Visual CUT ............................................................................................................................................ 76
COMMAND LINE ARGUMENTS FOR TRIGGERING/SCHEDULING PRINTING ............................................................................................ 77
Specifying Number of Copies ........................................................................................................................................................ 78
Setting Custom Text for Each Print Copy ...................................................................................................................................... 78
Scheduling Printing ........................................................................................................................................................................ 79
Scheduling Printing for Multiple Reports ...................................................................................................................................... 79
ARGUMENT FOR PRINTER SETUP ......................................................................................................................................................... 79
ARGUMENT FOR DOCUMENTING FILE LOCATIONS AND REPORT PARAMETERS ................................................................................... 80
LAUNCH A REPORT WHILE VIEWING ANOTHER REPORT ...................................................................................................................... 81
Current Report Path Token ............................................................................................................................................................. 82
Create a User Interface for Selecting and Launching Reports ........................................................................................................ 82
Embed Input from The User in the Command Line Call for Another Report ................................................................................ 83
LAUNCH ANOTHER APPLICATION AND PASS PARAMETERS TO IT ......................................................................................................... 84
LAUNCH AN APPLICATION BEFORE REPORT RUNS .............................................................................................................................. 85
Optional Arguments and Working Directory Elements ................................................................................................................. 85
LAUNCHING REPORTS IN A NEW WINDOW .......................................................................................................................................... 86
New Window On File Launch and/or On Double Click ................................................................................................................ 86
Right-Click the Grid and Select Preview Report (new Window) ................................................................................................... 86
Remove the Preview Tab from the Initial Window ........................................................................................................................ 87
DATABASE CHOICE FUNCTIONALITY ........................................................................................................................................ 88
CHANGING DATA SOURCE (SERVER/DATABASE) ................................................................................................................................ 88
SELECT ALTERNATIVE ODBC DATA SOURCES FOR THE SAME REPORT .............................................................................................. 89
RESTRICTING ODBC DSN CHOICES (DSN GROUPS)........................................................................................................................... 90
©2002-2024 Millet Software Page 5
DSN Groups with Wildcards .......................................................................................................................................................... 90
FORCING LOGIN ................................................................................................................................................................................... 91
for DSN Group Members ............................................................................................................................................................... 91
For All Reports ............................................................................................................................................................................... 91
For Specified DSNs ........................................................................................................................................................................ 91
RESTRICTING ODBC DSN CHOICES (DATABASES WITHIN SERVER) ................................................................................................... 92
Facilitating Deployment ................................................................................................................................................................. 92
SPECIFY THE ODBC DSN .................................................................................................................................................................... 93
OVERRIDING THE DATABASE SPECIFIED IN THE REPORT OR ODBC DSN............................................................................................ 93
OVERRIDING THE TABLE LOCATION (ODBC) ...................................................................................................................................... 94
OVERRIDING THE XML FILE LOCATION .............................................................................................................................................. 94
STRIPPING TABLE QUALIFIERS WHEN CONNECTING TO A DIFFERENT DATABASE ............................................................................... 94
OVERRIDING THE SERVER IN NATIVE ORACLE CONNECTION .............................................................................................................. 95
SELECTING AN ALTERNATIVE SQL SERVER – OLE DB DATA SOURCE ............................................................................................... 95
FORCED LOGIN .................................................................................................................................................................................... 96
SELECTING FOLDER LOCATION FOR FOXPRO DBF FILES (MASTERBUILDER) .................................................................................... 97
CHANGING FOLDER LOCATION FOR ACCESS/EXCEL/PERVASIVE/PARADOX/ACT! FILES .................................................................... 98
Using Command Line Argument to Avoid Path Prompt ................................................................................................................ 98
CHANGING DATA SOURCE IN UDL FILES ............................................................................................................................................ 99
INTEGRATED AUTHENTICATION............................................................................................................................................... 100
INTEGRATED AUTHENTICATION ("REMEMBER ME") ......................................................................................................................... 100
SHARED MACHINE AUTHENTICATION................................................................................................................................................ 101
SHARED SECRET PASSWORD WITH WINDOWS USER IDS ................................................................................................................... 102
INTEGRATED AUTHENTICATION FOR INTERACTIVE ODBC DSN CHANGES ....................................................................................... 102
LANGUAGE TRANSLATION / LOCALIZATION ........................................................................................................................ 103
TRANSLATE BUTTON IN PREVIEW ...................................................................................................................................................... 103
PROTECT REPORT DESIGNS WITH RPZ FILES ...................................................................................................................... 104
MAKE_RPZ COMMAND LINE ARGUMENT .......................................................................................................................................... 105
CREATE RPZ FILES WITH EXPIRATION AND LICENSE KEYS ................................................................................................................ 106
Make_Rpz2 Command Line Argument ....................................................................................................................................... 107
MONITORING DATALINK VIEWER USE ................................................................................................................................... 108
RECORD PROCESSING TO AN ODBC DATABASE ................................................................................................................................ 108
Typical Use .................................................................................................................................................................................. 108
MS Access Data Structure ............................................................................................................................................................ 109
Oracle Data Structure ................................................................................................................................................................... 111
"Oracle" mode (Bind Variables)................................................................................................................................................... 112
How to Start Logging? ................................................................................................................................................................. 112
RECORD REPORT USE IN A TEXT LOG FILE ........................................................................................................................................ 113
SETTINGS & OPTIONS .................................................................................................................................................................... 114
CUSTOMIZING THE GRID LAYOUT ...................................................................................................................................................... 114
CUSTOMIZING THE GRID STYLE ......................................................................................................................................................... 115
DISABLING REPORT PREVIEW BUTTONS ............................................................................................................................................ 116
DISABLING DATALINK VIEWER BUTTONS ......................................................................................................................................... 117
©2002-2024 Millet Software Page 6
DISABLING LOGIN DIALOG MEMORY OF LAST USER ID .................................................................................................................... 117
EXCLUDE EXPORT FORMATS ............................................................................................................................................................. 117
ADD YOUR COMPANY INFO TO THE ABOUT DIALOG .......................................................................................................................... 118
FILE LOCATION & REDIRECT LOGIC .................................................................................................................................................. 119
Checking and Navigating to Key File Locations .......................................................................................................................... 120
Citrix and File Location Functionality ......................................................................................................................................... 121
Setting Integrated Authentication for Multiple Machines (Citrix Farm) ...................................................................................... 122
Enforcing Settings in a Master DataLink_Viewer.ini File ........................................................................................................... 123
Updating DataLink_Viewer.ini via a Delta File ........................................................................................................................... 124
EXPLICIT ASSIGNMENT OF DEFAULT PRINTER ................................................................................................................................... 124
DEFAULT PREVIEW-ONLY WINDOW SETTINGS .................................................................................................................................. 125
SETTING ENCRYPTED PASSWORD ENTRIES ........................................................................................................................................ 125
KNOWN ISSUES AND LIMITATION ............................................................................................................................................. 126
UPDATE HISTORY ............................................................................................................................................................................ 127
VERSION 6.9.4002: ENTERED TESTING AUGUST 25, 2024 ................................................................................................................. 127
New Features ................................................................................................................................................................................ 127
Fixes ............................................................................................................................................................................................. 127
VERSION 6.9.1001: RELEASED SEPTEMBER 4, 2023 ........................................................................................................................... 128
New Features ................................................................................................................................................................................ 128
Fixes ............................................................................................................................................................................................. 129
VERSION 6.7.1001 [SP23]: RELEASED JUNE 30, 2018........................................................................................................................ 131
Fixes ............................................................................................................................................................................................. 132
VERSION 6.6.1001 [SP19]: RELEASED FEBRUARY 27, 2017 .............................................................................................................. 134
Fixes ............................................................................................................................................................................................. 135
VERSION 6.5.1001 [SP15]: NOVEMBER 25, 2015 ............................................................................................................................... 137
Fixes ............................................................................................................................................................................................. 138
VERSION 6.4.1003 [SP12]: NOVEMBER 29, 2014 ............................................................................................................................... 139
New Features ................................................................................................................................................................................ 139
Fixes ............................................................................................................................................................................................. 140
VERSION 6.3.1047 [SP7]: NOVEMBER 28, 2013 ................................................................................................................................ 141
©2002-2024 Millet Software Page 7
Introduction
DataLink Viewer 2011 uses the Crystal 2016 runtime components and allows you to run Crystal reports from
version 7, 8, 8.5, 9, 10, XI, 2008, 2011, 2013, and 2016.
While the creation and design changes of Crystal reports (.rpt files) require the full Crystal Reports software,
you can let other PCs view, print, and export these reports by installing DataLink Viewer.
DataLink Viewer provides several useful features such as command line API (allowing you to schedule
printing and trigger viewing of reports from your application, task scheduler, batch files, or desktop shortcuts),
an intuitive Grid for organizing and selecting previously opened reports, reduced login frustrations via
integrated authentication, choice of alternative data sources, selective parameter refresh, dynamic and
cascading parameters even for versions prior to XI, auto-refresh, user-based row-level security, and more...
Main Benefits:
1. Refresh, View, Print, and Export Crystal reports
2. Schedule Report Exports or Printouts (using the free windows task scheduler)
3. Uses Crystal 2011 runtime components providing full support for new features such as
interactive parameter panel and advanced CrossTabs.
4. Group Swap Expert allowing allowing group changes on the fly
5. Data Visualizer adding OLAP and advanced charting capabilities
6. Intuitive Customizable Grid Interface to classify, organizing, and launch Reports.
7. Dynamic & Cascading Parameters (even for pre-XI reports):
Select Live Parameter Values from linked Crystal reports that act as dynamic
pick list data sources or default to using Crystal’s static parameters.
Restrict Live Parameter Values based on choices in a prior live parameter.
Remember Values last used for each Live Prompt allowing the user to
accept or replace those values.
8. Command Line Interface: for launching reports from other programs and from other Crystal
reports.
9. Protect & Hide Report Designs by converting your rpt files into rpz files. Your users can run the
resulting rpz files in DataLink Viewer, but cannot view or modify them in Crystal. To completely
protect report designs, DataLink Viewer blocks exporting of rpz files to rpt or report definition files.

©2002-2024 Millet Software Page 8
10. Filter Data based on User Login.
11. Export & Print Reports Directly (without previewing)
12. Remember Last Export Format and File Name for Each Report.
13. Auto-Refresh Reports
14. React to User Actions in Useful Ways (requires special formulas):
In-Place Drill Down (https://youtu.be/3CmayJMAImE)
Click to Group/Sort (https://youtu.be/oGbzdY1D7ZQ)
Click to set a formula value
Click to prompt for and pass a value to another process
15. Selective Parameter Refresh: When refreshing a report, users can select which parameters they
wish to change. This avoids tedious re-entering of values for the other parameters. The parameter
refresh choices are stored for each report and can be easily reused or changed at a later session.
16. Integrated Authentication: use Windows User Login and Machine ID to remove the need to
repeatedly authenticate to data sources.
17. Reduced Memory Requirements compared to Crystal and other viewers.
18. Select Different Data Sources for the same Report.
©2002-2024 Millet Software Page 9
Install / Remove
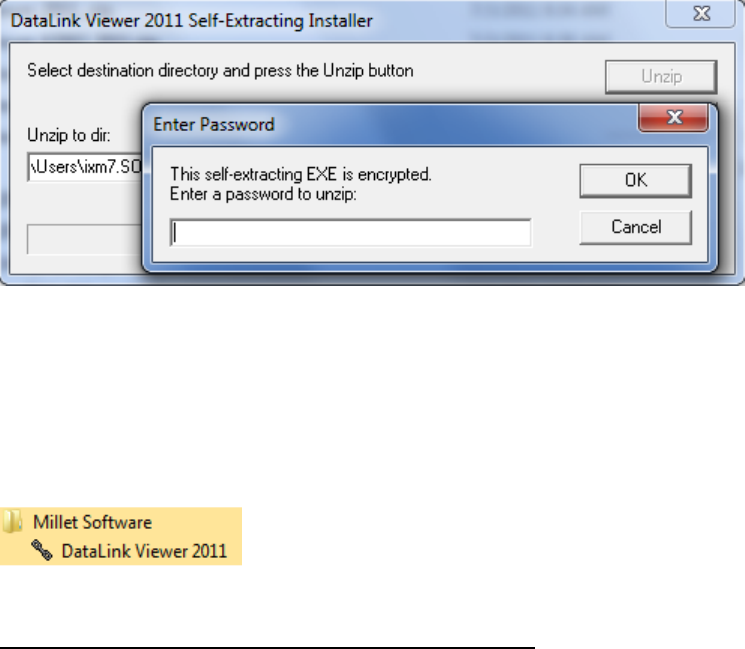
The exe file you downloaded self-extracts to 2 files: a setup.exe and an msi file.
First, it will prompt you to provide a password:
It automatically triggers the setup.exe to check for and download/install any missing prerequisites such as
the .NET framework and the Crystal 2011 runtime components.
It then triggers the msi install of DataLink Viewer itself.
DataLink Viewer 2011 32-bit is installed under the "Program Files (x86)\Millet Software:
Avoid Installation on a Crystal Enterprise Machine:
Due to the risk of rare runtime component conflicts, you should avoid installing the software on a machine
that also runs Crystal Enterprise.
SPEEDING UP VIA NATIVE IMAGE
The application folder provides 3 batch files for managing a native image of DataLink Viewer:
NGEN_4DLV_Install.cmd to install a native image of the app for faster startup
NGEN_4DLV_Check_Status.cmd to check status of the native image
NGEN_4DLV_Uninstall.cmd to uninstall the native image
By installing a native image of the application, you avoid Just-In-Time compilation each time the
application starts.
You need Admin privileges to run these batch files. Depending on the operating system, you may need to
right-click and 'Run as Administrator'.
An easier method to generate/remove the native image is provided by a button in the Launch tab of the
Options dialog. This avoids the need to navigate and manually launch the batch files described above.

©2002-2024 Millet Software Page 10
Typical Use Scenarios
In a typical scenario, you would select a report to view by double-clicking it. After prompting you for parameter
values, the viewer would display the report with all the preview functionality available within Crystal
(drilldown, tree view, export, zoom, print).
The report can also be invoked from a desktop shortcut, a batch file, or another program using command line
options.
Select Report Window
After starting DataLink Viewer, you would see a screen similar to this:
Use the button to browse for and open a report for the first time. Previously selected reports are listed
in a grid and can be launched by double-clicking or by Right-Clicking or by selecting and clicking the
Preview Tab.
Use the button to reload a report (if changed and saved in Crystal).
Use the button to access a dialog for setting various options. These options are maintained in the
file DataLink_Viewer.ini
Use the button to open this User Manual inside MS Word.

©2002-2024 Millet Software Page 11
Use the button to compress & encrypt RPT files into RPZ files. This allows you to protect and
hide your reports designs (either as an intellectual property issue or as a tech support issue). See the section
on "Protecting Report Designs with rpz Files" for more detail on this feature.
Use the button to access a dialog with Version (and system) information. That dialog also has a
button that allows you to check for software patches on my web site and install them online. This patching
mechanism is very fast since the patches are typically very small (contain only file changes).
Use the button to exit DataLink Viewer.
RIGHT-CLICK REPORT ROW MENU
if you Right-Click a report row in the grid, the following popup menu is displayed:
To delete a report from the grid (but not from the hard drive) select ‘Delete Row’ from the popup menu or
select the report row and hit Ctrl-Delete. The grid information in maintained in a plain text file
(ReportList.txt).
The other options in the popup menu allow you to launch a report to a new window, force a login dialog
(allowing a choice of a different data source), and printing or exporting the report without previewing it.
When adding a report to the grid, DataLink Viewer populates the title and subject columns automatically if it
finds that information in the summary information for the report.
You set that information for the .rpt file in Crystal (under the file, Summary Information menu).

©2002-2024 Millet Software Page 12
Preview Report Window:
The preview window looks similar to the preview window in Crystal except for a few enhancements:
Export Button (remember export format/file)
The export button "remembers" the last export format and file destination you used for each report. If this is the
first time you are exporting a report, the export format and folder will default to those used in the last export.
AFTER EXPORT ACTION
DataLink Viewer also prompts for (and remembers) the user choice of after-export action:
This can also be controlled via a global setting under the Options dialog:

©2002-2024 Millet Software Page 13
EMAIL EXPORTED FILE
If you have Outlook as an email client, you can instruct DataLink Viewer to start a new email message and
attach the exported file by adding the following sections to the DataLink_Viewer.ini file (located from the
Version info button).
First, indicate what reports are targets for email-after-export action using this section:
[Email_After_Targets]
Reports=||Order_Confirmation.rpt||New_Application.rpt||
In the example above, 2 reports will be targeted for emailing via Outlook after they are exported.
Use ||ALL|| if you wish to target all reports.
Then, for each target in the Reports entry above, create an ini section to specify email options. For example:
[Email_After_Order_Confirmation.rpt]
Subject=Report Attached
Message=The attached pdf shows your order confirmation.
Here is an example of an Outlook message popped by DataLink Viewer after an export of a targeted file:

©2002-2024 Millet Software Page 14
3 PRINT BUTTONS
Instead of a single print button, DataLink Viewer gives you:
1. a regular print button, which invokes a printer selection and setup dialog
2. a "Quick Print" button, which immediately sends the report to the default printer, or
3. a "Print Current Page" button, which immediately prints just the current page to the default printer.
REFRESH (AUTO-REFRESH) BUTTON
DataLink Viewer allows you to auto-refresh a report every N seconds and to selectively change the values of
only some parameters:
Interactive Parameter Button
Just like in Crystal, the interactive parameter panel allows you to change parameter values without refreshing
the whole report:

©2002-2024 Millet Software Page 15
REPORT GRID HELP
If you hit F1 or Ctrl-F1 while on the Select Reports tab, the following Help window displays:
REPORT PREVIEW HELP
If you hit F1 or Ctrl-F1 while on the report Preview tab, the following Help window displays:

©2002-2024 Millet Software Page 16
SELECTING A REPORT TO VIEW
To launch a report, you can:
1) Selecting that row and clicking the Preview Tab, or
2) Right-Clicking that row and selecting Preview, or
3) Double-clicking the row.
Note: the sample reports use the Extreme Sample Database. If you don't have that installed, you can elect to not
refresh the data.
Before displaying the report, DataLink Viewer would prompt you for any report parameters and logon
information required by the report. If the report was saved with data, the viewer would ask you if you want
to refresh the data or use the data saved with the report (in which case you would not be prompted for parameter
values).
Copying Object/Text From The Report
OBJECT COPY (CTRL-C)
Ctrl-C copies the selected object. For example, you can copy a chart, a map, an image, or text with
formatting into an email message.
TEXT COPY (ALT-C)
After a field/formula is clicked, pressing Alt-C copies the value of the field as plain text to the clipboard. You
can then paste that text (using Ctrl-V or right-click editing menu to a target of your choice.
TOOLTIP COPY (CTRL-SHIFT-C)
After a field/formula is clicked, pressing Ctrl-Shift-C copies the value of the tooltip of that field as text to the
clipboard. In Crystal, the tooltip can be set via a dynamic expression…
Use Scenario:
Imagine you have Customer Support Representatives (CSRs) who use Crystal reports to view order history
information for calling customers. Frequently, these CSRs need to grab order history information for a specific
order within the report, and email that information to the customer. You don’t want to display all that history
information inside a single field on the report because of formatting and space utilization considerations. But
you can accumulate that content using Crystal formula logic into the tooltip expression for a field or a formula.
After selecting that field or formula, the CSR can simply hit Ctrl-Shift-C to copy the content of the tooltip.
They can then paste it to an email message using Ctrl-V.

©2002-2024 Millet Software Page 17
Parameter Functionality
Remember Parameter Values from a previous Session (video demo)
If you refresh or reload the same report, the values you specified last time for each parameter are already
selected, allowing you to accept or replace them.
Selective Parameter Refresh (video demo)
When refreshing a report that has parameters, a special dialog allows users to select which parameters they wish
to change. These choices are stored for each report for reuse/ change at a later session. Unlinked subreport
parameters participate in this process and are listed as [subreport name] -> Parameter Name.
Notes:
To remove linked subreport stored procedure parameters from this dialog, the parameter name must
contain "_Linked".

©2002-2024 Millet Software Page 18
Initializing Parameter Values with Date Expressions (video demo)
If a Date or DateTime parameter name ends with a _Set2_ followed by a date expression (using date constants),
DataLink Viewer initializes the parameter value accordingly. This means that a dynamic saved value for the
parameter is generated on the fly to match the date expression relative to the current date.
Here is a link to a sample report.
For detail about available date expressions, see the user manual section on Date Constants.
This functionality has two key benefits:
1. It allows users to avoid tedious entry of parameter values.
2. It can improve report performance compared to using formula logic to restrict record selection. This is
because formula logic might force Crystal to execute filtering locally, instead of passing the selection
logic to the database server via the SQL WHERE clause.
For example, the 3 date parameters shown in the image below get initialized by DataLink Viewer to
a) yesterday, b) today, and c) a date range ranging from start of the month to today, inclusive of the end points.
DataLink Viewer would then show the following dialog box allowing the user to either accept or change these
initial values (the displayed dates are relative to a current date of Sep 16, 2018):

©2002-2024 Millet Software Page 19
Save and Reuse Named Parameter Sets (video demo)
If you click the refresh button for a report that has at least 8 parameters (Options dialog allows you to change
that number), a Save button becomes visible in the following dialog:
If you click Save, the following dialog allows you to save the current parameters value set to
DataLink_Viewer.ini under a unique name for this report.

©2002-2024 Millet Software Page 20
The next time you load this report, you would get a dialog that allows you select and reuse any of the saved
named parameter sets for this report:
Double-clicking any of the entries (or selecting an entry and clicking the OK button) would launch a dialog
allowing you to reuse that set of saved parameter values or selectively change some of these saved parameter
values.
This functionality was designed to address scenarios where reports with many parameters are used in one of
several parameter patterns. By saving and naming these patterns, the user can reuse them.
Note: if you are a report developer, you can deliver these saved parameter patterns to a user machine by copying
the [Named_Parameter_Sets] section in your DataLink_Viewer.ini file to the user’s DataLink_Viewer.ini file.
©2002-2024 Millet Software Page 21
Click to Change a Parameter Value (video demo)
If you place a main report parameter on the report layout, when a DataLink Viewer user clicks on that
parameter, DataLink Viewer prompts the user for just that parameter. That allows your users to simply and
intuitively select just one parameter to refresh. Note: avoid special characters in the parameter name.
TOGGLING BETWEEN 2 PARAMETER VALUES
If a user clicks on a parameter that has exactly 2 default values (no custom values allowed), DataLink Viewer
toggles the value of that parameter to the other value. This provides many useful behaviors. The sample report
demonstrates toggling between viewing Profit or Revenue by simply clicking on the {?Metric} parameter.
Another parameter allows toggling between expanding all top nodes or manually selecting which nodes to
expand.
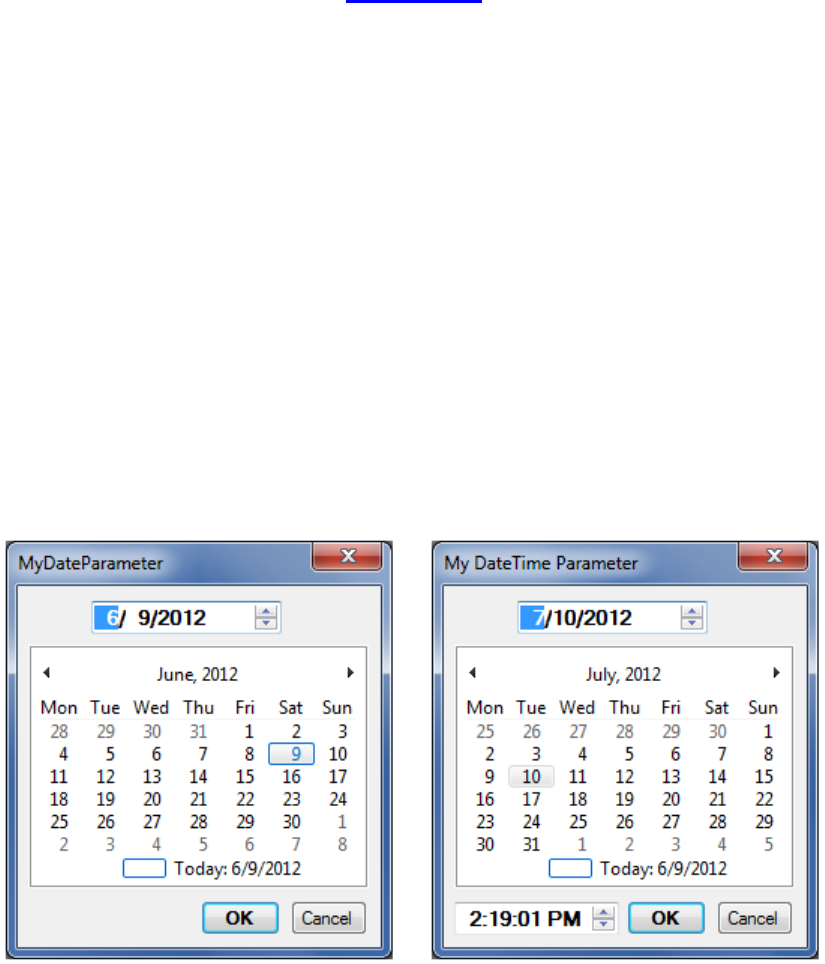
SPECIAL DATE AND DATETIME PARAMETER DIALOGS
If a user clicks on a single-value Date or DateTime parameter, DataLink Viewer presents an enhanced date
entry/selection dialog. To quickly select a date, double-click a date on the calendar. Once the calendar is
selected, Page Up/Down changes the month and Ctrl+(Page Up/Down) changes the year:

©2002-2024 Millet Software Page 22
INPUT BOX DIALOG
If a user clicks on a single-value parameter with less than 2 default values, where custom values are allowed,
DataLink Viewer presents a simple InputBox dialog, making it easier and faster for the user to change the
parameter value.
LISTBOX DIALOG
If a user clicks on a single-value parameter more than 2 default values, where custom values are not allowed,
DataLink Viewer presents a multi-row dialog, with one row for each default value designed for that parameter.
This allows the user to quickly change the value for that parameter. To quickly select an item, the user can
simply double-click it.
To quickly locate an item in the list, the user can type the first few characters and the list will automatically
scroll to the first item starting with these characters. To quickly select an item, the user can simply double-click
it.
CHANGING A PARAMETER BY CLICKING ON A RELATED FORMULA
In some cases, you may wish to invoke a parameter change by clicking on a related formula. For example, you
may wish to embed the parameter inside some text, or perhaps the parameter may have an empty value, making
it impossible to click on the parameter object by itself.
To use a formula as a proxy for clicking on a parameter, the formula name must start with
"DLV_Param_Click:" followed by the parameter name you wish to change when a user clicks on that formula.
For example, "DLV_Param_Click:Customers"
The formula itself may display any values you wish. For example, you may concatenate static text with the
parameter value, or you may wish to return "No Value" if the parameter value is null, and a nicely formatted
value if the parameter is not null.

©2002-2024 Millet Software Page 23
Load ini Values into Parameters
Specially named parameters get loaded automatically from DataLink_Viewer.ini file entries. For example, you
may use this with parameters that change only once per quarter. Another case could be a situation where
you develop and sell reports (probably .rpt files converted to .rpz files) to clients in a vertical market. These
reports are designed to work against a known database structure, but each client may need to customize the
reports with text elements, conditional formatting, or record selection criteria without changing the
report design. Or perhaps you wish to restrict use of your reports to only paying customers by providing a
license code that must match (using secret logic) the company name in the customer’s database.
Instructions:
First, add to the [Options] section in DataLink_Viewer.ini (in the application folder) an entry with a key name
(Company) and value (Millet Software) of your choice. For example:
[Options]
…
Company=Millet Software
Then, add a String Single-Value parameter named "DLV_INI_Option_KeyName" to the report. DataLink
Viewer automatically sets the value of such parameters to the value found for the Key Name under the
[Options] section of DataLink_Viewer.ini. So, in the case above,
the parameter value of DLV_INI_Option_Company would be set to "Millet Software".
Notes:
Within DLV, the user never gets prompted for the value of such parameters.
If a matching key name can’t be found, the parameter gets the value of:
"Failed INI Lookup"
You can have as many parameters like this as you wish, each with a different key name.
To pass such parameters to subreports, create a formula in the main report that simply returns the value
of the parameter. Then, pass that formula as a link to the subreport.
The ini file used by this process is always the MASTER ini file (the one in the DataLink Viewer
application folder), even if you redirect to a DataLink_Viewer.ini at a different location. This allows you
to enforce this type of parameters from a centralized location.
Securing Reports against Unauthorized Use
If you wish to secure your reports against unauthorized use, you can provide authorized users a License Key
string for the ini entry. Within the report (later distributed to clients as an .rpz file) you design a record selection
criterion that returns true only if the license key matches the company name in the database. As a simple
example, you could check the number of characters in the license key is equal to the length of the actual
company name (in the database) plus the number of R’s in that company’s name.
If you don’t have access to the company name in the database, or if you wish to issue per-machine licenses, use
the technique described in the next section.
©2002-2024 Millet Software Page 24
Load Machine/Company/Report Information into Parameters
DLV_MACHINE_NAME
If a report has a single-value string parameter called DLV_Machine_Name, DataLink Viewer automatically
sets the value of such a parameter to the Windows Machine Name on which DataLink Viewer is running.
DLV_REGISTERED_COMPANY
If a report has a single-value string parameter called DLV_Registered_Company,
DataLink Viewer automatically sets the value of such a parameter to the Company Name specified when the
Windows operating system was installed..
In conjunction with the ability to load ini values into report parameters, this functionality allows report
developers to distribute rpz files and restrict their use to only those where a license code matches the company
to which Windows is registered.
DLV_HD_SERIAL_N
If a report has a single-value string parameter called DLV_HD_Serial_N,
DataLink Viewer automatically sets the value of such a parameter to the serial number of the current hard drive.
In conjunction with the ability to load ini values into report parameters, this functionality allows report
developers to distribute rpz files and restrict their use to only those where a license code matches the machine
on which the report is running.
DLV_RPT_PATH
If a report has a single-value string parameter called DLV_Rpt_Path, DataLink Viewer automatically sets the
value of such a parameter to the path to the rpt or rpz file. This is particularly useful in the case of rpz files.

©2002-2024 Millet Software Page 25
Control Data Access according to PC Login
Assume you have several Sales Reps who need access only to their own sales information. DataLink Viewer
can limit the data shown in a report according to who is logged in to the PC.
To achieve this functionality you need two elements:
1. The report must have a String parameter named "DLV_User_ID" as shown below.
DataLink Viewer automatically sets the value of such a parameter to the User ID who is currently logged in
to the PC.
2. The record selection formula must include a condition that restricts the data
according to the User ID. In most cases, this would be achieved by creating a new table in your database
(or adding a new column to an existing table). For example, a new column in the Sales_Rep table (or a new
table) can associate each Sales_Rep_ID with his/her User ID.
The record selection formula would include a condition such as: {Sales_Rep.User_ID}={?DLV_User_ID}
This would ensure that as each Sales Rep logs into their PC, DataLink Viewer will show them only the sales
records associated with their own Sales_Rep_ID.
Note: using a table, you can use multiple records to map the same User_ID to multiple areas of responsibility
(Customer_IDs, Product_IDs, Region_IDs):
This allows you to give a single user (for example, a regional manager who should be able to see information
for all her Sales Reps) permissions to view information that is related to more than one entity.
In the table example above, ixm7 is allowed to view sales information for all three products, while ido is
allowed to view sales information only for Visual CUT.

©2002-2024 Millet Software Page 26
Dynamic & Cascading Parameters (video demo)
This section explains the special dynamic & cascading parameter functionality provided by DataLink Viewer.
When a parameter name matches a report name, DataLink Viewer uses that report as a parameter
dialog.
The first parameter in our sample report was named (by the report developer) as:
"Prompt_Order_Year.rpt"
DataLink Viewer detects that such a report exists and "links" to that report as the basis for prompting the user.
Note: if a prompting report doesn’t exist, the regular parameter dialog provided by Crystal will be used.
DataLink Viewer always tries to locate and use Live Prompts before using the regular Crystal prompts.
RESPOND TO SINGLE-VALUE LIVE PROMPTS
DataLink Viewer detects that the Prompt_Order_Year.rpt parameter was designed to accept only a single
value, and hence it presents you with the linked report inside a dialog that allows you to click and select only a
single value:
Note that by linking to a live prompt report, the designer of the report doesn’t have to change the report design
every year in order to add one more entry to the default value list of the static parameter. Instead, the prompt
report dynamically presents all available years in the database.

©2002-2024 Millet Software Page 27
LINK BACK IN A HIERARCHY OF LIVE PROMPTS
Once you select 2004 and hit OK, the viewer detects a second parameter in our sample report:
"Prompt_Products.rpt"
Again, DataLink Viewer detects that such a report exists and links to that report as the basis for prompting the
User.
However, before presenting this report to the user, the viewer detects that the Prompt_Products.rpt itself is
designed with a parameter of its own:
"Prompt_Product_Types.rpt"
What we have here is a hierarchy of links whereby the values selected by the user in response to the
Prompt_Product_Types.rpt parameter restrict the values available for selection in the Prompt_Products.rpt
parameter:
DataLink Viewer always starts from the bottom of the hierarchy for each parameter!
Hence, we are going to be prompted first for Product Types before we select Products within those Product
Types.

©2002-2024 Millet Software Page 28
RESPOND TO MULTI-VALUE LIVE PROMPTS
DataLink Viewer detects that the parameter called Prompt_Product_Types.rpt was designed to accept
multiple values, and hence it presents you with the linked report Prompt_Product_Types.rpt inside a dialog
that allows you to click and select multiple values:
After clicking on Competition and Helmets to select those Product Types, click OK to progress to the Products
selection within those Product Types.

©2002-2024 Millet Software Page 29
MANAGE DISPLAY & DATA VALUES FOR LIVE PARAMETERS
In this particular situation, the Product Type Name is used for both display value (what gets shown to the user
in the list of available values) as well as data value (what gets passed into Crystal as the parameter value). As
demonstrated in the following step, DataLink Viewer allows you to present the user with meaningful product
names as display values while passing Product IDs as the actual parameter data value.
Again, DataLink Viewer detects that the parameter called Prompt_Products.rpt was designed to accept
multiple values, and hence it presents you with the linked report Prompt_Products.rpt inside a dialog that
allows you to click and select multiple values. Note that only Products within the Selected Product Types
(in the previous step) are available for selection.
This demonstrates the power of cascading dynamic parameters:
While you can click on any field/formula to add its text to the selection list, it’s good practice to use color, font,
and box effects to highlight the column you intend the user to click..
The viewer always uses what you click on as the Display Value. However, if that field has a tooltip, the text of
that tooltip is used as the parameter Data Value. After clicking on some product names, move your cursor over
these items in the list of selected Display Values. Notice that a popup text reflects the underlying Data Value
(Product IDs for each product).
You can resize the dynamic parameter dialogs, select a zoom level, and turn the group tree on or off for each
dynamic report. DataLink Viewer remembers these settings and will apply them the next time the same
dynamic parameter dialog (for the same dynamic parameter report) is loaded.

©2002-2024 Millet Software Page 30
VIEW THE REPORT
When you click OK, DataLink Viewer uses the selected values for both the "Prompt_Year.rpt" and
"Prompt_Products.rpt" parameters to display the requested report:

©2002-2024 Millet Software Page 31
Dynamic and Cascading Parameters (Developer Notes)
DataLink Viewer can be used to run existing Crystal reports without any design changes.
This section reviews how report designers can activate the extra functionality of linking to live prompt reports.
NAMING PARAMETERS
If you want to link a parameter to a live prompt report, you need to name the parameter as the report name. In
our sample report, the live prompt reports and parameter names were:
"Prompt_Order_Year.rpt" and "Prompt_Products.rpt":
DESIGNING LIVE PROMPT REPORTS
The reports acting as live prompts should be placed in the same directory as the report to be viewed or in
the DataLink_Viewer directory.
These reports should contain at least one formula with the word "parameter" within its name. Formulas
named in such a manner can be clicked and selected within the prompt viewer.
You can place a formula on the report to let the user select a meaningful Display Value
(e.g., "@Product_Name"). If you give that field or formula a tooltip text or expression, that value would be used
as the parameter Data value.

©2002-2024 Millet Software Page 32
IMPLEMENTING A "SELECT ALL" OPTION
If you run the report again and scroll to the bottom of the live Product Type selection prompt,
you would notice that you can select the "All Product Types" option:
This was implemented by adding a formula to the report footer with a static text value of "All Product Types".
The desired effect is obtained by specifying the following record selection criterion in Prompt_Products.rpt:
{Product_Type.Product Type Name} in {?Prompt_Product_Types.rpt}
OR
"All Product Types" in {?Prompt_Product_Types.rpt}

©2002-2024 Millet Software Page 33
SHARING VALUES ACROSS CASCADING PARAMETERS
Parameter values are automatically reused if the same Parameter name is used more than once in
the chain of cascading parameters.
The diagram below shows a situation where Prompt_Order_Year.rpt is used to first ask the user to
specify which orders should be shown in the report. That same parameter is then also used to limit the
dynamic list of products (Prompt_Products.rpt) such that only products that actually sold in that year
are available for selection.
DataLink Viewer now reuses the year specified by the user the first time Prompt_Order_Year.rpt is
invoked to avoid asking the user the same question twice.
To disable sharing parameter values from prior answers, open DataLink_Viewer.ini and change
the following entry from TRUE to FALSE:
[Options]
DataLink_Parameters_Share_Prior_Answers=TRUE
©2002-2024 Millet Software Page 34
REQUIRING A VALUE FOR A DYNAMIC PARAMETER
This can be achieved by following these guidelines:
1. Add a string formula with the name of: {@DLV_PARAMETER_REQUIRED} to the Report Footer (of
the dynamic parameter report, not the main report).
2. The formula must return a non-blank string if you wish to enforce a required value for the parameter.
3. If the string returned by the formula is longer than 10 characters it would be used as the text of the message
box in cases where the user clicks OK without specifying a value for the parameter. Otherwise, a standard
message appears.
4. The formula, and even the report footer section as a whole can be suppressed.
5. You must place the "Page N of M" special field in the Page footer of the dynamic parameter report (even if
that field or the page footer as a whole are suppressed.
FORCING USERS TO SELECT FROM THE LIST OF VALUES (NO DIRECT EDIT)
By default, dynamic parameter dialogs for single-value parameters allow the user to enter a value directly
instead of clicking on the displayed list. You can force the user to select from the list displayed by the
dynamic parameter report under two scenarios:
1. You include the text ‘NoEdit’ in the parameter name.
- or-
2. The user double-clicked an item in the dynamic parameter report and that item has an associated data value
(tooltip expression). If the option to remember dynamic parameter values is turned on, from that point on that
parameter will force the user to select from the list.

©2002-2024 Millet Software Page 35
Auto-Refresh Reports
When clicking the Refresh button, you can specify that the report should automatically refresh every N seconds.
As shown in the following dialog, when a report has parameters, the Auto-Refresh option is enabled only when
you elect to reuse the current parameter values:
When a report doesn't have parameters, the dialog is simpler and you can always elect to enable auto-refresh:
The auto-refresh process stops when you click the Refresh button again or when you select another report.
When auto-refreshing, a decrementing progress bar at the bottom of the page reflects the % of the refresh
interval remaining until the next refresh:
A click on that progress bar pauses/resumes the auto-refresh process.
If a user is on a drill-down tab, auto-refresh is placed on hold. When the user closes the drill-down tab or moves
back to the main report tab, auto-refresh resumes.
©2002-2024 Millet Software Page 36
Auto_Refresh Command Line Argument
You can also trigger auto-refresh by using an "Auto_Refresh" argument when invoking a report from a
command line. Here’s how you would trigger a viewing of a report and auto-refreshing it every 5 minutes (300
seconds):
__________________________________________________________________
"C:\Program Files\Millet Software\DataLink Viewer 2011\DataLink_Viewer_2011.exe" -v
"C:\temp\Report.rpt" "Auto_Refresh:300"
__________________________________________________________________
Saved Data Auto Refresh
Imagine a case where a huge report takes 30 minutes to run and 10 users wish to monitor the data in that report
by auto-refreshing it. Instead of each of the 10 users waiting for the report to retrieve data on their PC, you can
schedule the report (for example, using Visual CUT) to export to a Crystal Report format. The resulting rpt
file has all the information as Saved Data inside the rpt file.
The 10 users can then open the exported rpt in DataLink Viewer and elect to not refresh the saved data. If the
report was launched with an Auto_Refresh command line argument, the users can elect to keep loading the
saved data on each refresh cycle, allowing the latest exported data from Visual CUT to be reflected in the auto-
refreshed report within DataLink Viewer.
To tell DataLink Viewer to use saved data during Auto Refresh, use a command line like this:
__________________________________________________________________
"C:\Program Files\Millet Software\DataLink Viewer 2011\DataLink_Viewer_2011.exe" -v
"C:\temp\Report.rpt" "Auto_Refresh:600" "Auto_Refresh_Use_Saved_Data:True"
__________________________________________________________________
Specifying Parameters When Using Saved Data Auto Refresh
Some parameters don't participate in data selection. Such Non-Fetching parameters are typically used to control
how the data is displayed on the report (for example, grouping, sorting, and section suppressions). DataLink
Viewer allows you to specify values for such parameters when using saved data. For example:
__________________________________________________________________
"C:\Program Files\Millet Software\DataLink Viewer 2011\DataLink_Viewer_2011.exe" -v
"C:\temp\Report.rpt" "Auto_Refresh:600" "Auto_Refresh_Use_Saved_Data:True" "Parm1:Crew"
__________________________________________________________________
©2002-2024 Millet Software Page 37
Auto_Page_and_Refresh
Using this command line argument, you can request the viewer to automatically advance to the next page every
N seconds. After getting to the last page, the viewer will next move to the first page and also refresh the report
data. The cycle then continues. Here’s how you would trigger the process with 20 seconds as the time
increment:
__________________________________________________________________
"C:\Program Files\Millet Software\DataLink Viewer 2011\DataLink_Viewer_2011.exe" -v
"C:\temp\Report.rpt" "Auto_Page_and_Refresh:20"
__________________________________________________________________
Note: to pause the auto-page & refresh process, double-click on the report -- Double-click again to resume.
ViewMode (Remove Toolbar/Status bar/TitleBar)
When you trigger a report from a command line using a –v (View Only window), you can also elect to remove
the toolbar/status bar/title bar in order to maximize the space available for the report itself.
The command line argument for controlling this behavior is "ViewMode" and it has these possible values:
…"ViewMode:NoStatusBar" - only the status bar at the bottom of the window is removed
…"ViewMode:NoToolBar - only the toolbar at the top of the window is removed
…"ViewMode:NoBars" - both the toolbar and the status bar are removed
…"ViewMode:NoBarsNoTitle" - toolbar, status bar, and window title are all removed
A typical scenario for using this option is in combination with the Auto_Refresh command line argument. For
example:
__________________________________________________________________
"C:\Program Files\Millet Software\DataLink Viewer 2011\DataLink_Viewer_2011.exe" -v
"C:\temp\Report.rpt" "Auto_Refresh:300" "ViewMode:NoBars"
__________________________________________________________________

©2002-2024 Millet Software Page 38
Cycling Through Several Auto-Refreshed Reports
Assume you want your monitor to cycle through 2 different auto-refreshed reports every 15 seconds. You can
take advantage of the fact that as a report gets auto-refreshed its window becomes the active one. So, you can
trigger auto-refresh every 30 seconds for both reports, but separate the start times by 15 seconds.
Here’s how you can automate the whole process:
Step 1: Use notepad to create a batch file that can be called from within another batch file to delay processing
by a given number of second. Call it WAIT.bat
(if you’d like to understand the logic, see: http://malektips.com/dos0017.html):
@ping 127.0.0.1 -n 2 -w 1000 > nul
@ping 127.0.0.1 -n %1% -w 1000> nul
Step 2: Use notepad to create the following text file. Call it invis.vbs
(this allows us to call 1 report and progress to the next line in a batch file (no blocking) as well as avoid the ugly
DOS window):
CreateObject("Wscript.Shell").Run """" & WScript.Arguments(0) & """", 0, False
Step 3: Use notepad to create one batch file for each report to trigger its viewing and auto-refreshing. Here are
two batch files, one for a report with a parameter and one for a report without one:
Report_1.bat
"C:\Program Files\Millet Software\DataLink Viewer 2011\DataLink_Viewer_2011.exe" -v "C:\DLV\Report_1.rpt" "Parm1:2004"
"Auto_Refresh:30"
Report_2.bat
"C:\Program Files\Millet Software\DataLink Viewer 2011\DataLink_Viewer_2011.exe" -v "C:\DLV\Report_2.rpt" "Auto_Refresh:30"
Step 4: Use notepad to create a batch file, which silently calls the two reports, inserting a 15 seconds wait
between the calls. Double-click or schedule that batch file to start the processing:
wscript.exe "C:\DLV\invis.vbs" "C:\DLV\Report_1.bat"
CALL WAIT 15
wscript.exe "C:\DLV\invis.vbs" "C:\DLV\Report_2.bat"

©2002-2024 Millet Software Page 39
Click to Set Formula Value (video demo)
DataLink Viewer reacts to user clicks on specially named formulas by setting the value of another formula.
Click to Set Another Formula to Clicked Formula Value
For example, if a user clicks on a formula called {@DLVSet_1:Sort1} that has as its string value the text
"Region" it will attempt to locate the {@Sort1} formula and set its string value to "Region". If, the user clicks
on another formula called {@DLVSet_2:Sort1} that has as its string value the text "Country" it will attempt
to locate the {@Sort1} formula and set its string value to "Country".
The name of the clicked formula has 4 parts:
1. DLVSet_ this is a constant that identifies the formula to DataLink Viewer as a click source.
2. Any number (not limited to a single digit) (1 or 2 in samples above). This allows for multiple formulas, each
with a different string value, to set the string value of the same target formula
3. a colon (:)
4. The name of the target formula (Sort1 in the examples above) whose string value would be set to the string
value of the clicked formula.
Note: avoid spaces and special characters (e.g. underscores) in the target formula names.
Click to Set Another Formula to Clicked Formula Name
Following the scenario in the section above, if the target formula name contains "ClickedFormulaName" its
value gets set to the name (rather than value) of the clicked formula.
If it contains "ClickedFormulaNameDrillDown", the click also triggers a DrillDown. This allows initiating a
drill-down while dynamically controlling visibility of elements in the drill-down. Make sure the group name
you are drilling on is not blank ("").

©2002-2024 Millet Software Page 40
Click Column Headers to Re-Sort The Report
As a demonstration of what can be achieved with the "Click to Set a Formula Value" functionality, the sample
report (DLV_Column_Header_Sort_2011.rpt) reacts to clicks on column headers by resorting the report based
on the clicked column header. A short video demonstration is available at: https://youtu.be/QwyPQfQeY40
The four column headers are clickable formulas:
1. {@DLVSet_1:Sort1} (with a string value of "Customer Name")
2. {@DLVSet_2:Sort1} (with a string value of "Region")
3. {@DLVSet_3:Sort1} (with a string value of "Country")
4. {@DLVSet_4:Sort1} (with a string value of "Postal Code")
The target formula {@Sort1} starts with a design-time value of "Customer Name" and as its value gets changed
due to user clicks, the {@SortBy1}formula reacts by returning one of the 4 database columns (Customer Name,
Region, Country or Postal Code) . This in turn changes how the report groups are sorted.
Note: group rather than record sorting is used in this sample report because the Crystal runtime components
don't re-sort records unless the report data is refreshed from the database. The Group re-sort occurs all on the
client-side without hitting the database again.
Click to Show HTML Tooltip (video demo)
If the tooltip of a formula (or any other object!) begins with <HTML>, DLV assumes the tooltip contains rich
content that should be displayed in an independent window.
Crystal allows you to set the Tooltip property of any object to a complex expression, so you can easily
accumulate a lot of detail into nicely formatted HTML pages, including HTML tables. To see how Crystal
formulas can build an HTML table from report data, visit this video demo.
The key advantage of this technique is that in some cases, you want to display detail data side by side with the
main report. That is something that On-Demand Subreports or Drill-Downs typically can’t provide. You can
even click on several objects to open multiple HTML tooltip windows and arrange them side by side.
Notes:
You can press Ctrl-P to print the content of any HTML tooltip window.
DLV remembers the location & size of the last opened HTML tooltip window.
If the tooltip HTML syntax includes a <Title>… </Title> tag, the tooltip window reflects that title.
HTML Tooltip windows are automatically closed when you refresh or navigate away from the report
preview window. To automatically close the tooltip windows also on events such as drill-down, paging,
and parameter panel refresh, set the following entry in the DataLink_Viewer.ini file to TRUE:
[Options]
Close_HTML_Tooltips_On_Page_Events=True

©2002-2024 Millet Software Page 41
In-Place Drill-Down (video demo)
Crystal's Drill-Down functionality is limited to opening the detail in a new tab. However, in many cases users
prefer to expand/collapse detail within the main report tab. By adding to the report a few formulas and using
them in the suppress expression of detail sections, DataLink Viewer allows you to achieve In-Place Drill-Down
functionality.
A report may initially preview with all details collapsed, like this:
The + "buttons" are actually a formula that return a plus or a minus sign. When the user clicks on the these
"buttons" the level-2 detail is revealed:

©2002-2024 Millet Software Page 42
And when a + "button" (another formula) in level-2 is clicked, level-3 detail is revealed:
You are not limited to 1 drill-down path -- several branches can be expanded at the same time.
see video demo at: https://youtu.be/3CmayJMAImE
To learn how to create your own report with this functionality, open the sample report
DLV_Demonstration_12B.rpt and look at the comments and expressions in:
1. @DLV_Expand_Button_1 and @DLV_Expand_Button_2 formulas
2. @DLV_Current_Group_1 and @DLV_Current_Group_2 formulas
3. @DLV_Expanded_Group_List formula
4. Suppress expressions for the sections:
a. GH1b (acts as column headers for level 2) and GH2a
b. GH2b (acts as column headers for level 3) and GH3
The same approach can be extended to any number of group levels.
This functionality is enabled only in the main report view (not in Crystal's drill-down tabs).
Note: using my CUT Light UFL, you can "persist" to an ini file the information in
@DLV_Expanded_Group_List so that the report "remembers" its collapse/expanded state.

©2002-2024 Millet Software Page 43
Converting Section Double-Click to In-Place Drill-Down
When you implement In-Place Drill-Down, as discussed above, you may wish to allow the user to trigger this
behavior by double-clicking anywhere in the section (rather than just by clicking the + / -
@DLV_Expand_Button_N formula placed in that section.
To override the default double-click behavior in Crystal (drill-down to a new tab) and divert the double-click
action to an In-Place Drill-Down, simply use all Upper Case when naming the button formula: for example
instead of
@DLV_Expand_Button_1
use
@DLV_EXPAND_BUTTON_1 .
Note: Verify that if you move the mouse cursor over the formula placed in the report section, the correct
upper/lower case is shown. If you already created the formula and you wish to change it to upper case, you may
need to propagate that change to the actual formula object in the report section by copying the formula (Ctrl-
drag) and then deleting the old clone.
Note 2: if only the 2
nd
click on the button is recognized, you can correct that problem using the same procedure
as above: copy the button formula (using Ctrl-drag) and then delete the old clone.
Hiding the + / - Buttons
If you use an upper case formula name for any of your @DLV_Expand_Button_N formulas, you can hide the
formula by using the section background color as the font color. This would allow you to use double-clicks
exclusively for In-Place Drill-Down actions (the user will not see the + / - Buttons).

©2002-2024 Millet Software Page 44
Dynamic Grouping (Group Swap Expert) (video demo)
When previewing a Grouped report, if you click or press Ctrl-G, the Group Swap Expert dialog open up.
Using Drag & Drop, you can change and reorder the fields/formulas used to group the report. For
example, instead of Grouping the report by Employee and by Product Type, you may group the report by
Country and Year.
The grouping change doesn’t require hitting the database again, so it is very quick.
DataLink Viewer also adjusts all formulas using group summaries, as well as the Group Selection formula, to
reflect the new grouping.
This feature avoids the need to create parameters and formulas in cases where you wish to provide dynamic
grouping functionality. A video demonstration is available.

©2002-2024 Millet Software Page 45
Notes:
1. If you try to invoke the Group Swap expert for a report grouped on a date you get a detailed message
box like this:
2. For the same reason, date fields/formulas are not listed as candidates for change of grouping.
3. If you try to invoke the Group Swap expert for a report grouped on a field/formula that is not on the
report layout you get a detailed message box like this:
4. To make a field/formula participate in this dialog, it must be placed on the report layout.
Its name must not end with "_NOK" (an indication it’s Not OK to include it)
If the field/formula is suppressed or is placed in a suppressed section, it gets loaded into the list of
candidate Fields/Formulas only if it’s name ends with "_OK".
This approach is designed to avoid exposing suppressed information.
5. Conditional formatting formulas using group summaries are not adjusted.
6. Groups sorted Descending by total field may become sorted Ascending.
To avoid that behavior, use a TopN sort (with a large N) instead.
7. You may disable this functionality by adding this to the master DataLink_Viewer.ini
[Options]
Disable_Group_Swap=True

©2002-2024 Millet Software Page 46
Optional Technique for Gaining Formula Access to the Dynamic Grouping:
If the report contains formulas names as: DLV_Group_L1, DLV_Group_L2, etc. DataLink Viewer will set
the expression of each of these formulas to return the grouping Field/Formula at that level after applying group
swaps. For example, you can design the report to have {Employee.Last Name} as the formula expression for
DLV_Group_L1 (reflecting the initial design of the report). If the user swaps {Customer.Country} for the
level 1 grouping, DLV changes the expression in the DLV_Group_L1 from {Employee.Last Name} to
{Customer.Country}. This allows you to build Advanced Charts (not limited to the Grouping Hierarchy)
and CrossTabs that reflect the dynamic grouping. The sample report
(DLV_2011_Change_Group_Demo.rpt) demonstrates this feature.

©2002-2024 Millet Software Page 47
Change Layout & Content when Printing the Report
In some cases you may wish to use different layout & content when printing a report.
Here is a video demo demonstrating this technique.
This requires that you add a formula called Print_Mode to your report and set its value to “Preview”.
DataLink Viewer temporarily toggles the value of that formula to “Print” before printing, and restores its value
to “Preview” after printing. You just need to control the layout and content of the report using the value of that
formula.

©2002-2024 Millet Software Page 48
Data Grid
You can click this toolbar icon to load the report data into an interactive data grid for ad-hoc grouping,
sorting, totaling, filtering, and exporting of the data.
Example
The sample report DLV_2011_Visualization_Demo.rpz was saved with data, so launch it and elect to not
refresh the data. Click the Data Grid toolbar icon to load the report data into the interactive grid:
As shown in the image above, the grid allows you to sort, group, size/move/remove/reinsert columns, auto-fit
column widths, filter, and search the grid.

©2002-2024 Millet Software Page 49
As shown by the image below, you can drag column headers to the grouping area to group the grid by
Employee, Sales Rep, Product Type, and product.
You can also drag column headers sideways to change the order of the columns.
As shown in this image, summaries are added by right-clicking the area below a column and selecting the
desired summary type.
Filter conditions are displayed at the bottom of the grid and can be edited/suspended/reactivated via a checkbox:

©2002-2024 Millet Software Page 50
What Data is Included?
To get loaded into the data grid, a field/formula must be placed on the report layout. Its name must not end with
"_NOK" (an indication it’s Not OK to include it). If the field/formula is suppressed or is placed in a suppressed
section, it gets loaded into the grid only if its name ends with "_OK". This is designed to avoid exposing
sensitive suppressed information.
Disabling the Data Grid functionality
To disable this option set the Disable_Data_Grid option to ‘True’ in DataLink_Viewer.ini.
Exporting/Copying the Data
Right-clicking the grid, provides a menu with options for selecting, copying, and exporting the data. Export
formats include Excel (xls or xlsx), HTML, PDF, Text, etc.
Saving/Restoring Grid Layouts
If the user has modify permissions on the report folder, when the grid is closed, the layout is saved to a .grd file
with the same name as the report. This allows the grid to remember its layout for each report. If the File
Locations options specified a path to visualization layouts folder, that folder is used for storing these .grd files.

©2002-2024 Millet Software Page 51
Data Visualizer
When previewing a report, clicking the toolbar button loads the report data into a powerful data
visualization tool. The idea is to go beyond regular pivot tables or charts. The user can drag-and-drop to display
and drill-down into data patterns using effects such as multiple data panels, animation, filtering, sorting,
coloring, sizing, shapes, trend lines, and filters.
DataLink Viewer takes care of loading the report data into the visualizer, and mapping it into Measures
(numeric columns), Attributes, and Dates. Dates are treated as special attributes with Year, Quarter, Month, and
day hierarchy. Users can then create, save, and reuse visualization layouts. Please watch a 25-minute video
demo for more detail.

©2002-2024 Millet Software Page 52
Notes:
You may disable this functionality by adding this to the master DataLink_Viewer.ini
[Options]
Disable_Visualization=True
Since the visualizer takes care of generating summaries from the data, it is best to use it with detail reports.
To get loaded into the visualizer, a field/formula must be placed on the report layout. Its name must not end
with "_NOK" (an indication it’s Not OK to include it). If the field/formula is suppressed or is placed in a
suppressed section, it gets loaded into the list of candidate Fields/Formulas only if its name ends with
"_OK". This is designed to avoid exposing sensitive suppressed information.
When a user launches a report that has save visualization layouts, you may want DataLink Viewer to
immediately launch the visualization, instead of the report preview. You can achieve that behavior by going
into the DataLink Viewer Options dialog, Launch tab, and selecting a Visualization Action:
After creating a Visualization layout you can name and save it. What gets saved is only the layout, not the
data. So each time you load report data, the layout applies to the new data.
Visualizations get saved into a.dlvv file, in the report folder (if the user has write permissions on that
folder). This allows you to easily distribute the visualizations with your reports.
Using the Options dialog, you can specify a folder location for visualization files. You can give users Read-
Only, Centralized, or Distributed access to visualization files.
The logic is as follows:
1. If the dlvv file for the rpt is found in the rpt folder, it is used there.
2. If the user has no write permissions to that folder, the layouts get loaded as Read-Only/Embedded
layouts (surrounded by {…} to indicate the user won't be able to change/move those layouts. In such
Read-Only case, if matching dlvv file is also found where ReportList.txt is managed for the user or
under the Visualization Path folder (specified under the File Locations tab in the option dialog), the
layouts from that file are appended as regular layouts after the Read-Only layouts from the dlvv file
in the report folder.
3. If no dlvv file is found in the report folder, if it is found in the ReportList folder (the folder where
the ReportList.txt is located), it is used there. Again, if the user has no write permissions to that
folder, the user won't be able to save new Visualization Layouts.
4. Otherwise, if a location was specified in the Options dialog for the visualization layouts folder, the
visualization layouts for the report would be loaded from and saved to that folder. Again, if the user
has no write permissions to that folder, the user won't be able to save new Visualization Layouts.

©2002-2024 Millet Software Page 53
5. So if you use Citrix or Terminal Services server and you wish to give each user their own
visualization files, you can specify the visualizations folder as something like H:\... (where H:\ is
the user’s Home folder.). If you wish to also include in the layouts for all users a set of protected
layouts, place them in the same folder as the RPT files and make sure users don't have write
permissions on that folder.
When packaging an rpz file, a new checkbox option allows you to embed the .dlvv file inside the rpz file.
This makes it easy for professional report writers to develop, protect, and deliver not only reports but also
data visualizations to their clients.
When loading the visualizer for a report that has saved visualization layouts, the 1
st
layout gets applied to
the current data automatically. A drop-down provides access to all the other named visualizations:
In the example above, the top 6 layouts are surrounded with curly brackets {…}, indicating these
visualizations were embedded inside the rpz file. The next 2 items were added by the user and are managed
in a local .dlvv file. Only non-embedded entries can be added, deleted, renamed, and sorted by the user.
Hitting the F1 keyboard key provides the following reminders about useful function keys:
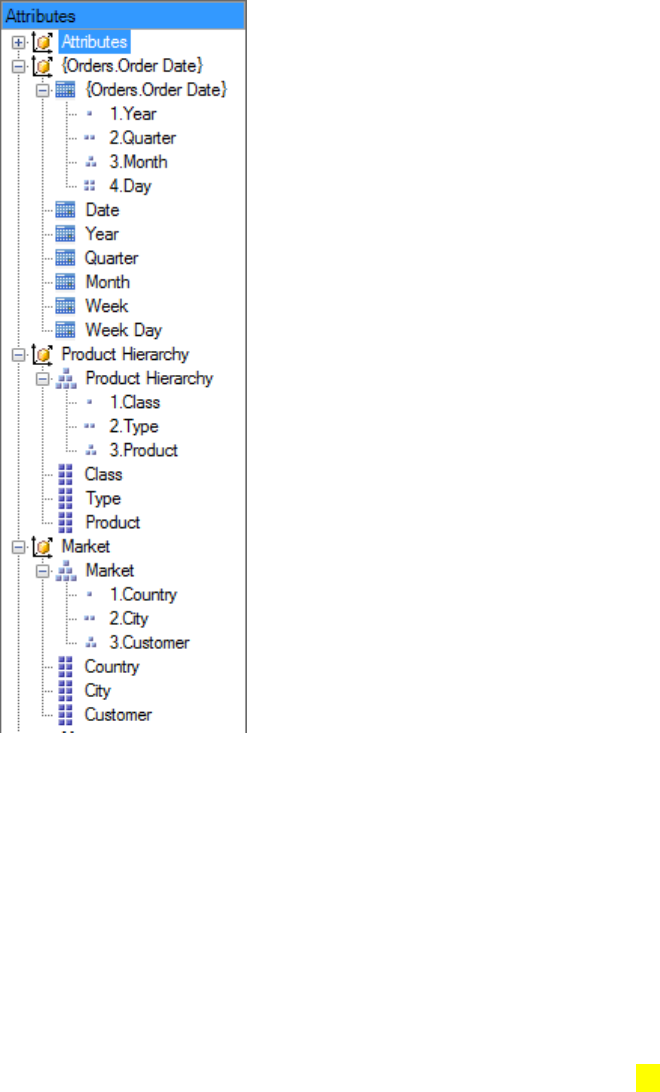
©2002-2024 Millet Software Page 54
Adding Hierarchies
As shown for {Orders.Order Date} below, each date column automatically generates a dimension node with a
date hierarchy of Year, Quarter, Month, and Day. The dimension node also hosts these elements (plus Week
and Week Day) as separate attributes, in case the user wishes to use them independently (e.g. Revenue by
Quarter regardless of the Year).
However, you may want to add your own custom hierarchies. The Product and Market hierarchies shown to
the right, demonstrate how you can package attributes into a hierarchy node so that a user can drag the whole
hierarchy to a shelf and proceed to expand/collapse its branches.
Each custom hierarchy is located under its own dimension node. The dimension node also hosts the hierarchy
attributes as independent elements. By applying user-friendly names to all these nodes, the user can find these
attributes more easily.
You can add custom hierarchies for your visualizations by adding a [Visualization_Hierarchies] section to
DataLink_Viewer.ini. See example below.
The Top_Nodes entry in that section specifies what columns, if found in the report data, should be used as top
nodes in custom hierarchies. The column names are separated by ::: .

©2002-2024 Millet Software Page 55
Each top node, such as {Product.Product Class} has an entry defining the following elements:
Hierarchy Label followed by ^^^. For example: Product Hierarchy^^^
This label applies also to the dimension node that hosts the hierarchy and its components.
This is followed by the sequence of attributes making up the levels of the hierarchy from top, separated
by >>> delimiters.
Each level is specified as the column name and its friendly name, separated by :::
[Visualization_Hierarchies]
Top_Nodes={Product.Product Class}:::{Customer.Country}
{Product.Product Class}=Product Hierarchy^^^{Product.Product
Class}:::Class>>>{Product_Type.Product Type Name}:::Type>>>{Product.Product Name}:::Product
{Customer.Country}=Market^^^{Customer.Country}:::Country>>>{Customer.City}:::City>>>{Custome
r.Customer Name}:::Customer
Automated Exporting
See the user manual section on 'Fully-Automated Exporting of Data Visualizations' for detail

©2002-2024 Millet Software Page 56
Report Inspection & Documentation Tools
Note: Visual CUT extends this functionality to allow mass updates of formulas, expressions, text, and data
sources.
Report Inspector
DataLink Viewer allows you to inspect report formulas, data connections, database tables, parameters,
text objects, field objects, sections, SQL expressions, running totals, selection formulas, and conditional
formatting expressions for one or multiple reports.
A right-click menu on a report grid row provides the following menu options:
The results are presented in a grid allowing grouping, sorting, searching, exporting, and filtering. Formulas that
fail to compile are presented with an error message.
See a full-sized sample image here: http://screencast.com/t/74ux1XgWRms
Note: to disable this functionality, set Disable_Inspect_Reports=True
in the DataLink_Viewer.ini [Options] section.

©2002-2024 Millet Software Page 57
Report Documentation
After previewing a report, a click on the status bar panel displaying the report name:
provides a report documentation window such as this:

©2002-2024 Millet Software Page 58
Launching Reports & Command Line API
Launch Reports from File Explorer
DataLink Viewer allows you to launch a report from the Windows File Explorer by
Right-Clicking a .rpt or .rpz file. The typical File Explorer menu provides the following extra options:
Open: launches a report to a Preview window.
Export: exports the report to a user selected export format and disk file.
Print: prints the report to the Default printer.
Print with…: prints the report to a user-selected printer.
These options allow users to invoke exporting or printing of a report without previewing it. This means users
don't have to wait for the preview to complete before providing exporting or printing choices. Similar choices
are available from the full user interface in DataLink Viewer (by right-clicking a report row in the 1
st
-tab grid).
However, some users may prefer to use File Explorer as a launch mechanism without starting DataLink Viewer.
Note: DataLink Viewer associates these file explorer actions with .rpt and .rpz files only on PCs where these
extensions are not already associated with other applications. This means that on a machine where Crystal
Reports is already installed (where .rpt files are already associated with the Crystal application) you will not see
these right-click menu options in File Explorer.

©2002-2024 Millet Software Page 59
Generate Desktop Shortcuts to Launch Reports
Using the right-click menu on the report list grid, you can easily generate a desktop shortcut to launch a report.
See video demo.
Select the Command Line / Shortcut option:
And use the resulting dialog to ‘Create Shortcut’:
This creates a desktop shortcut that launches the report.
DataLink Viewer remembers the size, location, zoom level, and Group Tree panel status last used for each
report previewed from its desktop shortcut.
You can right-click the shortcut to edit its properties. For example, remove some parameter arguments (from the
Target property) to prompt the user for their values.

©2002-2024 Millet Software Page 60
Launch Reports from Command Lines
DataLink Viewer allows you to launch a report from another application, from batch files, or from a shortcut
using a command line.
The general structure of the command line is:
1) the full path and name of the DataLink Viewer executable
2) –S or –V as a processing flag indicating we are requesting a report to be shown/viewed
-S shows the report and allows selection of other reports via the Report Selection Tab
-V is a View Only option that allows only viewing of the specified report
(the Report Selection Tab is not available to the user)
3) the report path and file name
4) Optional Parameter value arguments supplied as "ParmN:Value"
(where N is the position of the parameter in the parameter list within the Crystal report)
5) Optional User ID and Password arguments
6) Other optional arguments: Export, Printer, Print_Copies, ODBC_DSN, ODBC_DSN_From_To,
Oracle_Server, Connect_To_SQLOLEDB, Auto_Refresh, ViewMode, Disable_Print_Button,
Disable_Print_ThisPage_Button, Disable_Print_Quick_Button, Disable_Export_Button,
Disable_Search_Button, Disable_Refresh_Button, DB_Path_Use_Default, Disable_Group_Swap
EXAMPLES:
1. Invoke viewing of a sample report while passing 1997 as the 1
st
parameter value:
__________________________________________________________________
"C:\Program Files\Millet Software\DataLink Viewer 2011\DataLink_Viewer_2011.exe"
-s "C:\Temp\DataLink_Viewer_Year_and_Product_Prompts.rpt" "Parm1:1997"
__________________________________________________________________
2. Invoke viewing of a secure report while passing User_ID and Passord:
__________________________________________________________________
"C:\Program Files\Millet Software\DataLink Viewer 2011\DataLink_Viewer_2011.exe"
-s "C:\temp\Some Secure Report.rpt" "user_id:dba" "password:sql"
__________________________________________________________________
3. Invoke viewing of a report with only Preview tab (no Select Report tab) and specify an ODBC data source.
This is useful in cases where you have multiple database with the same structure. You create several ODBC
DSNs and can control via a command line which database is used:
__________________________________________________________________
"C:\Program Files\Millet Software\DataLink Viewer 2011\DataLink_Viewer_2011.exe"
-v "C:\temp\MyReport.rpt" "ODBC_DSN:Company1"
__________________________________________________________________
HANDLING SAVED DATA
You can force or avoid the use of saved data using a command line argument.
You can also use the Options dialog to set the default launch option (Refresh/Prompt/Display) for saved data.
©2002-2024 Millet Software Page 61
Call DataLink Viewer from Another Application
Here's a code example of invoking DLV from a visual basic application with only a Preview tab (no Select
Report tab) and specifying a parameter value. Note that double quotes are "escaped" by using
""
instead of
"
__________________________________________________________________
Dim RetVal
ls_temp = "C:\Program Files\Millet Software\DataLink Viewer 2011\DataLink_Viewer_2011.exe " &
_
"-v ""c:\temp\Lab2_Chase.rpt"" ""Parm1:800"""
RetVal = Shell(ls_temp)
__________________________________________________________________
Here's a code example for invoking DLV from a vba event and dynamically setting the report path, name, and
parameter value:
__________________________________________________________________
Private Sub Combo0_AfterUpdate()
Dim rs As Object
Set rs = Me.Recordset.Clone
rs.FindFirst "[txtReportName] = '" & Me![Combo0] & "'"
If Not rs.EOF Then Me.Bookmark = rs.Bookmark
Dim myreport As String
Dim stAppName As String
Dim myvalret As String
' me.fullrep is a field that concatenates the report path and name
myreport = Me.fullrep
myvalret = Str(MyCaseno)
stAppName = "C:\Program Files\Millet Software\DataLink Viewer
2011\DataLink_Viewer_2011.exe" & _
" -s """ & myreport & """ ""Parm1:" & myvalret & """"
DoCmd.Close
Call Shell(stAppName, 1)
End Sub
__________________________________________________________________
©2002-2024 Millet Software Page 62
ViewMode (Remove Toolbar/Status bar/TitleBar)
When you trigger a report from a command line using a –v (View Only window), you can also elect to remove
the toolbar/status bar/title bar in order to maximize the space available for the report itself.
The command line argument for controlling this behavior is "ViewMode" and it has these possible values:
…"ViewMode:NoStatusBar" - only the status bar at the bottom of the window is removed
…"ViewMode:NoToolBar - only the toolbar at the top of the window is removed
…"ViewMode:NoBars" - both the toolbar and the status bar are removed
…"ViewMode:NoBarsNoTitle" - toolbar, status bar, and window title are all removed
A typical scenario for using this option is in combination with the Auto_Refresh command line argument. For
example:
__________________________________________________________________
"C:\Program Files\Millet Software\DataLink Viewer 2011\DataLink_Viewer_2011.exe" -v
"C:\temp\Report.rpt" "Auto_Refresh:300" "ViewMode:NoBars"
__________________________________________________________________

©2002-2024 Millet Software Page 63
Referring to Saved Encrypted Passwords
This section describes how to centralize and protect passwords by avoiding specifying them directly inside
command line argument. Instead, you can name, encrypt and store the passwords inside DataLink_Viewer.ini.
Besides protecting your passwords, this also allows you to change the passwords in one location, instead of in
multiple command line arguments.
Instead of specifying a plain password in a command line such as:
"C:\Program Files\Millet Software\DataLink Viewer 2011\DataLink_Viewer_2011.exe" -v "C:\temp\my.rpt"
"user_id:dba" "password:sesame"
You can refer to a saved and encrypted password like this:
"C:\Program Files\Millet Software\DataLink Viewer 2011\DataLink_Viewer_2011.exe" -v "C:\temp\my.rpt"
"user_id:dba" "password:Encrypted_Password_FTP"
To save the encrypted password, go to the Launch tab in the Options dialog and click on the 'Encrypt & Save
Password' button. This provides the following dialog:
The ini file entry is always named as "Encrypted_Password_" followed by the password name you specify.
So in my case, the full name is Encrypted_Password_FTP. From that point on, I can refer to that password
inside my command line arguments as Encrypted_Password_FTP and DataLink Viewer would make the
appropriate substitution.
If you need to change a previously saved password, use the drop-down to select the previously saved password
name and enter a new password.

©2002-2024 Millet Software Page 64
Command Line Arguments for Parameter Values (old approach)
Since parameter values can have different data types and structures (discrete, multi-value, range, mixed), this
section explains how you can specify parameter values via command lines.
All arguments must be enclosed in double quotes and separated by a single space.
A numeric or string parameter would be specified as:
"C:\Program Files\Millet Software\DataLink Viewer 2011\DataLink_Viewer_2011.exe" -v
"C:\temp\MyReport.rpt" "Parm1:1998"
A date parameter would be specified as:
"C:\Program Files\Millet Software\DataLink Viewer 2011\DataLink_Viewer_2011.exe" -v
"C:\temp\MyReport.rpt" "Parm1:3/10/2003"
DataLink Viewer handles the data type conversion to match the parameter data type.
The syntax is constructed as the word "Parm", followed by the number of the parameter (according to the order
of parameters shown in Crystal), followed by a colon and the value.
Here’s how you would specify the 1
st
and 3
rd
parameter values:
"C:\Program Files\Millet Software\DataLink Viewer 2011\DataLink_Viewer_2011.exe" -v "C:\Program
Files\DataLink Viewer 12\MyReport.rpt" "Parm1:1998" "Parm3:Ido Millet"
RANGE AND MULTI-VALUE PARAMETERS
DataLink Viewer supports all parameter types including multi-value, range, and mixed parameters. A multi-
value discrete parameter value is specified as follows:
... "Parm1:Competition:::Gloves:::Helmets"
A range parameter (in this case a date range) is specified as follows:
... "Parm1:7/15/1996>>>7/15/2003>>>3"
The 3 at the end indicates the start and end points are included.
A 0 at the end would indicate the start and end points are NOT included.
A 2 at the end would indicate the start point is included and the end point is not.
A 1 at the end would indicate the start point is not included and the end point is.
Add 4 to these values if there is no Upper Bound.
Add 8 to these values if there is no Lower Bound.
For example, this would indicate all dates up to, and including 7/15/2003:
---------------------------------------------------
... "Parm1:12:00:00 AM>>>7/15/2003>>>9"
---------------------------------------------------
The 12:00:00 AM value is just a place-holder. Any date value would work (will be ignored).

©2002-2024 Millet Software Page 65
Command Line Arguments for Parameter Values (New Approach)
A more user friendly way to specify parameter values was added in July 2016. Instead of referring to the
position of a parameter in the parameter list, you can now refer to it by its name.
For example, instead of
"Parm1:3/16/2010"
you can use
"Parm_[{?Start}]:3/16/2010"
The arguments starts with Parm_[ followed by the parameter name. Then, after a ]:
separator, the parameter value is provided.
SPECIFYING SUBREPORT PARAMETER VALUES
To specify subreport parameter value, you structure the argument to include the subreport name:
"Parm_[{?Start}_{Sales.rpt}]:3/16/2010"
GENERATING A COMMAND LINE WITH PARAMETERS
No need to study the structure of the arguments above. Instead, simply right click the report row in the report
grid and select 'Command Line / Shortcut'. You would then get a dialog with the full command line elements.
Then, click on the button to 'Copy to NotePad' and the command line would be copied into a NotePad window.
Note: the parameter arguments are populated from previously saved parameter values (or from the report's
saved data). So, preview the report in DataLink Viewer at least once to establish saved parameter values.
©2002-2024 Millet Software Page 66
OPTIONAL PARAMETERS WITH NO VALUE
To specify no value for an optional parameter, provide a blank value (e.g., "Parm2:"). HasValue() function,
within the Crystal report, would then return False, as if the user didn’t specify any value for the optional
parameter.
NULL VALUES
Null parameter values (for stored procedures) are specified in command lines by using the constant
[VC_NULL]. For example, to specify that the first parameter value is null, use:
"Parm1:[VC_NULL]"
IGNORING SAVED PARAMETER VALUES
In order to ignore saved parameter values, use the following command line argument:
"Ignore_Saved_Parameter_Values:[ALL]"
The user would then get prompted for unspecified parameter values, skipping the saved parameter values
dialog.

©2002-2024 Millet Software Page 67
DATE CONSTANTS
When setting parameters via command line arguments, you can use the following special expressions to set
Date or DateTime values. DLV can do this for discrete or range date parameters. The supported constants are:
1. TODAY -or- YESTERDAY
2. TODAY_PLUS_N -or- TODAY_MINUS_N -or-
TODAY_MINUS_N_MINUS_M -or-
TODAY_MINUS_N_MINUS_M_EOM -or-
TODAY_MINUS_N_MINUS_M_SOM
3. START_MONTH_PLUS_M -or- START_MONTH_MINUS_M
4. END_MONTH_PLUS_M -or- END_MONTH_MINUS_M
5. START_YEAR_PLUS_Y -or- START_YEAR_MINUS_Y
6. END_YEAR_PLUS_Y -or- END_YEAR_MINUS_Y
7. Nth_N_PLUS_M –or- Nth_N_MINUS_M
8. LAST_MM_DD –or- NEXT_MM_DD
9. Now_Plus_S -or- Now_Minus_S
10. YMD=+Y/Month/Day_of_Month or YMD=-Y/Month/EOM
Where N=days, M=Months, Y=Years, and S=seconds to be added or subtracted.
For example, if the current date is March 6, 2004 then:
Today = 3/6/04
Nth_16_MINUS_1 = 2/16/04 (the 16
th
of the previous month)
Today_Minus_3 = 3/3/04
Last_04_01 = April 1, 2003
End_Month_Plus_0 = 3/31/04
End_Month_Minus_1 = 2/29/04
Start_Year_Plus_0 = 1/1/04
Start_Year_Minus_1>>>Today>>>3 = Inclusive range of [1/1/03 to 3/6/04]
YMD=-1/6/15 = 6/15/2003 (-1 indicates 1 year prior).
YMD=+0/6/EOM = 6/30/2004 (must use + or – after the = sign). EOM = End of Month.
In the case of Today_Minus_N_Minus_M, N is the Days and M is the Months, so:
Today_Minus_1_Minus_2 = 1/5/2004 (one day and two months earlier)
Adding _EOM or _SOM to the end of a Today_Minus_N_Minus_M constant returns the
End-of-Month or Start-of-Month, so:
Today_Minus_1_Minus_2_SOM = 1/1/2004 (Start of Month for 1/5/2004)
Today_Minus_1_Minus_2_EOM = 1/31/2004 (End of Month for 1/5/2004)
For DateTime parameters, Now_Plus_S or Now_Minus_S, returns the current datetime adjusted by the number
of specified seconds. For Time parameters, this argument returns just the current time adjusted by the number
of specified seconds. For example, if the current datetime is
June 17, 2008, 5:22:38 PM then Now_Minus_3600 returns
June 17, 2008, 4:22:38 PM for a DateTime parameter and 4:22:38 PM for a Time parameter.

©2002-2024 Millet Software Page 68
You can specify a Date Constant as the parameter value in a command line invocation of DataLink Viewer. For
example:
"…\DataLink_Viewer_2011.exe" -v "C:\Test\Report.rpt" "Parm1:Today"
or, for a range parameter:
… -v "C:\Test\Report.rpt" "Parm1:Start_Month_Minus_1>>>Yesterday>>>3"
Benefits: these date constants allow you to use the same report interactively (specifying any date as the
parameter value) as well as in scheduled mode. This can also lead to faster report execution since using
date functions in the record selection formula within the report can force record selection to be performed by
Crystal instead of by the DBMS.
Note: for DateTime parameter, the Time portion of the parameter value is set by these constants to 12:00:00
AM (start of the day). To set a DateTime parameter to the end of the day (11:59:59 PM), you must include
the parameter name in a DataLink_Viewer.ini entry
under the [Options] section like this (the parameter names are separated by ||):
--------------
[Options]
Date_Constants_EndofDay_Parameters={?To_Date}||{?EndDate}
-------------

©2002-2024 Millet Software Page 69
CUSTOM CALENDARS
If you need to set Date or DateTime parameters to the start or end date of custom periods (for example, Fiscal
Weeks or Quarters) relative to a current or shifted date, you specify just the start dates of the periods in the
DataLink_Viewer.ini as follows:
[Custom_Calendars]
FiscalQ =1/1/2013>>4/1/2013>>7/1/2013>>10/1/2013>>1/1/2014
For this FiscalQ custom calendar example, you can specify parameter values like this:
"Parm1:FiscalQ_Start_RelativeTo_Yesterday"
FiscalQ is the name of the custom calendar, Start requests the start date of the period within which the relative
date falls. If you specify End, the parameter is set to 1 day before the next start period (at 11:59:59 if
DateTime parameter).
RelativeTo is a fixed word. The date constant can be any date constants as described in the Date Constants
section above. Assuming today is 6/7/2013:
"Parm1:FiscalQ_Start_RelativeTo_Today" would return 4/1/2013
"Parm1:FiscalQ_End_RelativeTo_Today_Minus_5" would return 6/30/2013
"Parm1:FiscalQ_End_RelativeTo_Start_Year_Minus_1" would return 3/31/2012
If the relative date falls outside the boundaries of the calendar, the custom calendar years are shifted
until the relative date is within the calendar. This allows you to set the custom calendar and not worry
about updating it again (if the dates remain the same across years).

©2002-2024 Millet Software Page 70
ADJUSTING DATA CONSTANTS FOR DAY OF WEEK
Visual CUT allows you to set a date parameter to the first day of week (DOW) before or after a specified date
constant. For example, the first Monday in the previous month.
The syntax options are as follows:
DayOfWeek[>]Date_Constant for first target DOW after the date constant.
DayOfWeek[<]Date_Constant for first target DOW before the date constant.
Or, same as above except that date returned from date constant is used if it falls on target DOW:
DayOfWeek[>=]Date_Constant
DayOfWeek[<=]Date_Constant
Examples, assuming today is Tuesday, March 10, 2015
"Parm1:Wednesday[>]Today" => March 11, 2015
"Parm1:Wednesday[<]Today" => March 04, 2015
"Parm1:Tuesday[>]Yesterday" => March 10, 2015
"Parm1:Tuesday[>=]Today" => March 10, 2015

©2002-2024 Millet Software Page 71
NUMBER CONSTANTS
When triggering viewing, printing, or exporting via a command line for a report that has a Numeric parameter,
you may want to set the parameter to a constant reflecting a year or a month relative to the current year or the
current month. DLV can do this for discrete or range number (not currency) parameters.
The supported constants are:
1. MONTH_PLUS_N -or- MONTH_MINUS_N
2. YEAR_PLUS_N -or- YEAR_MINUS_N
3. YEAR_AT_PLUS_MONTHS_N -or- YEAR_AT_MINUS_MONTHS_N
4. YearMonth_AT_PLUS_MONTHS_N –or- YearMonth_AT_MINUS_MONTHS_N
Where N is the number of months/years to be added/subtracted from the current month/year.
For example, if the current date is January 6, 2005 then:
Month_Plus_0 = 1
Month_Minus_1 = 12
Year_Plus_0 = 2005
Year_Minus_2 = 2003
Year_AT_Minus_Months_1 = 2004
YearMonth_AT_MINUS_MONTHS_3 = 200410 (year=2004 and month = 10)
You can specify a Number constant as the parameter value in a command line invocation of DataLink Viewer.
For example:
… -v "C:\Test\Report.rpt" "Parm1:Year_Plus_0"
Benefits: these constants allow you to use the same report interactively as well as in scheduled mode. This can
also lead to faster report execution since using formulas within the report can force record selection to be
performed by Crystal instead of by the DBMS.

©2002-2024 Millet Software Page 72
Argument for Using Saved Data
In cases where another process (for example, Visual CUT) generates the rpt file with saved data, you can launch
a report and include a "Use_Saved_Data:True" command line argument to indicate the saved data should be
used (instead of retrieving the data from the database).
Specifying Parameters When Using Saved Data
Some parameters don't participate in data selection. Such Non-Fetching parameters are typically used to control
how the data is displayed on the report (for example, grouping, sorting, and section suppressions). DataLink
Viewer allows you to specify values for such parameters when using saved data. For example:
__________________________________________________________________
"C:\Program Files\Millet Software\DataLink Viewer 2011\DataLink_Viewer_2011.exe" -v
"C:\temp\Report.rpt" "Use_Saved_Data:True" "Parm1:Detail"
__________________________________________________________________
Argument for Setting Formula Expressions
You can set formula expressions via a command line argument provided that:
Any double-quotes are specified as [dblq]
Only main report formulas are targeted
The command line argument starts with Set_Formulas1: followed by pairs of Formula Names and Formula
Expressions. The name is separated from the expression by >>>. Each pair is separated from the following one
by ||| like this:
… "Set_Formulas1:Name1>>>Expression1|||Name2>>>Expression2"
For example, the following command line argument would set the first specified formula expression to the
string "Ido" and the second formula to the numeric expression of 2 + 2:
… "Set_Formulas1:{@MyName}>>>[dblq]Ido[dblq]|||{@TwoAndTwo}>>>2+2"

©2002-2024 Millet Software Page 73
Argument to Set Extra Record Selection Logic
You can use the Xtra_Record_Selection command line argument to append an extra expression to the main
report record selection formula via a command line argument. This provides flexibility in filtering the report
beyond parameter logic. The change applies only to the process triggered by the command line.
If the report already has a record selection formula the logic becomes:
(old expression) AND (extra expression).
Otherwise, the extra expression simply becomes the temporary record selection formula.
Here is an example:
…"Xtra_Record_Selection:{Product.Product Name} <> [dblq]Triumph Vertigo Helmet[dblq]"
Notes:
any double-quotes in the expression must be specified as [dblq]

©2002-2024 Millet Software Page 74
Command Line Arguments for Triggering/Scheduling Exporting
Using the "Export" command line argument you can trigger, or even schedule, exporting for a report so the
user doesn't need to preview the report or see the DataLink Viewer user interface.
INTERACTIVE USE
If you want the user to be prompted for the export format and file name, the syntax is constructed as the word
"Export", followed by a colon and the word "Dialog". For example:
"C:\Program Files\Millet Software\DataLink Viewer 2011\DataLink_Viewer_2011.exe" -v
"C:\temp\Report.rpt" "user_id:dba" "password:sql" "Parm1:Gloves" "Export:Dialog"
FULLY-AUTOMATED EXPORTING
If you want to export the report with no user interaction, you can specify Default in the command line argument
to use the export format and file name last used for the report when a user clicked on the Export button from the
GUI. For example:
"C:\Program Files\Millet Software\DataLink Viewer 2011\DataLink_Viewer_2011.exe" -v
"C:\temp\Report.rpt" "user_id:dba" "password:sql" "Parm1:Gloves" "Export:Default"
Alternatively, you can specify the export file name and export format like this:
"C:\Program Files\Millet Software\DataLink Viewer 2011\DataLink_Viewer_2011.exe" -v
"C:\temp\Report.rpt" "user_id:dba" "password:sql" "Parm1:Gloves"
"Export:c:\temp\Labels.pdf||PDF"
Note that the export file name and export formats are separated by ‘||’
Valid export formats include: XLS, XLSX, XLS Data Only, XLSX Data Only, PDF, CSV,
HTML 32, HTML 40, TTX, DOC, DOC – Editable, RTF, TXT, XML, RPZ, RPTR, and
RPT
Notes:
RPT exports the report to a Crystal Report format with saved data.
A user can then open that report without needing access to the database.
TTX provides export to Tab Separated Values.
SCHEDULING EXPORTING
Since you can trigger exporting using the Export command line argument, you can use the Windows Task
Scheduler (or any other scheduler/application) to trigger exporting of the report. For detailed instructions on
how to use the free windows task scheduler, see the section on "Scheduling" in my Visual CUT User Manual
(Visual CUT provides much more powerful report scheduling options) at:
www.milletsoftware.com/visualcutManual.htm

©2002-2024 Millet Software Page 75
Fully-Automated Exporting of Data Visualizations
Imagine you need to schedule a data refresh and export of this data visualization created for a Crystal report
inside the DataLink Viewer data visualizer:
Or perhaps you wish to generate a CrossTab where columns are sorted or TopN-filtered by total values. That's
easy to do in the DLV visualizer (and quite difficult in Crystal). Here's a link to an image showing what such a
CrossTab looks like in the visualizer.
TO AN IMAGE FILE
You can use a command line argument to specify the visualization layout name and export file:
"C:\Program Files\Millet Software\DataLink Viewer 2011\DataLink_Viewer_2011.exe" -v
"C:\temp\Report.rpt" "Export_Viz:%Late by Lead Time||c:\temp\Viz7.png"

©2002-2024 Millet Software Page 76
The resulting png file:
For image file export types, valid export file extensions are: .png, .jpeg, and .bmp
TO EXCEL FILE
For a CrossTab display of the data in Excel (even if it's displayed as a chart rather than as a CrossTab in the
visualization), you may specify .xlsx as the export file type. For example:
"C:\Program Files (x86)\Millet Software\DataLink Viewer 2011\DataLink_Viewer_2011.exe" -v
"C:\Documents\Crystal Reports\bdrep\DLV_2011_Visualization_Demo.rpt"
" Export_Viz:CrossTab_Rev_Emp_Product||c:\temp\CrossTab_Revenue.xlsx"
The resulting Excel file content (columns get auto-fitted) is shown in this image.
https://www.screencast.com/t/GjdkiYVPgIf
FOLLOW-UP PROCESSING IN VISUAL CUT
Using Visual CUT, you can use a batch file to first export to an image file from DLV 2011 and then embed the
image inside an email message, report, or an auto-refreshing web dashboard. Alternatively, you can attach
the exported xlsx file to an email. Or embed the Excel tab in a bigger workbook.

©2002-2024 Millet Software Page 77
Command Line Arguments for Triggering/Scheduling Printing
Using the "Printer" command line argument you can trigger printing for a given report in an unattended mode
(the user doesn't need to preview the report or see the DataLink Viewer user interface).
The syntax is constructed as the word "Printer", followed by a colon and:
the word "Default" if the report should be sent to the default printer, or
the word "Dialog" if the user should be prompted to select a printer, or
the printer name, if the report should be sent to a specific printer
Here’s how you would send a report to the default printer:
"C:\Program Files\Millet Software\DataLink Viewer 2011\DataLink_Viewer_2011.exe" -v
"C:\temp\Report.rpt" "user_id:dba" "password:sql" "Parm1:Gloves" "Printer:Default"
Here’s how you would send a report to a printer selected by the user:
"C:\Program Files\Millet Software\DataLink Viewer 2011\DataLink_Viewer_2011.exe" -v
"C:\temp\Report.rpt" "user_id:dba" "password:sql" "Parm1:Gloves" "Printer:Dialog"
Here’s how you would send a report to a specified printer:
"C:\Program Files\Millet Software\DataLink Viewer 2011\DataLink_Viewer_2011.exe" -v
"C:\temp\Report.rpt" "user_id:dba" "password:sql" "Parm1:Gloves" "Printer:\\Srv1\Laser1"

©2002-2024 Millet Software Page 78
SPECIFYING NUMBER OF COPIES
To control the number of printed copies, you can use a "Print_Copies" argument. The syntax is constructed as
the word "Print_Copies", followed by a colon and the number of desired copies. For example:
"C:\Program Files\Millet Software\DataLink Viewer 2011\DataLink_Viewer_2011.exe" -v
"C:\temp\Report.rpt" "Printer:\\Srv1\Laser1" "Print_Copies:3"
SETTING CUSTOM TEXT FOR EACH PRINT COPY
In cases where Print_Copies is specified, each print copy can have custom text (such as 'Copy 1 of 2', 'Copy 2
of 2'). Simply place a Crystal formula called {@Print_Copy_Template} on the report canvas. For each printed
copy, DataLink Viewer first updates the text in that formula by replacing [[N]] with the copy number, and [[M]]
with the total number of copies:

©2002-2024 Millet Software Page 79
SCHEDULING PRINTING
Since you can trigger printing using the Printer command line argument, you can use the Windows Task
Scheduler (or any other scheduler/application) to trigger printing of the report. For detailed instructions on how
to use the free windows task scheduler, see the section on "Scheduling" in my Visual CUT User Manual
(Visual CUT provides much more powerful report scheduling options) at:
www.milletsoftware.com/visualcutManual.htm
SCHEDULING PRINTING FOR MULTIPLE REPORTS
If you need to schedule printing of multiple reports at the same time, the best approach is to place all command
lines into a single batch file. Then, schedule the batch file in the free Windows Task Scheduler as described
above.
Argument for Printer Setup
The Printer_Setup command line argument allows you control:
1. The Printer Name (Note: only if the ‘No Printer’ option is tuned off for the report)
2. The Dissociate Formatting Page Size and Printer Page Size property
This argument is designed to address use scenarios where, during automated export, the page size and margins
for a specified printer should be used.
The syntax is constructed as the word "Printer_Setup", followed by a colon and the following "||" separated
elements:
Printer Name , "Default", or leave blank if you don’t want to change the printer name)
True or False if you want to control the Dissociate Formatting Page Size and Printer Page Size
property. You may skip that property if you only need to control the Printer Name.
Here are some examples:
… "Printer_Setup:MyPrinterName"
Or
… "Printer_Setup:MyPrinterName||True"
Or
… "Printer_Setup:||True"
©2002-2024 Millet Software Page 80
Argument for Documenting File Locations and Report Parameters
The Document2INI command line argument allows other applications to request information from DataLink
Viewer about:
- key file locations (DataLink_Viewer.ini, ReportList.txt)
- design of parameters for a given report
The command line call looks like this (all in 1 line):
"C:\Program Files\Millet Software\DataLink Viewer 2011\DataLink_Viewer_2011.exe"
"Document2ini:c:\My_Reports\my_Report.rpt>>c:\temp\MyFile.ini"
The two elements after the Document2ini argument name and the colon are:
1. the rpt file containing the parameters to document. If the rpt file doesn’t exist, only the key file
locations get updated in the ini file.
2. The ini file that should be created/updated with the documentation
If the specified rpt file doesn’t exist, only file locations are set in the ini file. For example:
[File_Locations]
Master_Ini_File=C:\ProgramData\MilletSoftware\DLV_2011\DataLink_Viewer.ini Slave_Ini_File=
C:\ProgramData\MilletSoftware\DLV_2011\DataLink_Viewer.ini
Report_List= C:\ProgramData\MilletSoftware\DLV_2011\ReportList.txt
If the specified report does exist, information about report parameter gets added to the ini file, providing
summary info as well as dedicated section for each parameter based on its position in the report:
[Parameters]
c:\temp\test.rpt=1||{?City}||String||False||False-----2||{?Country}||String||False||False
[1]
Name={?City}
InUse=True
Type=String
PromptText=Enter City:
SingleValue=False
RangeValue=False
AllowEditing=False
Optional=False
[2]
Name={?Country}
InUse=True
Type=String
PromptText=Enter Country:
SingleValue=False
RangeValue=False
AllowEditing=False
Optional=False

©2002-2024 Millet Software Page 81
Launch a Report while Viewing another Report
See video demo [ ] DataLink Viewer allows you to view a report and launch another report by:
single-clicking a report object with a tooltip expression returning a string as per the instructions below
OR
double-clicking a report formula returning a string as per the instructions below.
The string should have the following components:
1) DLV_Run:-v (launch specified report in a new Preview Only window) or
DLV_Run:-s (launch specified report in a new DataLink Viewer window) or
DLV_Run_Here:-s (launch the second report within the current Preview Tab)
2) the report path and file name
3) Optional command line arguments (parameter values, login information, etc.) as discussed in the "Launch
Reports from Command Lines" section of this user manual.
Notes:
The User ID & Password values from the current report are automatically passed to
the new report. Specify these arguments only if you need to override these values.
-v should be the preferred option because it removes the Select Report tab from the new window.
Here are some examples of such String formulas:
// invoke a second report and load it into the Current Preview Tab
'DLV_Run_Here:-s "c:\directory\subdirectory\Report.rpt"'
// launch into a Preview Only (-v) window and specify some parameter values:
'DLV_Run:-v ""c:\CR\My_Report.rpt"" ""Parm1:" + {Cust.CUST_N} +
""" ""Parm2:" + {Prod.PROD_Code} +""""
// full DLV window (-s) and specify both login as well as Parameter information:
'DLV_Run:-s "Some_Report.rpt" "user_id:dba" "password:sql" "Parm1:1997"'
Note:
The single-click option with a tooltip directive was added in 2023 as a better alternative.
You should prefer that approach over the double-click option.
With the double-click option, to hide the formula you can use font colors, not the Suppress attribute.
When you need to embed double quotes into the result of a string formula, you must "escape" the double
quotes with another double quote. Here are some variations on that theme:
…+ """" + add. """…" start with. "…""" end with. "…""…" include.
Or use Chr(34) to avoid the need to escape the " character:
"DLV_Run:-v " + Chr(34) + "Report2.rpt" + Chr(34) + " " +
Chr(34) + "Parm1:" + {Emp.ID} + Chr(34)

©2002-2024 Millet Software Page 82
CURRENT REPORT PATH TOKEN
If you wish to launch another report in the same folder as the current report file without knowing the absolute
path to these reports, either specify just the report name (without a path) or you may use a
#{DLV_RPT_PATH}# token and DataLink Viewer will replace it with the path for the currently viewed report.
For example:
"DLV_Run:-v " + Chr(34) + "#{DLV_RPT_PATH}#" +
"\Product Type Catalog V12.rpt" + Chr(34) + " " +
Chr(34) + "Parm1:" + {Product_Type.Product Type Name} + Chr(34)
CREATE A USER INTERFACE FOR SELECTING AND LAUNCHING REPORTS
The ability described above (launching one report from another) allows you to very easily create a user interface
that lets your users select and launch reports. The key steps are:
1. Create a REPORT Table with one record for each report. Typical columns would include: a) the path
and report file name, b) a description of the report, c) report subject (Profit, Product Returns, Orders), d)
report frequency (Daily, Weekly, Monthly), etc.
2. Create a "Report Selection" report listing these available reports with a formula in the detail section for
launching the selected report. Note: you can design the main report with Parameters for listing only
reports of certain subjects or certain frequencies. Of course, the REPORT table must store these
classifications.
Let the user run the Report Selection report and launch the selected report by
double-clicking it.

©2002-2024 Millet Software Page 83
EMBED INPUT FROM THE USER IN THE COMMAND LINE CALL FOR ANOTHER REPORT
When launching another report by double-clicking a report section (as described above) you may wish to
prompt the user for some input and embed that input into the command line. One scenario is a case where you
wish to prompt the user to provide the value for a parameter. Another scenario may be a case where you wish
to print labels for the product you are double-clicking but you want the user to be prompted for the number of
copies to print.
You can achieve this functionality by embedding within the command line a call to an InputBox function.
DataLink Viewer would then replace the InputBox Call with the input from the user.
For example, the following formula would prompt the user for number of copies and then print the Product.rpt
report for the double-clicked Product Name to the default printer with the number of copies specified by the
user:
"DLV_Run:-v ""C:\temp\Product.rpt"" ""Parm1:" +
{Product.Product Name} + """" +
" ""Printer:Default""" +
" ""Print_Copies:#{InputBox||Please Specify How Many Labels:" & "||" & "How Many
Copies for " & {Product.Product Name} & "?" &
"||" & "1}#"""
The bold text is the InputBox call. This call must be enclosed by #{… }# and has 4 parts separated by "||":
1. InputBox (a keyword indicating this is a request for an InputBox dialog
2. The Prompt (the text shown within the InputBox dialog. If you need to specify line breaks within the
prompt text, be sure to use "vbCrLf" (case sensitive), rather than Chr(10).
3. The Title (the text shown as the title of the InputBox dialog.
4. The Default value (1 in the example above).
Notes:
1. With double-click formula approach, the formula must be displayed on a single line, so use small font
(that requirement does not apply to the preferred single-click object with tooltip approach)
2. to hide the formula you should use font colors, not the Suppress attribute

©2002-2024 Millet Software Page 84
Launch another Application and Pass Parameters to It
DataLink Viewer lets you launch any other application and pass parameters to it by:
single-clicking a report object with a tooltip expression returning a string as per the instructions below
OR
double-clicking a report formula returning a string as per the instructions below.
The string should have the following structure:
'EXE_Run:Any_Program.exe:command line arguments'
Note:
The single-click option with a tooltip directive was added in 2023 as a better alternative.
You should prefer that approach over the double-click option.
With the double-click option, to hide the formula you should use font colors, not the Suppress attribute.
When you need to embed double quotes into the result of a string formula, you must "escape" the double
quotes with another double quote. Here are some variations on that theme:
…+ """" + add a double quote.
"""…" start the resulting string with a double quote
"…""" end the resulting string with a double quote
"…""…" insert a double quote into the middle of the resulting string

©2002-2024 Millet Software Page 85
Launch an Application Before Report Runs
When loading a report, before data is retrieved, if a formula called Call_EXE_Before_Load is detected,
DataLink Viewer assumes the text in that formula specified the path and name of an executable to launch.
Data Retrieval into the report is delayed until the executable process is completed. The status bar notifies the
user that a pre-load process is in progress.
The path to the executable can use environment variables. For example, if the Call_EXE_Before_Load
formula contains the following: "%windir%\system32\notepad.exe"
DataLink Viewer would launch NotePad and wait until the NotePad window is closed before actually running
the report.
The executable file may be any file that can launch a process, including exe (.exe) file, batch file (.cmd, .bat),
and shortcuts (.lnk). For example:
"C:\Users\ixm7\Desktop\Notepad Shortcut.lnk"
OPTIONAL ARGUMENTS AND WORKING DIRECTORY ELEMENTS
The formula text may include 2 additional elements to specify Arguments and/or a Working Directory for the
process. To specify only Arguments, use a structure like this example:
"%windir%\system32\notepad.exe||c:\temp\MyFile.txt"
To specify only Working Directory, use a structure like this example:
"%windir%\system32\notepad.exe||||c:\temp"
To specify both Arguments and Working Directory, use a structure like this example:
"%windir%\system32\notepad.exe||c:\temp\MyFile.txt||c:\temp"
can include includes '||' the text before that delimiter is treated as the executable file to launch, and the text after
the '||" is used to set the Working Directory for the process. For example:
"%windir%\system32\notepad.exe||c:\temp"

©2002-2024 Millet Software Page 86
Launching Reports in a New Window
By default, the initial DataLink Viewer (DLV) window displays two tabs: ‘Select Reports’ and ‘Preview.’ You
select a report from the first tab, and view it in the second tab. However, in many cases you may wish to
launch a report from the initial window into a new preview only window. You may also wish to remove
the Preview tab from the initial window. This section describes the various options for achieving this:
As described in the sections dealing with the command line api of DLV, you can launch reports in a Preview
Only window by using –v instead of –s within the command line. However, this section deals with user
interaction options for achieving the same thing. There are several ways to achieve this.
NEW WINDOW ON FILE LAUNCH AND/OR ON DOUBLE CLICK
The Launch tab in the DLV Options dialog allows you to direct DLV to launch reports into a View Only
window when double-clicking an rpt file in File Explorer or when double-clicking a report row in the Select
Report tab:
RIGHT-CLICK THE GRID AND SELECT PREVIEW REPORT (NEW WINDOW)
When you righ-click a report row in the Select Report tab, a popup menu provides you an option of Preview
Report (new window). If you click on that option, the report would launch in a new window.

©2002-2024 Millet Software Page 87
REMOVE THE PREVIEW TAB FROM THE INITIAL WINDOW
If you wish to always use the initial DLV window to launch reports into new preview only windows, you may
want to completely remove the Preview tab from the initial DLV window. You can achieve that by setting the
following options in the DataLink_Viewer.ini file:
_______________________________
[Options]
Show_Preview_Tab=FALSE
_______________________________
Note: this option takes effect only if you also use the Options dialog to turn on the option for Double-
Clicking a Report Row in the Grid Launches the Report to a View Only Window.
When these two options are set, DLV changes several things:
1. The initial DLV window shows only a Select Report tab
2. The right-click menu option of Preview Report is not shown. Instead, only the Preview Report (new
window) option is visible.
3. The right-click menu option of Preview Report (force login) launches the report to a new window
instead of to the Preview tab (which is not available).
The end result is that the initial DLV window becomes just a launch pad to report previews.

©2002-2024 Millet Software Page 88
Database Choice Functionality
DataLink Viewer provides login dialogs to support any number of secure data sources in the main report as well
as the subreports. Here is what the login dialog looks like:
Changing Data Source (Server/Database)
… "DataSource:Server>>Database>>IntegratedSecurity>>Options"
The parameters (after the ":") are separated by a ">>" and are as follows:
1. Server is the Server Name or IP address the report should connect to. Leave it blank for no change.
2. Database is the target Database Name within the given server. Leave it blank for no change.
3. IntegratedSecurity : True or False. If False, Leave it blank.
4. Options : not yet in use. Leave it blank.
Notes:
If IntegratedSecurity is set to False, remember to include "User_ID:…" and "Password:…" arguments in the
command line if your wish to avoid a login dialog.
Examples:
This changes only the target Server because the Database element is left blank.
"DataSource:sqlServer1>>>>True>>"
This changes only the target Database because the Server element is left blank.
"DataSource:>>CompanyA>>False>>" "User_ID:AliBaba" "Password:sesame"

©2002-2024 Millet Software Page 89
Select Alternative ODBC Data Sources for the Same Report
When running reports that use ODBC data sources, you can select which ODBC data source should be used.
Clicking a button to the right of the Server name, expands the display to include a listing of all available ODBC
data sources (grouped by ODBC driver type). The original ODBC data source is initially selected and the driver
group it belongs to is expanded
(and prefixed with a "!"):
To force the list of ODBC DSNs to display by default, set the following option in the DataLink_Viewer.ini:
---------------------------
[Options]
Display_DSN_List_in_ODBC_Login=True

©2002-2024 Millet Software Page 90
Restricting ODBC DSN Choices (DSN Groups)
The default ODBC DSN used by a report may belong to what you may consider to be a group of alternative
ODBC DSNs. You may wish to restrict the list of ODBC DSNs options shown for such a report to only those
that belong to that group. This can be accomplished by specifying an ODBC_Groups entry under a
[Login_Window] section in the DataLink_Viewer.ini file. Here is an example of such an entry:
[Login_Window]
ODBC_Groups={||Xtreme 9||Xtreme 11||} {||Northwind_2||NorthWind_6||Xtreme 9||}
Each ODBC Group is enclosed in { } brackets. A single space separates the groups.
Each ODBC DSN is enclosed in a || delimiter (including at the start and end of the group.
A report that by default uses an ODBC DSN that is NOT in any of the specified groups will experience no
restrictions in the choice of alternative ODBC DSNs. A report that uses an ODBC DSN that is in only one of
the specified groups will be restricted to a choice among the DSNs of that group. A report that uses an ODBC
DSN that is in several groups will be restricted to the combined list of DSNs from all matching groups.
DSN GROUPS WITH WILDCARDS
If an element in a DSN Group uses a wildcard expression, all DSNs that match that expression would be
included. For example, the following ini enry:
ODBC_Groups={||Xtreme Sample Database 2008||Xtreme*||}
would cause a report that uses the DSN of Xtreme Sample Database 2008 to also display all DSNs that start
with “Xtreme…” as alternative DSN targets.

©2002-2024 Millet Software Page 91
Forcing Login
To delay automatic connection and give the user a choice of data sources, you can force a login dialog with a
list of ODBC DSNs to select from. There are several ways to force such dialogs:
FOR DSN GROUP MEMBERS
In the scenario above, where a DSN can be a member of an ODBC "Group" you probably want to force a login
dialog with a restricted DSN list to be displayed so the user can select the desired DSN. This is true even if the
report can connect to the data source without login information. To achieve this behavior, the following entry in
the DataLink_Viewer.ini (Options section) is set to TRUE be default:
Always_Force_Login_If_In_DSN_Group=TRUE
In the case above, if the report requires no User ID & Password to login, you can ensure a simplified DSN
choice dialog is used by adding the following entry to the same section:
Simple_Choice_If_In_DSN_Group=True
FOR ALL REPORTS
In a similar manner, if you wish to force a DSN choice dialog for all reports, regardless of membership in
ODBC groups, you can set the following entry to True:
Always_Force_Login=TRUE
FOR SPECIFIED DSNS
If you wish to force a DSN choice dialog only for reports that use certain ODBC DSNs, set the following entry
in the ini file under [Options]:
ODBC_DSN_Force_Login=||Northwind||Sage||MB7||
In the example above, reports that use one of the specified DSNs would trigger a DSN choice in a login dialog.

©2002-2024 Millet Software Page 92
Restricting ODBC DSN Choices (Databases within Server)
In some cases, users need to select a Database target for a report as one of the databases under a single server.
For example, Sage 100 (Master Builder) users manage multiple companies as separate databases under a single
MS SQL Server instance. To address such use scenario, add a section to the DataLink_Viewer.ini file:
[ODBC_DSN_Force_Database_Choice]
millet1 =Auto_Generate_DSNs
MB Data=RightClick_Generate_DSNs
In the example above, the Auto_Generate_DSNs means that when running a report that uses the millet1 ODBC
DSN, DataLink Viewer will automatically generate an ODBC DSN for each database (in the same server) that
doesn't yet have an ODBC DSN. It then displays a restricted list of only DSNs for databases within the same
server:
As demonstrated by the image above, if the original ODBC DSN uses NT Authentication (no user id &
password), the options are displayed in a simplified list without a User ID & Password options. The user can
select a database target by double-clicking the desired row.
Getting the simplified dialog above also requires that in the DataLink_Viewer.ini:
a) Always_Force_Login=FALSE (in the [Options] section)
b) Always_Force_Login_If_In_DSN_Group=True (in the [Options] section)
c) Report's DSN is a member of ODBC_Group (in the [Login_Window] section)
If RightClick_Generate_DSNs is specified, the user can request generation of missing ODBC DSNs using a
right-click menu option from the grid of alternative ODBC DSNs.
FACILITATING DEPLOYMENT
If the report uses a DSN called DLV_AutoGen_DSN there is no need to set ini entries.
Such a report would automatically trigger generation of DSNs. And DLV_AutoGen_DSN will not show up in
the list of DSN choices. You just need to create that DSN on the user machine and point it at the right server,
and a non-user database (e.g. SQL Server's "master" database). Since generating DSNs requires MODIFY
permissions on the Registry, you may need to (temporarily) set the DLV exe file to Run As Administrator.
Dynamic parameter reports that use DLV_AutoGen_DSN as their DSN also "follow" the DSN selected for the
main report even if the ini file option of Set_Parameter_Rpt_to_Main_Rpt_DSN is set to False.

©2002-2024 Millet Software Page 93
Specify the ODBC DSN
In some cases, you may want to use the same report to connect to different data sources, such as a testing or
production server. While each report stores connection properties for only one default ODBC Data Source
Name (DSN), DataLink Viewer allows you to use command line arguments or the DataLink_Viewer.ini to
specify a different ODBC DSN.
The command line argument structure is as follows:
… "ODBC_DSN:Data Source Name"
or
… "ODBC_DSN_From_To:Old_DSN1>>New_DSN1||Old_DSN2>>New_DSN2"
The ODBC_DSN argument overrides all ODBC DSNs used in the report by the new DSN
The ODBC_DSN_From_To argument overrides only for tables that use the old DSN.
Note: ODBC_DSN_From_To support multiple pairs separated by "||" as shown in the example above. This
addresses scenarios where a report uses multiple ODBC DSNs (e.g. when subreports use different DSNs).
Also, you may specify ODBC_DSN_From_To as a global entry in the [Options] section of
DataLink_Viewer.ini.
Overriding the Database Specified in the Report or ODBC DSN
For ODBC data sources, you can enter a database name into the login dialog if you wish to override the
database specified in the ODBC data source or in the report itself. This is useful for situations where the same
database (e.g., MS SQL Server) contains multiple databases each with the same table structure. If the number
of such databases is large, creating a dedicated ODBC DSN for each and using the select ODBC DSN
functionality may be too tedious. Instead, you can directly type in the database name in the login dialog.
To enable database name input into the database field in the login dialog, you need to set the
Override_ODBC_DSN_Database entry under the [Options] section in the DataLink_Viewer.ini file to TRUE,
like this:
[Options]
Override_ODBC_DSN_Database=TRUE
Note that if that option is set to TRUE, the database specified in the ODBC DSN can no longer override the
database specified in the report (if the user doesn't type in a Database, the specified Database remains the one
used in the report.
Note: This functionality is not available in the Crystal 8.5 version of DataLink Viewer.

©2002-2024 Millet Software Page 94
Overriding the Table Location (ODBC)
This functionality was added for a developer who needed to call DataLink Viewer from his application via a
command line. The data source was Pervasive via ODBC and a command line argument was needed to control
what year archive is used for the report. The database contained a table for 2010 (GL-10JRL) as well as a
similar table for 2011 (GL-11JRL).
The report was already designed to reference the GL-10JRL table using a generic alias of GL_JRNL.
The command line argument to allow overriding the table used for the report looks like this:
… "Table_From_To:GL-10JRL>>GL-11JRL||AR-10JRL>>AR-11JRL"
Within each pair of From/To directives, the ‘From’ location is separated by a ‘>>’ from the ‘To’ location. The
pairs are separated by a "||" from each other.
Notes:
1. If any of the From tables is not found in the report, the report loading stops with a message indicating
which From tables were unmatched with report tables.
2. This functionality is available only in DataLink Viewer 2008 and 2011.
Overriding the XML File Location
This functionality was added for a customer who needed to call DataLink Viewer from his application via a
command line. The data source for the report was an XML file (ADO.NET XML connection), but on each call
to DataLink Viewer, instead of using the original XML file as a data source, a different XML file (name and
location) may be used.
The command line argument to allow overriding the XML file path looks like this:
… "XML_Path_From_To:C:\custprog\PICKLIST.xml>>C:\temp\B139.xml"
If you need more than one pair of From/To directives, separate them with a ‘||’ delimiter. Within each pair of
From/To directives, the ‘From’ location is separated by a ‘>>’ from the ‘To’ location.
Notes:
1. If any of the From paths is not found in the report, the report loading stops with a message indicating
which From paths were unmatched.
2. This functionality is available only in DataLink 2011.
Stripping Table Qualifiers when Connecting to a Different Database
The SQL statement generated by Crystal frequently contains not only table names, but also the database name
used at the time the report was designed (Database.Table or Database.Owner.Table). Such table qualifiers can
frustrate attempts to run the report against a different database.
DataLink Viewer supports selection of a new ODBC data source even when the database name is different from
that used in the original ODBC DSN. To ensure this works even when the table names in your report are fully
qualified, set the following line under the [Options] section in DataLink_Viewer.ini to True:
Strip_Table_Qualifiers=True

©2002-2024 Millet Software Page 95
Overriding the Server in Native Oracle Connection
When a report uses a native connection to Oracle, you can edit the Server name in the login dialog and run
the report against a different server (rather than the one the report was designed against).
Alternatively, if you are launching a report from a command line, you can override the Oracle server name by
using the "Oracle_Server:" command line argument. For example:
__________________________________________________________________
"C:\Program Files\Millet Software\DataLink Viewer 2011\DataLink_Viewer_2011.exe" -v "C:\temp\test.rpt"
"user_id:dba" "password:sql" "Oracle_Server:Server2"
__________________________________________________________________
Note: This functionality is not available in the Crystal 8.5 version of DataLink Viewer.
Selecting an Alternative SQL Server – OLE DB Data Source
… "Connect_To_SQLOLEDB:DataSource>>InitialCatalog>>Integrated_Auth"
The parameters (after the ":") are separated by a ">>" and are as follows:
1. DataSource is the Server Name the report should connect to.
2. InitialCatalog is the Database Name within the given server.
3. Integrated_Auth is a True or False argument indicating if Microsoft SQL Server Integrated Authentication
should be used (if TRUE, user_id & password are ignored).
Note: This method overrides the connection method of the report. For example, it can change the connection
method from ODBC to OLE DB.

©2002-2024 Millet Software Page 96
Forced Login
Right-clicking the report list provides a Preview Report (force login) popup menu option for forcing a login
window before previewing the report:
This is useful when:
a previous report connected to one ODBC data source and you wish to run the same (or another) report
against another ODBC data source.
you wish to login to the same data source under a different user id, without restarting DataLink Viewer.
You wish to avoid the default login information provided by Integrated Authentication (without
bothering to go into the Options dialog and turning Integrated Authentication off)
Note: for some ODBC data sources (Crystal Commands), there are some scenarios where the only way to avoid
connecting to a previously opened connection is to close and reopen DataLink Viewer.
When refreshing or reloading (U-turn button) a report, you can ensure connectivity is reset by turning on the
options shown in this image.

©2002-2024 Millet Software Page 97
Selecting Folder Location for FoxPro DBF Files (MasterBuilder)
DataLink Viewer 2011 supports dynamic selection of data folders for reports using the Visual FoxPro ODBC
driver for a File DSN (using "Free Tables", which are dbf files under a given folder). IMPORTANT NOTES:
1. The File DSN must be present (and user should have modify permissions) at:
C:\Program Files\Common Files\ODBC\Data Sources\
or, on a 64-bit machine, C:\Program Files (x86)\Common Files\ODBC\Data Sources\
(but not in both locations)
2. The folder choice actually changes the File DSN, so you may wish to create a dedicated File DSN just
for your Crystal Reports.
This functionality was originally developed to support Intuit Master Builder company reports where each
company’s data is located in a different folder on the same PC.
Two sections in the DataLink_Viewer.ini file control this functionality:
----------------------------------------------------------------------
[Folder_Selection_DSNs]
Visual_FoxPro_DBF=||MB7 Data.dsn||MB Data.dsn||
[MB7 Data.dsn]
Folder_Selection_Must_Contain=company.dbf
Enable_Folder_Selection=TRUE
----------------------------------------------------------------------
The 1
st
section specifies which File DSNs call for this new functionality. The File DSNs are specified exactly
as they are named in the report itself. They must be enclosed in "||" as delimiters (even for the first, last, or only
entry)
The 2
nd
section specifies, in the case of Master Builder data, that users should be allowed to select only folders
that contain a company.dbf file. That section also allows users to Enable or Disable dynamic folder selection.

©2002-2024 Millet Software Page 98
Changing Folder Location for Access/Excel/Pervasive/Paradox/ACT! Files
If your report uses the native connection to MS Access or Excel files, or if you are connecting to Act! (via pad
files) or Pervasive (ddf) files, you can control the location of the database files using the following section in
DataLink_Viewer.ini
----------------------------------------------------------------------
[Database_Path_Selection]
Paths = C:\Old\xtreme.mdb>>C:\New\xtreme.mdb||C:\a\test.mdb>>?
// for Pervasive ddf files: Paths = E:\Jobtrack\FILE.DDF>>?
// for ACT! .pad files: Paths = E:\DB1\DB1.pad>>E:\DB2\DB2.pad
// for Paradox specify only path to DB files: Path = C:\Old\>>c:\New\
----------------------------------------------------------------------
Note: you can also use a "Database_Path_Selection:… " command line argument.
As demonstrated above, the Paths entry may contain multiple pairs of old>>new paths.
Each pair specifies the old path followed by a ">>" separator, followed by the new path.
The pairs are separated by "||"
If the new path is blank, or if it contains just a question mark, DataLink Viewer will prompt the user to select a
new path when a report using the old path is first used.
If the new path has one question mark (?) followed by a valid path, that path will be the default location in the
dialog asking the user to select a path.
If instead of a single question mark, the new path starts with a double question mark (??), DataLink Viewer will
always prompt the user to select a path each time a report using the old path runs. The user choice will be
added after the ?? and will become the new default value in the path selection dialog.
If the report uses a database file that can’t be found on the machine, DataLink Viewer prompts the user to select
a valid location, creates the [Database_Path_Selection] section (if it doesn’t already exist) and creates/adds the
pair information to the Paths entry.
These options are designed to address typical deployment scenarios when a report developer sells reports to
users who may have their data source location at a different folder than the one used when the reports were
developed.
USING COMMAND LINE ARGUMENT TO AVOID PATH PROMPT
By default, pairs with two question marks before the new default path (old_path>>??new_path) cause a prompt
each time the old path is encountered in a report. You may wish to avoid such repeated prompts when
launching one report from within another report or when scheduling printing. The following command line
argument will cause DataLink Viewer to ignore the two question marks and simply use the new_path.
… "DB_Path_Use_Default:TRUE"
©2002-2024 Millet Software Page 99
Changing Data Source in UDL Files
Crystal reports can use text files with .udl (Universal Data Link) extension as the source for OLE DB
connection information. If you need to override the "Data Source" property stored in the UDL file, you can use
the following section in DataLink_Viewer.ini
----------------------------------------------------------------------
[UDL_Data_Source]
Targets = CAMBISLLC||YOATCO||NESTOR
----------------------------------------------------------------------
If the report uses a UDL for a data source with a name matching one of the ||-delimited targets, the user would
be prompted to enter a new Data Source name.
If you want any UDL source to be targeted for a data source change, set the Targets entry to ALL like this:
----------------------------------------------------------------------
[UDL_Data_Source]
Targets = ALL
----------------------------------------------------------------------

©2002-2024 Millet Software Page 100
Integrated Authentication
Integrated Authentication ("Remember Me")
DataLink Viewer allows users to avoid repeated login prompts to databases. The database login information
is stored, highly encrypted, inside DataLink_Viewer.ini as shown below:
The security of login information is maintained not only by storing it in encrypted format, but also by storing it
with an internal identification of which Windows User & PC this login information belongs to. DataLink
Viewer uses this encrypted database login information only after checking that the same Windows user is
running from the same PC. In other words, users cannot break the login security by attempting to copy and
paste the encrypted information to their own ini file entry).
For example, in the example shown above integrated authentication has been enabled. This can be done via a
checkbox in the Option dialog (Launch Tab). The user (ixm7) then logged in to a secure database by providing
a database user id & password. The user turned on the "Rememebr Me" option (visible only when integrated
authentication is enabled):
The information was then saved for the ixm7 user, running on the SOBPC02 PC as shown in the ini file above.
From that point on, the same user (ixm7), once logged to the same PC (SOBPC02), doesn't need to
manually login to the same data source.
The same user can turn on the "Remember Me" option for unlimited number of secure data sources and the
information for all of them would be maintained inside the encrypted entry. The Options dialog allows each
user to delete their own integrated authentication information by clicking a button.

©2002-2024 Millet Software Page 101
Shared Machine Authentication
This section describes how one user can elect to share their integrated authentication information with any other
user who successfully logged in to the same machine.
Step 1: First, add the entry in bold to the DataLink_Viewer.ini file:
-------------------------------------------------
[Integrated_Authentication]
Enable_Integrated_Authentication=TRUE
ixm7@SOBPC02=18CB9CAE3D8BF3484000123301DD155638EAD4AD6B4D622C04DF125B7404BCBC4717A5DA2FBCD94314A7CE63BBF7357E
Enable_Shared_Machine_Authentication=TRUE
-------------------------------------------------
Step 2: Then, as the "key" user who will share integrated authentication, run a report and get to a login dialog.
Note: if you already have integrated authentication for yourself, use Forced Login.
Alternatively, discard your integrated authentication (using the Trash Can button in the Options dialog). Make
sure you turn on the Remember Me option in the login dialog, just like setting up integrated authentication for
yourself.
Step 3: Because of the Enable_Shared_Machine_Authentication=TRUE
you would get a dialog asking you if you wish to share your integrated authentication functionality with other
users who logged in to the same machine. This ensures a user can’t be tricked into sharing integrated
information without their knowledge and expressed consent.
Click YES.
If you then open the DataLink_Viewer.ini file you would notice this process generated a new entry (in bold):
-------------------------------------------------
[Integrated_Authentication]
Enable_Integrated_Authentication=TRUE
ixm7@SOBPC02=18CB9CAE3D8BF3484000123301DD155638EAD4AD6B4D622C04DF125B7404BCBC4717A5DA2FBCD94314A7CE63BBF7357E
Enable_Shared_Machine_Authentication=TRUE
Shared_Machine_Authentication=C8B6CD373D5D5ADDC6FE9F379521C7318FA297CB595B992C
-------------------------------------------------
That entry, in my particular case, points to the ixm7@SOBPC02 integrated authentication entry.
Notes:
1. The Enable_Integrated_Authentication (True or False) setting is always taken from the "user" ini file.
This allows the user to turn it off if they wish. For example, they may wish to switch between ODBC Data
Sources by using the special option in the login dialog.
2. The Enable_Shared_Machine_Authentication and Shared_Machine_Authentication information is
always taken from the "master" ini file. This allows an administrator to enable/disable and change the shared
machine authentication for all users in one central file.
3. The regular integrated authentication information (for a user@machine entry that matches the logged in
user id and the machine id) is always taken from the user ini file, if it exists.
4. There can be only one shared machine authentication entry. If you need to change to another
administrator, delete the Shared_Machine_Authentication line and let the new administrator go through the
Remember Me and dialog step.

©2002-2024 Millet Software Page 102
5. If the administrator adds more data sources and login information to their integrated authentication
information, all the machine users would have access to the new data sources.
This is because the entry is really a "pointer" to whatever that administrator has accumulated in their entry
(ixm7@SOBPC02 in my case).
6. If you interactively switch between DSNs and you want Integrated Authentication functionality, set
Enable_Integrated_Authentication_For_DSN_Changes to True
This is a rare scenario so, for more detail, contact Millet Software.
Shared Secret Password with Windows User IDs
DataLink Viewer has special functionality allowing an administrator to set/change a secret global password for
all users who will then be authenticated to the database using their own windows user id and the secret global
password.
If you are in the rare situation where you need to use this functionality, contact Millet Software and, if your use
scenario matches this functionality, you will receive detailed instructions.
Integrated Authentication for Interactive ODBC DSN Changes
'Database Choice Functionality' can be combined with 'Integrated Authentication' by setting the ini entry of:
Enable_Integrated_Authentication_For_DSN_Changes=True
Clicking one of the ODBC DSNs listed in the login dialog then populate the user id & password automatically.
See this image as an example.
To streamline the choice and the login steps, you can simplify the login dialog so it only shows the DSN
choices (see image), locate the following ini entry under [Integrated Authentication], and set it to True:
[Integrated Authentication]
…
Simple_Choice_If_Enable_Integrated_Authentication_For_DSN_Changes=TRUE
A double-click on the target DSN would then automatically log in to that data source.

©2002-2024 Millet Software Page 103
Language Translation / Localization
DataLink Viewer provides options for translating all text object and column headers from one language to
another. See 2-minute video demo.
See this picture for side-by-side images of DataLink Viewer showing the same report: a) with no translation, b)
translation to Spanish, c) translation to Chinese, and d) translation to Norwegian.
Or click on the image below to see a larger version.
This functionality uses Google Translate, which charges $20 for 1 million translated characters and supports
more than 100 languages. To enable the service, you need to follow Google's Instructions to create a cloud
project, enable billing, and get your API Key. You then need to set an entry in a [Translate] section
ofDataLink_Viewer.ini similar to the example below:
--------------------------------
[Translation]
Enable_Translation=True
From_Language=English
To_Language=Chinese
GoogleAPI_TranslateKey=AIzaSyC4C22Af…
No_Change=DataLink Viewer||Millet Software
--------------------------------
The No_Change entry indicates what text elements should be exempt from translation.
To translate dynamic content in the report (database fields and formulas), you may use my CUT Light User
Function Library, which adds a GoogleTranslate() function to the Crystal Reports formula editor.
Translate Button in Preview
If the translation feature is turned on (Enable_Translation = True) then a Translate button becomes visible in
the Preview window and allows you to change the target language without needing to run the report again.
See demo image and 2-minute video demo.

©2002-2024 Millet Software Page 104
Protect Report Designs with rpz Files
The ‘Compress & Encrypt Rpt to Rpz button’ (on the 1
st
Tab of DataLink Viewer) allows you to select an
rpt file and convert it to rpz file.
The resulting rpz file is a compressed and encrypted version of the rpt file that is recognizable only by
DataLink Viewer & Visual CUT. Your users can run the resulting rpz files in DataLink Viewer or Visual CUT,
but cannot view or modify them in Crystal.
This allows developers to protect and hide their reports designs (either as an intellectual property issue or as a
tech support issue). They can simply keep the rpt files and distribute only the rpz files to their users. Note: .rpz
files should not be renamed.
Within DataLink Viewer & Visual CUT, rpz files behave just like rpt files except that, in order to protect the
report design, exporting rpz files to "rpt" format is not possible.
Note: DataLink Viewer provides a special export format of "Protected Report (*.rpz)". This allows users to
export the report with saved data to another .rpz file.

©2002-2024 Millet Software Page 105
Make_Rpz Command Line Argument
If you need to automate the conversion of rpt files to rpz files using scheduled or automated processes,
DataLink Viewer provides a command line API.
Your command line call should look like this (all in one line):
"C:\Program Files\Millet Software\DataLink Viewer 2011\DataLink_Viewer_2011.exe"
"Make_RPZ:c:\test\*.rpt>c:\MyFolder>120"
After the Make_RPZ key word and the colon, the arguments are separated by ">" as a delimiter. The three
arguments are:
1. The path to the rpt file(s) to be converted.
- you may specify wild cards (as demonstrated in the example above)
- you may specify multiple paths separated by a semi-colon. For example:
"Make_RPZ:c:\rptFolder1\*.rpt;c:\rptFolder2\*.rpt>c:\rpzFolder>120"
2. The target folder where the rpz files should be deposited
3. The maximum age, in minutes, of the rpt file in order to be included. Older files would be skipped.
This allows the command line to be placed in a batch file and scheduled while avoiding the conversion
of older files that have already been converted.
Use a value of zero to convert all files regardless of age.

©2002-2024 Millet Software Page 106
Create rpz Files with Expiration and License Keys
You can apply expiration date and/or license keys to rpz files by setting the following entry in the
DataLink_Viewer.ini file:
[Options]
Enable_Advanced_RPZ_Options=True
When that option is enabled, the dialog you get when clicking on the ‘Compress & Encrypt Rpt to Rpz’ button
looks like this:
Please contact Millet Software for more detail about the various options and the use scenarios supported by this
dialog.

©2002-2024 Millet Software Page 107
MAKE_RPZ2 COMMAND LINE ARGUMENT
If you need to automate the conversion of rpt files to rpz files with expiration dates and license keys, your
command line call should look like this (all in one line):
"C:\Program Files\Millet Software\DataLink Viewer 2011\DataLink_Viewer_2011.exe" "Make_RPZ2:c:\test\*.rpt>>>
c:\MyFolder>>>False>>>2221440>>>rpz file info line 1/////and line 2>>>30/07/2010>>>
True"
After the Make_RPZ2 key word and the colon, the arguments are separated by ">>>" as a delimiter. The 8
arguments are:
1. The path to the rpt file(s) to be converted.
- you may specify wild cards (as demonstrated in the example above)
- you may specify multiple paths separated by a semi-colon.
2. The target folder where the rpz files should be deposited
3. Include subfolders when wildcard expressions are used for source files (True/False)?
4. The maximum age, in minutes, of the rpt file(s) to be included. Older files would be skipped. This
allows the command line to be placed in a batch file and scheduled while avoiding the conversion of
older files that have already been converted.
Use a value of zero to convert all files regardless of age.
5. Text information to embed in the rpz file. Separate lines with ‘/////’. This information can be accessed
via a report parameter named DLV_Rpz_File_Info
6. Rpz Expiration Date (dd/mm/yyyy). The rpz file will not run beyond that date, unless a license key
with a later expiration date is added to the machine.
7. Contact Information to embed in the rpz file. This information is provided to the user when trying to
run an expired rpz or an rpz requiring a new license key.
8. Show Conversion Results Dialog (True/False). This controls whether the process will be "quiet"
(typical for a scheduled process) or result in a dialog showing what files were converted and what
options were applied:
©2002-2024 Millet Software Page 108
Monitoring DataLink Viewer Use
DataLink Viewer allows you to monitor the use and performance of reports across the organization via logging
to an ODBC table or to a simple text file. Logging to ODBC is a more secure and powerful approach and is
described first.
Record Processing to an ODBC Database
To log processing to an ODBC database, you must create a table called DLV_Log in the target database. Email
to me if you’d like to receive a sample MS Access database with the required DLV_Log table.
Below are example of data structures for MS Access and MS SQL Server. However, those are just examples.
You can use such a table in any other ODBC aware database (Oracle, DB2, Sybase, etc.).
TYPICAL USE
The DLV log table can be used to:
Monitor report use
1. Monitor report performance (using the start & end time information)
2. Monitor what employees access/print/export what data. This can be useful for addressing data privacy
and protection concerns and requirements (e.g., HIPAA)
If there is a need to monitor this log for exception situations, you can use Visual CUT (another Millet Software
tool) to schedule exception reports and email alerts against this table.

©2002-2024 Millet Software Page 109
MS ACCESS DATA STRUCTURE
Here is the table structure required for this table, when implemented under MS Access (along with comments
explaining what information is recorded):

©2002-2024 Millet Software Page 110
SQL Server Data Structure
Here is a script for creating the table in Microsoft SQL Server:
CREATE TABLE [dbo].[DLV_Log] (
[LogN] [int] IDENTITY (1, 1) NOT FOR REPLICATION NOT NULL ,
[Rpt_Path] [nvarchar] (255) COLLATE SQL_Latin1_General_CP1_CI_AS NULL ,
[Rpt_Name] [nvarchar] (255) COLLATE SQL_Latin1_General_CP1_CI_AS NULL ,
[Proc_Start_Local] [nvarchar] (255) COLLATE SQL_Latin1_General_CP1_CI_AS NULL ,
[Proc_End_Local] [nvarchar] (255) COLLATE SQL_Latin1_General_CP1_CI_AS NULL ,
[Proc_Start_GMT] [nvarchar] (255) COLLATE SQL_Latin1_General_CP1_CI_AS NULL ,
[Proc_End_GMT] [nvarchar] (255) COLLATE SQL_Latin1_General_CP1_CI_AS NULL ,
[Windows_User_ID] [nvarchar] (255) COLLATE SQL_Latin1_General_CP1_CI_AS NULL ,
[Machine_ID] [nvarchar] (255) COLLATE SQL_Latin1_General_CP1_CI_AS NULL ,
[Parameter_Values] [nvarchar] (40000) COLLATE SQL_Latin1_General_CP1_CI_AS NULL ,
[Connection_Properties] [nvarchar] (40000) COLLATE SQL_Latin1_General_CP1_CI_AS NULL,
[Report_SQL] [nvarchar] (40000) COLLATE SQL_Latin1_General_CP1_CI_AS NULL ,
[Live_Data_1_0] [int] NULL ,
[Records_Read_N] [int] NULL ,
[Export_Activity_1_0] [int] NULL ,
[Print_Activity_1_0] [int] NULL
) ON [PRIMARY]
GO
Note: for recent versions of SQL Server, replace [nvarchar] (40000) with [nvarchar] (MAX)
©2002-2024 Millet Software Page 111
ORACLE DATA STRUCTURE
The script below, contributed by Jonathan Klobucnik from A.H. Belo, also includes a definition of a Sequence
and a Trigger to handle the Auto-Numbering requirement:
CREATE TABLE DLV_LOG
(
LOGN NUMBER(*, 0) NOT NULL , RPT_PATH NVARCHAR2(255) , RPT_NAME NVARCHAR2(255)
, PROC_START_LOCAL NVARCHAR2(255) , PROC_END_LOCAL NVARCHAR2(255)
, PROC_START_GMT NVARCHAR2(255) , PROC_END_GMT NVARCHAR2(255)
, WINDOWS_USER_ID NVARCHAR2(255) , MACHINE_ID NVARCHAR2(255) , PARAMETER_VALUES CLOB
, CONNECTION_PROPERTIES CLOB , REPORT_SQL CLOB , LIVE_DATA_1_0 NUMBER(*, 0)
, RECORDS_READ_N NUMBER(*, 0) , EXPORT_ACTIVITY_1_0 NUMBER(*, 0)
, PRINT_ACTIVITY_1_0 NUMBER(*, 0) , CONSTRAINT DLV_LOG_PK PRIMARY KEY
(
LOGN
)
ENABLE
)
LOGGING
PCTFREE 10
INITRANS 1
STORAGE
(
BUFFER_POOL DEFAULT
)
LOB (PARAMETER_VALUES) STORE AS
(
ENABLE STORAGE IN ROW
CHUNK 8192
RETENTION
NOCACHE
LOGGING
)
LOB (CONNECTION_PROPERTIES) STORE AS
(
ENABLE STORAGE IN ROW
CHUNK 8192
RETENTION
NOCACHE
LOGGING
)
LOB (REPORT_SQL) STORE AS
(
ENABLE STORAGE IN ROW
CHUNK 8192
RETENTION
NOCACHE
LOGGING
);
/
/*Sequence to allow the trigger to "auto number" the primary key*/
CREATE SEQUENCE DLV_LOG_SEQ;
/
/*Trigger to automatically generate the primary key values*/
CREATE OR REPLACE TRIGGER DLV_LOG_INS
BEFORE INSERT ON DLV_LOG
FOR EACH ROW
WHEN (new.LogN IS NULL)
BEGIN
SELECT DLV_LOG_SEQ.NEXTVAL
INTO :new.LogN
FROM dual;
END;

©2002-2024 Millet Software Page 112
"ORACLE" MODE (BIND VARIABLES)
If you wish to log processing to an Oracle database, you should add the following entry to the [Options] section
of DataLink_Viewer.ini:
Log_ODBC_Type=Oracle
That option sends Insert SQL statements using bind variables, an approach that avoids a 4K column size
limitation.
HOW TO START LOGGING?
The following DataLink Viewer Options dialog allows you to specify the ODBC Data Source Name (DSN)
where the DLV table resides and the User ID & Password (stored encrypted), if the data source requires a login.
©2002-2024 Millet Software Page 113
Record Report Use in a Text Log File
If you use the Options dialog to specify a folder location for a DLV_Use_Log.txt DLV creates that file (if it
doesn't already exist) and appends to it use statistics after each report viewing. This log file contains one row
with column headers followed by one row for each report viewing event. The columns are:
1) Report Path
2) Report Name
3) User_ID
4) PC
5) Start
6) Finish
You can use that file (for example, using Crystal with a Text ODBC driver) to analyze what reports are popular,
who runs what reports, and what reports take too long to run.

©2002-2024 Millet Software Page 114
Settings & Options
Customizing the Grid Layout
By dragging, clicking, or right-clicking the grid column headers you can apply various options such as grouping
the report by any column(s), sorting the grid, hiding/showing columns, etc.
Here is the menu you get when you right-click a column header:
Most of these options are quite intuitive. The ‘Group By Box’ shows or hides the area at the top of the screen
that allows you to control how the Grid is grouped by dragging & Dropping column headers to/from that area.
Here is the menu you get when you right-click the top-left corner of the grid:
As shown above, the Columns menu cascades to the list of columns and allows you to directly set column
visibility. You can do the same via a slightly longer process using the "Column Chooser" option in the
previously shown menu.

©2002-2024 Millet Software Page 115
Customizing the Grid Style
The "Grid Style" option in the menu you invoke by right-clicking the top-left corner of the grid bring up a
dialog that allows you to customize the look & feel of the grid. Any choice you make in the Grid Style dialog
shown below is immediately reflected in the style of the grid.
The style of the grid is maintained in ReportList.grd. You can always revert back to the default style of the
application by closing DataLink Viewer, Deleting that file, and starting DataLink again.

©2002-2024 Millet Software Page 116
Disabling Report Preview Buttons
In some scenarios you may wish to remove the Print, Export, Select Expert, or Search Expert buttons from the
preview window of reports. This is useful, for example, in cases where your application launches reports in
DataLink Viewer via a command line and you wish to restrict some users from printing and/or exporting the
report.
You can globally remove buttons from the Preview window by setting the following options in the
DataLink_Viewer.ini file:
_______________________________
[Options]
Disable_Print_Button=TRUE (note: this disables all 3 print buttons)
Disable_Print_ThisPage_Button=TRUE
Disable_Print_Quick_Button=TRUE
Disable_Export_Button=TRUE
Disable_Search_Button=TRUE
Disable_Refresh_Button=TRUE
Disable_Parameter_Panel_Button=TRUE
_______________________________
Alternatively, you can control these options via command line arguments. For example (all in one line):
"C:\Program Files\Millet Software\DataLink Viewer 2011\DataLink_Viewer_2011.exe" -v
"C:\temp\MyReport.rpt.rpt" "Parm1:1997" "Disable_Print_Button:TRUE" "Disable_Export_Button:TRUE"
Note: see "Enforcing Settings in a Master DataLink_Viewer.ini File" for information about enforcing these
settings from the "master" ini file to all "user" ini files.

©2002-2024 Millet Software Page 117
Disabling DataLink Viewer Buttons
In some scenarios you may wish to disable certain user interface buttons so that, for example, users can’t
convert rpt files to rpz files, open the user manual, etc.
You can disable user interface buttons by setting the following options in the DataLink_Viewer.ini file:
_______________________________
[Options]
Disable_RPZ_Creation=TRUE
Disable_Check_for_Updates=TRUE
Disable_Options_Dialog=TRUE
Disable_Browse_Dialog=TRUE
Disable_User_Manual=TRUE
Disable_Version_Info=TRUE
_______________________________
Note: see "Enforcing Settings in a Master DataLink_Viewer.ini File" for information about enforcing these
settings from the "master" ini file to all "user" ini files.
Disabling Login Dialog Memory of Last User ID
By default, DLV remembers and displays the last User ID specified in the login dialog.
To disable that behavior, set the following option in the DataLink_Viewer.ini file:
_______________________________
[Options]
Last_User_ID=DLV_DISABLED
Exclude Export Formats
To remove certain export formats from the export dialog, add an Exclude_Export_Formats entry to the
[Export_Options] section in the DataLink_Viewer.ini file. Here is an example:
_______________________________
[Export_Options]
Exclude_Export_Formats =|Protected Report (*.rpz)|Read Only Report (*.rptr)|Crystal Report (*.rpt)|
The formats are listed exactly as they appear in the export format drop-down.

©2002-2024 Millet Software Page 118
Add your Company Info to the About Dialog
In DataLink_Viewer.ini you can set 3 lines in the About dialog to text of your choice. This can be useful in a
large company where you want users to know who to contact with technical questions. It can also be useful
when you sell Crystal reports bundled with DataLink Viewer and you wish to specify your contact information
for similar reasons.
For example, using the following settings in DataLink_Viewer.ini:
__________________________________________
[Options]
About_Line1=www.acme.com
About_Line2=For Technical Support, contact Jane Doe:
__________________________________________
you would get the following About dialog:
Note: as demonstrated with the www.acme.com line, DataLink Viewer automatically assigns a web link to lines
that contain only a url.
©2002-2024 Millet Software Page 119
File Location & Redirect Logic
Each time DataLink Viewer loads, the location of the Master DataLink_Viewer.ini is redirected by following
these steps:
1. If the ini file in the application folder has a value specified for "ini_file" in the [File_Locations] section,
that location is used for the DataLink_Viewer.ini
note: this allows an administrator who has write permissions on the application folder to manually set
the location.
2. More typically, the value in step 1 would be found as blank. DataLink Viewer then determines if a
redirect is needed by testing to see if: a) ReportList.grd doesn’t exists in the application folder or b) user
doesn’t have write permissions to DataLink_Viewer.ini in the application folder. If a redirect is needed,
the application tries to locate and use DataLink_Viewer.ini in one of the following app data folder
locations,
under a \MilletSoftware\DLV_2011\ folder:
a. Common App Data folder - that location allows all users on that local machine to share the
same ini file
b. User’s Local App Data folder - that location allows each user on that machine to have their
own ini file
c. User’s Roaming App Data folder - that location allows each user to have the same ini file
"follow them" to other machines.
3. If DataLink_Viewer.ini was not found in any of the 3 locations above, which is typical in 1
st
-time
installation scenarios, DataLink Viewer will copy it as well as ReportList.txt from the application
folder to the Common App Data folder and notify the user that the redirect has occurred. The location
of ReportList.txt would also be set to the same redirected location.
Notes: an ini file that was redirected to one of the locations above due to a write-protected application folder is
considered a Master ini file. As usual, that Master ini file can be redirected further to a slave ini file by
manually setting its "ini_file" location option under [File_Locations].
A blank option for ReportList.txt location in a redirected ini file is considered as an indication that the
ReportList.txt file should be automatically copied to (if missing) and used at that location.
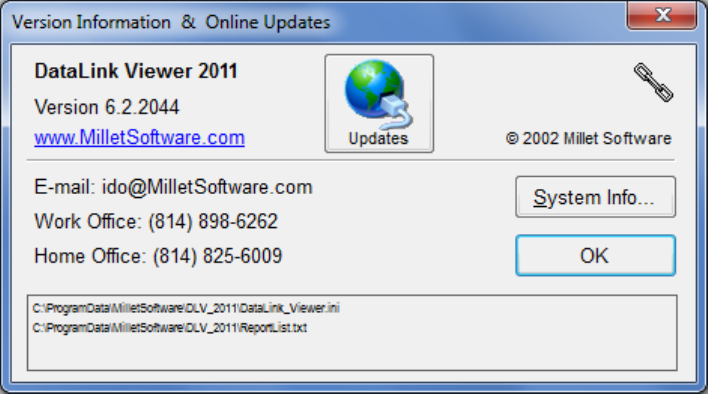
©2002-2024 Millet Software Page 120
CHECKING AND NAVIGATING TO KEY FILE LOCATIONS
To check the locations of DataLink_Viewer.ini and ReportList.txt, you can click on the
‘Version Information & Updates’ button. The textbox at the bottom of the dialog shows the current file
locations:
To navigate to the Folder where DataLink_Viewer.ini is located, double-click that textbox and DataLink
Viewer will open that folder location in File Explorer. That makes it easier to find and edit the ini file in cases
where the folder is hidden (typical for app data folders).

©2002-2024 Millet Software Page 121
CITRIX AND FILE LOCATION FUNCTIONALITY
DataLink Viewer can be installed on Citrix but be sure to install from the Console.
The File Locations tab in the Options dialog allows a single installation of DataLink Viewer on a Citrix or
Terminal Server to support individual settings for each user by providing each user their own version of
DataLink Viewer.ini and ReportList.txt file under their own mapped user drive. For example:
%USERPROFILE%\AppData\Local\MilletSoftware\DLV_11\DataLink_Viewer.ini
Note: upon initial launch of DataLink Viewer by a user, if the target folders don’t exist, they get created, and if
the target files don’t exist, they get copied from the master copies in the application folder.
An alternative approach is to use these settings to force all users to share a centralized version of these files. In
such a case, you should make the ReportList.txt file attribute to Read-Only, so that the master list of reports
doesn't get changed by the users.
Note: when the ReportList.txt file attribute of Read-Only is turned on, the Select Report grid would show to
each user reports only from folders they have READ access to.
This dialog also allows you to specify a centralized/local logging of report use statistics.
Note: folder location options for files such as DataLink_Viewer.ini and ReportList.txt can include references
to environment variables (such as %USERNAME%). This is useful for Citrix/TS scenarios.

©2002-2024 Millet Software Page 122
SETTING INTEGRATED AUTHENTICATION FOR MULTIPLE MACHINES (CITRIX FARM)
The Integrated_Authentication_Set_Entry command line argument can automate encrypted storage (within
DataLink_Viewer.ini) of login information (Database User ID & Password) per specified Windows User ID and
Machine Name(s).
In the simplest case, this allows an administrator to set or change Integrated Authentication for a user after
installation of DataLink Viewer or after database password changes. Keep in mind that this login information is
stored encrypted and can be used only if the specified Windows User ID manages to log into the specified
Windows Machine Name.
Automated setting of Integrated Authentication information can be particularly useful for Citrix or TS server
farms. Such deployments allow each user to launch DataLink Viewer on the least busy machine within the
server farm. Any changes made to the DataLink_Viewer.ini file in the user’s Home folder are automatically
replicated to the other machines participating in the server farm.
However, integrated authentication information is stored (encrypted) per user & machine combination. So, as
an administrator, when you add a user to the server farm, you may need to generate Integrated Authentication
entries for that user & all machines in the server farm. Multiple ini file entries for the same user & different
machines look like this:
[Integrated_Authentication]
User33@Server101=148580D7008FB47042E07958BB8884A7BAD32B2B7C268A6...
User33@Server102=0AA0F62E3F8091CD90AD9D87F4F5279102439D2432134BF725...
To facilitate the automated generation of such entries, you can call DataLink Viewer using a command line (all
in 1 line) argument as follows:
…"C:\Program Files\DataLink Viewer 11\DataLink_Viewer_11.exe" "Integrated_Authentication_Set_Entry:
H:\DataLink_Viewer.ini>>Server101||Server102>>User33>>joe3>>sesame>>Append"
After the Integrated_Authentication_Set_Entry key word and the colon, the 6 arguments are separated by ">>"
as a delimiter:
1. The path & name of the ini file
2. List of machines separated by || delimiter (or just the name of 1 machine)
3. The user id
4. The Database user id
5. The Database password
6. Operation Type:
a. Append: Appends the User ID & Password pair if it doesn't already exist for all specified
machines
b. Replace: like Append, but removes any other User ID & Passwords
c. Delete: Deletes the User ID & Password pair if it already exists
d. Drop: Completely drop all pairs from the specified User ID & Machine entries

©2002-2024 Millet Software Page 123
ENFORCING SETTINGS IN A MASTER DATALINK_VIEWER.INI FILE
The "master" DataLink_Viewer.ini file is located in the application folder or the auto-redirected folder as
described in the section above. The [File_Locations] section in the "master" file may indicate that a different
"user" DataLink_Viewer.ini file, located at a different folder, should be used. As an administrator, you may
want to ensure that some centralized settings in the "master" ini file always override the settings in the "user" ini
file. You can do this by setting the values to all upper case (for example, TRUE or FALSE instead of True or
False). This tells DataLink Viewer that it should use these settings from the "master" file.
This behavior applies to the following options, shown as if you wanted to apply them centrally from the
"master" DataLink_Viewer.ini file:
[Options]
Disable_RPZ_Creation=TRUE
Disable_Check_for_Updates=TRUE
Disable_Options_Dialog=TRUE
Disable_Browse_Dialog=TRUE
Disable_User_Manual=TRUE
Disable_Version_Info=TRUE
Disable_Print_Button=TRUE
Disable_Export_Button=TRUE
Disable_Search_Button=TRUE
Disable_Parameter_Panel_Button=TRUE

©2002-2024 Millet Software Page 124
UPDATING DATALINK_VIEWER.INI VIA A DELTA FILE
When deploying DataLink Viewer to many users, you may want to automate the process of updating some of
the DataLink_Viewer.ini settings. You can do that by placing a DataLink_Viewer_Delta.ini file in the
application folder. Any entries found in that file will update DataLink_Viewer.ini when the application is
launched.
Here is an example of a DataLink_Viewer_Delta.ini file:
[Delta_Options]
Delete_After=NEVER
//USE or NEVER or Some Date specified as yyyyMMdd
// if entry above not found, then default is USE
Update_Master_INI=False
// if entry above not found, then default is False
Update_Slave_INI=True
// if entry above not found, then default is True
[Options]
Attempt_Logon_Without_Password=False
Strip_Table_Qualifiers=True
Saved_Data_Action=Display
Associated_File_Launch_Mode=View Only
New_Window_On_DblClick=True
Parameter_Values_Remember_Max_Chars=900
Saved_Parameter_Set_Minimum_N=5
[Integrated_Authentication]
Enable_Integrated_Authentication=True
The [Delta_Options] section is used only to control the following aspects of the process:
The Delete_After option controls when the Delta ini file is deleted:
o NEVER - the file will not be deleted
o USE - the file is deleted after being used once
o yyyyMMdd - the file is deleted after the specified date
Update_Master_INI controls whether the Master ini file is updated.
Update_Slave_INI controls whether the User ini file is updated.
Explicit Assignment of Default Printer
To address a rare printing failure scenario under Citrix and Windows 2003, the following
Datalink_Viewer.ini option allows an explicit assignment of the default printer when the user clicks the print
button (before the printer selection dialog is displayed):
[Options]
Set_Report_To_Default_Printer=TRUE
©2002-2024 Millet Software Page 125
Default Preview-Only Window Settings
You can specify default window size and location for view-only report preview when a report is launched that
way for the first time. You specify this by adding a DEFAULT entry to the [Report_Windows] section in
DataLink_Viewer.ini.
Simply copy an entry for a report within that section that was closed after setting size & position as desired.
For example, here is an entry for a maximized window without Group Tree panel and zoom level of 100%.
[Report_Windows]
DEFAULT=0||0||None::200||100||-120||-120
Setting Encrypted Password Entries
The Encrypted_Password_Set_Entry command line argument can automate encrypted storage (within
DataLink_Viewer.ini) of passwords. This allows an administrator to set or change encrypted passwords for
DataLink Viewer or Visual CUT that can later be referenced from command line arguments.
To generate such entries in a targeted ini file, you call DataLink Viewer using a command line (all in 1 line)
argument as follows:
…"C:\Program Files\DataLink Viewer 11\DataLink_Viewer_11.exe" "Encrypted_Password_Set_Entry:
H:\DataLink_Viewer.ini>>Options>>Encrypted_Password_FTP>>sesame"
After the Encrypted_Password_Set_Entry key word and the colon, the 4 arguments are separated by “>>” as a
delimiter:
1. The path & name of the ini file
2. The ini section name (typically 'Options')
3. The Password Name
4. The Password to be Encrypted

©2002-2024 Millet Software Page 126
Known Issues and Limitation
The preview window doesn’t provide a Select Expert option. That option is not available in the new
runtime components.
Exports to pdf may result in smaller font size. This is a Crystal issue, and can be fixed using some registry
entries. For explanation, see this blog by Ken Hamady:
http://kenhamady.com/cru/archives/2503#more-2503
It boils down to setting the following registry keys (for DataLink Viewer 2011):
HKLM\SOFTWARE\SAP BusinessObjects\Crystal Reports for .NET Framework 4.0\Crystal
Reports\Export\PDF\TruncationAdjustment (=2)
HKLM\SOFTWARE\SAP BusinessObjects\Crystal Reports for .NET Framework 4.0\Crystal
Reports\Export\PDF\UsePrecisePositioningForText (=1)
This enlarges the font and also eliminate the truncation in most cases, and when it doesn’t you can
increase the TruncationAdjustment from 2 to 3 (or higher) until the problem is resolved. Note: On a 64-
bit machine, for the 32-bit version of DLV 2011, the registry paths start with:
HKLM\SOFTWARE\Wow6432Node\SAP BusinessObjects\...
Linked Dynamic Parameters (applies only to the special DataLink Viewer linked dynamic parameter
reports, not to the regular Crystal Reports dynamic parameters):
Data value in linked dynamic parameter reports is set via the tooltip property instead of via a different
formula. This is not a limitation, but users of prior versions should be aware of this change. It requires
a change in linked parameter reports design if you wish to reuse old reports.
Footer formula can’t be used to control the default value in a linked dynamic parameter reports.
Similarly, a footer formula can’t be used to require a value for a linked dynamic parameter report.

©2002-2024 Millet Software Page 127
Update History
Version 6.9.4002: Entered Testing August 25, 2024
NEW FEATURES
You can now launch another report or application (and pass dynamic parameter values) via a
single-click on a report object by setting a tooltip expression for that object.
For detail, see Launch a Report while Viewing another Report
and Launch another Application and Pass Parameters to It.
See video demo [ ]
The 32-bit and 64-bit versions can now be both installed on the same machine.
Added database driver name and printer/page setup information to the Report Documentation popup
triggered by clicking the report name panel in the status bar.
FIXES
Fixed a problem in handling of ODBC DSN Groups (filtering the list of alternative ODBC DSNs in
the login dialog) in the 64-bit version of DataLink Viewer.
Fixed handling of the delimiter option in CSV exports.
Fixed InputBox handling (e.g. prompting user for number of print copies) when launching another
report via a click on the current report.

©2002-2024 Millet Software Page 128
Version 6.9.1001: Released September 4, 2023
NEW FEATURES
You can now Generate Desktop Shortcuts to Launch Reports. See video demo [ ]
You can now initialize parameters based on date expressions.
For detail, see Initializing Parameter Values with Date Expressions. See video demo [ ]
You can now Change Layout & Content when Printing the Report. See video demo [ ]
You can now use a command line argument to set extra record selection logic.
You can now specify Default Preview-Only Window Settings.
You can now exclude export formats. See detail here.
You can now generate a native image of the application so it starts and runs faster.
For detail, see Speeding Up via a Native Image.
A centralized ReportList.txt file (with all reports) can behave as if it contains user-specific
reports. If the C:\ProgramData\MilletSoftware\DLV_2011\ReportList.txt file is set to Read-Only,
the Select Report grid shows reports only from folders where the current user has Read permissions.
Updated several components to newer versions.
Implemented faster startup using multi-core Just-in-Time compilation.
Restricting ODBC DSN Choices (DSN Groups) now supports DSN Groups with Wildcards.
You can now embed environment variables in Last_Used_Export_Options entry. For example:
Last_Used_Export_Options =%USERPROFILE%\Desktop||5
Language translation (via Google translate) now support more languages. See video demo [ ]
Added Alt-C as a keyboard shortcut to copy plain text content of clicked field to the clipboard.
For detail, see Copying Object/Text From The Report.
New Items in Report Inspector:
o Printer properties: Printer Driver, Saved Printer name, Dissociate Page Size (True/False),
‘No Printer’ (True/False).
o Subreport properties: ‘Is Imported’, ‘Import Path’, ‘Reimport When Opening’, and ‘On
Demand’.
o Subreport Link Properties: the main report field, the subreport links, and the linked parameter
name.
o Data Connection properties: ‘Database Name’ and ‘User ID’
o Border property expressions for crosstabs, charts, and images.
Data Visualizer left panel (dimensions & measures) is now wider by default. It also remembers and
restores prior used width.

©2002-2024 Millet Software Page 129
Parameter values are now saved for later reuse even when DLV is launched from a command line.
Adding Debug_Mode_When_Delegated = True to [Options] section in ini file turns on debug
mode when DLV processing is delegated from Visual CUT.
Setting formula expressions via command line argument is now supported even when the
formula name doesn't start with '^'.
Enriched information in messages dealing with missing printer.
Added sample report DLV_Column_Header_Sort_2011.rpt demonstrating how users can
sort the report by clicking a column header.
FIXES
Exporting GUI now includes the ‘Crystal Report (*.rpt)’ export format.
Fixed installation ini file causing pdf export format to be excluded in some cases.
Fixed an issue with resizing selective parameter refresh.
Fixed handling of command line arguments using parameter names.
Fixed an issue with reusing last export folder.
Fixed a rare problem causing an error on report load.
Fixed a rare login issue in scenarios where password is blank.
Fixed handling of delegated processing (from Visual CUT) with Skip_Recent directives,
Always_Force_Login option, group selection formula, more than 8 report parameters,
.htm file extension, or cases where main report in empty and logon happens only at the subreport
level.
Fixed handling of some arguments (e.g. Xtra_Record_Selection and Set_Formulas1) when
Skip Complex Login Logic is turned on.
Xtra_Record_Selection argument can now handle odd cases where the existing record selection
seems empty but actually contains several spaces and/or CrLf hidden characters.
Fixed an issue with saving stored procedure parameters with null values.
‘Loading Visualizer’ progress bar now remains active while the data visualizer loads.
Fixed a case where the main window opens outside screen boundaries due to screen changes.

©2002-2024 Millet Software Page 130
Fixed an issue causing login dialog for dynamic parameters.
Fixed scenario where browsing for rpt file can add a duplicate row to the grid if the row is filtered.
Improved user interface for encrypting named passwords.
When specifying parameter values via a command line argument, parameter names can now contain
a colon character. For example, "Parm_[{?:Test}]:test123"
Fixed a problem with Integrated_Authentication_Set_Entry argument.
Fixed rare problem in delegated processing for DateTime parameters marked for End-of-Day logic
via an ini file option.
Fixed language code lookup in language translation (Google Translate) feature.
When launching a related report by double-clicking in a current report (DLV_Run feature) an error
message was triggered if the user double-clicked twice too quickly. This is now fixed.
When setting a DateTime parameter via a date constants pointing to the end of a custom calendar
segment, (e.g. "Parm1:FiscalQ_End_RelativeTo_Today"), the time portion of the date is now set to
the end of the day (11:59:59).
Fixed remembering date parameter values when machine is set to display years as 2 digits.

©2002-2024 Millet Software Page 131
Version 6.7.1001 [SP23]: Released June 30, 2018
Packaged with Service Pack 23 of the Crystal Runtime.
If you use Outlook, report exports can now automatically launch an email message dialog with
report-specific options (email subject, message, from, to, …) prepopulated and the exported
file attached. For detail, see Email Exported File.
Enhanced integration with Visual CUT 11 now allows Visual CUT to run Crystal 2016 reports
with CrossTab calculated members and embedded summaries.
Report Inspector feature now captures data connections, database tables, parameters (including an
indication of use count), and many additional conditional formatting expressions for picture, line,
box, and field objects (graphic location, font, border, Date, Numeric, etc.).
Report inspector grid now uses column filters for certain columns (Object Type, Expression Type,
Section) that facilitate multiple choices via checkboxes.
You can now provide users with a mixture of protected data visualization layouts (users can't change
or delete those layouts) as well as user-controlled layouts. For detail, see: Data Visualizer.
Report grid now shows a find panel by default. See image.
To hide the panel, find and set the Show_Find_panel_in_Report_Grid ini entry to False.
Report grid column filters for certain columns (Path, Subject, and Type) now facilitate multiple
choices via checkboxes.
You can now trigger exporting and provide only some of the parameter values in the command
line arguments. DataLink Viewer will prompt the user for the rest of the parameters and then
complete the export (avoiding a 'Missing Parameter Values' error message).
Added the 'Report Reload Discards Login Info' and 'Always Force Login If In DSN Group'
checkboxes to the Database tab of the Options dialog.
When 'Use Integrate Authentication for DSN Changes' is turned on, matching login info for the
report's DSN is now prepopulated on initial load of the report.
You can now force login for reports using certain DSNs by setting the following entry in the ini
file under [Options]:
ODBC_DSN_Force_Login=||Northwind||Sage||
Added a DataLink_Viewer.ini option under the [Integrated_Authentication] section of
Simple_Choice_If_Enable_Integrated_Authentication_For_DSN_Changes.
If set to True, and Enable_Integrated_Authentication_For_DSN_Changes is also True, the login
dialog gets simplified (see image) and you can change the DSN and automatically log in by simply
double-clicking the desired DSN.

©2002-2024 Millet Software Page 132
Dynamic linked parameter reports that use DLV_AutoGen_DSN as their DSN now "follow" the
DSN selected for the main report even if the ini file option of
Set_Parameter_Rpt_to_Main_Rpt_DSN is set to False.
Added DataSource command line argument for changing Server/Database targets for any type
of data source. See Changing Data Source (Server/Database).
Connect_To_SQLOLEDB is now faster when server is specified as alias
Previously, only Microsoft Excel (2007-2010) Data Only exports to .xlsx files were handled using
fast internal processing. Now, regular Microsoft Excel (2007-2010) exports to .xlsx files also don't
require Excel automation. A new component is used to handle the internal conversion from xls to
xlsx (including merging tabs). This is faster and avoids the need for Excel to be installed. To disable
this option, find and set the following ini file option:
Use_Excel_Component_v3=False
Added an option to launch an application, and wait for it to finish, before previewing a report.
For detail, see Launch an Application Before Report Runs.
Added support for specifying custom calendars as start or end points relative to date
constants. For example, this allows you to return the start or end of a the fiscal month relative to
yesterday’s date. For detail, see Custom Calendars.
Added a new YMD= data constant. See detail in Date Constants. Examples:
"Parm2:YMD=+1/6/15" --> June 15, 2018 "Parm2:YMD=+1/6/EOM" --> June 30, 2018
Added options to set date parameters to the first Day of Week before/after a date constant. For
example, the first Monday of the previous month. See Adjusting Data Constants for Day of Week.
Improved sizing and positioning of selective parameter refresh dialog.
Linked parameter report dialogs now respond to pressing Enter as an OK button click after
initial load. This is useful in cases where the user wishes to accept the saved parameter value(s).
The Data Visualizer can now export the image or data set of any visualization to an image file
or to an excel crosstab. This can be initiated via clicking Ctrl-X or via the Fully Automated
Exporting of Data Visualizations.
The Data Visualizer now generates a backup layouts (dlvv) file each time a new version is saved. It
also sends that backup file to the recycle bin.
The toolbar icon to load the report data into an interactive data grid is now enabled by default.
To disable it, set the Disable_Data_Grid option to ‘True’ in DataLink_Viewer.ini. The grid now
loads the same data set as the Data Visualizer. For detail, see the user manual section of Data Grid.
FIXES
Fixed parameter panel issue (not showing saved & reused date parameter values).
©2002-2024 Millet Software Page 133
Fixed a problem with interactive DSN change and a wrong password causing persistent failure to
login even with good password.
Fixed an issue causing ODBC DSN choice in one report to interfere with DSN choice for a later
reload of the same report or a load of a different report.
Fixed a problem causing hyperlinks to launch images/processes twice.
Fixed a problem in saving a Visualization Layout Folder option.
Fixed handling of blank/optional parameter value as a command line argument.
Fixed an issue with automatic generation of ODBC DSNs on 32-bit machines.
Fixed a problem with saving additional Data Visualization layouts (into .dlvv files).
Improved error messages when a report connects to a data source, but fails to retrieve data.
Fixed unnecessary exception (Error: 0) thrown when setting table location.
Encrypted_Password_Set_Entry argument now operates without opening a window.
Fixed a problem in handling special fields (e.g. Record Selection Formula) when loading data into
the data grid or data visualizer.

©2002-2024 Millet Software Page 134
Version 6.6.1001 [SP19]: Released February 27, 2017
Packaged with Service Pack 19 of the Crystal Runtime.
Images are now rendered and printed with higher resolution (avoiding jagged edges). To elect to use
the old drawing mode, change the DataLink_Viewer.ini option of Drawing_Mode from
'HighQualityBicubic' to 'Normal'. When viewing a report, you can toggle between the 2 drawing
modes by pressing the F4 key. The F1 key shows a help screen about keyboard shortcuts, and the
text for F4 reflects current/new drawing modes.
During Preview, Ctrl-End scrolls the report to the last page and Ctrl-Home scrolls to the first page.
The Report Inspection window now captures not only expressions but also all instances of formulas,
database fields, Text and other objects that are placed on the report canvas. A typical use scenario is
to search for all reports that use a specific database field.
Added a 3
rd
Report Inspection option for recursive search of all reports in a selected folder and all
lower-level folders. See image.
DataLink Viewer can now translate text objects and column headers in your reports. You specify
the source and target languages, and the required Google API key (Google's Translate service costs
$20 per 1 million translated characters) in the DataLink_Viewer.ini file. See detail in the Language
Translation / Localization section. Or see video demo.
When exporting a report for the first time, the export file name now defaults to the report file name.
Note: for subsequent exports of the same report, DLV remembers the last used export file path &
name.
To automatically close html tooltip windows on events such as drill-down, paging, and parameter
panel refresh, you can now set the following entry in the DataLink_Viewer.ini file:
[Options]
Close_HTML_Tooltips_On_Page_Events=True
The Always_Force_Login_If_In_DSN_Group option now defaults to TRUE for new installations.
When this option is set to TRUE, if the report requires no User ID & Password to login, you can
ensure a simplified DSN choice dialog is used by adding the following entry to the same ini section:
Simple_Choice_If_In_DSN_Group=True
Added special handling for proxy handling of calls from Visual CUT when the report has multiple
data sources, and only some of those sources require password authentications, and
Skip_Complex_Login_Logic is turned on.
To allow paging through the report as soon as possible, the status bar no longer displays the total
number of records selected / retrieved.

©2002-2024 Millet Software Page 135
DataLink Viewer 2011 now allows users to select among ODBC DSNs that target alternative
databases within a single server. It can also automatically generate ODBC DSNs for databases
within the same server that don't yet have ODBC DSNs. Typical use scenarios are cases where a
single SQL Server manages multiple databases with common table structures. For example, one
database for each Sage 100 (Master Builder) company. For detail, see Restricting ODBC DSN
Choices (Databases within Server).
When the option 'Override ODBC DSN Database' is turned off, DataLink Viewer now sets to 'True'
the 'Use DSN Default Properties' property of ODBC connections within reports. This supports cases
where the user elects to use a different data source.
Added Set_Font command line argument to change the font in the report. For example,
"Set_Font:Arial"
The Group Tree panel is now hidden when previewing a report with no groups.
You can now specify parameter values for the main report as well as for subreports using command
line arguments that refer to parameter names. For example:
… "Parm_[{?Start_Date}]:3/16/2010"
… "Parm_[{? Date_Range}]:3/8/2010>>>3/26/2010>>>3"
… "Parm_[{?@TopN}_{Sales.rpt}]:5"
Added a Disable_Parameter_Panel_Button option to hide the Parameter Panel button in the viewer
toolbar.
Packaged with a newer version of the Chilkat component. Users who deploy both DataLink Viewer
2011 as well as my CUT Light .NET user function library (UFL) may need to update both to avoid
different versions of the component.
New installations of DataLink Viewer now set Enable_Integrated_Authentication (the option
allowing DataLink Viewer to encrypt and reuse logins) to True by default.
Added HTML version of the user manual from Shift-Click of User Manual button or:
https://www.milletsoftware.com/DataLink_Viewer_User_Manual
The report grid right-click menu option of 'Generate Command Line' now offers a window that
generates a full command line, including all parameters or just date parameters, using the new
naming convention (referring to parameter names).
See demo image.
FIXES
Fixed a problem with print command line arguments and number of copies.
Fixed an issue with shifting the focus across multiple auto-refreshing reports.
Fixed a problem when switching DSN for a report with a connection property of 'Use DSN
Properties' set to False.
©2002-2024 Millet Software Page 136
Fixed an issue causing clicks on objects with http hyperlinks to be handled twice.
Changed keyboard shortcut for Quick Print (to default printer) from Shift-P to Ctrl-Shift-P. This
avoids false triggering when a user starts a parameter panel entry with upper P.
Fixed a public key issue that blocked some installation scenarios.
Fixed a problem with saving the ini setting for 'Password Fill On User ID Change'
Fixed in-place drill-down issue when group values contained double/single quotes.
Fixed a problem with regular .xls exports with saved options for fixed column width.
Selective parameter refresh dialog now shows date parameters as dates rather than as date-time.

©2002-2024 Millet Software Page 137
Version 6.5.1001 [SP15]: November 25, 2015
Packaged with Service Pack 15 of the Crystal Runtime.
DataLink Viewer now provides an Expressions Inspector for listing & searching formulas, SQL
expressions, running totals, selection formulas, and conditional formatting expressions. The
report grid right-click menu provides options to launch the Expressions Inspector for one or
multiple reports. See 'Report Inspection & Documentation Tools, Expression Inspector' and this
demo image.
A click on the status bar panel showing the report name now provides a window (see demo image)
with information about the report. For detail, see: Report Inspection & Documentation Tools,
Report Documentation.
Visual CUT can now delegate exporting to DataLink Viewer 2011 in order to take advantage of
Crystal 2008/2011/2013 features (e.g. Calculated CrossTab members).
The status bar now provides smoother updates during load, refresh, auto-refresh, and data visualizer
events.
Added Print_As_Designer ini file entry to the [Options] section and to the Export/Print tab of the
Options dialog. By default, this option is now set to TRUE in order to use the same mechanism that
Crystal Reports Designer uses to print. This solves printing issues caused by the prior Crystal
runtime printing logic. For example, for one customer, this allowed printouts of UPC barcodes to
scan properly.
The Reload_Report_On_Refresh option now accommodates Auto-Refresh scenarios.
The command line argument of Printer_Setup now supports specifying "Default" as the printer
name.
DataLink Viewer can now prompt & switch the report to a different Data Source when running
reports that use UDL files as the OLE DB data source method. For detail, see: Changing Data
Source in UDL Files
Use_Saved_Data command line argument now overrides the ini file option of
Saved Data Action.
When viewing the report grid, the help window triggered by F1 shows that
Ctrl-Delete removes rows or groups. Also, Ctrl-Delete provides a different confirmation dialog
(allowing the user to abort) depending on whether the selected row is a group header or a detail row.

©2002-2024 Millet Software Page 138
When starting DataLink Viewer with a command line argument of "ODBC_DSN:.." but no report
path or other arguments, the ODBC DSN argument now applies to all reports opened during that
session (rather than just to the first report opened).
This allows a desktop shortcut, for example, to launch DataLink Viewer with a DSN target specified
for all reports opened during that session.
HTML Tooltip windows are now automatically closed when you refresh or navigate away from the
report preview window.
When you trigger a report from a command line using a –v (View Only window), you can now use
"ViewMode:NoBarsNoTitle" to remove not only the toolbar and status bar but also the title of the
window in order to maximize the space available for the report.
The application now loads faster when populating large report list grids.
Implemented automatic hiding of group tree panel for reports without grouping.
A double-click on editable cells in the report list grid (Title/Description, Subject, Type) now
launches a preview of the report.
Using the "Print_Copies:" argument. you can now set custom text on each print copy (such as 'Copy
1 of 2', 'Copy 2 of 2'). See 'Setting Custom Text for Each Print Copy' and this demo image.
Added Export_Viz command line argument to save data visualization to an image. Combining this
with Visual CUT allows embedding of visualizations in reports, email message bodies, and auto-
refreshing web dashboards.
FIXES
Packaged with Service Pack 15 of the Crystal Runtime. Fixes printing issues.
Fixed install problem in older Windows platforms (XP, 2003)
Fixed an issue with saved date parameter values.
Fixed an issue with saved linked dynamic parameter value.
Fixed issues with Grid search (Ctrl-F, F3, Shift-F3).
Fixed issue with triggering a parameter dialog by clicking on a formula.
©2002-2024 Millet Software Page 139
Version 6.4.1003 [SP12]: November 29, 2014
Packaged with Service Pack 12 of the Crystal Runtime.
NEW FEATURES
Added special handling for printing using custom paper size. This involves targeting the custom
paper size by saved name rather than by ID (which can be different across machines).
Added Printer_Setup command line argument. This allows control of printer name and the
Dissociate Formatting Page Size and Printer Page Size property. This argument is designed to
address use scenarios where, during automated export, the page size and margins for a specified
printer should be used.
The Launch tab in the Options dialog now has a button called 'Encrypt & Save Password'. It
allows you to centralize & protect passwords by avoiding specifying them directly inside
command line argument. Instead, you can name, encrypt and store the passwords inside
DataLink_Viewer.ini. For detail, see "Referring to Saved Encrypted Passwords."
A new Encrypted_Password_Set_Entry command line argument allows administrators to
automate the saving of Encrypted Passwords to targeted ini files. For detail, see "Setting
Encrypted Password Entries."
Report Grid now has drop-downs for the Subject and Type columns.
Report grid right-click menu now provides an 'Open Containing Folder' and 'Generate Command
Line' options.
The report list grid style is now managed in ReportList.xml file instead of ReportList.grd. This
avoid conflict with incompatible ReportList.grd files from older versions of DataLink Viewer (8.5,
9, XI R2). The transition from the grd to the xml file occurs automatically.
Added Test_Connectivity_On_Refresh_Parameters option to the DataLink_Viewer.ini [Options]
section and to the Options dialog. For certain databases scenarios, you may set it to False to avoid
that extra step.
Added Reload_Report_On_Refresh option to the DataLink_Viewer.ini [Options] section and to
the Options dialog. For certain databases scenarios, this avoids database connection failure when
refreshing a report.
You can now change folder location for ACT! (*.pad) data source files.
See "Changing Folder Location for Access/Excel/Pervasive/Paradox/ACT! Files".
When auto-refreshing, a decrementing progress bar at the bottom of the page reflects the % of
the refresh interval remaining until the next refresh. A click on that progress bar
pauses/resumes the auto-refresh process.
If a user is on a drill-down tab, auto-refresh is placed on hold. When the user closes the drill-
down tab or moves back to the main report tab, auto-refresh resumes.
©2002-2024 Millet Software Page 140
Added Auto_Refresh_Use_Saved_Data command line argument. This allows multiple users to
quickly auto-refresh a report and reload its saved data, which is refreshed in the background through
a scheduled export to a Crystal rpt format.
You may specify parameter values as command line arguments in such a scenario if those
parameters are not involved in fetching data.
Added a user manual section about the Use_Saved_Data command line arguments.
ODBC DSN choice grid now also shows DSN Descriptions.
Added the option Always_Force_Login_If_In_DSN_Group to force selection of data sources. In
such a case, if the data source uses Integrated Security (NT Authentication for SQL Server) then
the login dialog displays only the ODBC DSN choice grid and allows selection via a double-click.
You can now disable extra application exit processing (~ once per 12 cases, DLV moves
ReportList.txt to the recycle bin and deletes temp files created by the Crystal runtime) by creating
the following entry in the master DataLink_Viewer.ini [Options] section:
Disable_Exit_Processing=True
Added special handling for a Citrix scenario where file redirects might experience some network
latency.
Folder location options for files such as DataLink_Viewer.ini and ReportList.txt can now include
references to environment variables (such as %USERNAME%). This is useful for Citrix/TS
scenarios.
FIXES
Fixed an issue with re-saving a data visualization layout under the same name.
Fixed an issue with native (ADO) connections to Access/Excel.
Fixed an issue with specifying a main report parameter via command line argument when the
parameter is linked to a subreport stored procedure parameter.
Fixed a report load delay when using saved data and Integrated Authentication is turned on.
Improved error message for a rare report load failure.
Fixed handling of optional text log file location.
Fixed an issue with exporting from the report grid (right-click menu option).
Fixed an issue with the button to reset integrated authentication information.
Fixed handling of double quotes within "ParmN:…" command line arguments.
Fixed an issue with storing the extra Folder location for dynamic parameter rpt files.
Fixed an issue with command line printing when the report has zero records.

©2002-2024 Millet Software Page 141
Version 6.3.1047 [SP7]: November 28, 2013
You can now schedule or trigger report exports (not just printouts) without user intervention.
This version supports the new features in Crystal 2011:
- Run .rptr (read only) Crystal reports. You can also package .rptr files into .rpz files with
expiration dates and/or license keys.
- Export Excel (Data Only) natively to .xlsx files
note: regular (not Data Only) excel exports to .xlsx still use custom conversion from xls to
xlsx. This is because Crystal 2011 provides native export to xlsx only for
Data Only exports.
Added Data Visualization functionality.
For detail, see ‘Data Visualizer’
or watch a 25-minute video demo.
Users can now click a new toolbar icon (or Ctrl-G) to launch a Group Swap Expert. This new
dialog allows changing (via drag-and-drop) the fields/formulas used to group the report or
reordering the groups. For example, instead of Grouping the report by Country, and within
Country by City, you may Group the report by Product Type and within Product Type by Product.
For detail, see ‘Dynamic Grouping (Group Swap Expert)’ or watch video demo .
Users can now click a new toolbar icon to launch a Data Grid panel for ad-hoc grouping,
sorting, totaling, filtering, and exporting of the report’s data set. To enable this, set the
Disable_Data_Grid option to ‘False’ in DataLink_Viewer.ini.
Users can now click a fields/formulas/objects and, if the report developer assigned an HTML
tooltip for these objects, a window pops up and displays that content. For a description of this
functionality, see ‘Click to Show HTML Tooltip’.
A short video demo is also available.
Added Ctrl-C to copy the text and Ctrl-Shift-C to copy the tooltip text of a clicked field in report
preview. Since you can use a formula to control the content of a tooltip, this allows you to copy to
the clipboard much more than just the displayed value of a field. For detail, and sample use scenario,
see the user manual section on "Copying Text Content from the Report."
Removed dependency on Visual Basic PowerPacks.In the 2008 version, exporting drill-downs in rpz
files resulted in exporting the main report instead. In the 2011 version, this limitation is now
removed.
The Option dialog has a new Database tab for setting logon and connectivity options.

©2002-2024 Millet Software Page 142
The Options dialog has a new Export tab to control the After- Export action. You can elect to
automatically open the exported file within its associated application, Open the folder in File
Explorer, take no action, or Ask the user each time they export. The dialog for asking the user has a
checkbox for adopting the selected choice and applying for all future exports (to avoid being asked
again).
Added a ‘Skip_Export_Format_Dialog’ option in DataLink_Viewer.ini. By changing this option to
True, if the user selects an export format of CSV or Excel, and the report has saved export settings
(in Crystal, File, Export, Report Export Options…), the dialog showing export format options would
be skipped and the saved settings would be used.
Installing on a machine with an older version (Service Pack) of the SAP Crystal Reports Runtime
Engine for .NET Framework 4.0 now automatically upgrades the runtime to the latest service pack.
The user no longer needs to first manually uninstall the older service pack version.
Double-clicking a section with a formula that launches a report now accepts wrapped text and
doesn’t require double-clicking directly on the formula. If a section contains multiple launching
formulas, the one that is directly double-clicked gets launched.
Clicking on a formula can now set the value of another formula to either the name of the clicked
formula (new option) or to the value of the clicked formula (old option). For more detail, see the user
manual section on ‘Click to Set Formula Value.’
If you embed #{DLV_RPT_PATH}# in the text of a launching (DLV_Run) formula, DataLink
Viewer substitutes the path to the current report file for that token (allowing you to dynamically
specify the folder where the calling report is).
Fixed rendering of parameter refresh dialogs when user elects to set Display options to larger font
sizes.
Added support for Date Constants and Number Constants when specifying parameter values via
command line arguments. For example, "Parm1:Start_Month_Minus_1" For detail, see the ‘Date
Constants’ and ‘Number Constants’ sections in the user manual.
Using a command line argument: "Ignore_Saved_Parameter_Values:[ALL]" you can run a report
and get prompted for unspecified parameter values, skipping the saved parameter values dialog.
©2002-2024 Millet Software Page 143
DataLink Viewer now ignores a saved parameter value if that parameter is no longer used in the
report.
Improved handling of "Printer:Default" and "Printer:Dialog" arguments:
a) the main window is minimized unless user interaction with login or parameter dialog is required,
b) if the user cancels from a parameter dialog, the process closes without a warning message about
missing parameter values, c) "Printer:Dialog" now closes automatically after printing.
A configuration file is now available at
C:\Program Files\Millet Software\DataLink Viewer 2011\DataLink_Viewer_2011.exe.config
It allows users to set number of rows per parameter "page".
The status bar at the bottom of the window shows how many records were selected out of the total
number of records retrieved.
Fixed a login issue with ODBC_DSN command line argument.
Fixed an issue with Oracle_Server command line argument.
Fixed data refresh issue. Also, when refreshing without changing parameters, the preview returns to
the same page (if the new preview contains at least that number of pages).
Logging DLV processing to an ODBC table can now handle database targets with limitations on
number of characters in each field in a SQL statement. The new mode (using bind variables to pass
potentially long strings capturing the parameter values and the report SQL) is enabled by setting the
following entry in the [Options] section of DataLink_Viewer.ini:
Log_ODBC_Type=Oracle
ODBC_DSN_From_To now support multiple pairs separated by "||".
This addresses use scenarios where a report uses multiple ODBC DSNs
(e.g. when the main report DSN is not the same as subreports’ DSNs).
Also, you may now specify ODBC_DSN_From_To as a global entry in the [Options] section of
DataLink_Viewer.ini.
If you interactively switch between DSNs, Integrated Authentication functionality is now available
by setting to True a new ini option of Enable_Integrated_Authentication_For_DSN_Changes.
This is a rare scenario so, for more detail, contact Millet Software.
During forced login scenarios, Integrated Authentication now automatically sets the Password
in the login dialog after the User ID is manually set.
When the rpt has saved data, Preview Report (Force Login) now always shows a login dialog
(even if the default action for saved data is to simply display it).
Fixed a problem with "Printer:…" command line argument.
Online Version Update functionality was removed due to the component Update.exe being
(mistakenly) flagged by virus protection software.
©2002-2024 Millet Software Page 144
When using the Options dialog to change the default location of ReportList.txt, if the target folder
already contains a ReportList.txt file, the user can now elect to load that file into the grid or (upon
exiting DataLink Viewer) overwrite the content of the file with the list of reports currently loaded
into the grid.
Document2ini command line argument now allows calling DataLink Viewer 2011 from another
application and requesting that documentation about key file (DataLink_Viewer.ini, ReportList.txt)
location as well as report parameters be written to a specified ini file.
Added XML_Path_From_To command line argument, allowing users to override the stored path
to XML files as data source for the report.
Database_Path_Selection can now be specified via a command line argument.
Database_Path_Selection can now be used for Paradox data sources by specifying just the path (not
including the DB file name. For example, using a command line argument such as:
"Database_Path_Selection:C:\Old\>>c:\New\"
Fixed an issue with Database_Path_Selection when used to change the location of Excel files as a
data source.
Fixed in-place drill-down issue when the group value contains a single-quote.
Fixed an issue with remembered parameter values when they end with hyphens.
If an Excel or Access file data source is specified in the report via relative path, and the file exists in
the same folder as the report, DataLink Viewer uses the file in the same folder as the data source.
Paths to sample reports in the report list grid are now updated to
C:\Program Files (x86)\...
on first-time launch of DataLink Viewer 32-bit version on a 64-bit machine.
Version Info and Options dialogs now always maintain their position in front of the main DataLink
Viewer window.
Improved the help screens triggered by function key F1.
When the login dialog shows alternative ODBC DSNs to select from, if the machine has more than 9
DSNs, the dialog provides a search panel allowing you to enter text to search the list of DSN. This
makes it more efficient to locate a particular DSN in a long list of DSNs.
©2002-2024 Millet Software Page 145
Added a DataLink_Viewer.ini option of Skip_Complex_Login_Logic. By default, this option is set
to False. This allows DLV to have full control over the login process, change ODBC DSNs, servers,
databases, and data source paths on the fly, and capture encrypted Integrated Authentication
information.
Setting this option to True solved a database connection failure for one user with an Oracle ODBC
connection with tables that belong to different schemas.
Added a DataLink_Viewer.ini option of Report_Reload_Discards_Login_Info. By default, this
option is set to False. This allows you to run a report in DLV, change the rpt design in Crystal, Save,
and reload the new rpt design in DLV without repeating the login process.
Added logic to preserve qualifiers in table names for native Oracle connections.
A new Integrated_Authentication_Set_Entry command line argument allows administrators to set
integrated authentication information for specified Windows User ID and Machine Name(s).
For detail, see "Setting Integrated Authentication for Multiple Machines (Citrix Farm)."
A new Set_Formulas1 command line argument allows setting of formula expressions (provided
the formula name starts with a ^ character). For detail, see the user manual section on Argument for
Setting Formula Expressions.
DateTime parameter placed on the report layout now react to user clicks by providing a popup
change dialog with Calendar and Time change controls In prior versions, this was possible only
with Date parameters.
Added a new option to DataLink_Viewer.ini [Options] section:
Save_Screen_Space_By_Removing_Main_Report_Tab=True
By default, this option is set to True and DLV saves screen space by removing the "Main Report"
tab at the top of the Preview window. When a drill-down is initiated, DLV restores the tabs to allow
navigation. This causes a brief flicker. If you wish to avoid this step, you can now set this option to
False.
Ctrl-Shift-F1 now opens DataLink_Viewer.ini (configuration settings) in Notepad.
When closing the application after an interactive session, the ReportList.txt file
(1
st
tab report grid) is now transferred to the recycle bin approximately once per 10 times. This
provides a copy of the file in case it gets erased during abnormal termination of a user session.
The report grid right-click menu provides options to increase/decrease font size. The changes
are saved and reused across sessions.
Added a 64-bit version of DataLink Viewer 2011.

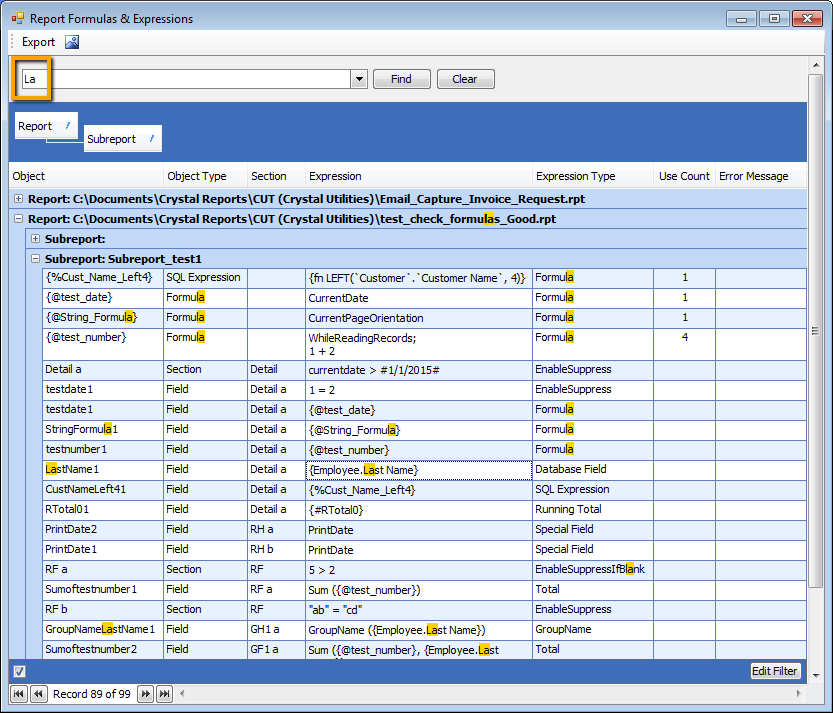
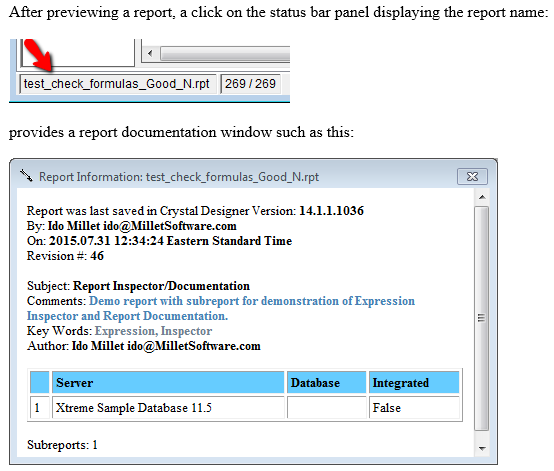
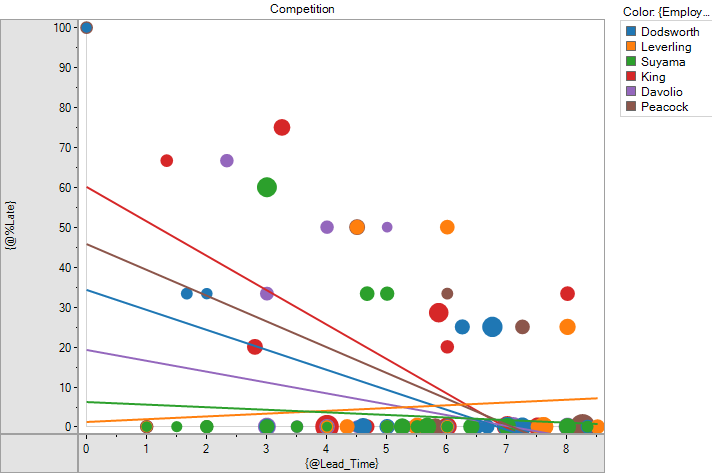