
Sage Fixed Assets
Reporting
User guide

2
Sage Fixed Assets – Reporting User Guide
Last updated September 8, 2023
© 2023 The Sage Group plc or its licensors. All rights reserved. Sage, Sage logos, and Sage product and
service names mentioned herein are the trademarks of The Sage Group plc or its licensors. All other
trademarks are the property of their respective owners.
Sage End User License Agreement (EULA): https://www.sage.com/en-us/legal/eula/

3
Sage Fixed Assets – Reporting User Guide
Contents
Contents are now available from the Bookmarks panel, which you can access quickly from anywhere in this
PDF. Bookmarks are displayed automatically when you open the PDF from a download location on your
computer.
If you are viewing this guide in a web browser, you might need to turn on the bookmarks from the toolbar
in the PDF, depending on your browser. (For example, in Microsoft Edge, hover over the top of the page to
display the toolbar, and then click the Table of contents icon in the top left corner. In the Chrome browser,
you would click the Bookmarks icon in the top right corner.)

4
Sage Fixed Assets – Reporting User Guide
Chapter 1
Introduction to Sage Fixed Assets—Reporting
About Sage Fixed Assets—Reporting
Note: The latest version of Sage Fixed Assets—Reporting uses SAP® Crystal Reports 2020
(Crystal Reports), which requires 2 GB of hard disk space and a 64-bit environment. The
previous version of Sage Fixed Assets—Reporting used Crystal Reports 2016 and is still
available if you have not yet upgraded or your machine has a 32-bit operating
environment. If both versions of Crystal Reports are on your machine Sage Fixed Assets—
Reporting will default to Crystal Reports 2020.
The Sage Fixed Assets—Reporting application enables you to create custom reports to serve
most every asset management reporting need, from financial reporting to departmental
tracking and asset planning. Users of the Sage Fixed Assets—Depreciation products who also
use the Sage Fixed Assets—Tracking products can create combined reports using fields from
both applications. You can even combine Sage Fixed Assets data with data residing in other,
non-Sage Fixed Assets data sources.
Note: Throughout this manual, we refer to all of the Sage Fixed Assets products (Sage
Fixed Assets—Depreciation, Sage Fixed Assets—Tracking, and Sage Fixed Assets—
Planning) as Sage Fixed Assets. Since Sage Fixed Assets—Reporting works identically
with each product, these instructions apply to all three.
Sage Fixed Assets—Reporting is a powerful application that allows you to design, create, print,
and distribute your custom reports. See the examples below.
Use the Sage Fixed Assets Standard Reporting Features with Crystal Reports
You can use the Sage Fixed Assets standard reporting features to create most of the
reports that meet your needs. Even if you have not purchased Sage Fixed Assets—
Reporting, you can still make the following changes to Sage Fixed Assets standard
reports:
• Set the current reporting period
• Set the orientation of the report (portrait or landscape)
• Set the currency rounding option
• Specify the group of assets included on the report
• Change the sort order specified in the selected group of assets
• Set the page break options
• Add the report to favorites.
For more information about formatting reports, see the online Sage Fixed Assets—
Depreciation User Guide.
The easiest way to get started using Crystal Reports is by exporting a standard report
from within Sage Fixed Assets to Crystal Reports. Then, in Crystal Reports, you can

5
Sage Fixed Assets – Reporting User Guide
add a chart, create formula fields, and format the report with shading, special fonts,
or a logo. With this method, you maintain all of the time-saving, built-in logic of the
Sage Fixed Assets standard reports while extending the reporting functionality by
using the powerful features of Crystal Reports. For more information, see “Exporting a
Standard Report to Crystal Reports,” page 46.
Note: After you export a standard Sage Fixed Assets report to Crystal Reports, that report
can display data only for the reporting period for which the report was run in Sage Fixed
Assets.
Customize a Standard Report
Using the Sage Fixed Assets—Reporting customization feature, you can make
changes to the standard reports that are shipped with Sage Fixed Assets products. You
still get all of the report logic designed by the Sage Fixed Assets experts, but you are
able to modify the report format to fit your company’s needs. You perform all of
these tasks inside your Sage Fixed Assets application. Starting with one of the Sage
Fixed Assets standard reports, you can:
• Add and remove columns
• Edit the column headers
• Change the order of the columns
• Change the column widths
• Change the text of headers and footers
• Save multiple versions of the same report.
For more information on customizing standard reports, see Chapter 2, “Customizing
Standard Reports.”
After you customize a standard report in your Sage Fixed Assets application, you can
export the report to Crystal Reports. Then, in Crystal Reports, you can add a chart,
create formula fields, and format the report with shading, special fonts, or a logo.
Note: After you export a customized standard Sage Fixed Assets report to Crystal
Reports, that report can display data only for the reporting period for which the report
was run in Sage Fixed Assets.
Create Your Own Sage Fixed Assets Reports in Crystal Reports
You can create your own Sage Fixed Assets reports in the Crystal Reports program. First,
open a Sage Fixed Assets company and from the top menu go to Reports > Reporting >
Create New Report.
We provide a template that has been preconfigured to work with your Sage Fixed
Assets application and that connects directly to the Sage Fixed Assets database. The
template contains basic filtering and sorting logic, as well as other information, such
as the name of the company and the name of the report. You can easily add Sage Fixed
Assets fields to create columns on the report.
Here are just a few examples of how the powerful features of Crystal Reports can add
value to Sage Fixed Assets data:
• Add special formatting, such as shading or a logo

6
Sage Fixed Assets – Reporting User Guide
• Use parameters and formula fields to show data in multiple currencies
• Integrate data from multiple Sage Fixed Assets companies into a single report
• Compare information from multiple depreciation books in a single report
• Specify the records shown on the report using sophisticated grouping and sorting
features
• Add charts and graphs to your reports
• Integrate Sage Fixed Assets data with data existing in other sources, such as
relational, XML, and spreadsheet data.
For information on creating your own Sage Fixed Assets reports, see “Creating a
Report from Scratch in Crystal Reports,” page 29 and “Adding Sage Fixed Assets
Fields to the Report,” page 32.
Which Method of Creating Reports is Right for Me?
As we mentioned above, Sage Fixed Assets—Reporting gives you several options for
creating a report. With this application, you can:
• Customize a standard Sage Fixed Assets report inside the Sage Fixed Assets program
• Export a Sage Fixed Assets report to Crystal Reports
• Create a report from scratch in Crystal Reports
How do you choose which method is best for you?
Planning the Report
The first step is to decide what information you want to include on the report and how you
want the report to look. Some of the questions you will want to ask are:
• Which group of assets do you want to include on the report?
• Do you need to narrow the group of assets further? For example, you may want to
include only those assets that cost over $10,000, or only the assets placed in service
in the past year.
• Which depreciation book(s) do you want to report on?
• Do you want to compare information from two depreciation books on a single report?
• Which fields do you want to subtotal?
• For which fields do you want to show totals at the end of the report?
• How do you want to sort the data on the report? For example, you can sort the assets
by their location, and for each location you can sort the assets by their class.
• Do you want the report to include a graph or chart?
• Do you want to add special formatting, such as shading or a logo?
• Do you need to display information for more than one company at a time?
• Will you integrate this data with data from other sources?
• Will you publish and distribute the report via the web or email?

7
Sage Fixed Assets – Reporting User Guide
The table below may help you decide whether you need to use the customized reporting
feature in Sage Fixed Assets or use the features in Crystal Reports.
If you need to…
You should use…
Set the current reporting period
Sage Fixed Assets Standard Reporting features
Set the orientation of the report
Sage Fixed Assets Standard Reporting features
Set the currency rounding option
Sage Fixed Assets Standard Reporting features
Specify the group of assets included on the
report
Sage Fixed Assets Standard Reporting features
Change the sort order
Sage Fixed Assets Standard Reporting features
Set the page break options
Sage Fixed Assets Standard Reporting features
Add the report to a list of favorites in Sage Fixed
Assets
Sage Fixed Assets Standard Reporting features
Add or remove columns
Customized Standard Reports
Modify column headers
Customized Standard Reports
Change the order of columns
Customized Standard Reports
Change the Orientation (portrait vs. landscape)
Customized Standard Reports
Change the Column Widths
Customized Standard Reports
Add a chart or graph
Crystal Reports
Add special formatting (such as shading or
drawing boxes around fields)
Crystal Reports
Add formula fields
Crystal Reports
Report on multiple companies
Crystal Reports
Compare two or more depreciation books
Crystal Reports
Does a Standard Report Meet My Needs?
After you have planned your report, you should review the Sage Fixed Assets standard
reports. Ask yourself if any of them meets your needs or comes close to meeting your
needs. For a description of the standard reports, see the Sage Fixed Assets user’s guide
for your application. For a table of the standard reports that shows which reports are fully
customizable, see “Which Reports Can Be Customized?,” page 26.
If the Answer is Yes
If a standard report meets all of your needs, you do not need to use Sage Fixed Assets—
Reporting in this instance. For information on running the standard reports, see the Sage
Fixed Assets guide for your application.
If the Answer is Almost
If one of the standard Sage Fixed Assets reports meets most but not all of your needs, you
should probably use the custom reporting feature in your Sage Fixed Assets application.
You can customize a standard report by adding and deleting columns, changing column
widths, and more. For complete information on customizing a standard report, see
Chapter 2, “Customizing Standard Reports.” You can then export the customized standard
report to Crystal Reports for even more advanced customization.
If the Answer is No
If the custom reporting feature does not meet all of your needs, you have two options:
• You can create your report from scratch in Crystal Reports. The easiest way to do this
is to select Reports/Reporting/Create New Report from the menu bar in Sage Fixed

8
Sage Fixed Assets – Reporting User Guide
Assets. That way, you start with a basic report template that establishes a database
connection to Sage Fixed Assets and sends the name of the Sage Fixed Assets
company and the title of the report to Crystal Reports. In Crystal Reports, you can
easily select Sage Fixed Assets fields as columns on the report. For information on
using Sage Fixed Assets—Reporting to create a report from scratch, see “Creating a
Report from Scratch in Crystal Reports,” page 29 and “Adding Sage Fixed Assets
Fields to the Report,” page 32. For a list of all of the fields you can add in Crystal
Reports, see Appendix A, “Crystal Reports for Sage Field Names.”
• You can run a standard report in Sage Fixed Assets, use the customized standard
report features (if necessary), and then export the report to Crystal Reports. That way,
you still get all of the logic built into the report by Sage Fixed Assets experts, and
you can make further changes to the report in Crystal Reports. For more information,
see “Exporting a Standard Report to Crystal Reports,” page 46.

9
Sage Fixed Assets – Reporting User Guide
Chapter 2
Customizing Standard Reports
This chapter describes how to make changes to a standard report that is shipped with the
product. You can also design, create, and print a custom report from scratch using Crystal
Reports. For some ideas for using Crystal Reports to create informative reports, see
Chapter 3, “Tips for Using Crystal Reports.”
Customizing a Report
There may be times when you want to make changes to one of the standard reports, but you
do not want to take the time to recreate the report using the Sage Fixed Assets—Reporting
program. For example, you may want to add a new column to the report, or you may want to edit
one of the column headers.
Using Sage Fixed Assets—Reporting, you can customize a report from within the Sage Fixed
Assets application. You get all of the report logic designed by the Sage Fixed Assets
experts, but you are able to modify the report format to fit your company’s needs.
You can make the following changes to an existing standard report:
• Add and remove columns (see “Adding and Removing Columns on a Report,” page 16)
• Change the text in column headers (see “Changing the Column Headers of a
Report,” page 17)
• Change the order of columns (see “Changing the Column Order on a Report,” page 18)
• Change the column widths (see “Changing the Column Widths of a Report,” page 19)
• Change the space between columns (see “Changing the Space Between Columns on a
Report,” page 20)
• Change the left and right margin spacing (see “Changing the Left and Right
Margins of a Report,” page 21)
• Change the text in headers and footers (see “Changing the Headers and Footers of
Reports,” page 21)
• Save multiple versions of the same report (see “Saving Multiple Versions of the Same
Report,” page 22)
The Sage Fixed Assets customized standard reporting features are also available in Crystal
Reports. However, the customized standard reporting features in the application have
several advantages:
• Sage Fixed Assets customization features are easier to use. Although Crystal
Reports is a powerful program, many novice users find it to be more challenging
to accomplish tasks.
• Customized standard reports can be saved on the Reports menu to be run at a
later time (by selecting Reports/Customized Reports). Reports created in
Crystal Reports do not appear on the Reports menu.
• Customized standard reports can be run in Global Task Manager (available in Sage
Fixed Assets–Premier Depreciation only.)

10
Sage Fixed Assets – Reporting User Guide
• Customized standard reports can be included in Batch Reports.
• In Sage Fixed Assets, you can create a security profile that allows a user to run a
report but doesn’t allow that user to customize or edit the report and/or create a
new report with the Reporting/Create New Report command on the Reports
menu. If you create a report in Crystal Reports, you cannot attach security
restrictions to it.
To customize a report
1. Select Reports/Reporting/Customize Reports from the menu bar. The Report
Customization dialog appears.
Tip: You can also access the Report Customization dialog by clicking the Customize
Report button on the Report Definition dialog.
2. From the Report Name field, select the report you want to customize.
Note: You can select either a standard report or a report that you have already
customized. If you select a standard report, you must rename the report when you
save your changes.
3. Complete the Report Customization dialog. For more information, see “Completing
the Report Customization Dialog,” page 10.
4. Do one of the following:
• Click the Save As button if you are customizing a standard report, or you want to
save your changes under a different report name. The Save As dialog appears.
Enter a new name for the report, and then click the Save button. The application
adds the report to the list of customized reports that you can run by selecting
Reports/Customized Reports from the menu bar.
• Click the Save button if you are making changes to a customized report, and you
do not want to change the name of the report. The application saves the changes
that you made to the report.
5. Click the Close button to exit from the Report Customization dialog.
Completing the Report Customization Dialog
Follow the guidelines below to complete the Report Customization dialog.
Report Name
Use this field to select the report that you want to customize.

11
Sage Fixed Assets – Reporting User Guide
Note: This field is unavailable if you access the Report Customization dialog by
clicking the Customize Report button on the Report Definition dialog. That’s because
you can edit only one standard report at a time. However, this field is available if you
access the Report Customization dialog by selecting Reports/Reporting/Customize
Reports from the menu bar.
Description
Use this field to enter a description of the report that you are customizing. You can
enter up to 200 characters.
Three tabs on the dialog:
Edit Columns Tab
For more information, see “Completing the Edit Columns Tab of the Report
Customization Dialog,” page 11.
Edit Header/Footer Tab
For more information, see “Completing the Edit Header/Footer Tab of the Report
Customization Dialog,” page 14.
View Report Layout Tab
For more information, see “Completing the View Report Layout Tab of the Report
Customization Dialog,” page 15.
Save Button
Click this button to save the changes you make to the report. Because you cannot
overwrite a standard report, this button is unavailable until you click the Save As
button and enter a new name for the report.
Save As Button
Click this button to save the changes you make under a different report name. After you
rename the report, it appears under Customized Reports on the Reports menu. The
renamed report also appears underneath the standard report on which it was based in
the Report Name field on this dialog, as well as the Report Name field of the Report
Definition dialog.
Completing the Edit Columns Tab of the Report Customization Dialog

12
Sage Fixed Assets – Reporting User Guide
Follow the guidelines below to complete the Edit Columns tab of the Report Customization
Reports dialog.
Field Category
Select the type of fields you want displayed in the field list. This option allows you to
limit the number of fields in the list, to reduce scrolling through them all.
All Fields
Select this category to display all available fields in the application.
Book Related Fields
Select this category to display additional data entry fields that affect
depreciation calculations (in addition to the fields in the Critical Fields
category). Most of these fields can have different values in each book.
Report Specific Fields
Select this category to display only the fields that are specially calculated for the
selected report. This category contains fields only after you have removed fields
from the Report Columns box.
Critical Fields
Select this category to display only the fields that are required to calculate
depreciation.
Depreciation Fields
Select this category to display only the fields that contain application-
calculated depreciation amounts or information about those amounts (such as
the dates for which depreciation was calculated).
Disposal Fields
Select this category to display only fields that pertain to asset disposals.
General Info Fields
Select this category to display only the fields that contain general information
about an asset, such as its location, but do not affect the asset’s depreciation
calculations.
Tracking Fields
Select this category to display only the fields that are unique to the Sage Fixed
Assets— Tracking application. This category appears only if you use the current
company in Sage Fixed Assets—Tracking.
Transfer Fields (Child)
Select this category to display only fields that pertain to assets that have been
created as a result of a transfer.
Transfer Fields (Parent)
Select this category to display only fields that pertain to original assets that have
been transferred.
Field List Box
Use this field to select the data that you want to include as columns on the report. You
can select more than one field at a time. You are limited to a maximum of 20 columns on

13
Sage Fixed Assets – Reporting User Guide
each report. You can include up to five additional currency columns that you can total
to each standard report.
>> (Add Button)
Click this button to add the selected field(s) to the Report Columns box.
<< (Remove Button)
Click this button to remove the selected field(s) from the Report Columns box.
Report Columns
This field displays the columns that will be displayed on the report. The application
displays the leftmost column on the first row, the second column on the second row,
and so on. After you make changes to the report columns, you can see how the report
will appear by clicking the View Report Layout tab.
Field
This column displays the name of the field in the application. If you have changed
the name of the field using the Customize Fields dialog, the new field name
appears in this list. The application displays the new fields added to the report in
bold, to distinguish them from the original columns.
Header
This column displays the column header for the field. You can click on the column
header and change it. To create a two-line column header, insert a double pipe
symbol (||) where you want the break in the column header.
Width
This column displays the width of the column in inches. You can click on the width
and change it. If you want to change the overall size of the report in order to display
wider columns, you can change the margins and change the page orientation to
landscape.
Total?
This field displays whether a field is totaled and subtotaled. The application
displays a check mark when a field is totaled and subtotaled; otherwise, the
column is blank.
Up/Down Buttons
Click these buttons to move the selected field either up or down in the list. As you
move the field up, the column is moved to the left on the report.
Total Column Widths
This field displays the total of the column widths without the spaces between the
columns.
Column Spacing
Use this field to enter the space, in inches, between columns on the report.
Total Width
This field displays the total of the column widths and the space between the columns.
(This field does not include the width of the left and right margins.)
Maximum Width
This field displays the total space available for columns and space between columns.
This amount is the width of the paper minus the space for the left and right margins.
(Over)/Under

14
Sage Fixed Assets – Reporting User Guide
This field displays the amount of space that is available for use on the report. This
amount is the maximum width minus the total width. The application displays
negative amounts in red.
Paper Width: (inches)
Use these fields to set the page orientation of the report.
8.5
Click this option button if you want the report to have an overall page width based on
8.5 inches.
11
Click this option button if you want the report to have an overall page width based on
11 inches.
Margins: (inches)
Use these fields to enter the left and right margins. Changing each of these fields
affects the amount of data that can be displayed on the report.
Left
Click the up and down arrows to specify the left margin of the report.
Tip: If you want to place the reports in binders, you may want to increase the left
margin to avoid cropping data.
Right
Click the up and down arrows to specify the right margin of the report.
Restore Defaults Button
Click this button to restore the original settings for the standard report on which the
customized report is based.
Completing the Edit Header/Footer Tab of the Report Customization Dialog
Follow the guidelines below to complete the Edit Header/Footer tab of the Report
Customization dialog.

15
Sage Fixed Assets – Reporting User Guide
Header
Use these fields to enter text that will appear in the header of the report.
Left Justified
Use these three text fields to enter text that will appear on the left side of the
header. You can enter a maximum of 35 characters in each text field.
Centered
Use this text field to enter text that will appear in the center of the header below
the company name, which will always print on the report. You can enter a
maximum of 40 characters in the text field.
Right Justified
Use these three text fields to enter text that will appear on the right side of the
header. You can enter a maximum of 35 characters in each text field.
Footer
Use these fields to enter text that will appear centered in the footer of the report. The
application automatically displays the date on the left side of the footer and the
page number on the right side of the footer. You can enter a maximum of 110
characters in each text field.
Completing the View Report Layout Tab of the Report Customization Dialog
The View Report Layout tab displays a sample report for the report that you select in the
Report Name field. If you select a report that you have customized, this tab displays the
changes that you made to the original standard report.
Follow the guidelines below to review the report on the View Report Layout tab of the Report
Customization dialog.
Header
This field displays the header section of the report.
Columns
This text box displays sample data for the report.

16
Sage Fixed Assets – Reporting User Guide
Footer
This field displays the footer section of the report.
Adding and Removing Columns on a Report
You can add columns and remove columns from standard reports.
To add columns to a report
1. Select Reports/Reporting/Customize Reports from the menu bar. The Report
Customization dialog appears.
2. From the Report Name field, select the report to which you want to add or remove
columns.
Note: You can select either a standard report or a report that you have already
customized. If you select a standard report, you must rename the report when you
save your changes to the report.
3. Click the Edit Columns tab. The Edit Columns information appears.
4. From the Field Category list, select a field category to limit the number of fields
shown in the field list box, if desired.
5. From the field list box underneath the Field Category list, select the field that you
want to add as a column on the report.
6. Click the Add button. The application removes the field name from the field list and
adds it to the Report Columns box. The field will appear as a column when you run the
customized report. The columns will appear on the report in the same order as they
appear in the Report Columns box, but you can change the column order, if desired.
Note: When you add a column to a report, the application recalculates the remaining
space available on the report and displays the amount in the (Over)/Under field.
Make sure this amount is zero or greater. If the number in the (Over)/Under field is
negative, one or more columns will be truncated. You can change the left and right
margins and the space between the columns to adjust the amount in the (Over)/Under
field.
7. Do one of the following:
• Click the Save As button if you are adding a column to a standard report, or you
want to save your changes under a different report name. The Save As dialog
appears. Enter a new name for the report, and then click the Save button. The
application adds the report to the list of customized reports that you can run by
selecting Reports/Customized Reports from the menu bar.
• Click the Save Button if you are adding a column to a customized report, and you
do not want to change the name of the report. The application saves the changes
that you made to the report.
8. Click the Close button to exit from the Report Customization dialog.
You are now ready to run the customized report with the additional column(s).

17
Sage Fixed Assets – Reporting User Guide
To remove columns from a report
1. Repeat steps 1 through 3 above. The Edit Columns information appears.
2. Select the field that you want to remove from the Report Columns box.
3. Click the Remove button. The application removes the field from the Report Columns
box and adds it to the Field List box.
4. Do one of the following:
• Click the Save As button if you are removing a column from a standard report, or
you want to save your changes under a different report name. The Save As dialog
appears. Enter a new name for the report, and then click the Save button. The
application adds the report to the list of customized reports that you can run by
selecting Reports/Customized Reports from the menu bar.
• Click the Save Button if you are removing a column from a customized report, and
you do not want to change the name of the report. The application saves the
changes that you made to the report.
5. Click the Close button to exit from the Report Customization dialog.
You are now ready to run the customized report with the removed column(s).
Changing the Column Headers of a Report
You can change the text that appears at the top of columns on a standard report.
By default, the column headers display the names of fields as they appear in the
application. If you change a field name in the Customize Fields dialog, the new field name
appears on the report. You can change the field name in the Report Customization dialog
before you run the report, and that new name will appear on the report.
To change the column headers on a report
1. Select Reports/Reporting/Customize Reports from the menu bar. The Report
Customization dialog appears.
2. From the Report Name field, select the report for which you want to change the
column headers.
Note: You can select either a standard report or a report that you have already
customized. If you select a standard report, you must rename the report when you
save your changes to the report.
3. Click the Edit Columns tab. The Edit Columns information appears.
4. In the Header column of the Report Columns box, click in the field that you want to
change. A blinking cursor appears in the field.
5. Using the left and right arrow keys, make the desired changes to the text.

18
Sage Fixed Assets – Reporting User Guide
Note: You can indicate a line break (or carriage return) in a column header by
inserting two vertical pipe symbols (||) where you want the line to break. For example,
to make the words “Sys No” appear on two lines instead of one, you would insert two
vertical pipe symbols between “Sys” and “No.” It would look like this: Sys||No.
6. Do one of the following:
• Click the Save As button if you are changing the column headers of a standard
report, or you want to save your changes under a different report name. The Save
As dialog appears. Enter a new name for the report, and then click the Save
button. The application adds the report to the list of customized reports that you
can run by selecting Reports/Customized Reports from the menu bar.
• Click the Save button if you are changing the column headers of a customized
report, and you do not want to change the name of the report. The application
saves the changes that you have made to the report.
7. Click the Close button to exit from the Report Customization dialog.
You are now ready to run the customized report with the changes that you have made to the
column headers.
Changing the Column Order on a Report
You can change the order of the columns on the standard reports.
To change the column order on a report
1. Select Reports/Reporting/Customize Reports from the menu bar. The Report
Customization dialog appears.
2. From the Report Name field, select the report for which you want to change the column
order.
Note: You can select either a standard report or a report that you have already
customized. If you select a standard report, you must rename the report when you
save your changes to the report.
3. Click the Edit Columns tab. The Edit Columns information appears.
4. In the Report Columns box, select the field whose position you want to change, and
then click the Up button or the Down button. As you move a field up in the list, the
column moves to the left on the report. As you move a field down in the list, the
column moves to the right on the report.
5. Do one of the following:
• Click the Save As button if you are changing the column order on a standard
report, or you want to save your changes under a different report name. The Save
As dialog appears. Enter a new name for the report, and then click the Save
button. The application adds the report to the list of customized reports that you
can run by selecting Reports/Customized Reports from the menu bar.

19
Sage Fixed Assets – Reporting User Guide
• Click the Save Button if you are changing the column order on a customized
report, and you do not want to change the name of the report. The application
saves the changes that you made to the report.
6. Click the Close button to exit from the Report Customization dialog.
You are now ready to run the customized report with the changed column order.
Changing the Column Widths of a Report
You can change the column widths on a standard report. You may want to decrease one or
more column widths after you have added a column to the report so that the new column fits
on the report.
To change the column widths on a report
1. Select Reports/Reporting/Customize Reports from the menu bar. The Report
Customization Reports dialog appears.
2. From the Report Name field, select the report for which you want to change the
column widths.
Note: You can select either a standard report or a report that you have already
customized. If you select a standard report, you must rename the report when you
save your changes to the report.
3. Click the Edit Columns tab. The Edit Columns information appears.
4. In the Report Columns box, click in the Width column for the field whose column
width you want to change. A blinking cursor appears in the field.
5. Make the desired change to the width.
Note: When you tab out of the Width column, the application recalculates the
remaining space available on the report and displays the amount in the (Over)/Under
field. Make sure this amount is zero or greater. If the number in the (Over)/Under
field is negative, one or more columns will be truncated. You can change the left and
right margins and the space between the columns to adjust the amount in the
(Over)/Under field.
6. Do one of the following:
• Click the Save As button if you are changing the column widths on a standard
report, or you want to save your changes under a different report name. The Save
As dialog appears. Enter a new name for the report, and then click the Save
button. The application adds the report to the list of customized reports that you
can run by selecting Reports/Customized Reports from the menu bar.
• Click the Save button if you are changing the column widths on a customized
report, and you do not want to change the name of the report. The application
saves the changes that you have made to the report.
7. Click the Close button to exit from the Report Customization dialog.

20
Sage Fixed Assets – Reporting User Guide
You are now ready to run the customized report with the changes that you have made to the
column width(s).
Changing the Space Between Columns on a Report
You can change the space between columns on a standard report. After you have added a
column to a report, you may want to change the space between columns so that the new
column fits on the report.
To change the space between columns on a report
1. Select Reports/Reporting/Customize Reports from the menu bar. The Report
Customization dialog appears.
2. From the Report Name field, select the report for which you want to change the space
between columns.
Note: You can select either a standard report or a report that you have already
customized. If you select a standard report, you must rename the report when you
save your changes to the report.
3. Click the Edit Columns tab. The Edit Columns information appears.
4. In the Column Spacing field, enter the desired spacing between the report columns.
Note: When you tab out of the Column Spacing field, the application recalculates
the remaining space available on the report and displays the amount in the
(Over)/Under field. Make sure this amount is zero or greater. If the number in the
(Over)/Under field is negative, one or more columns will be truncated. You can
change the left and right margins and change the width of columns to adjust the
amount in the (Over)/Under field.
5. Do one of the following:
• Click the Save As button if you are changing the space between columns on a
standard report, or you want to save your changes under a different report
name. The Save As dialog appears. Enter a new name for the report, and then
click the Save button. The application adds the report to the list of customized
reports that you can run by selecting Reports/Customized Reports from the
menu bar.
• Click the Save button if you are changing the space between columns on a
customized report, and you do not want to change the name of the report. The
application saves the changes that you have made to the report.
6. Click the Close button to exit from the Report Customization dialog.
You are now ready to run the customized report with the changes that you have made to the
space between columns.

21
Sage Fixed Assets – Reporting User Guide
Changing the Left and Right Margins of a Report
You can change the left and right margins of a standard report. You may want to decrease
the margins after you have added a column to the report so that the new column fits on
the report.
To change the margins of a report
1. Select Reports/Reporting/Customize Reports from the menu bar. The Report
Customization dialog appears.
2. From the Report Name field, select the report for which you want to change the margins.
Note: You can select either a standard report or a report that you have already
customized. If you select a standard report, you must rename the report when you
save your changes to the report.
3. Click the Edit Columns tab. The Edit Columns information appears.
4. Select the left margin in the Left field and select the right margin in the Right field.
Note: When you change the width of the margins, the application recalculates the
remaining space available on the report and displays the amount in the (Over)/Under
field. Make sure this amount is zero or greater. If the number in the (Over)/Under
field is negative, one or more columns will be truncated. You can change the width of
columns and the space between the columns to adjust the amount in the (Over)/Under
field.
5. Do one of the following:
• Click the Save As button if you are changing the margins of a standard report, or
you want to save your changes under a different report name. The Save As dialog
appears. Enter a new name for the report, and then click the Save button. The
application adds the report to the list of customized reports that you can run by
selecting Reports/Customized Reports from the menu bar.
• Click the Save button if you are changing the margins of a customized report, and
you do not want to change the name of the report. The application saves the
changes that you have made to the report.
6. Click the Close button to exit from the Report Customization dialog.
You are now ready to run the customized report with the changes that you have made to the
left and right margins.
Changing the Headers and Footers of Reports
You can change the text at the top of standard reports (the header) and the bottom of the
standard report (the footer).
To change the text of headers and footers
1. Select Reports/Reporting/Customize Reports from the menu bar. The Report
Customization dialog appears.

22
Sage Fixed Assets – Reporting User Guide
2. From the Report Name field, select the report for which you want to change the text of
headers and footers.
Note: You can select either a standard report or a report that you have already
customized. If you select a standard report, you must rename the report when you
save your changes to the report.
3. Click the Edit Header/Footer tab. The Edit Header/Footer information appears.
4. Enter the desired text in the text boxes.
5. Do one of the following:
• Click the Save As button if you are changing the headers and footers on a
standard report, or you want to save your changes under a different report name.
The Save As dialog appears. Enter a new name for the report, and then click the
Save button. The application adds the report to the list of customized reports
that you can run by selecting Reports/ Customized Reports from the menu bar.
• Click the Save Button if you are changing the headers and footers on a
customized report, and you do not want to change the name of the report. The
application saves the changes that you made to the report.
6. Click the Close button to exit from the Report Customization dialog.
You are now ready to run the customized report with the changed headers and footers.
Saving Multiple Versions of the Same Report
You can save multiple versions of the same report. For example, you could create two
versions of the Depreciation Expense report. For one report, you select a group that you
defined to show the assets in the Store #1 location. You could save this report definition
as “DER Store #1.” For the second report, you select a group that you defined to show the
assets in the Store #2 location. You could then run each report monthly and distribute
them to different managers.
To save multiple versions of the same report
1. Select Report/Standard Reports from the menu bar. A submenu containing all of the
standard reports appears.
2. Select the report you want to run from the submenu. The Report Definition dialog appears.
3. Complete the fields on the Setup Report tab and the Format Report tab.
4. Click the Save As button. The Save As dialog appears.

23
Sage Fixed Assets – Reporting User Guide
5. Enter a name for the new version of the report and click the Save button. The
application returns to the Report Definition dialog.
6. Repeat steps 3 through 5 to save multiple versions of the report.
7. Click the Close button to close the Report Definition dialog.
Completing the Save As Dialog
Follow the guidelines below to complete the Save As dialog.
Report Name
Use this field to type a system name for the new report. This name is for use within
the application on the Report Definition dialog and on the Customized Reports
submenu. This is not the name that appears when you run the report. To customize the
printed report name, use the Customize Reports button on the Report Definition
dialog.
Save Button
Click this button to save the changes to the report definition.
Running a Customized Report
Follow the steps below to run a standard report that you have customized.
To run a customized report
1. Select Reports/Customized Reports from the menu bar. A submenu containing
all of the reports that you have customized appears.

24
Sage Fixed Assets – Reporting User Guide
Note: If you have formatted a standard report and saved it under a different
name, the report also appears on the submenu. The submenu does not display
reports created using Crystal Reports. To run a report that you created using
Crystal Reports, select Reports/Reporting/Open Existing Report from the menu
bar.
2. Select the customized report that you want to run. The Report Definition dialog appears.
3. Complete the fields on the Report Definition dialog, and then click the Run Report
button. The application either displays the report on your computer or sends the
report to the printer.

25
Sage Fixed Assets – Reporting User Guide
Managing Customized Reports
Note: You use the Reports working area to manage your customized reports. In the Reports
working area, you can do the following:
• Rename existing customized reports. For more information, see “Renaming a
Customized Report,” page 25.
• Delete existing customized reports. For more information, see “Deleting a
Customized Report,” page 25.
Renaming a Customized Report
After you have customized a standard report, you can rename the report using the Reports tab.
Note: You can rename a report only after you have customized it. You cannot rename a
standard report.
To rename a customized report
1. Click the Reports button on the navigation pane.
2. Select the Reports tab.
3. In the reports list box, right-click the report that you want to rename.
4. From the popup menu, select Rename Report. The Rename Report dialog appears.
5. In the Rename To field, enter the name of the report, and then click OK. The system
changes the name of the report in the reports list box.
Note: You must enter a unique name for the report. You cannot enter a name of a report
that already exists.
The new name of the report also appears in the Report Name field of the Report Definition
dialog.
Deleting a Customized Report
After you have customized a standard report, you can delete it from the list of reports that
you can run.
Note: You can delete only customized reports. You cannot delete a standard report. In
addition, you cannot delete a report that has been included in a Batch report. You must
first remove the report from the Batch report before you can delete it.
To delete a customized report
1. Click the Reports button on the navigation pane.
2. Select the Reports tab.

26
Sage Fixed Assets – Reporting User Guide
3. In the reports list box, right-click the report you want to delete.
4. From the popup menu, select Delete Report. A confirmation message appears.
5. Click Yes to delete the report. The system removes the selected report from the reports list
box.
The customized report that you have deleted no longer appears in the reports list box nor
in the Report Name field of the Report Definition dialog.
Which Reports Can Be Customized?
You can customize most of the standard reports in the application. However, for some reports
you cannot change the columns; you can only change the headers and footers. And some
reports are not customizable at all unless you export them to Crystal Reports.
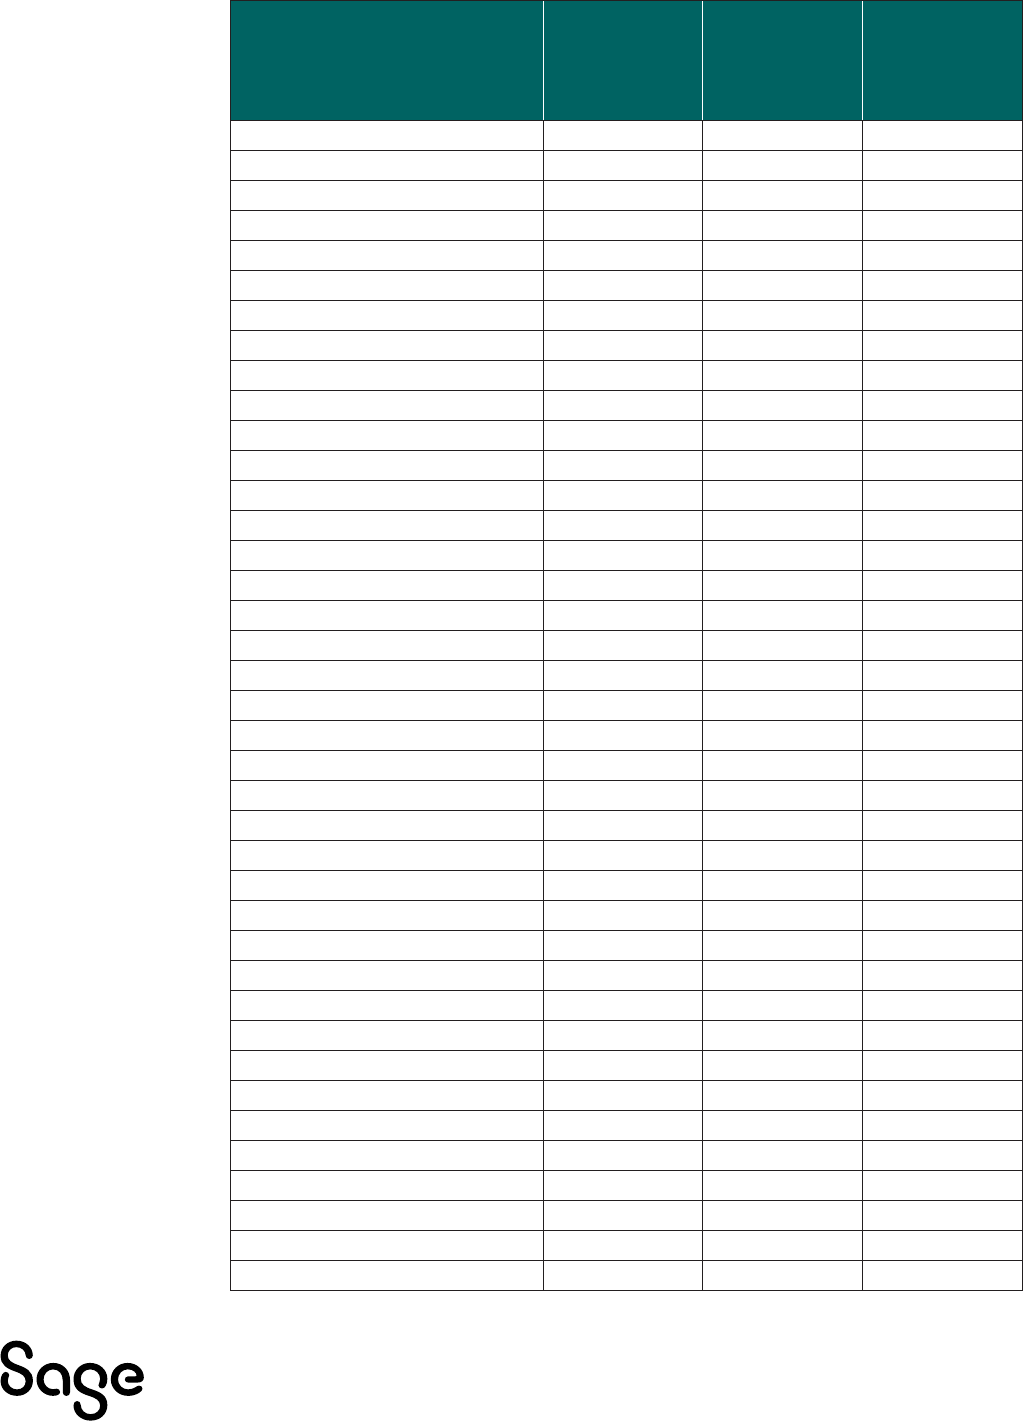
Sage Fixed Assets—Depreciation for U.S. Companies
The table below indicates which reports are fully customizable, which reports allow changes to
the headers and footers only, and which reports are not customizable.

27
Sage Fixed Assets – Reporting User Guide
Report Name
Customization Level
Full
Headers/
Footers
None
Adjusted Current Earnings
X
Alternative Minimum Tax
X
Annual Activity X
Annual Projection
X
Asset Basis X
Depreciation Adjustment X
Depreciation Expense X
Depreciation on RV
X
Depreciation Summary X
Disposal X
FASB 109 Projection
X
File Listing X
Fixed Asset Summary X
Form 3468
X
Form 4255
X
Form 4562*
X
Form 4626
X
Form 4797*
X
General Ledger Posting
X
Interest on RV
X
Midquarter Applicability*
X
Monthly Projection
X
Net Book Value X
Partial Disposal
X
Partial Transfer
X
Period Close Summary X
Property Tax - Detail X
Property Tax - Summary
X
Quarterly Acquisition
X
Quick Projection
X
Replacement Value X
Section 199A Report*
X
Tax Expense X
Transfer
X
*The name for this report can be customized.

28
Sage Fixed Assets – Reporting User Guide
Sage Fixed Assets—Depreciation for Canadian, Government, or
Nonprofit Organizations
The table below indicates which reports are fully customizable, which reports allow
changes to the headers and footers only, and which reports are not customizable.
Report Name
Customization Level
Full
Headers/
Footers
None
Allocation Percentages
X
Annual Activity
X
Annual Projection
X
Capital Assets Note Disclosure
X
Change in Capital Assets
X
Depreciation Adjustment X
Depreciation Expense X
Disposal X
File Listing X
General Ledger Posting
X
Monthly Projection
X
Net Book Value X
Partial Disposal
X
Partial Transfer
X
Period Close Summary X
Quarterly Acquisition
X
Quick Projection
X
Replacement Value X
Transfer
X

29
Sage Fixed Assets – Reporting User Guide
Chapter 3
Tips for Using Crystal Reports
In this chapter, we provide some ideas for using Crystal Reports to create informative reports.
Creating a Report from Scratch in Crystal Reports
Follow the steps below to create a report in Crystal Reports.
To create a new report
1. In Sage Fixed Assets, open the company or organization that you want to report on.
2. Select Reports/Reporting/Create New Report from the menu bar. The Create New
Report dialog appears.
3. Enter the name of the report in the Report Title field. For more information, see
“Completing the Create New Report Dialog,” page 31.
4. Click the Browse button to select the folder in which you want to save the report.
The Save New Report As dialog appears.

30
Sage Fixed Assets – Reporting User Guide
5. In the File Name field, enter the name of the report file.
Note: You do not need to type the RPT extension when you enter the file name. The system
automatically adds the RPT extension to the file name.
6. Click the Save button to return to the Create New Report dialog.
31
Sage Fixed Assets – Reporting User Guide
7. Click the Create Report button. The Crystal Reports program opens in Preview mode.
The new report contains the following information by default:
• The name of the company or organization
• The title of the report
• The date and time the report was created
• Columns for System Number and Extension (for a Sage Fixed Assets—
Depreciation report) or a column for System Number (for a Sage Fixed Assets—
Tracking report), or columns for Line Item ID and Line Item Description (for a
Sage Fixed Assets—Planning report).
Completing the Create New Report Dialog
Follow the guidelines below to complete the Create New Report dialog.
Report Title
Use this field to enter the name of the report as you want it to appear at the top of the first
page.
Location
This field displays the folder in which the report file is saved. You can specify the
folder by clicking the Browse button.
Browse Button
Click this button to select the folder in which you want to save the report file.
32
Sage Fixed Assets – Reporting User Guide
File Name
Enter the file name for the report. (If you entered the file name when you specified the
folder, then this field displays the name that you entered.)
Tip: You do not need to type the RPT extension when you enter the file name. The system
automatically adds the RPT extension to the file name.
Create Report Button
Click this button to launch the Crystal Reports program and begin creating the report.
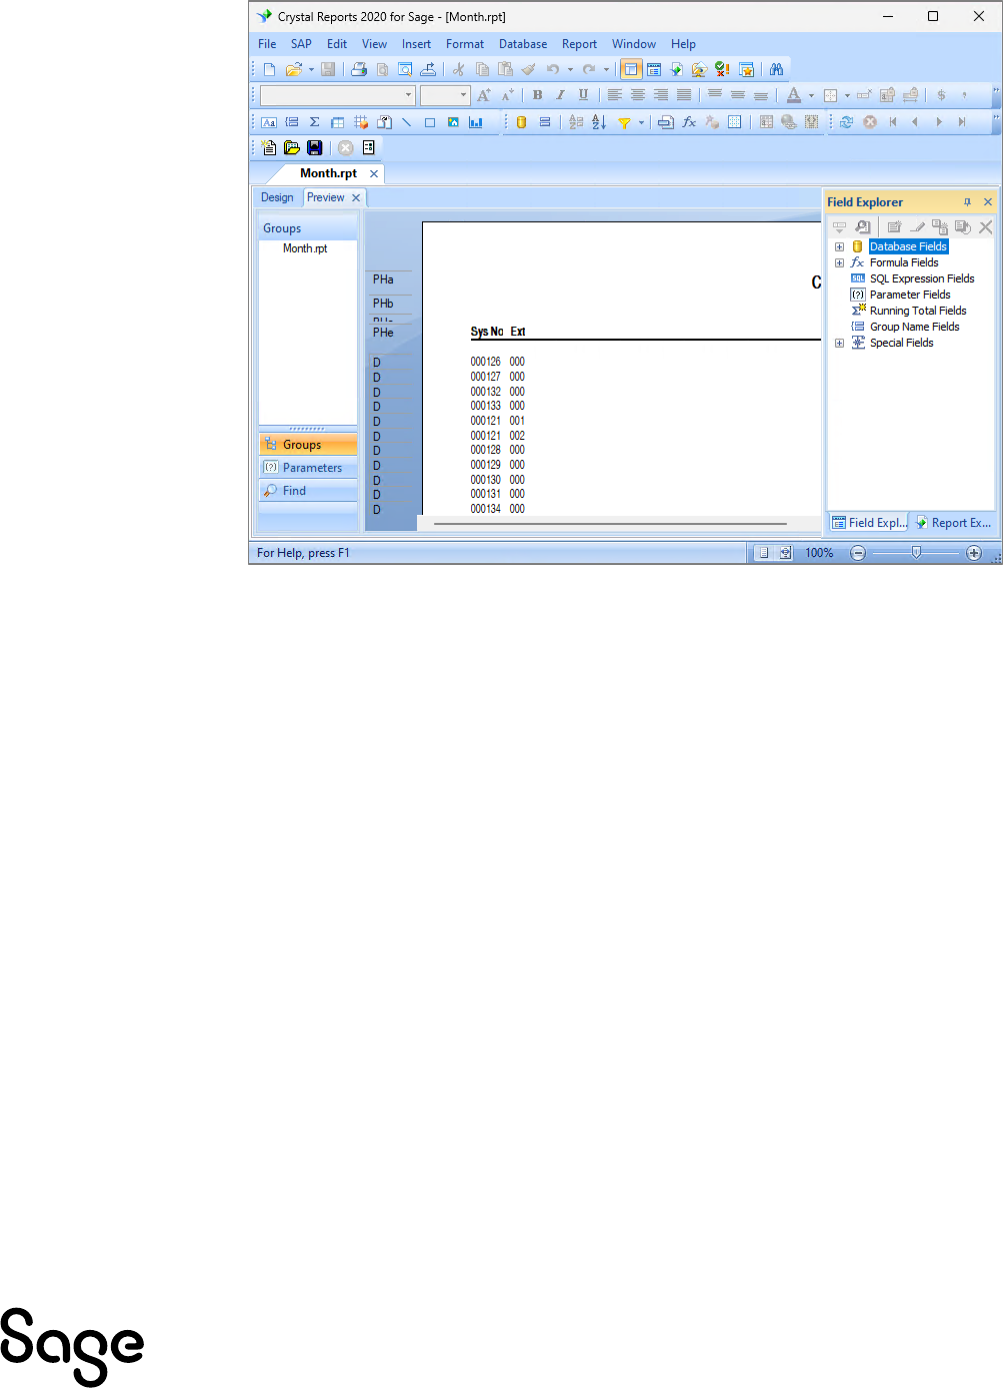
Adding Sage Fixed Assets Fields to the Report
Follow the steps below to add Sage Fixed Assets fields as columns on the report.
To add Sage Fixed Assets fields as columns on the report
1. If the Field Explorer does not appear, do one of the following:
• Select View/Field Explorer from the menu bar.
• Click the Field Explorer icon.
The Field Explorer tab appears on the right side of the main application window.
2. Click the Plus Sign (+) next to Database Fields to expand it. The Database Fields
subcategories appear. The subcategories change depending on the entity type you
are using.
3. Click the Plus Sign (+) next to the Depreciation Asset Information subcategory to
expand it. The fields in the subcategory appear.
33
Sage Fixed Assets – Reporting User Guide
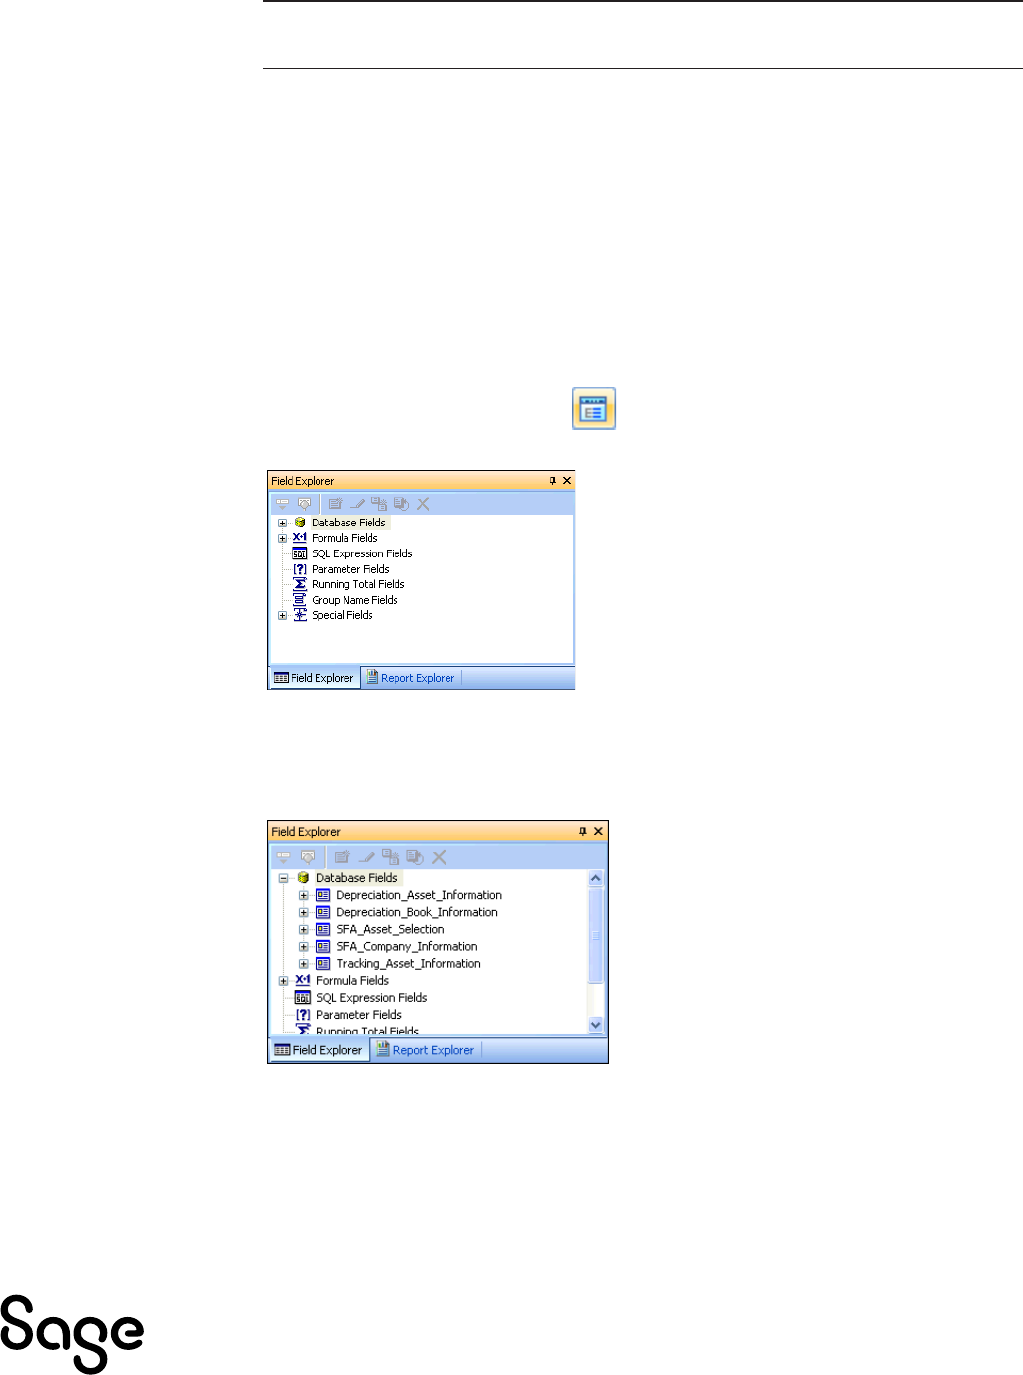
4. Select the field that you want to add as a column on the report, and drag the field
onto the report Design or Preview tab.
5. When the field is in the correct position, release the left mouse button to place the
field on the report.

34
Sage Fixed Assets – Reporting User Guide
For a complete list of views and field names available from Sage Fixed Assets applications,
see Appendix A, “Crystal Reports for Sage Field Names.”
Sorting Fields on a Report
Sorting means placing data in some kind of order so you can find it and evaluate it. For
example, you might want assets to appear on a report sorted by System Number, in
ascending order.
Crystal Reports contains a Record Sort Expert that enables you to sort the records on a report.
To sort fields on a report
1. Do one of the following:
• Select Report/Record Sort Expert
• Click the Record Sort Expert icon. The Record Sort Expert dialog appears.

35
Sage Fixed Assets – Reporting User Guide
For more information on sorting records, see “Sorting Data” in the SAP Crystal
Reports User Guide.
Creating Groups
Grouped data is data that is sorted and broken up into meaningful groups. For example,
you might want the assets on your report to be grouped according to their location.
Crystal Reports contains a Group Selection Formula Editor to help you group the records on
your report.
To create groups
1. Select Report/Selection Formulas/Group from the menu bar. The Group Selection
Formula Editor dialog appears.
For more information on creating groups, see “Grouping Data” in the SAP Crystal Reports
User Guide.
Connecting to the Sage Fixed Assets Database
You can connect to the Sage Fixed Assets database without using the template provided
by your Sage Fixed Assets application. When you connect to a Sage Fixed Assets database
without using the provided template, you lose sorting and group selection logic that
makes your reports more meaningful. In addition, the template provides database views
with links between database views. The database views translate your data into user-
friendly terms, making the data much more manageable for reporting purposes.
If you are an advanced Crystal Reports or database user, the following steps will help you
connect to the Sage Fixed Assets database.
To connect to the Sage Fixed Assets database
1. Do one of the following:
• Select File/New/Standard Report from the menu bar.
• On the Crystal Reports start page, select Standard Report Wizard.
The first Standard Report Creation Wizard dialog appears.

36
Sage Fixed Assets – Reporting User Guide
2. Expand (double-click) the Create New Connection folder, and then expand the ODBC
(RDO) folder.
3. Double-click Make New Connection. The ODBC (RDO) - Data Source Selection
dialog appears.
4. Select WINFASRW in the Data Source Name list box.
5. Click the Next button. The ODBC (RDO) - Connection Information dialog appears.

37
Sage Fixed Assets – Reporting User Guide
6. Enter guest in the User ID field and leave the Password field blank.
7. Click the Finish button. The application returns to the Standard Report Creation Wizard
dialog.
8. Complete the remaining wizard dialogs.

38
Sage Fixed Assets – Reporting User Guide
Opening an Existing Report
After you have worked on a report and saved it in Crystal Reports, you may want to work on
it later. Follow the instructions below to open an existing report from the Sage Fixed
Assets application.
To open an existing report from the Sage Fixed Assets application
1. In the Sage Fixed Assets application, select Reports/Reporting/Open Existing Report
from the menu bar. The Open Existing Report dialog appears.
2. Select the report that you want to open, and then click the Open button.
If the report you are opening contains saved data or was created from another company,
a message asks how you want to open the report. The report opens in Preview mode in
Crystal Reports.
Note: You can also launch Crystal Reports from the Start menu and open an existing Sage
Fixed Assets report. The report is automatically linked to the Sage Fixed Assets database.

39
Sage Fixed Assets – Reporting User Guide
Saving a Report with Data
Reports with saved data are useful for saving a snapshot of the depreciation numbers
exactly as they were first generated without having to recalculate depreciation. When you
navigate through reports with saved data, and drill down for details on columns or charts,
you don’t access the database server directly; instead, you access the saved data.
For example, you may have performed a period close for a certain date, and you want to save
the period close information for that date for future reference. That way, you can avoid
having to reset depreciation for an earlier date and running the report again.
After you run the report with the period close information, you can specify that you want to
save the report with data. To save a report with data, first make sure the Save Data with
Report option is selected on the File menu; then, save your report.
For more information, see “Saved Data” in the SAP Crystal Reports User Guide.
Comparing Two or More Sage Fixed Assets Depreciation Books in a Report
When you run a standard report in your Sage Fixed Assets application, the report displays
data for a single Sage Fixed Assets depreciation book. You can use Crystal Reports to
create a single report that compares data in two (or more) different books.
For example, suppose you want to calculate your book to tax adjustments for your tax return.
You could add the following fields as columns on the report:
• Current Year-to-Date Depreciation field for the Tax book
• Current Year-to-Date Depreciation field for the Internal book
• A formula field that calculates the difference between them.
For information on adding fields as columns on a report, see “Inserting a Field” in the SAP
Crystal Reports User Guide.
Filtering the Data on a Report
The Select Expert makes it easy to specify the records you want included in your report.
When you work with the Select Expert, you select the field to which you want to apply
selection conditions and then you specify those conditions.
For example, you can create a report that shows:
• Only those assets placed in service between January 1, 2022 and December 31, 2022.
• Only those assets with an acquired value greater than $10,000.
For more information on filtering data on reports, see “Selecting Records” in the SAP
Crystal Reports User Guide.

40
Sage Fixed Assets – Reporting User Guide
Filtering a Report with a Parameter Field
Parameter fields allow you to filter the data on a report at the time you view the report. For
example, you can insert a parameter field that filters the report by location. When you
open the report, a message appears asking which location you want to run the report for.
In this way, a single report can contain different data every time you run it, depending on
which location you ask for.
For more information on adding parameter fields and prompts, see “Parameter Fields and
Prompts” in the SAP Crystal Reports User Guide.
Adding a Formula Field
In many cases, the data needed for a report already exists in Sage Fixed Assets fields. For
example, if you want the report to show the location of an asset, you simply add the
Location field to the report.
Sometimes, however, you want to put data on the report that does not exist in any of the
Sage Fixed Assets fields. In such cases, you need to create a formula field. For example,
you may need to calculate a specific dollar amount for a step-up in basis for each asset.
You could create a formula field that allocates the step-up amount based on the relative
net book value of each active asset.
For information on creating formula fields, see “Using Formulas” in the SAP Crystal Reports
User Guide.
Combining Parameter Fields and Formula Fields
Combining parameter fields and formula fields allows you to create sophisticated
reports. For example, suppose you would like to send a report to your company
headquarters in Canada. You want the report to display data in both U.S. dollars and
Canadian dollars.
To do this, you need to create both a parameter field and a formula field in Crystal
Reports.
For example, suppose you want to show the Acquisition Value field in both U.S. dollars
and Canadian dollars. You would set up a parameter field that prompts you to enter the
exchange rate when you open the report.

41
Sage Fixed Assets – Reporting User Guide
You would also need to include a formula field on the report. The formula for this field
would multiply the Acquisition Value amount by the exchange rate that you entered.
For more information on adding parameter fields and prompts, see “Parameter Fields and
Prompts” in the SAP Crystal Reports User Guide. For information on creating formula
fields, see “Using Formulas” in the SAP Crystal Reports User Guide. For information on
displaying the currency symbol, see “Using Conventional Accounting Formats” in the SAP
Crystal Reports User Guide.
Adding a Chart or Graph to a Report
Sometimes a chart or graph can provide information quickly and more effectively than
columns of numbers. Creating visually appealing charts and graphs from Sage Fixed
Assets data is easy in Crystal Reports.

42
Sage Fixed Assets – Reporting User Guide
For more information on adding charts to your report, see “Charting” in the SAP Crystal
Reports User Guide.
Using Select Expert
The Select Expert in Crystal Reports is another feature that allows you to create some
sophisticated reports.
Note: The companies must be in the same Sage Fixed Assets database.

43
Sage Fixed Assets – Reporting User Guide
For example, you can combine data from multiple Sage Fixed Assets companies. The report
below shows data from three Sage Fixed Assets companies.
For information on using the Select Expert, see “Using the Select Expert” in the SAP Crystal
Reports User Guide.

44
Sage Fixed Assets – Reporting User Guide
Using Formula Fields and Advanced Formatting
Combining formula fields and advanced formatting techniques allows you to create
sophisticated, visually appealing reports.
For information on formatting your reports, see “Formatting” in the SAP Crystal Reports
User Guide.
45
Sage Fixed Assets – Reporting User Guide
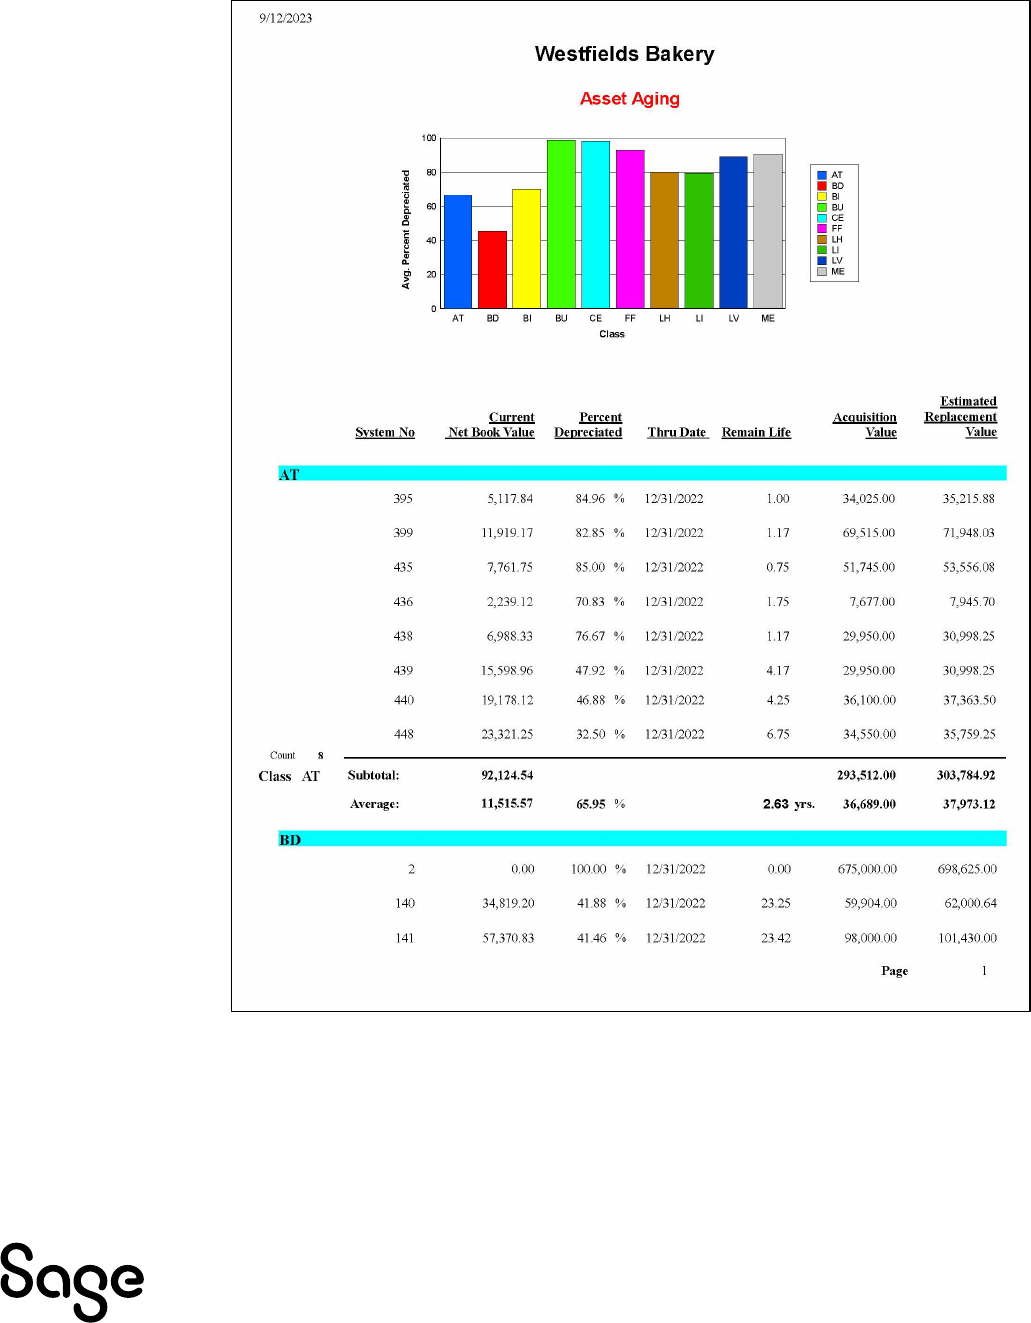
Using Multi-line Subtotals and Advanced Formatting
The report below shows an example of a multi-line subtotal, a formula field, bold text, and a
chart.
For information on adding totals to a report, see “Running Totals” in the SAP Crystal Reports
User Guide.

46
Sage Fixed Assets – Reporting User Guide
Exporting a Standard Report to Crystal Reports
There may be times when you want to add a chart or special formatting to a Sage Fixed
Assets standard report or to a Sage Fixed Assets standard report that you have
customized. After you run a report in Sage Fixed Assets, you can export the report to the
Crystal Reports program. Then all of the powerful features in Crystal Reports are
available to make the report fit your precise needs.
To export a standard report to Crystal Reports
1. In Sage Fixed Assets, run the standard report or the customized standard report.
The report appears in the report viewer.
2. In the report viewer, click the Export Report button. The Export Report dialog appears.
3. In the File Name field, enter the name of the report you want to save.
4. The Save as Type field should default to Crystal Reports (*.rpt), if it does not, select
Crystal Reports (*.rpt) from the drop-down list box.
5. Click the Save button. The Export Completed dialog appears indicating the file
was saved successfully.

47
Sage Fixed Assets – Reporting User Guide
6. Click OK to return to the report viewer.
Note: In order to modify, save, and preview reports, you must enter the guest Login ID with
blank password on the Login tab of the Connect to SQL Anywhere dialog.
Note: You can also use the Export Report feature to export data to a number of popular
formats, such as Microsoft Excel and PDF. This makes the distribution of information
easier.

48
Sage Fixed Assets – Reporting User Guide
Appendix A: Crystal Reports for Sage Field Names
List of Field Names in Sage Fixed Assets Applications
The tables below show all of the views and fields that are available when creating a report
from Sage Fixed Assets applications. For information how to access Sage Fixed Assets
fields in Crystal Reports, see “Adding Sage Fixed Assets Fields to the Report,” page 32.
Field Names in Sage Fixed Assets—Depreciation and Sage Fixed Assets—Tracking
The following views are available from Sage Fixed Assets—Depreciation and Sage Fixed
Assets— Tracking.
Database Fields
Allocated_Fields
This view contains the allocated general ledger fields and their corresponding
allocation percentages. Use this view only if you allocate depreciation across
multiple GL accounts; otherwise use the GL fields in the SFA Asset Information view.
SFA_Asset_Selection
This view contains flag fields to help determine which Sage Fixed Assets
application (Depreciation or Tracking) the asset has been recorded in. If you use
only one Sage Fixed Assets application, either Sage Fixed Assets—Depreciation
or Sage Fixed Assets— Tracking, then you do not need to use these flag fields.
Depreciation_Asset_Information/SFA_Asset_Information
This view contains the general information and book information fields for the assets.
Tracking_Asset_Information
This view contains asset attributes that are used exclusively in Sage Fixed
Assets— Tracking, such as the exception code and reconciliation code.
Depreciation_Book_Information/SFA_Book_Information
This view contains depreciation book attributes, such as the fiscal year-end and
whether the book is open.
SFA_Company_Information/SFA_Organization_Information
This view contains the company name and flag fields to help determine which Sage
Fixed Assets application (Depreciation or Tracking) the company has been opened
in. For example, a company can be created in Sage Fixed Assets—Tracking but never
opened or used in Sage Fixed Assets—Depreciation and vice versa. If you use only
one Sage Fixed Assets application, either Depreciation or Tracking, then you do not
need to use these flag fields.
Formula Fields
The template contains many predefined formula fields that calculate the fiscal year
end of certain key transaction dates. For example, the fiscal year end of the placed-
in-service date is available in the formula fields and can be particularly useful when
you need to group or sort by fiscal year. You might want to do this when preparing
property tax reports.
Special Fields

49
Sage Fixed Assets – Reporting User Guide
This view contains report attributes, such as the file creation date, page number, and
total page count.
Note: The table below lists the field names in the latest version of the applications. Your
field names might differ slightly if you have upgraded from a previous version of the
application.
Field Name
U.S.
Company
Government
or Nonprofit
Organization
Canadian
Organization
Allocated_Fields
Alloc GL Accum Acct
x x
Alloc GL Accum Pct
x x
Alloc GL Asset Acct
x x
Alloc GL Asset Pct
x x
Alloc GL Expense Acct
x x
Alloc GL Expense Pct
x x
Depreciation_Asset_Information/
SFA_Asset_Information
168 Allowance (all books) x
168 Allowance % (all books) x
Acquisition Date x x x
Acquisition Value (all books) x x x
Activity Code x x
Activity Type
x x
Adjustment Amount (all books) x x x
ADS Life x
Asset Note x x x
Beginning Accum (all books) x x x
Begin Prior Accum Depr (all books) x x x
Beginning Date (all books) x x x
Beginning YTD (all books) x x x
Cash Proceeds x x x
Child Company/Org Name (1) x x x
Child 1 Database x x x
50
Sage Fixed Assets – Reporting User Guide
Field Name
U.S.
Company
Government
or Nonprofit
Organization
Canadian
Organization
Child 1 Extension x x x
Child System Number (1) x x x
Child Company/Org Name (2) x x x
Child 2 Database x x x
Child 2 Extension x x x
Child System Number (2) x x x
Child Company/Org Name (3) x x x
Child 3 Database x x x
Child 3 Extension x x x
Child System Number (3) x x x
Class x x x
Asset ID x x x
Creation Code x x x
Current Accum (all books) x x x
Current Business Use % (all books) x
Current Depreciable Basis (all books) x x x
Current Key Codes (all books) x x x
Current Net Book Value (all books) x x x
Current Prev Thru Date (all books) x x x
Current Remain ACE Basis x
Current Remain ACE Life x
Current Remain Life (all books) x x x
Current Through Date (all books) x x x
Current YTD (all books) x x x
Owner x x x
Date Of Transfer In x x x
Date Of Transfer Out x x x
Deferred Code (all books) x x x
Deferred Date (all books) x x x
Department x x x
Depreciation Method (all books) x x x
Depr This Run (all books) x x x
Description x x x
Disposal Date x x x
Disposal Description x x x
Disposal Method x x x
Effective Date Of Transfer In x x x
Effective Date Of Transfer Out x x x
Entity Code x

51
Sage Fixed Assets – Reporting User Guide
Field Name
U.S.
Company
Government
or Nonprofit
Organization
Canadian
Organization
Estimated Life (YYMM) (all books) x x x
Acquired By x
Expenses of Sale x x x
Extension x x x
Tracking Last Extension x x x
First Yr Business Use % (all books) x
FYE of PIS Date (all books) x x x
G/L Accum Account x x x
G/L Asset Account x x x
G/L Expense Account x x x
Gain/Loss (all books) x x x
Include on Depr Report? (all books) x x x
Fund
x x
Insurance Category x
ITC Amount x
ITC Basis Reduction x
ITC Option x
ITC Recapture (all books) x
ITC % x
Last Calc Date (all books) x x x
Location x x x
Serial Number x x x
Non Cash Proceeds x x x
Parent Org ID
x x
Parent Company/Org Name x x x
Parent Database x x x
Parent Extension x x x
Parent System Number x x x
Transferred In % x x x
Transferred Out % x x x
Period Close Accum (all books) x x x
Period Prior Accum Depr (all books) x x x
Period Close Date (all books) x x x
Period Close YTD (all books) x x x
Placed in Service Date (all books) x x x
Prior Accum Depr (all books) x x x
Property Type x x x
Purchase Order x x x
Remaining Life Switch (all books) x x x

52
Sage Fixed Assets – Reporting User Guide
Field Name
U.S.
Company
Government
or Nonprofit
Organization
Canadian
Organization
Replacement Value x x x
Override RV x x x
RV Override Date x x x
Salvage Value (all books) x x x
179 Other Amount (all books) x
179 Other Code (all books) x
Current 179 Recapture (all books) x
179 Qualified? (Y/N) (all books) x
179 Deduction (all books) x
System Number x x x
Transfer As Disposal (Y/N) x x x
Transfer By Key x x x
Transfer From (Child) x x x
Transfer From (Parent) x x x
Transfer To (Child) x x x
Transfer To (Parent) x x x
Custom Field 1 x x x
Custom Field 2 x x x
Custom Field 3 x x x
Custom Field 4 x x x
Custom Field 5 x x x
Custom Field 6 x x x
Custom Field 7 x x x
Custom Field 8 x x x
Custom Field 9 x x x
Custom Field 10 x x x
Quantity x x x
Vendor x x x
Custom Date 1 x x x
Custom Date 2 x x x
Zone Type (all books) x
Depreciation_Book_Information/
SFA_Book_Information
Book Name (all books) x x x
Is Open? (all books) x x x
Fiscal Year End (all books) x x x
Current Reporting Period (all books) x x x

53
Sage Fixed Assets – Reporting User Guide
Field Name
U.S.
Company
Government
or Nonprofit
Organization
Canadian
Organization
SFA_Asset_Selection
Depreciation
x
x
x
Tracking
x
x
x
Current Sequence
x
x
x
Last Sequence
x
x
x
SFA_Company_Information/
SFA_Organization_Information
Business Start Date
x x x
Company/Org Name
x x x
Company/Org Number
x x x
Depreciation Company/Organization
x x x
Tracking Company/Organization
x x x
Tracking Tag Field
x x x
Contact
x x x
Address
x x x
Country
x x x
State
x x x
City
x x x
Zip
x x x
Phone
x x x
Fax
x x x
Note
x x x
Tracking_Asset_Information
Tracking Field 1
x x x
Tracking Field 2
x x x
Tracking Field 3
x x x
Tracking Field 4
x x x
Tracking Field 5
x x x
Tracking Field 6
x x x
Tracking Field 7
x x x
Tracking Field 8
x x x
Tracking Field 9
x x x
Tracking Field 10
x x x
Tracking Field 11
x x x
Tracking Field 12
x x x
Condition
x x x
Room
x x x
Floor
x x x

54
Sage Fixed Assets – Reporting User Guide
Field Name
U.S.
Company
Government
or Nonprofit
Organization
Canadian
Organization
Exception Status x x x
Reconciliation Status x x x
Expected Return Date x x x
Return Date x x x
Checked Out By x x x
Check-Out Date x x x
Formula Fields
Center x x x
Company/Org Name x x x
Database File Name x x x
Database Name x x x
Extension x x x
FYEnd Acquisition Date (all books) x x x
FYEnd Custom Date 1 (all books) x x x
FYEnd Date Of Transfer In (all books) x x x
FYEnd Date Of Transfer Out (all books)
x x x
FYEnd Deferred Date (all books) x x x
FYEnd Disposal Date (all books) x x x
FYEnd Period Close Date (all books) x x x
FYEnd PIS Date (all books) x x x
FYEnd Through Date (all books) x x x
Report Title x x x
System Number x x x
Vertical Spacer 10 x x x
Vertical Spacer 15 x x x
Special Fields
Content Locale x x x
Current CE User ID x x x
Current CE User Name x x x
Current CE User Time Zone x x x
Data Date x x x
Data Time x x x
Data Time Zone x x x
File Author x x x
File Creation Date x x x
File Path and Name x x x
Group Number x x x
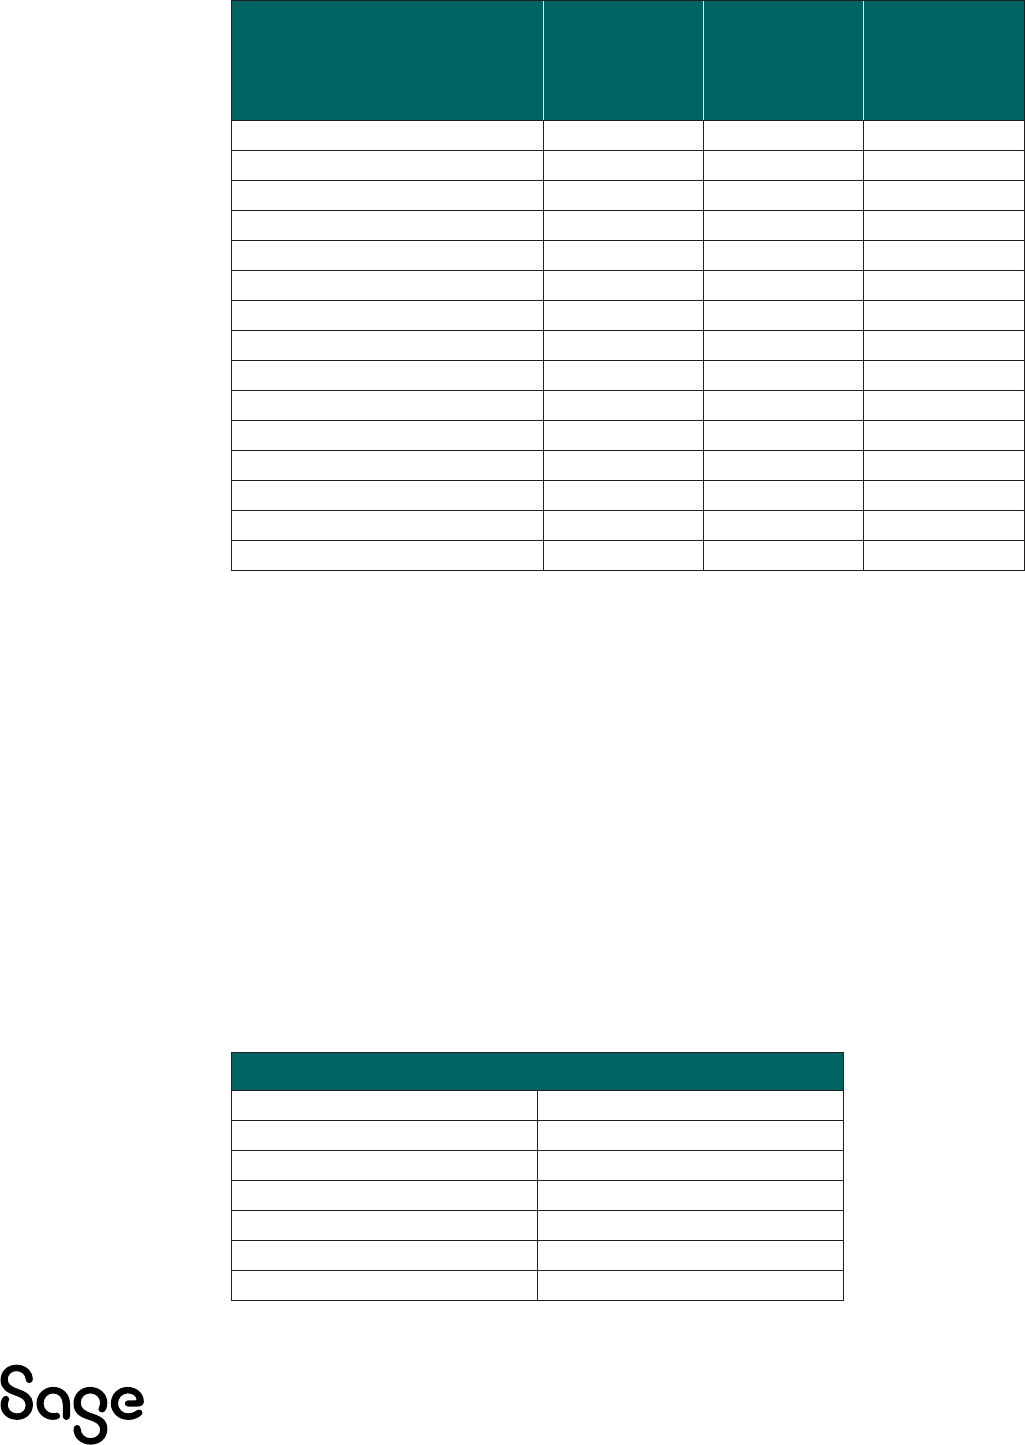
55
Sage Fixed Assets – Reporting User Guide
Field Name
U.S.
Company
Government
or Nonprofit
Organization
Canadian
Organization
Group Selection Formula x x x
Horizontal Page Number x x x
Modification Date x x x
Modification Time x x x
Page N of M x x x
Page Number x x x
Print Date x x x
Print Time x x x
Print Time Zone x x x
Record Number x x x
Record Selection Formula x x x
Report Comments x x x
Report Title x x x
Selection Locale x x x
Total Page Count x x x
Field Names in Sage Fixed Assets—Planning
The following views are available from Sage Fixed Assets—Planning.
Line_Item
This view contains the all the information associated with a line item that exists on both
the Line Item Information and Asset Information tabs in Detail View. This includes
information related to the GL CIP Acct No. and the statistics for the number of
transactions associated with the selected line item.
Projects
This view contains the information related to an individual project such as the project
status and budget amounts.
Transaction
This view contains the attributes related to each transaction within a line item, including
the transaction date, transaction amount and twenty-one user defined fields.
Field Name Sage Fixed Assets—Planning
Line_Item
Asset Description Revised vs. Actual
Asset Template Spending Complete
Date Complete User Field 1
Date Sent User Field 2
Description User Field 3
GL CIP Acct No User Field 4

56
Sage Fixed Assets – Reporting User Guide
Field Name Sage Fixed Assets—Planning
In Service Date User Field 5
Last Transaction Date User Field 6
Line Item Actual User Field 7
Line Item End Date User Field 8
Line Item ID User Field 9
Line Item Original Budget User Field 10
Line Item Revised Budget User Field 11
Line Item Start Date User Field 12
Line Item Status User Field 13
Line Item Type User Field 14
# of Assets User Numeric 1
# of Transactions User Numeric 2
Original Last Updated User Numeric 3
Original % Complete User Numeric 4
Original vs. Actual User Numeric 5
Revised Last Updated User Numeric 6
Revised % Complete User Numeric 7
Projects
Company Original Last Updated
Contact Name Percent Complete
Contact Location Project Code
Contact Phone Project Description
Contact Ext Project Name
Contact Fax Project Notes
Contact Mobile Revised Budget
Contact EMail Revised Last Updated
Contact Address Start Date
Contact City Status
Contact State User Field 1
Contact Zip Code User Field 2
Contact Country User Field 3
End Date User Field 4
Original Budget User Field 5
Transaction
Amount User Field 6
Batch ID User Field 7
Created Date User Field 8
Date Posted User Field 9
Description User Field 10
Journal User Field 11

57
Sage Fixed Assets – Reporting User Guide
Field Name Sage Fixed Assets—Planning
Last Edited Date User Field 12
Reference User Field 13
Transaction Date User Field 14
Target Line Item ID User Numeric 1
Transaction ID User Numeric 2
Vendor User Numeric 3
User Field 1 User Numeric 4
User Field 2 User Numeric 5
User Field 3 User Numeric 6
User Field 4 User Numeric 7
User Field 5

58
Sage Fixed Assets – Reporting User Guide
Index
A
adding Sage Fixed Assets Fields to Report .................................... 32
C
charts, adding to report ............................................................... 41
combining parameter and formula fields ...................................... 40
comparing Sage Fixed Assets depreciation books ......................... 39
creating a report in Crystal Reports .............................................. 29
Crystal Reports
creating report in .................................................................... 29
exporting from Sage Fixed Assets ........................................... 46
opening existing reports in Sage Fixed Assets ......................... 38
customized reports
column headers, changing ...................................................... 17
column order, changing .......................................................... 18
column spacing, changing ....................................................... 20
column width, changing .......................................................... 19
columns, adding and removing ............................................... 16
deleting ................................................................................... 25
headers and footers, changing ................................................ 21
margins, changing ................................................................... 21
overview ................................................................................... 9
running .................................................................................... 23
which reports can be customized ........................................... 26
D
deleting customized reports ........................................................ 25
E
exporting reports to Crystal Reports ............................................ 46
F
filtering data ................................................................................. 39
formatting reports ........................................................................ 44
formula fields ............................................................................... 40
G
graphs, adding to report .............................................................. 41
groups, creating ........................................................................... 35
M
multi-line subtotals ...................................................................... 45
O
options for creating reports ........................................................... 6
P
parameter fields ........................................................................... 40
planning the report ........................................................................ 6
R
reports
adding charts and graphs ........................................................ 41
adding Sage Fixed Assets fields ............................................... 32
combining parameter and formula fields ............................... 40
comparing Sage Fixed Assets depreciation books .................. 39
connecting to Sage Fixed Assets database .............................. 35
creating groups ....................................................................... 35
creating in Crystal Reports ...................................................... 29
exporting to Crystal Reports ................................................... 46
filtering data ........................................................................... 39
filtering with parameter fields ................................................ 40
formatting ............................................................................... 44
formula fields .......................................................................... 40
multi-line subtotals ................................................................. 45
opening from Sage Fixed Assets ............................................. 38
options for creating .................................................................. 6
planning .................................................................................... 6
reporting on multiple Sage Fixed Assets companies ............... 42
running customized report ..................................................... 23
saving with data ...................................................................... 39
sorting fields ........................................................................... 34
which can be customized ........................................................ 26
S
Sage Fixed Assets database, connecting to ................................... 35
Sage Fixed Assets standard reporting features .............................. 4
Sage Fixed Assets—Reporting, overview ....................................... 4
saving report with data ................................................................ 39
Select Expert ................................................................................ 42
sorting fields ................................................................................. 34
