
1
Analysis: Data Management for
Maps
S U M M A R Y
This lesson is an introduction to creating maps in the Analysis module using Epi Map features.
The lesson focuses on the data management skills necessary to map data.
In this lesson, you will aggregate or group data using the SUMMARIZE and FREQUENCY
command. Data tables must be aggregated and contain a geographic value in order to be
mapped. At the end of this lesson, you will have a map that shows the count of missed days
from your survey mapped by zip code. From this, you can see which zip codes have the highest
number of absences based on answers to the survey question.
Maps can be saved as images and used in reports to later illustrate the findings as part of the
asthma report. In this lesson, you will use a map to illustrate the number of missed days of
school by the zip codes of the survey population.
Length of time to complete: 1 hour Beginner
Getting Started with Epi Map
Introduction to Epi Map including a diagrammed explanation of how data must match or be
aggregated to match shape files to produce maps.
Use the Map Command
Use the SUMMARIZE command to aggregate data and create a choropleth map using the data
to show the sum of missed days of school per zip code in the region.
Aggregate Data for Mapping
Use the FREQUENCY command to create a data table that contains the count of asthma cases
per zip code for the survey population. This data table will be used in Lesson 9 Epi Map.
Skills Review
Hands-on task to practice creating an aggregate data table that contains the count of bronchitis
cases per zip code for the survey population. This data table will be used in Lesson 9 Epi Map.
B E F O R E Y O U B E G I N
Complete Lesson 4 Analysis: Basics
Lesson 8

Complete Lesson 5 Analysis: Creating Statistics
Complete Lesson 7 Analysis: Exporting Files
Download the map files to the EIHA Tutorial folder.
W H A T Y O U N E E D
Asthma Survey 2005.MDB.
ALBZCTA_region.SHP
ALBZCTA_region.PRJ
ALBZCTA_region.DBF
ALBZCTA_region.SHX
F I V E G O A L S
Be familiar with the types of data that can be mapped in Epi Map and the types of map
files needed.
Use the SUMMARIZE command to create a sum of the variable MissDays that can be
plotted on a map.
Use the MAP command and make geographic selections leading to a choropleth map of
the MissDays data table.
Use the FREQUENCY command to create an output table containing the count of asthma
cases by zip code.
Use the FREQUENCY command to create an output table containing the count of
bronchitis cases by zip code.
Getting Started with Epi Map
Epi Map, the mapping component of Epi Info, is built around MapObjects software from
ESRI, the makers of ArcView and ArcInfo, popular Geographic Information System (GIS)
tools. Epi Map displays shapefiles from these two systems, and uses the enormous reservoir of
map boundaries and geographic data available on the Internet in ESRI-compatible formats.
Epi Map is designed to show data from Epi Info files by relating data fields to shapefiles
containing the geographic boundaries. Shapefiles can also contain data on population or other
variables, and can therefore provide numeric data that becomes part of the display as either a
numerator or a denominator. Numeric data can be displayed either as color/pattern

L E S S O N 8
3
(choropleth) maps or as dot density maps with the dots randomly distributed within geographic
regions.
Point locations can be plotted automatically from data files containing X and Y coordinates in
various symbols, colors, and sizes. Shapefiles can contain lines or points to represent streets or
point locations, and points can be placed on top of the shapefile layer to represent homes in
which cases occurred or other geographic points of interest.
Choropleth and Case-Based maps can be created through Analysis; however, there are more
map options available when working through the Epi Map program on its own.
For information on how to download shape files refer to Appendix G: Preparing to Use Epi
Info™.
Commands in this Lesson
SUMMARIZE
The Summarize command creates a new table containing descriptive statistics for the current
dataset or its strata. Analysis creates a new table or appends to an existing table containing
variables that represent aggregates or groups of variables in the current data source. Located in
the Statistics folder.
Aggregates are computed for each group of records, determined by the Stratified Variables,
which are also included in the table. Available aggregates are Count, Minimum, Maximum, Sum,
Average, Variance, and Standard Deviation.
MAP
The Map command produces a choropleth (color coded) map by summarizing data based on
a geographic field that matches the geographic field of a .SHP file. Through Epi Map, the map
can be customized by the user, and this customization can be saved into a MAP template.
Located in the Statistics folder.
SELECT
The Select command allows you to specify an expression that must be true for a record to be
processed. Located in the Select/If folder.
FREQUENCY
The Frequency command produces a table showing how many records have each value of
selected variables. Confidence limits for each proportion are included. Located in the Statistics
folder.

L E S S O N 8
5
Aggregate Data in Analysis
In this lesson, you are going to create a map of the sum of values in the MissDays variable.
Map data must be aggregated to a unique geographic field that corresponds to the map file. In
order to create a map that shows the sum of missed days per zip code, you must use the
SUMMARIZE command to aggregate your data. Then you can create a new table that will
contain the Count of MissDays grouped (aggregated) by Zip.
1. Read/Import the Asthma Survey 2005.MDB that contains your 800 records.
2. From the Command Tree Statistics folder, click Summarize. The Summarize dialog box
opens.
3. From the Aggregate drop-down menu, select Sum.
4. From the Variable drop-down, select MissDays.
5. In the Into Variable, type DaysSum.
6. Click Apply. The code appears in the open field as DaysSum::Sum(MissDays).
7. From the Group By drop-down, select Zip.
8. In the Output to Table field, type DaysTable.
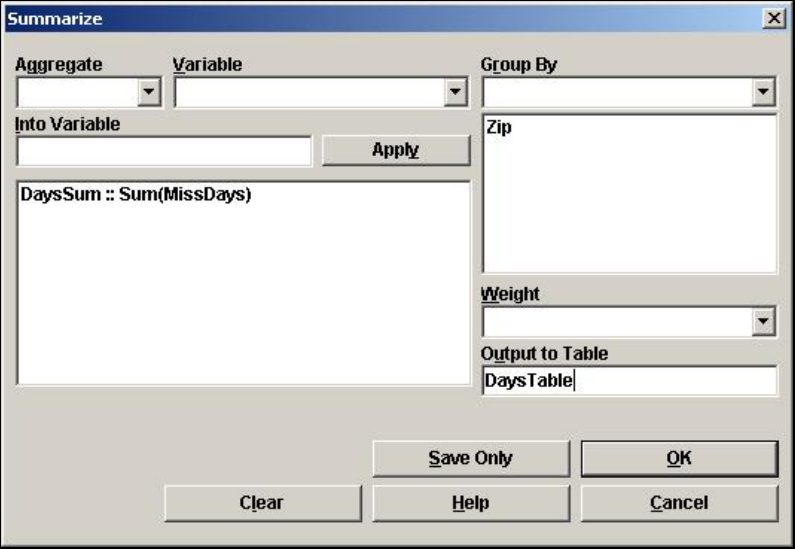
9. Click OK. The following message appears in the Output window.
Output table created: C:\Epi_Info\EIHA Tutorial\Asthma Survey
2005.mdb:DaysTable
10. Click Read/Import. The READ dialog box opens.
11. Click the Show All radio button. All the tables in your dataset appear in a list.
12. Locate and select the DaysTable.
13. Click OK. You should have 33 records in the Output window.
Click List if you want to see how your data has been aggregated with the number of
missed days summed per zip code.

L E S S O N 8
7
Create a Choropleth Map from Analysis
Now that the data has been aggregated, you can use it to create a choropleth map. Choropleth
maps are shaded with a range of colors indicating differing sums. A corresponding legend is
also created. To see sample code for all the maps in this chapter, open the Asthma Survey 2005
Sample.MDB and run the program MapCode.PGM.
1. From the Command Tree Statistics folder, click Map. The MAP dialog box opens.
2. Select the 1 Record per Geographic Entity checkbox. The Aggregate Function drop-down
defaults to Sum.
3. From the Geographic Variable drop-down, select Zip.
4. From the Data Variable drop-down, select DaysSum.
5. Click the Browse button next to the Shapefile field. The Look In Map dialog box opens.
6. Locate and select the file ALBZCTA._region.SHP. This is a map of Albany, New York by
zip code regions.
7. Click Open.
8. From the Geographic Variable drop-down, select Zip.

9. Click OK. The Incomplete Join window appears.
From the Incomplete Join window, you can see which zip codes are in your data table
and not in the map files, and which zip codes are in your map files and not in the data
table.
In this example, you have 7 zip codes that are part of the map files, but not in the survey
data, and 1 zip code that is in the survey data, but not part of the map. In order to get
the most accurate representation of the data, you would need to verify that the survey
data was correct and did not contain missing records or data entry errors and that you
had the best map to represent the surveyed area.

L E S S O N 8
9
10. Click Continue. Epi Map opens.
The map you created should appear like the following:
You have created a choropleth map. Choropleth is used to categorize features into
equal ranges or counts (quantiles).
Notice the legend at the bottom left of the window. Your map is color-coded, based
on the sum of days missed per zip code. This map shows you a graphic
representation of the number of missed days by zip code, and enables you to see if
there are areas of the county in close proximity to each other with large numbers of
missed days.
Click the close X to exit Epi Map.

L E S S O N 8
11
Aggregate Data for a Case Based Map
You can add case-based data to a choropleth map. Normally, case-based maps are used to show
different symbols based on levels of classification (e.g., Confirmed, Probable, Discarded,
Suspected).
In this example, you will aggregate asthma data to place numbers of cases on the map per zip
code. You will use Analysis to create the data table. The new data table will be used in Epi Map
Lesson 9.
1. Read/Import the Asthma Survey 2005 project with 800 records.
2. Use the SELECT command to select those who answer yes to asthma. You should have
91 records. (Hint: Asthma=Yes)
3. Create a FREQUENCY of Asthma stratified by Zip.
4. In the Output to Table field, type CountAsthma.
5. Click OK.
6. Read/Import in the file CountAsthma. Remember to select the All radio button to see the
all tables in your project. You should have 33 records.
7. List the records.
Notice that each zip code contains the total count of students who answered yes to
asthma for that zip code.

Skills Review
To create map containing the count of bronchitis cases per zip you need to create a new
Frequency table for Bronchitis. This table will be used in the Skills Review of Chapter 9.
Read/Import the file Asthma Survey 2005.
Select the students who answered Yes to Bronchitis.
Create a FREQUENCY of Bronchitis stratified by Zip.
Output to a table named CountBronchitis.
Read/Import CountBronchitis.
List the records to verify the data table contents.
Close Analysis.

R E F E R E N C E S
13
Lesson Complete!
W H A T Y O U L E A R N E D
How to
Use the SUMMARIZE command to aggregate data.
Use the MAP command to create a choropleth map.
Use the FREQUENCY command to aggregate data.
Create Output tables to use in mapping.
