
1
Getting Started
Shiplap Siding Installation
WRAP YOUR HOME
IN ECO-FRIENDLY BEAUTY


54
Storage and Handling
•
• Do not place Shiplap directly on a surface that can develop excessive heat
• Store in a cool, dry place
• We recommend storing with pallet covers to keep it clean and protected
• Shiplap are packaged interlocked. Pull boards across the row and not straight down the stack
(see image)
• Acclimate ACRE to the temperature it will be installed at for at least two hours before
processing. During installation, keep ACRE at a consistent temperature
Safety
• Wear safety glasses and appropriate personal protective equipment (PPE) for job site
conditions
• Follow proper safety practices for using all power tools and any job site equipment

76
Getting Started ACRE Siding
• Shiplap siding is a one sided product. Shiplap boards are to be installed as shown in the
diagram below
Circular Saw Tape Measure
Outdoor rated, Minimum
#8 x 2-1/4 in, 305 screw
or 6D/8D ring shank nails.
Exterior rated fasteners
Safety Glasses
Drill with appropriate
fastening bits
Ladder
TOOLS YOU WILL NEED
FRONT FACE
• Shiplap siding can be stained, painted, or left natural with appropriate clear coat or sealant.
Please visit the ACRE coatings guidelines for more information.
• Shiplap Siding Dimensions NOMINAL ACTUAL
1”x8”x20’
1”x8”x16’
1”x8”x12’
3/4”x7.25”x20’
3/4”x7.25”x16’
3/4”x7.25”x12’

98
FLASHING REQUIREMENTS
•
• Allow ½” clearance between the siding and the roof line
•
•
water getting through the cladding
Expansion and Contraction
• Shiplap siding undergoes a degree of linear expansion with changes in weather or seasons.
• Fasten Shiplap siding as soon after cutting as possible to minimize expansion and contraction.
• Whenever possible, use shorter lengths as splitter / divider boards in continuous runs of
boards.
• For best results, keep boards as cool as possible during attachment. if attaching during high
heat, larger gapping can be expected.
Installation Preparation
BEFORE GETTING STARTED
• Ensure boards are dry before installation
Based on the temperature at
time of installation, see chart.
Create a gap between boards
and follow fastening guidelines.
WALL REQUIREMENTS
• Shiplap siding must be installed over traditional wood framed walls with the studs spaced at
most 16in on center.
• The wall should be sheathed with OSB, minimum 7/16” thick or 1/2” thick plywood.
• Wherever possible, shiplap siding should be fastened directly to the studs.
• Prior to installation. Be sure that wall is structurally sound. Ensure that there are no nails or
screws protruding.
MOISTURE
• Always install a drainable weather-resistant barrier according to local building code
requirements
• Avoid installing product in standing water or areas that can stop water from draining away from
the building
Pro tip: Apply stains or clear coats on the ground before installation.
Coat ACRE with manufacturer recommended water-based paints, stains or sealers.
If you choose to paint ACRE, use a coating with a Light Reective Value (LRV) above 55%.
Pay close attention to our approved coatings for darker colors.
that have passed paint-manufacturer testing standards and for
technical assistance.
PAINTING, STAINING OR FINISHING ACRE PRODUCTS

1110
Installation
FASTENING
To have fasteners last as long as Shiplap siding, use a high-quality fastener that meets the following
• Using screws for fastening is highly recommended.
• Stainless Steel recommended; alternatively use exterior rated galvanized fasteners
•
•
• 6D or 8D Stainless steel pneumatic ring shank nails may be used as well.
•
• If fasteners are unable to penetrate framing, fasten into OSB no more than 12” apart along
the length of the board
• For a more secure fastening schedule and to mitigate movement, fasten every 12”
•

1312
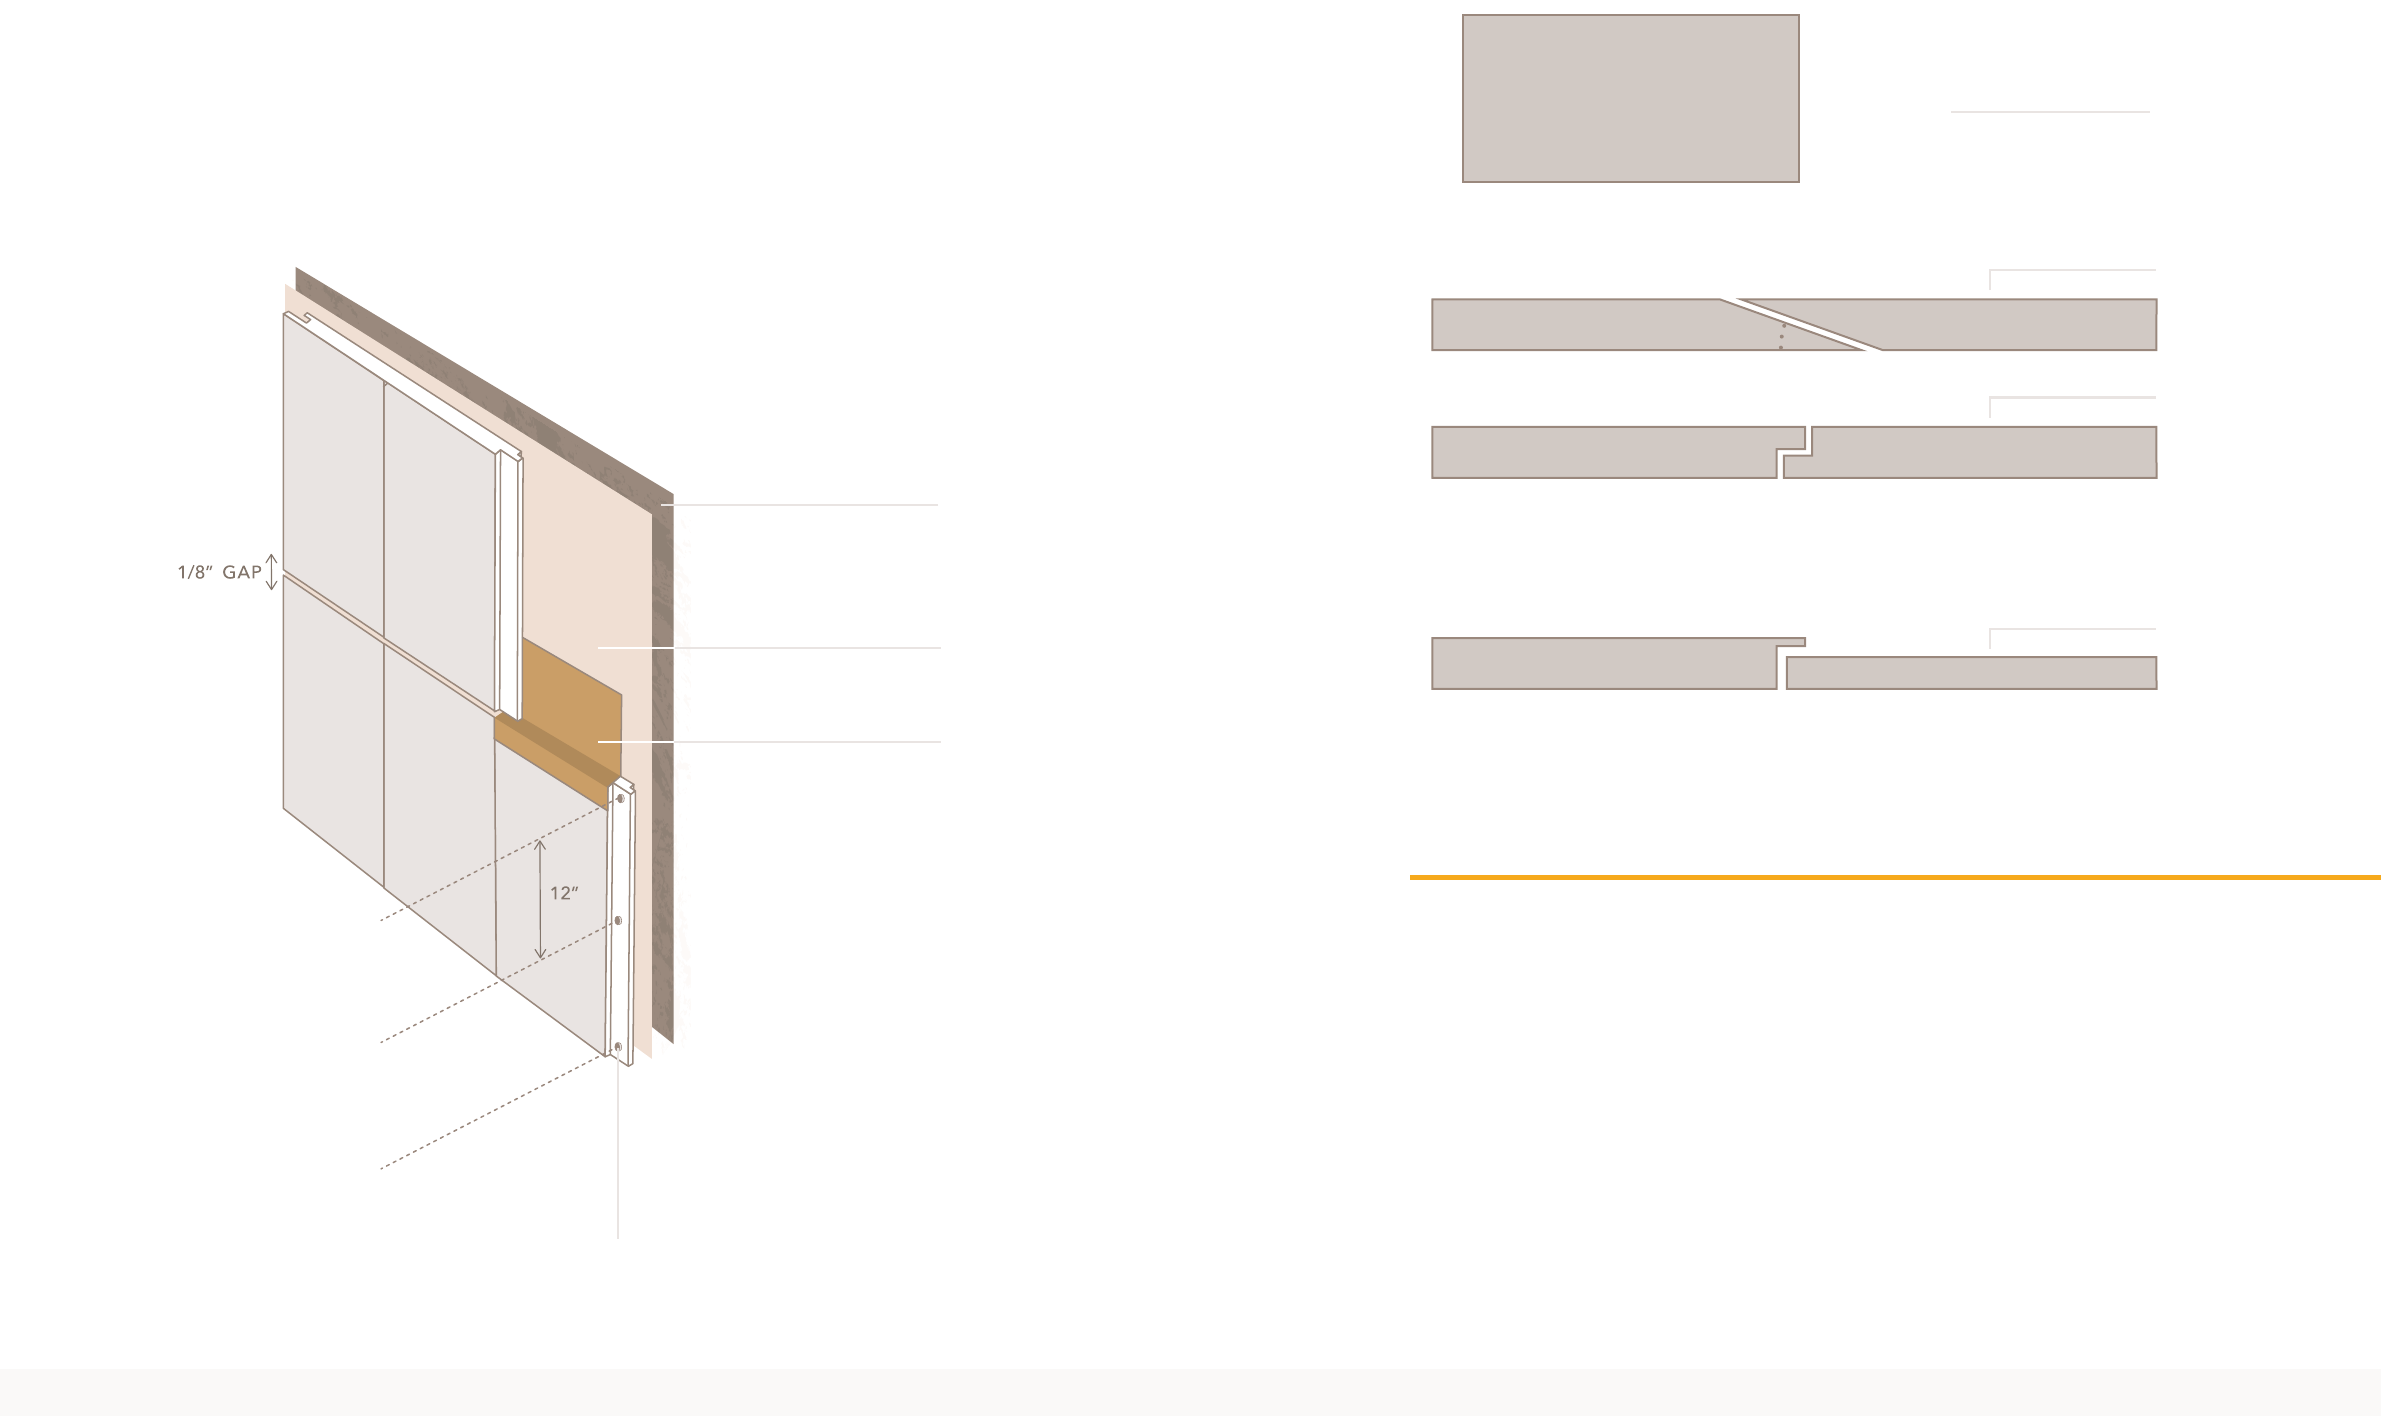
JOINTS
• For butt joints, ACRE shiplap may be joined together using a shiplap joint. Refer to the
expansion and contraction section above for gap information.
• For long continuous courses of ACRE shiplap or for installations using glued butt joints, leave
1/8” gap into a rabbeted ACRE trim on corners to allow for movement. A scarf joint may be
used for gluing two boards together.
• We recommend glues formulated for PVC products.
HANGING ACRE SHIPLAP HORIZONTALLY
• Stagger butt joints over stud locations to reduce noticeable patterns
• Leave 1/8’’ gap from the board to the edge of the wall into the rabbeted outside corners
• When a course of siding runs underneath a window, fastener every 8”
• Seal all vertical joints along window and door edges with a high-grade exterior caulk
• Shiplap siding can be installed by stacking the siding into the course below
• Starter and end boards require fastening at its face at least 1/2” from the edge
STARTING AND ENDING COURSE FOR HORIZONTAL
INSTALLATION
• Begin by ripping a piece of ACRE shiplap in half lengthwise. Use the top cut as the starter
course and the bottom cut as the end course.
•
•
• Continue the installation as described below
• End the installation with the bottom cut by stacking the board on top of the last course and
face fastening into the wall.
7/16” OSB
END COURSE STARTING COURSE
FASTEN ON STUDS
EVERY 16 OC
MAXIMUM
DRAINABLE
WEATHER-RESISTANCE
BARRIER
1514
INSTALLATION TIPS
•
•
•
achieving a clean look
HANGING ACRE SHIPLAP VERTICALLY
•
•
•
•
• Fasten along every 8” of the board
Care and Cleaning
• Wash down the exterior surface with a water hose every six to 12 months
• Be mindful of products which contain chemicals that may alter the appearance of Shiplap
siding
• To clean ACRE products use a gentle all-purpose cleaner such as Simple® Green with a natural
•
of the wall
•
• Prune any vegetation back that is touching the wall
• We recommend clearance between siding and shrubs
FASTEN EVERY 12”
ALONG THE BOARD
7/16” OSB
FLASHING
DRAINABLE
WEATHER-RESISTANCE
BARRIER
16”+16”+8”+8”= 48”
16”
16”
8” 8”
SCARF JOINT
20° - 30°
GLUE
SHIPLAP JOINT
RABBETED TRIM

16
www.modern-mill.com
ACREShiplapInstallGuide_2022.07
Shiplap Siding
