
x2
x2
P
a
t
e
n
t
a
n
d
t
r
a
d
e
m
a
r
k
i
n
f
o
r
m
a
t
i
o
n
:
v
a
r
i
.
c
o
m
/
p
a
t
e
n
t
s
|
©
2
0
2
0
V
a
r
i
d
e
s
k
,
L
L
C
A
l
l
r
i
g
h
t
s
r
e
s
e
r
v
e
d
.
x1
1.
2
P
e
o
p
l
e
R
e
q
u
i
r
e
d
Electric Standing Desk
48 x 30
H
o
l
d
s
u
p
t
o
2
2
0
l
b
(
9
9
,
8
k
g
)
2
P
e
o
p
l
e
R
e
q
u
i
r
e
d
60 x 30
H
o
l
d
s
u
p
t
o
2
0
0
l
b
(
9
0
,
7
k
g
)
x2
x1
M10
x1
M6
x4
M6
x4
M10
40mm
x4
M6
14mm
E
0
1
E
0
2
T
a
b
l
e
L
e
g
F
a
i
l
u
r
e
D
i
s
c
o
n
n
e
c
t
t
h
e
l
e
g
c
a
b
l
e
s
f
r
o
m
t
h
e
c
o
n
t
r
o
l
b
o
x
.
R
e
c
o
n
n
e
c
t
c
a
b
l
e
s
,
e
n
s
u
r
i
n
g
a
l
l
c
a
b
l
e
s
a
r
e
f
u
l
l
y
c
o
n
n
e
c
t
e
d
.
F
o
l
l
o
w
b
e
l
o
w
i
n
s
t
r
u
c
t
i
o
n
s
t
o
r
e
s
e
t
(
R
S
T
)
t
h
e
d
e
s
k
.
I
f
e
r
r
o
r
p
e
r
s
i
s
t
s
,
c
o
n
t
a
c
t
V
a
r
i
.
H
0
1
M
o
t
o
r
O
v
e
r
u
s
e
I
f
t
h
e
d
e
s
k
i
s
r
a
i
s
e
d
a
n
d
l
o
w
e
r
e
d
c
o
n
t
i
n
o
u
s
l
y
f
o
r
m
o
r
e
t
h
a
n
2
m
i
n
u
t
e
s
,
i
t
w
i
l
l
d
i
s
p
l
a
y
t
h
i
s
c
o
d
e
a
n
d
c
e
a
s
e
w
o
r
k
i
n
g
t
e
m
p
o
r
a
r
i
l
y
t
o
p
r
o
t
e
c
t
t
h
e
m
e
c
h
a
n
i
s
m
f
r
o
m
o
v
e
r
h
e
a
t
i
n
g
.
S
t
o
p
a
d
j
u
s
t
i
n
g
t
h
e
d
e
s
k
,
a
n
d
r
e
s
u
m
e
a
f
t
e
r
2
0
m
i
n
u
t
e
s
.
E
0
3
O
v
e
r
l
o
a
d
I
f
t
h
e
d
e
s
k
i
s
a
t
o
r
o
v
e
r
i
t
s
w
e
i
g
h
t
c
a
p
a
c
i
t
y
;
r
e
m
o
v
e
i
t
e
m
s
o
r
r
e
d
u
c
e
w
e
i
g
h
t
f
r
o
m
t
h
e
d
e
s
k
t
o
p
.
F
o
l
l
o
w
b
e
l
o
w
i
n
s
t
r
u
c
t
i
o
n
s
t
o
r
e
s
e
t
(
R
S
T
)
t
h
e
d
e
s
k
.
E
0
4
D
a
t
a
E
r
r
o
r
T
h
e
c
o
n
t
r
o
l
p
a
n
e
l
m
a
y
n
e
e
d
t
o
b
e
r
e
s
e
t
.
F
o
l
l
o
w
b
e
l
o
w
i
n
s
t
r
u
c
t
i
o
n
s
t
o
r
e
s
e
t
(
R
S
T
)
t
h
e
d
e
s
k
.
E
0
5
B
u
t
t
o
n
S
t
u
c
k
I
f
o
n
e
o
f
t
h
e
b
u
t
t
o
n
s
o
n
t
h
e
c
o
n
t
r
o
l
p
a
n
e
l
i
s
s
t
u
c
k
,
m
o
v
e
t
h
e
a
f
f
e
c
t
e
d
b
u
t
t
o
n
b
a
c
k
a
n
d
f
o
r
t
h
t
o
r
e
l
e
a
s
e
.
I
f
t
h
e
b
u
t
t
o
n
r
e
m
a
i
n
s
s
t
u
c
k
,
c
o
n
t
a
c
t
V
a
r
i
.
E
0
6
C
o
n
n
e
c
t
i
o
n
E
r
r
o
r
C
h
e
c
k
t
h
e
c
o
n
n
e
c
t
i
o
n
b
e
t
w
e
e
n
t
h
e
c
o
n
t
r
o
l
b
o
x
a
n
d
t
h
e
c
o
n
t
r
o
l
p
a
n
e
l
.
M
a
k
e
s
u
r
e
a
l
l
c
a
b
l
e
s
a
r
e
f
u
l
l
y
c
o
n
n
e
c
t
e
d
.
F
o
l
l
o
w
b
e
l
o
w
i
n
s
t
r
u
c
t
i
o
n
s
t
o
r
e
s
e
t
(
R
S
T
)
t
h
e
d
e
s
k
.
E
0
7
E
0
8
H
e
i
g
h
t
S
e
t
t
i
n
g
E
r
r
o
r
C
o
n
t
r
o
l
p
a
n
e
l
e
r
r
o
r
w
h
i
l
e
r
e
g
i
s
t
e
r
i
n
g
d
e
s
k
h
e
i
g
h
t
.
D
i
s
c
o
n
n
e
c
t
t
h
e
l
e
g
c
a
b
l
e
s
f
r
o
m
t
h
e
c
o
n
t
r
o
l
b
o
x
.
R
e
c
o
n
n
e
c
t
a
n
d
m
a
k
e
s
u
r
e
a
l
l
c
a
b
l
e
s
a
r
e
f
u
l
l
y
c
o
n
n
e
c
t
e
d
.
F
o
l
l
o
w
b
e
l
o
w
i
n
s
t
r
u
c
t
i
o
n
s
t
o
r
e
s
e
t
(
R
S
T
)
t
h
e
d
e
s
k
.
I
f
e
r
r
o
r
p
e
r
s
i
s
t
s
,
c
o
n
t
a
c
t
V
a
r
i
.
CODE TROUBLESHOOTING SOLUTION DESCRIPTION
(800) 207-2587
W
A
R
N
I
N
G
:
D
o
n
o
t
o
p
e
n
a
n
y
c
o
m
p
o
n
e
n
t
s
;
t
h
e
r
e
i
s
a
d
a
n
g
e
r
o
f
e
l
e
c
t
r
i
c
s
h
o
c
k
.
W
A
R
N
I
N
G
:
R
i
s
k
o
f
e
l
e
c
t
r
i
c
s
h
o
c
k
.
C
o
n
n
e
c
t
t
h
i
s
d
e
s
k
t
o
a
p
r
o
p
e
r
l
y
g
r
o
u
n
d
e
d
o
u
t
l
e
t
o
n
l
y
.
W
A
R
N
I
N
G
:
R
i
s
k
o
f
f
i
n
g
e
r
i
n
j
u
r
y
—
p
i
n
c
h
i
n
g
h
a
z
a
r
d
.
U
s
e
c
a
u
t
i
o
n
w
h
e
n
l
o
w
e
r
i
n
g
d
e
s
k
.
W
A
R
N
I
N
G
:
T
o
r
e
d
u
c
e
r
i
s
k
o
f
f
i
r
e
,
e
l
e
c
t
r
i
c
s
h
o
c
k
,
o
r
p
e
r
s
o
n
a
l
i
n
j
u
r
y
,
u
s
e
o
n
l
y
i
n
d
o
o
r
s
a
n
d
d
o
n
o
t
i
n
s
t
a
l
l
i
n
a
w
e
t
o
r
d
a
m
p
l
o
c
a
t
i
o
n
.
W
A
R
N
I
N
G
:
N
e
v
e
r
o
p
e
r
a
t
e
t
h
i
s
p
r
o
d
u
c
t
i
f
i
t
h
a
s
a
d
a
m
a
g
e
d
c
o
r
d
o
r
p
l
u
g
,
i
f
i
t
i
s
n
o
t
w
o
r
k
i
n
g
p
r
o
p
e
r
l
y
,
i
f
i
t
h
a
s
b
e
e
n
d
r
o
p
p
e
d
o
r
d
a
m
a
g
e
d
,
o
r
d
r
o
p
p
e
d
i
n
t
o
w
a
t
e
r
.
C
o
n
t
a
c
t
o
u
r
c
u
s
t
o
m
e
r
s
e
r
v
i
c
e
d
e
p
a
r
t
m
e
n
t
d
u
r
i
n
g
b
u
s
i
n
e
s
s
h
o
u
r
s
t
o
r
e
p
o
r
t
a
n
y
i
s
s
u
e
s
.
O
u
r
c
u
s
t
o
m
e
r
s
e
r
v
i
c
e
t
e
a
m
w
i
l
l
p
r
o
v
i
d
e
a
r
e
p
l
a
c
e
m
e
n
t
i
f
n
e
c
e
s
s
a
r
y
.
W
A
R
N
I
N
G
:
T
o
a
v
o
i
d
o
v
e
r
h
e
a
t
i
n
g
,
a
p
r
o
t
e
c
t
i
o
n
p
r
o
g
r
a
m
i
s
b
u
i
l
t
i
n
t
o
t
h
e
s
y
s
t
e
m
l
i
m
i
t
i
n
g
t
h
e
l
e
g
s
f
r
o
m
m
o
v
i
n
g
u
p
a
n
d
d
o
w
n
c
o
n
t
i
n
u
o
u
s
l
y
f
o
r
m
o
r
e
t
h
a
n
2
m
i
n
u
t
e
s
w
i
t
h
i
n
a
n
y
2
0
m
i
n
u
t
e
p
e
r
i
o
d
.
I
f
t
h
e
u
n
i
t
o
v
e
r
h
e
a
t
s
,
t
h
e
d
i
s
p
l
a
y
w
i
l
l
s
h
o
w
"
H
o
t
"
o
r
"
E
R
R
"
.
W
A
R
N
I
N
G
:
K
e
e
p
p
l
u
g
a
w
a
y
f
r
o
m
h
e
a
t
e
d
s
u
r
f
a
c
e
s
.
C
A
U
T
I
O
N
:
B
e
v
e
r
a
g
e
s
s
u
c
h
a
s
w
a
t
e
r
o
r
c
o
f
f
e
e
c
o
u
l
d
c
a
u
s
e
p
r
o
d
u
c
t
f
a
i
l
u
r
e
i
f
s
p
i
l
l
e
d
.
W
A
R
N
I
N
G
:
M
a
k
e
s
u
r
e
n
o
o
b
s
t
a
c
l
e
s
a
r
e
i
n
t
h
e
d
e
s
k
'
s
p
a
t
h
.
M
a
k
e
s
u
r
e
t
h
e
d
e
s
k
t
o
p
i
s
n
o
t
t
o
u
c
h
i
n
g
a
n
y
w
a
l
l
s
.
M
a
k
e
s
u
r
e
a
l
l
c
o
r
d
s
a
r
e
a
p
p
r
o
p
r
i
a
t
e
l
e
n
g
t
h
t
o
a
c
c
o
m
m
o
d
a
t
e
t
h
e
c
h
a
n
g
e
i
n
h
e
i
g
h
t
.
•
T
h
i
s
d
e
s
k
i
s
o
n
l
y
i
n
t
e
n
d
e
d
t
o
b
e
u
s
e
d
a
s
d
e
s
c
r
i
b
e
d
i
n
t
h
e
i
n
s
t
r
u
c
t
i
o
n
s
,
i
n
c
o
m
m
e
r
c
i
a
l
a
n
d
h
o
u
s
e
h
o
l
d
s
e
t
t
i
n
g
s
.
D
o
n
o
t
u
s
e
a
t
t
a
c
h
m
e
n
t
s
n
o
t
r
e
c
o
m
m
e
n
d
e
d
b
y
t
h
e
m
a
n
u
f
a
c
t
u
r
e
r
.
•
U
n
p
l
u
g
t
h
e
d
e
s
k
f
r
o
m
o
u
t
l
e
t
b
e
f
o
r
e
a
d
d
i
n
g
o
r
r
e
m
o
v
i
n
g
a
n
y
p
a
r
t
s
.
•
T
h
e
d
e
s
k
e
d
g
e
s
h
o
u
l
d
b
e
a
t
l
e
a
s
t
1
"
(
2
.
5
c
m
)
a
w
a
y
f
r
o
m
a
n
y
s
u
r
f
a
c
e
s
o
r
o
b
s
t
a
c
l
e
s
.
*
D
e
s
k
t
o
p
s
h
i
p
s
i
n
a
s
e
p
a
r
a
t
e
b
o
x
R
S
T
S
y
s
t
e
m
R
e
s
e
t
I
f
t
h
e
d
i
s
p
l
a
y
i
s
n
o
t
f
l
a
s
h
i
n
g
“
R
S
T
”
:
1
.
L
o
w
e
r
t
h
e
d
e
s
k
t
o
t
h
e
l
o
w
e
s
t
p
o
s
i
t
i
o
n
(
2
5
.
0
)
,
t
h
e
n
r
e
l
e
a
s
e
t
h
e
b
u
t
t
o
n
.
2
.
P
r
e
s
s
a
n
d
h
o
l
d
t
h
e
D
O
W
N
b
u
t
t
o
n
u
n
t
i
l
t
h
e
“
R
S
T
”
f
l
a
s
h
e
s
a
n
d
r
e
l
e
a
s
e
t
h
e
b
u
t
t
o
n
.
3
.
P
r
e
s
s
a
n
d
h
o
l
d
t
h
e
D
O
W
N
b
u
t
t
o
n
a
g
a
i
n
u
n
t
i
l
t
h
e
d
i
s
p
l
a
y
s
h
o
w
s
t
h
e
h
e
i
g
h
t
o
f
2
5
.
0
,
t
h
e
n
r
e
l
e
a
s
e
t
h
e
b
u
t
t
o
n
.
I
f
t
h
e
d
i
s
p
l
a
y
i
s
a
l
r
e
a
d
y
f
l
a
s
h
i
n
g
“
R
S
T
”
,
b
e
g
i
n
w
i
t
h
s
t
e
p
2
a
b
o
v
e
.
x1 x1

2.
D
e
s
k
t
o
p
a
n
d
d
e
s
k
l
e
g
s
w
i
l
l
a
r
r
i
v
e
i
n
s
e
p
a
r
a
t
e
b
o
x
e
s
.
W
e
r
e
c
o
m
m
e
n
d
a
s
s
e
m
b
l
i
n
g
t
h
e
d
e
s
k
w
i
t
h
t
h
e
d
e
s
k
t
o
p
f
a
c
e
d
o
w
n
i
n
t
h
e
b
o
x
t
o
p
r
e
v
e
n
t
a
n
y
s
u
r
f
a
c
e
s
c
r
a
t
c
h
i
n
g
.
O
p
e
n
t
h
e
d
e
s
k
t
o
p
b
o
x
.
R
e
m
o
v
e
t
h
e
d
e
s
k
l
e
g
s
f
r
o
m
t
h
e
i
r
b
o
x
.
P
l
a
c
e
t
h
e
l
e
g
s
i
n
t
o
t
h
e
g
r
o
o
v
e
d
a
r
e
a
s
o
n
e
a
c
h
s
i
d
e
o
f
t
h
e
m
e
t
a
l
f
r
a
m
e
.
(
B
o
t
h
l
e
g
s
w
i
l
l
w
o
r
k
o
n
t
h
e
r
i
g
h
t
o
r
l
e
f
t
s
i
d
e
.
)
A
f
t
e
r
e
a
c
h
l
e
g
i
s
p
l
a
c
e
d
i
n
t
o
t
h
e
g
r
o
o
v
e
d
a
r
e
a
,
p
u
s
h
t
h
e
l
e
g
a
l
l
t
h
e
w
a
y
b
a
c
k
t
o
w
a
r
d
s
t
h
e
o
u
t
s
i
d
e
o
f
t
h
e
f
r
a
m
e
,
s
e
c
u
r
i
n
g
i
t
i
n
p
l
a
c
e
t
o
c
o
n
f
i
r
m
i
t
i
s
p
r
o
p
e
r
l
y
a
l
i
g
n
e
d
.
1
7.
U
s
e
t
h
e
s
m
a
l
l
e
r
h
e
x
k
e
y
(
M
6
)
p
r
o
v
i
d
e
d
t
o
s
e
c
u
r
e
l
y
t
i
g
h
t
e
n
t
h
e
s
c
r
e
w
s
a
n
d
w
a
s
h
e
r
s
(
M
6
-
1
4
m
m
)
o
n
t
o
e
a
c
h
l
e
g
.
1
2 3 4
M
1
2 3 4
M
Press and hold the “M” buon (about 8 seconds) unl the LED display switches to “S-” and then to
“LOC”. Release the buon.
Control Panel Lock
Control Panel Unlock
Press and hold the “M” buon (about 8 seconds) unl the LED switches from “LOC” to the height
display. Release the buon.
1
2 3 4
M
The desk may need to be recalibrated if the screen is not showing the correct height—for instance the
display reads 50.5” but is in fully lowered posion. To do this, press the DOWN buon on the control panel
unl the base reaches its lowest posion. Measure the distance from floor to the top surface of the
desktop. If the number on the LED display does NOT match your measurement, follow these steps:
Press and hold the DOWN buon unl the LED display reads “RST”. Press and hold the “M” buon unl the
LED displays the flashing height. Use the UP/DOWN buons to change the value of the starng height so
that it matches your measurement. The display will return to “RST” in about 5 seconds.
Finish the reset process by pressing and holding the DOWN buon again unl the desk lowers a lile bit
more, slightly rises, and stops. Release the buon. The new starng height value is saved and your desk is
now ready to use.
Note: The LED display has a +/- 0.1 tolerance.
Recalibrating
If the legs have no response, your desk may need to be reset. Follow the inial setup instrucons
and ensure all connecons are in the correct locaon and fully plugged in. If the legs are rising
slowly, check the input power connecon to make sure it’s secured correctly. If any errors
connue, please contact Vari.
Troubleshooting and Reset
To toggle from inches to cenmeters on the display, first press the DOWN buon unl the desk reaches the
lowest posion (25”). Press and hold the DOWN buon again unl the display flashes “RST”. Press and hold the
2 buon (about 5 seconds) unl the display flashes “RST” and then switches to either:
10.3 = cm
10.4 = in
If the display is not flashing “RST”:
1. Lower the desk to the lowest posion (25”), then release the buon.
2. Press and hold the DOWN buon unl the “RST” flashes and release the buon.
3. Press and hold the DOWN buon again unl the display shows the height of 25”, then release the buon.
If the display is already flashing “RST”, begin with step 2 above.
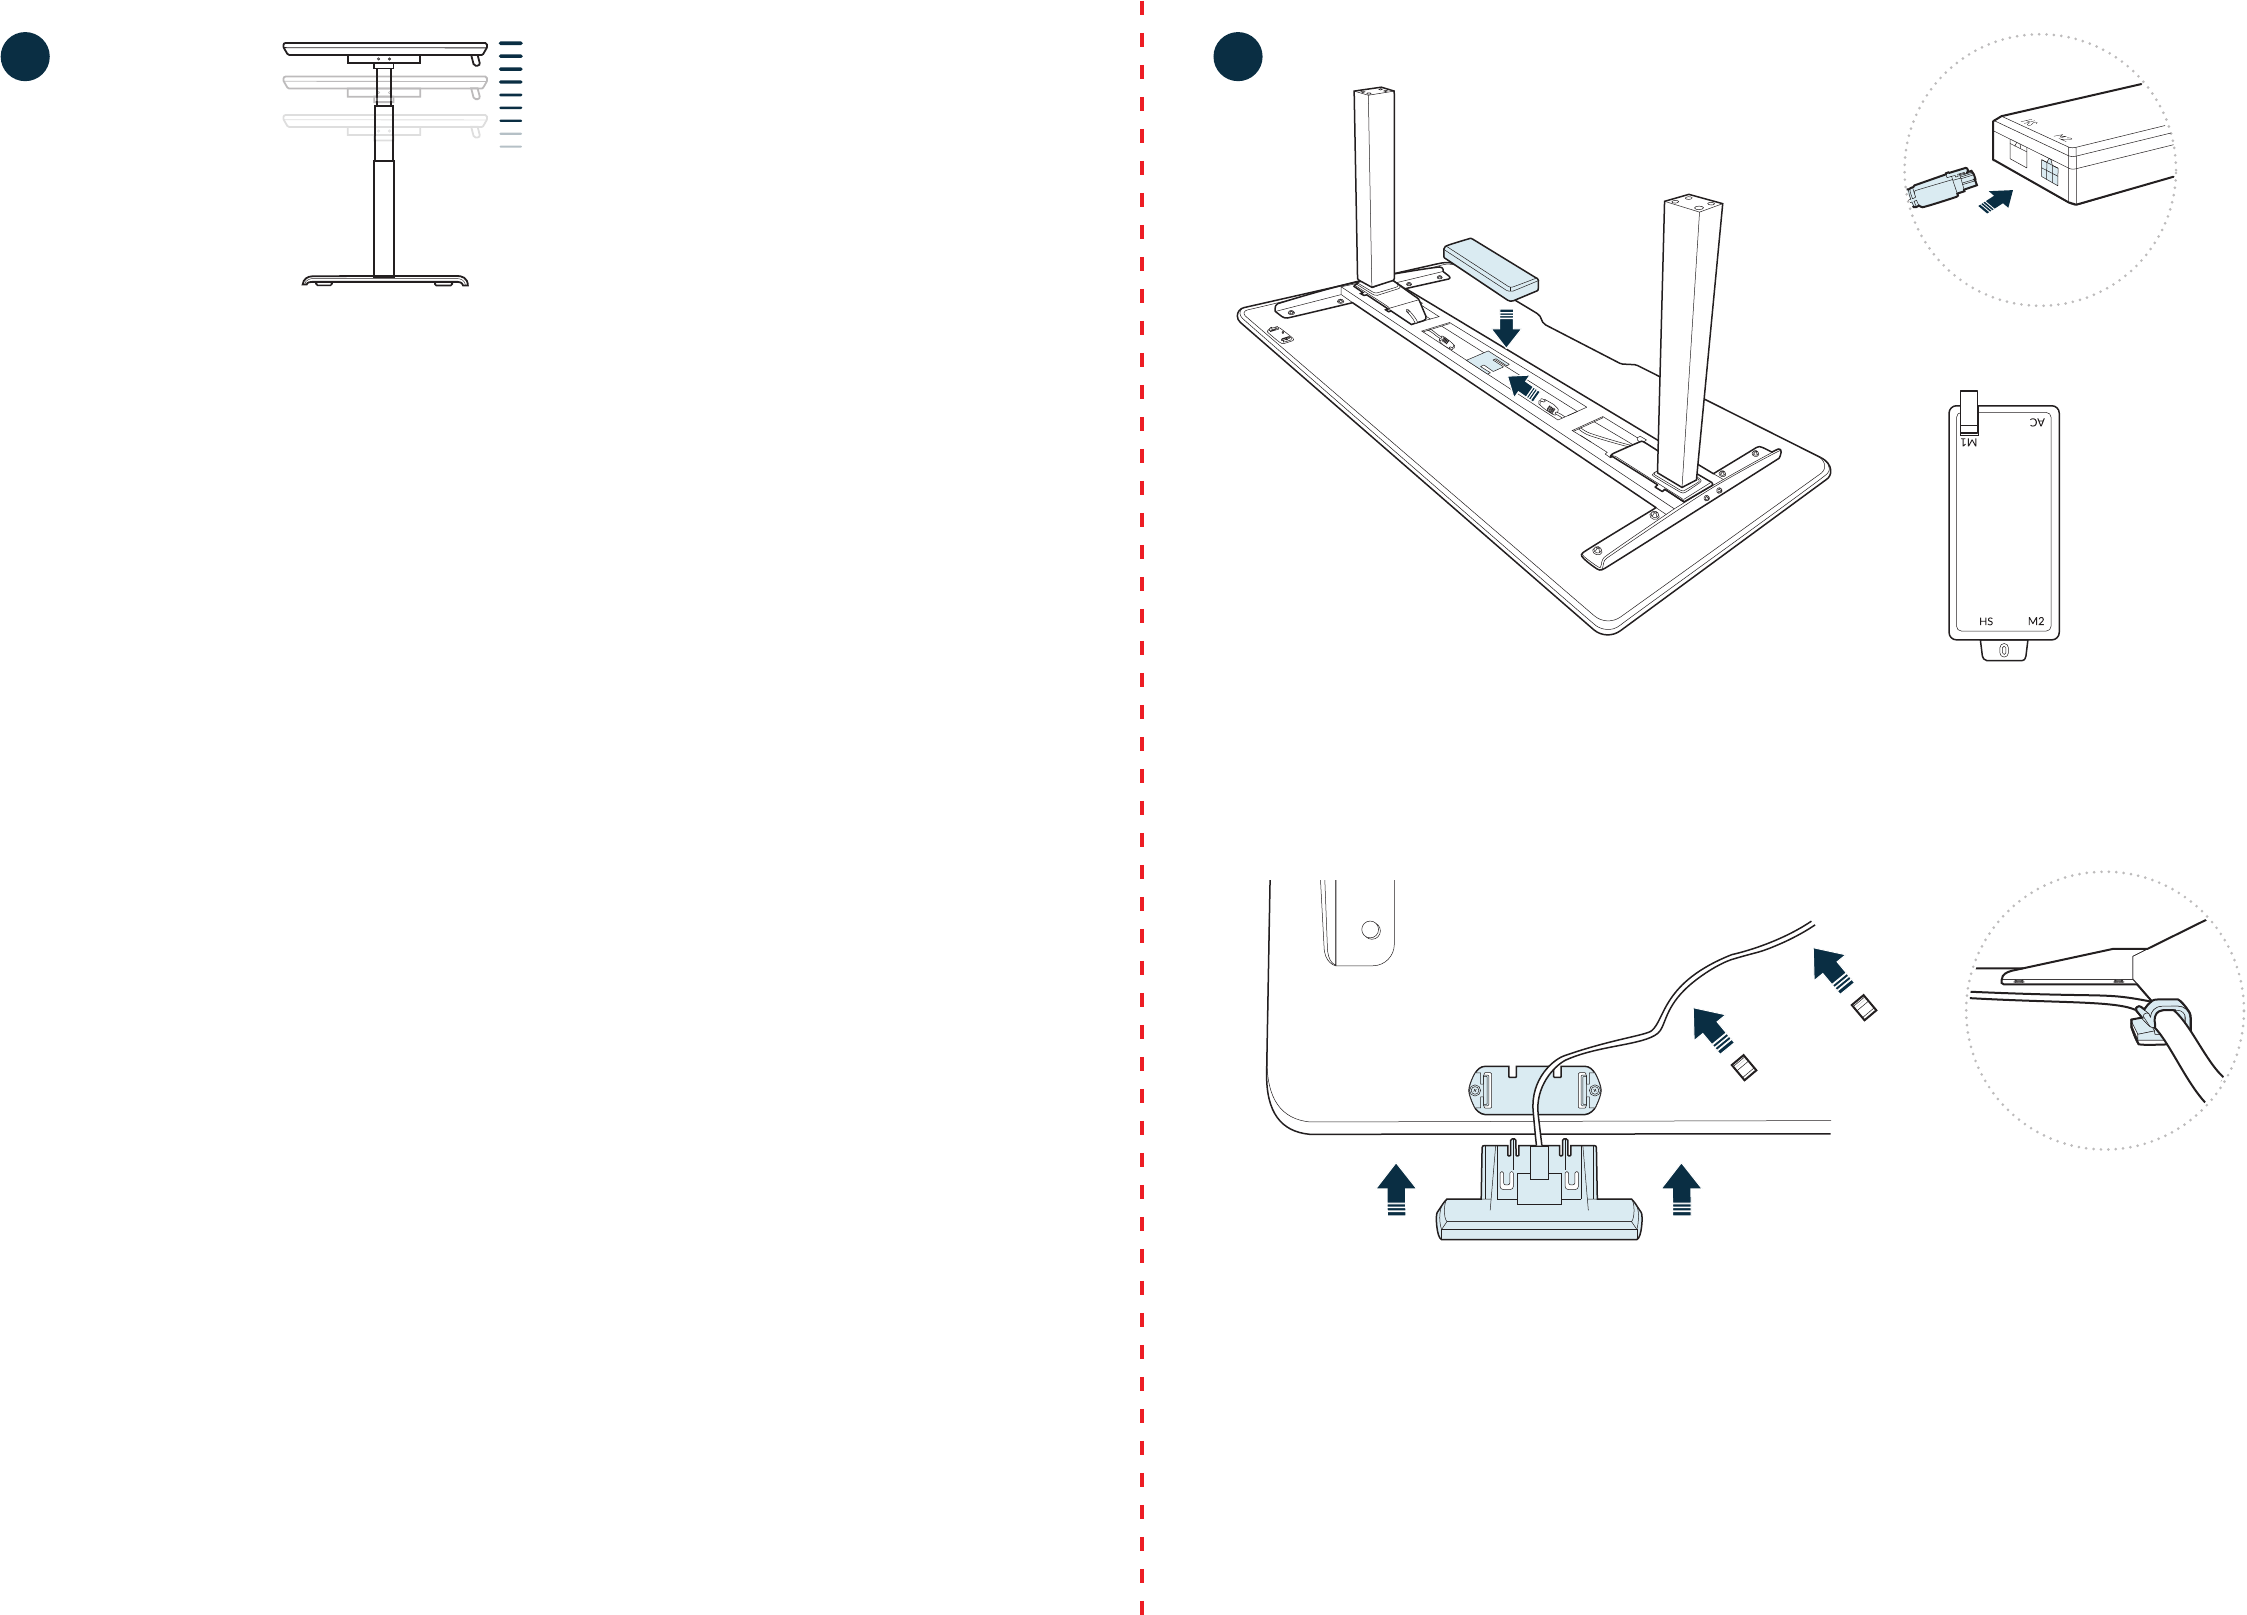
2
Once the legs are secured with screws and while the desk is sll face down, lower the control box into the
middle cavity of the metal frame. Then, slide the control box to engage the bracket that holds the control
box in place. When the control box is secured, connect the leg cables to the corresponding control box
inputs, M1 and M2.
AC = Power Cord
M1 = Leg Cable
M2 = Leg Cable
HS = Control Panel
Locate the control panel and slide it into the bracket to aach. Once the panel is in place, connect its
cable to the corresponding control box input, HS.
Please note: The control panel can be placed on the desk’s right or le side, depending on the user’s preference.
If the bracket for the control panel is not on the preferred side, unscrew it, line it up with the pre-drilled pair of
holes on the other side, and screw it in before aaching the control panel.
You can use the included adhesive clips to secure the control panel cord to the underside of the desktop
to keep it out of the way.
3.
6.
The height sengs range from 25-50.5 inches (63.5-128 cm). If you prefer to change the sengs to a more
narrow range, follow these steps:
Make sure the power is ON and a number reads on the LED display (if no number appears, please follow the
Troubleshoong and Reset procedure).
To set the Upper-Limit Posion:
Use the UP/DOWN buons to move the base to the desired maximum-height posion. Press the “M”
buon and release. Press the UP buon and release. The LED display will flash “S-”. Press and hold the “M”
buon unl the LED display changes to “999”. The display will automacally return to the selected height.
The new upper limit is now set.
To set the Lower-Limit Posion:
Use the UP/DOWN buons to move the base to the desired minimum-height posion. Press the “M”
buon and release. Press the DOWN buon and release. The LED display will flash “S-”. Press and hold the
“M” buon unl the LED display changes to “000”. The display will automacally return to the selected
height. The new lower limit is now set.
To Remove Upper/Lower Limit Posions:
Press the “M” buon and release. The LED display will read “S-”. Within 5 seconds, press and hold the “M”
buon again for 2 seconds. The LED display will change to “555” and then automacally return to the height
display. The upper and lower limits are now removed.
WARNING: A RESET procedure requires the desk base to fully retract (beyond any lower limit set). Please
ensure that you have the proper clearance below the desk base.
Aer the upper and lower limits are set, the previous memory posions (1, 2, 3, 4) may be outside the new
range of movement. If so, simply reset the memory posions.
If you aempt to revise a previously set upper or lower limit and it is outside of the exisng range, you will
need to remove the previously set upper/lower limits first.
7
Setting Upper & Lower Limits
Highest Setting
Prefered Lowest Setting
Lowest Setting
Inches to Centimeters

4.
3
4
Once the control box is secure and while the desk is sll face down, place one foot on top of one leg aligning
the screw holes. Use the larger hex key (M10) provided to securely ghten screws (M10 - 40mm) into the
feet. Repeat this step to aach the other foot.
Please note: A cable tray is available for purchase as an added accessory. If you plan to aach a cable tray, it will be
easiest to do so while the desk is sll face down.
5
Once legs and feet are secure, two people should carefully flip the assembled desk (along the back edge to
avoid damaging the control panel) to an upright posion. Adjust the footpads to level the desk as needed.
Before starng your inial setup, place the desk where you want it, connect the power cord to the control
box AC input, and plug the desk in.
Press the DOWN buon on the control panel unl the base reaches its lowest posion. Press and hold
the DOWN buon again unl the LED display reads “RST”.
Press and hold the 1 buon (about 5 seconds) while the LED flashes “RST” and switches to either:
10.1 = One-Touch (preset buons work with one quick press)
10.2 = Constant-Touch (preset buons work when pressed and held down for a few seconds)
Release the 1 buon. Press the 1 buon again unl desired seng is reached. Once the chosen seng is
displayed, release the buon and wait for the display to return to “RST”.
Finish the reset process by pressing and holding the DOWN buon unl the desk lowers a lile bit more,
slightly rises, and stops. Release the buon. The new program is saved and your desk is now ready to use.
5
Initial Setup
The height sengs range from 25-50.5 inches (63.5-128 cm). You can program 4 height preferences by
raising or lowering the desk to your desired height, pressing the “M” buon (you will see “S-” appear on
the display), then pressing 1, 2, 3, or 4.
1
2 3 4
M
Height Settings and Preferences
6
25” (63.5 cm)
50 ½” (128 cm)
