
Nokia 2720 V Flip
user guide

Get started
Buttons and parts
1. Call button
2. Shortcut button
3. Left selection button
4. Scroll button
5. Earpiece
6. Camera
7. Flash
8. Microphone
9. Headset connector
10. SOS call/Google Assistant button. If you have set
the accessibility mode on, this button sends an
SOS call. Otherwise, the button switches Google
Assistant on.
11. Back cover opening slot
12. USB connector
13. Loudspeaker
14. Volume buttons
15. Right selection button
16. Back button
17. Power/End button
18. Microphone
Do not connect to products that create an output signal,
as this may damage the device. Do not connect any
voltage source to the audio connector. If you connect an
external device or headset, other than those approved
for use with this device, to the audio connector, pay
special attention to volume levels.
Some of the accessories mentioned in this user guide,
such as charger, headset, or data cable, may be sold
separately.
Swap the SIM card and insert the memory
card
Note: Switch the device off and disconnect the charger
and any other device before removing any covers. Avoid
touching electronic components while changing any
covers. Always store and use the device with any covers
attached.

Optional:
Your phone comes with the SIM card preinstalled, but if
you want to swap the SIM, follow these steps:
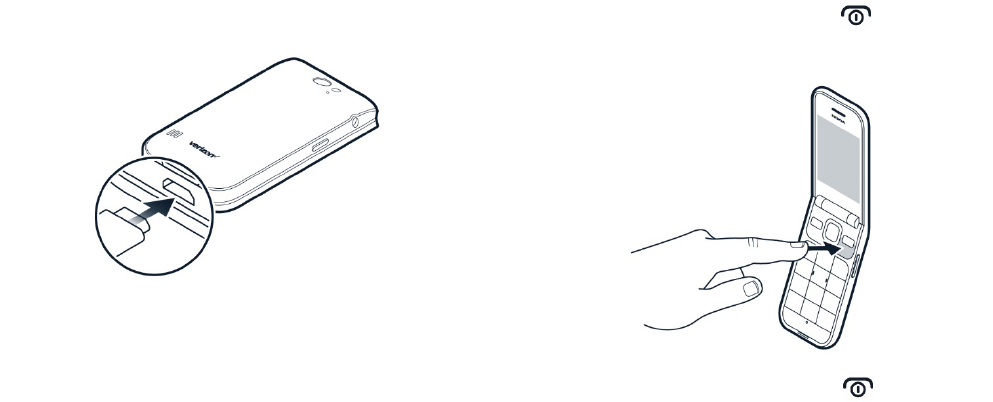
1. Put your fingernail in the small slot at the
bottom of the phone, lift and remove the cover.
2. If the battery is in, lift it out.
3. Slide the SIM card holder to the left and open it
up. Place the nano-SIM in the slot. face down,
close down the holder and slide it to the right to
lock it in place.
4. Slide the memory card in the memory card slot.
5. Put back the battery.
6. Put back the cover.
Note: The microSD card is sold separately.
Important: Do not remove the memory card when an
app is using it. Doing so may damage the memory card
and the device and corrupt data stored on the card.
Use only compatible memory cards approved for use
with this device. Incompatible cards may damage the
card and the device and corrupt data stored on the card.
Charge your phone
1. Insert the small end of the USB cable into the
phone.
2. Insert the larger end into the charger and plug it
into an outlet.
Your phone supports the USB Micro-B cable. You can also
charge your phone from a computer with a USB cable,
but it may take a longer time.
If the battery is completely discharged, it may take
several minutes before the charging indicator is
displayed.
WARNING: Only use approved chargers with your device.
Incompatible chargers or tampering with the charger
port could damage your device and void the warranty.
Turning your phone on/off
NOTE: The first time you turn on your phone, you will
need to activate it. See the Get started guide included
with your phone.
To turn your phone on, press and hold until the
phone vibrates.
To turn your phone off, press and hold and select
Power Off.

Basics
Explore your phone
To open the apps list, press the scroll button.
To open an app or select a feature, scroll to the app or
feature and select SELECT.
To go back to the previous view, press the back button.
To go back to the home screen, press .
CHANGE THE VOLUME
To change the volume during a call, press the volume
buttons.
To change the volume of your media apps, ringtones,
alerts, and alarms, press the scroll button, and select
Settings. Scroll right to Personalization, and select Sound
> Volume.
To change the volume when listening to the radio or
music, select Options > Volume.
Protect your phone
LOCK THE BUTTONS AND SCREEN
If you want to avoid accidentally making a call when your
phone is in your pocket or bag, you can lock your buttons
and screen.
To lock your buttons and screen, press and hold and
select Lock, or close the fold.
UNLOCK THE BUTTONS AND SCREEN
To unlock the buttons and screen, select Unlock, or open
the fold.
SET A SCREEN LOCK
You can set the phone to ask for a screen lock code.
1. Press the scroll button and select Settings.
2. Scroll right to Privacy & Security.
3. Select Screen Lock > Screen Lock > On, and
create a four-digit code. Note, however, that
you need to remember the code you created, as
Verizon wireless is not able to open or bypass it.
Write text
Press a button repeatedly until the letter is shown.
To type in a space, press 0.
To type in a special character or punctuation mark, press
*.
To switch between character cases, press # repeatedly.
To type in a number, press and hold a number button.
CHANGE THE TEXT SIZE
Do you want to read bigger text on the display?
1. Press the scroll button and select Settings.
2. Scroll right to Device, and select Accessibility >
Large text > On.
Accessibility mode
With the accessibility mode, the text on the phone
display is bigger, the alerts louder, and the Google
Assistant button turns into an SOS call button. If you
didn’t switch the accessibility mode on when setting up
your phone, press the scroll button, and select Settings >
Device > Accessibility Mode > On.
ADD YOUR ICE DETAILS
To be able to make SOS calls, you need to add your ICE
(In Case of Emergency) details. To add your personal
details, press the scroll button, and select Settings >
Device > ICE information.
To define the contacts to whom the SOS call is made,
press the scroll button, and select Settings > Device > ICE
information > Options > Create ICE contacts. Note that
you cannot use official emergency call numbers as your
ICE contacts.
MAKE AN SOS CALL
Once you have the accessibility mode switched on and
added an ICE contact, you can make SOS calls. To make
the call, press and hold the SOS call button for three
seconds, or press the SOS call button quickly twice. The
phone calls your first ICE contact. If the contact doesn’t
answer in 25 seconds, the phone calls the next contact,
and keeps calling your contacts 10 times until one of
them answers the call, or you press the end button.
Note: When the SOS call is answered, the phone goes to
handsfree mode. Do not hold the phone close to your
ear, as the volume may be very loud.
SEND AN SOS MESSAGE
You can select to send an SOS message if no one answers
your SOS call. Press the scroll button and select Settings
> Device > Accessibility Mode > On > SOS Call > SOS
Message > On.
To edit the pre-defined message, select SOS Message >
Edit.
Tip: If you want to keep the accessibility mode on, but
don’t want to make SOS calls, press the scroll button, and
select Settings > Device > Accessibility Mode > SOS Call
> Off.
Google Assistant
Google Assistant can help you search information online,
translate words and sentences, make notes and calendar
appointments, for example.
If you have not switched on the accessibility mode, the
SOS call button works as the Google Assistant button.
To use Google Assistant, press and hold the Google
Assistant button for three seconds, and follow the
instructions on the display.

Battery life
To save power:
• Always charge the battery
fully.
• Mute unnecessary sounds, such as keypad
sounds.
• Use wired headphones, rather than the
loudspeaker.
• Set the phone screen to switch off after a short
time.
• Lower the screen brightness.
• When applicable, use network connections,
such as Bluetooth, selectively: switch the
connections on only when you are using them.
Connect with your friends and
family
Calls
MAKE A CALL
1. Type in the phone number. To type in the +
character, used for international calls, press *
twice.
2. Press .
3. To end the call, press or close the fold.
ANSWER A CALL
When the phone rings, press .
REJECT A CALL
To reject a call, press .
REAL-TIME TEXT (RTT)
To set real-time text on, press the scroll button, and
select Settings > Device > Accessibility > RTT > On. Select
Visible during calls to see RTT functions during phone
calls, Always visible - Automatic to be able to make only
RTT calls in Messages, Contacts and Call log applications,
or Always visible - Manual to be able to select whether
to make a phone call or an RTT call in Messages, Contacts
and Call log applications.
When you receive a phone call, press and then select
Options > RTT view to be able to start writing.
Contacts
Save and organize your friends' and family members'
phone numbers.
ADD A CONTACT
1. Press the scroll button and select Contacts.
2. Select New and whether to save the contact to
the phone memory or the SIM card.
3. Enter the contact details.
4. Select SAVE.

TRANSFER CONTACTS FROM YOUR OLD PHONE
To add contacts from your Gmail or Outlook account or
your memory card to your new phone, press the scroll
button, and select Contacts > Options > Settings >
Import Contacts and the relevant option.
To add contacts from your old phone using Bluetooth:
1. On your new phone, press the scroll button, and
select Settings > Network & Connectivity >
Bluetooth > On.
2. Switch on Bluetooth on your old phone and
send the needed contacts to your new phone
using Bluetooth.
3. On your new phone, accept the transfer
request.
4. On the home screen, select Notices > Files
received > Import.
CALL A CONTACT
You can call a contact directly from the contacts list.
1. Press the scroll button, and select Contacts.
2. Scroll to a contact and press .
Send messages
SEND A MESSAGE
1. Press the scroll button, and select Messages >
New.
2. In the To field, press # until you are able to
enter numbers and then type in a phone
number, or select Add to add a contact from
your contacts list.
3. Write your message. If you need to remove a
character, press the back button.
4. Select Send.
Mail
ADD A MAIL ACCOUNT
When you use the E-mail app for the first time, you are
asked to set up your email account.
1. Press the scroll button, and select E-Mail.
2. Select Next and type in your name and e-mail
address.
3. Select Next and type in your password.
SEND MAIL
1. Press the scroll button and select E-Mail.
2. Select Compose.
3. In the To field, type in an e-mail address.
4. Type in the message subject and the mail.
5. Select Send.
Personalize your phone
CHANGE YOUR RINGTONE
1. Press the scroll button, and select Settings.
2. Scroll right to Personalization and select Sound
> Tones > Ringtones.
3. Scroll to a ringtone and press the scroll button.
CHANGE THE LOOK OF YOUR HOME SCREEN
You can change the look of your phone with wallpapers.
1. Press the scroll button, and select Settings.
2. Scroll right to Personalization and select Display
> Wallpaper.
3. Select Camera to take a new photo for the
wallpaper, Gallery to choose a wallpaper from
the photos on your phone, or Wallpaper to
select from pre-defined wallpapers.
Camera
TAKE A PHOTO
1. To switch the camera on, press the scroll
button, and select Camera.
2. To take a photo, press the scroll button.
TAKE PHOTOS WITH A TIMER
Want to have time to get in the shot too? Try out the
timer.
1. Press the scroll button, and select Camera.
2. Select Options, scroll right to Self Timer, and
select the time.
3. Press the scroll button to take the photo.
VIEW A PHOTO YOU HAVE TAKEN
To view the photo right after taking it, select Preview.
To view the photo later, on the home screen, press the
scroll button, and select Gallery.
RECORD A VIDEO
1. Press the scroll button, and select Camera.
2. To start recording, scroll right and press the
scroll button.
3. To stop recording, press the scroll button.
WATCH THE RECORDED VIDEO
To view the video right after recording, select Preview.
To watch the video later, on the home screen, press the
scroll button and select Video.
Internet and connections
Browse the web
CONNECT TO THE INTERNET
1. Press the scroll button, and select Internet.
2. Select Search Internet.
3. Write a web address, and select GO.
4. Use the scroll button to move the mouse cursor
in the browser.
CLEAR YOUR BROWSING HISTORY
1. Press the scroll button, and select Settings.
2. Scroll right to Privacy & Security and select
Browsing privacy.
3. Select Clear browsing history.
Bluetooth®
SWITCH ON BLUETOOTH
1. Press the scroll button, and select Settings >
Network & Connectivity > Bluetooth.
2. Switch Bluetooth to On.
3. Select Nearby devices to find a new device or
Paired devices to find a device you have paired
your phone with previously.
Wi-Fi
SWITCH ON WI-FI
1. Press the scroll button and select Settings >
Network & Connectivity > Wi-Fi.
2. Switch Wi-Fi to On.
3. Select Available networks and the network you
want, enter a password if needed, and select
Connect.
ENABLE WI-FI CALLS
1. Press the scroll button and select Settings >
Network & Connectivity > Wi-Fi calling.
2. Switch Wi-Fi calling to On.
You can now make calls over a Wi-Fi connection if mobile
network is not available.
Music and videos
Music player
You can listen to your MP3 music files with the music
player.
LISTEN TO MUSIC
1. Press the scroll button and select Music.
2. Select whether you want to view your playlists,
artists, albums, or songs.
3. Scroll to a song, and press the scroll button.
Tip: To set a song as ringtone, scroll right to Songs, scroll
to the song you want, and select Options > Save as
ringtone.
Listen to radio
SEARCH FOR RADIO STATIONS
You need to connect a compatible headset to listen to
the radio. The headset acts as an antenna. Make sure
that the headset is properly connected.
Press the scroll button and select FM Radio > TURN ON.
To search for available radio stations, select Stations >
Options > Scan Stations.
To save a radio station, select Options > Add to
favorites.
To switch to a saved station, select Stations > Favorites
and the station.
To adjust the volume, select Options > Volume and scroll
up or down.
To listen to a radio station using the phone’s speakers,
select Options > Switch to speaker. Keep the headset
connected.
To turn off the radio, select TURN OFF.
Video player
PLAY A VIDEO
1. Press the scroll button, and select Video.
2. Scroll to the video you want to watch and press
the scroll button.
3. Press the scroll button to pause and resume
playback while watching the video.
To watch the video in full screen, select Full Screen.
To adjust the volume, select Options > Volume and scroll
up or down.
To share the video with a friend, select Options > Share,
and select to share using e-mail, messaging, or
Bluetooth, for example.
Recorder
RECORD A SOUND CLIP
1. Press the scroll button, and select Recorder.
2. To record, select New and press the scroll
button.
3. To stop recording, select Done.
Organize your day
Clock
SET AN ALARM
1. Press the scroll button, and select Clock.
2. Select New > Time, use the scroll button to set
the time, and select SAVE.
3. If needed, set the alarm to repeat or give the
alarm a name.
4. Select Save.
If you often need an alarm at the same time, but don’t
want to set in on repeat, just scroll to the alarm and
select TURN ON. The alarm sounds at the time you have
specified.
COUNTDOWN TIMER
If you need an alarm but don’t want to create one in the
alarm clock, use the countdown timer.
1. Press the scroll button, and select Clock.
2. Scroll right to Timer.
3. Select SET, and use the scroll button to set the
needed time.
4. Select START.
STOPWATCH
1. Press the scroll button, and select Clock.
2. Scroll right to Stopwatch and select START.
3. Select Lap when a lap has been completed.
4. To stop the stopwatch, select PAUSE > Reset.
Calendar
Add a calendar reminder
1. Press the scroll button and select Calendar >
CALENDAR.
2. Scroll to the date you want and select Add.
3. Enter the event details.
4. Select whether to add a reminder to the event.
5. Select Save.
Calculator
MAKE A CALCULATION
1. Press the scroll button, and select Calculator.
2. Enter the first factor of your calculation, use the
scroll button to select the operation, and enter
the second factor.
3. Press the scroll button to get the result of the
calculation.
Converter
CONVERT MEASUREMENTS
1. Press the scroll button and select Unit
Converter.
2. Select the conversion type.
3. Press the scroll button to open a list of available
measurements, and select the one you want to
convert from.
4. Scroll to the second measurement, press the
scroll button, and select the measurement you
want to convert to.
5. Use the number buttons to enter the value you
want to convert. The converter shows the
converted value automatically.
Copy content and check the
memory
Copy content
COPY CONTENT BETWEEN YOUR PHONE AND
COMPUTER
1. Press the scroll button, and select Settings.
2. Scroll right to Storage and set USB storage to
Enabled.
3. Connect your phone to a compatible computer
with a compatible USB cable.
4. On your computer, open a file manager, and
browse to your phone. You can see the content
stored on your phone and on the memory card,
if inserted.
5. Drag and drop items between your phone and
computer.
File manager
FIND YOUR FILES
To find your files quickly, press the scroll button, and
select File Manager. To find items on your phone, select
Internal. To find items on your memory card, select SD
Card.
Memory
CHECK THE AMOUNT OF FREE MEMORY
1. Press the scroll button, and select Settings.
2. Scroll right to Storage and check Media and
Application data to see how much memory is
consumed and how much is available.
Security and privacy
Security settings
CHECK YOUR APPS’ PERMISSIONS
1. Press the scroll button, and select Settings.
2. Scroll right to Privacy & Security and select App
permissions.
3. Select an app to see what kind of permissions it
requests. You can grant or deny permissions.
MANAGE YOUR INTERNET PRIVACY SETTINGS
1. Press the scroll button, and select Settings.
2. Scroll right to Privacy & Security and select Do
not track.
3. Select whether you want to allow websites to
track your browsing.
HAC notice
Your phone is compliant with the FCC Hearing Aid
Compatibility requirements.
The FCC has adopted HAC rules for digital wireless
phones. These rules require certain phones to be tested
and rated under the American National Standard
Institute (ANSI) C63.19-2011 hearing aid compatibility
standards. The ANSI standard for hearing aid
compatibility contains two types of ratings:
M-Ratings: Rating for less radio frequency interference to
enable acoustic coupling with hearing aids.
T-Ratings: Rating for inductive coupling with hearing aids
in telecoil mode.
Not all phones have been rated. A phone is considered
hearing aid compatible under FCC rules if it is rated M3
or M4 for acoustic coupling and T3 or T4 for inductive
coupling. These ratings are given on a scale from one to
four, where four is the most compatible. Your phone
meets the M4/T4 level rating.
However, hearing aid compatibility ratings don't
guarantee that interference to your hearing aids won't
happen. Results will vary, depending on the level of
immunity of your hearing device and the degree of your
hearing loss. If your hearing device happens to be
vulnerable to interference, you may not be able to use a
rated phone successfully. Trying out the phone with your
hearing device is the best way to evaluate it for your
personal needs.
This phone has been tested and rated for use with
hearing aids for some of the wireless technologies that it
uses. However, there may be some newer wireless
technologies used in this phone that have not been
tested yet for use with hearing aids. It is important to try
the different features of this phone thoroughly and in
different locations, using your hearing aid or cochlear
implant, to determine if you hear any interfering noise.
Consult your service provider or the manufacturer of this
phone for information on hearing aid compatibility. If
you have questions about return or exchange policies,
consult your service provider or phone retailer.
Hearing devices may also be rated. Your hearing device
manufacturer or hearing health professional may help
you find this rating. For more information about FCC
Hearing Aid Compatibility, please go to
http://www.fcc.gov/cgb/dro.
Copyrights
The availability of products, features, apps and services
may vary by region. For more info, contact your dealer or
your service provider. This device may contain
commodities, technology or software subject to export
laws and regulations from the US and other countries.
Diversion contrary to law is prohibited.
The contents of this document are provided "as is".
Except as required by applicable law, no warranties of
any kind, either express or implied, including, but not
limited to, the implied warranties of merchantability and
fitness for a particular purpose, are made in relation to
the accuracy, reliability or contents of this document.
HMD Global reserves the right to revise this document or
withdraw it at any time without prior notice.
To the maximum extent permitted by applicable law,
under no circumstances shall HMD Global or any of its
licensors be responsible for any loss of data or income or
any special, incidental, consequential or indirect
damages howsoever caused.
Reproduction, transfer or distribution of part or all of the
contents in this document in any form without the prior
written permission of HMD Global is prohibited. HMD
Global operates a policy of continuous development.
HMD Global reserves the right to make changes and
improvements to any of the products described in this
document without prior notice.
HMD Global does not make any representations, provide
a warranty, or take any responsibility for the
functionality, content, or end-user support of third-party
apps provided with your device. By using an app, you
acknowledge that the app is provided as is.
Downloading of maps, games, music and videos and
uploading of images and videos may involve transferring
large amounts of data. Your service provider may charge
for the data transmission. The availability of particular
products, services and features may vary by region.
Please check with your local dealer for further details and
availability of language options.
Certain features, functionality and product specifications
may be network dependent and subject to additional
terms, conditions, and charges.
All specifications, features and other product information
provided are subject to change without notice.
HMD Global Privacy Policy, available at
http://www.nokia.com/phones/privacy, applies to your
use of the device.
©2021 HMD Global Oy. All rights reserved.
HMD Global Oy is the exclusive licensee of the Nokia
brand for phones & tablets. Nokia is a registered
trademark of Nokia Corporation.
The Bluetooth word mark and logos are owned by the
Bluetooth SIG, Inc. and any use of such marks by HMD
Global is under license. Google and other related marks
are trademarks of Google LLC.
